
Follow these tips on how to easily navigate and manage lengthy documents in Word by taking advantage of key features.

Your Microsoft Word document has mushroomed to dozens or even hundreds of pages. The dilemma? Working with and navigating such a lengthy document can be slow and clumsy. Fortunately, Word offers features that can ease the burden of using a long document:
- You can use styles to format your document in strategic places and sections;
- You can add page numbers to keep track of the pages;
- You can set up a table of contents to display different sections;
- You can enable the Navigation pane to see and jump to a specific page more easily; and
- You can zoom out to view multiple concurrent pages and turn on Split View to view different parts of the document at the same time.
This tutorial covers how to use each of these features. If you wish to follow along with this tutorial, create a long Word document with any type of content. Create headings throughout your document and apply a specific style to each heading. I’m using Word from an Office 365 subscription, but the features I cover here work in the past couple of versions of Word as well.
SEE: 50 time-saving tips to speed your work in Microsoft Office (free PDF) (TechRepublic)
How to use styles in long Microsoft Word documents
Styles can prove very effective in lengthy Word documents, as they play a key role if you wish to create a table of contents or use a Navigation Pane. Applying a heading style is easy enough. Place your cursor anywhere in the heading text. At the Home Ribbon, click on the icon for the heading style you wish to apply, such as Heading 1 or Heading 2 (Figure A). To see more styles, click on the Design tab and choose a style from the Document Formatting section. Repeat this process for all the headings throughout your document.
Figure A

How to apply page numbers in long Microsoft Word documents
It’s a good idea to apply page numbers to any long document, whether or not you plan to print it or distribute it to other people. To set up page numbers most simply, click the Insert tab. In the section for Header & Footer, click the icon for Page Number. Choose the location: Top Of Page or Bottom Of Page. Then choose the horizontal location: Left, Center, or Right on the page (Figure B). If you wish to add other elements to each page, you can do so through a header or footer, but if you want to keep it basic, page numbers alone will easily do the trick.
Figure B

How to set up a table of contents in long Microsoft Word documents
A table of contents (TOC) is another effective option for a long document. The table shows you the name and page number of each heading page, section, chapter, or other division in your document. Even further, you can click on each entry in the TOC to take you to that specific page. To create a simple TOC, position your cursor where you want the table to appear, typically at the top of your document. Click on the References tab. Click on the icon for table of contents. Choose one of the two automatic tables. Your TOC is instantly created for you (Figure C). To move to a specific entry in the TOC, Ctrl + click anywhere on that entry, and Word takes you to that specific page.
Figure C

How to view the Navigation pane in long Microsoft Word documents
If you don’t want to add a full table of contents to your document, you can achieve a similar effect through the Navigation pane. The difference here is that the Navigation pane doesn’t include page numbers, though you can easily turn it on and off. To do this, click on the View tab. Check the box for Navigation pane. In the Navigation pane under headings, links to all your styled heading pages appear. Click on a link to navigate to that page or section (Figure D). To turn off the Navigation pane, uncheck its box on the View ribbon.
Figure D

How to zoom out in long Microsoft Word documents
The Zoom feature also comes in handy for viewing multiple pages in a lengthy document. Here, you have a few options through various zoom levels. Click on the View tab. Click on the icon for Multiple Pages. Depending on the size of your monitor, screen resolution, and other factors, you should see at least two full pages or four partial pages (Figure E).
Figure E

How to view multiple pages in long Microsoft Word documents
Here’s a zoom option that you can control. At the View ribbon, click on the Zoom icon. Then check the box for Many Pages and click OK (Figure F). You’ll likely see dozens of pages of your document that are too small to be readable or easily navigable.
Figure F

How to control the number of pages in long Microsoft Word documents
You can control the view of multiple pages. Hold down the Ctrl key and scroll up or down on the scroll wheel of your mouse or swipe up or down on your touchpad with two fingers. You’ll see that the view changes to display fewer or more pages depending on your action (Figure G).
Figure G

How to control the rows and columns of pages in long Microsoft Word documents
Here’s another way to control how many pages you see in this mode. Click on the Zoom button and then click on the icon for Multiple Pages. Select how many pages you want to see horizontally and vertically, such as 1×4, 2×2, or 2×4. Click OK (Figure H).
Figure H

How to use Split View in long Microsoft Word documents
You can use Split View to view two different pages of your long document at the same time. At the View ribbon, click on the icon for Split. A horizontal bar splits your document in half. You can move to one spot in the top half and a different spot in the bottom half (Figure I). You can also resize the bar to give more space to one half. When you’re done, click on the icon to Remove Split.
Figure I

This is a long treatise on creating long documents in Word. I could have broken it up into more pages, but I figured that you either care about this topic or you don’t. This way, if you do care, you can print it out for reference later. (Note that it was written in circa Word 6-2000 days, but many of the principles still apply.)
- Use Sections
- Work with Breaks
- Create Headers or Footers
- Format Page Numbers
- Use Fields
- Use SEQ Fields to Number Chapters
- Insert Index Entries
- Use RD Fields
- Create Cross References
- Cross Reference Text in the Same File
- Cross Reference Text in Other Files
- Reduce Document File Size
Historically speaking, Word hasn’t exactly excelled at creating long documents. The problem with long documents like manuals or books is that they often require cross references, graphics, tables of contents, and indexes. If you attempt to create long documents in Word, you must consider the trade-off between file size and stability. Bigger files are less stable, so when you create large documents, try to keep your file sizes as small as possible.
If you were to buy into Microsoft’s marketing hype, you might want to try using the Master Document feature to work with your long documents. But in Word 6 and Word 95 the Master Document feature (and we use that term loosely) didn’t work. It was horribly unstable and scary to use. So in general everybody has avoided it and work arounds were developed. This page explains a few of them.
Use Sections
If you have a huge document, make each chapter (or other logical section) a separate document. Divide the document so that each chapter ends up being fewer than 50-pages. For medium-sized documents (fewer than 50-pages), use section breaks to divide your document into chapters. Breaking a document into sections lets you format each section differently, as if each section were its own document. Within a section, you can change formatting such as headers, footers, numbering, and columns.
Return to top
Work with Breaks
Every document you create is just one big section. To insert a new section, choose Insert, Break and select a type of break.
Four types of section breaks exist:
- Next Page. Begins a new section at the top of the next page.
- Continuous. Begins a new section, but doesn’t insert a page break. The break is at the insertion point. Continuous section breaks are often used with columns or when part of a document should be protects, such as a form.
- Even Page. Starts a new section on the next even-numbered page (usually the left-hand page in a book). If the break is on an even-numbered page, the next odd-numbered page is left blank.
- Odd Page. Starts a new section on the next odd-numbered page (usually the right-hand page in a book). If the break is on an odd-numbered page, the next even-numbered page is left blank.
In the Break dialog box, you also can insert page breaks and column breaks, which are useful for forcing text to end in a certain place. If you need to delete breaks, it’s easier to see them in Normal view than it is in Page view. For example, a page break appears as a dotted line with the words Page Break to distinguish it from the soft page breaks that Word inserts automatically at the end of every page.
Return to top
Create Headers and Footers
Long documents generally have headers and footers to help people figure out where they are in the document. Headers and footers printed at the top and bottom (respectively) of every page in a document and contain repeating text. Books, for example, are often set up with the book or chapter name in the header and the page number in the footer.
If you want your document to have different headers and footers on the odd and even pages or a different header or footer on the first page, you must choose File, Page Setup and click the Layout tab. Click the options for Different Odd and Even pages or Different First Page, depending on what you want to do.
If you want the footers to be the same on all the even pages in all the sections of a document, you can link them together. When you change even-page footer in the first section, the even-page footers in the following sections change as well. The header or footer information also can be different in each section if you break the link to the previous section. Unlinking a header or footer from the previous one makes it completely separate from the contents of the headers or footers in the other sections.
To create a header or footer
- Choose View, Header and Footer.
- In the Header and Footer toolbar, click the Switch Between Header and Footer button to move your cursor into the header or footer area.
- Enter information into the area within the dashed line. Click the page number, date, or time buttons to add this information.
- Click the Same as Previous button to link the header or footer to the previous section. I
- Click Show Previous and Show Next buttons to view the other headers and footers in the document, if you have different first, odd, or even pages set up or multiple sections.
Return to top
Format Page Numbers
After you add a page number, changing it is less obvious. To format a page number, highlight the page number and choose Insert, Page Numbers. Click Format and change the options.
Return to top
Use Fields
A field is a hidden code you insert to tell Word to do something. For example, the page number you insert into a footer is a {PAGE} field. In general, you see the result of the field (in this case, the page number) rather than the field code. To see field codes, choose Tools, Options. In the View tab, click Field Codes. Some fields are formatted as hidden text, so you may need to place a check mark next to Hidden Text to see certain field codes such as a table of contents.
Many fields have optional instructions called switches. You add a switch by including a backward slash character () and instruction to customize the field result in some way.
These fields are often used in long documents:
- XE. Used to add an index entry. You enter text in an XE field that you want included in the index when you generate it using an INDEX field.
- INDEX. Used to create an index. The INDEX field reads the index entries you add with XE (Index Entry) fields and collates them into an index. An INDEX field can be added by choosing Insert, Index and Tables.
- TOC. Used for creating a table of contents. The TOC field collects entries for a table of contents using the built-in Heading 1-9 styles, styles you specify, or entries you specify using TC (Table of Contents entry) fields. A TOC field can be added by choosing Insert, Index and Tables.
- TC. Used to add a Table of Contents entry. TC fields are useful if you don’t want to generate a table of contents using the built-in heading styles. The TC field can also be used for entries for other lists, such as a table of figures.
- RD (Referenced Document). Used for temporarily retrieving files into a separate document such as a table of contents, so you can compile an index or table of contents using a TOC or INDEX field.
- SEQ. Used to sequentially number items in a document such as chapters, tables, or figures. If you use SEQ fields, you can move text around (changing the numerical sequence) and reorder the numbers by updating the fields.
- PAGEREF and REF. Used for cross references. PAGEREF inserts the page number of a bookmark’s location for a cross reference. REF inserts the contents of the bookmark.
- IncludePicture. Used to insert a graphic. When you choose Insert, Picture, Word puts in an IncludePicture field. If you add a d switch, the graphic is linked to the original file (instead of embedded), which reduces file size.
- IncludeText. Used to insert all or part of a document (using a bookmark) into another document. You can use the IncludeText field in conjunction with the REF or PAGEREF fields to create cross references across documents.
If you use fields, get to know the online help. All of the field codes and their switches are explained in the help.
These keyboard shortcuts are used for working with fields:
- F9: Updates the selected fields. To update all fields in a document, press Ctrl+A (Select All) and then press F9.
- Shift+F9: Changes the selected fields between the field codes and the results.
- Ctrl+F9: Inserts field code brackets { }, so you can type in a field code directly instead of using the Field dialog box. Most fields don’t update automatically. If you have done something that affects a field result, make sure to update the fields.
- Ctrl+Shift+F9: Unlinks a field. Unlinking a field permanently replaces the field with its result.
Return to top
Use SEQ Fields to Number Chapters
You can use SEQ fields to number repeating items in a large document. These fields can be formatted in many ways and you can reset the starting number. For example, to create a numbering scheme with the chapter number and then the page number (1-1, 2-1, 3-1, etc.), you use an SEQ field to set the chapter number. You assign a name to each numbering sequence you create. If you want to create a numbering sequence called chapter, you’d use this code:
{ SEQ chapter r 3 }
The r switch sets the chapter number sequence to start at 3. Another switch you can use is c, which looks for the closest prior instance of that sequence and repeats the result. This switch is useful for inserting chapter numbers in headers or footers. For example:
Page { SEQ chapter c } - { PAGE }
If you place this text in the footer of Chapter 3, the result is Page 3-1.
You also can use the SEQ field switches to change the type of numbering. In the Insert Field dialog box, click the Options button to see the switches for the field. For example, if you want your Appendices to use letters rather than numbers for the chapter headings, this code numbers the chapter A:
{ SEQ Chapter r 1 *Alphabetic }
The *Alphabetic switch changes the numeric value 1 to the equivalent letter value (A). Begin the word Alphabetic with an uppercase A if you want an uppercase result.
You can use SEQ fields as an alternative to Word’s built-in numbering functions. Because the built-in heading numbering isn’t saved with the style, it’s lost if you have “automatically update styles” enabled in your chapters (which you might want to do to retain consistency across chapters). With all their switches SEQ fields also offer more control. For example, you can use a different sequence name for each level of heading, so the first instance of the this code results in 3.1.1 (assuming you are in Chapter 3):
{SEQ Chapter c}.{SEQ Heading2}.{SEQ Heading3}
SEQ fields also are good for numbering figures or tables. For example, this code could be used to number a figure followed by a caption:
Figure {SEQ Chapter c}-{SEQ Figure}. The Field Dialog Box.
Because the caption is created with SEQ fields, you can move the caption anywhere in the file or to another file. When you update fields, the SEQ field causes the figure to be renumbered to reflect its new location in the document.
SEQ fields don’t automatically show updated results, so you need to update the fields. Be sure to update the fields in all your documents using F9 before you generate a table of contents or index.
Return to top
Insert Index Entries
The Index Entry (XE) field is often used in large documents. To mark the text you want to incorporate into the index, follow these steps:
- Select a word or words to add as an index entry. Or you can enter different text by placing the insertion point where you want the XE code to appear.
- Press Alt+Shift+X. The Mark Index Entry dialog box appears.
- If you highlighted text, it appears in the Main Entry box. Otherwise, type your first-level index entry text. You also can type a second-level entry in the Subentry box. If you need a three-level index, you can follow the subentry text with a colon and type the third-level entry text.
- Click Mark. The Mark Index Entry dialog box stays open, so you can add entries.
After you have defined you index entries, you can create an index. In a short document, you can just add the INDEX field at the end of the document. In a large document, you may want to make the index a separate document and use RD fields as described next.
Return to top
Use RD Fields
When you create a table of contents or index for a large document that is composed of multiple files, you can use RD (Referenced Document) fields. The RD fields retrieve your chapters just long enough for Word to compile the table of contents or index. RD fields are hidden text, so to see them, you must choose Tools, Options and enable Hidden Text in the View tab.
Place the RD fields in the order the chapters should appear in the document. For example, the RD field for Chapter 1 should be listed before the RD code for Chapter 2, or the page numbers will appear out of order.
If the files you reference with an RD field are located in a different directory than the table of contents or index file, you must use double backslashes in the path name. For example, if you show hidden text and field codes, a table of contents file might look like this:
{ RD C:DOCSMANUALCHAPTER1.DOC }
{ RD C:DOCSMANUALCHAPTER2.DOC }
{ RD C:DOCSMANUALCHAPTER3.DOC }
{ TOC }
Choose Insert, Index and Tables to insert the Index or TOC code; or use Insert, Field to insert the code directly. The Index and Tables dialog box has a lot of formatting options to help you create a custom table of contents or index.
The easiest way to create a table of contents is by generating it from the built-in heading styles (Heading 1 through Heading 9). Or you can click the Options button in the Table of Contents tab to assign different styles to specific TOC levels. Refer to the online help for more information about the TOC field code switches. For example, this field code tells Word the heading levels and sequence numbers to include:
{TOC o "1-3" s chapter }
The o switch indicates that World should include built-in Heading levels 1 through 3. The s switch says to include the chapter numbers from the sequence defined in the chapter SEQ fields. This TOC code gives you a three-level table of contents with a chapter-page (1-1, 2-1, 3-1) format.
Another way to use the built-in heading levels is to apply them to certain elements in your document. For example, to create a list of figures, you could apply the Heading 9 style to all of your figure captions. Then you use this field code {TOC o “9-9” } to create a table of figures.
Return to top
Create Cross References
You create cross references in Word by using bookmarks in conjunction with the PAGEREF field. Bookmarks mark a location in a document. The cross reference then points to the bookmark.
Bookmarks mark a place in the document that has a particular piece of information. A bookmark can indicate a specific location, or you can highlight text and have a bookmark span that piece of text. Then you reference the text enclosed in the bookmark or place it somewhere else.
To define a bookmark:
- Select a piece of text or a location.
- Choose Edit, Bookmark.
- Type a name for the bookmark. Bookmark names must begin with a letter and can contain letters, numbers, and underscore characters (but no spaces).
- Click Add. The new bookmark name appears in the list.
Return to top
Cross Reference Text in the Same File
Once you add bookmarks, you can create cross references. To cross reference information within the same file, choose Insert, Cross-Reference to add the reference. Cross references can refer to a bookmark, footnote, endnote, caption, or text formatted with the built-in heading styles.
To create a cross reference within the same document:
- Choose Insert, Cross-Reference.
- Choose a type of reference (Heading, Bookmark, Footnote, Endnote, Equation, Figure, Table) in the Reference Type box.
- Select the type of information you want to add into the document (such as a bookmark text or page number). The options depend on the type of reference you select.
- Select the item you want to create a reference to. For example, if you choose Bookmark, you see a list of all your bookmark names.
- Click Insert. The Cross-Reference dialog box stays open so you can continue adding references.
Return to top
Cross Reference Text in Other Files
You can’t use Insert, Cross-Reference to cross reference something in another file. Instead, you have to use the IncludeText field and pass it the bookmark name in the other file. The IncludeText field brings in just the text marked by a bookmark. If you are referencing text that doesn’t contain fields, you can use the IncludeText field and pass it the name of the file and the bookmark name:
{INCLUDETEXT C:DOCSMANUALCHAPTER1.DOC mybookmark1}
Note that you must use double backslashes () to indicate the path name.
If you bookmark contains SEQ, PAGE, or other fields, they will try and update when IncludeText brings it into the new location. For example, a field that was 2.1 in the original file may end up as 3.2 after the fields update in the file with the cross reference. To prevent this problem, you add a ! switch to the field:
{ INCLUDETEXT C:DOCSMANUALCHAPTER1.DOC mybookmark1 ! }
The ! switch prevents the field results from being updated unless they are updated in the original file.
Return to top
Reduce Document File Size
When you create large documents, try to keep the file sizes as small as possible. The more tables, graphics, and other features you include, the more likely you are to experience problems.
- Try to keep your files fewer than 50 pages. If you have a lot of complex graphics and tables, you may want to make your chapters even shorter. The fewer features you use, the longer your document can be before you have problems.
- Use SEQ fields to automatically number your sections and make your table of contents and indexes separate documents. In your table of contents or index, use RD (Referenced Document) fields to pull in the component parts of your document.
- Use Insert, Picture to add your graphics. Linking graphics to the original files on your disk (instead of embedding them in the document) decreases the Word file size. Be sure a check mark appears next to Link to File when you insert pictures. Also make sure that no check mark is next to Save with Document. If you view field codes, inserted graphics will have a field code that looks something like this:
{ INCLUDEPICTURE C:DOCSMANUALFIG22.BMP d *MERGEFORMAT }The d switch tells Word to link the graphic to the original file instead of embedding it in the document.
- If your file starts getting really slow, choose Tools, Options. In the View tab, click Picture Placeholders. This option tells Word to show each picture as a box, which is much faster than displaying the actual picture. The box Word displays is the same size as the actual picture, so your document pagination stays in tact.
- Turn off background repagination when you work in Normal view. The now ancient Word 2 included a command called Repaginate Now that let you control when Word repaginated a document. If you work in Normal view a lot, you may want to add the command (called ToolsRepaginate) back into your Tools menu.
Return to top
Microsoft 2013 provides several tools for working with Long Documents, such as Styles, a Navigation Pane, Multi-level Lists, Tables of Contents, and Outline View.
Styles are useful because they allow for the creation of various Headings and Sub-Headings that contain certain portions of the text.
The Navigation Pane allows for easy movement between Headings and Sub-Headings.
Word allows users to create a Table of Contents for Long Documents, simplifying the structure of the document.
In addition to the Navigation Pane, Multi-level Lists and Outline View are alternative layouts for examining a document in general, structural terms.
Watch the free video here, transcripts for the entire video follow:
Learn how to master Microsoft Word 2013. Get 9 hours of Word 2013 training – click here.
Video transcripts:
Welcome back to our course on Word 2013. In this section, we’re going to look at some of the main aspects of dealing with long documents. The document we’re going to use as an example is just under 20 pages long, so it’s not particularly long, but we can use it to demonstrate all of the main features and tools that you might need when you’re dealing with a long document. So let’s get started.
Now as is often the case with long documents, this one’s got quite a bit of technical content on it. It’s about computer databases actually. It’s quite an old document but it’s still relevant today. And one of the most important things about long documents, in fact the way that virtually everybody approaches long documents is that they structure a document using styles. Now we’ve dealt with styles already earlier in the course. If I take one of the early pages of this document, let’s say here, and click on the very heavily bold word there Objectives. Go to the Home tab, I can see that it’s Heading style 1. And in fact, the main sections of this document are all begun with a Heading style 1 entry. So that one, Designing a Database is also Heading style 1. Now within that there are various lower level parts of the document that are marked as Heading level 2. So if I move further down here, Designing your Table, that’s a Heading 2 style, and it’s the use of those styles that gives the document its structure.
Earlier on in the course, we looked at the Navigation Pane and I’d like to look at the Navigation Pane again now. So if we click on View and enable Navigation Pane in the Show Group, the Navigation Pane appears on the left and one of the three options which we looked at earlier on but we couldn’t actually use earlier on was Headings. And you can see now how the headings of this particular document work. The Heading level 1’s are the left most ones in the list and the Heading level 2’s are indented one level from there. So this on, Online Help, must be a Heading level 2. Designing your Table, that’s Heading level 2 as well. Now, within that there are then some Heading level 3’s; so we’ve got Fields, Field Sizes, Field Types. So you can see in this summary how the structure of the document works.

This also shows you how you can use the Navigation Pane to navigate around this long document because if I click on one of the headings, I can go straight to that point in the document. So for instance, if I wanted to go to Getting Reports, I go down to the Navigation Pane and click on Getting Reports, it takes me there in the document. If I wanted to go to Fields within Designing your Table, I click on Fields and it takes me there. Note by the way that if I click on Fields in the actual text of the document, go to the Home tab, I can see that it is a Heading 3 styled paragraph. I know it’s only one line but it’s still a paragraph and it’s Heading 3 styled.
Now when you’re navigating your way around a document, particularly a very long document using the Navigation Pane and the styles, you may have literally hundreds of headings of various levels shown in the Navigation Pane and it’s often very useful to be able to collapse those headings so that you can see more. So for instance here in Creating a Simple Database, I’ve got two Heading level 2’s. Each of the Heading level 2’s has got some Heading level 3’s. I could collapse either of the Heading 2’s to make myself a little bit more space in the Navigation Pane or in fact, I could collapse the whole of Creating a Simple Database and just show the Heading level 1. The fact that there is a little arrow, a little wedge next to it tells me that there’s some other heading levels within that Heading level 1 and I can investigate that further if I need to.
Now I’d like to demonstrate something else here alongside this. This is another one of the new features in Word 2013 and it’s not strictly to do with the Navigation Pane, but it very closely mirrors what we’ve just seen. Within the body of a document if you hover over one of the headings, you’ll see a little wedge, a little arrow there, and you can actually collapse a Heading level section of a document here just by clicking on that arrow, and this hides the content. (Modafinil online) Of course, it doesn’t delete anything and anybody who wants to see that content again would just click on the wedge, click on the arrow again. But it’s very useful when you’re looking at a very long document and you just want to focus on one part. You can even use this approach when you ask other people to review the document. You can basically collapse the parts you don’t particularly want them to read and just leave expanded the parts you do.
If you right click on a heading, you have as one of the menu options on the contextual menu Expand/Collapse and from Expand/Collapse, you can say expand heading if it’s collapsed or collapse heading if it’s expanded. You can also say expand all headings or collapse all headings. This is within the document itself. This is not in the Navigation Pane. So that’s a great way when you’re dealing with a long document of collapsing the bits you’re not particularly interested in at the moment and it can make the whole of a very long document seem a bit less daunting if you can have most of it collapsed and just see the bit you’re working on at the moment. As I say that’s one of the new features in Word 2013.
Now one thing you may want to do when you’re working with a long document is to number the sections of the document, maybe just number the chapter or number the sections within the chapters. Let’s suppose for a very straightforward example of this I just decide I want to number these chapters. There’s a very straightforward way of doing this in Word 2013. All you need to do is to go to the Styles Group on the Home tab, and within that if you right click on Heading 1 which is basically the style that’s used on the Heading level 1’s, one of the option there is modify. Click on modify. You get up with this modify style where you can change all sorts of things about this particular style. The one we’re going to change is the numbering system. So if I just click on the bottom here where it says format, one of the options there is numbering. At the moment, there is no numbering. It says None. All I’m going to do is to put numbers on each chapter, 1, 2, 3, with a full stop with a point. Click on OK, click on OK, and now you notice that Headings level 1 now has a style which includes the number of the chapter at the beginning. Now, of course, if you scroll through the document, you’ll see that those numbers have been applied to the name of every chapter where it begins. And also, of course, if you look in the Navigation Pane, you can see that the numbering has appeared on the Navigation Pane.
Now in many situations, you may want to number at a lower level as well. So if you take Chapter 6, Creating a Simple Database, you may want it to say 6.1 Designing your Table, 6.2 Setting Up your Table, and maybe even at the lower level 6.1.1 Fields and so on. Now to do this, you use pretty much the same approach we’ve just made in principle, but it gets a bit more complicated when you’re working at the lower levels and the recommended way of doing this with Word if you access the Word Help it explains this to you in quite a lot of detail. It’s not a very straightforward procedure to be honest with you, but you basically use a multilevel list as here, as we used for multilevel lists earlier on, but linked to the heading numbers. So in the styles here, Heading 2 would say 1.1 double-A, double-B. But as I say, the Word Help gives you a link through to a community help section that explains to you how to do that. So we’ve now got our chapter numbers numbered and the next thing I’d like to look at, in fact the last main thing in relation to a long document is how to put a table of contents in.

So I’m going to close the Navigation Pane and I’m going to decide where I want my table of contents to go. I’m going to put it here, just partway down the first page under the sort of heading. Then go to the References tab. One of the options on the References tab is Table of Contents. Click on Table of Contents and I’m presented with some options for automatic layouts for Table of Content. You can see the different layout styles there. I’m going to go for, I think, the first one. Note that there are some options down at the bottom to do custom Table of Contents and also, of course, to remove a Table of Contents if you’ve previously put one in and want to remove it again. But on this occasion, I’m just going to go for the first one, click on there, and let me just scroll back up again, and there is my Table of Contents.
Now at any time that I’m working on the document, particularly if I’m working on a long document for a long time, I may need to update the Table of Contents. I may be putting pages in, taking pages out, putting whole chapters in and taking them out. So if you right click on the Table of Contents, one of the options you have is to update and if you click on Update, it says Update Table of Contents. It gives you the option of either updating just the page numbers. So if you haven’t changed any chapters, you just want to update the page numbers you can do that. But if you want to update the entire table, that’s remake the whole thing you choose the second option. Now with modern computers and unless you’ve got a really huge document, it’s probably always best to update the entire table, but if you know for a certain that you haven’t actually added or taken any sections out, just updating page numbers only is fine.
Now if I want to customize the Table of Contents, let me go back to that menu that we saw just now, Table of Contents, click on Custom. And for instance, at the moment I’ve got down to level 3 in the Table of Contents. Supposing I just want the chapters themselves, I can change it to show levels just down to 1, click on OK. Do you want to replace the selected Table of Contents? OK and now all I’ve got is the chapters themselves.
Now one other useful thing to point out here is that the Table of Contents is not just intended as a Table of Contents if you like for a paper document. Each of the entries in the Table of Contents is, in fact, a link and if you hold down the Control key and click on one of the entries in the Table of Contents, suppose I click on Create a Simple Database, it takes me to that point in the document and that is how the Table of Contents is intended to be used in an electronic version of a document.
So there’s just a couple of other things now while we’re talking about long documents. One of the things we talked about very, very early on in the course was the types of view that are available, and one of the types of view that mentioned but I couldn’t show you then was Outline View. So if you go to the View tab in the Views Group, Outline View will actually show you a document in terms of its structure and its headings and so on. And it’s a bit like the Expand and Collapse feature that’s been introduced in Word 2013, a more traditional version of that. It’s also a specific view as well. So you close that Outline View when you finished with it. But what it enables you to do, it enables you to control the level at which you’re looking at the overall structure of a document. So for instance, when I’m looking at this Chapter 6 here, if I click on minus it actually collapses that down to just show me the headings within that chapter. Click on one of the headings within the chapter, click on minus, it collapses that down as well. So within the document rather than using the Navigation Pane, you can expand and collapse various parts of the document so that you can concentrate on reading or reviewing a particular that you’re interested in. So that’s Outline View and we close it from here.
So that’s it on long documents. I mentioned towards the beginning of this section about technical documents. There are various things you can help with technical documents such as the use of a Thesaurus and various research tools. There are also additional things you can generally use in long documents. For instance, you can insert a cover page. You can also insert an index and then add terms to that index. You also have things like endnotes, footnotes, and so on. These are all outside the scope of this course but well worth looking into, particularly if you deal with long and/or technical documents.
So that’s it in this section. I’ll see you in the next one.

Simon Calder

Chris “Simon” Calder was working as a Project Manager in IT for one of Los Angeles’ most prestigious cultural institutions, LACMA.He taught himself to use Microsoft Project from a giant textbook and hated every moment of it. Online learning was in its infancy then, but he spotted an opportunity and made an online MS Project course — the rest, as they say, is history!
If you have not had the pleasure of managing a document hundreds of pages long, I am quite happy for you! However, this does not mean you will not have to at some point. You may end up with a monster document, whether it be for work report, writing a novel for fun, or writing your VCDX design. Large word documents, are nothing to fear, I promise. I am here to give you some tips and tricks I have picked up along the way dealing with long documents, specifically using Microsoft Word.
Large Word Documents Are a Way of Life
If you are a student, writer, or professional, you will eventually encounter a large Microsoft Word document. Some examples of large documents are:
- Novels
- Technical Books
- Other Books
- White Papers
- Product Documentation
- Architecture Guides
- Thesis/Dissertation
The worst thing you could do in any of these cases is write everything down in a single long Word document. Let’s talk about some strategies to approaching large word documents.
Start Strong With Planning Your Large Document
If you know you’re going to be working on a huge long document, make sure you get off to a strong start. This means a couple of things.
First, write yourself an outline, in whatever medium you like. I usually brainstorm with a paper outline, then write my working outline in Microsoft Word, and turn on Track Changes. This way, I can see how my outline has progressed.
The second important aspect to starting strong is taking advantage of Styles in Microsoft Word. If you are using a template, hopefully you have some styles set up for you already in it. Take a few minutes to review them, and get an understanding of what they are used for. If you aren’t using a template, styles are super easy to create and customize. Make sure to give them a descriptive name, so you know what each style is for as you write.

Click home, then Styles Pane on the right to see the Styles in your document. Creating a new style is as easy as clicking New Style, giving it a name, and setting its attributes.
Whenever you write some sort of text, use a style! Create styles for bullets, tables, lists, you name it! If it is in your document, it should have a style!
If you are doing a lot of copying, make sure you are pasting as either unformatted text, or using the tool which will remove formatting after pasting circled below. After you have the content in your document, then use a style to format it properly.

Break Down Your Large Microsoft Word Document
Managing everything in one huge, long Word document is just a terrible idea. I learned this lesson the hard way. Break your large document into more manageable word documents. If you are writing a book, break down your Microsoft Word documents into chapters. If not, break them into smaller logical segments.
For example, when I was writing my VCDX document, I had one document for the Conceptual Model, another for Logical/Physical Network Design, Logical/Physical Compute design, etc. Breaking things into smaller documents will make things load faster, scroll better, and all around make your life happier during your Word work. It is also easier if you plan on sending out portions of the document for different people.
Another good example of this trick is when I was running Requests For Proposals (RPFs) as a Systems Engineer. I would give anyone contributing a master copy of the RFP request, and a formatted copy of the material relevant to them. I would also send out a pdf master copy periodically, so they couldn’t edit that one by mistake. This made stitching the final response together much easier.
Leave Enough Time for Editing Your Long Word Document
There will come a time where you need to stitch these documents into one, and it is important to leave yourself time to do this. With practice, it will be a quick process. The first couple of times you do it, it may however take a couple times. I like to use a dual monitor approach, and pick one screen for editing, while I use the other screen for any source material. I also use this opportunity to review the material once again.
Create Good Habits With Managing Long Microsoft Word Documents
After some time, working with Word documents will become a habit. When you’re getting started, you should start building your good habits. Save! Save! Save! Save early, save often. Have I mentioned you should save your work? Every time you make a significant change, save. When you switch to edit another document, save before you move around. Let’s face it, Word crashes, and AutoSave doesn’t always recover everything you just did. You don’t want to lose all of your beautiful work, do you?
Hopefully I have given you some ideas on how you can make editing large documents easier for yourself. It seems daunting at first, but I can tell you from experience it gets easier with practice. Soon, all of the tips I mentioned will be second nature, and you will be a documentation pro.

Melissa is an Independent Technology Analyst & Content Creator, focused on IT infrastructure and information security. She is a VMware Certified Design Expert (VCDX-236) and has spent her career focused on the full IT infrastructure stack.
Document properties
Also called ‘metadata’, document properties is all of the information that can identify the document. It can include the name of the author, the date the document was created, the number of pages, copyright information, etc.
Microsoft redesigned the File tab in Word 2010 to make it easier to view the document properties. To view it, simply select the File tab. It can be found on the right side of the page.
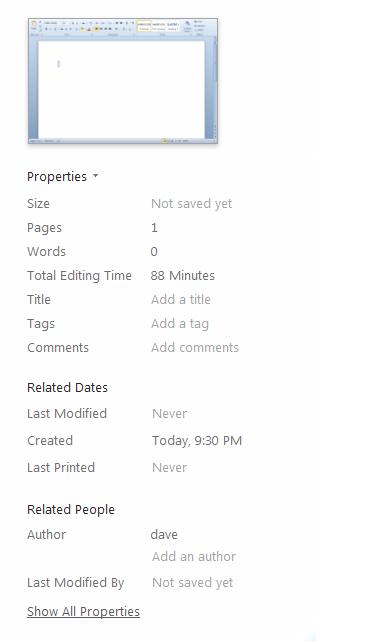
You can easily edit this information from this location. Simply click an item, and start typing. In the example above, we’ve decided to change the title of the document, so the Title field is active. Hit Enter when finished.
Cover pages
Including a nicely designed cover to your document can give it that final, professional touch. But where are you going to find a designer on short notice, who’ll work for peanuts? Luckily, Word 2010 includes some cover design templates.
To access them, navigate to the Insert Pane and click the Cover Page button.
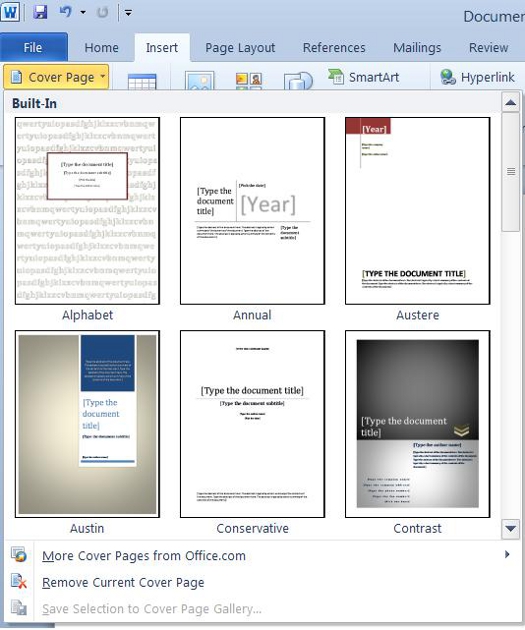
Each cover comes with placeholder text. To change it, simply click the text and start typing your own.
Table of Contents
It’s said that utilizing functions in Word 2010 is quick and easy. Well, it’s true. What’s more, creating a Table of Contents for any body of work that you create in MS Word is also very quick and easy.
The quickest way to create a Table of Contents is to put all chapter titles, subtitles, section headings, etc. as Headings. Any category that you want listed in a Table of Contents should be listed as Headings.
To list categories, chapter titles, etc. as headers:
Go to the ‘Home’ tab in the Ribbon
Go to the ‘Styles’ group. Select Heading as the style you want to apply.

The lower the number (ex. Heading 1), the larger the font of the heading. You’d want to use a larger heading for chapter titles and smaller headings for subtitles.
For example:
Section One
Subsection one
Subsection one.
Note how the font for Section One is larger. The heading style that was used was Heading 1. For the subsections, Heading 2 was used. You’ll see how this comes into play with the Table of Contents later. As you create your document, it’s best if you get into the habit of putting all chapters, subsections, etc. as Headings. It will make creating a Table of Contents a lot easier when it’s time to do it.
Creating a Table of Contents
When you’re finished with your document and ready to add a Table of Contents, or TOC, select the place in the document where you want it to appear and put the cursor there.
o Next, click the ‘References’ tab in the Ribbon.
o Click Table of Contents in the ‘Table of Contents’ group. You’ll see this drop down menu.
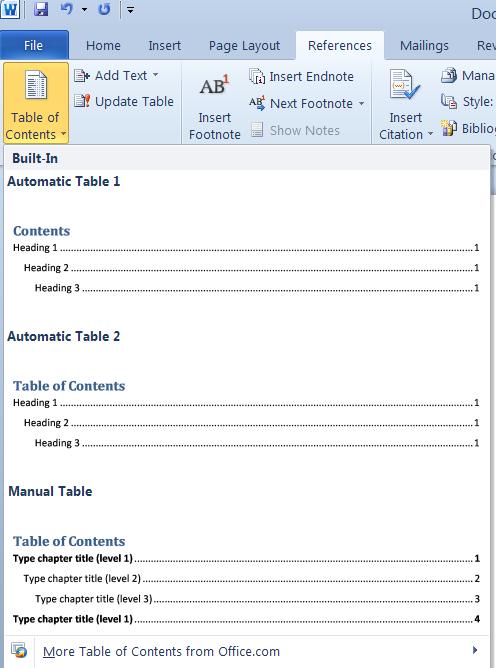
o Select the format you’d like to use for your Table of Contents. (Notice how important Headings are in the format. )
Update a Table of Contents
If you’ve edited your document or made changes to headings, you can update your Table of Contents without redoing the whole thing.
o Apply all headings to the document.
o Select the ‘References’ tab in the Ribbon.
o Select Update Table in the ‘Table of Contents’ group. This is right beside the Table of Contents button.

Delete a Table of Contents
Deleting a Table of Contents is as quick as a mouse click.
Simply click on the Table of Contents again. Scroll down the drop down menu until you see ‘Remove Table of Contents.’ Clicking on that will remove the Table of Contents from your document. Be careful doing this, however, your Table of Contents cannot be recovered once it is deleted.
Header and Footer Tools
Adding a header or a footer in Word 2010 is a cinch. There are two ways to go about this. You can go to the top of the page (the header) and double-click the white space above the top margin (for the footer, you’d click the white space below the bottom margin.)
When the header and footer is active, the rest of the document becomes opaque. This makes it easy to see only what you are currently editing.

To enter text into the header, click into it and start typing. Format your text and paragraph attributes just like you would in the ordinary body of a story. You can even apply quick styles.
Whenever the header and footer are active (they always activate simultaneously), the Header & Footer Tools also become active. Let’s take a look at the options available to us.

Here is a zoom of the Header and Footer Tools Ribbon left side and right side
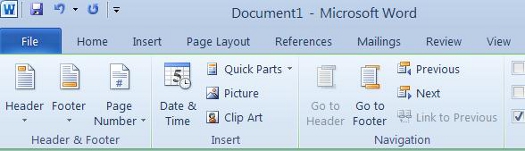
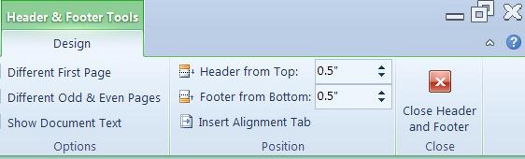
Use the Header and Footer buttons to access templates. Below is an example of one such template.

Use the Page Number to insert a page number and select where you want it aligned.
Use the Different First Page box if you want to use a different header (or remove it entirely) on the first page. This is particularly important if you have a cover page and don’t want it marred by a header.
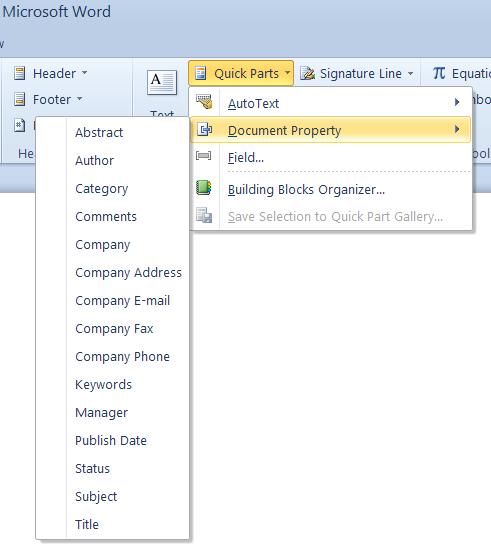
Quick Parts — Headers and Footers
The Quick Parts button on the Header & Footer Tools ribbon is to easily insert commonly used information into the header or footer. As you can see in the following example, some options include the Title, Abstract, Author, and Category.
Auto-Text and Building Blocks
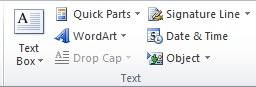
If you use the same content or text throughout different documents, it can be a pain to have to retype it over and over, or even go to a document to copy and paste the text you want multiple times. Instead, you can use Auto-Text in MS Word 2010 to save time. Auto-Text will automatically enter text and fields. It can even edit the properties of a document. It’s simply reusable content or text that you can quickly and easily access whenever you need it. You access Auto-Text by going to Quick Parts in the Text group under the Insert tab. Quick Parts in MS Word 2010 is always a quick way to insert text and information.
Quick Parts is a gallery where you can store, create, and find reusable pieces of content, including Auto-Text.
In MS Word 2010, Auto-Text is stored as building blocks. That said, to use Auto-Text, you must first create building blocks. To do this, first select the text that you want to save as Auto-Text. Then go to Quick Parts, click the downward arrow, and select Save Selection to Quick Part Gallery.
You’ll then see this window:
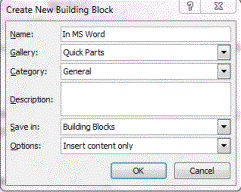
Now you’re going to create a building block by entering in information:
o Name: Type a name for the Auto-Text entry that you’ll recognize.
o Gallery: Select the AutoText gallery.
o Category: Select General, or you can create a new one.
o Description: Enter in a description for your building block.
o Save in: Click on the name of a template in the dropdown list.
o Options: Select any options you want.
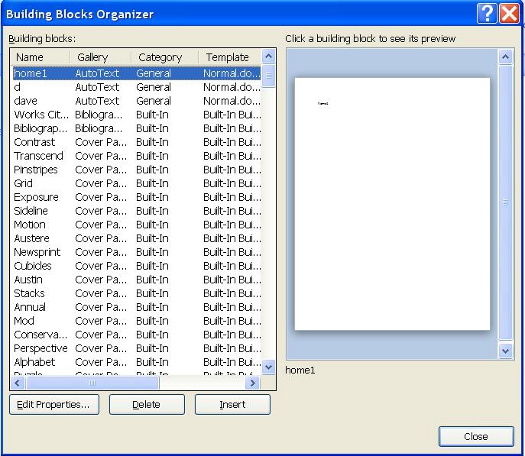
To delete a building block, go to Quick Parts and select Building Blocks Organizer from the dropdown list. Find the building block you want to delete, select it, then click the Delete button, as pictured below.
Using AutoText
To use AutoText, type the first word of the building block, then hit F3. It will fill in the rest for you. It will select the most similar. You can also go to Quick Parts then select AutoText from the dropdown menu.
Technical Documents
Line Numbering
By default, MS Word numbers every line in a document except for those in tables, footnotes, endnotes, text boxes, frames, as well as headers and footers. However, it does not show these line numbers. You have to specify if you want Word to show line numbers and which ones to display. This is especially helpful in technical papers to create reference points. You can display line numbers in all or part of a document, or at certain intervals such as every tenth line.
To display line numbers, go to the Page Layout tab. Click on Line Numbers in the Page Setup group, as shown below. Line Numbers is right below Breaks.
If you click the downward arrow beside Line Numbers, you’ll see this dropdown menu:
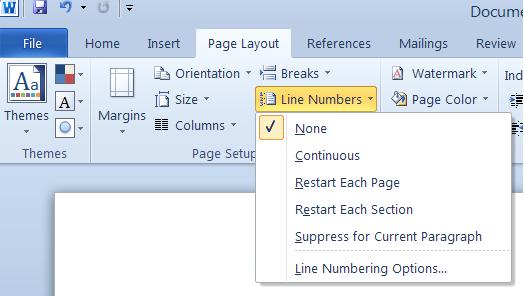
As you can see, None is selected by default. You can also select:
Continuous to display every line number within the document. MS Word will label the first line «1,» the second line «2,» and so on throughout the entire document.
Restart on each page means that each page’s first line will be numbered ‘1.»
Restart Each Section means that line numbering will start over in each section. You must use headers for MS Word to be able to do this.
Suppress for Current Paragraph means you can select a paragraph and select this option so that the paragraph’s lines are not numbered.
If you want more exact specifications (such as line numbering at certain intervals), click on Line Numbering Options. After clicking Line Numbering Options, Page Setup will appear as shown below.
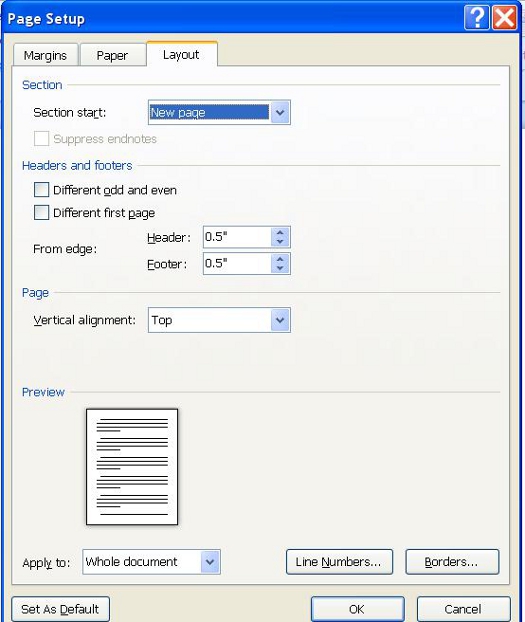
Click the Line Numbers button that appears above the OK button.
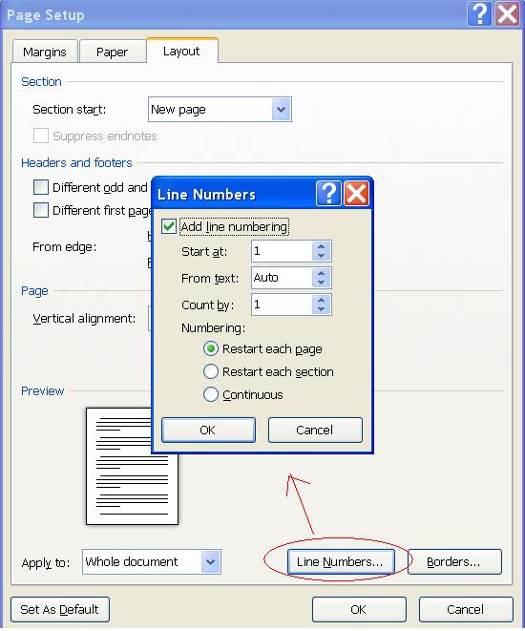
The Line Numbers Window will appear. You can use this window to set intervals. Check the Add Line Numbering box, then specify the page where you want to start numbering lines. Set the rest of the options, then click OK.
References and Citations
If you’ve ever written a term paper, you know how important (and time consuming) writing a bibliography and citing sources can be. But guess what? MS Word 2010 helps you do all those things. quickly and easily of course.
The first thing you need to do when creating a bibliography or citing sources in MS Word is to select the style you want it formatted in. To do this:
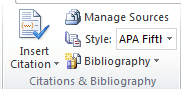
Click the References tab in the Ribbon.
Click the Style dropdown menu under the Citations and Bibliography group and select the style you want to apply.
How to Insert Citations
A citation is giving credit to a source in the body of the document. For instance, if you used a quote from a magazine article, you’d want to cite the article, author, and magazine after the quote.
To insert a citation:
o Go to the References tab in the Ribbon.
o Click on Insert Citation in the Citations and Bibliography group.
o Choose the appropriate menu item from the dropdown menu.
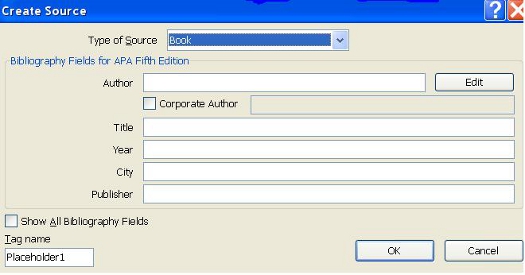
o If you are creating a new source, click Add New Source, then the type of publication.
o Fill out the Create Source Form.
Placeholders
Use placeholders when you need to insert a source, but don’t yet have all the information you need.
To insert a placeholder:
o Go to the References tab on the Ribbon.
o Click Insert Citation
o Select Add New Placeholder
Manage Sources
If you ever need to add or delete sources, modify them, or go back and enter information for a placeholder, you can do this simply by managing your sources.
To manage your sources:
o Go to the References tab
o Select Manage Sources. 
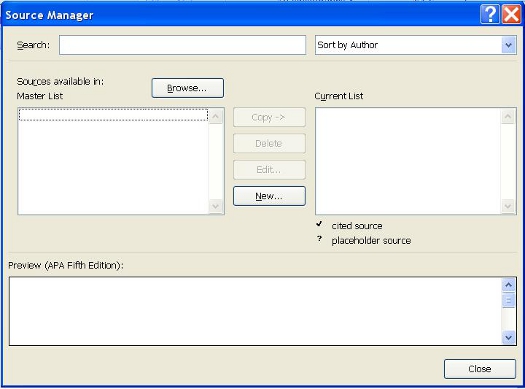
Now you can manage all your sources easily and quickly.
Adding a Bibliography
To add a bibliography to your document, go to the References tab in the Ribbon. In the Citations and Bibliography group, select Bibliography. You can choose from one of the two bibliography layouts listed.

Creating an Index
An index is simply a list of terms that you used in a document with the page numbers where those terms appear. It’s kind of like a glossary, just without the definitions. You can mark words, phrases, symbols, etc. for inclusion into the index. You mark them in your document, then create the index. Let’s learn how to do that.
To insert an index into an MS Word 2010 document, you must first mark entries that will be indexed.
Marking Entries
Start out by selecting the word or phrase that you want to index (we are using the word «right» for this example. Go to the References tab, then click Mark Entry.
You’ll then see this window:
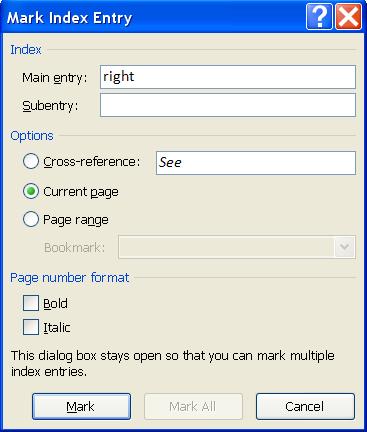
The text that you selected is the text that will appear in the index. If you want something else to appear in the index, then type that into the Main Entry box. For example: if you selected the word «cow» within your document, it will appear as Cow in the Main Entry box above. If you want «cow» to appear as Cattle instead, type Cattle in the Main Entry box. You can also type a subentry. This might be «Longhorns.»
You can also create a cross reference to another index entry. If you want to do that, select Cross-Reference in the options group. Perhaps you want to cross reference cattle with dairy farms.
Now, you can specify the way that the indexed page numbers appear. You can make them boldface or italic by using the checkboxes at the bottom of the window above.
If you want to format the text for your index, right click on the text in the Main Entry or the Subentry box. You’ll then see this dropdown menu:
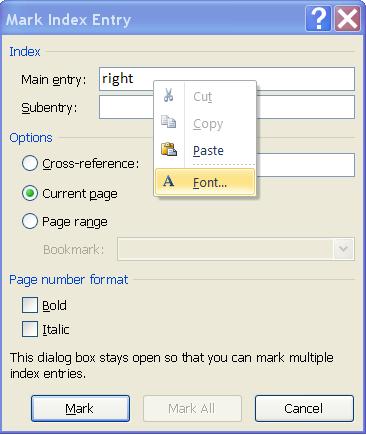
Select Font and click on it. You’ll then see this window:
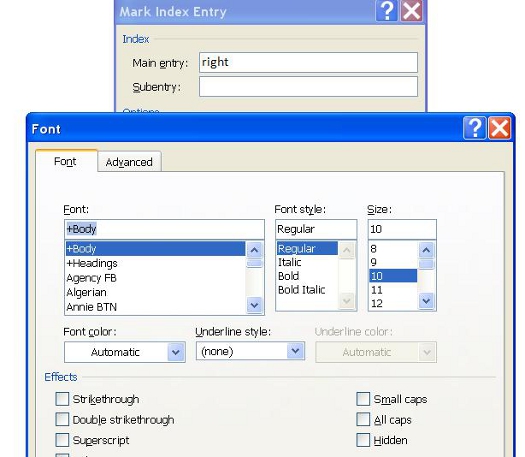
You can now change your font type, style, size, etc. Click OK when you’re finished. When you’re finished marking an entry, click Mark. If you want to mark all entries, click Mark All.
Marking Text Over Multiple Pages
If you want to mark text that is rather lengthy, such as a few pages in length, here’s how to do it.
First, bookmark the text. You can bookmark text by selecting it, then clicking the Insert tab on the Ribbon. In the Links group, select Bookmark.
Now, type in a name for the bookmark, then click add.
Now, position the cursor after the bookmarked text, then go to the References tab and click on Mark Entry. Name it. When you select Page Range, you can choose your bookmark from the Bookmark dropdown list.
Adding The Index
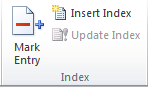
When you’re finished marking entries, it’s time to create the index. Simply move the cursor to where you want the index to appear. Then go to the Reference Tab and click on Insert Index which has been circled for you in red below.
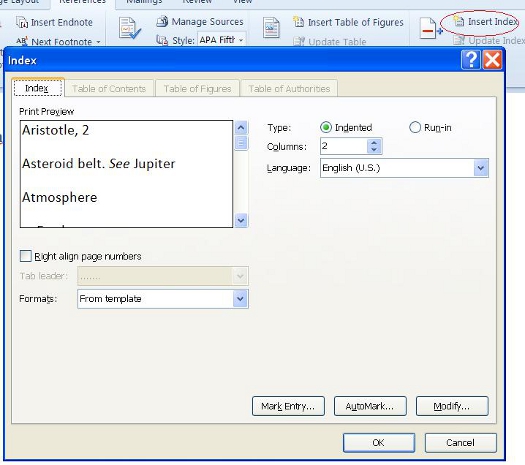
Now you can set the preferences and options for your index:
o Right align page numbers means that all your pages numbers will appear on the right and neatly — one under the other.
o Tab leader is only available if you right align page numbers. Tab leader means that a dotted line, dashed line, or straight line will appear from the entry to the page number.
o Formats means that you can choose a format to change the style of the index. A format is shown in the Print Preview window.
o Type. If you choose indented, each entry will appear on a new line. Run-in displays entries one after the other with multiple entries on the same line.
o Columns determines how many columns your index will have.
When you’re finished, click OK. MS Word will collect all your marked entries for the index, sort them alphabetically, reference their page numbers, then display your index in your document. It’s really easy, isn’t it?
Formatting Marks
Formatting marks are marks that show the ends of paragraphs, spaces between words, indentions, etc. If you want to see the formatting marks in your document, go to the Home tab, then click on Show/Hide, as shown below. By default, formatting marks are hidden.
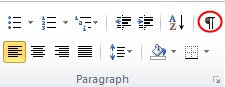
When you show formatting marks, your document now looks like this:

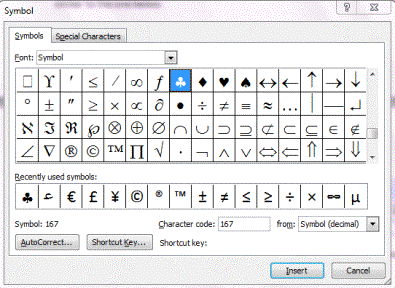
Inserting Special Characters Into Your Document
Special characters refer to punctuation, symbols, or other items that are not generally available on keyboards, such as copyright symbols, trademark symbols, etc.
To insert special characters or symbols:
1. Place your cursor where you want the symbol to appear.
2. Click the Insert tab.
3. Click the Symbols button in the ‘Symbols’ group.

4. Choose the symbol you want from the dropdown menu, or click on More Symbols.
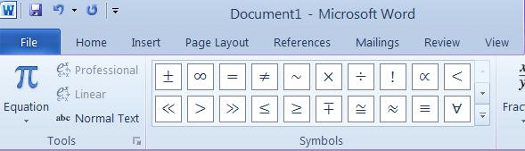
Inserting Equations
You can create and insert mathematical equations into your document using MS Word 2010.
To do this:
o Place your cursor where you want the equation.
o Select the Insert tab.
o Click the equation button (located beneath Symbol) and select your equation from the dropdown menu. If you don’t see the equation you want, select Insert New Equation. This box will then appear in your document:

And you’ll see this toolbar in the Ribbon:

A zoom of this toolbar is below with left and right sides:
 :
:
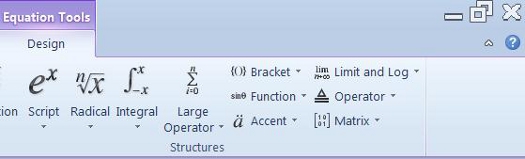
Select your equation.
To edit an equation, click Design in the Ribbon while the equations dialogue box is open. (See above picture.)
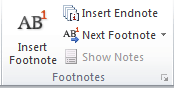
Adding Footnotes
If you need to add footnotes to your document, you can do this by going to the References tab in the Ribbon. Go to the ‘Footnotes’ group. From there, you can insert a footnote, view and edit footnotes, and also add endnotes.
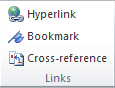
Adding Bookmarks
You can use bookmarks in 2010 the same way you would use a bookmark to mark a page of a book so you can pick up reading where you left off. You bookmark text by selecting it, then clicking the Insert tab on the Ribbon. In the Links group, select Bookmark.
Now, type in a name for the bookmark, then click add.
Cross-reference
You can also insert a cross reference to refer someone to another portion of a document. To start with, type the introductory text for the cross reference, such as «See Page 3.»
To do this, go to the Insert tab, then click Cross-reference in the Links group.
Alternatively you can find Cross Reference in the Captions group under the References Tab. You’ll see this box:

o In the Reference type box, select what you want to refer to. Maybe you want to refer to a heading.
o In the Insert Reference To box, click the information that you want inserted into your document.
o In the For Which box, select the item that you want to refer to. If you want users to be able to jump to that item, make sure the Insert as Hyperlink box is checked.

If you work with long documents in Word and prefer not to use Master Documents or separate files, you can use bookmarks to jump to specific places in your document.
Inserting bookmarks in Word is like putting a bookmark in a book to mark your place. Bookmarks in Word are codes that are inserted into your document, but they are not visible (unless you make them visible) and do not print.
NOTE: This procedure works the same in Word 2007, 2010, 2013, and 2016, except where noted.
To insert a bookmark at a specific point in your document, insert the cursor where you want the bookmark and click the Insert tab on the ribbon.
NOTE: You can also highlight text where you want to place a bookmark.

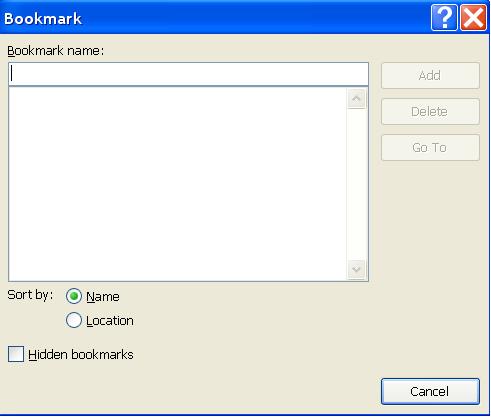
Click Bookmark in the Links group on the Insert tab.
On the Bookmark dialog box, enter a name for the bookmark in the edit box below Bookmark name and click Add.
NOTE: Use a descriptive name for each bookmark to help you know what text is located at each bookmark. We just used “Bookmark1” as an example, although it is not the best name for a bookmark.
Bookmarks are not visible by default. To be able to view the bookmarks in your document, click the File tab and click Options.
NOTE: If you are using Word 2007, click the Office button and click Word Options at the bottom of the Office menu.
On the Word Options dialog box, click Advanced in the list on the left. On the Advanced screen on the right, scroll down to the Show document content section and select the Show bookmarks check box so there is a check mark in the box. Click OK to save your changes and close the dialog box.
If you placed the cursor at a specific point when inserting a bookmark, the bookmark displays as an I-beam, as pictured below.
If you selected text when inserting a bookmark, the selected text is surrounded by brackets indicating the location of the bookmark.
NOTE: Bookmark brackets are useful when you need to modify text or other content enclosed by a bookmark without deleting the bookmark itself.
To jump to a bookmark, you can use the same Bookmark dialog box you used to insert the bookmark. Access the Bookmark dialog box from the Insert tab as discussed earlier in this article. Select the desired bookmark from the list and click Go To. The Cancel button becomes a Close button you can use to close the Bookmark dialog box.
You can also jump to bookmarks using the Find and Replace dialog box. To use this method, click the Home tab on the ribbon and click the drop-down arrow on the Find button in the Editing group.
The Find and Replace dialog box displays with the Go To tab active. Select Bookmark in the Go to what list and select a bookmark from the Enter bookmark name drop-down list. Click Go To. The Find and Replace dialog box remains open after jumping to a location. Click Close to close the dialog box.
You can add bookmarks the the different sections in your document to make it quicker and easier to get to those sections. Because bookmark symbols are not printed, you can set up bookmarks for headings, images, paragraphs, and even items such as imported objects and audio files.
READ NEXT
- › How to Reference Text from Other Documents in Microsoft Word
- › How to Reuse or Move a Bookmark in Microsoft Word
- › How to Rename a Bookmark in Microsoft Word Using a Free Add-in
- › Learn How to Use the Navigation Pane in Microsoft Word
- › How to Add and Link to Bookmarks in Microsoft Word
- › How to Adjust and Change Discord Fonts
- › This New Google TV Streaming Device Costs Just $20
- › BLUETTI Slashed Hundreds off Its Best Power Stations for Easter Sale
How-To Geek is where you turn when you want experts to explain technology. Since we launched in 2006, our articles have been read billions of times. Want to know more?
Everyone knows that writing a Senior Thesis is an exceptionally time intensive process. I expected that conducting the research necessary for a 75+ page paper and actually writing it would take months of work. However, what I did not expect was how time consuming other aspects of my thesis would be. As I was finishing up my thesis, I realized (the hard way) that one of these aspects is formatting. While exact requirements vary by department, most theses must include document elements, such as chapter headings, page numbers, and table of contents. Adding elements like page numbers may not seem particularly challenging, but, when you’re working in a very long document, it can be quite tedious.
In an attempt to save you all some time and stress, I have compiled a short list of tips on formatting long documents in Microsoft Word that I learned mostly through Google searches and trial and error. Many seniors format their theses in programs other than Word, such as LaTeX (Alec has provided some helpful advice on how to use LaTeX in a past post). But if you are like me and are relying on Word, here are a few things to keep in mind:

Headers, Footers, and Section Breaks
Many people include headers and/or footers in their documents to display information like page numbers, chapter titles, and the author’s name. Inserting a header or footer is relatively straightforward–recent versions of Word have a tab in the main toolbar called “Document Elements” from which headers and footers can be selected.
You may wish to have different headers or footers in different sections. Certain theses, for instance, have “Chapter One” written in the header of every page of their first chapter, “Chapter Two” written in the header of every page of their second chapter, and so on. In order to do this, you have to separate chapters into their own sections by clicking in between two chapters, going to “Layout” and selecting “Next Page” from the “Break” drop down menu. Because the chapters are now distinct sections, you can give them different headers, but you have to make sure that the sections aren’t “linked.” To do this, double click in the header or footer, select “Header and Footer” from the main toolbar, and uncheck “Link to Previous.” Creating section breaks between chapters is always a good idea because it allows you to edit one chapter without altering the spacing of the subsequent chapters. No matter how much you add to or take away from your first chapter, for instance, your second chapter will always start at the top of a new page.
Pagination
Adding page numbers is also relatively simple and can be done by selecting the page number icon from the “Document Elements” tab. You may wish to have different types of page numbers in certain parts of your thesis. For example, some theses use Roman numerals on pages before the first page of Chapter One (the pages with the acknowledgements, the table of contents, etc.). Once again, this can be done by creating section breaks and unlinking the sections as described above. Select the page number icon and then click “Format…” to choose the number type that you wish to use in the section in which you are working. From this window, you can also specify the number at which you would like your pages to start. This is an important feature if your chapters are unlinked because the page numbers will automatically start at 1 at the beginning of each chapter. To fix this, you can manually specify the page numbers at which each chapter starts using the “Format…” function. Doing so can be a little tedious, so it makes sense to save this step for when you are finished making major changes and know that your chapters’ page lengths are not still changing.
Tables of Contents
Microsoft Word has a helpful tool for creating tables of contents that can be found under the “Document Elements” tab. In order to use this tool, you should create chapter headings and subheadings using the “Styles” tool in the “Home” tab. Then go to the table of contents tool and insert the table into your document. The headings should automatically appear in the table of contents. If the pages on which sections start change as you work on your thesis, you can click “Update” and the table of contents will change accordingly. If you do not want to use the automatic table of contents feature, you can select a template from the table of contents tool and fill in the headings and page numbers manually.
These tips certainly do not cover all of the components of formatting a thesis, but hopefully they can save you time on some of the basics!
— Emma Kaeser, Social Sciences Correspondent
![]()
Written by Allen Wyatt (last updated December 30, 2021)
This tip applies to Word 2007, 2010, 2013, 2016, 2019, and Word in Microsoft 365
Hal has a very large document that he works with regularly. The document is just text, with no images, and contains about 2,700 pages. The file size of the document is not terribly large, being under 2 MB. However, opening and editing the document can be excruciatingly slow. For instance, editing a sentence or applying a style can take minutes to accomplish. Hal wonders how he can speed up working with this long document.
Actually, there are a good number of things you can do, each of which might contribute to working with the document faster. Let’s look at each of them, in turn.
How Your Document is Saved
First, let’s talk about your document. How old is it? If you have been working with it for a while (and by «a while» I mean years), I would try the following, checking after each task to see if it helps.
- Make sure you are saving your document on a local hard drive, not on a network drive or on a cloud drive such as OneDrive or DropBox.
- Use Save As to save the document under a new name.
- If the document is an old DOC format, save it in the current DOCX format.
- If the document is in the current DOCX format, save it in the older DOC format, get out of Word, get back into Word, load the DOC file, and save it under a new name in the current DOCX format.
- Save the document in RTF format, get out of Word, get back into Word, load the RTF file, and save it under a new name in the current DOCX format.
The reason that saving the document in different versions works is because it causes Word to, internally, «double check» pointers and references to make sure they are correct and as optimal as possible. This can then allow Word to work with the document faster.
What Your Document Contains
Now you may want to look at what is in your document. You mentioned that it was «just text» and contained no images, but you may want to check the following. (Because you said you had no images, I won’t include any suggestions relative to them.)
- Does the document contain a lot of text boxes? (Text boxes are very similar to graphics. While you may not have images, with lots of text boxes, performance by Word is similar to having a lot of images.)
- Have you used Track Changes for a while with a lot of edits noted on the screen? (These can really slow things down. Just turning off Track Changes won’t help; you’ll want to resolve the changes as much as possible.)
- Does the document contain links to external sources, particularly on the Web or on network drives? These can slow down editing tremendously. (See https://wordribbon.tips.net/T000978 for how you can turn off updating external links when opening a document.)
- Does the document have a lot of footnotes or endnotes? These present more complex page layout challenges to Word, particularly if you are using footnotes and they are individually quite long.
- Does your document have a lot of line breaks and, especially, section breaks? These can affect pagination quite a bit and force Word to repaginate more often than it otherwise would.
- Does your document contain a lot of tables? There have been reports of a large number of tables causing sluggishness in the program. (What constitutes «a large number of tables» can vary greatly depending on other variables.)
A rule of thumb here is that there are many things that people view as «just text,» but they aren’t really. You can check to see what is «just text» by opening a new document, selecting everything from the old document, and using Paste Special in the new document to paste as text only. This can strip many of the «extras» that Word may be working with in the old document. You should realize that it will also remove any formatting in the pasted text, so that could present a huge task in getting the formatting right again.
Potential Document Corruption
It is possible that your document is corrupted or that it is showing the first signs of corruption. You can narrow down whether this is the case or not by determining if the problem is with a single document or with multiple documents. (If it is with multiple documents, chances are good that the problem isn’t document corruption.)
It should also be noted that the various «saving» scenarios described in the first section of this tip may overcome any potential corruption in the document. If you think there may still be a problem, feel free to read on to help correct it.
The standard method to overcome document corruption is to copy the contents of the file (minus the last character in the file) to another document. This may work well with shorter documents, but isn’t particularly practical with very long documents. Instead, copy «chunks» of your document to a new one by following these steps:
- Open the corrupt document.
- Create a brand new document.
- Switch to the corrupt document.
- Press Ctrl+Home to go to the beginning of the document.
- Select a «chunk» of the document—perhaps 100 pages or so.
- Press Ctrl+C. This copies the selected portion of the document to the Clipboard.
- Switch to the new document (the one created in step 2).
- Press Ctrl+V. The contents of the Clipboard are pasted into the blank document.
- Repeat steps 5 through 8 with successive «chunks» of the document. Only when you are just about ready to copy the last part of the document should you continue with step 10.
- Position the insertion point just before the last portion of the corrupt document.
- Press Shift+Ctrl+End. This selects everything between the current insertion point and the end of the document.
- Hold down the Shift key as you press the Left Arrow key. This makes sure that the very last character in the document (the ending paragraph mark) is not selected.
- Press Ctrl+C. This copies the last portion of the document to the Clipboard.
- Switch to the new document (the one created in step 2).
- Press Ctrl+V. The contents of the Clipboard are pasted into the blank document.
- Save the new document.
- Close the document you suspect is corrupted.
Work with the new document for a while to see if the problems are corrected. (If the problems were related to document corruption, you should definitely see an improvement in responsiveness and less flakiness in Word’s behavior.)
Modify Word’s Configuration
You can also try these tasks, relative to how Word is configured. (After each of these suggestions I’ve tried to include a link to a WordTip that provides additional information relative to the suggestion.)
- Turn off background repagination. This stops the program from trying to repaginate every time you make an edit. (See https://wordribbon.tips.net/T005975.)
- Edit your document in Draft view. Only use Page Layout view on those few occasions when you need an approximation of what the finished document will look like. (See https://wordribbon.tips.net/T008142.)
- Get rid of styles that you don’t really need. You may have a bunch of them in this category, particularly if you do a lot of copying and pasting from other documents. (See https://wordribbon.tips.net/T010225.)
- Stop Word from tracking your formatting changes. (See https://wordribbon.tips.net/T007834.)
- Turn off Click and Type. (See https://wordribbon.tips.net/T005999.)
- Turn off background spell checking and grammar checking. This reduces the background tasks that Word needs to accomplish. (See https://wordribbon.tips.net/T006085.)
- Turn off background saving. (See https://wordribbon.tips.net/T006106.)
- Turn off background printing. (See https://wordribbon.tips.net/T006697.)
While not specifically a configuration change, you may also want to check to see if you have any add-ins or background programs running. This may include any virus checkers. Turn them off and check to see if the document editing goes faster.
The general rule is that you want to turn off any configuration option that requires additional processing or any background processing. While these optional items can make your life easier when dealing with shorter documents, they can slow down working with very long documents.
Final Things to Check
If none of these things work, you may want to check out some things relative to your system. First, there are lots of things you can tweak in Windows, itself, to make sure it is functioning at peak performance. Honestly, you shouldn’t have to poke and prod Windows if you are only having problems with the one document, but it doesn’t hurt to make sure that things are in fine shape. Here’s a Microsoft article about sluggishness in Word, and it spends a great deal of time focusing on Windows issues:
http://support.microsoft.com/kb/918793
You may also want to look at your hardware. How old is your computer? Does it have ample RAM? Is your hard drive nearly full? Is your hard drive one of the newer SSD drives?
If your hardware is found wanting and you cannot afford to upgrade it, you may want to look at breaking your document into several smaller documents—perhaps 4 or 5 documents of approximately equal length. You can then work with each document individually, and «put them back together» at a later point, if you need to.
WordTips is your source for cost-effective Microsoft Word training.
(Microsoft Word is the most popular word processing software in the world.)
This tip (5138) applies to Microsoft Word 2007, 2010, 2013, 2016, 2019, and Word in Microsoft 365.
Author Bio
With more than 50 non-fiction books and numerous magazine articles to his credit, Allen Wyatt is an internationally recognized author. He is president of Sharon Parq Associates, a computer and publishing services company. Learn more about Allen…
MORE FROM ALLEN
Speaking the Contents of Cells
Excel 2003 includes speech synthesis abilities that can «speak» your data to you as you enter it. This tip describes how …
Discover More
Formulas Don’t Calculate as Formulas
Enter a formula (starting with an equal sign) and you may be surprised if Excel doesn’t calculate the formula. Here’s a …
Discover More
Converting Forms to Regular Documents
Word allows you to protect documents that are intended to be used as forms. If you want to convert the form responses …
Discover More

How to Navigate Long Documents in Word
The Navigation pane makes it easy to get from one place to the next in a document. You can quickly jump between headings, pages, or search results.
Turn on the Navigation Pane
- Click the View tab.
- Check the Navigation Pane checkbox.

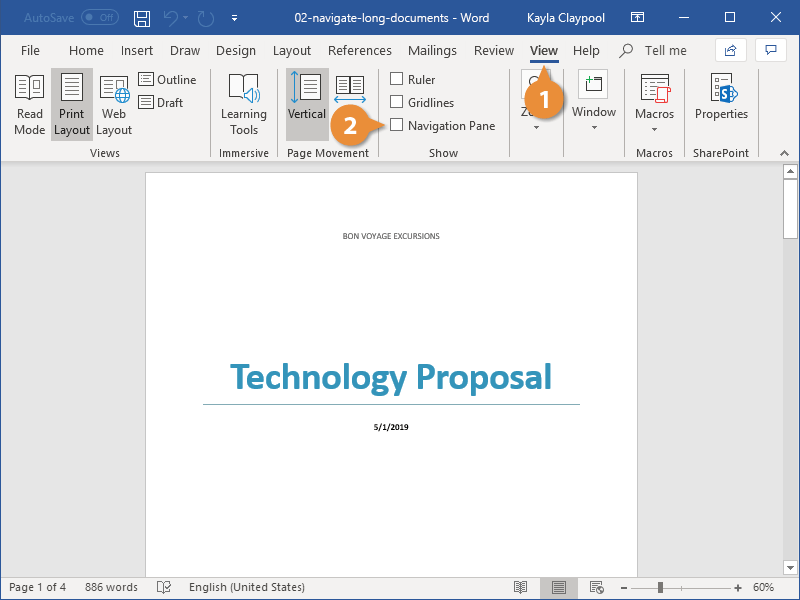
The pane appears at the left. It includes a search field for you to search for text in your document as well as three ways to browse: by heading, page, or search result.
Press Ctrl + F.
Use the Navigation Pane
Navigating your document by page or heading allows you to jump around your document very quickly.
- Click the Pages tab in the Navigation pane.
- Select a page in the list.
- Click the Headings tab.
- Select a heading in the Navigation pane.
Every page in the document is represented by a thumbnail. You can scroll through this list to see a quick overview of how the document looks.
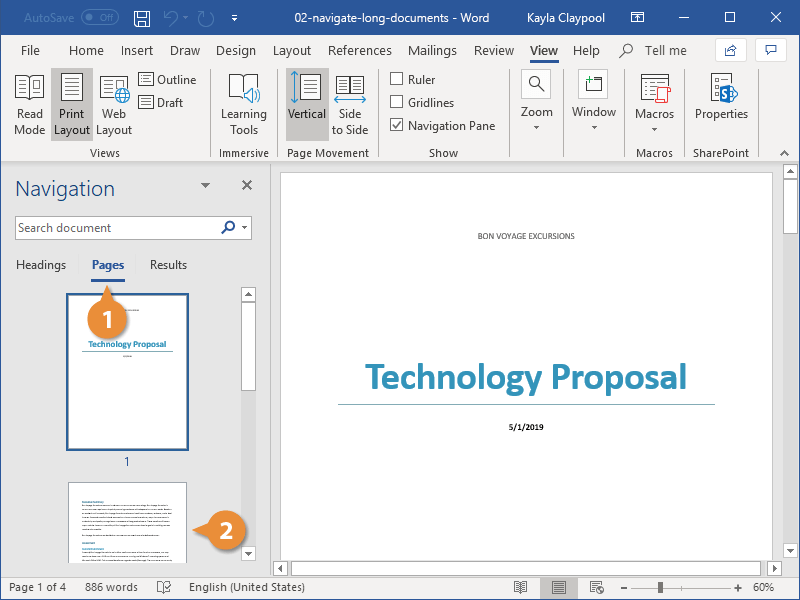
Word brings you directly to the selected page.
The Navigation pane now displays all the headings in the document.
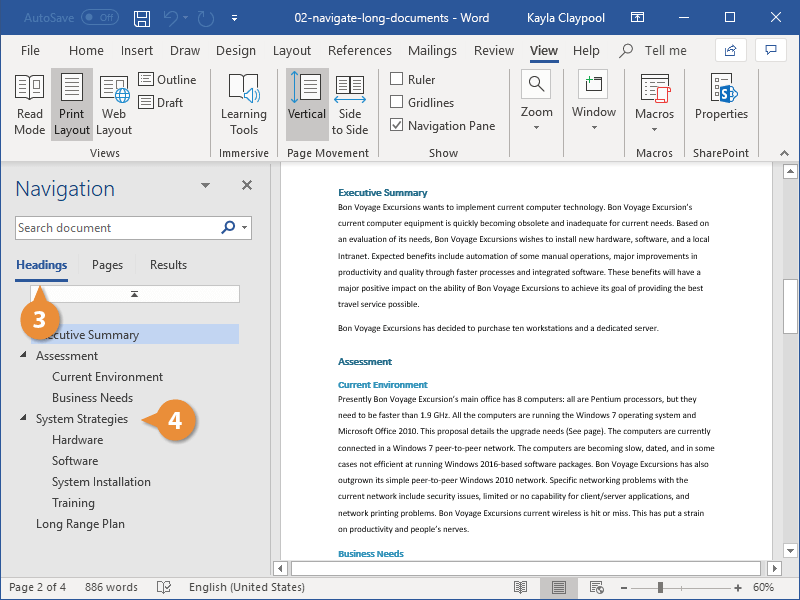
Word jumps directly to that heading.
You can collapse a section down by clicking the arrow next to a heading that contains subheadings. You can also rearrange sections in a document by clicking and dragging a heading up or down.

FREE Quick Reference
Click to Download
Free to distribute with our compliments; we hope you will consider our paid training.