
Файл логов сайта позволит узнать что создает нагрузку, какие страницы или картинки на сайте «битые», кто «стучится» к вам на сайт и прочее. Давайте откроем его в Excel, что позволит анализировать более удобно.
Получим в итоге вот такой внешний вид:

Увеличить. Открытый файл логов сайта .log в Excel
Приступим.
Для начала переходим в меню Excel Данные и нас интересует пункт Из текстового/CSV-файла.

Увеличить. Excel > Данные > Из текстового/CSV-файла
В открывшемся окне выберите Все файлы, чтобы отобразило ваш фай логов, т.к. он имеет нестандартное расширение .log

Увеличить. Выбираем тип «Все файлы»
Теперь проверяем кодировку и правильно ли выставлен разделитель. Посмотрите на скриншот ниже: у вас должно получиться аналогично. Если нет такого разделения по столбцам, то пробуйте экспериментировать с Разделителем: в зависимости от хостинга и настроек формирования файла лога, в качестве разделителя могут быть запятые, точки и другие знаки.

Увеличить. Настройка отображения файла лога
В итоге получаем таблицу с каким-то набором колонок, что позволит нам проанализировать файл логов и найти решение своего вопроса.
Увеличить. Открытый файл логов сайта .log в Excel
Содержание
- Logically Proven .
- Thursday, 26 February 2015
- How to create a LOG file in excel and access — VBA
- How to make an external log using Excel VBA?
- Version 2.01
- Windmill Software Ltd Data Acquisition Intelligence
- Connect Sensors and Instruments to Excel
- Importing Logged Data into Excel
- Acquiring Live Data in Excel
- Copying and Pasting Live DDE Data Links
- Using Macros for Analysis and Control with Excel
- Reading data from one channel
- Sending Data to an Analogue or Digital Output
- Reading Data from All the Instruments’ Channels
- Data Acquisition Example
- How to Transform Data in Excel (Log, Square Root, Cube Root)
- Log Transformation in Excel
- Square Root Transformation in Excel
- Cube Root Transformation in Excel
- How to Transform Data in Excel? Ultimate Guide
- What is data transformation in Excel?
- In what cases may data transformation in Excel be needed?
- What can you use to transform data in Excel?
- Excel functions
- Power Query
- Power Pivot
- Power View
- Coupler.io
- What are the data transformation functions in Excel?
- Example of transforming data in Excel
- Examples of transforming data using Excel functions and tools
- How to transform data into log in Excel?
- How to square root transform data in Excel?
- How to make cube root Excel data transformation?
- How to arcsine transform data in Excel?
- How to transform data in Excel from columns to rows?
- How to transform into numeric data in Excel?
- How to transform data range in Excel?
- Main ideas for data transformation in Excel
- Basic Excel data transformation rules
- What to do if transform data in Excel fails?
Logically Proven .
Thursday, 26 February 2015
How to create a LOG file in excel and access — VBA
Welcome to Logically Proven blog.
This post demonstrates how to create a log file in excel or access using VBA (Visual Basic for Applications) code.
Consider a scenario, the application is logging the user details into the log file who are accessing the application.
Here is application may be excel or access which is located in the network location which is accessed by the multiple users.
The log data contains the application name, who are accessing the application and the application accessed date.
In the below example I am considering the excel application which logs the data into the LOG file. The application appends the data to the LOG file every time the application is accessed.
Achieving this functionality by logging the user details when the workbook is opened.
So, the workbook open event code looks like this —
LogInfo is the sub-routine which saves the application name, user name and the access date of an application.
If the log file doesn’t exist, the application creates automatically at the run-time. But the path should be valid and exists otherwise the application runs into error. And make sure the application is having the permissions to create and write into the log file.
This method takes one argument which is the message that you want to write into the log file.
This method appends the log message every time the application is accessed.
This way the application logs the user details who are accessing the application. You can add the same functionality in many cases for example when user modifies something in the excel or access database you can trigger the code to save the user details and what modifications did.
LOG file is very useful to analyse the application. So keep logging your application.
Please write your comments if you find anything is incorrect or do you want to share more information about the topic discussed above.
Logically Proven
Learn, Teach, Share

Computer Science graduate, Techie, Founder of logicallyproven, Love to Share and Read About pprogramming related things.
Источник
How to make an external log using Excel VBA?
The code has been updated to reference the changes below.
This log system create an external document for Excel called Log.txt, it will create a line in the log.txt file that looks like this:
11:27:20 AM Matthew Ridge changed cell $N$55 from ss to
This will not tell you if someone entered a new line of code into the sheet, but if the code demands an answer, it will tell you what cell that answer is in. This codes below should work for both Mac and PC systems combined. If people find it doesn’t please say.
This code was created with the help of people here, and other forms, so I can’t take sole proprietorship of the document, but I can take ownership of the concept. So thanks to those who helped, without this there now wouldn’t be a viable logging system for Excel in my opinion 😉
BTW, before anyone freaks out and asks where does this code go, it isn’t obvious to the general/new end user. You need to go to the Developer Tab open it up, click on Visual Basic, and when the new window opens look for Microsoft Excel Object; under that folder should be your workbook. You can either put it under ThisWorkbook or inside any of the sheets by double clicking on the sheet you want the code to be in.
Once the sheet is open on the right panel, you will see Option Explicit, if you don’t it is best if you activate it by making sure the Require Variable Declaration is checked. This is found at the Visual Basic window again, and follow this path:
Tools-> Options -> Editor.
If it is checked then you have no worry, if not then you check it. Option Explicit is a good thing for you code, it forces you to declare variables, which is a good practice to begin with.
After it is verified, you can copy the code below to either paste it in your Workbook, or a specific sheet depending on your needs.
Version 2.01
As time goes by, I will attempt to update this code to add more features to it as I deem fit.
Again thanks to all that helped, it is greatly appreciated to make this possible.
Источник
Windmill Software Ltd
Data Acquisition Intelligence
Connect Sensors and Instruments to Excel
Windmill software collects data from instruments and devices connected to your PC. We have a range of drivers for many types of equipment, and now offer our newsletter subscribers free software to log data from instruments connected over RS232, RS485, Modbus and TCP/IP. This means that you can connect these instruments to Excel.
Using Excel you could average readings over time or a number of sampling points; calculate control outputs; or put data directly into reports. You can collect data with the Windmill Logger trial or free ComDebug application, and after collection has finished import it into your Excel spreadsheet. Alternatively you can transfer live data, using dynamic data exchange.
Importing Logged Data into Excel
The easiest way to get data into Excel is to open a logged data file after collection has finished. Windmill Logger can periodically close one data file and start another without pausing data collection, so no need to interrupt your tests or experiments to see the data.
- In Excel, from the File menu select Open.
- Select «All Files» as the file type.
- Choose your Logger *.wl file from the Windmill folder. (Or your WM Collect file if using the Microlink 840 Data Logger.)
- Excel will recognise this as a tab separated value file. Use the default options offered by the spreadsheet for importing the data.
- Save the data as an Excel file.
Example of data logged by Windmill being analysed in Excel
Acquiring Live Data in Excel
Windmill 7 lets you aquire live data in Excel using DDE. Just copy and paste data links which will continually update with live values. For more sophisticated tasks you can use a macro to grab data from Windmill. Some examples are given below
Copying and Pasting Live DDE Data Links
The Windmill DDE Panel lets you copy and paste live data into Excel.
- In DDE Panel, press the Copy to Clipboard button
- Choose the type of information you want to copy: data values, channel names, data units, alarm settings, etc.
- Move to Excel and select Paste Special from the Edit menu.
- Choose to paste as a link. Continually updating live data will appear in Excel.
For more sophisticated tasks, or to log live data in Excel, you can use macros.
Using Macros for Analysis and Control with Excel
Excel offers you analytical capabilities and lets you calculate control values to send back to the hardware.
To try out data acquisition into Excel
- Load Windmill DDE Panel and start collecting data from your instrument.
- Load Excel with a clean sheet, and then choose Record New Macro from the
Tools > Macro menu. Create an empty macro and then copy and paste the example macros given below into it.
We have three example macros. The first reads data from one channel, for example the current temperature reading. The second shows how to send data to an analogue or digital output. The third reads data from all instruments’ channels.
Reading data from one channel
To read data from one channel called Chan_00 and place it into a cell in the spreadsheet, create the following VBA code. (A channel holds one type of data. For a laboratory scale, you might have one channel holding the current weight. For a GPS receiver you might have two channels: one holding latitude and one holding longitude.)
Sending Data to an Analogue or Digital Output
Reading Data from All the Instruments’ Channels
This macro repeatedly samples data from all the instruments’ channels and stores the data in the Excel worksheet (by default Sheet 1). When the macro is run the operator chooses how many times to sample all the channels, and the interval between taking sets of samples. The macro loops until the required amount of samples have been collected. Make sure DDE Panel is running before starting the macro. You can quickly check DDE links by Copying them to Clipboard in DDE Panel and using Paste Special in Excel, before running the macro.
Another good macro for logging data, this time only logging when new data arrives, is given in Issue 56 of Monitor. Many more example macros are given in our Excel Tips and Tricks page.
Data Acquisition Example
In the example below Excel is reading data from the Windmill DDE Panel and storing it in cells B4 — B8. These cells are updated automatically whenever DDE Panel takes new samples, at which point Excel calculates the average and standard deviation and stores them in cells B10 and B11.
Источник
How to Transform Data in Excel (Log, Square Root, Cube Root)
Many statistical tests make the assumption that datasets are normally distributed.
However, this assumption is often violated in practice. One way to address this issue is to transform the values of the dataset using one of the following three transformations:
1. Log Transformation: Transform the values from y to log(y).
2. Square Root Transformation: Transform the values from y to √ y .
3. Cube Root Transformation: Transform the values from y to y 1/3 .
By performing these transformations, the data typically becomes closer to normally distributed. The following examples show how to perform these transformations in Excel.
Log Transformation in Excel
To apply a log transformation to a dataset in Excel, we can use the =LOG10() function.
The following screenshot shows how to apply a log transformation to a dataset in Excel:
![]()
To determine if this transformation made the dataset more normally distributed, we can perform a Jarque-Bera normality test in Excel.
The test statistic for this test is defined as:
JB =(n/6) * (S 2 + (C 2 /4))
- n: the number of observations in the sample
- S: the sample skewness
- C: the sample kurtosis
Under the null hypothesis of normality, JB
If the p-value that corresponds to the test statistic is less than some significance level (e.g. α = .05), then we can reject the null hypothesis and conclude that the data is not normally distributed.
The following screenshot shows how to perform a Jarque-Bera test for the raw data and the transformed data:
![]()
Notice that the p-value for the raw data is less than .05, which indicates that it is not normally distributed.
However, the p-value for the transformed data is not less than .05, so we can assume that it is normally distributed. This tells us that the log transformation worked.
Square Root Transformation in Excel
To apply a square root transformation to a dataset in Excel, we can use the =SQRT() function.
The following screenshot shows how to apply a square root transformation to a dataset in Excel:
![]()
Notice that the p-value of the Jarque-Bera normality test for the transformed data is not less than .05, which indicates that the square root transformation was effective.
Cube Root Transformation in Excel
To apply a cube root transformation to a dataset in Excel, we can use the =DATA^(1/3) function.
The following screenshot shows how to apply a cube root transformation to a dataset in Excel:
![]()
The p-value of the Jarque-Bera normality test for the transformed data is not less than .05, which indicates that the cube root transformation was effective.
All three data transformations effectively made the raw data more normally distributed.
Out of the three transformations, the log transformation resulted in the largest p-value in the Jarque-Bera normality test, which tells us that it likely made the data the “most” normally distributed out of the three transformation methods.
Источник
How to Transform Data in Excel? Ultimate Guide
Excel is a popular and handy tool for storing mathematical, statistical, and other information. Does Excel provide any functionalities for data transformation? Of course, it does! To transform data in Excel, you can use multiple functions, as well as native and third-party tools to automate processes. Read on to learn about all the available options.
What is data transformation in Excel?
According to Wikipedia:
Data transformation is the process of converting data from one format or structure into another format or structure.
So, you basically change the format without changing the information content of the data. The goal of data transformation is to present the data so that it can be used most effectively.
Data transformation in Excel means the same process but implemented in Excel and with the help of Excel functions and tools. For example, you can remove a column, change the data type, or filter rows. Each of these operations means data transformation.
In what cases may data transformation in Excel be needed?
Often, simply arranging data alphabetically, in ascending order, or transforming non-normal data in Excel is not enough. To understand the information, sometimes more complex transformations are required.
After conducting any sociological research, the collected data needs to be grouped in one place, and a detailed analysis should be carried out. Entrepreneurs use Excel data transformation to create reports or optimize their work. These can be companies that are engaged in sales or even tour operators.
If we talk about mathematics or physics, the systematization of data allows them to simplify the work as much as possible. And if, when working with data, you can immediately calculate the square root or raise a number to a power, it makes the work faster. It is almost impossible to list all areas where data transformation in Excel can be used, but to name a few:
- Reporting
- Analysis of statistical data
- Performing mathematical operations with a large amount of data
- Compiling financial data
- Business analytics, and many others
Each specialty can use data transformation in different ways, depending on their goals and needs.
What can you use to transform data in Excel?
Suppose you are planning to transform data values in Excel. In that case, you can take advantage of the numerous Excel functions, as well as built-in and third-party tools.
Excel functions
As for data transformation, Excel itself has a vast number of functions that allow you to transform data, change the spreadsheet’s appearance, perform various mathematical operations, and many others. These functions are more than enough to help you structure and organize your data in most simple cases.
Power Query
Power Query is a popular Excel tool used to extract, transform, and load data. It can be used as part of a self-service ETL solution to perform the following tasks:
- Extract data from the source.
- Transform your data to prepare it for analysis.
- Load the transformed data into a worksheet or data model.
Its massive popularity is in part due to its easy use. All steps are performed automatically, and the final results are recorded in a spreadsheet already familiar to you.
Power Pivot
This is an Excel-like user interface to a full-fledged SQL database installed on your computer and is a powerful tool for processing vast amounts of data. Power Pivot allows you to:
- Link imported spreadsheets by key columns.
- Filter and sort them.
- Perform mathematical and logical operations using more than 150 functions of the built-in DAX language.
Power View
Power View made its way into Excel 2013 from SharePoint. It primarily provides the user with tools for quickly creating live visual reports using pivot spreadsheets and database-based charts.
You can add totals to the report in a simple spreadsheet, a pivot spreadsheet, and various types of charts. Power View allows you to link data from spreadsheets even to Bing maps.
Coupler.io
Coupler.io is not a data transformation tool but a solution for importing data from different apps and sources to Excel. However, you can use it for data transformation purposes in many ways since it allows you to:
- Merge data from different spreadsheets.
- Select columns or a data range for import.
- Import queries (for specific data sources), and many more.
Check out the list of available Excel integrations and find the one you need.
Note: if you did not find the desired source, please fill out this form to let us know which application you would like to import data from.
What are the data transformation functions in Excel?
There are a considerable number of Excel data transformation functions. Here are 10 of the most popular ones:
| Function | Description |
|---|---|
| LOG10 | Allows you to calculate the logarithm to base 10. |
| ASIN | Allows you to calculate the arcsine. |
| SQRT | Allows you to calculate the square root. |
| ABS | Returns the absolute value of a number |
| LET | Assigns names to the results of calculations to allow storage of intermediate calculations, values, or name definitions in a formula. |
| ARABIC | Converts Roman numerals to Arabic numerals as a number. |
| DATE | Returns the sequential serial number that represents a particular date. |
| DAYS | Returns the number of days between two dates. |
| DEGREES | Converts radians to degrees. |
| ISO.CEILING | Rounds a number up to the nearest integer or multiple. |
Each function can perform one or more actions. You are unlikely to have to use all the existing functions. On average, one person uses 3 to 10 different functions, depending on what field of activity they work in.
Example of transforming data in Excel
One of the simplest examples of data transformation in Excel is removing duplicates. In Excel, you can do this either with Power Query if you’re getting data from an external source or with a button if your data set is already in Excel. Here is an example of a data set with duplicate records.

To remove these duplicates, click the Remove Duplicates button on the Data tab, then select the columns that contain duplicates.


Examples of transforming data using Excel functions and tools
How to transform data into log in Excel?
Users working with stats or scientists or other researchers need to calculate the logarithm of a certain number. It can be quickly done if you use a calculator, but what if there is a large amount of data, and you need to do everything as soon as possible? Then, use log transform data in Excel. To convert the required data to a logarithm, you can use two functions: LOG and LOG 10.
- LOG10 is the function to return the base-10 logarithm of a number.
- LOG is the function to return the logarithm of a number to the base you specify. The default base value is 10.
For example, here are two log transform formulas:
![]()
How to square root transform data in Excel?
To apply the square root transformation to a data set in Excel, you can use the SQRT function.
![]()
How to make cube root Excel data transformation?
There is no dedicated function in Excel for cube root transformation. However, you can apply the following formula:
![]()
According to this principle, you can perform root transformations of any degree, replacing 3 with the degree you need.
How to arcsine transform data in Excel?
The arcsine is the angle whose sine is the number. The arcsine transform can be used to stretch points between 0 and 1, for example, when working with proportions or fractions.
The arcsine transformation or the angular transformation is calculated as two times the arcsine of the square root of the proportion. To transform such data, use a combination of two functions: ASIN, which returns the inverse sine of a number, and SQRT.
For example, it looks like this:
![]()
The formula only works for the values in the range from 0 to 1. For example, it returned a #NUM! error for value 2. To avoid this, you will need to convert values to fit the 0 to 1 range. For this, divide each value by the max value into the data set using the following formula:

Nest this formula with the arcise one and you’ll get the proper result, for example:

How to transform data in Excel from columns to rows?
Use the transpose function if you have a worksheet with data in columns that need to be rotated to change its row order. With it, you can quickly switch data from columns to rows or vice versa.
Suppose you had a data set like this:
![]()
The transpose function rearranges the data set so that it looks like this:
![]()
To perform this transformation, you should select the range of data you want to reorder, including any row or column labels, and press Ctrl+C.
Next, you need to select a new location on the worksheet to insert the transposed data set (make sure you have enough space). The new data set that you insert here will completely overwrite any data/formatting already there.
Right-click the top-left cell to paste the transposed data set, then select Transpose.
Once you’ve transformed data in Excel, you can delete the original data set, and the data in the new one will remain intact.
How to transform into numeric data in Excel?
Sometimes, data in Excel is textual, which can lead to some problems. Fixing this is easy enough. You should select the cells and click on the diamond icon with an exclamation mark to select the conversion option to get started. You can perform such actions if this button is not available.

You should select the column where this problem occurs (if you don’t want to convert the entire column, you can select multiple cells instead).
On the Data tab, click Text to Columns.
The Text to Columns button is typically used to split a column, but it can also be used to convert a single column of text to numbers.
The remaining steps of the Text to Columns functionality are best for splitting a column. Since you’re just converting text in a column, you can click Apply right away, and Excel will convert the cells.

Press CTRL + 1 (or ⌘ + 1 on Mac). Then choose any format.
How to transform data range in Excel?
At any moment, you can convert the table to a normal range of data on a worksheet.

Right click on the table, select Table => Convert to range.

Main ideas for data transformation in Excel
The value of data transformation in Excel is difficult to overestimate. It can be used in various fields, such as sociology, mathematics, physics, and many other sciences. It solves several problems:
- Transforms data so that it is easier to do calculations
- Allows you to modify tables so that it is more convenient to work with them
- Simplifies data analysis
- Facilitates the creation of various reports and monitoring
Sometimes, it is impossible to perform calculations correctly since the values can be measured in different physical quantities (for example, radians and degrees), or vice versa; we need to perform some rounding. To not do all the conversions manually, you can use the special features of Excel. It allows you to save a lot of time, effort, and energy to deal with more complex and important processes, while computer technology is doing monotonous work.
Basic Excel data transformation rules
When transforming data in Excel, you need to remember the rules for using this spreadsheet:
- Any action can be reversed, so you should never panic.
- Using formulas when working with Excel simplifies working with a spreadsheet, but if you wish, you can do without them in some cases.
- If you work with Google Excel, there is no need to save permanently, but the interface and functions may differ slightly.
- Some add-ons may already be built into your version of the spreadsheet, while others may need to be downloaded. In the second case, use only trusted sites to avoid downloading a computer virus.
The above rules are not complex, and you can easily remember them even before working with a spreadsheet.
What to do if transform data in Excel fails?
In the process of data transformation, you may lose the data partly or entirely, and this may be very problematic. To mitigate losses, it is good to have a backup of the data.
Источник
Excel for Microsoft 365 Word for Microsoft 365 PowerPoint for Microsoft 365 Project Online Desktop Client Visio Plan 2 Excel 2021 Word 2021 PowerPoint 2021 Project Professional 2021 Project Standard 2021 Visio Professional 2021 Visio Standard 2021 Excel 2019 Word 2019 PowerPoint 2019 Project Professional 2019 Project Standard 2019 Visio Professional 2019 Visio Standard 2019 More…Less
When a user runs an Office app, such as Word or Excel, diagnostic information is collected and saved to log files on the user’s device. These log files contain information about the processes and components running in the application, and can help detect, diagnose, and fix issues and help make improvements to Office.
This information is very similar to optional diagnostic data that may already be collected on the user’s device, depending on what privacy settings have been chosen. But this information is more detailed and helps provide more context about technical issues that might occur when using Office apps. For example, the additional information in these log files could help us identify the underlying reason why a user has a problem saving a file to the device running Office. In those situations, it would be beneficial for those log files to be sent to Microsoft.
Sending the log files to Microsoft
These log files can be sent to Microsoft automatically if you have chosen to enable the collection and processing of optional diagnostic data by Microsoft. Note that even when you’ve enabled the processing of optional diagnostic data, Microsoft may not always collect these log files. We would process these files only in those situations where we think the additional information could be useful in resolving an issue.
The following table shows which Office apps might send these diagnostic log files to Microsoft.
|
Operating system |
Office apps |
Version |
|---|---|---|
|
Windows |
|
Version 2008 and later |
|
Android |
|
Version 16.0.13417.* and later |
In the coming months, Office apps running on macOS and iOS will be included. We’ll update the table when that happens.
Viewing the log files
You can use the Diagnostic Data Viewer (DDV) to see when these log files are sent to Microsoft. The DDV will show an event named Office.Diagnostics.DiagnosticLogsUploaded. This event shows the location on the user’s device where you can find a copy of the log files that are sent to Microsoft. These log files are retained for up to 24 hours. For more information about the DDV, see Using the Diagnostic Data Viewer with Office.
Log files on devices running Windows
There are separate log files for each Office app, such as Word or Excel. The total size of all the log files for each app will not exceed 80 mb. As new log files are created, older log files will be deleted.
A copy of the log files that are sent to Microsoft are usually found in the %temp%DiagnosticsUploadCache folder.
These files are text files, which can be viewed with most text editors.
Log files on devices running Android
There are separate log files for each Office app, such as Word or Excel. The location of the copy of the log files that are sent to Microsoft will vary, depending on the version of the Android operating system installed on the device, and will be different for each app.
For example, the location could be something like the following folder:
/storage/emulated/0/Android/data/<PackageName>/files/Diagnostics/UploadCache.
You can navigate to the files by using the file system viewer that comes with the Android operating system.
These files are text files, which can be viewed with most text editors.
The copy of the log files that are sent to Microsoft will be deleted after a day. The copy can be up to a few megabytes in size, depending on the length of the sessions that you use the apps for.
What data is sent to Microsoft?
These log files don’t include a user’s name or email address, the content of the user’s files, or information about apps unrelated to Office.
The diagnostic log files are structured like a table, with the following column headers for each row.
|
Field |
Description |
Example |
|---|---|---|
|
Timestamp |
The date and time of the particular event being logged. |
02/12/2020 20:05:02.17 |
|
Process |
The name of the app where the event occurred, accompanied by a numerical ID that clarifies which instance of the app the event is from (if there are multiple instances of the app running). |
WINWORD (0x9D40) |
|
TID |
Thread ID. An ID number that identifies the specific thread in the app which correlates to this event in the process. |
0xa94 |
|
Area |
The long name of the app this event occurred in. |
Microsoft Word |
|
Category |
The internal component, within the application, that is associated with this event. |
Telemetry Event |
|
EventID |
A unique ID that identifies a single event in the log. |
b7vzq |
|
Level |
Indicates how significant this specific event is likely to be in the error report. |
Medium |
|
Message |
The actual event message. |
SendEvent {«EventName»: «Office.FileSystem.File.CreateFileError», «Flags»: 28147506277843457, «InternalSequenceNumber»: 46, «Time»: «2020-02-12T20:05:02Z», «Data.Error»: 32} |
|
Correlation |
A unique identifier used to correlate events within the logs. This field may be blank. |
BCCE51EC-E7D7-4544-AD99-7216790952B6 |
Sending the log files when you send feedback to Microsoft
For devices running Windows
For Version 2103 and earlier of Office on devices running Windows, you also have the choice to include these diagnostic log files when you send feedback from an Office application. If you choose File > Feedback > I don’t like something option, you can include these log files by selecting the Attach my logs to help troubleshoot check box.
In some cases, you won’t see this check box. For example, if you’ve chosen to turn off connected experiences. Or, if you’re an admin for an organization, you’ve chosen to not send required or optional diagnostic data to Microsoft.
For Version 2104 and later of Office on devices running Windows, these log files will be included automatically with your feedback when you choose the I don’t like something option. You won’t see the Attach my logs to help troubleshoot check box, but you will see a message informing you that these log files will be sent to Microsoft. These log files are only sent if you, or your admin, has chosen to send optional diagnostic data to Microsoft. If you’re not sending optional diagnostic data to Microsoft, or if you’ve chosen to turn off connected experiences, these log files won’t be sent.
For devices running Android
For Version 16.0.14026.20298 and earlier of Office on devices running Android, you also have the choice to include these diagnostic log files when you send feedback from Word, Excel, or PowerPoint. If you choose Settings > Send feedback to Microsoft > I don’t like something option, you can include these log files by selecting the Attach diagnostic logs check box.
In some cases, you won’t see this check box. For example, if you’ve chosen to turn off connected experiences. Or, if you’re an admin for an organization, you’ve chosen to not send required or optional diagnostic data to Microsoft.
For Version 16.0.14131.20180 and later of Office on devices running Android, these log files will be included automatically with your feedback when you choose the I don’t like something option in Word, Excel, or PowerPoint. You won’t see the Attach diagnostic logs check box, but you will see a message informing you that these log files will be sent to Microsoft. These log files are only sent if you, or your admin, has chosen to send optional diagnostic data to Microsoft. If you’re not sending optional diagnostic data to Microsoft, or if you’ve chosen to turn off connected experiences, these log files won’t be sent.
Sending the log files when you use the in-app support experience
For users that have the ability to open Support tickets from within Office applications (Help > Contact Support), diagnostic logs are sometimes collected and sent to Microsoft. In these cases, you will be prompted to accept submitting these files.
Note: Currently, only subscription versions of Outlook on devices running Windows will collect and send these diagnostic log files.
Need more help?
Want more options?
Explore subscription benefits, browse training courses, learn how to secure your device, and more.
Communities help you ask and answer questions, give feedback, and hear from experts with rich knowledge.
In computers, a log file is a file that records either events that occur in an operating system or other software runs, or messages between different users of a communication software. Logging is the act of keeping a log. In the simplest case, messages are written to a single log file.
Consider a scenario, the application is logging the user details into the log file who are accessing the application.
Log files are useful in different situations, especially for developers. Log files are plain text files that can store information temporary or more permanent. You don’t need much code to create a log file. In this article we will focus on creating automatic log files in a specific folder.
Question: How can I create a notepad file which contains the current date, time & User name whenever the file gets open?
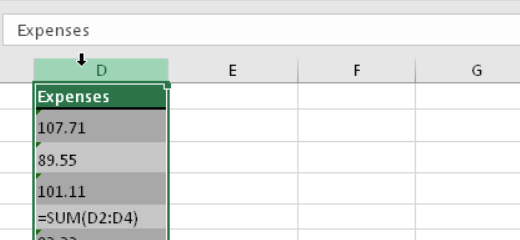
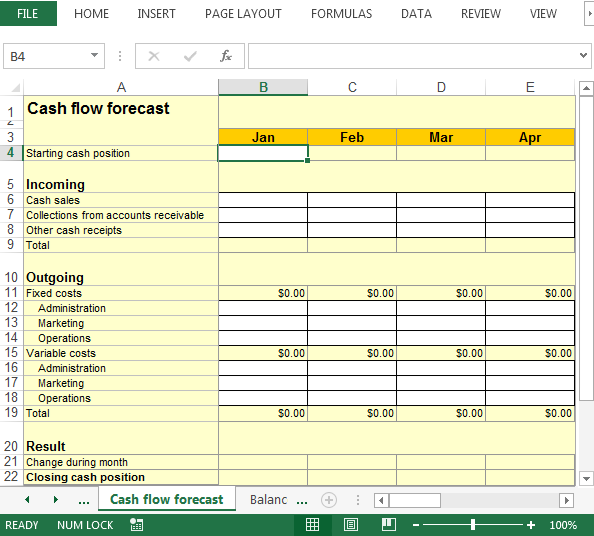
Following is the snapshot of Excel workbook containing financial information:
In this example, the result will be in the form of text file. The notepad will contain date, time & other details; somewhat like this:

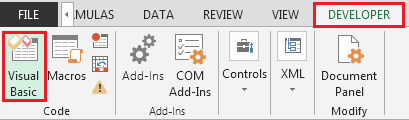
To create log files, we need to follow the below steps to launch VB editor:
- Click on Developer tab
- From Code group select Visual Basic
- Click on Insert then Module
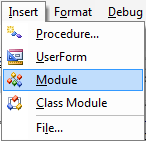
- This will create new module
- Enter the following code in the Module
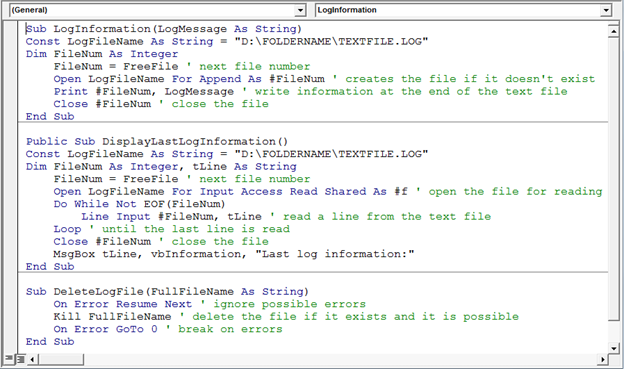
Sub LogInformation(LogMessage As String)

Const LogFileName As String = "D:FOLDERNAMETEXTFILE.LOG"

Dim FileNum As Integer

FileNum = FreeFile ' next file number

Open LogFileName For Append As #FileNum ' creates the file if it doesn't exist

Print #FileNum, LogMessage ' write information at the end of the text file

Close #FileNum ' close the file

End Sub
Public Sub DisplayLastLogInformation()

Const LogFileName As String = "D:FOLDERNAMETEXTFILE.LOG"

Dim FileNum As Integer, tLine As String

FileNum = FreeFile ' next file number

Open LogFileName For Input Access Read Shared As #f ' open the file for reading

Do While Not EOF(FileNum)

Line Input #FileNum, tLine ' read a line from the text file

Loop ' until the last line is read

Close #FileNum ' close the file

MsgBox tLine, vbInformation, "Last log information:"

End Sub
Sub DeleteLogFile(FullFileName As String)

On Error Resume Next ' ignore possible errors

Kill FullFileName ' delete the file if it exists and it is possible

On Error GoTo 0 ' break on errors

End Sub
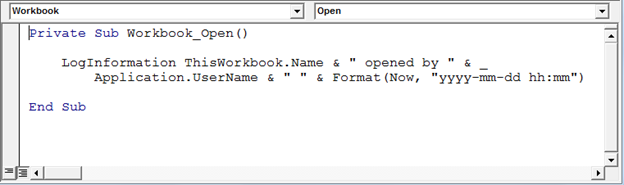
Copy the following code in the ThisWorkbook module
Private Sub Workbook_Open()

LogInformation ThisWorkbook.Name & " opened by " & _

Application.UserName & " " & Format(Now, "yyyy-mm-dd hh:mm")

End Sub
- Now the VBA code is all set to go; next time when we open the excel workbook the date & time will be saved in notepad; refer below image:
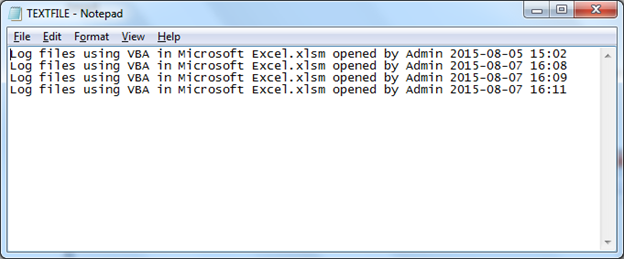
The macro will not overwrite data.
Conclusion: The macro will run every time the workbook gets open at specified path & folder.
If you liked our blogs, share it with your friends on Facebook. And also you can follow us on Twitter and Facebook.
We would love to hear from you, do let us know how we can improve, complement or innovate our work and make it better for you. Write us at info@exceltip.com
Содержание
- 1 Где посмотреть логи Excel?
- 2 Можно ли посмотреть историю изменений в Excel?
- 3 Как посмотреть историю сохранения файла Excel?
- 4 Как посмотреть логи через командную строку?
- 5 Где хранятся логи PowerShell?
- 6 Как посмотреть логи сервера Windows?
- 7 Как удалить историю изменений в Excel?
- 8 Как восстановить предыдущую версию файла Excel После сохранения?
- 9 Как принять исправления в Эксель?
- 10 Можно ли восстановить предыдущую версию файла?
- 11 Как узнать версию файла Excel?
- 12 Как узнать кто создал файл Excel?
- 13 Как посмотреть свои логи вов?
- 14 Как посмотреть логи выключения компьютера?
- 15 Как посмотреть лог подключения к интернету?
Пуск — Панель управления — Администрирование — Просмотр событий. В открывшемся окне: Журналы Windows — Приложения. Журналы приложений и служб — Microsoft Office Alert.
Можно ли посмотреть историю изменений в Excel?
Просмотр журнала изменений
- На вкладке Рецензирование нажмите кнопку Отслеживание изменений и выберите команду Выделить исправления. …
- В группе Отслеживать исправления, внесенные установите флажок по времени и в списке время выберите вариант Все.
- Снимите флажки пользователем и в диапазоне.
<-div id=»cnt_rb_259475″ class=»cnt32_rl_bg_str» data-id=»259475″>
Как посмотреть историю сохранения файла Excel?
Восстановление предыдущих версий файла Office
- Откройте файл, с которым вы работали.
- Перейдите в папку «>».
- В области «Управление книгой»или «Управлениепрезентацией» выберите файл с меткой (при закрытии без сохранения).
- На панели в верхней части файла выберите «Восстановить», чтобы переписать сохраненные ранее версии.
Как посмотреть логи через командную строку?
После нажатия комбинации “ Win+R и введите eventvwr. msc ” в любой системе Виндовс вы попадаете в просмотр событий. У вас откроется окно, где нужно развернуть Журналы Windows. В данном окне можно просмотреть все программы, которые открывались на ОС и, если была допущена ошибка, она также отобразится.
Где хранятся логи PowerShell?
log для более удобного анализа событий службы обновлений. Для этого используется командлет PowerShell — Get-WindowsUpdateLog. Данный командлет позволяет собрать информацию со всех . etl файлов (хранятся в каталоге C:WINDOWSLogsWindowsUpdate) и сформировать один файл WindowsUpdate.
Как посмотреть логи сервера Windows?
Открыть «Пуск»:
- Открыть «Панель управления»:
- В «Панели управления» выбрать «Просмотр журналов событий»
- В открывшемся окне выбрать «Просмотр событий» -> «Журналы Windows» -> «Система»
- Экспорт журнала …
- После нажатия ссылки «Сохранить все события как…» нужно выбрать путь и имя файла для сохраняемого журнала.
Как удалить историю изменений в Excel?
Чтобы удалить Журнал изменений из рабочей книги Excel, можно либо сохранить книгу, либо снять флажок Вносить изменения на отдельный лист в диалоговом окне Исправления.
Как восстановить предыдущую версию файла Excel После сохранения?
Если файл сохранен
- Откройте файл, с которым вы работали.
- Выберите Файл > Сведения .
- В разделе Управление документом выберите файл с отметкой (при закрытии без сохранения) . …
- На панели в верхней части файла выберите команду Восстановить , чтобы перезаписать сохраненные ранее версии.
Как принять исправления в Эксель?
Что необходимо для рецензирования исправлений
- Нажмите команду Исправления на вкладке Рецензирование и в выпадающем меню выберите пункт Принять/отклонить исправления.
- Если появится запрос, нажмите ОК, чтобы сохранить книгу.
Можно ли восстановить предыдущую версию файла?
1. Нажмите правой кнопкой мыши на файл или папку, предыдущую версию которого вы хотите восстановить, и в открывшемся меню выберите “Восстановить прежнюю версию”. 2. Выберите из доступных нужную версию и нажмите на “Восстановить”.
Как узнать версию файла Excel?
Какая у меня версия Office?
- Откройте любое приложение Office, например Word или Excel, и выберите Учетная запись. …
- В разделе Сведения о продукте отображается название продукта. …
- Для дополнительных сведений, например, разрядность версии, выберите Об Excel.
Как узнать кто создал файл Excel?
Откройте в Проводнике Windows папку, содержащую файлы Excel. Выберите нужный файл. Кликните по нему правой кнопкой мыши и в контекстном меню нажмите Свойства (Properties). На вкладке Подробно (Details) можно найти заголовок, тему, автора документа, комментарии и другие данные.
Как посмотреть свои логи вов?
Просмотр логов
Для просмотра загруженных вами логов просто перейдите на страницу вашей гильдии и кликните на нужный файл из календаря. Перед вами появится страница, похожая на представленную ниже в картинке.
Как посмотреть логи выключения компьютера?
Зайти в панель управления, либо из кнопки Пуск, либо в Мой компьютер, затем в разделе «Система и безопасность», выбрать раздел «Просмотр журнала событий». И вот тут по правую сторону приложения ищем строчку с Источником «Kernel General», именно она отвечает за запуск и выключения компьютера.
Как посмотреть лог подключения к интернету?
Для того, чтобы просмотреть логи, перейдите в окно “Дополнительные параметры”, выберите опцию “Наблюдение” в левом списке, а затем в секции “Параметры ведения журнала” кликните ссылку “Имя файла”. Дата и время подключения. Что произошло с подключением.