After creating a fillable form in Microsoft Word, you may want to lock it down to prevent users from accidentally editing content outside the fillable areas. Microsoft Word provides a function called Restrict Editing that lets you either lock down the form in its entirety or allow users to access only the fillable areas within the form.
Lock Down Form
-
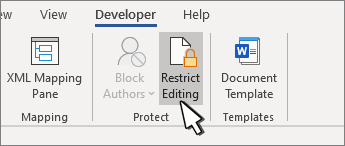
Open the form that you need to lock down, and press “Ctrl-A” to select all content within the form. Click the “Developer” tab, and then click “Restrict Editing” on the Protect group; if you cannot see the “Developer” tab, click “File | Options | Customize Ribbon | Developer | OK.”
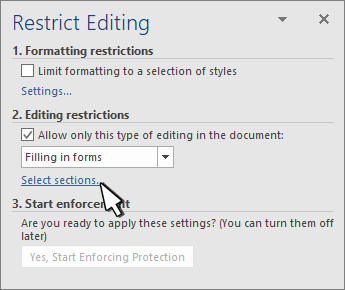
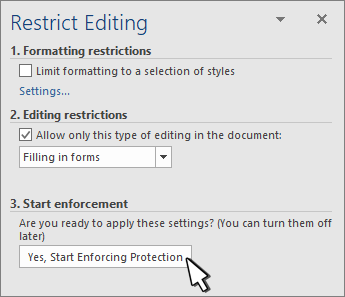
On the Restrict Editing pane that shows up, check «Allow Only This Type of Editing,» then click the pull-down menu under Editing Restrictions. Select “Filling in Forms” to prevent users from editing the content outside the fillable areas, or select “No changes (Read Only)” to lock down the entire form, including the ability to fill in anything. Click “Yes, Start Enforcing Protection,” then enter a password into both the «New Password» and «Reenter Password» boxes. Click «OK.»
Disclaimer
-
Information in this article applies to Microsoft Word 2013. It may vary slightly or significantly with other versions.
To create a form in Word that others can fill out, start with a template or document and add content controls. Content controls include things like check boxes, text boxes, date pickers, and drop-down lists. If you’re familiar with databases, these content controls can even be linked to data.
Show the Developer tab
If the developer tab isn’t displayed in the ribbon, see Show the Developer tab.
Open a template or a blank document on which to base the form
To save time, start with a form template or start from scratch with a blank template.
-
Go to File > New.
-
In Search online templates, type Forms or the type of form you want and press ENTER.
-
Choose a form template, and then select Create or Download.
-
Go to File > New.
-
Select Blank document.
Add content to the form
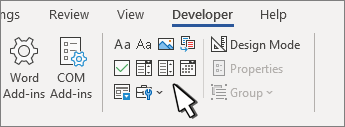
Go to Developer, and then choose the controls that you want to add to the document or form. To remove a content control, select the control and press Delete. You can set properties on controls once inserted.
Note: You can print a form that was created using content controls, but the boxes around the content controls will not print.
In a rich text content control, users can format text as bold or italic, and they can type multiple paragraphs. If you want to limit what users add, insert the plain text content control.
-
Click or tap where you want to insert the control.
-
Select Developer > Rich Text Content Control
or Plain Text Content Control
.
To set specific properties on the control, see Set or change properties for content controls.
A picture control is often used for templates, but you can also add a picture control to a form.
-
Click or tap where you want to insert the control.
-
Select Developer > Picture Content Control
.
To set specific properties on the control, see Set or change properties for content controls.
Use building block controls when you want people to choose a specific block of text. For example, building block controls are helpful when you need to add different boilerplate text depending on the contract’s specific requirements. You can create rich text content controls for each version of the boilerplate text, and then you can use a building block control as the container for the rich text content controls.
-
Click or tap where you want to insert the control.
-
Go to DeveloperBuilding Block Gallery Content Control
(or Building Block Content Control).
-
Select Developer and content controls for the building block.
-
Click or tap where you want to insert the control.
To set specific properties on the control, see Set or change properties for content controls.
In a combo box, users can select from a list of choices that you provide or they can type in their own information. In a drop-down list, users can only select from the list of choices.
-
Go to Developer > Combo Box Content Control
or Drop-Down List Content Control
.
-
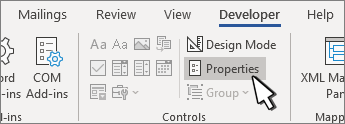
Select the content control, and then select Properties.
-
To create a list of choices, select Add under Drop-Down List Properties.
-
Type a choice in Display Name, such as Yes, No, or Maybe.
Repeat this step until all of the choices are in the drop-down list.
-
Fill in any other properties that you want.
Note: If you select the Contents cannot be edited check box, users won’t be able to click a choice.
-
Click or tap where you want to insert the date picker control.
-
Select Developer > Date Picker Content Control
.
To set specific properties on the control, see Set or change properties for content controls.
-
Click or tap where you want to insert the check box control.
-
Select Developer > Check Box Content Control
.
To set specific properties on the control, see Set or change properties for content controls.
Legacy form controls are for compatibility with older versions of Word and consist of legacy form and Active X controls.
-
Click or tap where you want to insert a legacy control.
-
Go to Developer > Legacy Forms
drop-down.
-
Select the Legacy Form control or Active X Control that you want to include.
Set or change properties for content controls
Each content control has properties that you can set or change. For example, the Date Picker control offers options for the format you want to use to display the date.
-
Select the content control that you want to change.
-
Go to Developer > Properties.
-
Change the properties that you want.
Add protection to a form
If you want to limit how much others can edit or format a form, use the Restrict Editing command:
-
Open the form that you want to lock or protect.
-
Select Developer > Restrict Editing.
-
After selecting restrictions, select Yes, Start Enforcing Protection.
Advanced Tip:
If you want to protect only parts of the document, separate the document into sections and only protect the sections you want.
To do this, choose Select Sections in the Restrict Editing panel. For more info on sections, see Insert a section break.
Show the Developer tab
If the developer tab isn’t displayed in the ribbon, see Show the Developer tab.
Open a template or use a blank document
To create a form in Word that others can fill out, start with a template or document and add content controls. Content controls include things like check boxes, text boxes, and drop-down lists. If you’re familiar with databases, these content controls can even be linked to data.
-
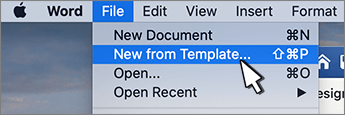
Go to File > New from Template.
-
In Search, type form.
-
Double-click the template you want to use.
-
Select File > Save As, and pick a location to save the form.
-
In Save As, type a file name and then select Save.
-
Go to File > New Document.
-
Go to File > Save As.
-
In Save As, type a file name and then select Save.
Add content to the form
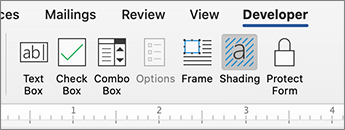
Go to Developer, and then choose the controls that you want to add to the document or form. To remove a content control, select the control and press Delete. You can set Options on controls once inserted. From Options, you can add entry and exit macros to run when users interact with the controls, as well as list items for combo boxes, .
-
In the document, click or tap where you want to add a content control.
-
On Developer, select Text Box, Check Box, or Combo Box.
-
To set specific properties for the control, select Options, and set .
-
Repeat steps 1 through 3 for each control that you want to add.
Options let you set common settings, as well as control specific settings. Select a control and then select Options to set up or make changes.
-
Set common properties.
-
Select Macro to Run on lets you choose a recorded or custom macro to run on Entry or Exit from the field.
-
Bookmark Set a unique name or bookmark for each control.
-
Calculate on exit This forces Word to run or refresh any calculations, such as total price when the user exits the field.
-
Add Help Text Give hints or instructions for each field.
-
OK Saves settings and exits the panel.
-
Cancel Forgets changes and exits the panel.
-
-
Set specific properties for a Text box
-
Type Select form Regular text, Number, Date, Current Date, Current Time, or Calculation.
-
Default text sets optional instructional text that’s displayed in the text box before the user types in the field. Set Text box enabled to allow the user to enter text into the field.
-
Maximum length sets the length of text that a user can enter. The default is Unlimited.
-
Text format can set whether text automatically formats to Uppercase, Lowercase, First capital, or Title case.
-
Text box enabled Lets the user enter text into a field. If there is default text, user text replaces it.
-
-
Set specific properties for a Check box.
-
Default Value Choose between Not checked or checked as default.
-
Checkbox size Set a size Exactly or Auto to change size as needed.
-
Check box enabled Lets the user check or clear the text box.
-
-
Set specific properties for a Combo box
-
Drop-down item Type in strings for the list box items. Press + or Enter to add an item to the list.
-
Items in drop-down list Shows your current list. Select an item and use the up or down arrows to change the order, Press — to remove a selected item.
-
Drop-down enabled Lets the user open the combo box and make selections.
-
-
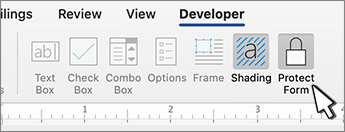
Go to Developer > Protect Form.
Note: To unprotect the form and continue editing, select Protect Form again.
-
Save and close the form.
If you want, you can test the form before you distribute it.
-
Protect the form.
-
Reopen the form, fill it out as the user would, and then save a copy.
Show the Developer tab
-
On the right side of the ribbon, select
, and then select Ribbon Preferences.
-
Under Customize, select Developer .
Open a template or a document on which to base the form
You can start with a blank document and create your own form. Or, to save time, you can start with a form template.
-
Go to File > New from Template.
-
In the left pane, expand Online Templates, and then select Forms.
-
Double-click the form template that you want to use.
Add content controls to the form
-
In the document, click where you want to add the control.
-
On the Developer tab, under Form Controls, select Text Box, Check Box, or Combo Box.
-
To set specific properties for the control, select Options, and then configure the properties that you want.
Note: To create a list of drop-down items in a combo box, select the combo box placeholder, click Options, and then add the items that you want to appear in the drop-down list.
-
Repeat steps 1 through 3 for each control that you want to add.
Add instructional text (optional)
Instructional text (for example, «Type First Name») in a text box can make your form easier to use. By default, no text appears in a text box, but you can add it.
-
Select the text box control that you want to add instructional text to.
-
On the Developer tab, under Form Controls, select Options.
-
In Default Text, type the instructional text.
-
Make sure that Fill-in enabled is selected, and then select OK.
Protect the form
-
On the Developer tab, under Form Controls, select Protect Form.
Note: To unprotect the form and continue editing, click Protect Form again.
-
Save and close the form.
Test the form (optional)
If you want, you can test the form before you distribute it.
-
Protect the form.
-
Reopen the form, fill it out as the user would, and then save a copy.
Creating fillable forms isn’t available in Word for the web.
You can create the form with the desktop version of Word with the instructions in Create a fillable form.
When you save the document and reopen it in Word for the web, you’ll see the changes you made.
Open a Word document that has text boxes. Click the “Review” tab, then click the “Restrict Editing” button in the Protect group. Word displays a pane allowing you to manage editing permissions for specific parts of the document, including text boxes.
Contents
- 1 How do I lock text in Word?
- 2 How do I lock text?
- 3 How do I restrict editing in Word 2016?
- 4 How do I lock a text box so it doesn’t move in Word?
- 5 Can you password protect text messages?
- 6 Can you lock fields in Word?
- 7 How do I protect a form in Word?
- 8 How do I lock text boxes in Word?
- 9 How do you anchor a text box in Word?
- 10 What is lock anchor in Word?
- 11 Can you hide text messages?
- 12 How do I send a private text message?
- 13 Is there a way to hide a text thread?
- 14 How do I lock a form in Microsoft Word?
- 15 How do you lock fields?
- 16 Can you lock a Microsoft form?
- 17 What does the anchor symbolize?
- 18 How do I find an anchored object in Word?
- 19 What are anchor text links?
On the Review tab, in the Protect group, click Protect Document, and then click Restrict Formatting and Editing. In the Editing restrictions area, select the Allow only this type of editing in the document check box. In the list of editing restrictions, click No changes (Read only).
How do I lock text?
There are a few ways to learn how to lock text messages on Android.
Signal Private Messenger: Chat Lock & Disappearing Messages
- Tap on your profile in the Signal app.
- Go to Privacy.
- Under Privacy, you should be able to enable or disable screen lock.
How do I restrict editing in Word 2016?
Start protection
- Open a document in Word 2016.
- Switch to the Review tab on the ribbon.
- Click Restrict Editing in the Protect section of the ribbon.
- In the Restrict Editing panel on the right, check Allow only this type of editing in the document under 2.
- No changes (Read only) is the default restriction type.
How do I lock a text box so it doesn’t move in Word?
Prevent text boxes from moving (Word 2010)
- The Text Box Tools Tab — Position Drop-Down.
- The Layout Dialog: The Position Tab.
- The Layout Dialog: The Text Wrapping Tab.
- The Wrap Text Drop-Down.
Can you password protect text messages?
Neither Android or iOS have a built-in way to password protect message apps, so if this is the route you want to go down then it will require third-party software. Sadly, iOS doesn’t allow third-party app lockers, so only Android users have this option.
Can you lock fields in Word?
To Lock Fields
On the toolbar ribbon, on the Review tab, under Protect, click Protect Document, and then click Restrict Formatting and Editing.
How do I protect a form in Word?
Protect the form
- Go to Developer > Protect Form. Note: To unprotect the form and continue editing, select Protect Form again.
- Save and close the form.
How do I lock text boxes in Word?
Click on the “Select sections” option and then select the section of your document where your text box is located. Click on the “OK” option and then click on the “Yes, Start Enforcing Protection” button.
How do you anchor a text box in Word?
Follow these steps to anchor an object in Word:
- Select an object.
- On the Ribbon’s Format tab, go to the Arrange group and choose Position→More Layout Options.
- Click the Position tab.
- (Optional) Set the position of an object precisely using controls in this dialog.
- Under Options, select the Lock Anchor check box.
What is lock anchor in Word?
When you turn on “Lock Anchor,” you can then move your image to any position on the same page as the anchor paragraph, and the object will stay in that position. However, if you move the anchor paragraph to another page, the object will also move to that page, but stay in the same relative position on the page.
Can you hide text messages?
If you want to hide your texts from the home screen, here’s what to do: Open the Messaging app on your phone. Then, tap on the three dot icon in the upper right-hand corner to access the Settings menu.Doing this will disable all pop-up messages so that no one can see them.
How do I send a private text message?
Send anonymous texts by email
- AT&T. SMS (a text-only message): [email protected]
- Metro PCS. SMS/MMS: [email protected]
- Sprint. MMS: [email protected]
- T-Mobile. SMS/MMS: [email protected]
- Verizon Wireless. MMS: [email protected]
Is there a way to hide a text thread?
The most simple way to hide text messages on your Android phone is by securing it with a password, fingerprint, PIN or lock pattern. If someone can’t get past the lock screen they can’t access your text messages.
How do I lock a form in Microsoft Word?
Lock/Unlock a form
- Step 1: Show the Developer tab on the ribbon. Right click on any of the ribbon commands. For example, right click on Home and then click Customize the Ribbon. Open Customize the Ribbon dialog.
- Step 2: Lock or unlock the form. On the Developer tab, click Restrict Editing command. Where is it?
How do you lock fields?
To lock a field, perform these steps:
- Select the field you want to lock.
- Update the field, if desired, by pressing Shift+F9.
- Press Ctrl+F11.
Can you lock a Microsoft form?
Microsoft Word provides a function called Restrict Editing that lets you either lock down the form in its entirety or allow users to access only the fillable areas within the form.
What does the anchor symbolize?
In ancient times, the anchor was viewed as a symbol that represented safety; because of this, Christians adopted the anchor as a symbol of hope.The anchor was chosen as it holds a ship in place, representing strength and security.
How do I find an anchored object in Word?
Figure 1.
- Display the Word Options dialog box. (In Word 2007 click the Office button and then click Word Options.
- Click Display at the left side of the dialog box. (See Figure 2.)
- To view object anchors, make sure the Object Anchors check box is selected.
- Click on OK.
What are anchor text links?
Anchor text is the clickable text in a hyperlink.The words contained in the anchor text help determine the ranking that the page will receive by search engines such as Google or Yahoo and Bing. Links without anchor text commonly happen on the web and are called naked URLs, or URL anchor texts.
Creating forms with Microsoft Word is useful and easy, but the challenge comes in when you decide to create fillable forms with options that you can send to colleagues or clients and have them fill out the form digitally. Whether you need a form for gathering information or if you are trying to create a survey to test out user response to software or a new product, Microsoft Word can assist in this process. It’s a slightly more technical job and requires access to the Developer tab in Microsoft Word, but is more than easily achievable with not too much hassle!
First off, you will require the Developer Tab of Microsoft Word to be enabled.
- For Word 2007 go to File > Word Options > Popular > select ‘Show Developer Tab in Ribbon’.
If you have a later edition of Word 2010 and onwards then go to File > Options > Customize Ribbon. In the right side of the Options dialog box, select Main Tabs and turn on Developer tab.
- The Developer tab should now be visible on your word document and we can get started on this tutorial.
- You will now have to make a decision to either use an existing Microsoft Word form template or to make a new one. Using an existing template is a great time saving option if you can find a template that satisfies your needs. To look through the templates go File>New>Forms, you can then have a browse to see if any might work for you.
- This tutorial will show you how to create a new form from scratch rather than using an existing one. To start this process go to File > New > My Templates.
- Select ‘Template’ in the bottom right hand corner and press ‘OK’.
- Now we have a blank template, we are ready to start adding information to the form. To highlight a range of responses available on forms we will create a simple form with the following responses:
- Name (Plain Text Response)
- Age (Drop-Down List)
- D.O.B. (Date Response)
- Sex (Check Box)
- Click on the “Developer” tab which you added earlier and under the “Controls” section; choose “Design Mode” to begin creating different control options. If you want to see what it looks like in action, remember to deselect the “Design Mode” option.
- For any answers that require a text based answer, you can add text sections. You will do this by selecting the Rich Text Content Control
(allows users to edit formatting) or the Plain Text Content Control
(only allows plain text without formatting) option. So for question one we will enable a plain text response. Write the question and then at the end of the question select the plain text response in the tool bar.
- It should look something like this:
10: For the ‘Age’ question we will add a drop down list.
For questions that only allow one answer such as numbers (question 2), a drop-down list is handy. We will add simple list and populate it with age ranges. You will need to add the content control box, right-click on it, and select the “Properties” option.
12: Give the drop down list a title e.g. What is your age. Next, click on ‘add’ to add age ranges.
13: When you have finished adding in the age ranges click OK.
14: Finally on this form we are going to add in a check box for the person’s gender. We write our options and then include check boxes after each option.
15: Now that your form is complete you will want to add in some permissions before sending it out so that only certain parts of the form are editable. To do this on the Review tab, in the Protect group, click Restrict Editing.
16: In the Editing restrictions area, select the Allow only this type of editing in the document check box.
17: In the list of editing restrictions, click No changes (Read only). Select the part of the document where you want to allow changes. For example, choose the boxes, tick boxes, and dropdown menu’s that you have created previously in this walkthrough. In the exceptions box choose tick the box everyone so that anyone can fill this form in.
Alternatively, if you have created form fields for everything that needs editing, select Filling in Forms in the editing restrictions section.
Well done! You have now created an editable form and learnt how to lock it so that only certain parts of the form are editable by others. The form that we created is not the most attractive to the eye and it is advised that you either use an existing template, or create a new template that can be used on multiple occasions if you are likely to be creating these regularly.
Word provides tools and features that allow you to create custom documents. One type of document you can design is a fillable form, which lets you add content controls — such as text controls, which are text boxes in which other users can enter text. After you create a form, you can lock it so that anyone who works with the document cannot change or delete the text boxes or other controls, although they can still type into them.
Step 1
Display the Developer tab of the ribbon if it is not already visible. Select the «File» tab and click «Options.» Select «Customize Ribbon.» Select the «Developer» check box in the Main Tabs list under Customize the Ribbon and click «OK.»
Step 2
Add a text control. Place the cursor where you want the text box to appear. Select the «Developer» tab and click «Design Mode» in the Controls group. Click «Rich Text Content Control» to allow users to format the text or type an entire paragraph or select «Plain Text Content Control» to limit the text they can add.
Step 3
Set the text box properties. Click on the control to select it. Click the «Developer» tab and click on «Properties» in the Controls group to open the Content Control Properties dialog. Choose the options you want to apply and click «OK.»
Step 4
Lock the form. Press «Ctrl-A» to select the entire document or click «Select» in the Editing group of the Home tab and click «Select All.» Click on the «Developer» tab and click «Restrict Editing» in the «Protect» group.
Step 5
Select «Allow Only This Type of Editing in the Document» in the Editing Restrictions section and choose «Filling in Forms» in the drop-down list. Click the «Yes, Start Enforcing Protection» button and save the document.
References
Writer Bio
Tricia Goss’ credits include Fitness Plus, Good News Tucson and Layover Magazine. She is certified in Microsoft application and served as the newsletter editor for OfficeUsers.org. She has also contributed to The Dollar Stretcher, Life Tips and Childcare Magazine.
Image Credit
Jupiterimages/Photos.com/Getty Images

 or Plain Text Content Control
  .
. .
. (or Building Block Content Control).
 or Drop-Down List Content Control
  .
. .
. .
. drop-down.

 , and then select Ribbon Preferences.


