
Suppose that your boss wants you to protect an entire workbook, but also wants to be able to change a few cells after you enable protection on the workbook. Before you enabled password protection, you had unlocked some cells in the workbook. Now that your boss is done with the workbook, you can lock these cells.
Follow these steps to lock cells in a worksheet:
-
Select the cells you want to lock.
-
On the Home tab, in the Alignment group, click the small arrow to open the Format Cells popup window.
-
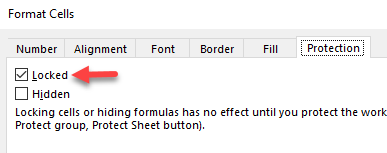
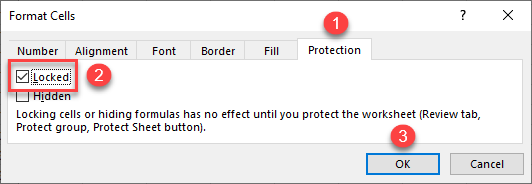
On the Protection tab, select the Locked check box, and then click OK to close the popup.
Note: If you try these steps on a workbook or worksheet you haven’t protected, you’ll see the cells are already locked. This means that the cells are ready to be locked when you protect the workbook or worksheet.
-
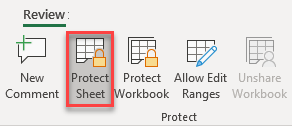
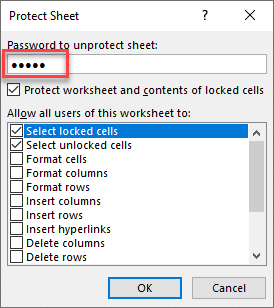
On the Review tab in the ribbon, in the Changes group, select either Protect Sheet or Protect Workbook, and then reapply protection. See Protect a worksheet or Protect a workbook.
Tip: It’s a best practice to unlock any cells that you may want to change before you protect a worksheet or a workbook, but you can also unlock them after you apply protection. To remove protection, simply remove the password.
In addition to protecting workbooks and worksheets, you can also protect formulas.
Excel for the web can’t lock cells or specific areas of a worksheet.
If you want to lock cells or protect specific areas, click Open in Excel and lock cells to protect them or lock or unlock specific areas of a protected worksheet.
Lock All Cells | Lock Specific Cells | Lock Formula Cells
You can lock cells in Excel if you want to protect cells from being edited.
Lock All Cells
By default, all cells are locked. However, locking cells has no effect until you protect the worksheet.
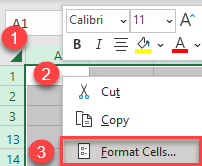
1. Select all cells.

2. Right click, and then click Format Cells (or press CTRL + 1).
3. On the Protection tab, you can verify that all cells are locked by default.

4. Click OK or Cancel.
5. Protect the sheet.
All cells are locked now. To unprotect a worksheet, right click on the worksheet tab and click Unprotect Sheet. The password for the downloadable Excel file is «easy».
Lock Specific Cells
To lock specific cells in Excel, first unlock all cells. Next, lock specific cells. Finally, protect the sheet.
1. Select all cells.
2. Right click, and then click Format Cells (or press CTRL + 1).
3. On the Protection tab, uncheck the Locked check box and click OK.

4. For example, select cell A1 and cell A2.

5. Right click, and then click Format Cells (or press CTRL + 1).
6. On the Protection tab, check the Locked check box and click OK.

Again, locking cells has no effect until you protect the worksheet.
7. Protect the sheet.
Cell A1 and cell A2 are locked now. To edit these cells, you have to unprotect the sheet. The password for the downloadable Excel file is «easy». You can still edit all other cells.
Lock Formula Cells
To lock all cells that contain formulas, first unlock all cells. Next, lock all formula cells. Finally, protect the sheet.
1. Select all cells.
2. Right click, and then click Format Cells (or press CTRL + 1).
3. On the Protection tab, uncheck the Locked check box and click OK.
4. On the Home tab, in the Editing group, click Find & Select.

5. Click Go To Special.

6. Select Formulas and click OK.

Excel selects all formula cells.

7. Press CTRL + 1.
8. On the Protection tab, check the Locked check box and click OK.

Note: if you also check the Hidden check box, users cannot see the formula in the formula bar when they select cell A2, B2, C2 or D2.
Again, locking cells has no effect until you protect the worksheet.
9. Protect the sheet.
All formula cells are locked now. To edit these cells, you have to unprotect the sheet. The password for the downloadable Excel file is «easy». You can still edit all other cells.
![]()
Download Article
![]()
Download Article
Locking cells in an Excel spreadsheet can prevent any changes from being made to the data or formulas that reside in those particular cells. Cells that are locked and protected can be unlocked at any time by the user who initially locked the cells. Follow the steps below to learn how to lock and protect cells in Microsoft Excel versions 2010, 2007, and 2003.
To learn how to unlock the cells, read the article How to Open a Password Protected Excel File.
Things You Should Know
- In all versions of Excel, highlight and right click your cells. Then, select «Format Cells» > «Protection.» Check «Locked» and save.
- In Excel 2007 and 2010, go to «Review» > «Changes/Protect Sheet» > «Protect worksheet and contents of locked cells.» Type a password click through the prompts to save.
- In Excel 2003, go to «Tools» > «Protection» > «Protect Sheet.» Check «Protect worksheet and contents of locked cells.» Enter a password and follow the prompts to save.
-

1
Open the Excel spreadsheet that contains the cells you want locked.
-
2
Select the cell or cells you want locked.
Advertisement
-
3
Right-click on the cells, and select «Format Cells.»
-
4
Click on the tab labeled «Protection.»
-
5
Place a checkmark in the box next to the option labeled «Locked.»
-
6
Click «OK.»
-
7
Click on the tab labeled «Review» at the top of your Excel spreadsheet.
-
8
Click on the button labeled «Protect Sheet» from within the «Changes» group.
-
9
Place a checkmark next to «Protect worksheet and contents of locked cells.»
-
10
Enter a password in the text box labeled «Password to unprotect sheet.»
-
11
Click on «OK.»
-
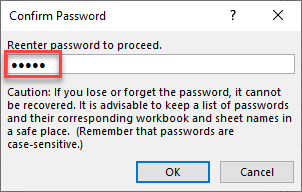
12
Retype your password into the text box labeled «Reenter password to proceed.»
-
13
Click «OK.» The cells you selected will now be locked and protected, and can only be unlocked by selecting the cells once again, and entering the password you selected.


Advertisement
-
1
Open the Excel document that contains the cell or cells you want to lock.
-
2
Select one or all of the cells you want locked.
-
3
Right-click on your cell selections, and select «Format Cells» from the drop-down menu.
-
4
Click on the «Protection» tab.
-
5
Place a checkmark next to the field labeled «Locked.»
-
6
Click the «OK» button.
-
7
Click on the «Tools» menu at the top of your Excel document.
-
8
Select «Protection» from the list of options.
-
9
Click on «Protect Sheet.»
-
10
Place a checkmark next to the option labeled «Protect worksheet and contents of locked cells.»
-
11
Type a password at the prompt for «Password to unprotect sheet,» then click «OK.»
-
12
Reenter your password at the prompt for «Reenter password to proceed.»
-
13
Select «OK.» All the cells you selected will now be locked and protected, and can only be unlocked going forward by selecting the locked cells, and entering the password you initially set up.


Advertisement
Add New Question
-
Question
How do I lock cells in Excel without the whole document becoming read only?

I suppose you want to lock certain cells instead of the whole sheets. To do that, choose the whole sheet, right click and then select «Format Cells», then «Protection», then uncheck the «Locked» option and click okay. Then select the cells you want to lock, right click and select «Format Cells», then Protection; this time, check the «Locked» option and click okay. Now go back to the main tab, select «Review», then click on «Protect Sheet», and do whatever you want to do with it. Now only the cells you «locked» are protected from editing instead of the whole sheet.
-
Question
How can I protract the single cell while using Excel?
You cannot protract a single cell in Excel. You can, however, make it appear longer than the rest of the cells around it by «merging» two or more cells together. Highlight the cells you desire and right click. A menu will pop up allowing you to merge them.
-
Question
How do I allow changes to some cells of a protected sheet?
Select the whole worksheet by clicking the Select All button. On the Home tab, in the Font group, click the Format Cell Font dialog box launcher. On the Protection tab, clear the Locked box and then click OK.
Ask a Question
200 characters left
Include your email address to get a message when this question is answered.
Submit
Advertisement
Video
-
If multiple users have access to your Excel document, lock all cells that contain important data or complex formulas to prevent the cells from being accidentally changed.
-
If the majority of cells in your Excel document contain valuable data or complex formulas, consider locking or protecting the entire document, then unlock the few cells that are allowed to be modified.
Thanks for submitting a tip for review!
Advertisement
About This Article
Article SummaryX
1. Select the cells.
2. Right-click the cells and select Format Cells.
3. Click Protection.
4. Check the ″Locked″ box and click OK.
5. Click Review.
6. Click Protect Sheet.
7. Check ″Protect worksheet and contents of locked cells.″
8. Enter a password and click OK.
Did this summary help you?
Thanks to all authors for creating a page that has been read 235,187 times.
Is this article up to date?
Содержание
- Lock cells to protect them
- Need more help?
- Lock Cells
- Lock All Cells
- Lock Specific Cells
- Lock Formula Cells
- Simple Ways to Lock Cells in Excel Workbook
- Part 1. How to Lock All Cells in Excel?
- Part 2. How to Lock Specific Cells in Excel?
- Option 1. Lock and Protect Cells in Excel 2010, 2013 and 2016
- Option 2. Lock and Protect Cells in Excel 2003
- Extra Tips: How to Unlock Password for Microsoft Excel 97 — 2016
- How to Lock Cells in Excel & Google Sheets
- Lock All Cells
- Lock Specific Cells
- Lock Cells in Google Sheets
Lock cells to protect them
Suppose that your boss wants you to protect an entire workbook, but also wants to be able to change a few cells after you enable protection on the workbook. Before you enabled password protection, you had unlocked some cells in the workbook. Now that your boss is done with the workbook, you can lock these cells.
Follow these steps to lock cells in a worksheet:
Select the cells you want to lock.
On the Home tab, in the Alignment group, click the small arrow to open the Format Cells popup window.
On the Protection tab, select the Locked check box, and then click OK to close the popup.
Note: If you try these steps on a workbook or worksheet you haven’t protected, you’ll see the cells are already locked. This means that the cells are ready to be locked when you protect the workbook or worksheet.
On the Review tab in the ribbon, in the Changes group, select either Protect Sheet or Protect Workbook, and then reapply protection. See Protect a worksheet or Protect a workbook.
Tip: It’s a best practice to unlock any cells that you may want to change before you protect a worksheet or a workbook, but you can also unlock them after you apply protection. To remove protection, simply remove the password.
In addition to protecting workbooks and worksheets, you can also protect formulas.
Excel for the web can’t lock cells or specific areas of a worksheet.
If you want to lock cells or protect specific areas, click Open in Excel and lock cells to protect them or lock or unlock specific areas of a protected worksheet.
Need more help?
You can always ask an expert in the Excel Tech Community or get support in the Answers community.
Источник
Lock Cells
You can lock cells in Excel if you want to protect cells from being edited.
Lock All Cells
By default, all cells are locked. However, locking cells has no effect until you protect the worksheet.
1. Select all cells.
2. Right click, and then click Format Cells (or press CTRL + 1).
3. On the Protection tab, you can verify that all cells are locked by default.
4. Click OK or Cancel.
All cells are locked now. To unprotect a worksheet, right click on the worksheet tab and click Unprotect Sheet. The password for the downloadable Excel file is «easy».
Lock Specific Cells
To lock specific cells in Excel, first unlock all cells. Next, lock specific cells. Finally, protect the sheet.
1. Select all cells.
2. Right click, and then click Format Cells (or press CTRL + 1).
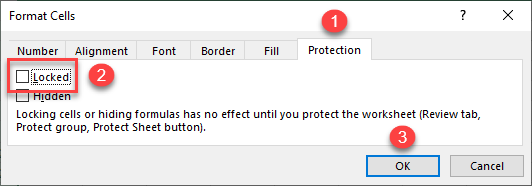
3. On the Protection tab, uncheck the Locked check box and click OK.
4. For example, select cell A1 and cell A2.
5. Right click, and then click Format Cells (or press CTRL + 1).
6. On the Protection tab, check the Locked check box and click OK.
Again, locking cells has no effect until you protect the worksheet.
Cell A1 and cell A2 are locked now. To edit these cells, you have to unprotect the sheet. The password for the downloadable Excel file is «easy». You can still edit all other cells.
Lock Formula Cells
To lock all cells that contain formulas, first unlock all cells. Next, lock all formula cells. Finally, protect the sheet.
1. Select all cells.
2. Right click, and then click Format Cells (or press CTRL + 1).
3. On the Protection tab, uncheck the Locked check box and click OK.
4. On the Home tab, in the Editing group, click Find & Select.
5. Click Go To Special.
6. Select Formulas and click OK.
Excel selects all formula cells.
7. Press CTRL + 1.
8. On the Protection tab, check the Locked check box and click OK.
Note: if you also check the Hidden check box, users cannot see the formula in the formula bar when they select cell A2, B2, C2 or D2.
Again, locking cells has no effect until you protect the worksheet.
All formula cells are locked now. To edit these cells, you have to unprotect the sheet. The password for the downloadable Excel file is «easy». You can still edit all other cells.
Источник
Simple Ways to Lock Cells in Excel Workbook
You can lock cells on your Excel worksheet to prevent other people from deliberately or accidentally changing, deleting, or moving data in a worksheet. You have put a lot of hard work in your spreadsheet and you do not want anybody to inadvertently make any changes to it. In this article, we will teach you how to lock cells in Excel exactly.
For example, you have the team status report worksheet, and you want the other team members only to add data in specific cells and not modify anything else you can lock certain cells in Excel. This worksheet protection makes only certain parts of the sheet editable, and other users will not be correct data in any other part of the sheet. This is not a security feature. It just prevents users from reorganizing locked cells in the worksheet. You can lock the cells to prevent them from being modified with all the different versions of Microsoft Excel.
Part 1. How to Lock All Cells in Excel?
By default, all cells will be locked when you protect a workbook or spreadsheet. This means that they cannot be deleted, edited, or reformatted. You can easily protect all the data and formula in a single worksheet just by applying the protect sheet option. To protect the figures and data in all the separate sheets in a workbook, the protect sheet option must be applied individually to every sheet.
Part 2. How to Lock Specific Cells in Excel?
Excel has specific tools that protect certain worksheet elements which can be applied with or without a password. Protecting your valuable data from change is a two-step process.
- Locking specific objects or cells such as graphics or charts in a worksheet.
- Applying the Protect Sheet option.
All data and worksheet elements can be changed until both the steps are complete. Locked cells can be unlocked anytime by the person who locked the cells in the first place. With the following steps, you can learn how to protect and lock cells in Excel versions 2003, 2007, 2010 and 2016.
Option 1. Lock and Protect Cells in Excel 2010, 2013 and 2016
1. Open the Excel worksheet that has the cells you want to lock.
2. Right-click on the cells that you want to lock and select ‘Format Cells.’
3. Click on the tab named ‘Protection.’
4. Tick the box next to tab labeled ‘Locked’ and click Ok.
5. At the top your Excel spreadsheet there is a tab labeled ‘Review,’ click on it next.
6. Look for the ‘Protect Sheet’ tab in the ‘Changes’ group and click on it.
7. Tick the box next to ‘Protect worksheet and contents of locked cells,’
8. Enter a password in the text box ‘Password to unprotect sheet’ and click Ok.
9. Retype your password in the text box ‘Reenter password to proceed’ and click Ok.
The cells that you selected are now protected and can only be unlocked by selecting them once more and entering your chosen password.
Option 2. Lock and Protect Cells in Excel 2003
Step 1. Open the Excel sheet that contains the cells you wish to lock.
Step 2. Right-click on the cells that you have selected and from the drop-down menu select ‘format cells.’
Step 3. Click on ‘protection’ and put a tick against ‘Locked’ and then click Ok.
Step 4. Open the ‘Tools’ menu at the top of your Excel spreadsheet and select ‘Protection.’
Step 5. Click on ‘Protect Sheet.’ Tick the box labeled ‘Protect worksheet and content of locked cells.’
Step 6. Type your password in the ‘Password to unprotect sheet’ and click Ok.
Step 7. Reenter the password and click Ok.
All selected cells are now locked and can only be unlocked by using your initial password. Ensure that you do not store any personal or sensitive information in the Excel spreadsheet. To ensure maximum security protection:
- Use modern versions of Excel with enhanced data encryption.
- Store your Excel files that have sensitive information on an encrypted hard drive.
- Protect the workbook structure to stop other users from moving, deleting, adding, or renaming your sheets.
- Use strong passwords to protect your sheets.
In the older versions of Excel anyone who had a basic knowledge of VBA could unlock the sheets easily. Although the recent versions of Excel use sophisticated methods of sheet protection they can also be easily unlocked.
If you have forgotten the password for your Microsoft Excel spreadsheet, you can still unlock it by using PassFab for Excel. This program allows you to recover forgotten or lost passwords for all xls/xlsx files created by using any Excel version from 1997 – 2016 irrespective of their complexity and length. You can download this Excel xls/xlsx password recovery for free.
Источник
How to Lock Cells in Excel & Google Sheets
This tutorial demonstrates how to lock cells in Excel and Google Sheets.
Lock All Cells
In Excel, you can lock all cells for editing. To do this, password protect a sheet.
- By default, all cells in Excel have the property Locked turned on, and you can check this (1) by selecting all cells (click the arrow in the upper left corner of the gridlines), (2) right-click anywhere in the selected area, and (3) choose Format Cells…
- In the Format Cells window, go to the Protection tab, and here you can see that Locked is checked. This means that, when you protect your sheet, all cells are locked for editing.
- Now you can protect the sheet. In the Ribbon, go to Review > Protect Sheet.
- In the Protect Sheet window, enter a password and press OK. As you can see, after you protect the worksheet, users will only be able to select cells.
- In the pop-up window, confirm the password and press OK.
Now, if you try to edit any cell in the sheet, you’ll get the message that the sheet is protected and can’t be edited.

To be able to edit cells again, unprotect the sheet.
Lock Specific Cells
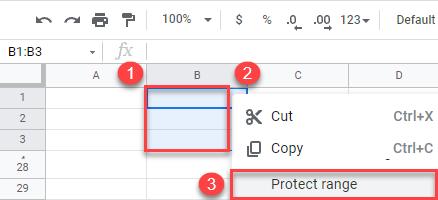
To lock only a specific range of cells (for example, B1:B3), follow these steps:
- Select all cells (by clicking on the arrow in the upper left corner of the gridlines), (2) right-click anywhere in the selected area, and (3) choose Format Cells…
- In the Format Cells window, (1) go to the Protection tab, (2) uncheck Locked, and (3) click OK.
- Now, (1) selectcells you want to lock (here, B1:B3), (2) right-click anywhere in the selected area, and (3) choose Format Cells…

- In the Format Cells window, (1) go to the Protection tab, (2) check Locked, and (3) click OK.
As a result, you can edit all cells except B1:B3 which are locked.
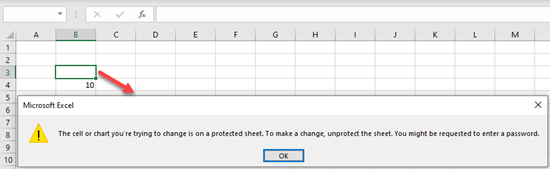
In the picture above, you can see that cell B4 is edited, but when you try to edit any cell in the range B1:B3, you get the error message.
Note that you also have the option to lock only formatting.
Lock Cells in Google Sheets
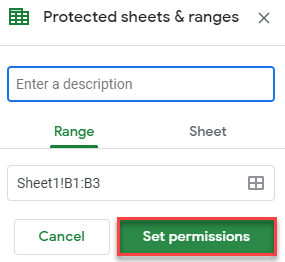
You can also lock cells for editing in Google Sheets, using protected ranges.
- Select all cells (by clicking on the arrow in the upper left corner of the gridlines), (2) right-click anywhere in the selected area, and (3) choose Protect range.
- In the window on the right side, choose Set permissions.
- Here, you can choose to only show a warning, or to specify who can edit the range (you or another specific user). Then click Done.
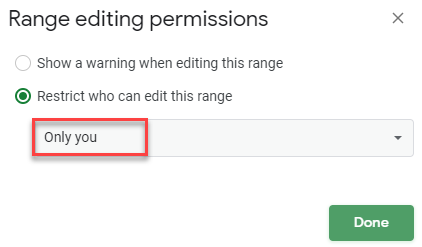
Now, only selected users can edit the range, while for all others, cells are locked for editing.
Note: To see, instead, how to lock a cell reference, see Freeze Cell in Formula or How to Anchor a Cell.
Источник
You’ve worked hard on your spreadsheet and now you want to make sure anyone you share it with doesn’t inadvertently change cells, so you need to know how to lock cells in Excel.
Thankfully, Microsoft Excel 2016 and earlier versions lets you lock cells or protect cells to keep them from being modified in Windows 10. You can lock all the cells in a worksheet or specific cells, allowing some parts of the spreadsheet to be changed. Here’s how to lock cells in Excel.
Editor’s Note: This tutorial was written for Excel 2016, but still applies to modern versions of Excel.
How to lock all the cells in an Excel worksheet
By default, when you protect cells in a sheet or workbook, all of the cells will be locked. This means they can’t be reformatted or deleted, and the content in them can’t be edited. By default, the locked cells can be selected, but you can change that in the protection options.
1. Navigate to the Review tab.
2. Click Protect Sheet. In the Protect Sheet window, enter a password that’s required to unprotect the sheet (optional) and any of the actions you want to allow users.
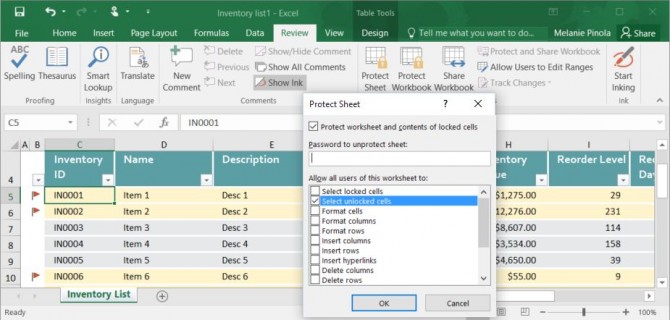
3. Click OK to protect the sheet.
When you or anyone else tries to edit any of the locked cells, this message will come up:

The cells can only be unlocked when the sheet is unprotected (by going to the Review tab again, choosing «Unprotect Sheet,» and entering the password, if required).
How to Lock Specific Cells in an Excel Worksheet
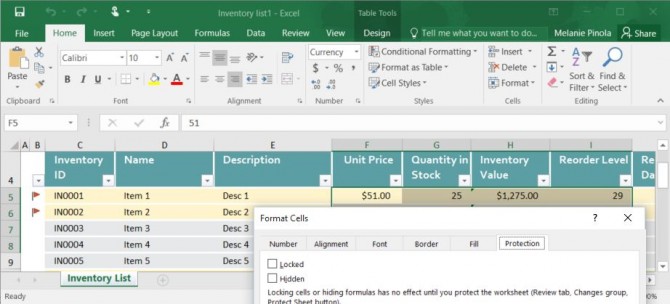
There might be times when you want to lock certain cells from being changed but still allow users to adjust other cells in a worksheet. In our example, in an inventory list you might allow unit prices and stock quantities to be updated, but not the item IDs, names, or descriptions. As mentioned above, all cells are locked by default when you protect the sheet. However, you can specify whether a certain cell should be locked or unlocked in the cell’s format properties.
1. Select all the cells you don’t want to be locked. These will be the specific cells that can be edited even after the sheet is protected.
2. Right-click on your selection, select Format Cells, and click on the Protection tab. (Alternatively, under the Home tab, click on the expansion icon next to Alignment, and in the Format Cells window go to the Protection tab.)
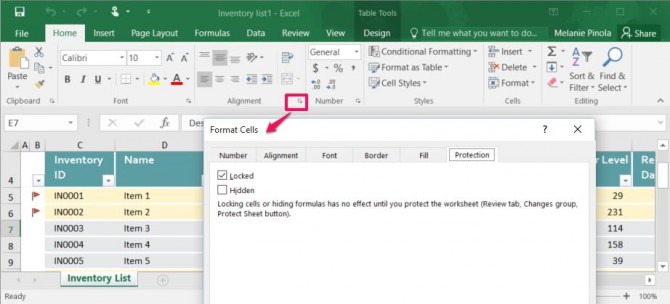
3. Uncheck «Locked» (which is checked by default) and click OK.
4. Go to Review > Protect Sheet and hit OK to protect the sheet. Any cells you didn’t unlock under the Format Cells option (step 3 above) will be locked, while the unlocked cells will be editable:
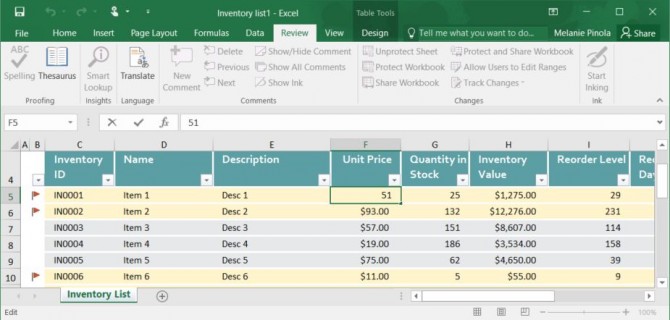
Note that locking (or unlocking) specific cells won’t take effect until you do step 4, protecting the sheet.
Protip: If you want to quickly lock or unlock cells that aren’t next to each other, you can use a keyboard shortcut. After selecting a certain cell or group of cells, use the Format Cells dialog as above to lock or unlock it. Then select your next cell(s) and hit F4 to repeat your last action.
More Microsoft Excel tips and tricks
There are a number of neat tips that’ll help you out when you’re managing your Excel spreadsheets. For example, we have a guide on how to use VLOOKUP in Excel, which you can use to to quickly find data associated with a value the user enters. And if you need to, you can also freeze rows and columns by selecting «Freeze Panes» in the View tab. If you need to organize your data, check out how to create sortable columns in Excel.
But, not everyone is a fan of Excel, so if you need to convert Excel Spreadsheets to Google Sheets, we have a guide for that, as well as a guide on how to open Google Sheets in Excel.
If you’re a business users, we also have 10 Excel business tips that you can use to help you keep your job, which include guides on how to remove duplicate data, recover lost Excel files, use pivot tables to summarize data and more.
We even have guides on how to use conditional formatting in Excel to color-code specific cells and how to add comments to your formulas in Microsoft Excel.
Get instant access to breaking news, the hottest reviews, great deals and helpful tips.