
Excel for Microsoft 365 Excel 2021 Excel 2019 Excel 2016 Excel 2013 Excel 2010 More…Less
Let’s say you want to add information to a spreadsheet report that confirms the location of a workbook and worksheet so you can quickly track and identify it. There are several ways you can do this task.
Insert the current file name, its full path, and the name of the active worksheet
Type or paste the following formula in the cell in which you want to display the current file name with its full path and the name of the current worksheet:
=CELL(«filename»)
Insert the current file name and the name of the active worksheet
Type or paste the following formula as an array formula to display the current file name and active worksheet name:
=RIGHT(CELL(«filename»),LEN(CELL(«filename»))- MAX(IF(NOT(ISERR(SEARCH(«»,CELL(«filename»), ROW(1:255)))),SEARCH(«»,CELL(«filename»),ROW(1:255)))))
Notes:
-
To enter a formula as an array formula, press CTRL+SHIFT+ENTER.
-
The formula returns the name of the worksheet as long as the worksheet has been saved at least once. If you use this formula on an unsaved worksheet, the formula cell will remain blank until you save the worksheet.
Insert the current file name only
Type or paste the following formula to insert the name of the current file in a cell:
=MID(CELL(«filename»),SEARCH(«[«,CELL(«filename»))+1, SEARCH(«]»,CELL(«filename»))-SEARCH(«[«,CELL(«filename»))-1)
Note: If you use this formula in an unsaved worksheet, you will see the error #VALUE! in the cell. When you save the worksheet, the error is replaced by the file name.
Need more help?
You can always ask an expert in the Excel Tech Community or get support in the Answers community.
Need more help?
Return to Excel Formulas List
Download Example Workbook
Download the example workbook
This tutorial will demonstrate how to get the path and file name using a formula in Excel.
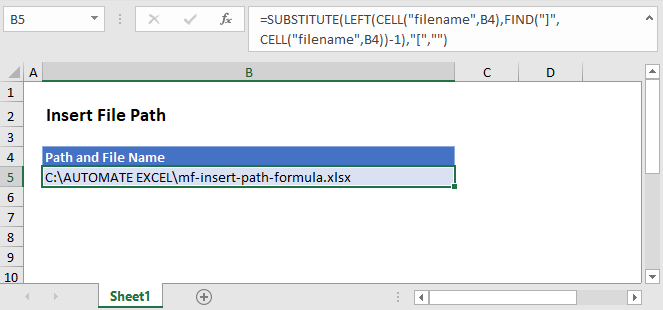
Get Path and File Name
In Excel there isn’t a function to get the path and file name directly, but the CELL Function will return the file path, name, and sheet. Using the text functions FIND, LEFT, and SUBSTITUTE, we can isolate the path and file name.
=SUBSTITUTE(LEFT(CELL("filename",B2),FIND("]",CELL("filename",B2))-1),"[","")
Let’s step through the formula.
File Name, Path, and Worksheet
We use the CELL Function to return the file path, name, and sheet by entering “filename” as the info type.
=CELL(“filename”,B2)
FIND the File Name Position
As shown above, the CELL Function returns the file path, name, and worksheet. We don’t need the worksheet or the square brackets, so we use the FIND function to determine the position of the last character (i.e. the one before “]”) of the file name.
=FIND("]",B3)-1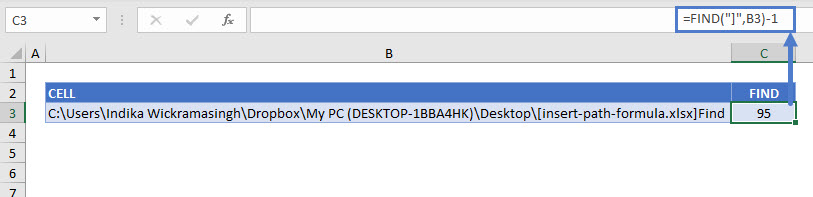
Remove the Worksheet Name
Once we have the position of the file name’s last character, we use the LEFT Function to remove the name of the worksheet.
=LEFT(B3,C3)
SUBSTITUTE Function
You can see above that there is still an open square bracket between the path and file names. Use the SUBSTITUTE function to replace the “[“ with an empty string.
=SUBSTITUTE(D3,"[","")
Combining these steps into a single formula gives us:
=SUBSTITUTE(LEFT(CELL("filename",B2),FIND("]",CELL("filename",B2))-1),"[","")Get Path Only
You might want to show the path only, without the file name. For this, we can stop at the LEFT Function with a little tweak. There’s no need to SUBSTITUTE since there won’t be any mid-string characters to delete. To return just the path, we find the position of the first character of the file name (“[“), instead of the last, and the path name is everything to the left.
=LEFT(CELL("filename",B2),FIND("[",CELL("filename",B2))-1)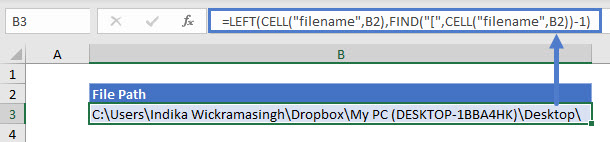
Many a time, it is good to Display the location of the file in Excel.
Not just the file name, but the entire path of the file. It is a good reference to make sure you are working on the correct file and is also good if you print out the Excel. With this option, the file path always gets printed on paper..
How to Write a Formula that will Display the File Path in Excel, automatically.
One useful formula that can assist us is the CELL formula. I bet you didn’t know about this in-built Excel Function…
The CELL function can help us to display the address, colour, format, type or width of any cell.
The CELL Function takes a maximum of 2 arguments, and only the first one is mandatory.
=CELL(info_type, [reference])
So, if you write =CELL(“filename”) in any cell, you will get the Full Pathname of this Excel file, along with the Sheet Name.
For example, I got the filename displayed as below:
| D:[email-blasting-migration.xlsx]Sheet1 |
According to the Excel Help, the CELL function has the following arguments:
- info_type Required. A text value that specifies what type of cell information you want to return. The following list shows some of the possible values of the info_type argument and the corresponding results.
info_type Returns “address” Reference of the first cell in reference, as text. “col” Column number of the cell in reference. “color” The value 1 if the cell is formatted in color for negative values; otherwise returns 0 (zero). “contents” Value of the upper-left cell in reference; not a formula. “filename” Filename (including full path) of the file that contains reference, as text. Returns empty text (“”) if the worksheet that contains reference has not yet been saved. “format” Text value corresponding to the number format of the cell. The text values for the various formats are shown in the following table. Returns “-” at the end of the text value if the cell is formatted in color for negative values. Returns “()” at the end of the text value if the cell is formatted with parentheses for positive or all values.
Display only the Excel File Name, without the Sheet Name
To only print the File name, you can use this long formula:
=MID(CELL("filename"),SEARCH("[",CELL("filename"))+1, SEARCH("]",CELL("filename"))-SEARCH("[",CELL("filename"))-1)
Keep in mind that the file should be saved somewhere. If you just open a new workbook, and try these formulas, you will get a #VALUE ERROR. This error will disappear automatically once the file is saved, and the error will be replaced with the correct full file path name, and file name.
This formula to display the filename in Excel also works on the Mac. Any Excel for Mac version, including Excel X for Mac, to Excel 2004, 2008, 2011 for Mac also work fine in displaying the filename.
For example, for a file on Mac with the path HD:Users:local:Desktop, the formula returns
HD:Users:local:Desktop:(filename)Sheet1
Displaying the FilePath only
While writing macros in Excel, you may need the file’s path only, to pick up other files, or for any other reason. Just use this to get only the file’s path in Excel
=LEFT(CELL(“filename”,A1),FIND(“[“,CELL(“filename”,A1),1)-1)
In this formula, we remove the Sheet Name, which starts with the [ character.
How To Display Filename & File Path in Excel Worksheet Header or Footer
If you wish to display the file name and/or file path in the Excel sheet’s header or footer, then it is extremely simple. Simply go to the Ribbon. Choose Insert > Header & Footer

All you need to do is click on the File Path, File Name icons.
Alternatively, if you want to type it yourself, simply type the following in the header or the footer in Excel:
&[Path]&[File]
Use &[Path] for only the File Path, and &[File] for only the File’s name.
Hope it helps you in your life with Excel.
Now you can confidently display the filename and the file path in Excel
With the File Name of Excel files visible in the header, with the File Path, you won’t lose a file in the wrong location & find what you are looking for easily!
Do let me know if you need any other functions in Excel, or if you are facing a problem in Excel. We can help you to solve everyday issues in Excel easily at ExcelChamp.Net.
And subscribe to the Excel Tips Newsletter for more such tips to improve productivity in Excel.
Cheers,
Vinai Prakash
Vinai is the founder and principal trainer for Microsoft Excel Tips and Techniques seminars all over the world. To book Vinai to conduct an Excel training at your office for your company, do email to vinai@excelchamp.net.
Если у вас много открытых файлов в Excel, вам, возможно, потребуется знать полный путь к активной книге. Как ни странно, Excel не предоставляет возможности напрямую получить эту информацию. В этом приеме описываются несколько методов, позволяющих определить путь к файлу активной книги.
Переход к представлению Backstage
Один из способов увидеть путь активной книги — выбрать команду Файл ► Сведения. Путь активной книги отображается в верхней части представления Backstage.
Использование формулы
Другой вариант заключается в том, чтобы ввести следующую формулу в ячейку: =ЯЧЕЙКА("имя_файла"). Формула показывает путь книги, в том числе имя листа, содержащего формулу.
Добавление элемента управления на панель быстрого доступа
Элемент управления под названием Размещение документа недоступен на ленте, но вы можете добавить его на свою панель быстрого доступа (рис. 177.1). К сожалению, вы не можете изменить ширину элемента, но если щелкнете на отображаемом имени, то увидите весь путь.

Рис. 177.1. Элемент управления Размещение документа, добавленный на панель быстрого доступа, позволяет увидеть полный путь активной рабочей книги
Чтобы добавить этот элемент управления на панель быстрого доступа, выполните следующие действия.
- Щелкните правой кнопкой мыши на панели быстрого доступа и выберите Настройка панели быстрого доступа.
- В разделе Панель быстрого доступа диалогового окна Параметры Excel в раскрывающемся списке слева выберите пункт Команды не на ленте.
- Прокрутите список вниз и выберите Размещение документа.
- Нажмите кнопку Добавить, чтобы добавить выбранный элемент управления на панель быстрого доступа.
- Нажмите кнопку ОК для закрытия окна Параметры Excel.
Отображение панели свойств документа
Еще один способ просмотреть путь активной книги — открыть панель Свойства документа. Выберите Файл ► Сведения ► Свойства ► Показать область сведений о документе. Панель отображается над строкой формул. К сожалению, она занимает много места и не может быть перемещена или уменьшена.
Вы, возможно, захотите добавить элемент управления Свойства на панель быстрого доступа. Делайте это так, как описано в предыдущем разделе, только в данном случае выберите раздел Файл в шаге 2 и команду Свойства в шаге 3. Элемент управления Свойства будет включать/выключать отображение панели свойств документа, так что вы можете просто щелкнуть на нем один раз, чтобы увидеть путь книги, а затем щелкнуть еще раз, чтобы скрыть панель.
Использование макросов
Если вас интересует использование VBA-макросов, введите следующую процедуру в модуль VBA:
1 2 3 |
Sub ShowPath() MsgBox ActiveWorkbook.Path End Sub |
Добавьте макрос ShowPath на панель быстрого доступа. Когда эта процедура выполняется, путь активной книги отображается в окне сообщения.
A new version of this post has been published here: http://easy-excel.com/?p=234
Maybe you want to e-mail a link to an Excel file to your colleagues (instead of sending the file as an attachment), or maybe you forgot where you just saved the file you’re working on. In any case, we need to find the location of the file; the file path.
This is not shown in Excel by default, and they have hidden it well, so bookmark this page in case you need to do this again someday in the future!
Excel 2010 with File Path:

Excel 2007 with File Path:

If the file is saved on a server, you can actually copy and paste the Excel file path and e-mail it to your colleagues. If they have access to the same server, they should be able to click on the link an open the file from there. A lot better than e-mailing the file as an attachment!
You only have to do it once – when you make any changes in the Quick Access Toolbar, they apply to all Excel documents.
Here’s how to do it in Excel 2010:
1. File => Options
2. Choose All Commands in the drop-down and scroll down to and choose Document Location.
3. Click Add

It’s done almost the same way in Excel 2007:
1. Office button => Excel Options => Customize
2. Choose All Commands in the drop-down and scroll down to and choose Document Location.
3. Click Add
Author: Audun Danielsen