
Are you trying to figure out how to load data from Excel into your database?
The problem: load data to Oracle
Many business analysts rely heavily upon Microsoft Excel as one of their primary sources for important business data. At some point they will need to load data into an Oracle database, and thus you will often hear them make requests such as the following:
- Copying Excel data to Oracle
- Importing Excel data to Oracle
- Loading Excel data to Oracle
- Transferring Excel data to Oracle
They key point is that regardless of how the business users ask, the request is essentially the same. Some very common ways they obtain such loading of the database data include:
Business user sending a formal data load request to their information systems people to perform and deliver the loaded Oracle table. However, this process can take time – sometimes more than the business user can wait.
Business user truly self-servicing by loading the database data themselves using a powerful tool like Quest®Toad® for Oracle, and then working with that data in Toad or some other database tool. This approach is quick and easy, plus Toad for Oracle integrates easily into the business analyst’s workflow.
In my recent blog titled “Copying database data to Microsoft Excel via Toad for Oracle” I showed how easily Toad for Oracle can export data into Excel — a favorite tool of many business analysts.
Toad for Oracle makes short work of this use case as well — how to load data from Excel into Oracle. For my example, I chose to use the Internet Movie Database (IMDB) and thus downloaded the movies title basic data. I then unzipped the file to obtain the 606 megabyte tab delimited text file named data.tsv. I then renamed that data file to movies.tsv so as not to forget what the file contains.

The solution to load data into Oracle
Many business analysts strongly favor the second choice of using Toad for Oracle to self-service and load data. In this blog I’ll review some common scenarios that facilitate easily copying Excel data to Oracle using Toad. The techniques that I’ll be showing work essentially the same in both of Toad’s primary interfaces for this task: the Schema Browser and Main-Menu—> Database —> Create —> Table. I’ll demonstrate using the Schema Browser, which is often the most common choice for this task.

Figure 1: Create a new table to load data
Now in Figure 2 below I’m inside the create table screen. First I chose to check the box for display advanced features, otherwise I would not see displayed the options which will be required. Second, I chose to open a file to read for the table’s column names. It uses the first row of data for that. Third, I chose my tab delimited text file. Finally, I pressed OK. Since my file was over 600 megabytes, it took a few seconds to process.

Figure 2: Method to populate the table columns to load data.
In Figure 3 below I now have all the columns for my table. Note that Toad has set the default datatype to VARCHAR2 for all columns. Moreover Toad also has set each column to be optional. You may need to modify these default choices as you know your data far better than Toad. Then press the OK button to create the table and load data.

Figure 3: Resulting population of table columns.
In Figure 4 below I have now created the table required to hold all the data for the IMDB movies data file. Remember, the file is over 600 megabytes in size, so the data load will likely take a few moments. But we’re more than half-way home at this point. Now I just need to import the data into my newly created table.

Figure 4: Resulting table creation.
In Figure 5 below I have now invoked Toad for Oracle’s Data Import wizard by opening the Right Hand Mouse (RHM) menu and select Import —> Data, or Main Menu —> Database—>Import—>Import Table Data. As you can now see, I am setup to initiate loading of the MOVIES table. However this is a multi-step wizard where we’ll need to specify additional information before the table can be loaded.

Figure 5: Page 1 of the data import wizard.
In Figure 6 below I am now on the second page of the data import wizard where I identify the file type and name. If you look back at Figure 2, you will see that we’ve answered two of the three key parameters. Note that we’ve yet to say that it’s a tab delimited file. Remember too that the first line in the file has the column names, so we’ll need to be able to tell Toad to skip over those.

Figure 6: Page 2 of the data import wizard.
In Figure 7 below I am now on the third page of the data import wizard where I identify the file as tab delimited text.

Figure 7: Page 3 of the data import wizard.
In Figure 8 below I am now on the fourth page of the data import wizard where I identify that Toad should start reading the table data at line 2 because the first row contains the column names. You should take your time on this page of the wizard to make sure you review the dates, times, and numbers settings based upon how your data is formatted in the text file.

Figure 8: Page 4 of the data import wizard.
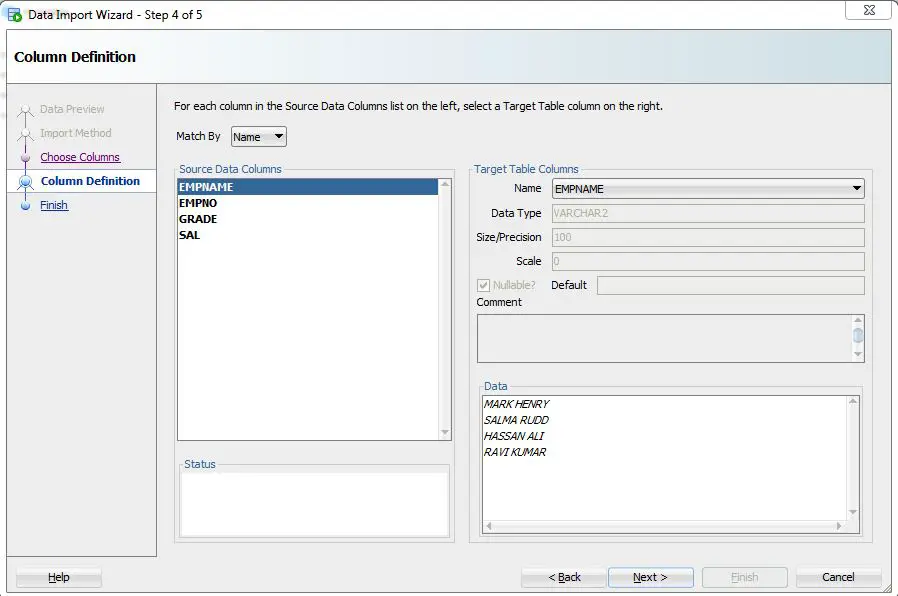
In Figure 9 below I am now on the fifth page of the data import wizard where Toad has read a sample of the data rows and displays them for you to verify. Moreover, Toad displays a pop-up to see how you want to map the columns of data to the table columns. In this case it really does not matter. But had I created the columns in the table in a different order or reordered them, then the choice would have to be by matching the names.

Figure 9: Page 5 of the data import wizard.
In Figure 10 below I am now on the sixth page of the data import wizard where Toad displays the results of your selection from the prior page’s pop up where you specified the data file field to table column mapping. Again if I had reordered the columns in the table, I would have had to make changes on this page to properly align the fields to columns.

Figure 10: Page 6 of the data import wizard.
In Figure 11 below I am now on the seventh page of the data import wizard where Toad displays the field to column matching results performed upon the sample data with the column header row removed. Note that the columns displayed here are sized based upon the column name size. I’ll need to press the size cols to data button if I wish to be able to see the column values displayed in their entirety.

Figure 11: Page 7 of the data import wizard.
In Figure 12 below I am now on the eighth page of the data import wizard where Toad allows one to specify a host of parameters or options that control the actual database transaction processing. As you can see, I have said to perform batch array inserts of 500 rows, to truncate the table before loading, and to commit after every 500 rows. These choices will affect how long the actual data load takes. Remember that my data file is over 600 megabytes, so setting these parameters is critical. Now when I press the execute button, the data import process will begin.

Figure 12: Page 8 of the data import wizard.
In Figure 13 below I am now executing the data import process. The first time I ran this I got errors because the default column data types and size were VARCHAR(32) and the movies titles are much longer than that. I just chose to abort, increased the column lengths, and restarted the wizard. It then ran to completion without error. Did you note that even on my small VM running on a desktop PC that I’m getting loads of over 66,000 records per second!

Figure 13: Page 9 of the data import wizard.
Conclusion
If you are a business user who wants to copy from Excel to Oracle, use Toad. You can easily do automatic table creation and data loading as shown above. Thus you can self-service without requesting help from your information systems people. No other database tool makes copying data from Excel to Oracle quicker and easier than Toad. Plus no matter whether you’re using Toad freeware or the commercial version of Toad, the process is essentially the same.
Need help managing data? Try Toad for free!
Quest Software® is here to help you simplify complexity, reduce cost and risk, and drive performance. Maybe that’s why we’re consistently voted #1 by DBTA readers and have 95%+ customer satisfaction rate.

Toad® database management tools are cross-platform solutions from Quest® that can help new and veteran DBAs, and even “accidental” DBAs manage data in Oracle, SQL Server, DB2, SAP, MySQL, and Postgres environments.
Related Toad World posts
Blog: Copying database data to Microsoft Excel via Toad for Oracle
Useful resources
Toad for Oracle general information
Technical brief: Top Five Reasons to Choose Toad Over SQL Developer
Case study: Opening doors and creating opportunities with data insights
Have questions, comments?
Head over to the Toad for Oracle forum on Toad World®! Chat with Toad developers, and lots of experienced users.
Help your colleagues
If you think your colleagues would benefit from this blog, share it now on social media with the buttons located at the top of this blog post. Thanks!
Tags:
Toad for Oracle

Written by Bert Scalzo
Bert Scalzo is a guest-blogger for Quest and a renowned database expert, Oracle® ACE, author, database technology consultant, and formerly a member of Dell Software’s TOAD dev team. With three decades of Oracle® database experience to draw on, Bert’s webcasts garner high attendance and participation rates. His work history includes time at both Oracle Education and Oracle Consulting. Bert holds several Oracle Masters certifications and has an extensive academic background that includes a BS, MS and Ph.D. in computer science, as well as an MBA, and insurance industry designations.
Bert is a highly sought-after speaker who has presented at numerous Oracle conferences and user groups, including OOW, ODTUG, IOUG, OAUG, RMOUG and many others. Bert enjoys sharing his vast knowledge on data modeling, database benchmarking, database tuning and optimization, «star schema» data warehouses, Linux® and VMware®.
As a prolific writer, Bert has produced educational articles, papers and blogs for such well-respected publications as the Oracle Technology Network (OTN), Oracle Magazine, Oracle Informant, PC Week (eWeek), Dell Power Solutions Magazine, The LINUX Journal, LINUX.com, Oracle FAQ, Ask Toad and Toad World.
This popular author is known throughout the industry for his instructive books, which include:
• Oracle DBA Guide to Data Warehousing and Star Schemas
• TOAD Handbook (1st Edition)
• TOAD Handbook (2nd Edition)
• TOAD Pocket Reference (2nd Edition)
• Database Benchmarking: Practical Methods for Oracle & SQL Server
• Advanced Oracle Utilities: The Definitive Reference
• Oracle on VMware: Expert Tips for Database Virtualization
• Introduction to Oracle: Basic Skills for Any Oracle User
• Introduction to SQL Server: Basic Skills for Any SQL Server User
• Toad Unleashed
• Leveraging Oracle Database 12cR2 Testing Tools
• Database Benchmarking and Stress Testing
Drop Bert an email at bertscalzo2@gmail.com and he’ll write you back, and maybe send you an autographed book!
Microsoft Excel has been a traditional choice as a spreadsheet application for organizations across the world. The ease of access, power formulas, and the ability to make visually stunning reports has made Microsoft Excel is widely used tool. However, managing thousands of sheets can be a time-consuming and resource-intensive task that may also lead to some errors. A good solution is to import your Excel files to a scalable, reliable, and fast relational database management system like MySQL.
You can Import Excel into MySQL either by using simple SQL commands like LOAD DATA or opt for third-party tools. By importing your Excel files to MySQL, you can leverage the powerful MySQL engine to quickly query data and perform complex data manipulations.
In this article, you will learn how to effectively Import Excel into MySQL using 4 different methods.
What is Microsoft Excel?
Microsoft Excel is a spreadsheet application developed by Microsoft to organize and record data in a tabular format. Launched in 1985, Microsoft Excel is a widely used Spreadsheet software in businesses worldwide allowing you to organize and manipulate data through formulas in columns and rows. MS Excel is loaded with functionalities to perform several operations such as calculations, pivot tables, graph tools, etc.
Compatible with Microsoft Windows, macOS, Android, and iOS, MS Excel is included with the MS Office Suite. It is typically used by firms to record, organize and analyze financial data. MS Excel also offers VBA programming that can assist you in automating repetitive tasks.
Key Features of Microsoft Excel
- Conditional Formatting: MS Excel allows you to apply formats to a cell or range of cells, and have that formatting change depending on the value of the cell or the value of a formula.
- Built-in Formulae: MS Excel provides you with basic and advanced built-in formulae for sum, average, minimum, etc. You can use formula auditing to graph or trace the relationship between cells and formulas with blue arrows. You can track precedents (cells that provide data for a particular cell) or the cells that depend on the value of a particular cell.
- Data Protection: Excel spreadsheets can be password protected on your laptop or PC. MS Excel also provides a robust system to recover data.
- Data Sorting & Filtering: You can easily perform the basic data sorting and filtering operation on your data in excel. MS Excel also provides Advanced filtering options for complex criteria.


What is MySQL?
MySQL is a popular Open-Source Relational Database Management System. MySQL data is stored in tables consisting of rows and columns. Introduced in 1995, MySQL is completely developed, distributed, and maintained by Oracle Corporation. Looking over the technical side, MySQL is written in the C and C ++ languages.
MySQL is compatible with multiple platforms such as Microsoft Windows, Oracle Solaris, AIX, Symbian, Linux, and macOS. You can use SQL commands to retrieve, change or add data from your MySQL tables. MySQL is also a vital component of the Modern LAMP stack, which consists of a Linux-based Operating System, Apache Web Server, MySQL Database, and PHP for processing.
SQL can also be used to define the table schema or even configure the relationship between the tables in the database. Client-Side Graphical User Interfaces such as MySQL WorkBench, SequelPro, or DBVisualizer can be used to type the SQL commands and the server will respond with the requested information. MySQL also offers a paid Enterprise version which includes premium support services and several extensions that can be installed as Server Plugins.
Key Features of MySQL
MySQL is widely used by organizations like Facebook, Flickr, Twitter, Wikipedia, and YouTube. This is due to the following set of MySQL’s eye-catching features:
- Ease of Operation: With MySQL, you can work with a diverse set of programming languages such as PHP, PERL, C, C ++, and JAVA. It also provides a set of intuitive tools to simplify time-consuming tasks such as Server Management, Reporting, and Data Analysis.
- Support for Several Data Structures: Allowing you to work with a broader range of datasets, MySQL offers full support for several Data structures like JSON and Geospatial data, as well as Logical, Numeric, Alphanumeric, Date, and Time data types.
- First-rate Performance: MySQL delivers best-in-class query performance across a variety of clustered servers. It provides a fast-loading utility with a separate memory cache and table index partitioning. MySQL can also efficiently handle fluctuating workloads and process large volumes of data at optimal speeds. This allows you to store more than 50 million rows of data in a table with a table’s default file size limit of 4 GB which can be increased to a theoretical limit of 8 million terabytes (TB).
- Open-Source: MySQL is under the GNU General Public License (GPL), which means it will always be freely available. It provides you the freedom to customize it on Oracle’s Open-Source MySQL codebase based on your needs.
- Localization: To make it user-friendly, MySQL supports multiple character sets, including latin1 (cp1252), german, big5, ujis, and more. You can also set the error message language that the server provides to the client.
- Data Security: MySQL provides full control over the Data Access Control settings. Robust mechanisms such as Access Privilege Systems and User Account Management allow you to regulate who can view or use your MySQL data. MySQL sets the highest standard with Host-based Verification and Password Encryption.
Why should you import Excel into MySQL?
Microsoft Excel is an easy-to-use spreadsheet application that allows you to directly access data and perform a combination of operations on this data. As you collect data and store it in your separate excel files, it becomes a huge task to track each sheet with millions of records in it. To simplify this, you can import Excel into MySQL. MySQL is a scalable, fast, and reliable database management system that allows you to store and query millions of rows of data using simple SQL commands.
Using MYSQL, you can also connect your Excel tables with one another tables using primary and foreign keys. MySQL can easily handle large datasets and allows you to manipulate data, filter data, update data and combine it. You can import Excel into MySQL and enjoy better speed, accuracy, & consistency for your ever-growing data needs.
MySQL is a popular Open-Source Relational Database Management system that allows you to effectively store your Excel file data and manage it using simple SQL commands or via its simple user interface MySQL Workbench. To import Excel into MySQL, check out the following four methods:
Method 1: Using Hevo Data to Import Excel into MySQL
Hevo Data, an Automated Data Pipeline, provides you a hassle-free solution to easily load data from 150+ data sources (including 40+ free sources like Google Sheets) to your desired destination such as MySQL, Data Warehouses, or BI tools in a completely hassle-free & automated manner. Using Hevo you can easily upload your Excel files present on your Google Drive to your MySQL Database in just a few clicks.
Get Started with Hevo for Free
Hevo is fully managed and completely automates the process of not only loading data from 150+ data sources but also enriching the data and transforming it into an analysis-ready form without having to write a single line of code.
Method 2: Using Sqlizer.io to Import Excel into MySQL
This method requires you to upload your Excel files that will be converted into SQL commands. You need to copy the SQL statements and execute them on MySQL Workbench. This method is only effective if you’re dealing with small Excel files with a few records that requires zero data transformation.
Method 3: Using the Load Data Statement to Import Excel into MySQL
This method would be time-consuming and somewhat tedious to implement. Users will have to write custom SQL statements & use the MySQL Workbench to import excel into MySQL. This method is suitable for users with a technical background.
Method 4: Import Excel into MySQL using phpMyAdmin
This method would require you to install the phpMyAdmin database administration tool to import Excel into MySQL. This tool is a good option if you require to perform data transfer once in a while with little to no data transformation.
- Method 1: Using Hevo Data to import Excel into MySQL
- Method 2: Using Sqlizer.io to Import Excel into MySQL
- Method 3: Using the Load Data Statement to Import Excel into MySQL
- Method 4: Import Excel into MySQL using phpMyAdmin
Method 1: Using Hevo Data to import Excel into MySQL
Hevo Data is a No-code Data Pipeline solution that can help you move data from 150+ data sources (including 40+ free sources like Google Drive & Google Sheets) to your desired destination such as MySQL, Data Warehouses, or BI tools in a completely hassle-free & automated manner. Using Hevo you can easily upload your Excel files present on your Google Drive to your MySQL Database.
Hevo also supports MySQL as a Source for loading data to a destination of your choice. Hevo is fully managed and completely automates the process of not only loading data from 150+ data sources but also enriching the data and transforming it into an analysis-ready form without having to write a single line of code. Its fault-tolerant architecture ensures that the data is handled in a secure, consistent manner with zero data loss.
Hevo Data takes care of all your data preprocessing needs and lets you focus on key business activities and draw a more powerful insight on how to generate more leads, retain customers, and take your business to new heights of profitability. It provides a consistent & reliable solution to manage data in real-time and always have analysis-ready data in your desired destination.
Take a look at some of the salient features of Hevo:
- Blazing-fast Setup: Straightforward interface for new customers to work on, with minimal setup time.
- Reliability at Scale – With Hevo, you get a world-class fault-tolerant architecture that scales with zero data loss and low latency.
- Monitoring and Observability – Monitor pipeline health with intuitive dashboards that reveal every stat of pipeline and data flow. Bring real-time visibility into your ELT with Alerts and Activity Logs
- Stay in Total Control – When automation isn’t enough, Hevo offers flexibility – data ingestion modes, ingestion, and load frequency, JSON parsing, destination workbench, custom schema management, and much more – for you to have total control.
- Transparent Pricing – Say goodbye to complex and hidden pricing models. Hevo’s Transparent Pricing brings complete visibility to your ELT spend. Choose a plan based on your business needs. Stay in control with spend alerts and configurable credit limits for unforeseen spikes in data flow.
- Auto-Schema Management – Correcting improper schema after the data is loaded into your warehouse is challenging. Hevo automatically maps source schema with destination warehouse so that you don’t face the pain of schema errors.
- 24×7 Customer Support – With Hevo you get more than just a platform, you get a partner for your pipelines. Discover peace with round the clock “Live Chat” within the platform. What’s more, you get 24×7 support even during the 14-day full-feature free trial.
Sign up here for a 14-Day Free Trial!
Without the need for converting your .xlsx file to .csv, you effortlessly import Excel into MySQL using Hevo by following the simple steps given below:
- Step 1: Upload your Excel files into your Google Drive.
- Step 2: Login to Hevo and naviagte to Pipleines > + Create. Select Google Drive as your Source and configure your Drive account by selecting the authentication method for connecting to Google Drive.
- Step 3: Finally, provide a name for your Pipeline and select all the folders whose Excel files you want to import to MySQL. Then, click on the Continue button.
- Step 4: For completing the process to import Excel into MySQL, you can start by providing your MySQL database credentials such as your authorized Username and Password, along with information about your Host IP Address and Port Number value. You will also need to provide a name for your database and a unique name for this destination.
Method 2: Using Sqlizer.io to Import Excel into MySQL
To import Excel into MySQL, you can use Sqlizer.io to convert your Excel files into SQL commands. You can achieve this by following the simple instructions given below:
- Step 1: Click on the Browse button and select the Excel file you want to import to MySQL.
- Step 2: Select MySQL as your desired database. According to your excel file, check or uncheck My File has a Header Row.
- Step 3: Based on your Excel file, check Use CHECK IF TABLE EXISTS. For using the active worksheet, check the Use the active worksheet box.
- Step 4: You can also choose to enter the Worksheet name. For this example, the worksheet name Students is mentioned.
- Step 5: To import Excel into MySQL, you can either provide the data cell range or check the Convert the whole worksheet box to import the whole data.
- Step 6: Finally, name the table in which to import excel into MySQL. Then, click on the Convert My File button.
- Step 7: After your file is converted, you will get the following message. Now, download the queries or you can even copy the queries to execute them on MySQL.
After the queries have been executed, you can view your data in MySQL using the SELECT command.
Method 3: Using the Load Data Statement to Import Excel into MySQL
Using the LOAD DATA Statement, you can import Excel data into MySQL. To do that, follow the simple steps given below:
- Step 1: You have to first convert your .xlsx file to .csv file. For that, open up the excel file that you need to import.
- Step 2: Navigate to File > Save As. Select CSV (Comma delimited)(*.csv) as your file type and click on the Save button.
- Step 3: Now, enter the LOAD DATA command shown below in your MySQL Workbench import Excel into MySQL.
# MySQL Version 8.0.27
LOAD DATA INFILE
'C:/ProgramFiles/MySQLExcel/import excel into mysql.csv'
INTO TABLE new_file
FIELDS TERMINATED BY ','
ENCLOSED BY '"'
LINES TERMINATED BY 'n'
IGNORE 1 ROWS;
In the above process to import an excel file in MySQL workbench, the .csv file data will be added to the new_file table in your MySQL database without the first row as it contains the row headers. For this example, the .csv file uses a comma as the delimiter to separate 2 fields. You can also use FIELDS TERMINATED BY ‘t’ or FIELDS TERMINATED BY ‘ ‘ if your file’s fields are separated using a tab or a single space respectively.
Alternatively, you can use the LOAD DATA command directly from the Command Line (CMD).
Method 4: Import Excel into MySQL using phpMyAdmin
You can also import excel into MySQL using phpMyAdmin by first converting your .xlsx files to .csv files. For that, you have to first download and phpMyAdmin tool on your system. For this example, a new table named tb_students_phpmyadmin has been created in the MySQL Database. To import excel into MySQL, you can follow the simple steps given below:
- Step 1: In phpMyAdmin, click on the Import tab and choose your desired .csv file.
- Step 2: Now, enter the format-specific options and once you are done, click on the Go button present in the bottom right corner of your screen.
After clicking on the Go button, you will observe the data import confirmation messages for all your rows.
- Step 3: Using the SELECT statement, you can check if the process to import excel into MySQL was successful or not.
Conclusion
In this article, you have learned how to effectively import Excel into MySQL using 4 different methods. Using Method 2, you convert your Excel file rows into SQL queries via sqlizer.io which you, later on, execute on your MySQL Workbench or Command-Line. Though this can be a time-consuming process if you are dealing with excel files containing thousands of rows. You can also use the LOAD DATA statement or a database administration tool like phpMyAdmin, though these require you to first convert the Excel files into CSV files.
These 3 methods are a good option if you only need to rarely import Excel into MySQL with no requirement for processes like Data Cleaning & Data Standardisation. However, when you need to frequently import excel files with millions of rows of data in real-time that require complex data transformation, then you can opt for a No-Code Automated Data Integration platform like Hevo Data!
Visit our Website to Explore Hevo
Hevo Data is a No-code Data Pipeline solution that can help you import data from a vast sea of sources like Google Drive to your desired destination such as MySQL, Data Warehouses, or BI tools. Using Hevo you can easily upload your Excel files present on your Google Drive to your MySQL Database. Hevo also supports MySQL as a Source for loading data to a destination of your choice. It is a reliable, completely automated, and secure service that doesn’t require you to write any code!
If you are using MySQL as your Database Management System and searching for a no-fuss alternative to manual data integration, then Hevo can effortlessly automate this for you. Hevo, with its strong integration with 150+ sources (Including 40+ Free Sources like Google Drive & Google Sheets), allows you to not only export & load data but also transform & enrich your data & make it analysis-ready in a jiffy.
Want to take Hevo for a ride? Sign Up for a 14-day free trial and simplify your Data Integration process. Do check out the pricing details to understand which plan fulfills all your business needs.
Tell us about your experience of completing the process to Import Excel into MySQL! Share your thoughts with us in the comments section below.
There are many ways to import data from an Excel file to a SQL Server database using:
- SQL Server Integration Services (SSIS)
- the OPENROWSET and OPENDATASOURCE functions
- SQL Server linked servers
- the SQL Server Import and Export Wizard
In this article, steps for importing data from an Excel file to a SQL Server database will be explained using the SQL Server Import and Export Wizard including some of problems that can occur during the processes.
To start the process of importing data from an Excel file to a SQL Server database using the SQL Server Import and Export Wizard the SQL Server Import and Export Wizard needs to be launched. There are several ways to do that, and this can be seen on the How to import/export data to SQL Server using the SQL Server Import and Export Wizard page
The first page that appears when the SQL Server Import and Export Wizard launched is Welcome page:
On this page, only a quick introduction of the SQL Server Import and Export Wizard is shown.
Click the Next button to continue. The next page in the SQL Server Import and Export Wizard is Choose a Data Source page:
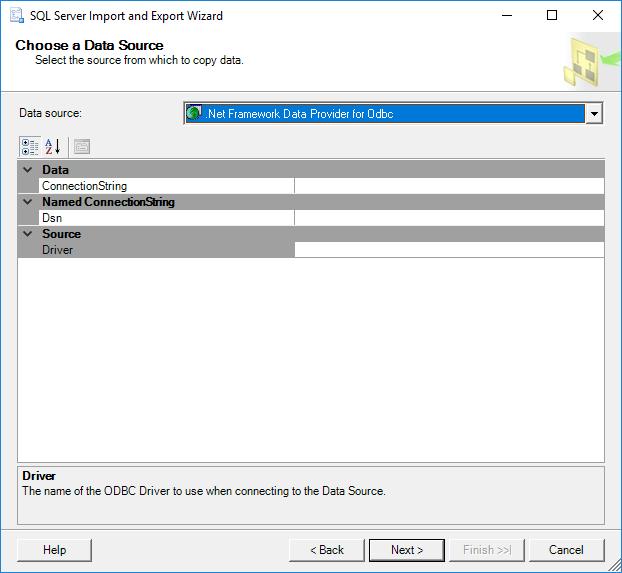
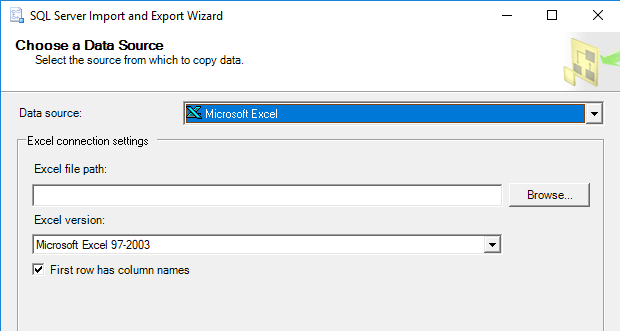
In the Choose a Data Source page, in order to continue with importing data from Excel to SQL Server the data source provider and way of connecting with data source must be provided. In our case, the provider for connecting to the Excel file is the Microsoft Excel provider.
From the Data source drop down box, select the Microsoft Excel provider:
As you can see, there is no Microsoft Excel provider in the list of the Data source drop down box. There are several reasons for this. The first reason could be that Microsoft Office isn’t installed. But there is no need to install Microsoft Office (Microsoft Excel) in order to see the Microsoft Excel provider in the Data source drop down box list.
To see the Microsoft Excel provider in the list, install Microsoft Access Database Engine 2016 Redistributable. The latest version of Microsoft Access Database Engine can open the earlier version of Excel, so make sure that you have the latest one.
The Microsoft Access Database Engine 2016 Redistributable comes with two versions:
- AccessDatabaseEngine.exe is 32-bit version
- AccessDatabaseEngine_X64.exe is 64-bit version
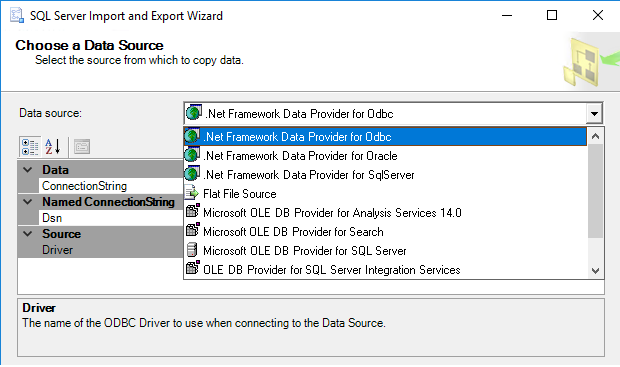
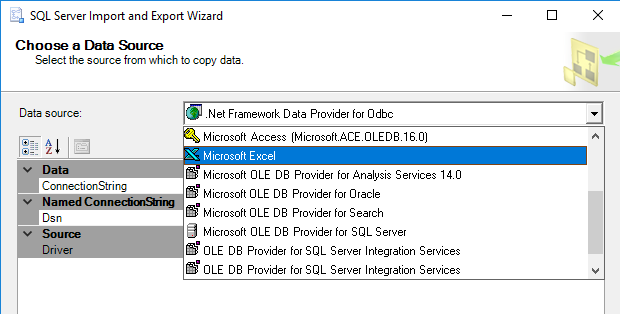
Now, when Microsoft Access Database Engine 2016 Redistributable is installed, we should see the Microsoft Excel provider in the list, but unfortunately the Microsoft Excel provider does not show in the list of the Data source drop down box.
This is because you may run a wrong version of the SQL Server Import and Export Wizard. For example, the AccessDatabaseEngine.exe is installed and the SQL Server Import and Export Wizard 64-bit version is launched. In this case, in order to see the Microsoft Excel provider in the list of the Data source drop down box, launch the SQL Server Import and Export Wizard 32-bit version and the Microsoft Excel provider will appear in the list:
Now, when all is installed, from the list, select the Microsoft Excel provider. On the Choose a Data Source page, additional options appear:
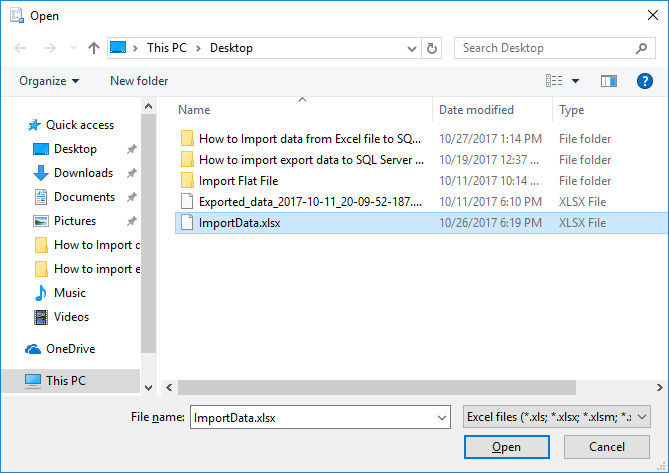
In the Excel file path box, type the location to the Excel file or use the Browse button to navigate to the location:
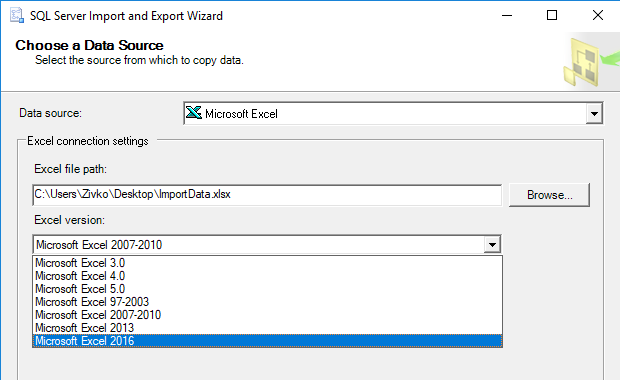
From the Excel version drop down box, choose the version of Excel that uses the source workbook. In our case, that is the Microsoft Excel 2016 version:
The latest option on this page is the First row has column names check box:
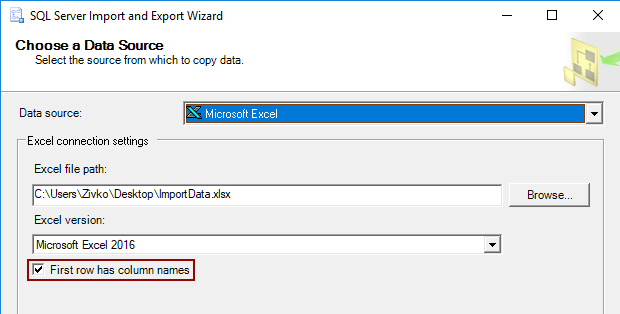
By default, this option is checked. It treads the first rows of the data source as the column names:
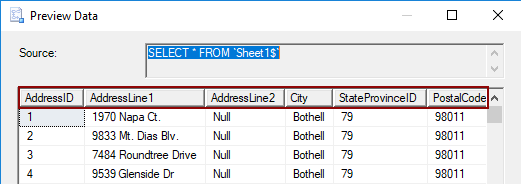
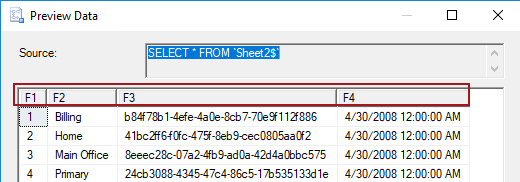
But if this option is enabled and data source does not contain column names, the SQL Server Import and Export Wizard will add the column names, starting with the name F1 for the first column name:
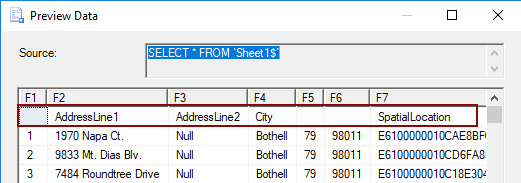
If this option is disabled and data source contain the column names the SQL Server Import and Export Wizard treats these columns as the first row of data:
Now, when everything is set on the Choose a Data Source page of the SQL Server Import and Export Wizard, click the Next button to continue.
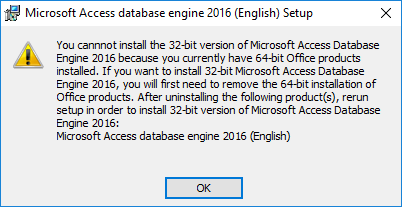
The following warning message may appear after clicking the Next button:
The operation could not be completed.
Additional information:
The ‘Microsoft.ACE.OLEDB.16.0’ provider is not registered on the local machine. (System.Data)
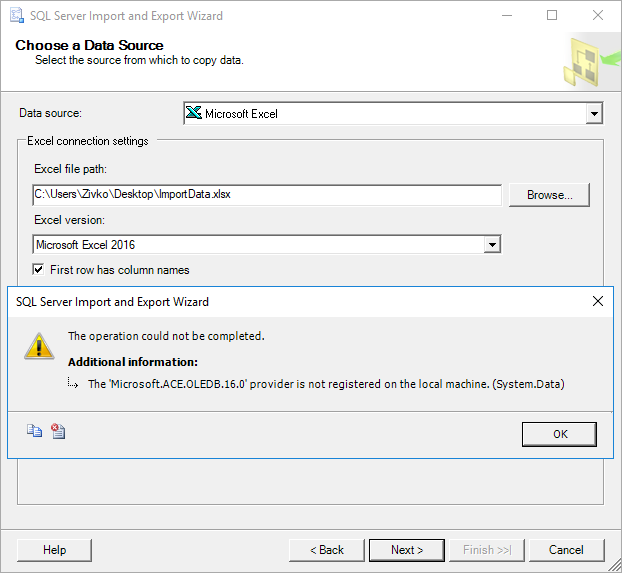
Typically, this warning message appears when the SQL Server Import and Export Wizard is launched via SQL Server Management Studio (SSMS) which is a 32-bit application and the 32-bit version of the SQL Server Import and Export Wizard is launched, but you have installed the Microsoft Access Database Engine 2016 Redistributable 64 bit version.
There are two solutions for resolving this problem:
- The first is to launch the 64-bit version of the SQL Server Import and Export Wizard via the Start menu
- The second resolution is to install the Microsoft Access Database Engine 2016 Redistributable 32 bit version and continue using the SQL Server Import and Export Wizard via SSMS, but first, you need to uninstall the 64-bit version of Microsoft Access Database Engine 2016 Redistributable, otherwise the following warning message will appear when launching the installation package:
Note: The Microsoft Access Database Engine 2016 Redistributable can be installed in quiet mode.
Open the Command Prompt window and run the following:
For 32-bit version
C:Users<User_Name>DownloadsAccessDatabaseEngine.exe /quiet
For 64-bit version
C:Users<User_Name>DownloadsAccessDatabaseEngine_X64.exe /quiet

The next page on the SQL Server Import and Export Wizard is the Choose a Destination page:
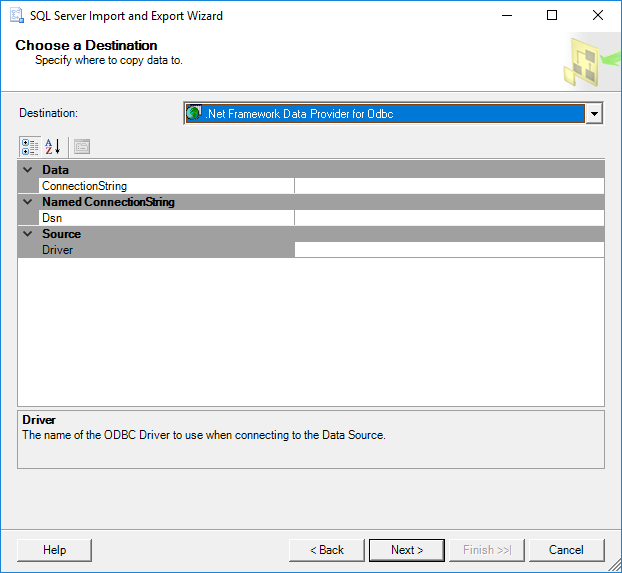
On this page, determine the destination where data from the data source (Excel file) will be placed. In our case, the destination will be a SQL Server database.
Under the Destination drop down box, choose a provider that can connect to a SQL Server database.
One of providers that can connect to SQL Server is:
- .NET Framework Data Provider for SqlServer
- Microsoft OLE DB Provider for SQL Server
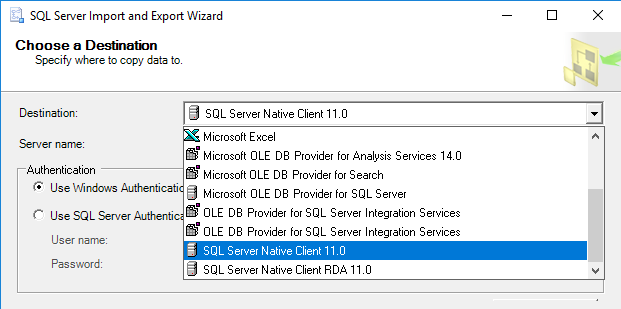
- SQL Server Native Client 11.0
In this case, the SQL Server Native Client 11.0 will be selected from the Destination list:
From the Server name combo box, select the SQL Server instance:
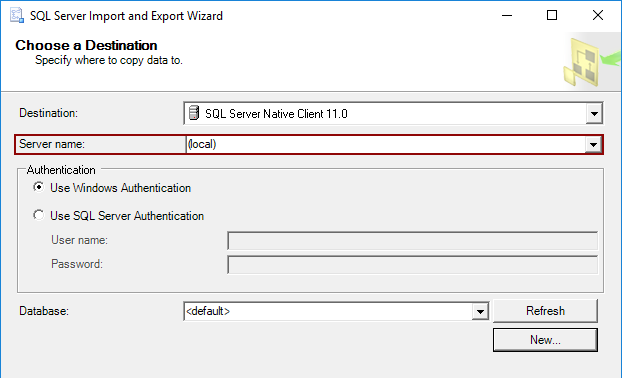
In the Authentication section, determine how it will be connected to SQL Server by using Windows or SQL Server Authentication mode.
From the Database drop down box, pick a database in which data from data source (Excel file) will be placed:
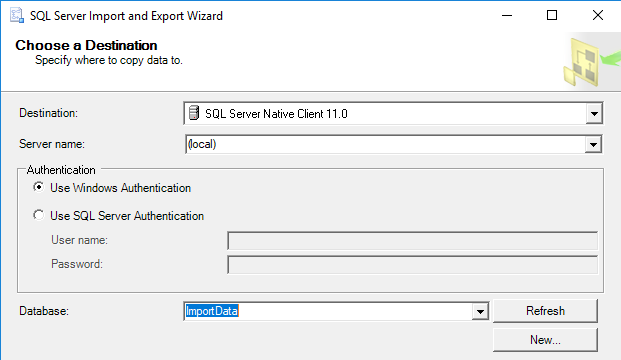
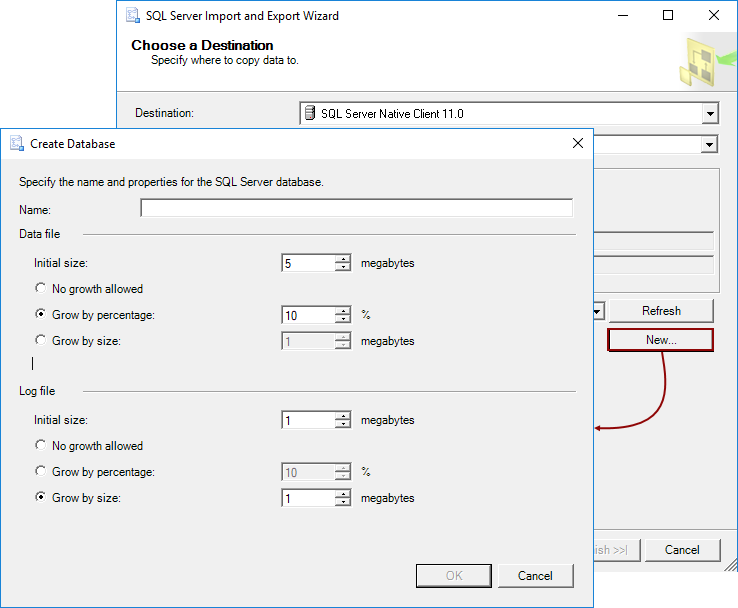
Or, create a new database as a destination for data from data source.
To do that, click the New button and in the Create Database dialog, set the parameters for the new SQL Server destination database:
When everything is set on the Choose a Destination page, click the Next button to proceed.
On the Specify Table Copy or Query page, determine how data from the data source will be copied to the destination:
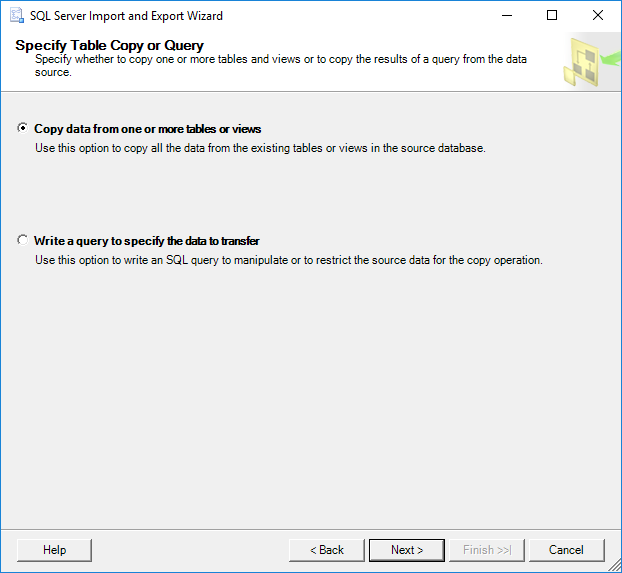
If the Copy data from one or more tables or views radio button is selected then all data from the chosen worksheets will be copied.
If the Write a query to specify the data to transfer is chosen, then only data that are specified in a SQL query will be copied from an Excel worksheet to a destination SQL Server database.
If the Write a query to specify the data to transfer in the Choose a Destination page is chosen, then the Provide a Source Query page will be shown when the Next button is pressed:
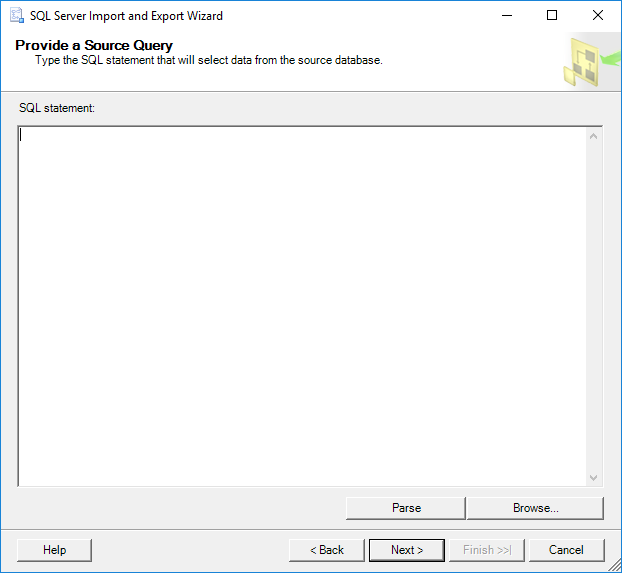
In the SQL statement text box, type the query that will select the data to copy form the Excel file to the SQL Server database or load a query using the Browse button.
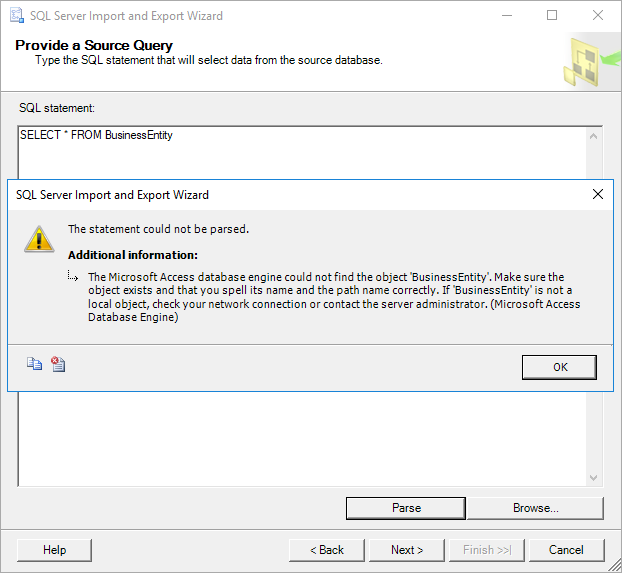
To successfully query a worksheet the $ to the end of the sheet name and the brackets around sheet name, ([BusinessEntity$]) must be added, otherwise the following warning messages may appear:
The statement could not be parsed.
Additional information:
The Microsoft Access database engine could not find the object ‘BusinessEntity’. Make sure the object exists and that you spell its name and the path name correctly. If ‘BusinessEntity’ is not a local object, check your network connection or contact the server administrator. (Microsoft Access Database Engine)
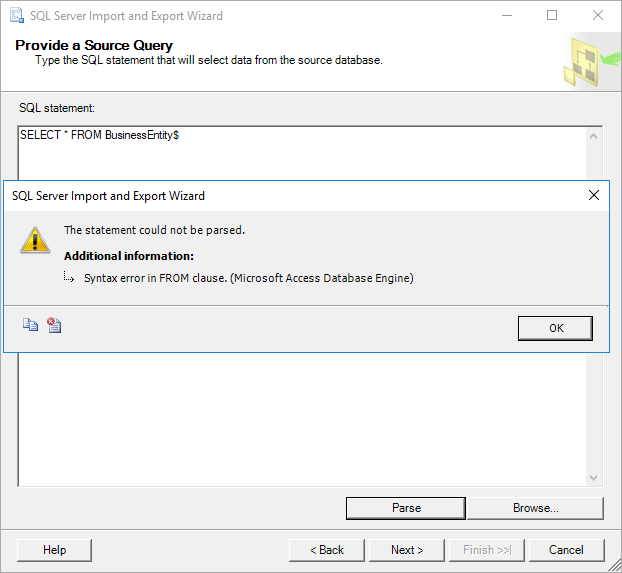
Or this:
The statement could not be parsed.
Additional information:
Syntax error in FROM clause. (Microsoft Access Database Engine)
If the Copy data from one or more tables or views radio button is chosen, when the Next button is pressed, the Select Source Tables and Views page will be shown:
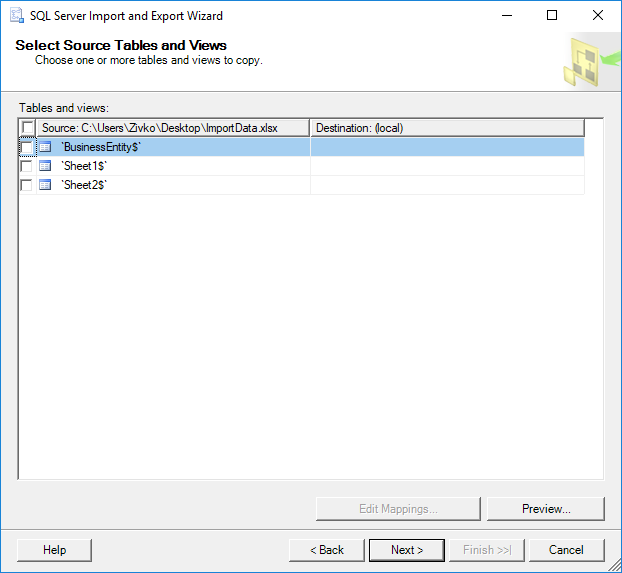
On this page, all worksheets for the Excel file (ImportData.xlsx) will be listed under the Source column. From the Source list, choose from which worksheets you want to import data to the SQL Server database by clicking the check box next to the name of the worksheets. The selected worksheets will appear in the Destination column:
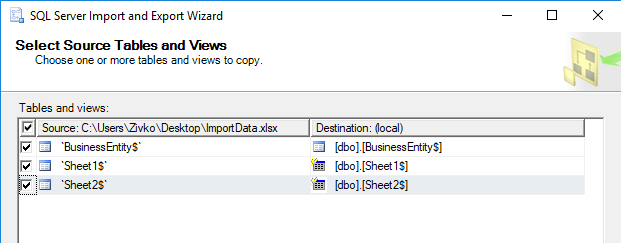
The name of the tables in the SQL Server database by default will be the names of the selected worksheets from the Source column, but these names can be changed by clicking on the name in the Destination column:
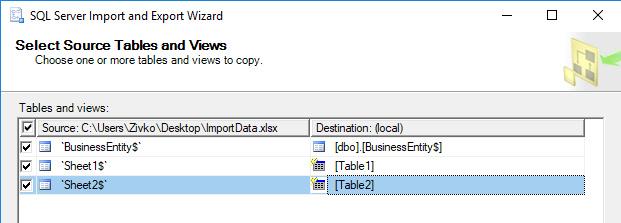
As it may be noticed, the icon in the Destination column for the BusinessEntity$ field is different from the Table1 and Table2 fields. This is because the table in the SQL Server database that is chosen as a destination already exists and for the Table1 and Table2 fields, new tables will be created.
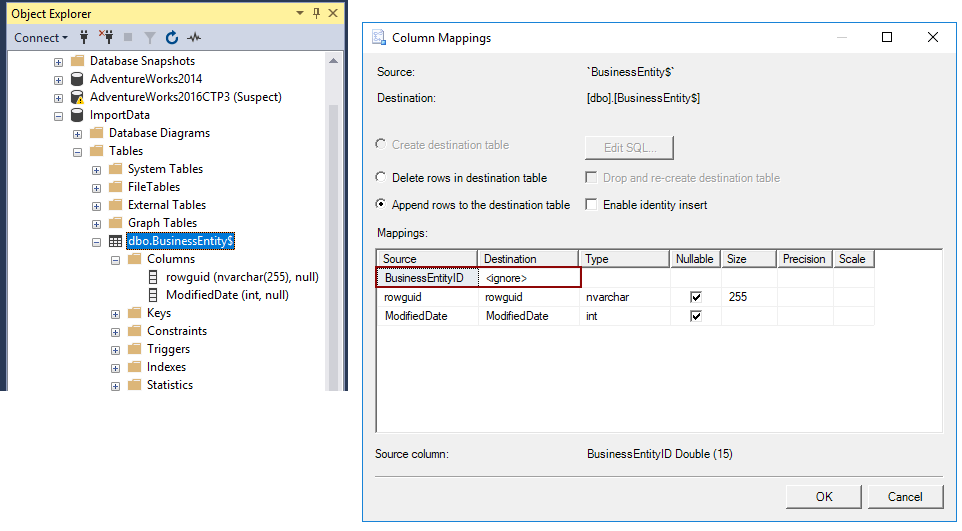
When using an existing table, make sure that the destination table has the same number of columns that have data source, otherwise the columns from the data source that does not have an adequate destination column will be by default ignored (<ignore>) and the data from that columns will not be imported to a destination table:
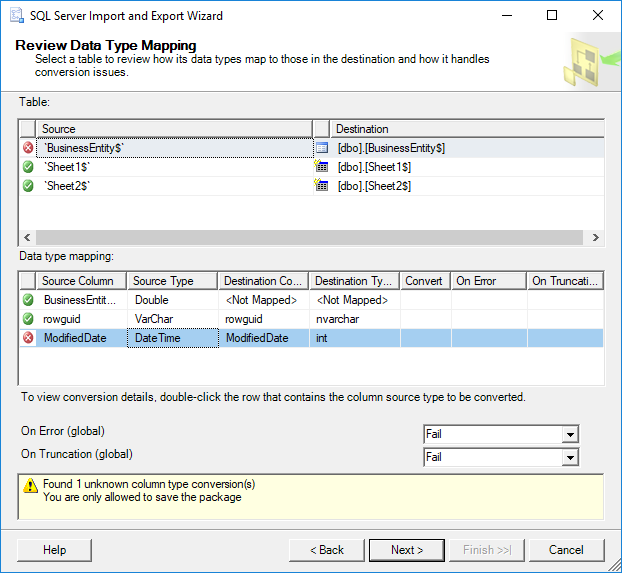
Also, make sure that columns in the destination table have data types that are compatible with the data types in the columns of the source data, otherwise the following error may appear:
Found 1 unknown column type conversion(s) You are only allowed to save the package
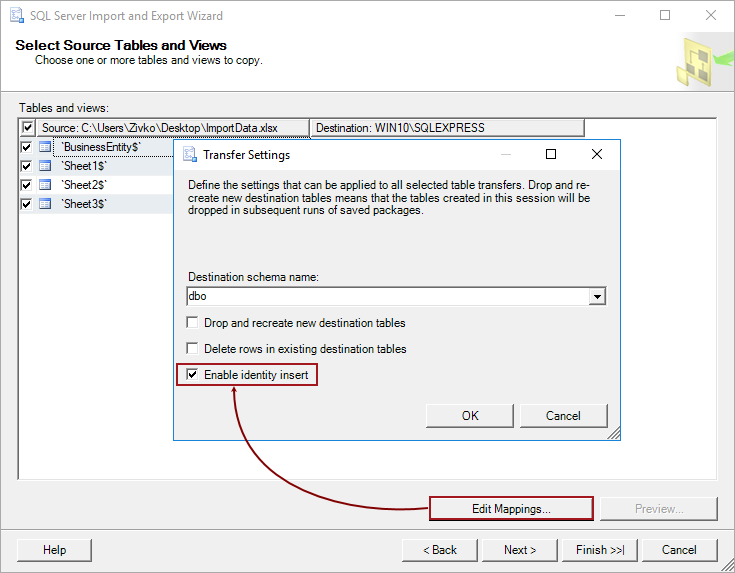
When the appropriate columns and the data types are set, click the Next button, the Save and Run Package page of the SQL Server Import and Export Wizard will appear:
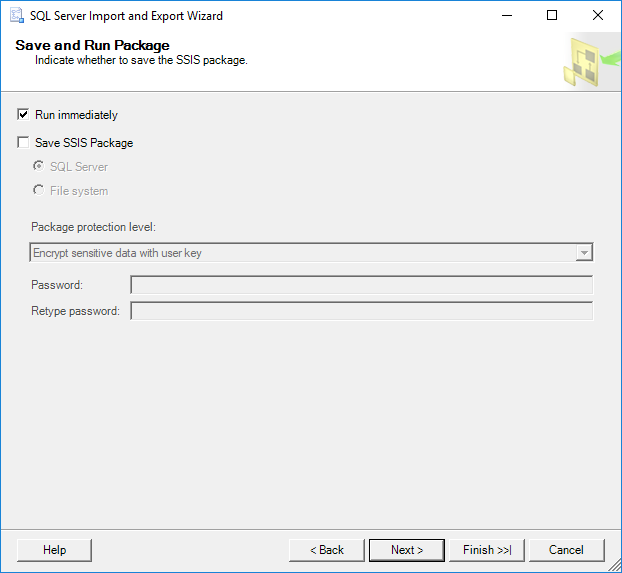
Click the Next button if want to import data from an Excel file to a SQL Server database, but if want to save the SSIS package for the later use, check the Save SSIS Package button.
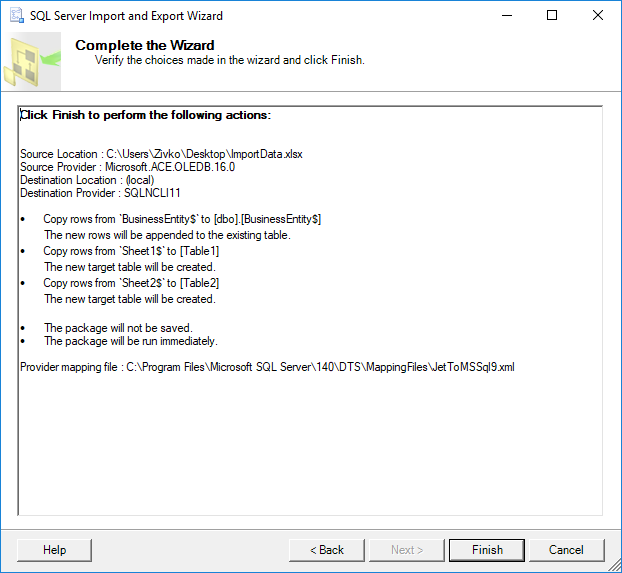
On the Complete the Wizard page, choices that are made in the previous wizard pages are shown:
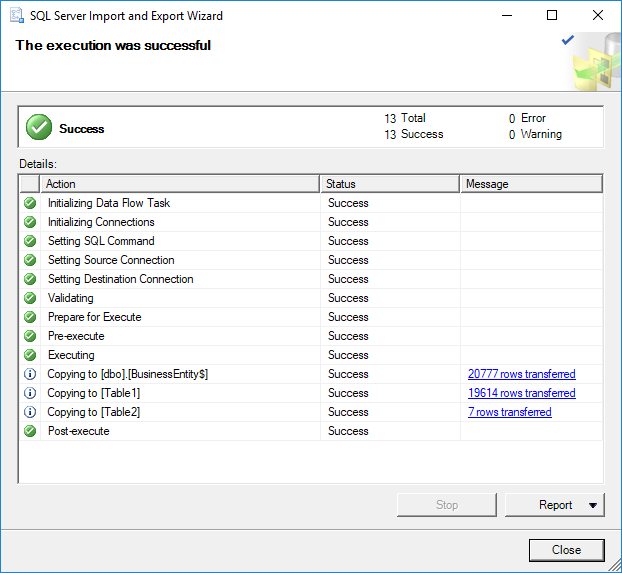
Click the Next button to import data from an Excel file to a SQL Server database. The Performing Operation page shows the status of the importing process if it is finished successfully or with the errors:
If the error occurs during the process of importing data from Excel file to the SQL Server database the Messages… word will appear in the Message column for the action that failed:
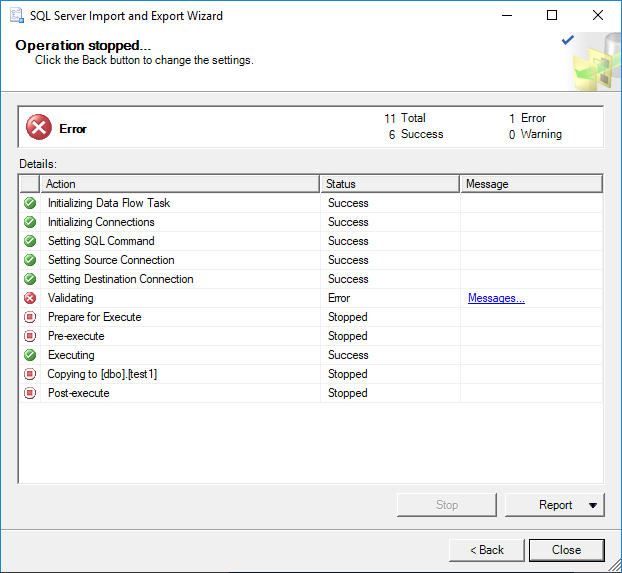
When click on the Messages…, the View Report dialog will appear with detailed information about the error:
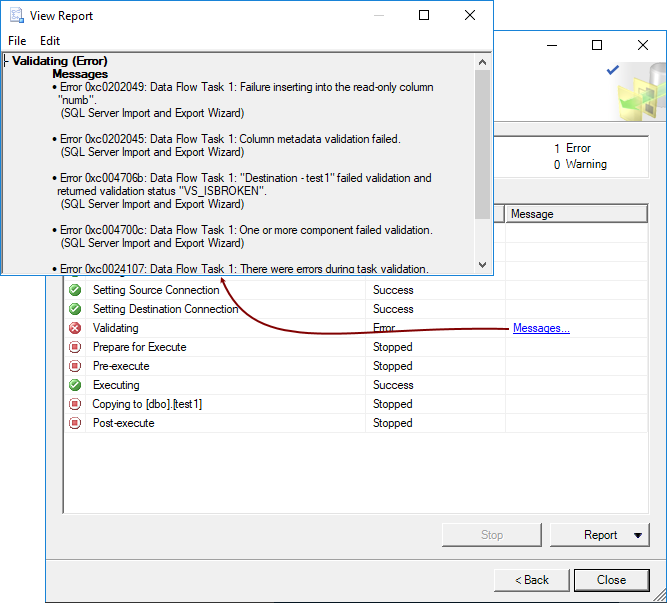
This error:
– Validating (Error)
Messages
- Error 0xc0202049: Data Flow Task 1: Failure inserting into the read-only column “numb”.
(SQL Server Import and Export Wizard)
- Error 0xc0202045: Data Flow Task 1: Column metadata validation failed.
(SQL Server Import and Export Wizard)
- Error 0xc004706b: Data Flow Task 1: “Destination – test1” failed validation and returned validation status “VS_ISBROKEN”.
(SQL Server Import and Export Wizard)
- Error 0xc004700c: Data Flow Task 1: One or more component failed validation.
(SQL Server Import and Export Wizard)
- Error 0xc0024107: Data Flow Task 1: There were errors during task validation.
(SQL Server Import and Export Wizard)
Typically, it appears when the destination table has an IDENTITY column. To resolve this, turn back to the Select Source Tables and Views page, select the tables that have identity property and press the Edit Mappings button. From the Transfer Settings dialog, select the Enable identity insert check box:
Also, another common problem that may appear when importing data from data source to the destination SQL Server tables is the FOREIGN KEY Constraints problem. In the error below two destination tables test1 and test2 are shown. The test2 table is referenced to the test1 table:
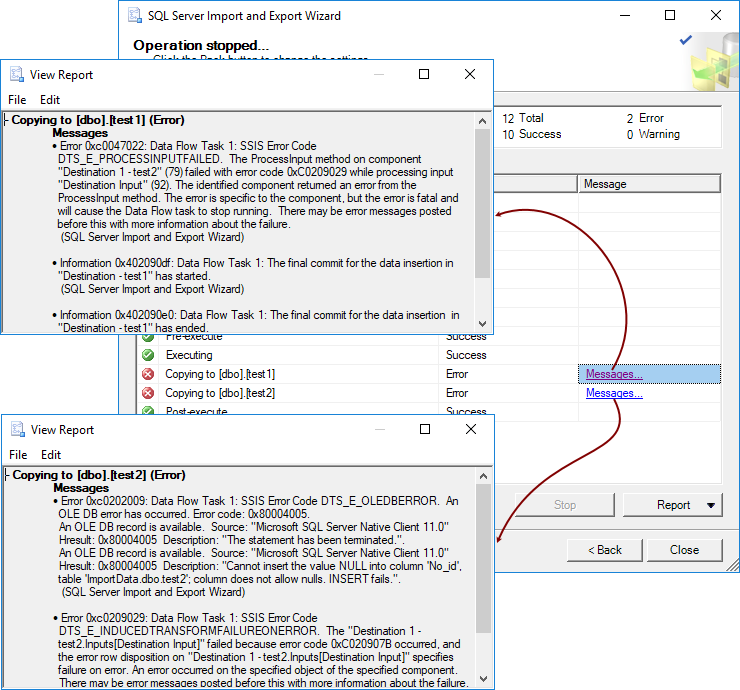
– Copying to [dbo].[test1] (Error)
Messages
- Error 0xc0047022: Data Flow Task 1: SSIS Error Code DTS_E_PROCESSINPUTFAILED. The ProcessInput method on component “Destination 1 – test2” (79) failed with error code 0xC0209029 while processing input “Destination Input” (92). The identified component returned an error from the ProcessInput method. The error is specific to the component, but the error is fatal and will cause the Data Flow task to stop running. There may be error messages posted before this with more information about the failure.
(SQL Server Import and Export Wizard)
- Information 0x402090df: Data Flow Task 1: The final commit for the data insertion in “Destination – test1” has started.
(SQL Server Import and Export Wizard)
- Information 0x402090e0: Data Flow Task 1: The final commit for the data insertion in “Destination – test1” has ended.
(SQL Server Import and Export Wizard)
– Copying to [dbo].[test2] (Error)
Messages
- Error 0xc0202009: Data Flow Task 1: SSIS Error Code DTS_E_OLEDBERROR. An OLE DB error has occurred. Error code: 0x80004005.
An OLE DB record is available. Source: “Microsoft SQL Server Native Client 11.0” Hresult: 0x80004005 Description: “The statement has been terminated.”.
An OLE DB record is available. Source: “Microsoft SQL Server Native Client 11.0” Hresult: 0x80004005 Description: “Cannot insert the value NULL into column ‘No_id’, table ‘ImportData.dbo.test2’; column does not allow nulls. INSERT fails.”.
(SQL Server Import and Export Wizard)
-
Error 0xc0209029: Data Flow Task 1: SSIS Error Code DTS_E_INDUCEDTRANSFORMFAILUREONERROR. The “Destination 1 – test2.Inputs[Destination Input]” failed because error code 0xC020907B occurred, and the error row disposition on “Destination 1 – test2.Inputs[Destination Input]” specifies failure on error. An error occurred on the specified object of the specified component. There may be error messages posted before this with more information about the failure.
(SQL Server Import and Export Wizard)
To resolve this problem, disable constraint for referenced table (test2) by executing the following code in SSMS:
|
ALTER TABLE test2 NOCHECK CONSTRAINT ALL |
After importing data from data source to the destination SQL Server database, execute the following code in SSMS to enable constraint for the test2 table:
|
ALTER TABLE test2 WITH CHECK CHECK CONSTRAINT ALL |
In some cases, the warning message like from the image below may appear:
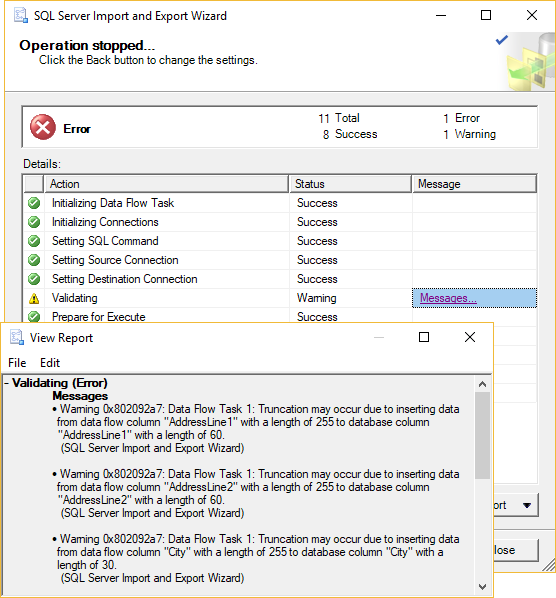
– Validating (Warning)
Messages
- Warning 0x802092a7: Data Flow Task 1: Truncation may occur due to inserting data from data flow column “AddressLine1” with a length of 255 to database column “AddressLine1” with a length of 60.
(SQL Server Import and Export Wizard)
- Warning 0x802092a7: Data Flow Task 1: Truncation may occur due to inserting data from data flow column “AddressLine2” with a length of 255 to database column “AddressLine2” with a length of 60.
(SQL Server Import and Export Wizard)
- Warning 0x802092a7: Data Flow Task 1: Truncation may occur due to inserting data from data flow column “City” with a length of 255 to database column “City” with a length of 30.
(SQL Server Import and Export Wizard)
- Warning 0x80049304: Data Flow Task 1: Warning: Could not open global shared memory to communicate with performance DLL; data flow performance counters are not available. To resolve, run this package as an administrator, or on the system’s console.
(SQL Server Import and Export Wizard)
To resolve this, go to the SQL Server destination table and increase the column size for the columns that are listed in the warning message.
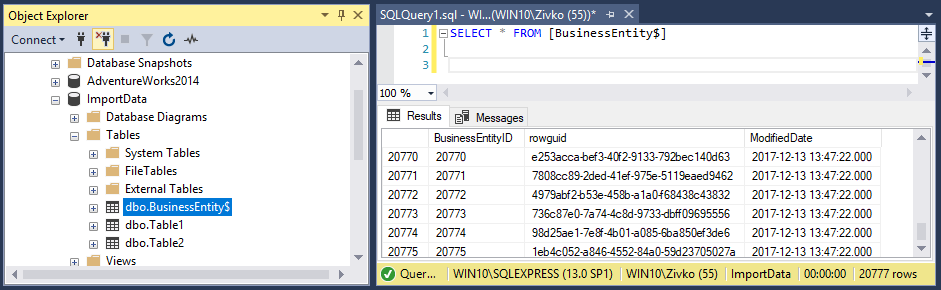
To verify that the data from the Excel file are imported to the SQL Server database, go to SSMS, find the database in which data are imported and list all data from the tables:
References:
- Import data from Excel to SQL Server or Azure SQL Database
- How to import/export data to SQL Server using the SQL Server Import and Export Wizard
- How to query Excel data using SQL Server linked servers
- Import and Export Data with the SQL Server Import and Export Wizard
- Author
- Recent Posts

Marko aka “Zivko” is a senior software analyst from Nis, Serbia focusing on SQL Server and MySQL as well as client technologies like SSMS, Visual Studio, and VSCode. He has extensive experience with quality assurance, issue escalation/resolution, and product evangelism.
He is a prolific author of authoritative content related to SQL Server including a number of “platinum” articles (top 1% in terms of popularity and engagement). His writing covers a range of topics on MySQL and SQL Server including remote/linked servers, import/export, LocalDB, SSMS, and more.
In his part-time, Zivko likes basketball, foosball (table-soccer), and rock music.
See more about Marko at LinkedIn
View all posts by Marko Zivkovic
Qlik Sense поддерживает чтение данных из таблиц Microsoft Excel. Поддерживаются следующие форматы файла: XLS, XLSX, XLW и XLSM. Можно использовать параметр «Добавить данные» в диспетчере данных или выбрать данные в редакторе загрузки данных. В обоих случаях из файла таблицы можно выбрать именованные области листа, один лист, несколько листов или все листы. Каждый лист загружается в виде отдельной таблицы, за исключением случаев, когда листы обладают одинаковой структурой полей: такие листы объединяются в одну таблицу.
Примечание о подсказкеПри загрузке таблицы Microsoft Excel таблица используется в качестве источника данных для приложений Qlik Sense. Это означает, что листы Microsoft Excel преобразуются в таблицы Qlik Sense, а не листы в приложении Qlik Sense.
Перед загрузкой таблицы Microsoft Excel может возникнуть необходимость внести изменения.
Выбор данных из листов Microsoft Excel
При выборе данных из листов Microsoft Excel для корректной интерпретации данных таблиц используются следующие параметры.
| Элемент интерфейса | Описание |
|---|---|
| Имена полей | Установите для таблицы параметр Встроенные имена полей или Имена полей отсутствуют. Как правило, первая стока в таблице Excel содержит встроенные имена полей. Если выбран параметр Имена полей отсутствуют, поля будут помечены как A,B,C… |
|
Размер заголовка |
Указано количество строк в заголовке таблицы, которые следует пропустить: как правило, это строки, содержащие общую информацию, формат которой отличен от столбцового. |
Таблица выглядит так:
| Машина: | AEJ12B | — | — |
|---|---|---|---|
| Дата: | 2015-10-05 09 | — | — |
| Timestamp | Order | Operator | Yield |
| 2015-10-05 09:22 | 00122344 | A | 52 |
| 2015-10-05 10:31 | 00153534 | A | 67 |
| 2015-10-05 13:46 | 00747899 | B | 86 |
В этом случае можно игнорировать две первые строки и загрузить таблицу с полями Timestamp, Order, Operator и Yield. Для этого используйте следующие параметры:
| Элемент интерфейса | Описание |
|---|---|
|
Размер заголовка |
2 Две первые строки рассматриваются как содержащие данные заголовка и при загрузке файла игнорируются. В этом случае две строки, начинающиеся с Machine: и Date: игнорируются, так как не входят в состав данных таблицы. |
| Имена полей |
Встроенные имена полей. Первая считанная строка используется в качестве имени поля для соответствующих столбцов. В этом случае первой считанной строкой является третья строка, так как две первые строки содержат данные заголовка. |
Подготовка листов Microsoft Excel для более простой загрузки в Qlik Sense
Если необходимо загрузить файлы Microsoft Excel в программу Qlik Sense, есть много функций, которые можно использовать для преобразования и очищения данных в скрипте загрузки данных, но, возможно, более удобным будет подготовить исходные данные непосредственно в табличном файле Microsoft Excel. В этом разделе предложено несколько подсказок, как подготовить таблицу для ее загрузки в программу Qlik Sense с минимальным кодированием скрипта.
Используйте заголовки столбцов
При использовании заголовков столбца в файле Microsoft Excel они автоматически будут использоваться как имена полей, если будет выбран параметр Встроенные имена полей при выборе данных в программе Qlik Sense. Также рекомендуется избегать переноса строки в метках, помещайте заголовок в качестве первой строки на листе.
Форматирование данных
Файл Microsoft Excel легче загрузить в программу Qlik Sense, если его содержимое организовано в виде необработанных данных в таблице. Желательно избегать следующего:
- Агрегированные величины, такие как суммы и итоги. Агрегированные величины можно определить и вычислить в программе Qlik Sense.
- Дубликаты заголовков.
- Дополнительная информация, которая не является частью данных, например комментарии. Лучше всего иметь отдельный столбец для комментариев, который можно пропустить при загрузке файла в программу Qlik Sense.
- Макет данных перекрестной таблицы. Если, например, есть по одному столбцу для каждого месяца, лучше создать один столбец с именем «Месяц» и записать те же данные в 12 строк, по одной строке для каждого месяца. В дальнейшем вы всегда сможете просмотреть этот столбец в формате перекрестной таблицы в программе Qlik Sense.
- Промежуточные заголовки, например, строка с названием «Отдел А» с последующими строками, относящимися к Отделу А. Вместо этого следует создать столбец с именем «Отдел» и заполнить ее соответствующими названиями отделов.
- Объединенные ячейки. Лучше помещать каждое значение ячейки отдельно.
- Пустые ячейки, значение которых подразумевается вышеуказанными значениями. Заполните все пустые ячейки, чтобы каждая из них содержала данные.
Используйте именованные области
Если необходимо прочитать часть листа, можно выбрать область из столбцов и строк и определить ее как именованную область в файле Microsoft Excel. Программа Qlik Sense может загружать данные из именованных областей и из листов.
Обычно можно определить необработанные данные как именованную область и сохранить все дополнительные комментарии и легенды за пределами именованной области. С учетом вышесказанного загрузить данные в программу Qlik Sense не составит труда.
Удалите защиту паролем
Защищенные паролем файлы не поддерживаются в Qlik Sense, поэтому перед загрузкой таблицы в Qlik Sense следует удалить защиту паролем.
Загрузка файлов Excel Binary Workbook (.xlsb)
Загрузить файлы Excel Binary Workbook (.xlsb) непосредственно в Qlik Sense невозможно. Обходное решение — использовать подключение ODBC.
In this article, we will explain different methods to load data from excel sheet into Oracle database.
Below are the methods that can be used.
- SQL DEVELOPER
- SQLCL utility
- TOAD
- SQLLOADER
Here we will explain how to do this with SQL developer and SQLCL utility.
USING SQLDEVELOPER TOOL:
SQL developer is a free tool provided by SQL developer is a free tool provided by Oracle for managing database with GUI interface.
You can download and install it on your desktop. Loading the excel sheet into a table using SQL developer is the easiest way.
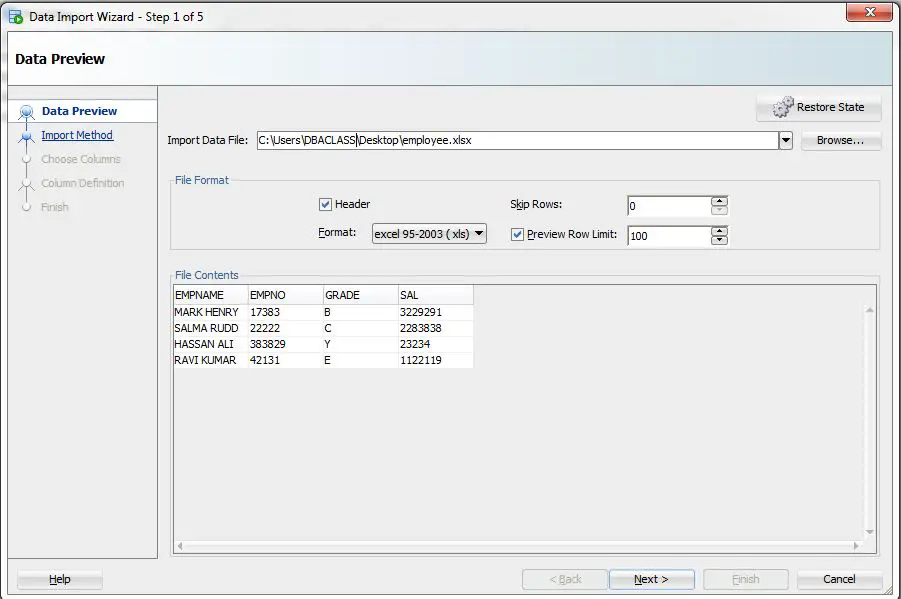
Let’s say, we have an excel sheet names employee.xlsx as below.
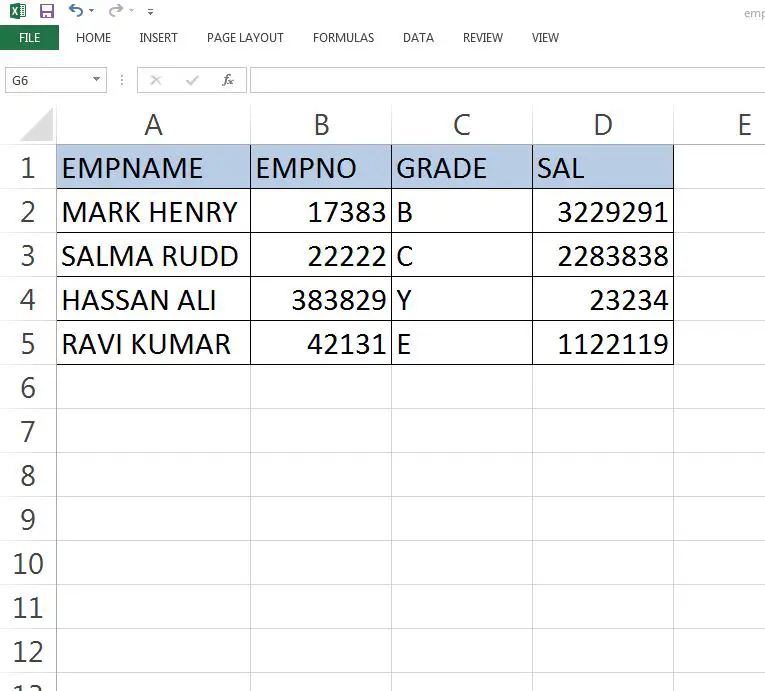
So first create a table with the columns same as excel sheet.
SQL> show user
USER is "APP_USER"
SQL>
SQL>
SQL> CREATE TABLE EMPLOYEE
( EMPNAME VARCHAR2(100),
  EMPNO   NUMBER ,
  GRADE   VARCHAR2(10),
  SAL     NUMBER
);  2    3    4    5    6

Table created.
Once the table is created, connect to the database using SQL developer.
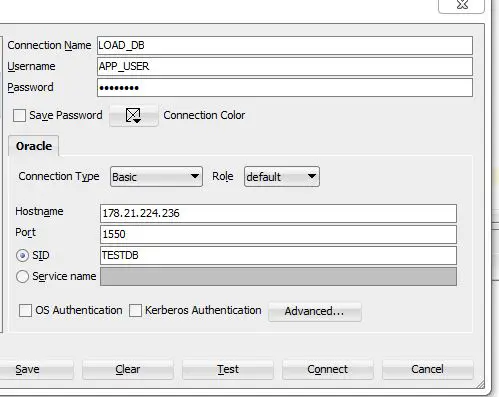
Select the table, which we created,(where data will be loaded).
Right click on the table and select Import Data.
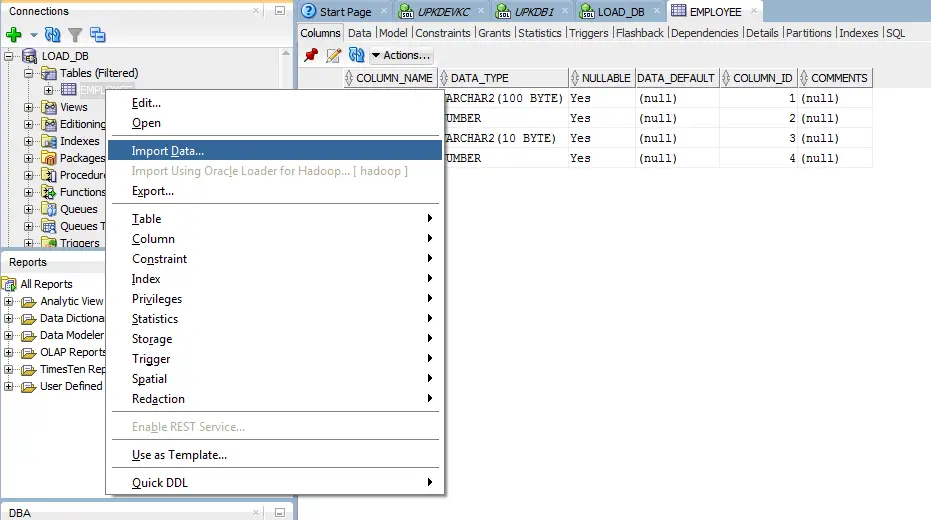
Browse the xlsx file and set format to xls.
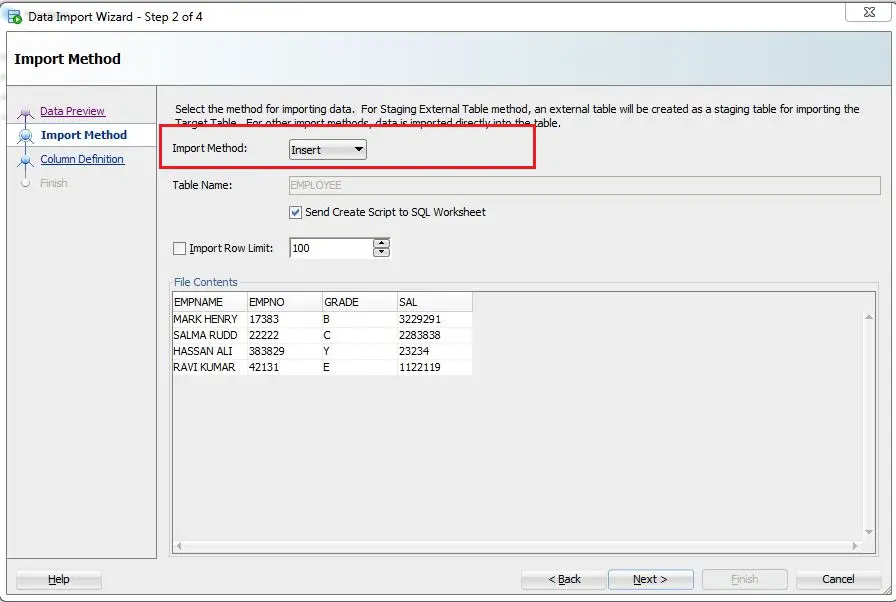
Import method -> Insert
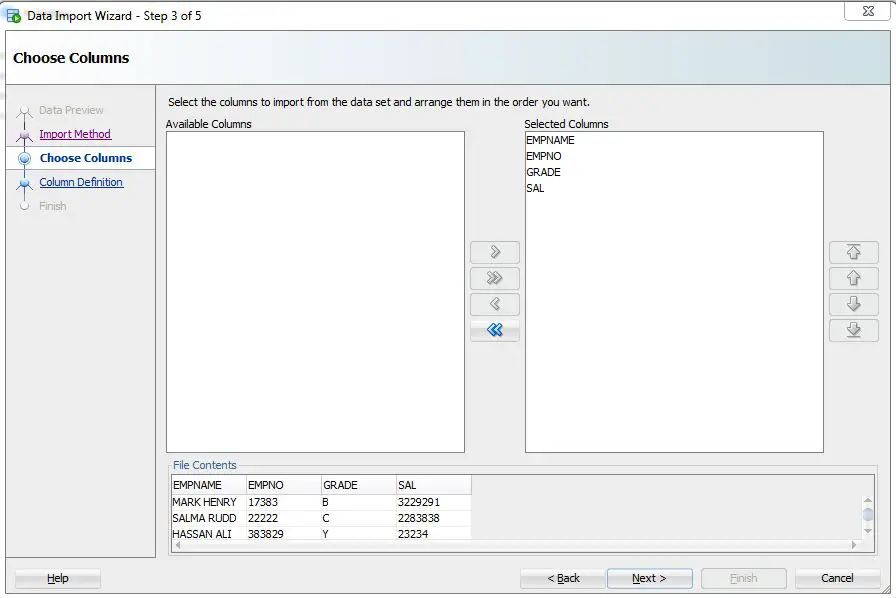
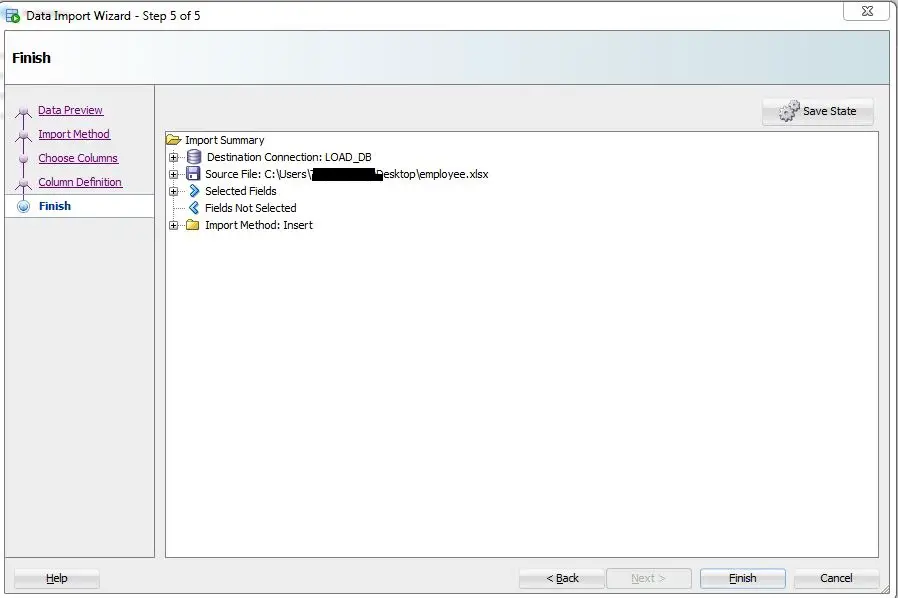
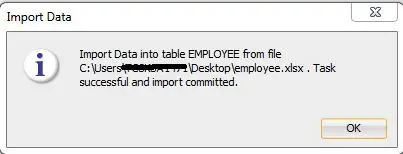
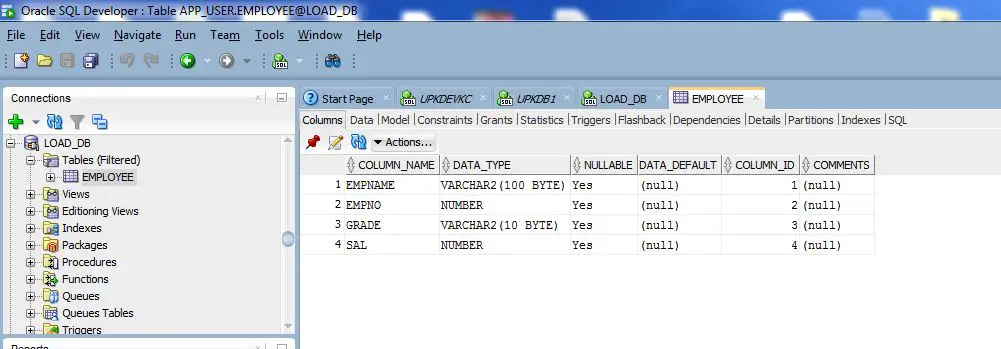
We have successfully imported the excel sheet into the table. Let’s check in the database.
SQL> select count(*) from app_user.employee;

  COUNT(*)
----------
         4
USING SQLCL UTILITY:
SQLCL is a free utility provided by Oracle that provides an option to load CSV file to a database table easily.
For installation and use please refer – SQLCL Utility in Oracle:
But here we have an excel sheet which has the extension. .xlsx So 1st step is to convert this to.xlsx csv .
Steps to convert excel sheet to the csv file.
Open a notepad and paste the below connect and name it as XlsToCsv.vbs
Script reference – https://stackoverflow.com/questions/1858195/convert-xls-to-csv-on-command-line
if WScript.Arguments.Count < 2 Then
    WScript.Echo "Error! Please specify the source path and the destination. Usage: XlsToCsv SourcePath.xls Destination.csv"
    Wscript.Quit
End If
Dim oExcel
Set oExcel = CreateObject("Excel.Application")
Dim oBook
Set oBook = oExcel.Workbooks.Open(Wscript.Arguments.Item(0))
oBook.SaveAs WScript.Arguments.Item(1), 6
oBook.Close False
oExcel.Quit
WScript.Echo "Done"
Now in command prompt, go to the location where this executable file exists.
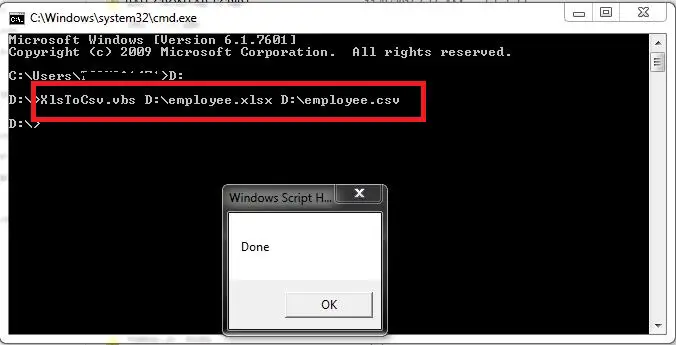
If it shows Done, then CSV file conversion is successful. Then copy this csv file to your database server.
Login with SQLCL utility and use LOAD command. Before that table structure needs to be created in the database.
SQL> CREATE TABLE EMPLOYEE
( EMPNAME VARCHAR2(100),
  EMPNO   NUMBER ,
  GRADE   VARCHAR2(10),
  SAL     NUMBER
);  2    3    4    5    6

Table created.
SYNTAX – LOAD [ table_name ] [ csv file with path ]
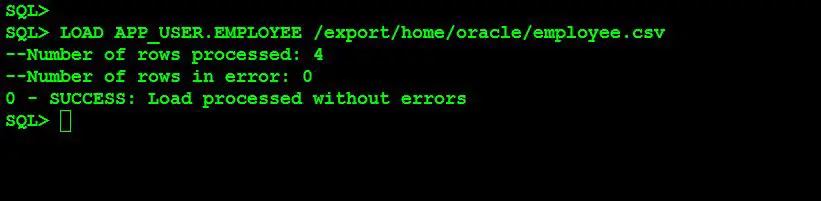
SQL> select count(*) from app_user.employee;

  COUNT(*)
----------
         4
We loaded the CSV file successfully.