
But this is a program that over time has not stopped evolving and growing. Thus, it has been receiving new updates and functions in order to meet the expectations and needs of its millions of users. Therefore and due to all this, at the moment we can find a multitude of functions, more or less useful or extended, but which try to cover all environments. At the same time we must bear in mind that here we are not only going to work with texts , but also that the application supports all kinds of additional elements. Here we find graphics, tables, images , videos, etc; many of them from the Insert menu.

To all that we have mentioned so far, another very interesting element as well as useful that we can add, are those called lists. In fact, in these we are going to focus on these same lines , a type of object as used and versatile as lists.
Surely, over the years, many of you have used these elements to add a plus to your documents. Well, that is why here we are going to focus on showing you in detail what these objects can offer us. We will also see the types of lists that we can use in Word , as well as the utility that they will offer us separately.
What is a Word list and what is it for?
First of all and as its own name lets us glimpse, the Word lists function allows us to carry out an accumulation of similar elements, and ordered properly. Thus, what we achieve is to generate our own personal lists that in the end will come in handy to show a set of elements, but in a structured way.
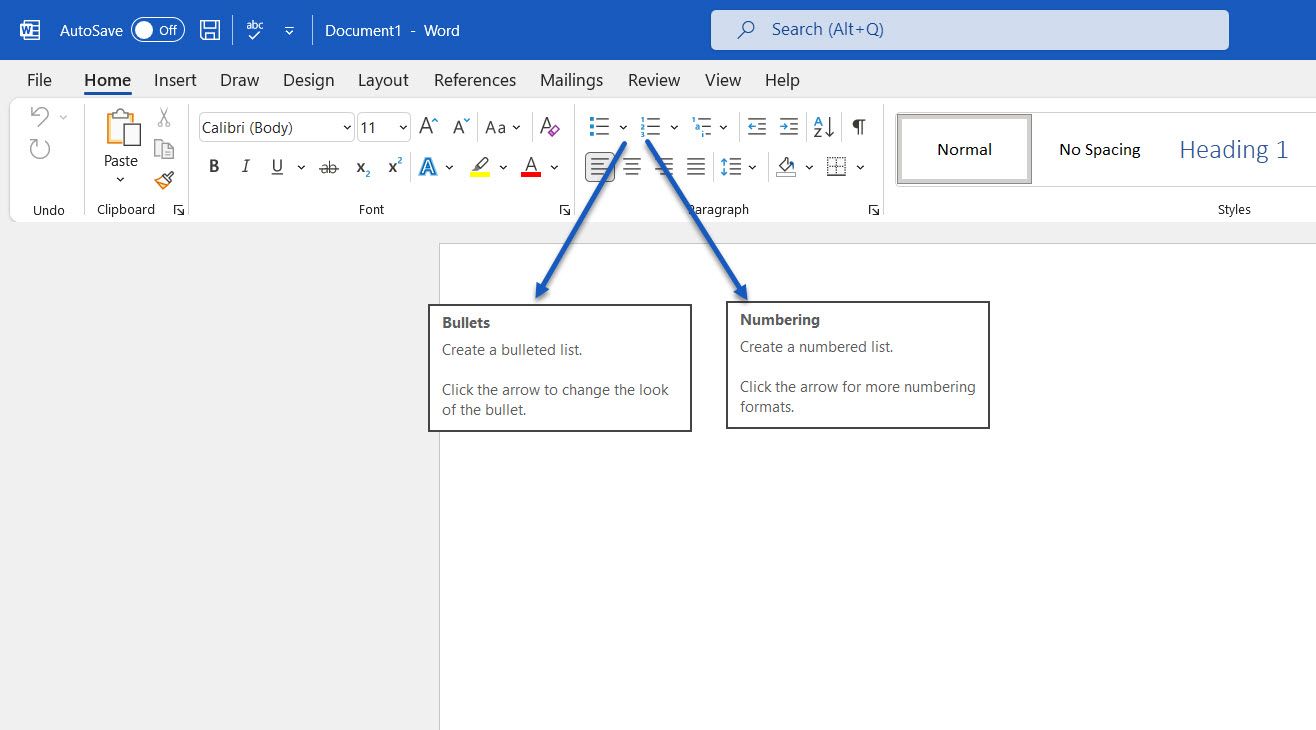
Of course, we must bear in mind that the advanced program of the Redmond , presents us with several ways, both to create those lists, and formats for them. For example, initially we have the possibility of accessing this type of elements directly from the Start menu option of Word itself. Thus, at the top of the section called Paragraph, we see the formats of the same that we can access and use below.

As we mentioned, a program of the potential of this Microsoft , presents us with several alternatives to choose from when dealing with its additional elements. Here come into play, as it could not be otherwise, the lists that concern us in these lines. That is why below we are going to talk about each of the types of lists that we are going to find here and that we can use. Each will be best suited for a type of use, or work environment.
Numbered lists
It is evident that the numbered lists are perhaps one of the most common ones that are often used when the time comes to make use of these elements. They could be considered as the most basic of the exposed formats, but perhaps they are also the most useful. These are represented, in the section discussed above, by a button with a series of numbers vertically. Therefore, to see what this format offers us, we will only have to click on it.
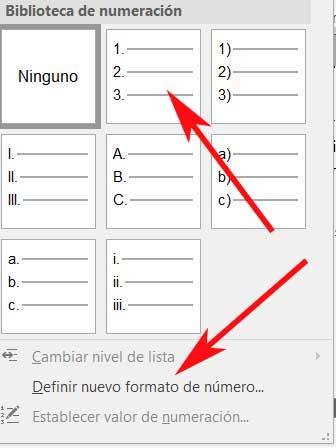
It is worth mentioning that despite being called Numbering Lists, here we can use other elements in the form of separators for the elements of the same. We will see these on the screen by clicking on the drop-down list to the right of the mentioned button. In this way, we can opt to use simple numbers , upper or lower case letters, numbers with a separator, etc. Say that when you click on the button directly, the list will begin to be classified by simple numbers.
But that’s not all, but at the same time we can specify our own custom classifier, all through the link Define new number format.
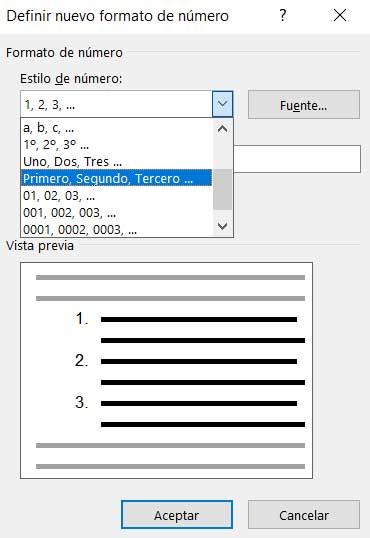
Here the program itself proposes a wide range of formats that will serve as classification elements for the list that we will create. Similarly, we will have the possibility to create a custom one by adding characters to the Number format field. Say that in this same window we have a preview to visualize how the numerical list that we are going to create will look like. As you can imagine, this function opens up a wide range of possibilities when creating basic and original lists in Word.
Before we finish this type, we will tell you that a shortcut to creating numerical lists here is, for example, writing a 1 followed by a -. Thus, when pressing the space bar, Word will directly create a list of this type for us to fill in and customize.
Bullet lists
On the other hand, a little more original than those previously reviewed, we find the Bullet lists. These we will find in the same section of the main interface of the program that we discussed earlier. But in this case, if we choose to use this specific format, say that it is represented by a button with a series of small squares. As in the previous case, when you click on the small arrow on the right of it, the corresponding drop-down list appears.
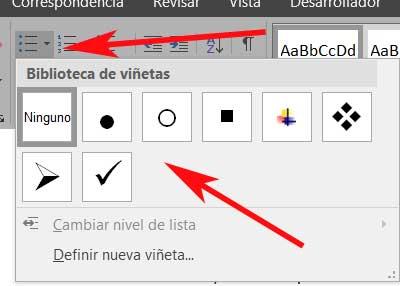
Here, as before, we are going to find a series of slightly more graphic elements or objects that will serve as cataloguers or separators for this new list. In this section, what we are going to find are a series of elements in the form of symbols that can act as separators for the elements of the new list. Thus, we find circles, squares, arrows, etc. But of course, as in the previous case, we can also define new ones. For this we click on Define new bullet from the mentioned drop-down list.
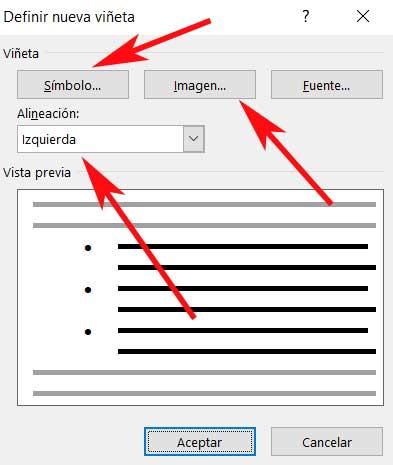
The most interesting thing about this is that here we can specify that we want to use some of the multiple symbols that we usually use throughout the operating system. But that is not all, we will also have the possibility to select an image that we have stored in the disk drives . Of course, we should be a little cautious, since this image will be repeated over and over again for each item on the list.
As in the previous case, we also have the possibility to shorten the process of creating a custom list. For this, it is enough that we write an asterisk on a new line, so that the bullet list starts automatically by pressing the space bar .
Multilevel lists
So far we have been able to see the main objective and how we can create both numerical and bulleted lists. Each format can serve us in an environment or type of independent use, we can also create both lists made up of generic classifiers, as well as more personalized and therefore original.
However, it is also worth taking a look at the so-called Multilevel lists. We will find these in the same section of the Word interface of the previous two. Of course, in this case they are represented by the levels of which they will be composed, in miniature. So, to start we will tell you these Multilevel are elements of this same type that we have seen, but they allow you to create a list within another. It is evident that for this the container must already exist, so within the primary list, we can create others. Say that these will keep the indentations that we added initially, as well as the numbering indicated in their design.

That is why it could be said that the use of these elements is like taking the use of the simple lists previously reviewed, one step further. In fact, if we deploy the corresponding drop-down menu on its button , we find designs similar to those we saw in the previous formats, but in this case, nested. In the same way we can create the design of our new multilevel list from the link Define new list style.
At the same time, we find another link in the same window that allows us to define a new, multilevel, personalized list. Here we will have the opportunity to specify various parameters of this nested list element. Among these we find the possibility of customizing the types of separators of the different lists, including the level number, the alignment of the elements, the distance of the indentation , etc.
How to sort a Word list
First, it must be clear that in order to sort the components of a Word list, we must first create an element of this type. For this we can use any of the types that we talked about previously, to later mark the list in its entirety.
Well, once we have marked it with the mouse, we return to look at the Paragraph section, but in this case we opted for the button called Order. This is represented by the letters A and Z with an arrow, where we can directly click. There are no drop-down lists here, as before. But of course, by clicking on the mentioned button that we discussed, we find a new window that will give us the opportunity to customize the order to use in the marked list, depending on the needs of each case.
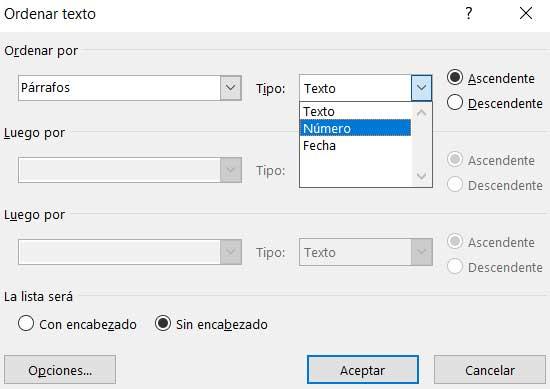
In this way, the program offers us the possibility of sorting the lists marked by paragraphs or titles on the one hand. When it comes to placing the elements that are part of it, Word offers us to order them by alphabetical, numerical order, or by date. Thus, if we are a little tricky and create the source lists in a structured way, this function will allow us to order their elements in a few seconds. And it is that the correct use of these elements will help to better understand our created documents.
Show the Developer tab
If the developer tab isn’t already visible, see Show the Developer tab.
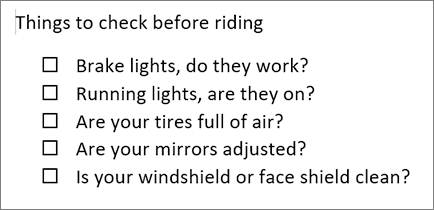
Make your list
-
Type the list.
-
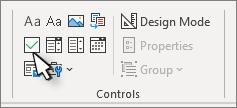
Go to Developer and select the Check Box Content Control at the beginning of the first line.

-
To change the default X to something else, see Make changes to checkboxes.
-
Copy and paste the check box control at the beginning of each line.
-
Select a checkbox to put an X (or other character) in the check box.
Add hanging indentation
If some list items are more than one line long, use hanging indents to align them.
-
Select the list. Bullets or numbers won’t look selected.
-
Go to Home and select the Paragraph dialog box launcher
. -
Under Indentation, in the Left box, type 0.25.
-
Under Special, choose Hanging.
-
For By, Word sets a default value of 0.5 inches. Change this if you want your additional lines indented differently.
-
Select OK when finished.
 .
.Lock the text and controls to prevent changes
-
Select the list and checkboxes.
-
Go to Developer >Group > Group.
To unlock the list, select the list and choose Group > Ungroup.
Create a print only list
-
Go to Home and select the down arrow next to the Bullets button.
-
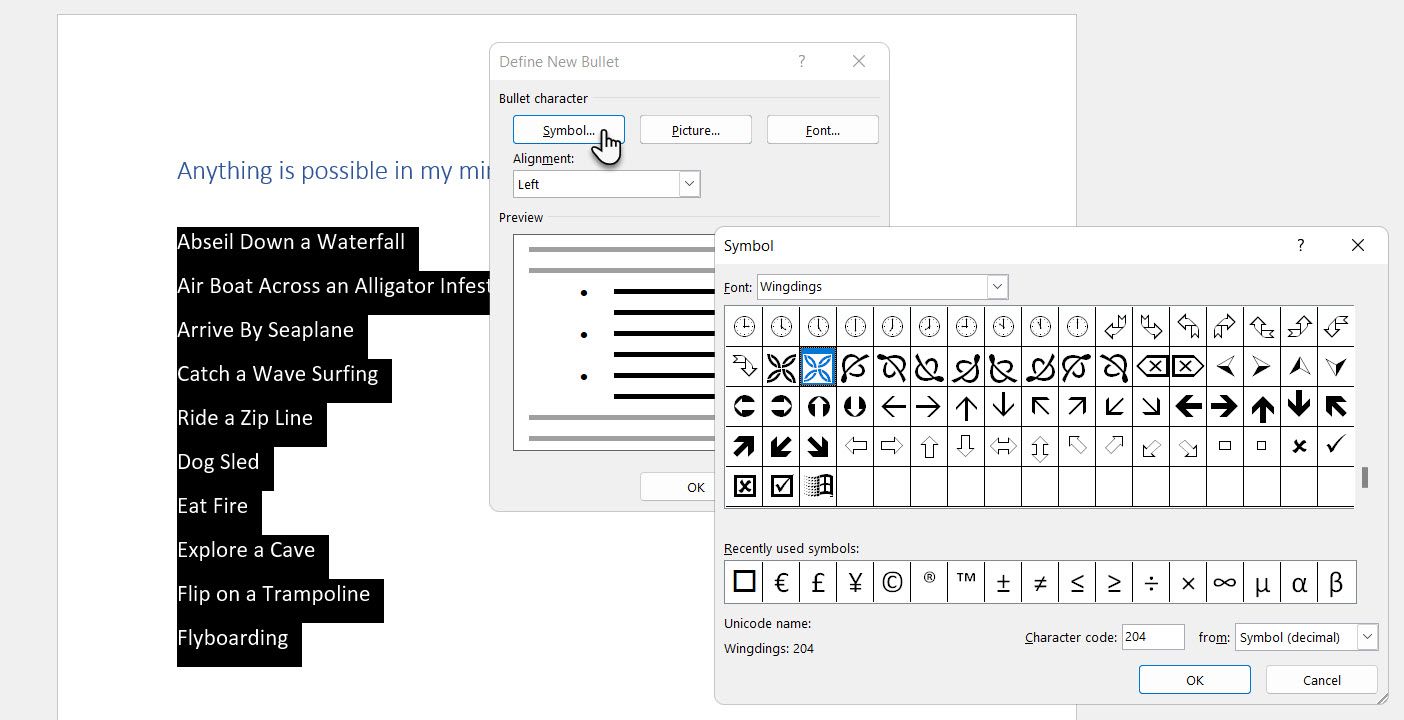
In the drop down menu, select Define New Bullet.
-
Select Symbol and find a box character. If you don’t initially see one, change Font to Wingdings or Segoe UI Symbol.
-
Select OK twice, and create your list.

Make a checklist you can check off in Word
To create a list that you can check off in Word, add content controls for checkboxes to your document.
Show the Developer tab
For more info if the developer tab isn’t already visible in Word, see Show the Developer tab.
Make your list
-
Create your list.
-
Place you cursor at the start of the first line.
-
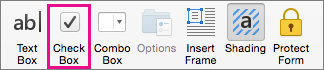
Go to the Developer tab, and then click Check Box.
-
If you want a space after the check box, press Tab or Spacebar.
Use a Tab character if you want to format the list item with hanging indentation, like Word applies to bulleted lists.
-
Select and copy (⌘ + C) the check box and any tabs or spaces.
-
Place the cursor at the start of the each list item, and paste (⌘ + V ) the copied check box and characters.
-
Paste the checkbox at the start of each line in your list.
Add hanging indentation
If some of the list items are longer than one line, use hanging indentation to align them.
-
Select the list.
-
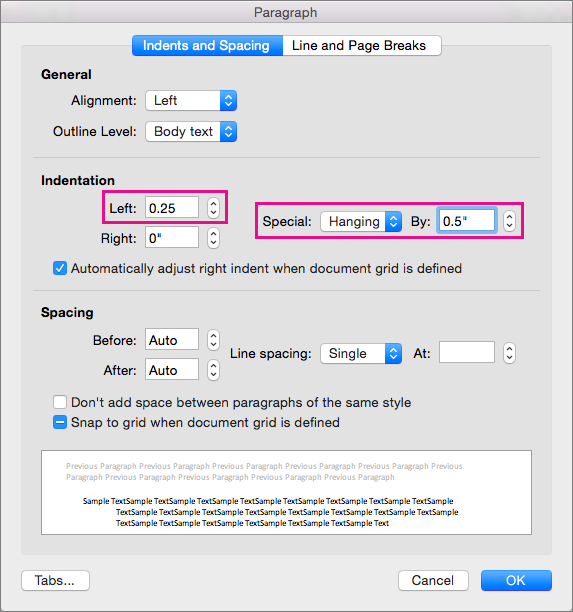
Go to Format and select Paragraph.
-
Under Indentation, type 0.25 in the Left box.
-
In the Special list, choose Hanging.
For By, Word sets a default value of 0.5 inches. Change this if you want your additional lines indented differently.
Make a print only check list
You can replace the bullets or numbers in a list with another symbol, such as a box can be checked on a printed version of your document.
-
Select the entire list.
-
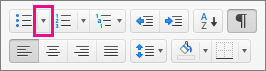
Select Home and select the arrow next to Bullets.
-
Select Define New Bullet.
-
Select Bullet, and choose a symbol from the table of symbols.
For more choices, in the Font box choose a symbol font, such as Wingdings.
-
Select a symbol to use, such as an open box (
) or a three-dimensional box (). -
Select OK, and then select OK again.
 ) or a three-dimensional box (
 ).
).Word for the web supports only the on-paper form of checklist.
-
Write your list, and then select it.
-
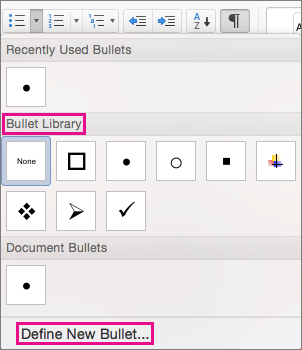
On the Home tab, choose the down-arrow next to the Bullets list to open the bullet library, and then choose the checkbox symbol.
Checklists and lists have become the staple of everything from grocery shopping to NASA launches. But they are boring.
Still, lists and checklists are also the simplest tools to reduce the complexity of information that assaults us every day. They are also the perfect antidote against forgetfulness. So, even as we swear to make perfect lists for productivity, let’s also get down to the basics with Microsoft Word and check off one daily office function—how to make those visually appealing lists and manage them.
1. Create Your First List
Most of the list-making tricks and tips lie within the Ribbon’s Paragraph group on the Home tab.
Select the text to which you want to add the numbered list and click the down arrows next to the Bullet Lists icon or the Numbered List icon to access the libraries for both. Preview each list format by hovering over the selections available.
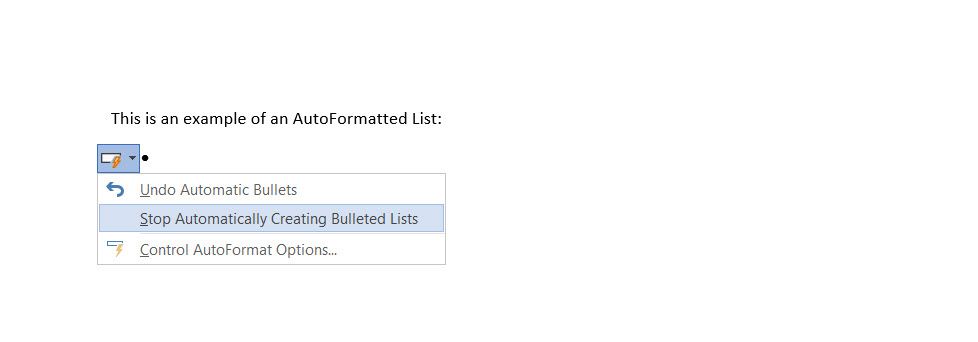
Microsoft Word also automatically creates a list for you when you start a paragraph with an asterisk or a number 1, period, and space followed by a press on the Enter key. With an asterisk, Word creates a bulleted list. Word senses that you are trying to create a numbered list with a number.
If you don’t want your text turned into a list, you can click the AutoCorrect options button image that appears. To disable or enable this option, go to File > Options > Proofing > AutoCorrect Options > AutoFormat As You Type.
To quickly change the style of a bulleted or numbered list, just click the style you want in the list that appears when you click the arrow next to Bullets or Numbering.
General Tip: You can change the format of just one or some of the bullet or number styles in a list. Place the cursor at the start of the line that you want to change before opening the Bullets and Numbering dialog box. Your changes will apply only to the selected lines.
2. Use Just the Keyboard to Create a List
Use a handy Microsoft Word shortcut to create numbered lists quickly with the keyboard alone.
The keyboard shortcut for a bulleted list: Press Ctrl + Shift + L to apply the default bullets to a list. Press Ctrl + Shift + N to remove the bullets.
To customize a keyboard shortcut for a numbered list, right-click anywhere on the Ribbon and select Customize the Ribbon from the popup menu. You can also open Word Options from File > Options > Customize Ribbon.

Click on the Customize button for Keyboard shortcuts.
Select All Commands in the Categories list. Scroll down the list on the left, and select FormatNumberDefault.
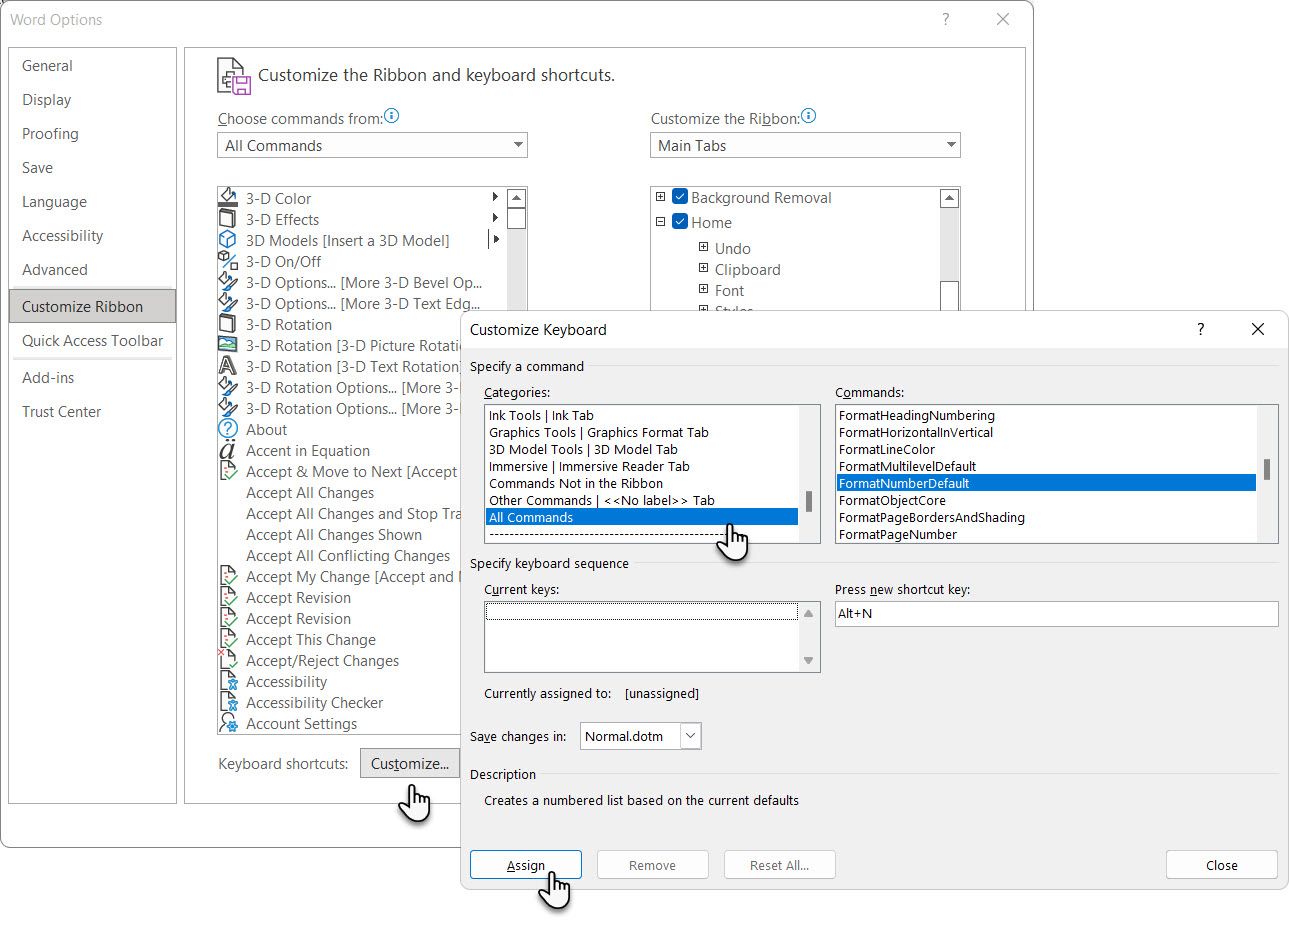
Place the cursor in the Press new shortcut key box and press the shortcut key combination you want to use to create a numbered list. For example, you could use Alt + N because it’s not assigned to anything else in Word. Click Assign.
The new keyboard shortcut is added to the Current keys list.
Click OK to exit the dialog box and test the new shortcut. Pressing «Alt + N» creates a numbered list. Pressing it again reverts it back to paragraph text.
General Tip: Do you want to skip numbering for a list item and convert it into a paragraph in the middle of a list? Select the specific list item and use the Alt + N shortcut to turn off the numbering.
3. Change the Default Numbered List Format
You can change, edit, or create a new numbered list. You have four Numbered List formats to choose from. But what if you want to use your own format other than the letters or Roman numerals, and it’s not available?
Go to Home > Paragraph group > Numbering. Click the down arrow. Choose Define New Number Format.
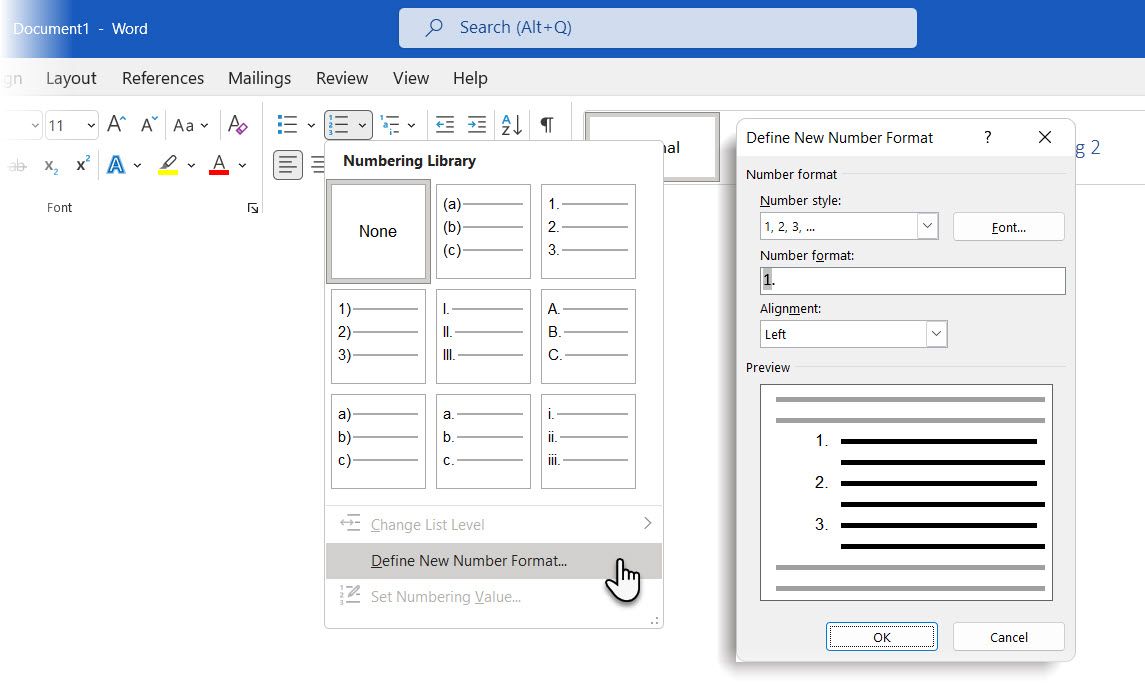
Choose any chronological format. To change the font size, style, and color, click Font and choose a setting on the Font or Advanced tab.
When you want to add a dash, parentheses, or another value like a pound sign to the number, enter it in the Number format field. The little preview displays the changes. You can see the square brackets for a list you can tick off in the screenshot below.
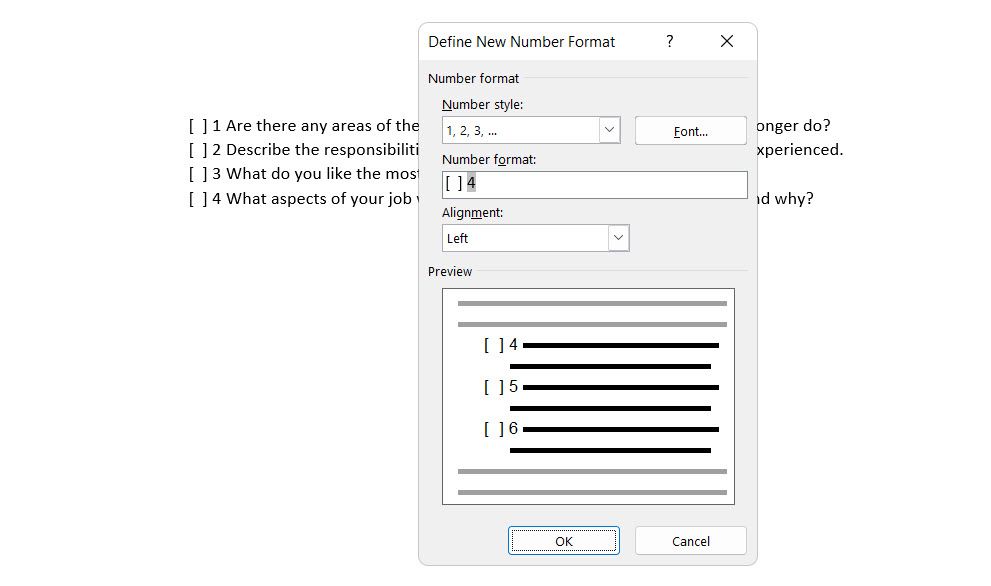
Choose Left, Centered, or Right under Alignment to change the number alignment. The default is Left-Aligned.
Click OK.
The new number format is applied to any selected text on your document.
General Tip: You can even prefix the numbered lists with descriptive text, e.g., Attendee 1, Attendee 2, Attendee 3…and so on.
4. Change the Default Bullet List Format
Just like the numbered list, you can also change the default look of any bulleted list. Again, visually appealing bullets (other than the boring black solid dots) help your documents stand out from the mundane.
Select the text you want the bulleted list for and follow these steps.
Go to Home > Paragraph group. Click the arrow next to Bullets.
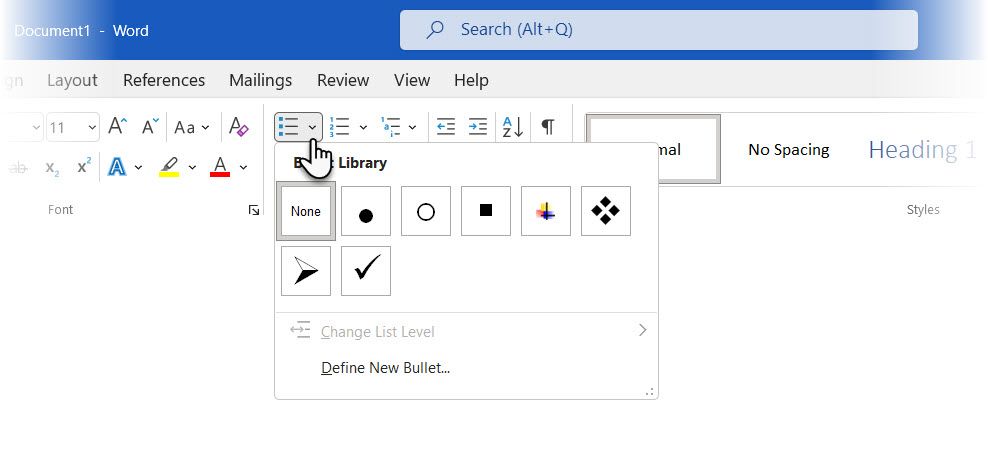
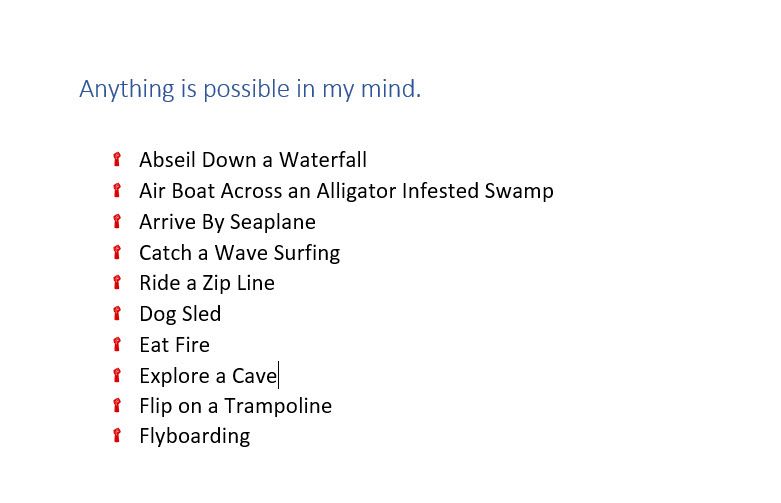
When the bullet you want isn’t in the library, click Define New Bullet.
The Define New Bullet dialog box opens. Under Bullet Character, choose Symbol.
Another dialog opens, which lets you choose appropriate symbols from your installed fonts.
The Wingdings fonts have the best variety that makes for stylized bullet lists. Like any other font, you can change the color, size, style, and other characteristics of your chosen bullet font. Click the Font button in the Bullet character section to enter the Font dialog box.
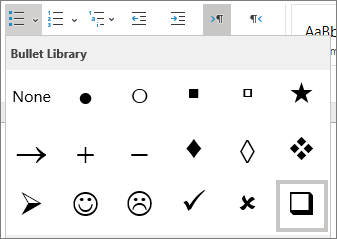
General Tip: Use an open box (Open box) or a three-dimensional box (3D box) from the Wingdings character palette to create a Word document with neat checkboxes.
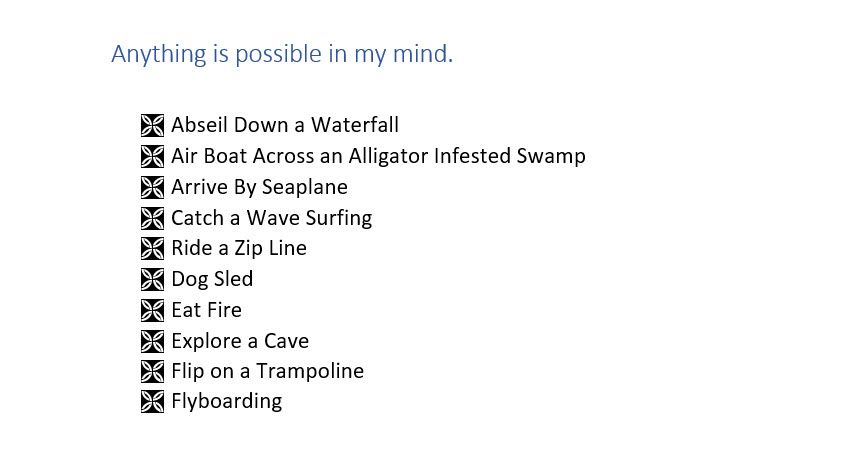
5. Use a Picture Instead of a Bullet
Sometimes all the mystic symbols in Webdings might not be enough. You can also use your own reusable graphics for bullet points. Though picture and SmartArt bullets look better on a PowerPoint slide, they work just as well in Word.
Select the bulleted list for which you want to change the bullets to pictures. Next, go to the Home tab > Paragraph group, click on the Bullets button, and select Define New Bullet from the dropdown menu. On the Define New Bullet dialog box, click Picture.
The Insert Pictures dialog box is displayed with different choices for your source file. You can insert a picture From a file on your PC or local network, from a Bing Image Search, or your OneDrive account.
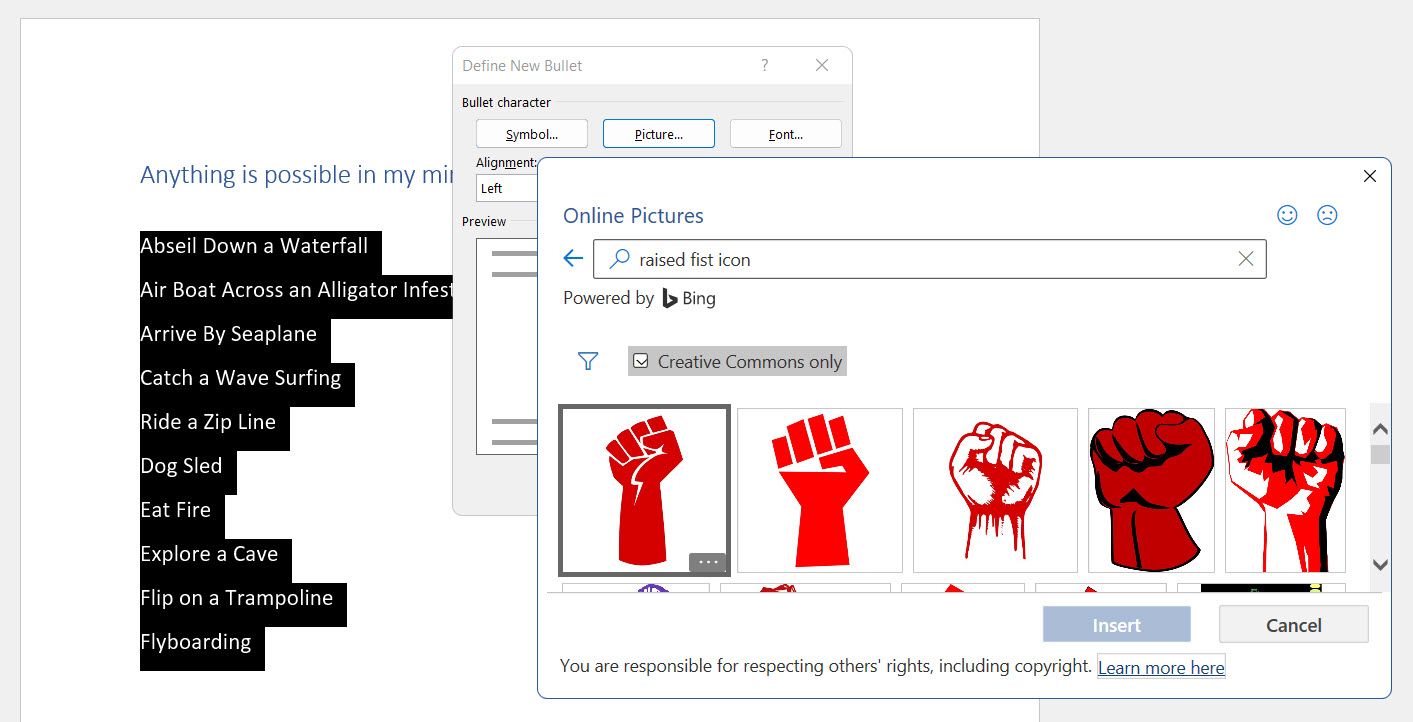
Navigate to the location of your source file and click on Insert. The Preview window shows the selection.
General Tip: You can choose a graphic that matches the «theme» of your list. For instance, display a banana as a picture bullet for a list of fruits. Make sure images are transparent and have a good background. In my experience, simple graphics work best.
6. Line Up the Numbers in a List
Sometimes, the smallest of tweaks can make a big visual difference. For example, note the screenshot below, which shows a numbered list with Word’s default Left alignment. As soon as the list reaches double digits, the default left alignment seems skewed as the decimal points do not line up neatly. Microsoft Word allows you to control this alignment and flush the double-digit numbers to the right.

Create your numbered list. Select the list items. Word can also control the alignment of a few selected items.
Go to Home > Paragraph. Then, click the dropdown arrow on Numbered list button.
Click on Define New Number Format. Choose Right alignment from the dropdown. Click OK.
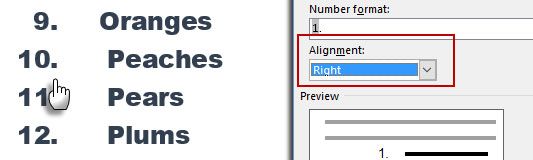
General Tip: Even if there is no decimal, it is preferable to have them aligned on the right edge of the number. Try it with brackets.
7. Adjust Microsoft Word’s Automatic List Indent
Every Word list comes with an automatic indent. Depending on the visual look you want, you may want to adjust the space.
Double-click any number in the list to select all of the numbers in the list.
Right-click the selection and choose Adjust List Indents from the context menu.
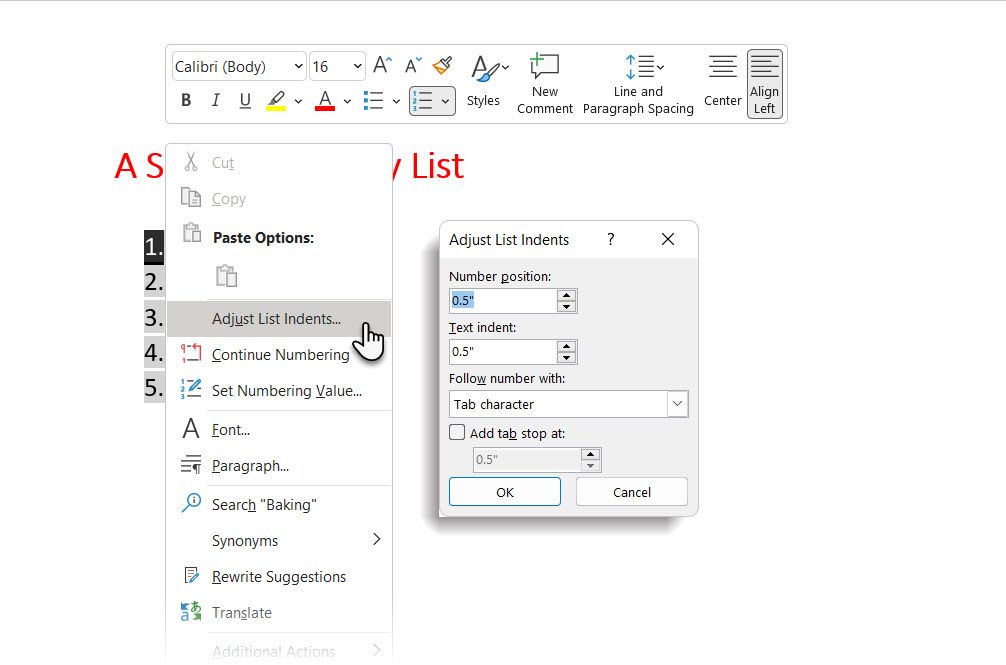
Change the distance of the bullet indent from the margin with the Number position box. Change the distance between the bullet and the text with the Text indent box.
Click OK.
8. Apply Formatting to a Single Number or Bullet on a List
You may want to format (changing the bullet style, color, or the size) a single bullet or number on a list without affecting any text on the list or any other succeeding bullets or numbers. Here’s an easy way.
Show formatting marks by clicking Home > Show/Hide.
Select just the paragraph marker (pilcrow) at the end for the list item whose bullet or number you want to change. Apply any formatting. The formatting affects only the bullet or number; the text in the list item retains its original format.
New bulleted or numbered items on the list coming after this will reflect this too. The text in the new list item will have the same font characteristics as the previous text, and the new bullet/number will have the same font characteristics as the previous bullet/number.
9. Create a Multilevel Numbered List
A multilevel list can be a mix of numbers, alphabets, and bullets arranged on different levels, as shown below. You can use multilevel lists to break down a list into its hierarchies or sub-points. Such an alignment is also used to create outlines. Word 2016 gives us a dedicated button on the Ribbon to create a multilevel list.
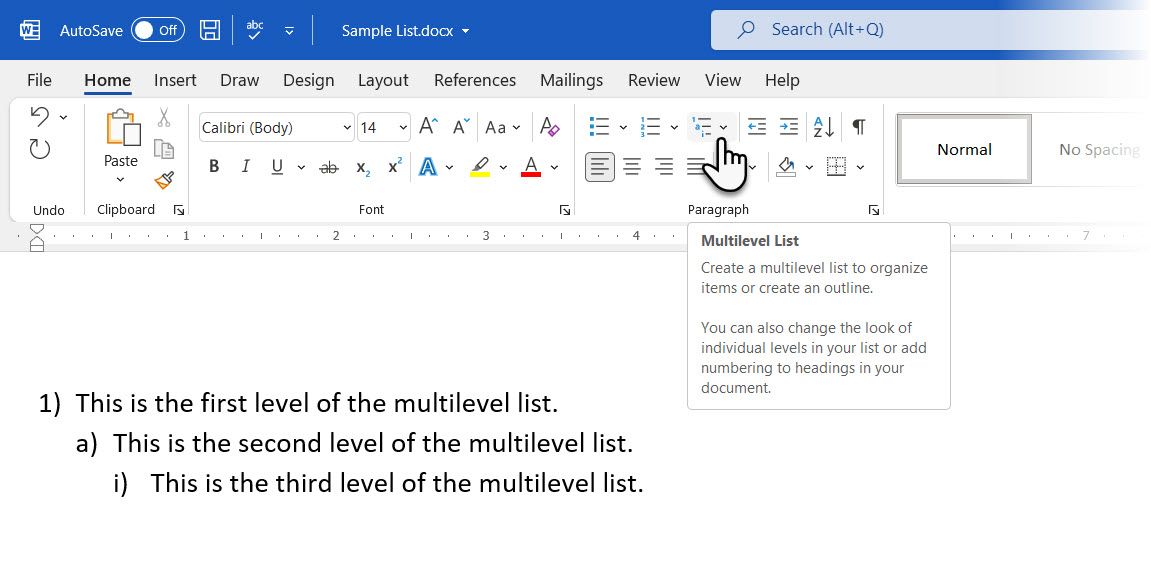
Click the Multilevel List button and type the list.
Press the Tab key to indent and create a sublevel. Press Shift + Tab to unindent and promote an item to a higher level.
General Tip: You can also write the entire list in advance. Select it, and click the Multilevel List button to align it using the Tab and Shift + Tab keys to organize the topics. You can also use the Increase or Decrease Indent commands on the Ribbon.
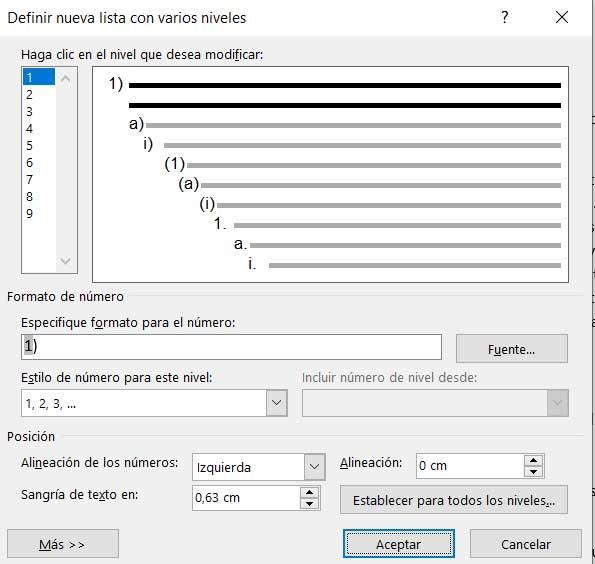
10. Create Reusable Styles for Multilevel Lists
You can change the bullets, letters, or numbers’ style, color, and alignment like any other list type. Save these changes as a new style and use it again and again.
Go to Ribbon > Home > click the arrow next to Multilevel List > Define New Multilevel List.
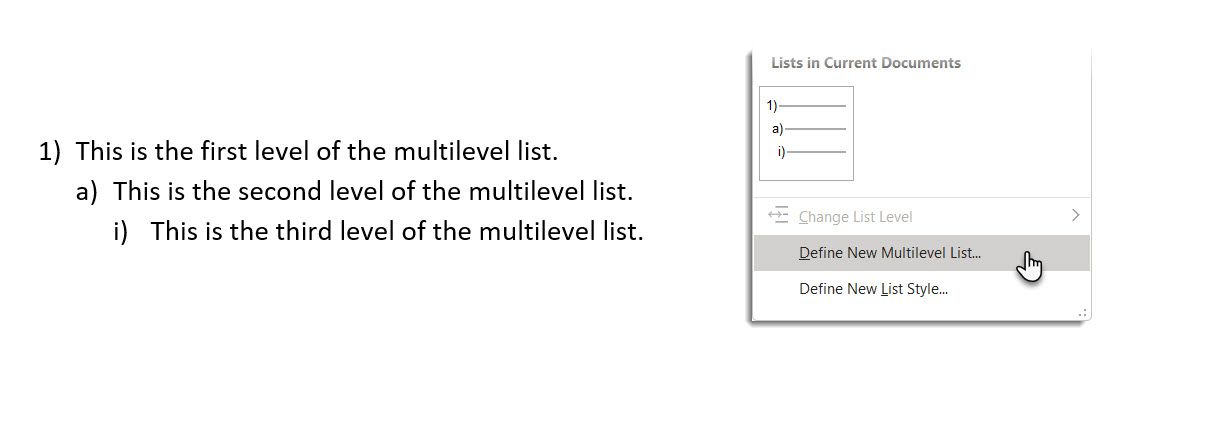
Click on More to expand the options.
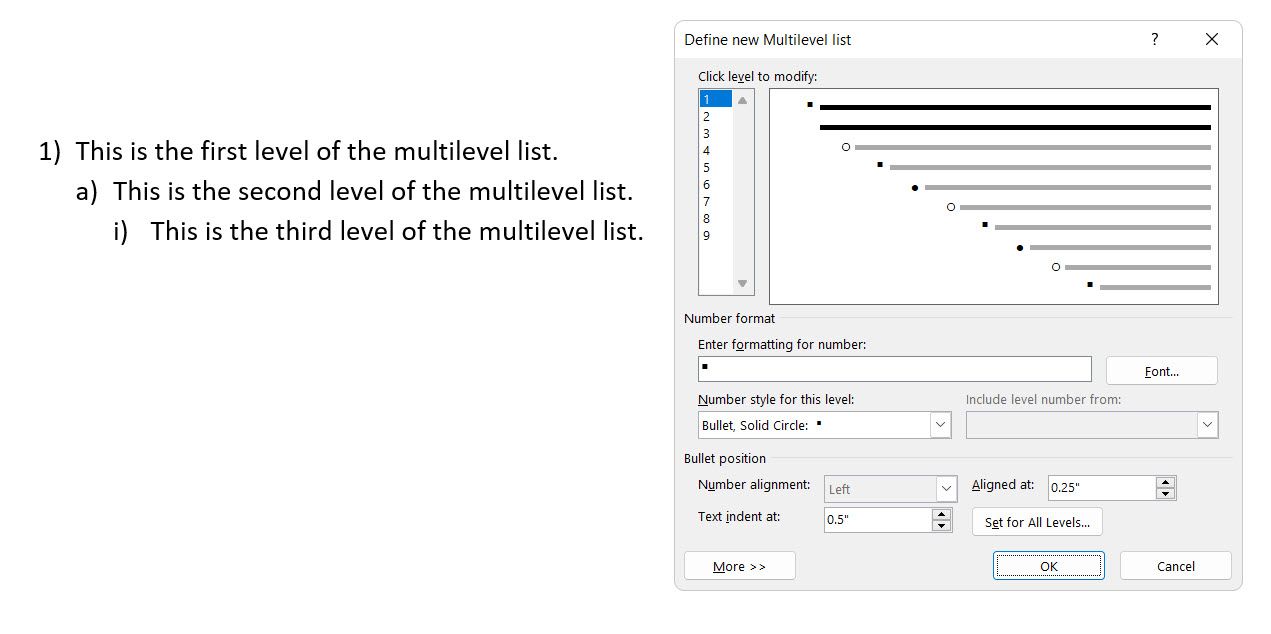
For customizing any of the levels, click the level number you want to modify. 1 is the default.
Use the options provided to change the appearance of the list. For example:
- In Number style for this level, type (1) if you want to style the numbers with parentheses or (A) to style the letters with parentheses.
- In Start at, choose the number, letter, or bullet where you want to start the list.
When you’ve finished the customizations, give the list a name under the ListNum field list name. This name will appear wherever you see the ListNum field.
Choose a style under Link level to style. This lets you use an existing style in Word for each level in the list.
Choose where you would like to apply your changes by clicking on Apply changes to and selecting from Selected text, Whole list, or This point forward.
11. Convert a List to a Table
First, select the list. Next, go to Home > Insert. Click the Table option in the Tables group.
Choose Convert Text to Table from the dropdown list.
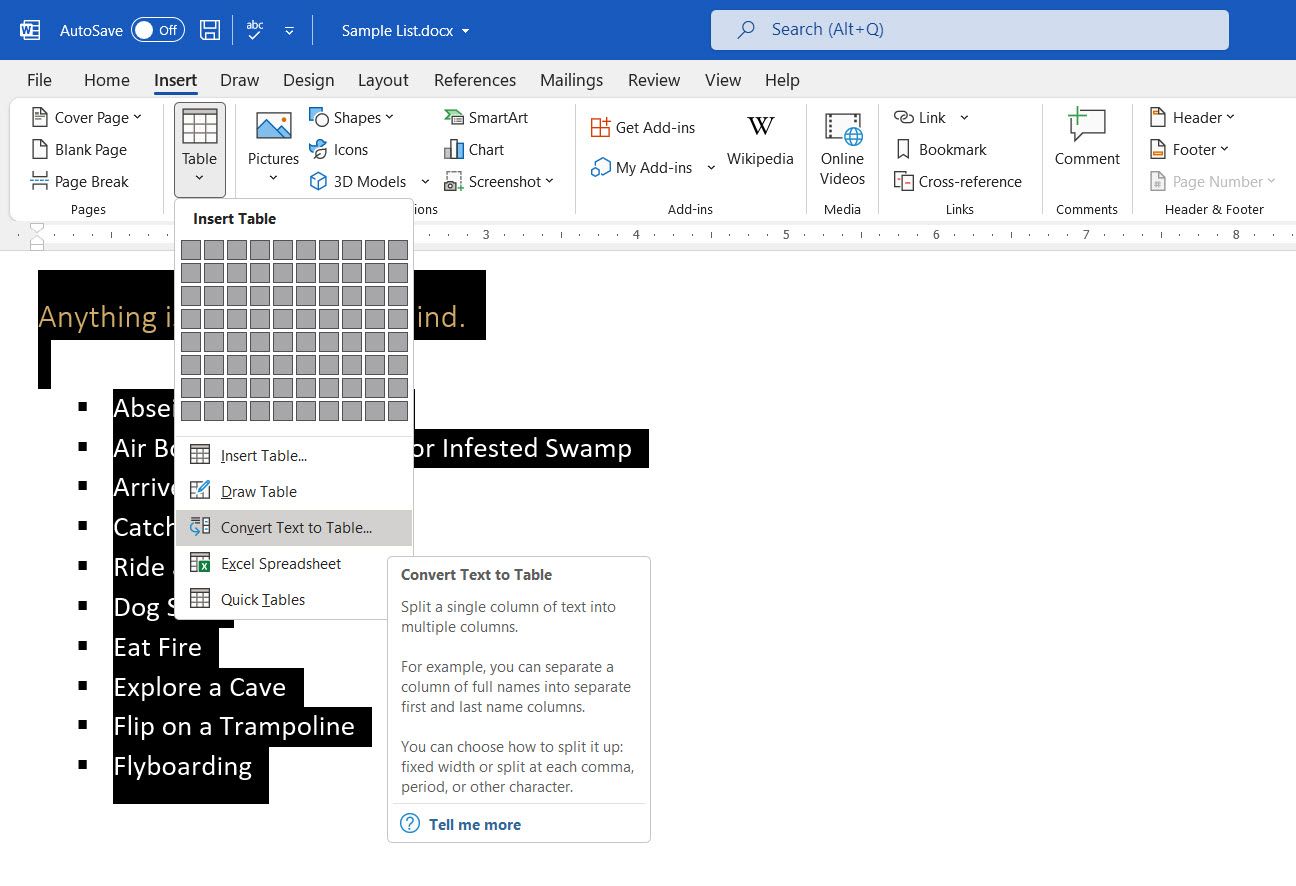
Microsoft Word estimates the table structure based on the list’s contents. Word creates the columns based on the separators between the items on the list.
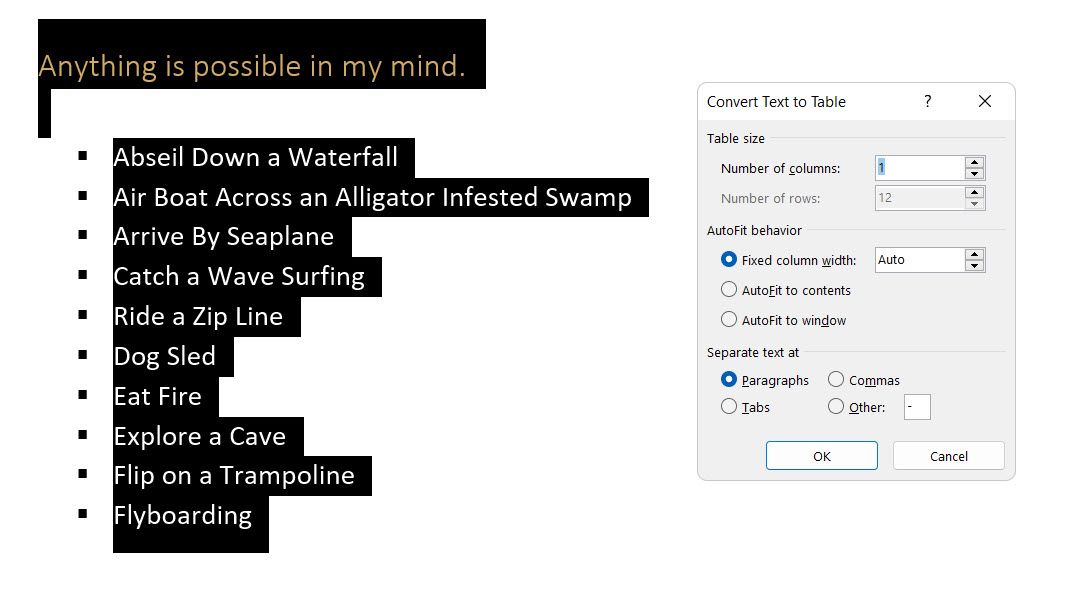
When Word doesn’t get it right, you have to modify the settings and make it easier for Word to convert the list. Once the table has been created, you can use the Table design tools to format the appearance.
General Tip: In most cases, the results aren’t perfect. The best way is to remove the numbering or the bullets and then create the table from the list of items. The serial numbers can easily be added to the table later.
12. Continue Your Numbering When a Paragraph Cuts It Short
Sometimes, a paragraph of text needs to interrupt the sequence of the list. Follow these steps to continue the list after the paragraph with the same number format.
Enter the rest of your numbered list after the paragraph and format it. The list begins with 1 again. Right-click on the list that comes after the paragraph. Choose Continue Numbering from the Context menu. The list is modified instantly.
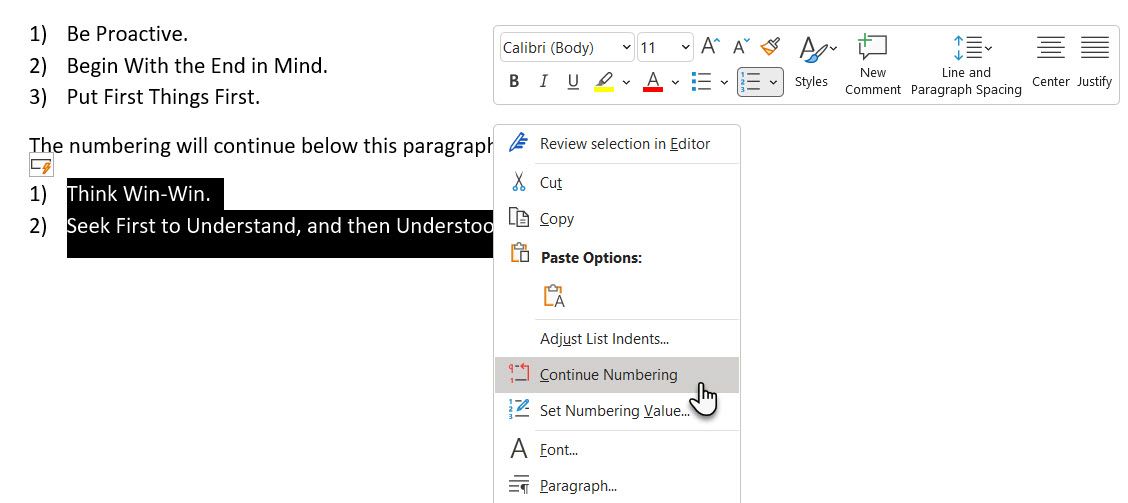
The list numbering continues from where the paragraph broke it off.
The Importance of Lists as Timesavers
Lists are time savers when a document has to be an exercise in economy. They instantly become a little less boring than blocks of text. Use them as the organizational backbone of a document and see your document better organized.
Приветствую всех читателей блога scriptcoding.ru. В этой статье мы рассмотрим коллекцию Lists и класс List объектной модели Word, которые отвечают за создание списка в ворде и позволяют обрабатывать их в групповом порядке.
Прежде всего, стоит сделать небольшое лирическое отступление. Смотрите, мы уже рассмотрели несколько компонентов, которые представляют многоуровневый и нумерованный список в ворде, и отвечают за создание списков в ворде в целом: ListGalleries, ListLevels и ListFormat. Также, советую посмотреть два примера, которые я рассмотрел в этой и этой статьях. Ладно, теперь давайте приступим к теме самой публикации…
Содержание
- Класс List и коллекция Lists – создание списка в ворде
- Коллекция Lists – свойства, многоуровневый список в ворде
- Объект List – свойства и методы, нумерованный список в ворде
Класс List и коллекция Lists – создание списка в ворде
Коллекция Lists – свойства, многоуровневый список в ворде

Коллекция List предоставляет набор классов List, каждый из которых предоставляет отдельный блок-список. Например, документ содержит 30 абзацев, абзацы с 5 по 10 отформатированы как список и абзацы с 15 по 20 тоже отформатированы как список, тогда коллекция Lists будет содержать два объекта List.
Доступ к коллекции Lists осуществляется через одноименное свойство объекта Document.
По сути, данная коллекция предоставляет только два свойства, которые используются на практике:
Count– Количество объектов Word List.
Item(index) – Свойство позволяет получить доступ к заданному Word объекту List по его номеру.
Объект List – свойства и методы, нумерованный список в ворде

Класс List предоставляет один объект-список. Практический интерес предоставляют только некоторые его свойства и методы данного.
ListParagraphs— Возвращает коллекцию ListParagraphs, представляющую все форматированные абзацы.
Range— Возвращает объект Range.
ApplyListTemplate(ListTemplate, ContinuePreviousList, ApplyTo, DefaultListBehavior) – Данный метод выполняет ту же функцию, что и одноименный метод у объекта ListFormat.
RemoveNumbers(NumberType) — Удаляет нумерацию списка в ворде или маркеры из указанного списка. Параметр NumberType содержит значения константы WdNumberType:
- wdNumberAllNumbers — 3 — значение по умолчанию для всех остальных случаев.
- wdNumberListNum — 2 — Значение по умолчанию для LISTNUM полей.
- wdNumberParagraph — 1 — Установленные заранее значения в диалоговых окнах Маркеры и нумерация.
При написании программного кода для примеров, я столкнулся с одной проблемой. Дело в том, что свойство Count коллекции Lists возвращает разное количество объектов List в зависимости от того, в какой последовательности применялось форматирование, то есть, происходило создание ворд списка. Так, мы можем сначала применить три маркера к выбранным абзацам, а уже потом применить вложенную нумерацию списка в ворде, или – последовательно создавать все списки.
Ниже я привел два примера программного кода на языках VBScript и JScrtipt, которые показывают данную ситуацию.
Пример на vbscript:
' ----------------------------------------------------------------------------
' Коллекция Lists и объект List
' Выравнивание абзаца и изменение междустрочного интервала
' многоуровневый список в ворде
' нумерованный список в ворде
' Lists.vbs
' ----------------------------------------------------------------------------
Option Explicit

dim oWord, oDoc, i, MyText
dim oRange1, oRange2, REnd1, REnd2, OPars1, OPars2

Set oWord = CreateObject("Word.Application")                                 ' Класс Word.Application
Set oDoc = oWord.Documents                                                 ' Коллекция Documents
oDoc.Add()                                                                               ' Создаем новый документ
oDoc.Add()                                                                               ' Создаем новый документ
oWord.Visible = True                                                                            ' Делаем документ видимым
Set oRange1 = oDoc(1).Range()
Set oRange2 = oDoc(2).Range()

MyText = "Создание списка в ворде "

' Вставляем в документ заданный текст
For i=0 to 30
     With oRange1
                 .Text=MyText & " первый документ " & MyText
                 .EndOf
                 .InsertParagraph
                 .EndOf
     End With
Next

' Вставляем в документ заданный текст
For i=0 to 30
     With oRange2
                 .Text=MyText & " второй документ " & MyText
                 .EndOf
                 .InsertParagraph
                 .EndOf
     End With
Next

Set oPars1 = oRange1.Paragraphs
Set oPars2 = oRange2.Paragraphs

REnd1 = oPars1(oPars1.Count).Range.End
REnd2 = oPars2(oPars2.Count).Range.End

With oRange1.ListFormat
     call LRange1(5,10)
     .ApplyBulletDefault 2
     call LRange1(7,9)
     .ApplyNumberDefault 2
     call LRange1(15,22)
     .ApplyBulletDefault 2
     call LRange1(17,20)
     .ApplyNumberDefault 2
     call LRange1(25,29)
     .ApplyBulletDefault 2
End With

With oRange2.ListFormat
     call LRange2(5,10)
     .ApplyBulletDefault 2
     call LRange2(15,22)
     .ApplyBulletDefault 2
     call LRange2(25,29)
     .ApplyBulletDefault 2
     call LRange2(7,9)
     .ApplyNumberDefault 2
     call LRange2(17,20)
     .ApplyNumberDefault 2
End With

With         oRange1
     .SetRange 0, REnd1
     .EndOf
     .InsertParagraph
     .InsertParagraph
     .Text=oDoc(1).Lists.Count & " - количество абзацев"
End With

With oRange2                                                                                                                                                                                                                                                                                                                                                                                                                                                                                                                                                                                                                                                                                                                                                                                                                        ' нумерация списка в ворде
     .SetRange 0, REnd2
     .EndOf
     .InsertParagraph
     .InsertParagraph
     .Text=oDoc(2).Lists.Count & " - количество абзацев"
End With

Sub LRange1(a, b)
    oRange1.SetRange 0, REnd1
    oRange1.SetRange oPars1(a).Range.Start, oPars1(b).Range.End
End Sub

Sub LRange2(a, b)
    oRange2.SetRange 0, REnd2
    oRange2.SetRange oPars2(a).Range.Start, oPars2(b).Range.End
End Sub
Пример на jscript:
// ----------------------------------------------------------------------------
// Коллекция Lists и объект List
// Выравнивание абзаца и изменение междустрочного интервала
// многоуровневый список в ворде
// нумерованный список в ворде
// Lists.js
// ----------------------------------------------------------------------------
var oWord1, oDoc1, i, MyText1;
var oRange11, oRange21, REnd1, REnd2, OPars1, OPars2;

oWord1 = WScript.CreateObject("Word.Application");                      // Класс Word.Application
oDoc1 = oWord1.Documents;                                                              // Коллекция Documents
oDoc1.Add();                                                                            // Создаем новый документ
oDoc1.Add();                                                                            // Создаем новый документ
oWord1.Visible = true;                                                                          // Делаем документ видимым
oRange11 = oDoc1(1).Range();
oRange21 = oDoc1(2).Range();

MyText1 = "Создание списка в ворде ";

// Вставляем в документ заданный текст
for (i=0; i<=30; i++){
     with(oRange11){
                 Text=MyText1 + " первый документ " + MyText1;
                 EndOf();
                 InsertParagraph();
                 EndOf();
     }
}

// Вставляем в документ заданный текст
for (i=0; i<=30; i++){
     with(oRange21){
                 Text=MyText1 + " второй документ " + MyText1;
                 EndOf();
                 InsertParagraph();
                 EndOf();
     }
}

oPars1 = oRange11.Paragraphs;
oPars2 = oRange21.Paragraphs;

REnd1 = oPars1(oPars1.Count).Range.End;
REnd2 = oPars2(oPars2.Count).Range.End;

with (oRange11.ListFormat){
     LRange1(5,10);
     ApplyBulletDefault(2);
     LRange1(7,9);
     ApplyNumberDefault(2);
     LRange1(15,22);
     ApplyBulletDefault(2);
     LRange1(17,20);
     ApplyNumberDefault(2);
     LRange1(25,29);
     ApplyBulletDefault(2);
}

with (oRange21.ListFormat){
     LRange2(5,10);
     ApplyBulletDefault(2);
     LRange2(15,22);
     ApplyBulletDefault(2);
     LRange2(25,29);
     ApplyBulletDefault(2);
     LRange2(7,9);
     ApplyNumberDefault(2);
     LRange2(17,20);
     ApplyNumberDefault(2);
}

with (oRange11){
     SetRange(0, REnd1);
     EndOf();
     InsertParagraph();
     InsertParagraph();
     Text=oDoc1(1).Lists.Count + " - количество абзацев";
}

with (oRange21){
     SetRange(0, REnd2);
     EndOf();
     InsertParagraph();
     InsertParagraph();
     Text=oDoc1(2).Lists.Count + " - количество абзацев";                                                                                                                                                                                                                                                                                                                                                                                                                                                                                                                                                                                                                                       //нумерация списка в ворде
}

function LRange1(a, b){
    oRange11.SetRange(0, REnd1);
    oRange11.SetRange(oPars1(a).Range.Start, oPars1(b).Range.End);
}

function LRange2(a, b){
    oRange21.SetRange(0, REnd2);
    oRange21.SetRange(oPars2(a).Range.Start, oPars2(b).Range.End);
}
Хорошо, теперь давайте разберем программный код. Мы создаем один класс Application и одну коллекцию Documents. Далее происходит создание двух документов Word с помощью метода Add. Следующей задачей является добавить текст в оба документа, для этих целей мы используем объект Range, при этом, для каждого документа мы создаем собственный экземпляр. Просмотрев код, вы увидите, что мы создали по два экземпляра и для остальных объектов и коллекций.
Внешнее содержимое обоих документов идентично, хотя и создание списков в ворд происходит в разной последовательности. В итоге, для одного документа мы получим количество объектов List 4, а для другого – 5. Конечно, я мог сократить код, создав несколько универсальных процедур, но так он был бы сложнее в плане чтения. Хотя с помощью оператораWITH и получилось немного сэкономить места.
This tutorial shows two ways to create numbered lists in Microsoft Word. We will also look at how to change list levels, start with a different list number, and change the font, size, and color of list numbers.
Do you want to create bulleted lists? Please see my previous tutorial “How to Create Bulleted Lists in Microsoft Word.”
What about Lists Ordered by Letters?
For simplicity, this tutorial refers to “numbered lists” because Word organizes all ordered (hierarchical) list options in the Numbering Library. However, all the steps shown here also apply to lists organized by letters.
If you would like to learn more about ordered and unordered lists, please see “How to Write Vertical Lists (Ordered and Unordered).”
Table of Contents
- How to Create a Numbered List — Basic Method 1
- How to Create a Numbered List — Basic Method 2
- How to Change Numbered List Levels
- How to Start a List with a Different Number
- How to Change the Font, Size, and Color of List Numbers
Watch all the steps shown here in real time!
Explore more than 200 other writing-related software tutorials on my YouTube channel.
The images below are from Word for Microsoft 365. These steps also apply to Word 2021, Word 2019, Word 2016, and Word 2013.
The basic steps are similar in Word for Mac. However, the more advanced steps, such as starting a list with a different number, are different on Mac. So, we will cover this topic for Word for Mac in a separate tutorial.
How to Create a Numbered List — Basic Method 1
This is the basic method to create a numbered list in Word. This method requires you to type each item as you create the list. If you have already typed your list items, see Method Two below.
- Place your cursor where you want to start your list.
- Select the Home tab in the ribbon.

- Select the menu arrow next to the Numbering button.
![]()
- Choose a number style from the Numbering Library.

The number one will appear in your document.

- Type your first list item after the number, and then press the Enter key on your keyboard. The next number will appear.

Continue typing your list items and pressing the Enter key until your list is complete.
- After typing the final item, press the Enter key twice to remove your cursor from the list.
How to Create a Numbered List — Basic Method 2
This method is for existing text formatted vertically as a list.
- Select the text.

- Select the Home tab in the ribbon (see figure 1).
- Select the menu arrow next to the Numbering button (see figure 2).
- Choose a style from the Numbering Library (see figure 3).
Your selected items should become a numbered list.

How to Change Numbered List Levels
Word lets you create numbered lists with up to nine nested levels. Here are two ways to change the level of list items.
Change List Levels — Method 1
Important note: This method won’t work for the first item in your list.
- Select one or more list items (other than the first item).

- Select the Home tab in the ribbon (see figure 1).
- Select the Increase Indent button in the Paragraph group.

Each time you select the Increase Indent button, the item(s) will move one level and take on the appropriate format for that level (e.g., lowercase letters, roman numerals, etc.).

Pro Tip: To return the selected text to a previous level, select the Decrease Indent button to the left of the Increase Indent button.
Change List Levels — Method 2
- Select one or more list items (see figure 8).
- Select the Home tab in the ribbon (see figure 1).
- Select the menu arrow next to the Numbering button (see figure 2).
- Select Change List Level from the drop-down menu.

- Select a list level from the list-level menu.

Your list item(s) should move to the next level.
How to Start a List with a Different Number
You can start a list with a number other than one or continue the numbering from the previous list.
- Select the first list number or place your cursor within the first list item. If you select the list number, all numbers on that level should also be selected.

- Select the Home tab in the ribbon (see figure 1).
- Select the menu arrow next to the Numbering button (see figure 2).
- Select Set Numbering Value from the drop-down menu.

5.a. Enter the number you want to start with in the Set value to text box in the Set Numbering Value dialog box.

5.b. (Alternative Option) Select Continue from previous list if you want to continue the numbering from a previous list in your document.

- Select the OK button.

Your list should be renumbered according to your selections in the Set Numbering Value dialog box.
How to Change the Font, Size, and Color of List Numbers
By default, the font, size, and color of your list numbers will be the same as your normal text style. However, you can manually change the appearance of list numbers by selecting them separately from the text.
- Select one list number. All numbers on that level should also be selected.

- Select the Home tab in the ribbon (see figure 1).
- Select a new font, size, or color from the Font group.

Your list numbers should change to the new formatting. Repeat these steps for each level in your list, as necessary.

Related Resources
How to Write Run-In Lists
How to Create and Update a List of Tables or Figures in Microsoft Word
How to Create Numbered Lists in PowerPoint (PC & Mac)
Updated February 12, 2023