
The process used to attach files in Microsoft Word is straightforward. Attachments can serve a variety of purposes, including as resources for professional papers and presentations. Using attachments creates a dynamic document with easy access to related media that is relevant to the content. Attachments are not common in Word documents, but they are useful tools.
Attach PDF Files to Word
PDF files are easy to insert into a Word document as attachments with the use of an icon. The icon acts as a link that opens the attached PDF. This is a useful feature for consolidating documents that are all related but intentionally separate. An employee handbook is one example where a variety of documents with contracts, guidelines, company policies and other related information can all live in one document with attachments.
The steps for attaching a PDF file are simple. Investintech advises to click «Insert» in the top toolbar and then click the «Object» option. Next, click the «Create from File» tab and choose to either link to the file or insert it as an icon. Inserting a document into Word as an icon makes for an easy to identify the link, but using an actual link is also effective.
Click «Browse» and locate the PDF file you want to attach. Click «OK» at the bottom, and the file is attached as a link or icon based on your chosen preference. When a user clicks this link, the file opens.
Attaching the Word Document to Email
After adding attachments and completing the Word document, you can attach the final file to an email for sharing. Despite having attachments within the file, it still attaches and loads to an email normally. Make sure the Word document is saved and named in an easy-to-find location on your computer. This makes it available for use at any time.
You can remove the attachments in the Word document by highlighting and deleting them. In the event that the document requires revisions or updates, the attachments are easy to phase out or replace.
Insert a Document
This method is not an attachment but more of a means to bring the content from an exterior document into a Word document. Microsoft Support refers to the process as inserting a document in Word, but it’s really pulling that information from the outside source to the Word document. You can grab chunks of information or the entire content source and transfer that information to a specific placement in your Word document.
While not a common tool, it remains valuable for several functions. For example, a writer might create a different Word file for each chapter of a book. When creating the final product, the writer may pull each chapter into a master document using this method. This helps with the segmentation and organization of the project.
To get started, open the Word document and click on the space where you want to add the exterior content. Click «Insert» on the toolbar and click the drop-down menu next to «Object.» Select «Text from File,» and a new dialogue box opens with access to the computer files. Choose the file with the desired text, and Word pulls the text into your document.
Many years ago, I’d added a separate list of appendices in the front matter containing the table of contents (TOC), list of figures, list of tables etc. I’d forgotten how to do it, because these days almost every document I work on incorporates the appendix headings into the main TOC. However, I needed to do this for a new client, who had appendix placeholders in the document with no page numbering (the PDF’d appendices would be inserted later, so they only needed a heading page). Adding the appendix headings to the main TOC wasn’t an option because the main TOC has page numbers and you can’t tell some parts of the TOC to not have page numbers—you either have them for everything or for nothing, not for some and not others. So these appendix headings needed to go into a separate updateable and clickable list.
NOTE: You MUST be using a uniquely named style for your appendix headings, not Heading 1, etc. In the example below, the heading style for these level 1 appendix headings is ‘Appendix Heading’.
To add a new list of appendices to the front matter:
- Make sure you know the name of the style you use for the appendix headings.
- Go to the References tab > Captions group.
- Click Insert Table of Figures.
- On the Table of Figures dialog box, click Options.
- Select the style you use for the appendix headings from the styles list. In this example, the style is called Appendix Heading.
- Check the Style checkbox.

- Click OK to close the Table of Figures Options dialog box. (Ignore the web preview panel—it won’t show what you’ve chosen.)
- Optional: Clear the Show page numbers checkbox if you don’t want page numbers; leave it selected if you do.

- Click OK.
- If you already have a list of figures etc., you’ll be asked if you want to replace it. Click No.
- Your new list of appendices will be added to the front matter section.


To update your list:
- Click anywhere inside the list of appendices.
- Either:
- Right-click and select Update Field, or
- Go to the References tab > Captions group, then click Update Table.
- If asked, select the option to update the entire table.
In this article we will explain how to use the Mail Merge feature in Microsoft Word to send personalized email messages by using a list of recipients stored in a Microsoft Excel worksheet, assuming that you already have it handy.
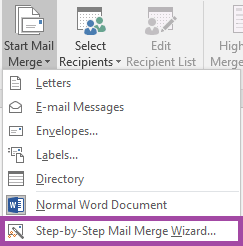
To begin merging, start Word, open the desired document (or start with blank one), and switch to the Mailings tab – all of the Mail Merge controls are located here.
We recommend using the Step by Step Mail Merge Wizard – it conveniently organizes the controls into a 6-step process. Its button is located on the “Start Mail Merge” group:
Step 1
First, the output type of the document has to be specified. Since we’re merging a Word file to an E-mail message – select E-mail Messages and click Next.
Step 2
Select Use the current document, and click Next.
Step 3
With Use an existing list option selected, click Browse… and navigate to the Excel data-source on your computer. Microsoft Word will show the contents of the worksheet in a small window, where sheets and recipients can be specified.
Click Next.
Step 4
Now you can write the contents of the E-mail message, if started with a blank document, and also add merge fields for personalization, if they exist in the Excel worksheet (in this example, the ‘name’ field is used):
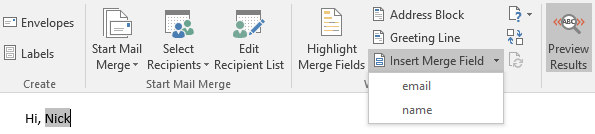
After doing so, click Next.
Step 5
This is, effectively, a proofreading stage – here you can verify that the merge fields are working and that the correct recipients are selected. Click Next when ready.
Step 6
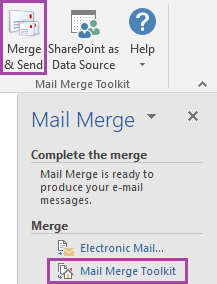
Almost done! Click the Mail Merge Toolkit button on the Wizard window (or the Merge & Send icon on the Word ribbon). Both Word Mail Merge and Mail Merge Toolkit require the same steps to be done to configure the mailing, but Mail Merge Toolkit introduces lots of new features.
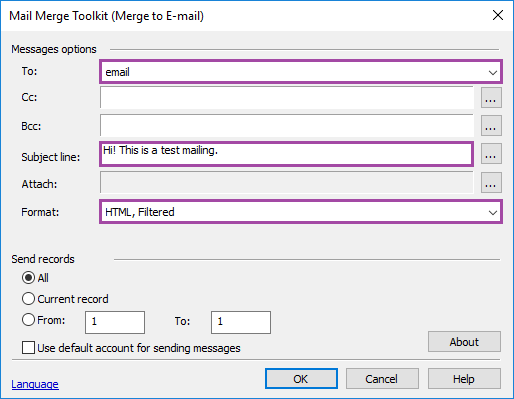
On the final window, specify the important fields, such as To (choose here the name of the worksheet column that holds the recipient e-mail information), Subject line (it can also be personalized!) and the mailing Format (for standard merging, choose HTML, Filtered), and any additional ones you require.
Note that you do not need to select “PDF, Attachment” as a mailing format if you wish to include .PDF files as attachments.
Clicking Ok means that you’ve successfully configured your mailing, and – after you specify the account to send from a folder to store the temporary copy of your Word document – Outlook should be able to send it in E-mail messages right away!

- Remove From My Forums
-
Question
-
Hi,
I have a custom list with an image attachment in jpg format. I have a workflow which creates a word document in a document library using the field values from the custom list. This works fine.
I would like to insert the jpg in the second page of the word document.
I can’t see any obvious way to do this. Can anyone suggest any solutions ?
Thanks
Steve
Answers
-
-
Marked as answer by
Emir Liu
Monday, October 8, 2012 1:31 AM
-
Marked as answer by
All replies
-
Hi,
Thanks for a suggestion. Can this be changed to pick the file from a Sharepoint list rather than a file on file system ? Also the Word document is created automatically from a Sharepoint workflow in the document library.
Steve
-
-
Marked as answer by
Emir Liu
Monday, October 8, 2012 1:31 AM
-
Marked as answer by
Many people use the Microsoft Word mail merge to send bulk emails. However, it only supports basic mail merge features. Microsoft Word cannot attach individual files in mail merges.
If you want to add individual attachments (such as an invoice or brochure) or personalize your subject lines, add CC or BCC, you’ll need third-party MS Word Mail Merge add-ins that work with significant restrictions. There are a lot of steps involved, and you must pay for the most expensive license to do certain things. GMass is a Chrome extension that handles these Microsoft Word mail merge limitations and allows you to send mail merges with attachments in Gmail quickly. In this article, we’ll show you how to mail merge with attachments in MS Outlook and Gmail and compare the two.
This article includes:
How to do a Mail Merge with Attachments
Mail Merge with Attachments in Microsoft Outlook
- Limitations of Microsoft Outlook Mail Merge Method
- MS Word Mail Merge with Attachments (Step-by-Step Method)
Mail Merge with Attachments in Gmail
- Use Case 1: Mail merge with individual/personalized attachments.
- Use Case 2: Mail merge with the same file as an attachment to all e-mails.
How to do a Mail Merge with Attachments
You can use third-party add-ins or scripts with Microsoft Word to create a mail merge with attachments, or you may use GMass with Gmail. We’ll look at how each method works and discuss its advantages and disadvantages:
Method 1: Mail Merge with Attachments in Microsoft Outlook
You can’t directly attach files in Microsoft Word mail merge. Instead, you’ll need third-party Add-ins like the “Outlook Mail Merge Attachment (OMMA),” “Merge Tools Add-In,” or “Mail merge toolkit.”
These add-ins are limited by the following factors:
- Sending Failures: Email servers limit the number of outgoing emails sent in a particular time frame to prevent unsolicited bulk emails. Because MS Outlook and these add-ins lack a feature that controls email sending rates, your email server may blacklist you from sending a large number of emails. Consequently, you could receive errors with delivery, and many emails might be sitting in your Outbox that you’ll need to send manually.
- Poor Deliverability: When the recipients’ servers detect a large number of bulk emails from a specific sender in a short period of time, their SPAM detection systems are triggered. The incoming servers may reject these bulk emails or put them in the SPAM/promotions tab. There are no add-ins that provide the functionality to send mass emails in batches or with a delay under Standard licenses. The “Mail Merge Toolkit” has batch delivery support, but only the most expensive license provides access to it. Nonetheless, it isn’t as efficient as GMass. Since GMass sends emails straight from the Gmail interface with advanced throttling, it mimics human behavior as though someone composed and sent each email manually. As a result, GMass helps to achieve better deliverability.
- The majority of these add-ons lack email tracking capabilities. These Add-ons don’t have a mechanism for tracking and reporting accurate email opens and clicks. Some add-ons provide basic email tracking features such as “read receipts” or “Google Analytics integration.” Unfortunately, many people do not always manually accept the read receipts, and some recipient mailboxes may have pixel blockers enabled; determining how many people open your emails using these methods is difficult. Then there are false opens from bots. Google Analytics also doesn’t tell who opened your email (except for some demographic data). GMass provides accurate click tracking data, including the email ID, time, and IP address.
- In certain situations, emails generated with Microsoft Word Mail Merge might have formatting or spacing errors. These add-ins generate and attach the PDFs in emails and send them to Outlook Outbox. As a result, the merged documents aren’t free of errors.
- Lack of personalization: If you’re using Microsoft Word Mail Merge with these add-ins, you have limited control over your email’s subject line or body. You can’t achieve GMass-level personalization.
- Some of these Add-ins don’t work on Mac or Linux systems.
Here’s how to create a mail merge with attachments in Microsoft Outlook:
Step 1: Download the Zip folder of any of these Add-ons. In this case, we will use the “Outlook Mail Merge Attachment (OMMA).”
Step 2: Extract the zip folder to your local hard drive.
Step 3: In Microsoft Outlook, click on the “Work Offline” button in the Send/Receive tab. Enabling offline mode ensures that the Mail Merge emails are kept in the Outbox and not sent immediately. Next, confirm that there are no existing messages in the Outbox.

Step 4: Create a Mail Merge document in MS Word and finish the merge as usual. Outlook will place the emails in the Outbox folder.
Step 5: Open the “Outlook Mail Merge Attachment” folder you extracted and execute (double-click) the “Outlook Mail Merge Attachment.vbs” file. If you’ve previously included attachments in your merged emails, the program will notify you of this and allow you to attach the files.

Step 6: Select the attachments. If you’d like multiple files attached to all of your outbox drafts, select them, and the script will do it for you. The script now adds the selected file to all the emails in the Outbox.
Step 7: Go Online – Disable the “Work Offline” option in Outlook and send the mail merge.
Note: You may also use another add-in, “Mail Merge Tool Kit,” to generate and attach personalized PDFs/Docs.
Method 2: Mail Merge with Attachments in Gmail
You can use GMass to send mail merge with attachments straight from Gmail. In addition, GMass provides features that are not available in the typical Microsoft Word Mail Merge procedure:
-
- Ability to add multiple personalized attachments: With GMass, you can easily create mail merge campaigns in Gmail and attach personalized attachments.
- Advanced Personalization: GMass allows you to personalize your mail merge campaign more effectively than a standard Word Mail Merge. With GMass, you can personalize anything, including the subject line and body of the email, and add pictures, links, and attachments.
- Improved deliverability: GMass improves your email deliverability by optimizing your campaigns. GMass also Throttles your mail merge speed to reduce the risk of the recipient email server blocking you for suspected spam.
- GMass allows you to save your merged emails as Drafts in Gmail first, review them for accuracy, and then send them with a single click.
- GMass works to deliver more accurate open and click tracking for your emails.
- You can also send attachments using the GMass API.
With GMass, you may use Gmail to send a Mail Merge with personalized messages, attachments, and other data from your spreadsheet. We’ll show you how to create a mail merge with attachments in Gmail using GMass.
To create a mail merge with attachments using Gmail and Google Sheets., follow the steps below:
Use Case 1: Mail merge with individual/personalized attachments.
Step 1: Add GMass to your Gmail or Google Workspace account.
Download the GMass Google Chrome extension and sign up for free with your Gmail or Google Workspace (previously G Suite) account.
Step 2: Host your attachments online
Host your attachment files on Google Drive, Dropbox, or any similar service such as your web server.
-
-
- If you’re using Google Drive, make sure GMass has read-only access to the attachment files. FOLLOW THIS LINK To allow GMass to download different attachment files from your Google Drive.
- You must log in with the same Gmail account that you’re using to send your mass email.
-
-
-
- Also, the files don’t all have to be in the same folder; they can be spread across multiple folders as long as they’re in one single Google Drive account.
- Finally, if you’re using Google Drive, make sure the “Convert uploaded files…” option is unchecked:
-

Step 3: Setup your Google Spreadsheet for Mail Merge.
Create a Google Spreadsheet that lists the email addresses in one column and the file names in the other.

-
-
-
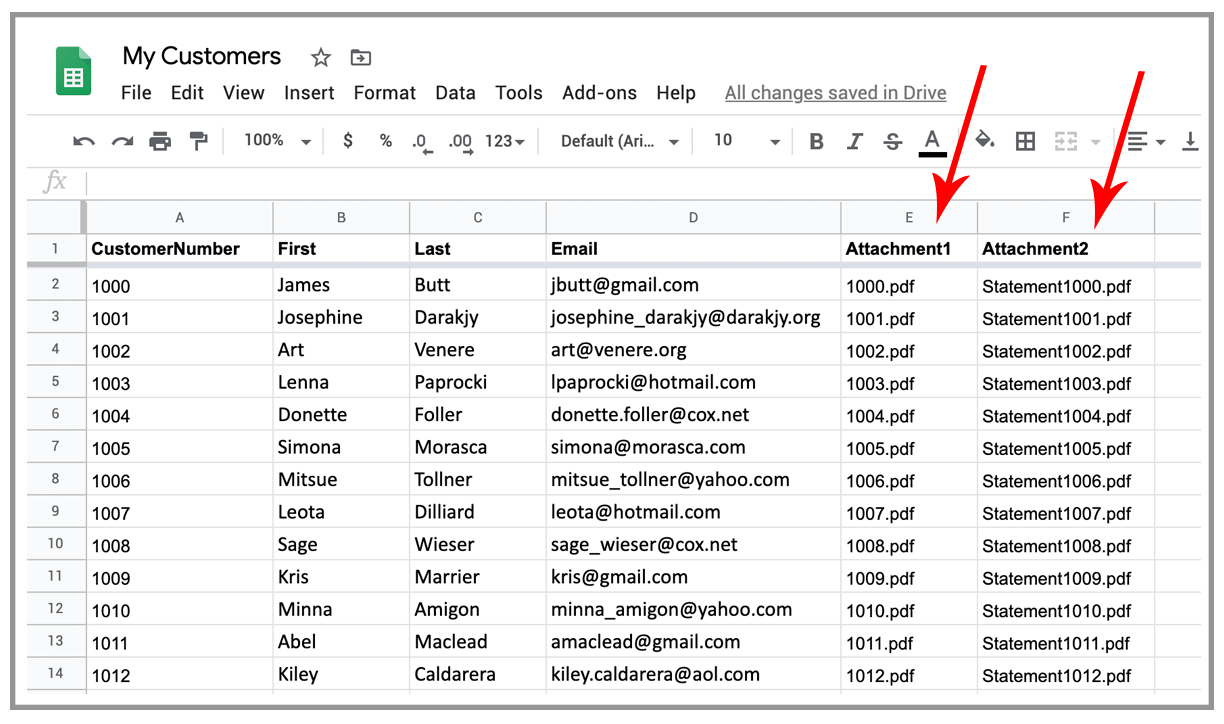
- For best results, keep your column names free of spaces and special characters. For your column headers, stick with numbers and letters. The actual data should begin from the second row.
- At least one column should include email addresses, which GMass will automatically identify and utilize as the recipient address column. If your Google spreadsheet has several columns with email addresses, keep the column with the recipient addresses to the left of the other columns.
- You may simply mention the file name in the attachment column if your files are saved in Google Drive. The attachment column should contain the entire URL to the file if it is hosted on the internet.
- The attachment column’s name may be whatever you like, as long as it begins with the word “attachment.” The following are acceptable column names: Attachment, Attachment1, AttachmentFile, or attachment22.
- If you need to send multiple attachments to each recipient, add a new column to your spreadsheet for each attachment.
-
-
Step 4: Connect your spreadsheet with GMass in Gmail
Click on the Sheets connector button near the search bar in Gmail, choose your spreadsheet and worksheet, and hit the “Connect to spreadsheet” button.

Step 5: After you connect your spreadsheet, the Gmail compose will open. Compose, and send your message.

If you want an attachment to go to all recipients, attach the file directly to the Gmail compose window. In that case, any files you attach to the Draft will be sent to all recipients.
Step 6: Hit the GMass button to send your mail merge.
Use Case 2: Mail merge with the same file as an attachment to all e-mails.
If you want an attachment to go to all recipients, you don’t need to upload the files to Google drive. Simply skip step 2 and the attachment column in Step 3. Instead, attach the file directly to the Gmail compose window. In that case, any files you attach to the Draft will be sent to all recipients.
File Types You Can Attach With Gmail Mail Merge:
PDFs, Microsoft Word, Powerpoint, and Excel Files, Pictures, Audio, and video files.
Here’s a detailed guide on mail merge personalization and how to send mass emails with personalized attachments in Gmail.
See why GMass has 300k+ users and 6,600+ 5-star reviews
Email marketing. Cold email. Mail merge. Avoid the spam folder. Easy to learn and use. All inside Gmail.
TRY GMASS FOR FREE
Download Chrome extension — 30 second intall!
No credit card required
Love what you’re reading? Get the latest email strategy and tips & stay in touch.
Есть ли у нас хорошие способы вставить все имена вложений в тело сообщения при составлении электронного письма в Outlook? В этой статье я расскажу о том, как решить эту задачу в Outlook.
Перечислите все имена вложений в теле сообщения при составлении письма с кодом VBA
Перечислите все имена вложений в теле сообщения при составлении электронной почты с помощью простой функции
Перечислите все имена вложений в теле сообщения при составлении письма с кодом VBA
Для выполнения этой задачи выполните следующие действия:
1. Удерживайте ALT + F11 , чтобы открыть Microsoft Visual Basic для приложений окно.
2. В Microsoft Visual Basic для приложений окно, дважды щелкните ThisOutlookSession из Проект1 (VbaProject.OTM) панель, чтобы открыть режим, а затем скопируйте и вставьте следующий код в пустой модуль.
Код VBA: перечислить все имена вложений в теле сообщения:
Private Sub Application_ItemSend(ByVal Item As Object, Cancel As Boolean)
    Dim xMailItem As MailItem
    If Item.Class = olMail Then
        Set xMailItem = Item
        If xMailItem.Attachments.Count > 0 Then
          AddAttachmentNamesToBody
        End If
    End If
    End Sub

3. Then go on clicking Insert > Module, copy and paste below code into the opened blank module, see screenshot:
VBA code: List all attachment names into message body:
Public Sub AddAttachmentNamesToBody()
    Dim xMailItem As MailItem
    Dim xAttachment As Attachment
    Dim xFileName As String
   Dim xInspector As Outlook.Inspector
    Dim xDoc As Word.Document
    Dim xWdSelection As Word.Selection
    On Error Resume Next
    Set xMailItem = Outlook.ActiveInspector.CurrentItem
    If xMailItem.Attachments.Count = 0 Then
        Exit Sub
    End If
    xFileName = ""
    For Each xAttachment In xMailItem.Attachments
        If xFileName = "" Then
            xFileName = " <" & xAttachment.FileName & "> "
        Else
            xFileName = xFileName & vbCrLf & " <" & xAttachment.FileName & "> "
        End If
    Next xAttachment
    Set xInspector = Outlook.Application.ActiveInspector()
    Set xDoc = xInspector.WordEditor
    Set xWdSelection = xDoc.Application.Selection
    xWdSelection.HomeKey Unit:=wdStory
    xWdSelection.InsertBefore "Attachments: " & vbCrLf & xFileName & vbCrLf & vbCrLf
    Set xMailItem = Nothing
    End Sub

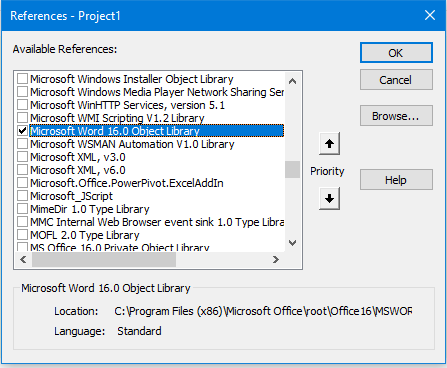
4. And then click Tools > References in the Microsoft Visual Basic for Applications window, in the popped out References-Project1 dialog box, check Microsoft Word Object Library option from the Available References list box, see screenshot:
 |
 |
5. Click OK to exit the dialog box, then you should add the macro button into the Quick Access Toolbar. In the new Message window, choose More Commands from the Customize Quick Access Toolbar drop down, see screenshot:

6. In the Outlook Options dialog box, do the following operations:
(1.) Select Macros from the Choose commands from drop down list;
(2.) Click the macro name that you have inserted just now;
(3.) And then click Add button to add the macro into the Customize Quick Access Toolbar.

7. Then click OK to close the dialog box, now, the macro button has been inserted into the Quick Access Toolbar, see screenshot:

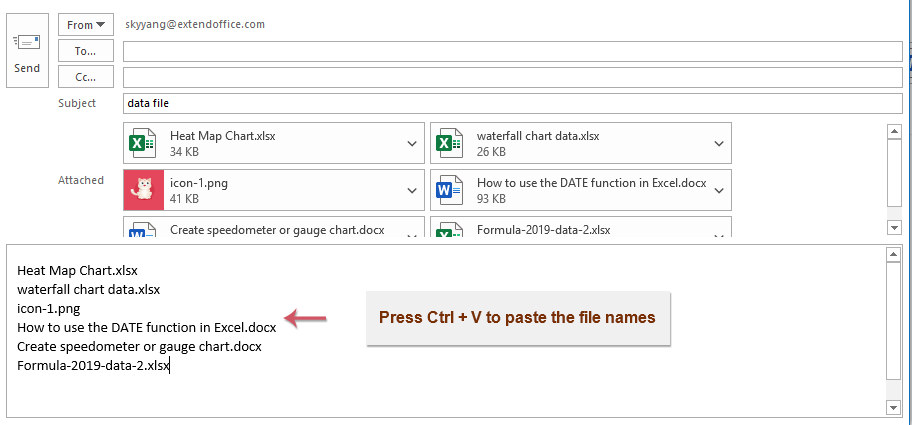
8. Now, when you create new message, and click the macro button, the attachment names will be inserted above the message body as following screenshot shown:

List all attachment names into message body when composing email with a simple feature
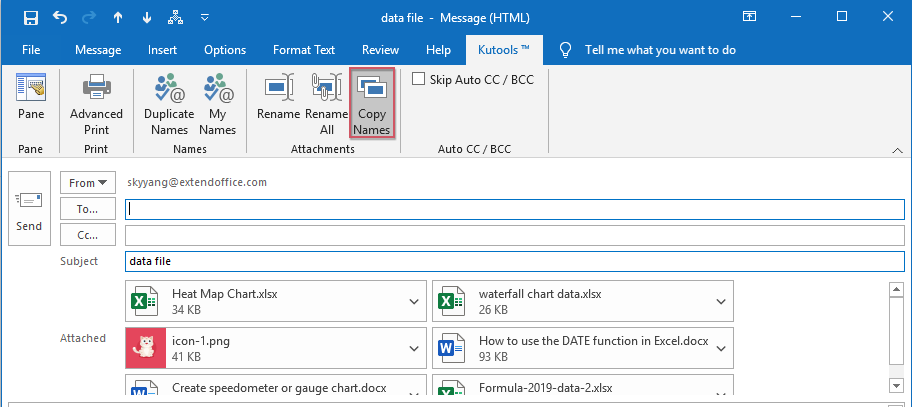
May be the above code is soemwhat difficult for you to apply, if you have Kutools for Outlook, with its Copy Names feature, you can quickly copy the attachment names of a message and paste them anywhere you need.
Note:To apply this Copy Names, firstly, you should download the Kutools for Outlook, and then apply the feature quickly and easily.
After installing Kutools for Outlook, please do as this:
1. First, please create the new email you need, and then click Kutools > Copy Names in the new Message window, see screenshot:
2. And then, a prompt box will pop out to remind you the attachment names have been copied to the clipboard, see screenshot:

3. Now, you just need to press Ctrl + V keys together to paste the attachment names to the message body you need, see screenshot:
More relative articles:
- Reply All With Original Attachments In Outlook
- Normally, when you apply the Reply All function to reply the message to all recipients in Outlook, the original attachments will be lost automatically. Is it possible to attach original attachments when reply to all in Outlook?
- Download/Save Attachments From Outlook To A Certain Folder
- Generally speaking, you can save all attachments of one email with clicking Attachments > Save All Attachments in Outlook. But, if you need to save all attachments from all received emails and receiving emails, any ideal? This article will introduce two solutions to automatically download attachments from Outlook to a certain folder.
- Change Default Attachment Saving Location In Outlook
- Have you fed up with finding the attachment location you have specified every time when launching Outlook? In this tutorial, we will show you how to change the default attachment location. After that, the specified attachment saving folder will be opened automatically every time you save the attachments even though you restarting the Outlook.
- Remove All Attachments From Email In Outlook
- Normally when you are previewing an email, you can delete an attachment with right clicking and select the Remove Attachment item. Sometimes there may be many attachments in an email message, and it will be tedious to remove them one by one. Here we arrange you with two easy tricks to remove all attachments in one email, and remove all attachments from multiple emails as well in Outlook.
Kutools for Outlook - Brings 100 Advanced Features to Outlook, and Make Work Much Easier!
- Auto CC/BCC by rules when sending email; Auto Forward Multiple Emails by custom; Auto Reply without exchange server, and more automatic features...
- BCC Warning - show message when you try to reply all if your mail address is in the BCC list; Remind When Missing Attachments, and more remind features...
- Reply (All) With All Attachments in the mail conversation; Reply Many Emails in seconds; Auto Add Greeting when reply; Add Date into subject...
- Attachment Tools: Manage All Attachments in All Mails, Auto Detach, Compress All, Rename All, Save All... Quick Report, Count Selected Mails...
- Powerful Junk Emails by custom; Remove Duplicate Mails and Contacts... Enable you to do smarter, faster and better in Outlook.


Read More... Download Now...
Comments (12)
No ratings yet. Be the first to rate!
Following our previous post covering the new ‘Populate Word Document‘ action and how to Mail Merge a Word Document with a Microsoft Forms Response.
This post will outline how to obtain SharePoint list item data (including images stored as attachments) before them to a word document.
Supporting Information
We recommend reviewing the following documentation to support the creation of your own solutions built with the ‘Populate Word Document‘ action
- Template Syntax for Populate Word Document
- Hyperlinks
- Images
- Repeating Sections or Paragraphs
- Error Handling
Resources
I have previously created a the following Microsoft Word Document which is used for this example:
Encodian – Template Syntax – SharePoint List Data.docx
The JSON data structure is detailed below:
{
  "companyName": "Encodian",
  "employees": [
  {
    "name": "Alex Rackwitz",
    "role": "Director",
    "profileUrl": "https://www.encodian.com",
    "profileDisplay": "Profile",
    "profilePic": "base64"
  },
  {
    "name": "James Sales",
    "role": "Operations Manager",
    "profileUrl": "https://www.encodian.com",
    "profileDisplay": "Profile",
    "profilePic": "base64"
  },
  {
    "name": "Jay Goodison",
    "role": "Technology Lead",
    "profileUrl": "https://www.encodian.com",
    "profileDisplay": "Profile",
    "profilePic": "base64"
  }
 ]
}
I have configured a SharePoint list as follows:

Insert SharePoint List Item Data and Images into a Word Document
1. Create a new Flow using a trigger relevant to your requirements, for the purposes of this example I will use the ‘Manually trigger a flow‘ trigger action.

2. Add an ‘Initialize Variable‘ action, this variable will be used to store data for each employee
2.a. Name: Set to ‘employees‘
2.b. Type: Set to ‘Array‘

3. Add the SharePoint ‘Get Items‘ action to retrieve SharePoint list item data
3.a. Site Address: Select the relevant SharePoint site
3.b. List Name: Select the relevant SharePoint list
 A single attachment has been added to each list item and we’ll use the SharePoint ‘Get Attachments‘ action to obtain the attachments. The following configuration assumes that only a single attachment has been added to each list item.
4. Add the SharePoint ‘Get Attachments‘ action to retrieve the list items attachments array
4.a. Site Address: Set as per step 3.a.
4.b. List Name: Set as per 3.b.
4.c. Id: Select the ‘ID‘ property from the SharePoint ‘Get Items‘ action. Upon selecting the ‘ID‘ property, Power Automate will automatically place the SharePoint ‘Get Attachments‘ action inside an ‘Apply to each‘ loop.

5. Add the SharePoint ‘Get attachment content‘ action
5.a. Site Address: Set as per step 4.a
5.b. List Name: Set as per 4.b
5.c Id: Select the ‘ID‘ property from the SharePoint ‘Get Items‘ action

The ‘Get attachments‘ action returns an array (i.e. one or more attachments) but given we only need to obtain a single attachment I’ll use the first() expression to negate Power Automate automatically adding an ‘Apply to each‘ loop.
Expression: first(body(‘Get_attachments’))?[‘Id’]
6. Add the ‘Append to array variable‘ action
6.a. Name: Select the ‘employees‘ variable
6.b. Value: Enter the following value
{
  "name": "",
  "role": "",
  "profileUrl": "",
  "profileDisplay": "",
  "profilePic": ""
}

We now need to populate the variable ‘Value‘ with dynamic data from the SharePoint list item as depicted below:
The ‘Profile‘ hyperlink is made up of two elements, the display value and the URL value. We can obtain the ‘URL‘ value from SharePoint and manually set the display value:
Finally, we need to append the attachment to the ‘profilePic‘ json property using the base64() expression:
Expression: base64(outputs(‘Get_attachment_content’)?[‘body’])
7. Add another ‘Initialize Variable‘ action underneath the ‘Apply to each‘ loop, this variable will be used to store data later sent to the Encodian ‘Populate Word Document‘ action
7.a. Name: Set to ‘data‘
7.b. Type: Set to ‘String‘
7.c. Value: Enter the following value
{
  "companyName": "Encodian",
  "employees":
}

7.d Assign the ‘employees‘ array variable to the ‘employees‘ json property:
At this stage, the ‘data‘ variable has been fully populated with the correct data.
I have stored the template document within SharePoint which I’ll need to retrieve, populate with data and then save the populated document to SharePoint.
8. Add the SharePoint ‘Get file content‘ action
8.a. Site Address: Select the relevant SharePoint site
8.b. File Identifier: Select the relevant Word document

9. Add the Encodian ‘Populate Word Document‘ action
9.a. File Content: Select the ‘File Content‘ property provided by the ‘Get file content‘ action
9.b. Document Data: Select the ‘data‘ variable

10. Add the SharePoint ‘Create File‘ action
10.a. Site Address: Select the relevant SharePoint site
10.b. Folder Path: Select the relevant folder path
10.c. File Name: Either manually add a name or use the Encodian ‘Filename’ property which will always be set to ‘result.docx’. I have manually set the filename for this example.
10.d. File Content: Select the ‘File Content‘ property provided by the Encodian ‘Populate Word Document‘ action

The flow is now complete and should be similar to this structure:
 We recommend reviewing the following article which will help how errors are reported during the creation of your solution: Error Handling
Test your solution by triggering the flow! Your word document should now be populated with data from the SharePoint list:

Finally…
Hopefully, this post provides a good example of using the Encodian ‘Populate Word Document‘ action to add SharePoint list item data to a Microsoft Word document, please share any feedback or comments – all are welcome!