
This tutorial shows two ways to create numbered lists in Microsoft Word. We will also look at how to change list levels, start with a different list number, and change the font, size, and color of list numbers.
Do you want to create bulleted lists? Please see my previous tutorial “How to Create Bulleted Lists in Microsoft Word.”
What about Lists Ordered by Letters?
For simplicity, this tutorial refers to “numbered lists” because Word organizes all ordered (hierarchical) list options in the Numbering Library. However, all the steps shown here also apply to lists organized by letters.
If you would like to learn more about ordered and unordered lists, please see “How to Write Vertical Lists (Ordered and Unordered).”
Table of Contents
- How to Create a Numbered List — Basic Method 1
- How to Create a Numbered List — Basic Method 2
- How to Change Numbered List Levels
- How to Start a List with a Different Number
- How to Change the Font, Size, and Color of List Numbers
Watch all the steps shown here in real time!
Explore more than 200 other writing-related software tutorials on my YouTube channel.
The images below are from Word for Microsoft 365. These steps also apply to Word 2021, Word 2019, Word 2016, and Word 2013.
The basic steps are similar in Word for Mac. However, the more advanced steps, such as starting a list with a different number, are different on Mac. So, we will cover this topic for Word for Mac in a separate tutorial.
How to Create a Numbered List — Basic Method 1
This is the basic method to create a numbered list in Word. This method requires you to type each item as you create the list. If you have already typed your list items, see Method Two below.
- Place your cursor where you want to start your list.
- Select the Home tab in the ribbon.

- Select the menu arrow next to the Numbering button.
![]()
- Choose a number style from the Numbering Library.

The number one will appear in your document.

- Type your first list item after the number, and then press the Enter key on your keyboard. The next number will appear.

Continue typing your list items and pressing the Enter key until your list is complete.
- After typing the final item, press the Enter key twice to remove your cursor from the list.
How to Create a Numbered List — Basic Method 2
This method is for existing text formatted vertically as a list.
- Select the text.

- Select the Home tab in the ribbon (see figure 1).
- Select the menu arrow next to the Numbering button (see figure 2).
- Choose a style from the Numbering Library (see figure 3).
Your selected items should become a numbered list.

How to Change Numbered List Levels
Word lets you create numbered lists with up to nine nested levels. Here are two ways to change the level of list items.
Change List Levels — Method 1
Important note: This method won’t work for the first item in your list.
- Select one or more list items (other than the first item).

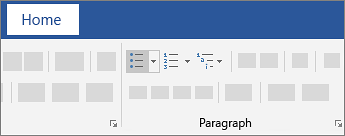
- Select the Home tab in the ribbon (see figure 1).
- Select the Increase Indent button in the Paragraph group.

Each time you select the Increase Indent button, the item(s) will move one level and take on the appropriate format for that level (e.g., lowercase letters, roman numerals, etc.).

Pro Tip: To return the selected text to a previous level, select the Decrease Indent button to the left of the Increase Indent button.
Change List Levels — Method 2
- Select one or more list items (see figure 8).
- Select the Home tab in the ribbon (see figure 1).
- Select the menu arrow next to the Numbering button (see figure 2).
- Select Change List Level from the drop-down menu.

- Select a list level from the list-level menu.

Your list item(s) should move to the next level.
How to Start a List with a Different Number
You can start a list with a number other than one or continue the numbering from the previous list.
- Select the first list number or place your cursor within the first list item. If you select the list number, all numbers on that level should also be selected.

- Select the Home tab in the ribbon (see figure 1).
- Select the menu arrow next to the Numbering button (see figure 2).
- Select Set Numbering Value from the drop-down menu.

5.a. Enter the number you want to start with in the Set value to text box in the Set Numbering Value dialog box.

5.b. (Alternative Option) Select Continue from previous list if you want to continue the numbering from a previous list in your document.

- Select the OK button.

Your list should be renumbered according to your selections in the Set Numbering Value dialog box.
How to Change the Font, Size, and Color of List Numbers
By default, the font, size, and color of your list numbers will be the same as your normal text style. However, you can manually change the appearance of list numbers by selecting them separately from the text.
- Select one list number. All numbers on that level should also be selected.

- Select the Home tab in the ribbon (see figure 1).
- Select a new font, size, or color from the Font group.

Your list numbers should change to the new formatting. Repeat these steps for each level in your list, as necessary.

Related Resources
How to Write Run-In Lists
How to Create and Update a List of Tables or Figures in Microsoft Word
How to Create Numbered Lists in PowerPoint (PC & Mac)
Updated February 12, 2023
Create a bulleted or numbered list

Create a list
To start a numbered list, type 1, a period (.), a space, and some text. Word will automatically start a numbered list for you.
Type* and a space before your text, and Word will make a bulleted list.
To complete your list, press Enter until the bullets or numbering switch off.
Create a list from existing text
-
Select the text you want to change into a list.
-
Go to Home> Bullets or Home> Numbering.

Note: Find different bullet styles and numbering formats by clicking the down arrow next to Bullets or Numbering.
See Also
Add and format text
Change the line spacing in Word
Apply styles
Apply themes
Need more help?
Want more options?
Explore subscription benefits, browse training courses, learn how to secure your device, and more.
Communities help you ask and answer questions, give feedback, and hear from experts with rich knowledge.
If you need to customize an existing numbered list (see
how to create a numbered list) or apply your
specifications to the number format, use the Define New Number Format dialog box.
I. To create a custom numbering format, do the following:
1. On the Home tab, in the Paragraph group,
choose the Numbering button:

2. In the Numbering list, click
Define New Number Format… item to display the Define New Number Format dialog
box:

3. In the Define New Number Format dialog box:
- Number style — Specifies the numbering style that you want. Choices include Arabic numerals,
uppercase and lowercase Roman numerals, uppercase and lowercase alphabet letters, and word series
(1st, One, and First). You can also choose no numbers at all, killing the sequential numbering. - Font… — Specifies the special font or font attributes (such as bold, italic, and underline)
and the point size for the numbers. A standard Font dialog box appears when this button is chosen. - Number format — Types the characters, if any that you want to come before each number. If you
want each number enclosed in parentheses, for example, type an opening parenthesis before the number
in this box.
Do not type over this number in this box! If you do so, even replacing it with another
number, you will break the automatic numbering; each number in the list will be the same. - Alignment — Sets the distance from the left, centered or right margin that Word places the
number.
II. To create a custom multilevel list format, following:
On the Home tab, in the Paragraph group, choose the Multilevel List button and
click Define New Multilevel List… item to display the Define new Multilevel List dialog
box:

If the button in the lower-left corner is the More >> button, click it. Word displays an
extra panel at the right of the dialog box, so you see the full dialog box, as shown here. Word also
changes the More >> button to a << Less button that you can click to hide the
extra section of the dialog box again.
- In the Click Level To Modify, select the list level you want to change. Word selects the
first level, 1, when you open the Define New Multilevel List dialog box. - If you need to link this numbered list level to a particular style, select the style in the Link
Level To Style drop-down list. - Use the controls in the Number Format area to specify the number format.
- In the Number Style For This Level drop-down list, select the number format you want
to use. For example:- «1, 2, 3,»
- «i, ii, iii,»
- «A, B, C.»
- To include the number from the previous level (or a higher level), choose the level from the
Include Level Number From drop-down list. (This drop-down list is unavailable for the
first level because there’s no level above it.) For example: if Level 1 uses «1, 2, 3»
numbering and Level 2 uses «a, b, c» numbering, applying Level 1 in the Include Level
Number From drop-down list to Level 2 changes the Level 2 numbering to 1a, 1b, and
so on. - Word displays the number formatting you’ve chosen in the Enter Formatting For Number
text box. Type any changes for the text of the format into this text box. For example, you
might edit the «A)» format to «Section A)» so that each instance of the number included the
word «Section.» - To specify font formatting, click the Font button. Word displays the Font
dialog box. Choose the font, font style, size, and any extras (such as color or effects),
and then click the OK button. - To customize the numbering, use the Start At spinner to change the starting number.
If you want to restart numbering after a certain level, select the Restart List After
check box and choose that level in the drop-down list. (The Restart List After
controls aren’t available for the first level in the list, because there’s no higher level.) - Select the Legal Style Numbering check box if you want to use legal-style numbering:
changing any roman numeral to an Arabic numeral. For example, 1.1.1 instead of
I.1.1.
- In the Number Style For This Level drop-down list, select the number format you want
- Use the controls in the Position box to customize where the number appears.
- In the Number Alignment drop-down list, choose Left, Centered, or
Right. - In the Aligned At text box, choose the position at which to align the number.
- In the Text Indent At text box, set the indent position for the text.
- In the Follow Number With drop-down list, select the character to include after the
number: a tab, a space, or nothing. If you choose a tab, you can select the Add Tab Stop
At check box and set the distance at which to place a tab stop.
- In the Number Alignment drop-down list, choose Left, Centered, or
Note: more details are available
in the Numbered lists section
in the Work with bulleted, numbered and multi-level lists lesson
of the Create basic documents free course.
See also this tip in French:
Comment personnaliser une liste numérotée.
The ListNum field inserts a set of numbers anywhere in a paragraph. It support two switches that enable you to control how numbering is performed, such as, starting number and the list level. To insert ListNum field:
- Press
Alt+Ctrl+Lkeyboard shortcut, or; - Choose
Inserttab, clickQuick Partsicon from theTextgroup, clickFieldand chooseListNumfrom the Field names box (see, Using Fields in Word):
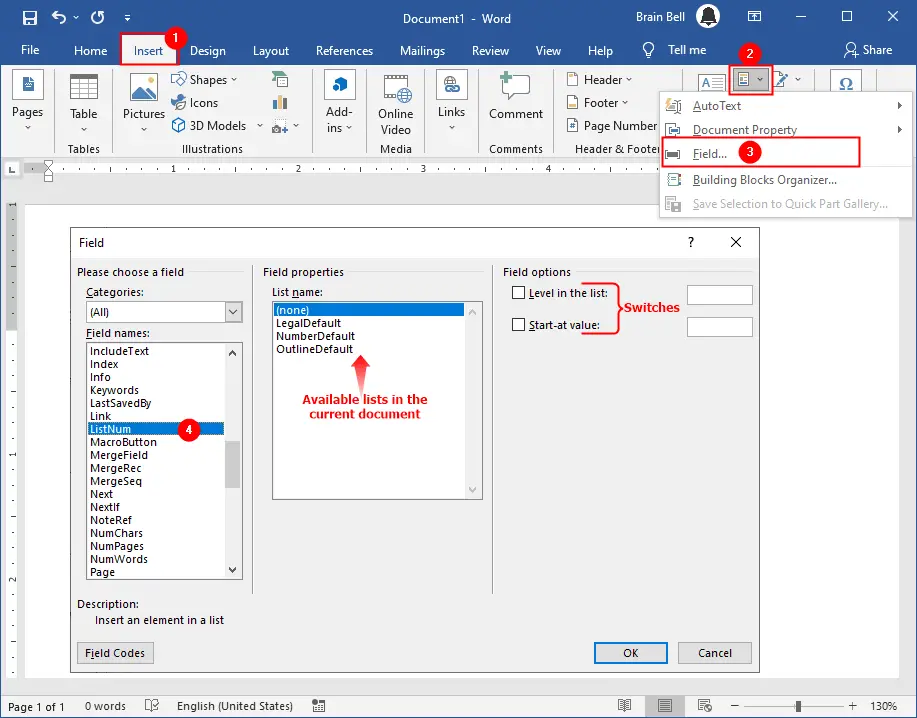
Syntax:
{ListNum ["Name"] [Switches]}- Name (optional):
List name defined in the active document. - Switches (optional):
lSpecifies the level in the listsSpecifies the start-at value for this field
ListNum Example
A common instance in which you’d use ListNum is when you’re numbering things within a single paragraph and don’t want to worry about having to renumber them when you insert or remove items. For example:
“I needed to 1) make a list of things to do, 2) do the things
on the list, and 3) add additional things to the list.” ListNum field is updated instantly and automatically anytime another ListNum field is inserted or deleted:
Ctrl+Alt+L keyboard shortcut keys to insert ListNum fieldListNum field supports two switches that enable you to control how numbering is performed, the starting number, and the list level: 1), a), i), (1), (a), (i), and so on.
Change starting number in ListNum field
Use s switch to change the lists starting number, for example, press Ctrl+Alt+L to insert ListNum field and add s 10 before the closing curly bracket to start the list from 10 number: {ListNum s 10}.
ListNum field starting numberChange level in the list
Use l switch to change the lists level, for example, press Ctrl+Alt+L to insert a ListNum field and use l 2 switch before the closing bracket closed. It will demote the list level to 2: {ListNum l 2}.
ListNum fieldChange starting number and list level
You can use both switches together to change the list level and starting number, for example: {ListNum s 10 l 2}.
Define Multilevel List with “ListNum field list name”
You can create a custom multilevel list by using the ListNum field. Just edit its code and write the name of the list before closing the curly bracket. When you define a new Multilevel list (see understanding “define new multilevel list” dialog box and Define Multilevel List), you can assign the list a name which you can later use in the ListNum field, for example: {ListNum ListName}:
ListNum fieldMore Fields Tutorials:
- Word Fields
- Insert a field with keyboard
- Show/hide (toggle) field codes
- Field Switches
- The ListNum field
- Define Multilevel List with “ListNum field list name”
- List Numbering using SEQ Fields
- AutoCorrect for SEQ Fields
- Hide, Unhide, Lock, or Unlock Fields
- Field Shading
- Apply Formula Field in Paragraphs
Numbered lists are useful in Word for many different types of documents, such as forms, registries, or even an outline. Word can automatically format numbered lists for you, or you can format them manually. Learn the different ways to approach creating and formatting a numbered list with the following articles.
Tips, Tricks, and Answers
The following articles are available for the ‘Numbered Lists’ topic. Click the
article»s title (shown in bold) to see the associated article.
Aligning Numbered Lists on the Period
When you convert a paragraph to a numbered list, Word adds a number at the start of the paragraph, as you would expect. How you align this number is the focus of this tip.
Applying Numbers from the Keyboard
Creating a numbered list is often done by using the tools available on the ribbon. With a bit of preparation you can create numbered lists using keyboard shortcuts.
Automatic Numbers with Leading Zeroes
Word’s automatic numbering formats allow you to easily create lists that have one leading zero. If you want more than one leading zero, then your options are more limited, and you may need to look to a technique that doesn’t even use the standard automatic numbering.
Automatic Question Numbering
Want to use Word’s numbering capabilities to help you number a series of questions? Here’s how to accomplish the task as easily as possible.
Changing the Types of Numbers in a Numbered List
Ever want to change the types of numbers that Word displays when you create a numbered list? There are several numbering scheme options. This tip tells you how to change the scheme to your preference.
Combining First and Second Numbered Levels on One Paragraph
Want to customize your paragraph numbering in Word? There are a few tricks that can be used to automatically display the numbering you want, in spite of Word’s default system.
Continuing Your Numbering
If you have a couple of numbered lists separated by regular text paragraphs, you might want the secondary lists to be continuations of the first one. Setting this up is rather easy.
Converting Automatic Numbering to Manual Numbering
The automatic numbering that Word lets you apply to paragraphs in your document can create some great looking content, but it can play havoc with your file if you import it into another program. Here’s how to get rid of the automatic numbering, but still retain the numbers.
Converting Lists to Text
If you have a numbered list in a document, you might want to convert it to regular, non-dynamic text and not lose the numbers that are in the list. This tip explains a couple of techniques you can use to accomplish the task.
Creating a Numbered List
Numbered lists provide a 1-2-3 way of organizing your document. You can create numbered lists very easily using the techniques in this tip.
Ensuring Standardized Numbering
Want to make sure your paragraph numbering looks the same on different computer systems? It’s a harder task in Word than it might seem.
Following a Number with Different Characters
When creating numbered lists, the normal characters that follow the number are a period and a tab. Here’s how to force Word to use a different character sequence more to your liking.
Lining Up Numbered List Numbers
Do you want the numbers in your numbered lists to be aligned differently than they normally are? You can adjust the alignment by following the steps outlined in this tip.
Numbered Lists without Indentation
Do you want to modify how your numbered lists (or bulleted lists) are created? The key is to use styles to create your lists instead of relying on the tools that Word provides.
Numbering with Sequence Fields
One of the most powerful and versatile fields you can use in Word is the SEQ field. This tip shows how you can use the field to create your own numbered lists.
Randomly Resetting Numbering
Have you ever been frustrated by the automatic numbering feature in Word? You are not alone. Fortunately, there are a few options that can work around this problem.
Restarting a Numbered List Easily
Word provides tools that allow you to add numbered lists to your documents. Sometimes the quirks built into these tools can make them a pain to work with. One such case is when you need to restart numbering. This tip looks at some techniques and ideas you can apply to make the process easier.
Reverse Numbered Lists
Adding numbered lists to your document is a snap; Word provides tools to add them immediately. What Word doesn’t do is provide a way to create a «countdown list» that is in reverse order. Here’s how you can do it.
Skipping Numbering
Got a numbered list, but you want to add other types of non-numbered paragraphs in the middle of the list? It’s easy to do if you follow the steps in this tip.
Stubborn Highlighting
When you make extensive edits to a document and those edits include changing the formatting of numbered or bulleted lists, you can end up with some strange (and stubborn) results. Here’s a look at the problem and how you can regain control of your list formatting.
Turning Off Automatic Numbered Lists
Type what Word thinks is a numbered list, and it will helpfully format the text to match what it thinks your numbered list should look like. If you don’t want Word to automatically do such formatting, you need the info in this tip.
Underlining a Number in a Numbered List
Word allows you to format the numbers that appear in a numbered list, but what if you want to underline only a single item’s number in that list? You are going to be out of luck, as we found out with a little testing.
Underlining Tabs In Numbered Lists
When Word creates an automatically numbered list, it removes some of your formatting flexibility. One thing you can’t seem to format is the space after the number and the period and before the start of your text. There are ways around this dilemma, however.


Numbers In Words – 1-10 – One Worksheet / FREE Printable Download Print


Free printable Numbers In Word Form List Worksheets to help students learn about Printable. This worksheets are a very useful tool to improve students skill on Printable subjects. Download our free printable worksheets today!
Related posts:
We use cookies on our website to give you the most relevant experience by remembering your preferences and repeat visits. By clicking “Accept All”, you consent to the use of ALL the cookies. However, you may visit «Cookie Settings» to provide a controlled consent.

on
July 12, 2012, 12:43 AM PDT
A quick way to create a list of sequential numbers in Word
Creating a list of sequential numbers isn’t as difficult as it might sound at first. If you can create a table, you can create a list of sequential numbers.
 Creating a sequential list of numbers, in Word, sounds like an intimidating task. Sure, you can create a numbered list quickly enough, but that feature works with additional text – you’re numbering something. If you want a list of just numbers, you have to work a bit harder. Word’s SEQ field might come to mind, but that solution is better suited to template-type numbering. In order words, this field works great if you’re numbering documents, labels, and so on. It doesn’t work so well if you just want to create a list of sequential numbers. You can use it that way, but it’ll be more work than it’s worth.
Another way
Instead of working harder than you need to, insert a one-column table with as many rows as necessary to accommodate your list. Then, using Word’s numbering feature, number that column. Finally, convert the table to text. The resulting list is a fixed numbered list, so you’ll have to live with its limitations; when you can do so, this method definitely beats most alternative solutions.
To illustrate this simple technique, we’ll create a sequential list from 1 to 100. First, we need to insert a table with one column and one hundred rows:
- Position your cursor where you want the table.
- Click the Insert tab. Then, choose Insert Table from the Table dropdown in the Tables group. In Word 2003, choose Insert from the Table menu and then choose Table.
- In the resulting dialog, enter 1 in the Number Of Columns field and 100 in the Number Of Rows field.
- Click OK. The resulting table will have one column and one hundred rows.
The next step is to number the column, as follows:
- Select the table by clicking the Table Selector (the small square in the table’s top-left corner that I’ve circled in the figure above).
- Click the Home tab.
- Click Numbering in the Paragraph group. In Word 2003, Numbering is on the Formatting toolbar. At this point, you have a one-column table with one hundred rows displaying a sequential list of 1 to 100.
Converting the table to text is the last step:
- With the table selected, click the contextual layout tab. Then, choose Convert To Text in the Data group. In Word 2003, choose Convert from the Table menu, and then select Table To Text.
- In the resulting dialog, click OK, as the table uses paragraph marks to denote columns by default. You now have a numbered list, but no table or list items-just numbers.
The results is a numbered list and as such, has the same pros and cons. For instance, you can quickly remove the period character following each number and the indention property, as follows:
- Right-click anywhere in the list, choose Numbering from the resulting context menu and then choose Define New Number Format.
- In the Number Format field, delete the period character.
- From the Alignment dropdown, choose Right.
- Click OK.
You can change the numbers in the list by restarting the sequence or by specifying a new start number. You can change the list’s style. You can do anything to this list that you can do to a normal numbered list because it is a numbered list, with one exception: the list, while easy to format, is fixed. If you delete an item, the list updates accordingly, but I haven’t found a way to add numbers.
-
Software
Multi-level list numbering allows you to format and organize text with nested numbers. The most common form of multi-level list is Heading Numbering, which summarizes the whole article with an outline list, frequently appearing in technical, academic and business documents. In this article, you’ll learn how to generate multi-level list numbering using Spire.Doc in C#, VB.NET.
Detailed Steps:
Step 1: Create a new Word document, add one section.
Document document = new Document();
Section section = document.AddSection();
Step 2: Define a new multi-level list style. Set its name as levelstyle, set ListType as Numbered, set parameters of level property. This list level operates independently of the style and controls the number formatting.
ListStyle listStyle = new ListStyle(document, ListType.Numbered);
listStyle.Name = "levelstyle";
listStyle.Levels[0].PatternType = ListPatternType.Arabic;
listStyle.Levels[1].NumberPrefix = "x0000.";
listStyle.Levels[1].PatternType = ListPatternType.Arabic;
listStyle.Levels[2].NumberPrefix = "x0000.x0001.";
listStyle.Levels[2].PatternType = ListPatternType.Arabic;
document.ListStyles.Add(listStyle);
Step 3: Create a paragraph, append text to paragraph and apply the paragraph style with Heading1. Apply the defined list style ‘levelstyle’ to this paragraph.
Paragraph paragraph = section.AddParagraph();
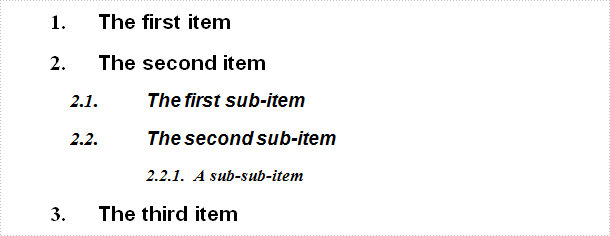
paragraph.AppendText("The first item");
paragraph.ApplyStyle(BuiltinStyle.Heading1);
paragraph.ListFormat.ApplyStyle("levelstyle");
Step 4: Repeat step 3 to add more paragraphs to this document. Here, you need to set different ListLevelNumber as 1 or 2 to make sure the sub-paragraph and sub-sub-paragraph will be assigned to deferent list templates.
paragraph = section.AddParagraph();
paragraph.AppendText("The second item");
paragraph.ApplyStyle(BuiltinStyle.Heading1);
paragraph.ListFormat.ApplyStyle("levelstyle");

paragraph = section.AddParagraph();
paragraph.AppendText("The first sub-item");
paragraph.ApplyStyle(BuiltinStyle.Heading2);
paragraph.ListFormat.ListLevelNumber = 1;
paragraph.ListFormat.ApplyStyle("levelstyle");

paragraph = section.AddParagraph();
paragraph.AppendText("The second sub-item");
paragraph.ApplyStyle(BuiltinStyle.Heading2);
paragraph.ListFormat.ContinueListNumbering();
paragraph.ListFormat.ApplyStyle("levelstyle");

paragraph = section.AddParagraph();
paragraph.AppendText("A sub-sub-item");
paragraph.ApplyStyle(BuiltinStyle.Heading5);
paragraph.ListFormat.ListLevelNumber = 2;
paragraph.ListFormat.ApplyStyle("levelstyle");

paragraph = section.AddParagraph();
paragraph.AppendText("The third item");
paragraph.ApplyStyle(BuiltinStyle.Heading1);
paragraph.ListFormat.ApplyStyle("levelstyle");
Step 5: Save the file.
document.SaveToFile(@"result.docx", FileFormat.Docx);
Result:
Full Code:
[C#]
using Spire.Doc;
using Spire.Doc.Documents;
namespace CreatList
{
 class Program
    {

      static void Main(string[] args)
        {
            Document document = new Document();
            Section section = document.AddSection();

            ListStyle listStyle = new ListStyle(document, ListType.Numbered);
            listStyle.Name = "levelstyle";
            listStyle.Levels[0].PatternType = ListPatternType.Arabic;
            listStyle.Levels[1].NumberPrefix = "x0000.";
            listStyle.Levels[1].PatternType = ListPatternType.Arabic;
            listStyle.Levels[2].NumberPrefix = "x0000.x0001.";
            listStyle.Levels[2].PatternType = ListPatternType.Arabic;
            document.ListStyles.Add(listStyle);

            Paragraph paragraph = section.AddParagraph();
            paragraph.AppendText("The first item");
            paragraph.ApplyStyle(BuiltinStyle.Heading1);
            paragraph.ListFormat.ApplyStyle("levelstyle");

            paragraph = section.AddParagraph();
            paragraph.AppendText("The second item");
            paragraph.ApplyStyle(BuiltinStyle.Heading1);
            paragraph.ListFormat.ApplyStyle("levelstyle");

            paragraph = section.AddParagraph();
            paragraph.AppendText("The first sub-item");
            paragraph.ApplyStyle(BuiltinStyle.Heading2);
            paragraph.ListFormat.ListLevelNumber = 1;
            paragraph.ListFormat.ApplyStyle("levelstyle");

            paragraph = section.AddParagraph();
            paragraph.AppendText("The second sub-item");
            paragraph.ApplyStyle(BuiltinStyle.Heading2);
            paragraph.ListFormat.ContinueListNumbering();
            paragraph.ListFormat.ApplyStyle("levelstyle");

            paragraph = section.AddParagraph();
            paragraph.AppendText("A sub-sub-item");
            paragraph.ApplyStyle(BuiltinStyle.Heading5);
            paragraph.ListFormat.ListLevelNumber = 2;
            paragraph.ListFormat.ApplyStyle("levelstyle");

            paragraph = section.AddParagraph();
            paragraph.AppendText("The third item");
            paragraph.ApplyStyle(BuiltinStyle.Heading1);
            paragraph.ListFormat.ApplyStyle("levelstyle");

            document.SaveToFile(@"result.docx", FileFormat.Docx);


        }
    }
}
[VB.NET]
Imports Spire.Doc
Imports Spire.Doc.Documents
Namespace CreatList
	Class Program

		Private Shared Sub Main(args As String())
			Dim document As New Document()
			Dim section As Section = document.AddSection()

			Dim listStyle As New ListStyle(document, ListType.Numbered)
			listStyle.Name = "levelstyle"
			listStyle.Levels(0).PatternType = ListPatternType.Arabic
			listStyle.Levels(1).NumberPrefix = vbNullChar & "."
			listStyle.Levels(1).PatternType = ListPatternType.Arabic
			listStyle.Levels(2).NumberPrefix = vbNullChar & "." & ChrW(1) & "."
			listStyle.Levels(2).PatternType = ListPatternType.Arabic
			document.ListStyles.Add(listStyle)

			Dim paragraph As Paragraph = section.AddParagraph()
			paragraph.AppendText("The first item")
			paragraph.ApplyStyle(BuiltinStyle.Heading1)
			paragraph.ListFormat.ApplyStyle("levelstyle")

			paragraph = section.AddParagraph()
			paragraph.AppendText("The second item")
			paragraph.ApplyStyle(BuiltinStyle.Heading1)
			paragraph.ListFormat.ApplyStyle("levelstyle")

			paragraph = section.AddParagraph()
			paragraph.AppendText("The first sub-item")
			paragraph.ApplyStyle(BuiltinStyle.Heading2)
			paragraph.ListFormat.ListLevelNumber = 1
			paragraph.ListFormat.ApplyStyle("levelstyle")

			paragraph = section.AddParagraph()
			paragraph.AppendText("The second sub-item")
			paragraph.ApplyStyle(BuiltinStyle.Heading2)
			paragraph.ListFormat.ContinueListNumbering()
			paragraph.ListFormat.ApplyStyle("levelstyle")

			paragraph = section.AddParagraph()
			paragraph.AppendText("A sub-sub-item")
			paragraph.ApplyStyle(BuiltinStyle.Heading5)
			paragraph.ListFormat.ListLevelNumber = 2
			paragraph.ListFormat.ApplyStyle("levelstyle")

			paragraph = section.AddParagraph()
			paragraph.AppendText("The third item")
			paragraph.ApplyStyle(BuiltinStyle.Heading1)
			paragraph.ListFormat.ApplyStyle("levelstyle")

			document.SaveToFile("result.docx", FileFormat.Docx)


		End Sub
	End Class
End Namespace

Creating and removing numbered lists in Word is easy using the “Numbering” command on the ribbon. However, if you prefer using the keyboard, there is a way to quickly create a numbered list using a keyboard shortcut.
We will add a keyboard shortcut to the command for creating numbered lists. To do so, right click anywhere on the ribbon and select “Customize the Ribbon” from the popup menu.

The “Customize the Ribbon and keyboard shortcuts” screen displays on the “Word Options” dialog box.
On the “Customize Keyboard” dialog box, select “All Commands” in the “Categories” list.
Scroll down in the “Commands” list and select “FormatNumberDefault”.
Put the cursor in the “Press new shortcut key” edit box and press the shortcut key combination you want to use to create a numbered list. We used “Alt + N” because it’s not assigned to anything else in Word. Click “Assign”.
The new keyboard shortcut is added to the “Current keys” list.
If you made other changes on the “Word Options” dialog box (not a sub-dialog), click “OK” to accept your changes and close the dialog box. Otherwise, click “Cancel”.
To remove the number from a numbered list item, simply press the keyboard shortcut again. The number and the paragraph indent are removed. You can also press “Ctrl + Q” to remove paragraph numbering, but this leaves the paragraph indented.
Word can also automatically create a numbered list, however you can turn off this feature.
READ NEXT
- › How to Add Bullet Points in Word
- › How to Cross-Reference in Microsoft Word
- › How to Change the Alignment of the Numbers in a Numbered List in Microsoft Word
- › Google Chrome Is Getting Faster
- › BLUETTI Slashed Hundreds off Its Best Power Stations for Easter Sale
- › The New NVIDIA GeForce RTX 4070 Is Like an RTX 3080 for $599
- › This New Google TV Streaming Device Costs Just $20
- › HoloLens Now Has Windows 11 and Incredible 3D Ink Features
How-To Geek is where you turn when you want experts to explain technology. Since we launched in 2006, our articles have been read billions of times. Want to know more?
Multilevel numbering in Word is the #1 headache for many people working with large documents.
Believe it or not, it’s not complicated. It just takes somebody to lead the way and point out the pitfalls you need to avoid.
Today that pleasure falls to me!
Before I start, grab your free multilevel numbering troubleshooting guide that shows you the steps to get multilevel numbering working properly first time, every time, together with answers to over 20 FAQs and plenty of real client examples constructed step by step to help you fix what isn’t working with your numbering.

1. What Multi-level Numbering Looks Like
Often used in the legal profession or in large corporate documents, multilevel numbering creates a logical hierarchy and easy navigation within the document. The headings can also be summarised later on in a table of contents. Here is a simple example:

2. How to Set Up Multilevel Numbering
Here is the correct process:
1. Select the text that you want to number (this can be a section of text or the whole document).

2. Select the Home tab.
3. Click the multilevel numbering icon in the Paragraph group.
![]()
4. You can either select an existing layout from the list to use as a starting point, or you can create a new numbering system from scratch. As you hover over each thumbnail image, Word provides a larger image of the numbering system.
5. Choose Define New Multilevel List to display the control dialog.

The dialog box can be broken down as follows:
Step #1 Click level to modify
In the top left is a list of levels. As you select each level, the settings in the rest of the dialog box changes.
Level 1 is the highest level, i.e. the main headings such as chapter or section titles.
Level 2 is subordinate to level 1.
Level 3 is subordinate to level 2.

Step #2 Enter formatting for number
This is where the level number is constructed. If you include a previous level number, it will be displayed with a grey background, as will the number for the current level.
Type anything you wish to put in between the numbers such as dots, dashes, brackets etc.
Clear any text in the ‘Enter formatting for this number’ box.
Step #3 Include level number from
When creating a subordinate level (or child level), you can first specify the level number of the parent.
For example, for section 3.2
- ‘3’ is the parent level (level 1) and
- ‘2’ is the child level (level 2)

Step #4 Number style for this level
Each level can have its own number style. It may be a standalone style, e.g. 1, 2, 3 or a, b, c or continue on from a higher level, e.g. 1.1.1 or 1.a.i.
- When creating 1.1 numbering, this option is 1, 2, 3.
- When creating 1.a numbering, this option is a, b, c

Step #5 Font
Set the font formatting for the selected level, if you want.

Step #6 Position
What position from the left margin do you want items for each level of numbering. For example, level 1 items may be 0cm from the left margin, level 2, 1cm from the left margin and level 3, 2cm from the left margin.
Here’s what they mean:
- The Aligned At determines how far from the left margin the number appears.
- The Text indent at figure determines how far from the left margin the text following the number is.

6. Click OK to save all the settings and close the dialog box.
The text you selected in step 1 now looks like this.

The next part is where the magic happens …
3. How to Apply Multilevel Numbering
Once you have created your numbering system:
1. Position the cursor at the beginning of a line.

2. Press the TAB key to move the text down a level (demote).

3. Press the SHIFT and TAB keys together to move the text up a level (promote).

If you prefer, you can also click the indent icon to demote and the outdent icon to promote between levels.
![]()
4. How to Change Multilevel Settings
Once you have created your numbering system:
1. Reselect all text that is using the multilevel numbering.
2. Click the multilevel numbering icon and select Define New Multilevel List (yes, you choose this option even if you are modifying an existing multilevel list).

The original settings that you defined are redisplayed.
3. In the top-left box select the level that you wish to change, then change your settings.
4. Repeat for the other settings.
5. Click OK to save the settings. Your numbered list should now reflect your new settings.
5. Linking Multilevel Numbering to Styles
Each level of a multilevel numbering system can be linked to a style. This means that as you apply styles throughout the document, the numbering is applied appropriately and automatically. You can either use the built-in Heading 1, Heading 2, Heading 3 styles or use your own custom styles.
1. In the Numbering dialog box, click the MORE button in the bottom-left corner to expand the dialog box.
2. Select level to modify in the top-left box.
3. Open the Link level to style drop-down list and choose the style you wish to connect to the numbering level.

4. Click OK.
5. In the document, apply the Heading 1, Heading 2, Heading 3 styles where needed.
It’s a good idea to create a body text style and apply that where appropriate, so that the body text does not inadvertently get caught up in the multi-level numbering.
6. Select the whole document (or the portion of the document where you want to apply your numbered sections).
7. Click the icon in the Paragraph group (Home tab).
8. Select your custom numbering style from the gallery. The thumbnail image should show the linked styles.

6. How to Use Styles to Set Number Levels
1. Select all the text that you wish to apply the same number level to. Alternatively, if you wish to go line by line, you can place the cursor anywhere in a line of text.
2. In the Styles gallery, click the style that corresponds to the number level you wish to apply. For example, to apply the top level numbering click Heading 1 and for the third level numbering click Heading 3 (assuming those are the styles you assigned).
The numbering and all the numbering settings will be applied to the selected text or the paragraph in which the cursor was positioned.

And that, my friend, is how you do multilevel numbering in Word with no loose ends.
How to set up a dual-multilevel numbering system in Word
7. Two resources to help you
1. Grab your free multilevel numbering troubleshooting guide.

2. Watch over my shoulder as I set up multilevel numbering from scratch.

8. What next?
I hope you found plenty of value in this post. I’d love to hear your biggest takeaway in the comments below together with any questions you may have.
Have a fantastic day.


About the author
Jason Morrell
Jason loves to simplify the hard stuff, cut the fluff and share what actually works. Things that make a difference. Things that slash hours from your daily work tasks. He runs a software training business in Queensland, Australia, lives on the Gold Coast with his wife and 4 kids and often talks about himself in the third person!
SHARE