
Содержание
- How to create a hyperlink from a Word document to an Excel workbook
- How to create a link to an Excel workbook
- How to create a link to a specific place in an Excel workbook
- How to link to an absolute address in an Excel workbook
- How to link to a range name in an Excel workbook
- How to add a screen tip to a hyperlink
- Insert an object in your Excel spreadsheet
- How to Link or Embed Excel Files in Word Documents
- In This Article
- What to Know
- How to Link Excel to Word
- What Happens When You Link Excel to Word
- How to Embed an Excel Spreadsheet in Word
- Embed an Excel Worksheet as an Object
- How to Embed an Excel Spreadsheet Table
How to create a hyperlink from a Word document to an Excel workbook
Linking from Word to Excel
You can use Word’s HYPERLINK field to link from a Word document to an Excel workbook.
To link to a specific place in the Excel file, specify an absolute address or a range name.
You can create a clickable hyperlink in a Word document that will open up an Excel file. Sometimes you just need to open the Excel workbook. Sometimes you want the link to go to a specific place in the Excel workbook. This page explains how.
How to create a link to an Excel workbook
In your Word document, do ctrl-F9. Within the braces that word gives you, type the following:
HYPERLINK «C:\My Documents\MyExcelFile.xls»
So it looks like
But note that you can’t type the < >braces by hand. You must use ctrl-F9 and type between the braces that Word gives you.
Obviously, you need to replace the text between the quote marks with your own folder and file name. Be sure to use double back slashes («\») in your path name.
When you’re finished, press F9, which toggles between displaying the field codes (that you just typed) and the field result (which is the hyperlink).
When you click the link, Excel will run and will open your Excel workbook.
Click, or ctrl-click to link?
By default, you need to do ctrl-click to follow a hyperlink from a Word document.
If you don’t like that, you can change it. In Word 2003 and earlier versions, do Tools > Options . On the Edit tab, un-tick «Use CTRL + click to follow hyperlink». In Word 2007 and Word 2010 do File > Word Options or File > Options . On the Advanced tab, in the Editing Options section, un-tick «Use CTRL + Click to follow hyperlink».
How to create a link to a specific place in an Excel workbook
You have two choices here. You can choose to link to an absolute address. Or, you can link to a range name.
How to link to an absolute address in an Excel workbook
In your Word document, do ctrl-F9. Within the braces that Word gives you, type so that it looks like the following:
If your sheet name contains a space, then you need to enclose it in single quote marks, like this:
Alternatively, you can use the l (that’s a lower-case L) switch to identify the range name:
How to link to a range name in an Excel workbook
To create a hyperlink to a Worksheet range name, use use ctrl-F9 and type so it looks like the following:
To create a hyperlink to a Workbook range name, use use ctrl-F9 and type so it looks like the following:
Word wouldn’t be Word if it were always that straight-forward! Excel gets confused if you have both a Workbook range and a Worksheet range with the same name. It seems to link to the range randomly. So, if you use range names, make sure they’re all sheet-specific or all workbook-wide. Or use an absolute address.
How to add a screen tip to a hyperlink
You can use the o switch (that’s a lower-case O, not a zero) to create a tooltip, like this:
Created April 2006. Last updated 21 July 2010.
This article is copyright. You may, however, print any page on this site for your own use or to distribute to others, as long as you give it to others in its entirety, with no changes.
The creator of ShaunaKelly.com, Shauna Kelly, passed away peacefully on Wednesday November 16, 2011 after a long battle with ovarian cancer. If you are requesting permission to re-use any information on this site, then you may do so with appropriate acknowledgement of her work. If her words, thoughts or pictures have helped you, or made money for you, then please consider making a donation in her name to WomenCan (previously Women’s Cancer Foundation).
The creator of ShaunaKelly.com, Shauna Kelly, passed away peacefully on Wednesday November 16, 2011 after a long battle with ovarian cancer.
If you are requesting permission to re-use any information on this site, then you may do so with appropriate acknowledgement of her work.
If her words, thoughts or pictures have helped you, or made money for you, then please consider making a donation in her name to WomenCan (previously Women’s Cancer Foundation).
 report this ad
Источник
Insert an object in your Excel spreadsheet
You can use Object Linking and Embedding (OLE) to include content from other programs, such as Word or Excel.
OLE is supported by many different programs, and OLE is used to make content that is created in one program available in another program. For example, you can insert an Office Word document in an Office Excel workbook. To see what types of content that you can insert, click Object in the Text group on the Insert tab. Only programs that are installed on your computer and that support OLE objects appear in the Object type box.
If you copy information between Excel or any program that supports OLE, such as Word, you can copy the information as either a linked object or an embedded object. The main differences between linked objects and embedded objects are where the data is stored and how the object is updated after you place it in the destination file. Embedded objects are stored in the workbook that they are inserted in, and they are not updated. Linked objects remain as separate files, and they can be updated.
Linked and embedded objects in a document
1. An embedded object has no connection to the source file.
2. A linked object is linked to the source file.
3. The source file updates the linked object.
When to use linked objects
If you want the information in your destination file to be updated when the data in the source file changes, use linked objects.
With a linked object, the original information remains stored in the source file. The destination file displays a representation of the linked information but stores only the location of the original data (and the size if the object is an Excel chart object). The source file must remain available on your computer or network to maintain the link to the original data.
The linked information can be updated automatically if you change the original data in the source file. For example, if you select a paragraph in a Word document and then paste the paragraph as a linked object in an Excel workbook, the information can be updated in Excel if you change the information in your Word document.
When to use embedded objects
If you don’t want to update the copied data when it changes in the source file, use an embedded object. The version of the source is embedded entirely in the workbook. If you copy information as an embedded object, the destination file requires more disk space than if you link the information.
When a user opens the file on another computer, he can view the embedded object without having access to the original data. Because an embedded object has no links to the source file, the object is not updated if you change the original data. To change an embedded object, double-click the object to open and edit it in the source program. The source program (or another program capable of editing the object) must be installed on your computer.
Changing the way that an OLE object is displayed
You can display a linked object or embedded object in a workbook exactly as it appears in the source program or as an icon. If the workbook will be viewed online, and you don’t intend to print the workbook, you can display the object as an icon. This minimizes the amount of display space that the object occupies. Viewers who want to display the information can double-click the icon.
Источник
How to Link or Embed Excel Files in Word Documents
Link an Excel file to a Word doc so the doc updates when the Excel data changes
:max_bytes(150000):strip_icc()/ryanperiansquare-de5f69cde760457facb17deac949263e-180a645bf10845498a859fbbcda36d46.jpg)
In This Article
Jump to a Section
What to Know
- Link: Copy cells. Right-click Link & Use Destination Styles or Link & Keep Source Formatting in Word.
- Embed: In Word, go to Insert >Object >Object >Create from File >Browse > choose Excel file >OK.
- Embed a spreadsheet table: In Word, go to Insert >Table >Excel Spreadsheet.
This article explains two ways to display Excel data in Word.
Instructions apply to Word for Microsoft 365, Word 2019, Word 2016, Word 2013, Word 2010, Excel for Microsoft 365, Excel 2019, Excel 2016, Excel 2013, and Excel 2010.
How to Link Excel to Word
To insert any part of an Excel worksheet in a Word document:
:max_bytes(150000):strip_icc()/link-embed-excel-files-in-word-3540000-9284e46842304acc92357823da7b3e9e-18cae6c0435049b7ae05a9d9e688d000.jpg)
Maddy Price / Lifewire
Open the Word document where the worksheet will display.
Open the Excel worksheet that contains the data you want to link to the Word document.
In Excel, select and copy the range of cells to include. If you plan to insert more columns or rows into the worksheet, select the entire worksheet.
To select the entire worksheet, select the cell located in the upper-left corner at the juncture of the row numbers and column letters.
:max_bytes(150000):strip_icc()/Capture-9cde6731206049949669889ec68ea234.JPG)
In the Word document, position the cursor where you want to insert the linked table.
Right-click and select Link & Use Destination Styles or Link & Keep Source Formatting.
Destination Styles uses the default Word table formatting, which usually results in a better-looking table. Keep Source Formatting uses the formatting from the Excel workbook.
:max_bytes(150000):strip_icc()/001-link-embed-excel-files-in-word-3540000-8252a46b9be54368998ea44fe6f1a9c4.jpg)
The Excel data pastes directly into the Word document where the cursor was positioned. If changes are made to the source Excel file, the Word document updates with those changes automatically.
What Happens When You Link Excel to Word
Linking an Excel file to a Word document ensures that the Word document is updated every time the data in the Excel file changes. It works as a one-way link feed that brings the updated Excel data into the linked Word document. Linking an Excel worksheet also keeps your Word file small because the data doesn’t save to the Word document.
Linking an Excel worksheet to a Word document has a few limitations:
- If the Excel file moves, the link to the Word document needs to be re-established.
- If you plan to transport the Word file or use it on another computer, you must transport the Excel file along with it.
- You must do data editing in the Excel worksheet. It isn’t a problem unless you require different spreadsheet formats in the Word document.
How to Embed an Excel Spreadsheet in Word
The process of embedding an Excel worksheet in a Word document is essentially the same as linking to an Excel worksheet. It does require a few extra clicks, but it brings all data from the worksheet into your document, not only the selected range.
There are two ways to embed an Excel worksheet in Word. The first is to embed the worksheet as an object. The second is to insert a table.
When you embed a worksheet, Word uses the formatting from the Excel worksheet. Make sure that the data in the worksheet looks the way you want it to appear in the Word document.
Embed an Excel Worksheet as an Object
To embed an Excel worksheet as an object:
Open the Word document.
Go to the Insert tab.
:max_bytes(150000):strip_icc()/001-insert-horizontal-lines-in-word-4169481-499c6dd02c6943b78939bc056f3150a3.jpg)
Select Object > Object. In Word 2010, select Insert > Object.
:max_bytes(150000):strip_icc()/002-link-embed-excel-files-in-word-3540000-c332627c94cb41b899bf99181d9c9ccb.jpg)
In the Object dialog box, select the Create from File tab.
:max_bytes(150000):strip_icc()/003-link-embed-excel-files-in-word-3540000-22bc6ac299e2423c8358e45a1cd4891d.jpg)
Select Browse, then choose the Excel worksheet that contains the data you want to embed.
:max_bytes(150000):strip_icc()/004-link-embed-excel-files-in-word-3540000-6872419cca134e2f93d294c7d63a4e5f.jpg)
Select OK.
:max_bytes(150000):strip_icc()/005-link-embed-excel-files-in-word-3540000-7c60dcc176a44a47aba5c40b75e6e63c.jpg)
The Excel worksheet is embedded in the Word document.
How to Embed an Excel Spreadsheet Table
An alternative is to insert the Excel worksheet as a table. This method inserts the worksheet the same way as if you embedded it as an object. The difference is that it opens a blank Excel worksheet for you to fill out. Choose this method if you haven’t created the Excel file yet.
To insert an Excel worksheet as a table in Word:
Open a Word document.
Place the cursor where you want to insert the Excel worksheet.
Go to the Insert tab, then select Table.
:max_bytes(150000):strip_icc()/006-link-embed-excel-files-in-word-3540000-4b6142baae0e4fc6b6ff96d57397f88a.jpg)
Select Excel Spreadsheet.
:max_bytes(150000):strip_icc()/007-link-embed-excel-files-in-word-3540000-e17eb7b8f6c24a439ef7a6abfa796e38.jpg)
This menu option opens a blank Excel worksheet that you can fill with data. Either enter new data or paste data from another spreadsheet.
When you insert and fill out a new Excel worksheet, you have an Excel file that you can update at any time. The data in the Word table automatically updates to match the data in the Excel file.
In Excel, select the Insert tab > Text > Object > Create from File. Next, select Browse to find the Word file > Insert > OK.
To create labels in Word from an Excel list, open a blank Word document > select Mailings > Start Mail Merge > Labels > choose the brand and product number for the labels. Then, choose Select Recipients > Use an Existing List > navigate to the Excel address list > OK. Add the merge mail fields to complete the merge.
Источник
Embed an Excel Worksheet as an Object
- Open the Word document.
- Go to the Insert tab.
- Select Object > Object.
- In the Object dialog box, select the Create from File tab.
- Select Browse, then choose the Excel worksheet that contains the data you want to embed.
- Select OK.
- The Excel worksheet is embedded in the Word document.
Contents
- 1 How do I get Word to automatically update in Excel?
- 2 Can Excel pull data from a Word document?
- 3 How do I create a link to a document in Excel?
- 4 How do I link a Word table to a cell in Excel?
- 5 How do I concatenate text and hyperlinks in Excel?
- 6 How do I create a link to a document?
- 7 How do I create a link to a file?
- 8 Can you concatenate a hyperlink in Excel?
- 9 How do you automatically hyperlink in Excel?
- 10 How do you turn a Word document into a link?
- 11 How do I link a document in Word?
- 12 How do you create a link for a Word document?
- 13 How do I merge links?
- 14 How do I create a hyperlink based on cell contents?
- 15 How do I put multiple hyperlinks in one Excel cell?
- 16 How do you combine text in Excel?
- 17 What is the fastest way to hyperlink in Excel?
How do I get Word to automatically update in Excel?
Automatic Update Link between excel and word
- In Word, try hovering the mousepointer over the linked spreadsheet table,
- right click,
- select “Link macro enabled Worksheet Object” ,
- select Links, to display the Links dialog.
- Check that the “Update Method for selected link” is set to “Automatic Update”
Can Excel pull data from a Word document?
Microsoft Office is designed so you can import data from one Office program to another seamlessly. For example, you can import Word document data and even whole Word documents in their entirety into your Excel spreadsheets.
How do I create a link to a document in Excel?
On the worksheet, select the cell where you want to create a link. On the Insert tab, select Hyperlink. You can also right-click the cell and then select Hyperlink… on the shortcut menu, or you can press Ctrl+K. Under Display Text:, type the text that you want to use to represent the link.
How do I link a Word table to a cell in Excel?
If you’re just looking to have individual cells in the Word table linked to specific cells in the Excel document;
- In Excel copy the source cell.
- In Word, click in the destination cell.
- Go to Edit> Paste Special.
- Click Paste Link.
- Select Unformatted Text.
- Click OK.
- Repeat as required for each additional cell.
How do I concatenate text and hyperlinks in Excel?
3 Answers. Use the CONCATENATE-Funktion in Excel, e.g. =CONCATENATE(A1;B1) . If you need the square bracets just add them in eg. g =CONCATENATE(A1;”[“;B1;”]”) .
How do I create a link to a document?
Create a hyperlink to a location in another document
- Select the text or picture that you want to display as a hyperlink.
- Press Ctrl+K.
- Under Link to, click Existing File or Web Page.
- In the Look in box, click the down arrow, and find and select the file that you want to link to.
How do I create a link to a file?
Hold down Shift on your keyboard and right-click on the file, folder, or library for which you want a link. Then, select “Copy as path” in the contextual menu. If you’re using Windows 10, you can also select the item (file, folder, library) and click or tap on the “Copy as path” button from File Explorer’s Home tab.
Can you concatenate a hyperlink in Excel?
These hyperlinks can come in handy when using Excel as an interface to the Internet or to an internal Web.Using the HYPERLINK function along with the CONCATENATE function (or just the ampersand, &), you can easily assemble a link and create a dynamic form using cells as fields.
How do you automatically hyperlink in Excel?
In the AutoCorrect dialog, go to the AutoFormat As You Type tab and make sure “Internet and network paths with hyperlinks” is checked. Then you should be able to enter URLs as desired and they will be automatically turned into a hyperlink.
How do you turn a Word document into a link?
Select the text you want to format as a hyperlink. Select the Insert tab, then click the Hyperlink command. The Insert Hyperlink dialog box will appear. Using the options on the left side, you can choose to link to a file, webpage, email address, document, or a place in the current document.
How do I link a document in Word?
Link or Embed a file
- Go to Insert > Object.
- Select Create from File.
- Select Browse and choose the file you want to use.
- Select Insert.
- Choose Display as icon to embed, or Link to file for a link.
- Select OK.
How do you create a link for a Word document?
Highlight the text you want to use as a link. Go to Insert > Links > Link (or right click the text and select Link) Type the URL for the link destination into the Address field. Click OK to create your hyperlink.
How do I merge links?
You can merge hyperlink destinations as well as text. If you include a fieldname in a hyperlink URL, Merge will merge the matching data from your data file into it at merge time. For example: In your PowerPoint merge template file, draw a rectangle, right-click it and choose Add Hyperlink.
How do I create a hyperlink based on cell contents?
Insert a Hyperlink
- Select the cell where you want the hyperlink.
- On the Excel Ribbon, click the Insert tab, and click the Hyperlink command. OR, right-click the cell, and click Link. OR, use the keyboard shortcut – Ctrl + K.
How do I put multiple hyperlinks in one Excel cell?
Put the cursor at the transparent rectangle, and right-click, choose Hyperlink from the menu, and then you can specify the file or enter the address to be hyperlinked. With this method, repeat the above steps, you can insert the second or multiple hyperlinks into an Excel cell.
How do you combine text in Excel?
Combine text from two or more cells into one cell
- Select the cell where you want to put the combined data.
- Type = and select the first cell you want to combine.
- Type & and use quotation marks with a space enclosed.
- Select the next cell you want to combine and press enter. An example formula might be =A2&” “&B2.
What is the fastest way to hyperlink in Excel?
To link to another worksheet or a specific location in another Excel file, you can use the Hyperlink context menu or Ctrl + K shortcut. If you plan to insert many identical or similar links, the fastest way is to use a Hyperlink formula, which makes it easier to create, copy and edit hyperlinks in Excel.
Use Word’s Edit Links to Files to Break, Update or Change Excel Links
by Avantix Learning Team | Updated May 1, 2020
Applies to: Microsoft® Excel® 2010, 2013, 2016, 2019 and 365 (Windows)
If you want to break, update or change links to Excel charts or worksheets in Microsoft Word, you’ll need to use the Edit Links to Files command. Unfortunately, this command is difficult to find. To make it easier to access, you can add Edit Links to Files to the Quick Access Toolbar. If you decide that you want to break links to external Excel files, be sure to make a copy of the file first because you can’t undo the break links command.
In this article, we’ll access Edit Links to Files in Microsoft Word in 3 ways – through the Ribbon, by right-clicking (displaying the context menu) or by adding a button to the Quick Access Toolbar.
Note: The links discussed here are not hyperlinks. For more information on hyperlinks, check out the article How to Insert, Edit and Remove Hyperlinks in Microsoft Word.
Recommended article: How to Compress Microsoft Word File Size (10 Ways to Reduce the Size of Large Word Documents)
Finding Word’s Edit Links to Files command in the Ribbon
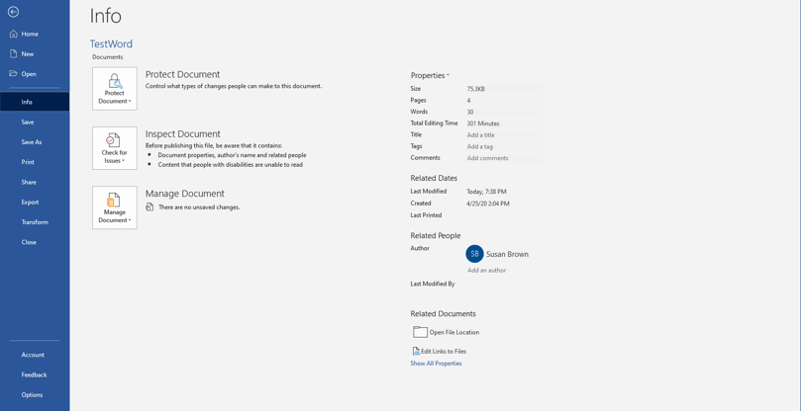
To access Edit Links to Files in the Ribbon:
- Save the Word document.
- Click the File tab in the Ribbon and then click Info.
- In the bottom right corner or the window, under Related Documents, click Edit Links to Files. This command will appear only if external links exist and you have saved the file.
Below is the Edit Links to Files command in Word:
Adding Edit Links to Files to the Quick Access Toolbar
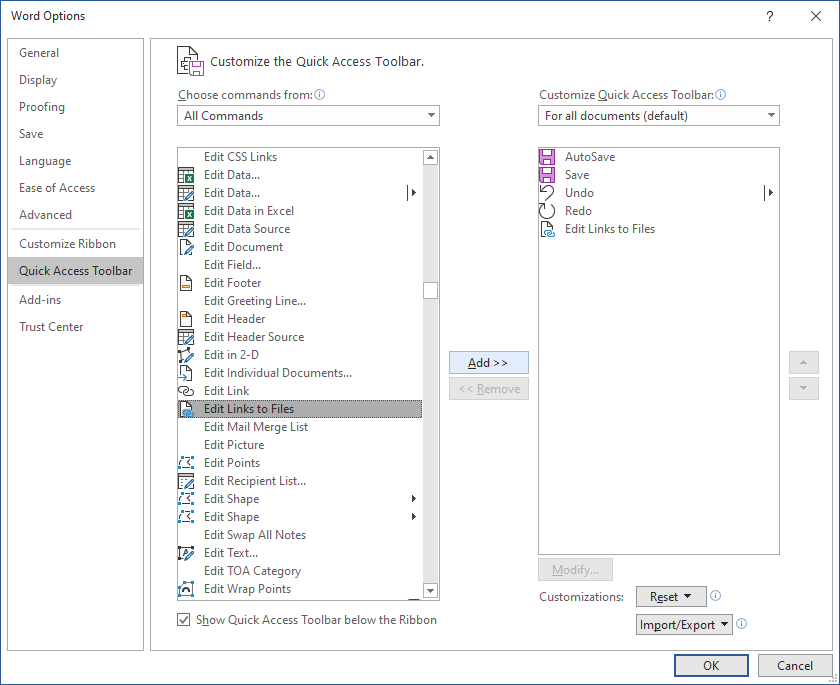
If you’re going to work with external links regularly, you may want to add Edit Links to Files to the Quick Access Toolbar:
- Click the arrow on the right side of the Quick Access Toolbar (this toolbar appears above or below the Ribbon).
- Select More Commands. The Options dialog box appears.
- From the drop-down menu below Choose commands from, select All Commands.
- In the list of commands on the left, click Edit Links to Files.
- Click Add.
- Click OK.
Edit Links to Files will appear on the Quick Access Toolbar. It will become active when you have inserted a linked chart, worksheet data or other object and saved the file.
Below is the Options dialog box in Word (which is similar in all versions):
Accessing Edit Links to Files in the context menu
You can also access Edit Links to Files in the context menu in Word for linked objects or HTML linked tables.
To access the Edit Links to Files command in the context menu:
- Save the Word document.
- Click on a linked object or in an HTML linked table.
- Right-click the linked worksheet object or table. A drop-down menu (context menu) appears. You can also press Shift + F10 or press the Context button on your keyboard if you have one.
- In the drop-down menu, select Linked Worksheet Object or Linked Binary Worksheet Object and then select Links from the sub-menu. The Links dialog box appears. Note: You can’t use this method with charts.
Automatic linking or manual linking
In the Links dialog box, you can click Automatic or Manual for each link as the update method. The default is Automatic so that when you open a document, links can be automatically updated (a prompt appears asking you to update the links).
Some users may select Manual as the type of update if the Word document is large and there are alot of links to Excel charts or worksheet data that are slowing down the Word file. Manual links are usually updated using the Links dialog box.
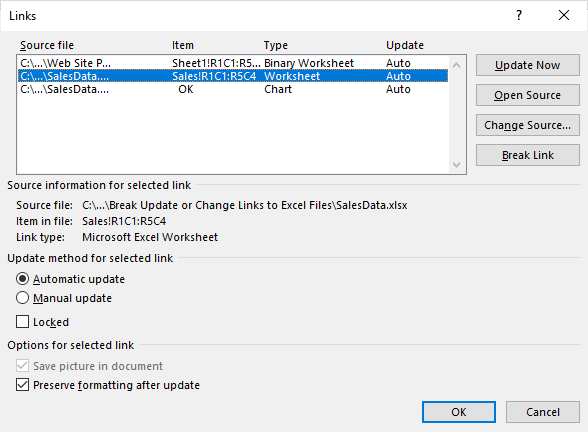
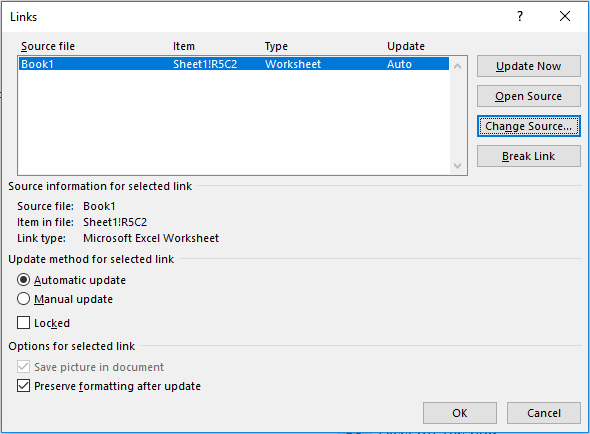
The Links dialog box appears as follows:
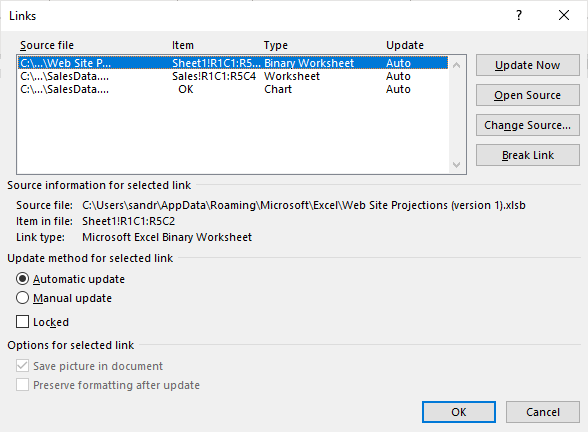
Locking and unlocking
In the Links dialog box, you can also check the Locked option for a link. If a link is locked, it cannot be updated. You will need to select the link and uncheck Locked if you want to unlock it.
Preserving formatting for HTML tables
If you have copied worksheet data into Word as HTML format, you should select the linked table and then select Preserve formatting after update in the Links dialog box so you don’t lose formatting when the link(s) are updated.
In the example below, the Preserve Formatting option is available for an HTML linked table:
Breaking links
To break a link:
- Save a copy of the Word document (always save a copy before breaking links).
- In the copy, click the File tab in the Ribbon and select Edit Links to Files, click Edit Links to Files in the Quick Access Toolbar, or right-click a linked worksheet object or HTML table and select Linked Worksheet Object or Linked Binary Worksheet Object from the drop-down menu and then select Links from the sub-menu. The Links dialog box appears.
- Click the link you want to break. You can also click the first link and then Shift-click a link to select contiguous links or Ctrl-click links to select non-contiguous links.
- Click Break Link. A dialog box appears asking if you want to break the link.
- Click OK.
- Click Close.
Updating links
You will normally be prompted to update links when you open a file with Links. Click Update Links in the dialog box that appears when you open a file to update the links. Automatic links will be updated.
You can also update links when a file is open.
To update a link:
- Save the Word document.
- Right-click the linked worksheet object or HTML table. A drop-down menu appears.
- Select Update Now.
To update one or multiple links:
- Save the Word document.
- Click the File tab in the Ribbon and select Edit Links to Files, click Edit Links to Files in the Quick Access Toolbar, or right-click a linked worksheet object or HTML table and select Linked Worksheet Object or Linked Binary Worksheet Object from the drop-down menu and then select Links from the sub-menu. The Links dialog box appears.
- Click the link you want to update. You can also click the first link and then Shift-click a link to select contiguous links or Ctrl-click links to select non-contiguous links.
- Click Update Now. Select the Automatic Update checkbox to automatically update for future changes when you close or open the file. If you select Manual Update, you will need to update links using Update Now.
- Click Close.
Changing the source of a link
If the source file has been moved or renamed, you will need to change the source.
To change the source of a link:
- Save the Word document.
- Click the File tab in the Ribbon and select Edit Links to Files, click Edit Links to Files in the Quick Access Toolbar, or right-click and select Linked Worksheet Object or Linked Binary Worksheet Object (for worksheet data only) from the drop-down menu and then select Links from the sub-menu. The Links dialog box appears.
- Click the link you want to change.
- Click Change Source.
- Navigate to the new location of the file and click it.
- Click Open. You can also double-click it.
- Click Close.
If you choose to link to Excel files in Word, you’ll often need to manage the links. Before you send files to clients or coworkers, you may also want to break the links. Always break links in a copy so you can retain the original file with the links.
Subscribe to get more articles like this one
Did you find this article helpful? If you would like to receive new articles, join our email list
Related
14+ Word Selection Shortcuts to Quickly Select Text
How to Remove Hard Returns in Word Documents
How to Superscipt or Subscript in Word (with Shortcuts)
Recommended courses
Microsoft Word: Intermediate / Advanced
Microsoft Excel: Intermediate / Advanced
Microsoft PowerPoint: Intermediate / Advanced
Microsoft Visio: Introduction
VIEW MORE COURSES >
Copyright 2023 Avantix® Learning
Our instructor-led courses are delivered in virtual classroom format or at our downtown Toronto location at 18 King Street East, Suite 1400, Toronto, Ontario, Canada (some in-person classroom courses may also be delivered at an alternate downtown Toronto location). Contact us at info@avantixlearning.ca if you’d like to arrange custom instructor-led virtual classroom or onsite training on a date that’s convenient for you.
Microsoft, the Microsoft logo, Microsoft Office and related Microsoft applications and logos are registered trademarks of Microsoft Corporation in Canada, US and other countries. All other trademarks are the property of the registered owners.
Avantix Learning |18 King Street East, Suite 1400, Toronto, Ontario, Canada M5C 1C4 | Contact us at info@avantixlearning.ca
In reference to Creating hyperlink from Excel FlowChart to MS Word Heading
I would like to know the correct syntax to hyperlink to a specific cell in an Excel Workbook from a Word document.
For example: Say I am in word document «Explaining» and I want to insert a hyperlink to the Excel file DataStuff, but to Cell ZX200. How would I do this manually, without VBA/MACROS?
I already know that to hyperlink to DataStuff I would type
File:///c:usersWin7UserdesktopDataStuff.xlsx
Then hit ENTER. (It then becomes an underlined hyperlink. Clicking on it opens DataStuff)
However, I want to add the fact that it should goto cell ZX200, not just open DataStuff at cell A1. The following does NOT work. Can someone fix the syntax for me?
    Does not work:
    File:///[c:usersWin7UserdesktopDataStuff.xlsx]Sheet1!ZX200
I don’t get how the Excel to Word question was answered in about 10 minutes, and my Word to Excel question accumulated crickets and tumbleweed. No MS Word experts??
I’ve figured it out after browsing many useless, and one useful document. The correct syntax is:
File:///c:usersWin7UserdesktopDataStuff.xlsx#Sheet1!ZX200
That should be typed into your word document, and will go to cell ZX200 in worksheet Sheet1 in Excel. Using the information fro the hyperlink I had in my question, you now have a wonderful BIJECTION between Word and Excel hyperlinking. So that when you send people somewhere, you can also send them back!
http://www.shaunakelly.com/word/word-and-excel/excelhyperlinks.html
A few weeks ago, I wrote a post about linking Excel files into PowerPoint. Whilst PowerPoint is probably the application I use most (after Excel of course), in third place would be Word. If, like me, you are regularly creating Word documents, or using standard templates, then learning how to link Excel to Word can save a lot of time.
Whilst the basic process is the same as PowerPoint, the method of implementation is a little different.
The process of linking an Excel workbook to a Word document is straightforward. Simply copy a range from Excel. Then, in Word click Home -> Paste (small arrow). There are various options, as default we can click the icons for Paste Link and keep formatting or Paste Link and merge formatting.
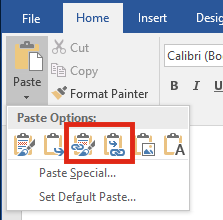
But, if we click Paste Special… it provides even more options. Click Paste link and then select the paste type. Finally, click OK to paste the Excel content into the Word document with your selected options.
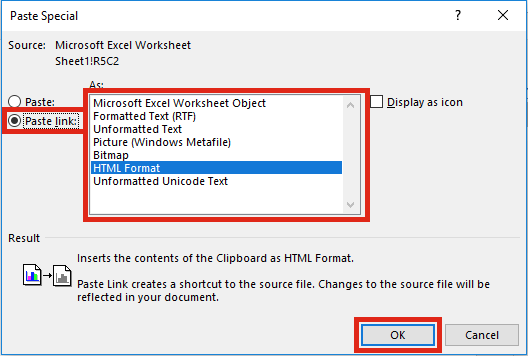
Notice the number of paste options available to you. I especially like Unformatted Text, as it can be used to add variable information to a standard sentence.
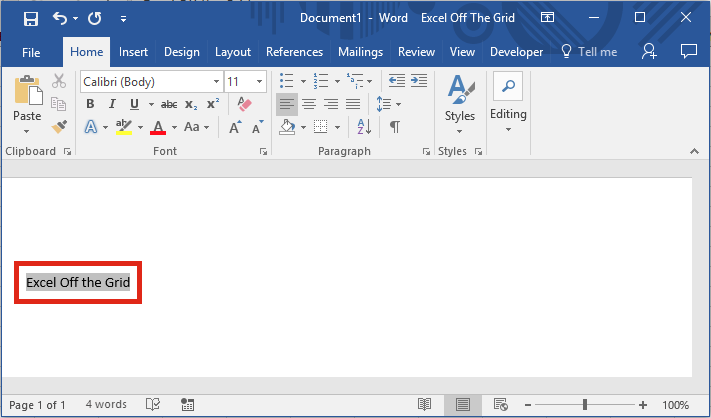
Within Word, when selected, any linked text will highlight grey (unless the settings in Word have been changed). See the screenshot below.
Field Codes
One of the key differences to PowerPoint is the existence of Field Codes. This is the method by which Word inserts linked documents and other dynamic options.
You can view the code behind the Field Code by pressing Ctrl+F9 to view all Field Codes, or Shift+F9 to display just the selected Field Code. The screenshot below shows an example of a Field Code.
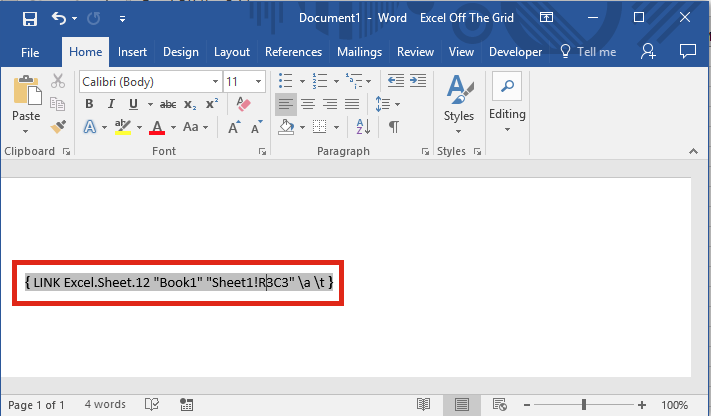
It is possible to manually edit the text in the Field Code. Along with changing the file path and cell address, it is also possible to change the “switches”. The switches are the pieces of text at the end which all have “” followed by a letter or letters. The main ones are:
| a | update link automatically (manual updating if switch not used) |
| t | show the linked item as text |
| p | show the linked item as a picture |
A lot more can be achieved through Field Codes, but that is really outside the scope of this post.
Update and edit links
The benefit of linking documents is that once created, you can update the linked values quickly.
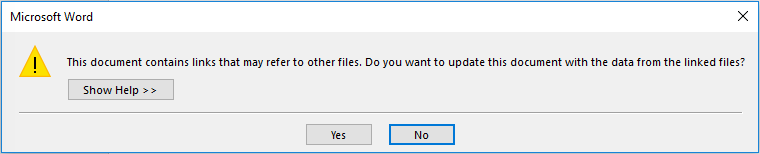
Update link on opening
When opening the Word document you will have the option to update the document with data from the linked files.
Updating on demand
If you just want to update a single link you can right-click the link then select Update Link from the menu.
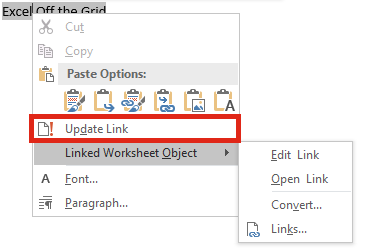
Through the Linked Worksheet Object submenu (as shown above) there are further options to Edit, Open and Convert Links.
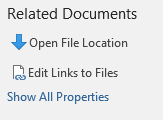
Update with the “edit links” option
This option is available through the Linked Worksheet Object menu as shown above, or through the ribbon File -> Info -> Edit Links to Files (it’s in the bottom right corner, but only once the Word document has been saved).
The Links window will open, which provides various options to update, edit and break links.
Top Tips to link Excel to Word
If you link Excel to Word often, you will soon find it doesn’t always behave how you might expect. Here are my top tips to get the best results:
- Use named ranges – adding rows and columns in a worksheet will not change the link reference in Word. For example, if Word is linked to Cell A1, then you insert a new column at the start, Cell A1 will become Cell B1. But, Word still references Cell A1. This would now be the wrong cell. A named range helps to ensure the correct range is displayed in the document.
- Word will not know if you change the name or file path of a linked file (see point 3 below for the exception). You need to ensure the most up-to-date version of the Excel file always has the same file name and file path, so that Word can find it.
- The fastest method of changing the source of an Excel file is to have both the Excel and linked Word files open. Then save the Excel file with a new path or file name. In this circumstance, Word will update the reference to the file automatically.
Related posts:
- Edit links in Word using VBA
- Controlling Word from Excel using VBA
- Linking Excel to PowerPoint

About the author
Hey, I’m Mark, and I run Excel Off The Grid.
My parents tell me that at the age of 7 I declared I was going to become a qualified accountant. I was either psychic or had no imagination, as that is exactly what happened. However, it wasn’t until I was 35 that my journey really began.
In 2015, I started a new job, for which I was regularly working after 10pm. As a result, I rarely saw my children during the week. So, I started searching for the secrets to automating Excel. I discovered that by building a small number of simple tools, I could combine them together in different ways to automate nearly all my regular tasks. This meant I could work less hours (and I got pay raises!). Today, I teach these techniques to other professionals in our training program so they too can spend less time at work (and more time with their children and doing the things they love).
Do you need help adapting this post to your needs?
I’m guessing the examples in this post don’t exactly match your situation. We all use Excel differently, so it’s impossible to write a post that will meet everybody’s needs. By taking the time to understand the techniques and principles in this post (and elsewhere on this site), you should be able to adapt it to your needs.
But, if you’re still struggling you should:
- Read other blogs, or watch YouTube videos on the same topic. You will benefit much more by discovering your own solutions.
- Ask the ‘Excel Ninja’ in your office. It’s amazing what things other people know.
- Ask a question in a forum like Mr Excel, or the Microsoft Answers Community. Remember, the people on these forums are generally giving their time for free. So take care to craft your question, make sure it’s clear and concise. List all the things you’ve tried, and provide screenshots, code segments and example workbooks.
- Use Excel Rescue, who are my consultancy partner. They help by providing solutions to smaller Excel problems.
What next?
Don’t go yet, there is plenty more to learn on Excel Off The Grid. Check out the latest posts: