
Word для Microsoft 365 Word 2021 Word 2019 Word 2016 Word 2013 Word 2010 Word 2007 Еще…Меньше
Документы часто выглядят лучше, если определенные слова или абзацы отображаются на странице вместе (до или после разрывов). Кроме того, можно добавить в текст переносы, чтобы упростить его чтение.
В Word текст автоматически переносится на следующую строку, если в конце текущей ввести пробел или дефис. Если вы хотите отображать два слова или составное слово с дефисом в одной строке, вместо обычных знаков следует использовать неразрывный пробел или неразрывный дефис.
-
Щелкните место, где требуется вставить неразрывный пробел.
-
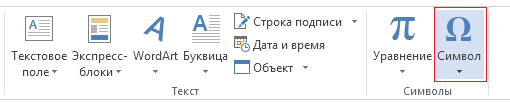
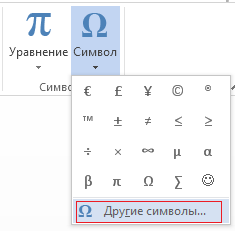
На вкладке Вставка в группе Символы нажмите кнопку Символ.

-
В появившемся меню выберите пункт Другие символы.
-
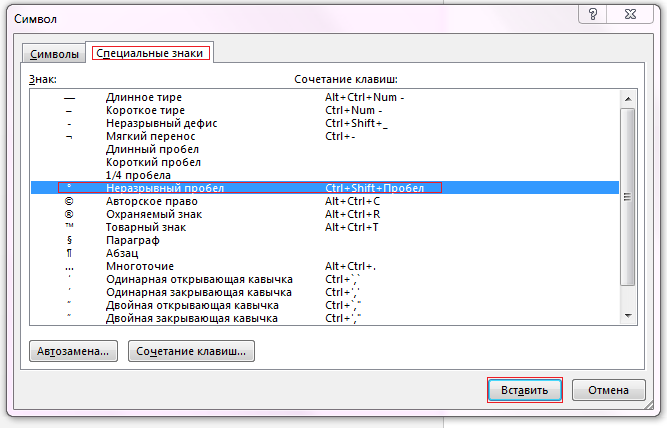
В диалоговом окне Символ на вкладке Специальные знаки выберите Неразрывный пробел и нажмите кнопку Вставить.
-
Нажмите кнопку Закрыть.
Совет: Для аналогичного эффекта можно также использовать специальное сочетание клавиш. Щелкните место, где требуется вставить неразрывный пробел, и нажмите клавиши CTRL+SHIFT+ПРОБЕЛ.
Иногда требуется, чтобы слово с дефисом отображалось в одной строке, а не переносилось на другую строку.
-
Щелкните место, где требуется вставить неразрывный пробел.
-
На вкладке Вставка в группе Символы нажмите кнопку Символ.
-
В появившемся меню выберите пункт Другие символы.
-
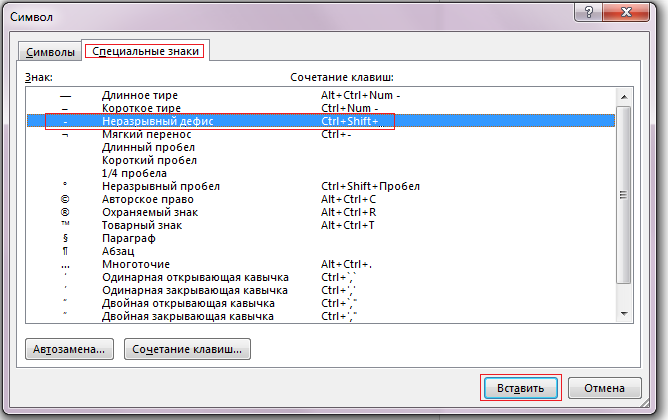
В диалоговом окне Символ на вкладке Специальные знаки выберите Неразрывный дефис и нажмите кнопку Вставить.
-
Нажмите кнопку Закрыть.
Совет: Для аналогичного эффекта можно также использовать специальное сочетание клавиш. Щелкните место, где требуется вставить неразрывный дефис, и нажмите клавиши CTRL+SHIFT+ЗНАК «МИНУС».
В Word абзацы автоматически разрываются в конце страницы, поэтому абзацы, начавшиеся на одной странице, часто продолжаются на следующей. Если вы хотите, чтобы весь абзац отображался на одной странице, сделайте следующее:
-
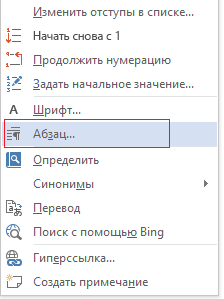
Щелкните правой кнопкой мыши абзац, который требуется отображать на одной странице. В контекстном меню выберите пункт Абзац.
-
В диалоговом окне Абзац перейдите на вкладку Положение на странице.
-
В разделе Разбивка на страницы установите флажок не отрывать от следующего и нажмите кнопку ОК.
Если два последовательных абзаца или подзаголовок и абзац близко связаны, может потребоваться отображать их на одной странице.
-
Щелкните правой кнопкой абзац или подзаголовок, который требуется отображать на странице вместе с последующим контекстом. В контекстном меню выберите пункт Абзац.
-
В диалоговом окне Абзац перейдите на вкладку Положение на странице.
-
В разделе Разбиение на страницы установите флажок Сохранить со следующим проверка и нажмите кнопку ОК.
Совет: Между абзацами лучше не добавлять дополнительные разрывы строк: каждый такой знак считается в Word началом нового абзаца, поэтому при их наличии разрывы страниц могут отображаться не так, как требуется. Если вы хотите вставить пробелы между абзацами, используйте элементы управления для изменения интервала между абзацами. Дополнительные сведения см. в статье Изменение интервала между абзацами.
Последняя строка абзаца, из-за разрыва отображаемая на следующей странице, называется «верхней висячей строкой». В свою очередь, первая строка абзаца, из-за разрыва находящаяся в нижней части предыдущей страницы, называется «нижней висячей строкой».
Если вы хотите исключить подобные строки в своем документе, сделайте следующее.
-
Щелкните необходимый абзац правой кнопкой мыши. В контекстном меню выберите пункт Абзац.
-
Откройте вкладку Положение на странице.
-
В разделе Разбивка на страницы установите флажок запрет висячих строк.
-
Нажмите кнопку ОК.
Если слово не умещается на строке, Microsoft Office Word 2007 переносит его в начало следующей строки, вместо того чтобы вставлять перенос. Тем не менее вы можете автоматически или вручную расстанавливать переносы в тексте, вставлять мягкие переносы или неразрывные дефисы, а также задавать максимальное расстояние между словом и правым полем, при котором слово не будет переноситься.
При использовании автоматической расстановки переносов Office Word 2007 автоматически вставляет дефисы там, где они нужны. Если впоследствии отредактировать документ и изменить разрывы строк, Office Word 2007 повторно расставит переносы.
-
Убедитесь в том, что не выделен ни один фрагмент текста.
-
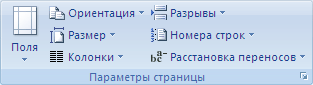
На вкладке Разметка страницы в группе Параметры страницы нажмите кнопку Расстановка переносов и выберите значение Автоматически.
Мягкий перенос определяет, где будет переноситься слово или фраза, если они не будут помещаться в строке. Например, можно указать, что слово «непечатаемый» должно переноситься как «не-печатаемый», а не как «непеча-таемый». Если мягкий перенос вставлен в слово, которое не находится в конце строки, дефис будет отображаться только в том случае, если вы нажмете кнопку Показать или скрыть.
-
На вкладке Главная в группе Абзац нажмите кнопку Показать или скрыть.
-
Щелкните слово, в которое вы хотите вставить мягкий перенос.
-
Нажмите клавиши CTRL+ДЕФИС.
Чтобы автоматически расставить переносы в части документа, сделайте следующее:
-
Выделите текст, в котором нужно расставить переносы.
-
На вкладке Разметка страницы в группе Параметры страницы нажмите кнопку Расстановка переносов и выберите значение Автоматически.
При расстановке переносов вручную Office Word 2007 ищет слова, в которых требуется перенос. Когда вы укажете, где нужно добавить переносы, Word вставит мягкие переносы. Если позже вы измените документ и измените разрывы строк, Office Word 2007 отображает и выводит только необязательные дефисы, которые по-прежнему попадают в конец строк. Word не расстанавливает переносы в документе повторно.
-
Выделите текст, в котором нужно расставить переносы.
-
На вкладке Разметка страницы в группе Параметры страницы нажмите кнопку Расстановка переносов и выберите значение Вручную.
-
Если Office Word находит слово или фразу, в которые нужно добавить перенос, выполните одно из следующих действий:
-
Чтобы вставить мягкий перенос в предложенном месте, нажмите кнопку Да.
-
Чтобы вставить мягкий перенос в другой части слова, переместите точку вставки в нужное место и нажмите кнопку Да.
-
Неразрывный дефисы предотвращают перенос слов и чисел с дефисами, которые находятся в конце строки. Например, можно предотвратить перенос в числе 555-0123; вместо этого все число переместится в начало следующей строки.
-
Щелкните место, в которое нужно вставить неразрывный дефис.
-
Нажмите клавиши CTRL+SHIFT+ДЕФИС.
Зона переноса слов — это максимальное расстояние между словом и правым полем, при котором оно не переносится. Вы можете настроить ширину зоны переноса слов. Чтобы уменьшить число переносов, расширьте зону переноса слов. Чтобы край правого поля был более ровным, сделайте зону переноса слов уже.
-
На вкладке Разметка страницы в группе Параметры страницы нажмите кнопку Расстановка переносов и выберите значение Параметры расстановки переносов.
-
В поле Ширина зоны переноса слов введите нужное значение.
Вы можете удалить все автоматически расставленные переносы и каждый из переносов, добавленных вручную, то есть мягких переносов и неразрывных дефисов.
-
Чтобы удалить переносы, расставленные автоматически, на вкладке Разметка страницы в группе Параметры страницы нажмите кнопку Расстановка переносов и выберите значение Нет.
-
Чтобы удалить переносы, добавленные вручную, на вкладке Главная в группе Редактирование выберите команду Заменить.
-
Если кнопка Специальный не отображается, нажмите кнопку Больше.
-
Нажмите кнопку Специальный и щелкните Мягкий перенос или Неразрывный дефис.
-
Поле Заменить на оставьте пустым.
-
Нажмите кнопку Найти далее, Заменить или Заменить все.
См. также
Разрывы строк и страниц
Вставка разрыва страницы
Изменение интервала между абзацами
Нужна дополнительная помощь?
When using Word to create a document that is long, has steps, or covers many areas of content, it is a good idea to create titles or headings that can be linked to sections in the document. The benefit of using links is it allows users to jump right to the information they need.
Using links to connect to information in a document is one of the easiest ways to navigate a document. Not only is it a time saver for the recipients of the document, but it can also be helpful for the document creator. This post discusses the best of two ways to add links in a Word document.
For a video demonstrating the same information:
The Best Way to Link to Different Sections in a Word Document
Linking a word, phrase, or title to the place in the document where that particular topic is discussed is a great way to organize a document. Unfortunately, linking content within the same Word document is limited to one of two ways:
- Headings
- Bookmarks
Of the two options, when you are working with bulleted lists of any kind, using bookmarks to link sections is far easier than linking headings. To see why bookmarks are better, you first need to understand how using headings works.
Headings
Using headings simply means linking titles to content in another area of the document that has been formatted into a heading style. Only content that has been styled as a heading will be available to link to when creating links.
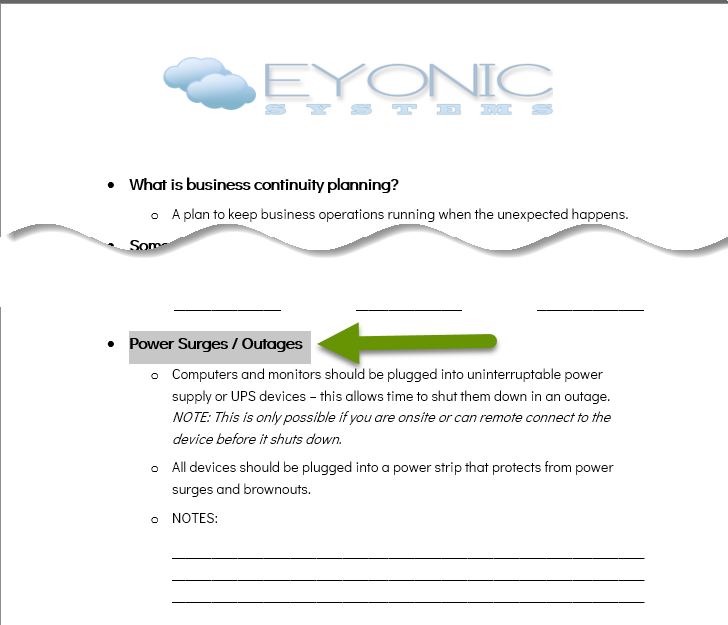
In this example we have a document with a page of titles that need to be linked to sections in the document that match these titles. Once we style the content titles within the document as headings, we can link to them from the first page.
To create headings that can be linked to:
- Select the title or text in the document that represents the desired link destination.
- On the Home tab, click any of the Heading styles available in the Styles section to change the formatting of the text.
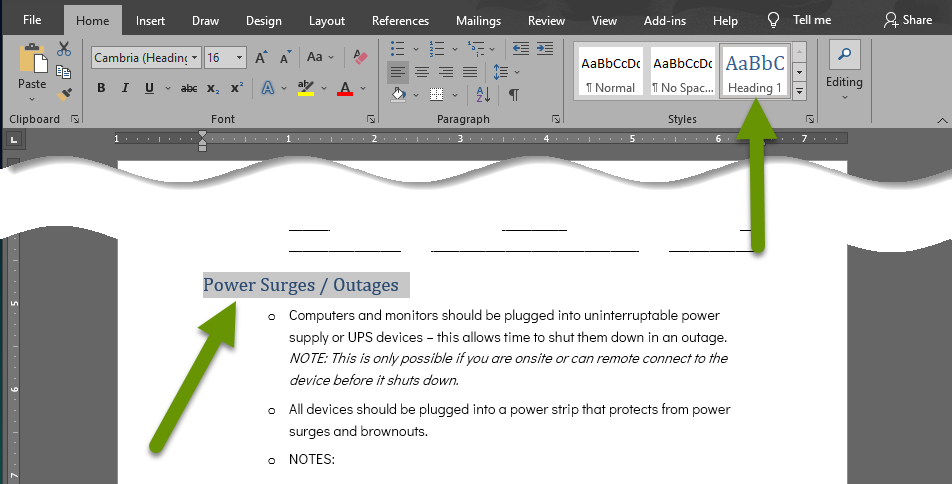
- With the text changed to a heading, you will notice much of its formatting has changed. Beyond that, it no longer has a bullet and is not part of the list.
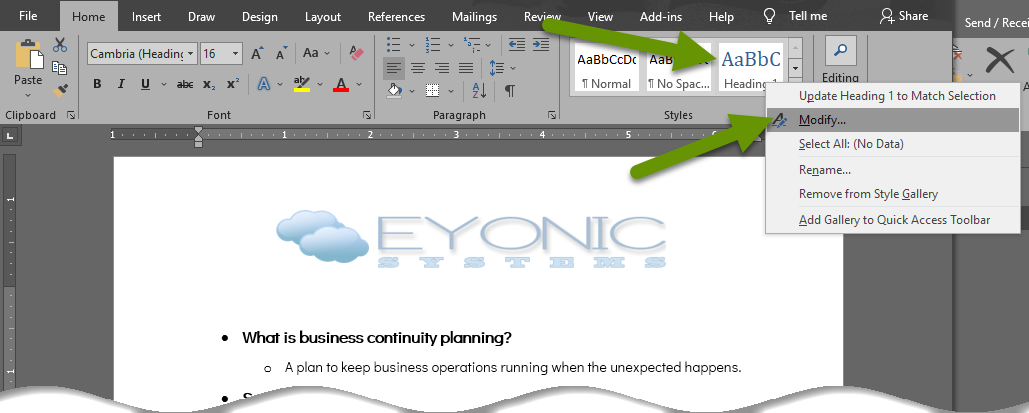
NOTE: The types of changes made by formatting content as a heading — the font size, type, color, etc., can be adjusted in many ways. These changes fall outside the scope of this post because they do not affect linking the text beyond the fact that the text has to be formatted as a heading. However, if you want to see what can be modified, right-click the heading style box and select «Modify» in the pop-up window.
Here is a comparison of the original content, still in list form, as well as the same content changed to a heading, where the list formatting was lost.

The longer the document you are working with, the more drastic having an element be removed from a list can be. Sometimes this can also affect sub-lists and you could spend a great deal of time chasing this down and trying to get your list righted. Luckily, there is a better way to link titles to content in a document when that content is part of any list.
Bookmarks
While styling content as a heading so it can be linked to, adding a bookmark that can be linked to does not change the content in any way. This means bookmarks do not break any lists the content is a part of either.
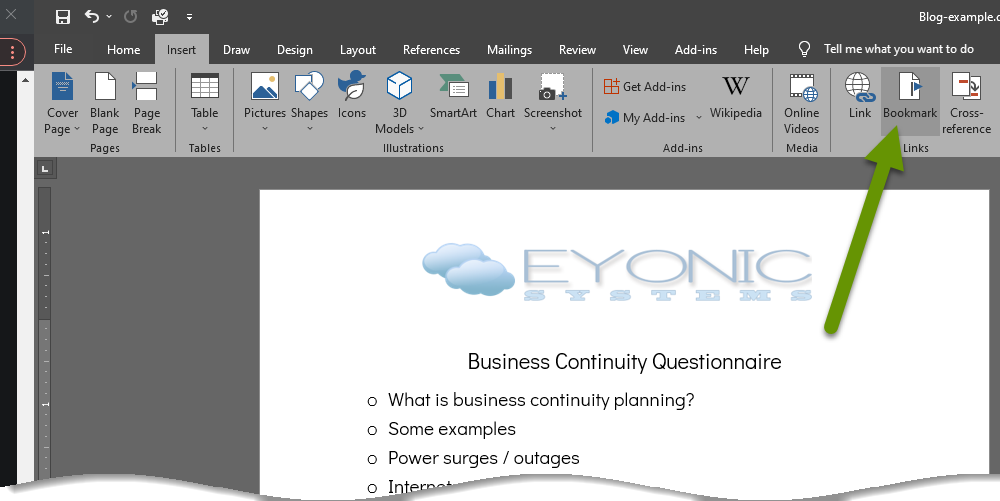
To create bookmarks that can be linked to:
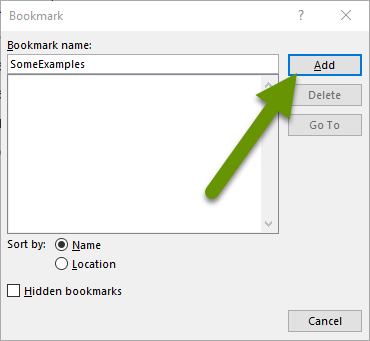
- Click in the document next to content that will be the destination of a link you are going to create.
- Click on the «Insert» tab and click «Bookmark» in the Links section.
- Enter a name for the bookmark. This can be as specific or as vague as you want, but keep in mind you will likely be making several bookmarks and will want to know what to link together after creating them all. NOTE: Bookmarks do not allow you to enter spaces in their names. If you add a space, the Add button will be disabled until you remove it.
- Once the bookmark has been named, click the «Add» button.
- Continue creating bookmarks by moving to a new location in the document and following the same insert bookmark process.
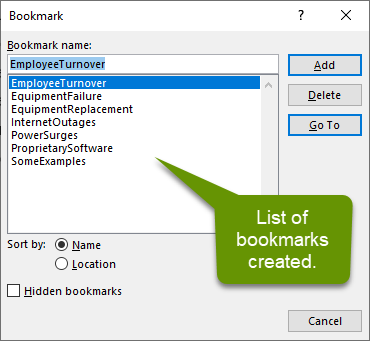
NOTE: Setting the bookmarks to sort by Name is often more effective in long documents where you are searching for a name that matches the title where sorting by Location may make more sense in shorter documents. Click the radio button next to whichever sort type best suits your needs, knowing you can change this at any time.
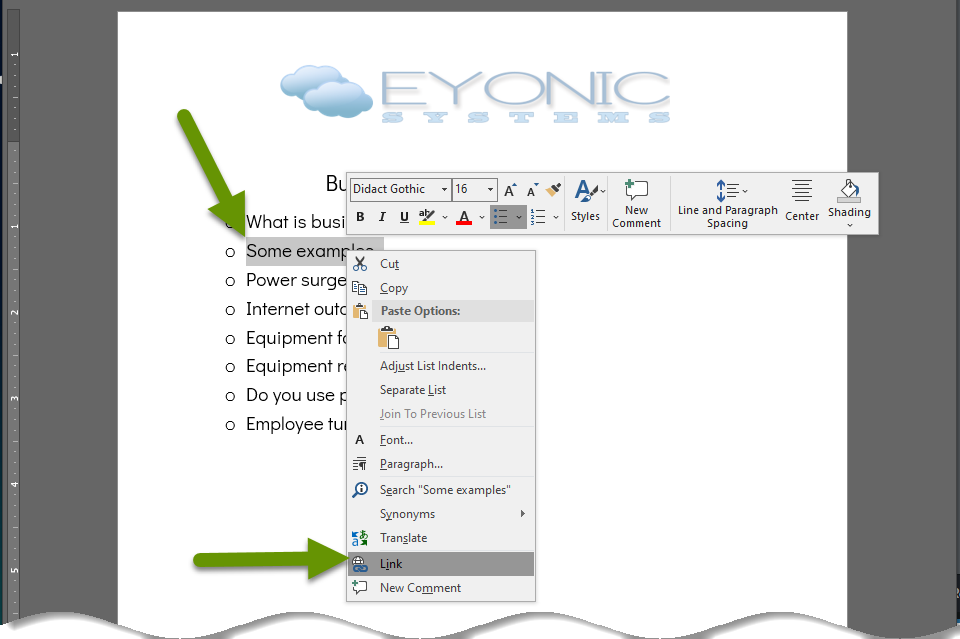
To link titles to bookmarks:
- Highlight the content in the document, usually the first page, where you want to create the link and right-click on the highlighted text.
- Select «Link» from the bottom of the menu.
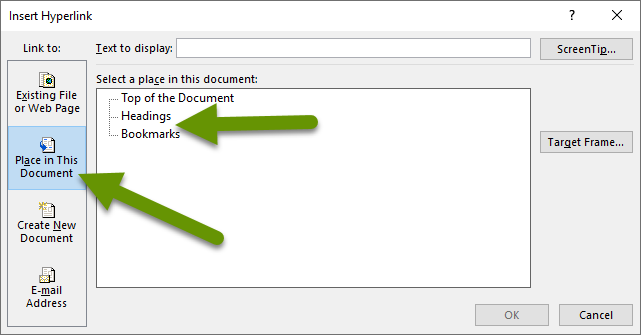
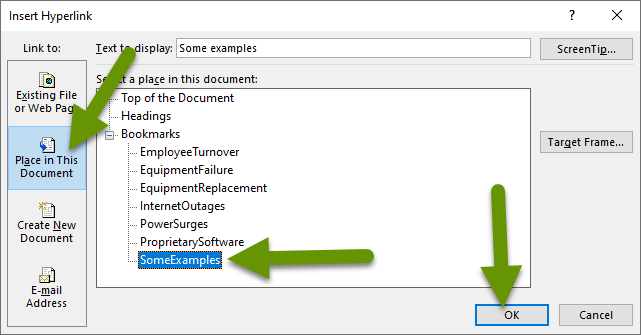
- In the Insert Hyperlink box, click on the «Place in This Document» tab in the left pane.
- Click on the corresponding bookmark under the heading «Select a place in this document:» and click the «OK» button.
- Repeat the process of highlighting titles and linking them to the appropriate bookmark until all links have been created.
- If desired, change the blue font or underlining applied to the linked titles.
Anyone accessing this document can press the Ctrl key and click on a link to go directly to the link destination. Additionally, if the document is saved as a .pdf, users can click on any link and go directly to the destination in the document.
Adding titles or a table of contents to a large document is a great way to make the information in it more accessible. There are two ways to create links within documents: using headings and bookmarks. When you have a document with items in a list, using bookmarks is a much more efficient way to create links to content. Once links are created, they can be used in Word or .pdf format.
As always, there is often more than one way to accomplish the same thing, but understanding what makes one way better than another can save a lot of time and frustration!
http://study-english.info/phrases.php.
Начало эссе (фактически — сочинения на заданную тему) — постановка проблемы. В первом абзаце (введении) необходимо сообщить читателю тему Вашего эссе, перефразировав ее, используя синонимы ключевых слов (показывая, что вы её осмыслили). Затем следует намекнуть читателю, какую позицию займете Вы. Используйте безличные или неопределенно-личные предложения, чтобы подчеркнуть свою объективность.
Many people think … but others do not agree.
Многие люди думают, (что) … , но другие не согласны.
Let us consider what the advantages and disadvantages of … are.
Рассмотрим, каковы преимущества и недостатки … .
Let’s consider some pros and cons of it.
Давайте рассмотрим некоторые плюсы и минусы (этого).
Let us start by considering the facts.
Начнем с рассмотрения фактов.
Let us start by considering pros and cons of it.
Начнем с рассмотрения плюсов и минусов (этого).
It is generally agreed today that …
Сегодня общепризнано,что … .
Следующие фразы можно использовать, если требуется рассмотреть аргументы «за» и «против». Не забывайте использовать слова-связки.
To begin with, … . Начнем с того, что … .
You can … . Вы можете (Можно) … .
Firstly, … / Secondly, … / Finally, … Во-первых, … / Во-вторых, …/ Наконец, … .
One argument in support of … . Один из аргументов в поддержку … .
The first thing that needs to be said is … .Первое, что нужно сказать, это то, что … . (Прежде всего, следует сказать, что … .)
First and foremost … . В первую очередь … .
It is true that … / clear that … / noticeable that … . Это правда, что … / Ясно, что … / Примечательно, что …
One should note here that … . Здесь следует отметить, что … .
Another good thing about … is that … . Еще один положительный момент … заключается в (том, что) … .
The second reason for … . Вторая причина … .
It is often said that … . Часто говорят, что … .
It is undeniable that… Нельзя отрицать, что … .
It is a well-known fact that … . Хорошо известно, что … .
For the great majority of people … . Для подавляющего большинства людей … .
We live in a world in which … . Мы живем в мире, в котором … .
A number of key issues arise from the statement. For instance, … . Это утверждение затрагивает ряд ключевых вопросов. Например, … .
One of the most striking features of this problem is … . Один из самых поразительных аспектов этой проблемы … .
First of all, let us try to understand … Прежде всего, давайте попытаемся понять
The public in general tend to believe that … . Общественность в целом склонна полагать, что … .
What is more, … . Более того, … .
Besides, … because it is … . Кроме того, … потому что … .
Doubtless, … . Несомненно, … .
One cannot deny that … . Нельзя отрицать, что … .
It is (very) clear from these observations that … . Из этих наблюдений (абсолютно) ясно, что … .
On the other hand, we can observe that … . С другой стороны, мы можем наблюдать, что … .
The other side of the coin is, however, that … . Однако, с другой стороны, … .
Another way of looking at this question is to … . Чтобы взглянуть на эту проблему с другой стороны, надо … .
One should, nevertheless, consider the problem from another angle. Тем не менее, следует взглянуть на эту проблему с другой стороны.
One should, however, not forget that … . Тем не менее, не следует забывать, что … .
If on the one hand it can be said that … the same is not true for … . И если с одной стороны, можно сказать, что … , то же самое нельзя сказать о … .
On the other hand, … . С другой стороны, … .
Although … . Хотя … .
Besides, … . Кроме того, … .
Moreover, … . Более того, … .
Furthermore, one should not forget that … Кроме того, не следует забывать, что
In addition to … . Кроме (того, что) … .
Nevertheless, one should accept that … . Тем не менее, следует признать, что … .
However, we also agree that … . Однако, мы также согласны с тем, что … .
Подкрепить свою мысль можно мнением (неких абстрактных) экспертов.
Experts… Эксперты …
… believe that … . … считают, что … .
… say that … . … говорят, что … .
… suggest that … . … предполагают, что … .
… are convinced that … . … убеждены, что … .
… point out that … . … отмечают, что … .
… emphasize that … . … подчеркивают, что … .
According to some experts… По мнению некоторых экспертов, … .
Perhaps we should also point out the fact that … . Возможно, нам также следует отметить тот факт, что … .
It would be unfair not to mention that fact that … . Было бы несправедливо не упомянуть тот факт, что … .
One must admit that … . Надо признать, что … .
We cannot ignore the fact that … . Мы не можем игнорировать тот факт, что … .
One cannot possibly accept the fact that … . Трудно смириться с тем фактом, что … .
From these facts, one may conclude that … . Из этих фактов, можно сделать вывод (о том), что … .
Which seems to confirm the idea that … . Что, по-видимому, подтверждает мысль (о том), что … .
Thus, … / Therefore,… Таким образом, … / Поэтому … .
The most common argument against this is that … . Наиболее распространенным аргументом против этого является то, что … .
В заключении эссе делаете вывод.
In conclusion, I can say that although … , … . В заключение я могу сказать, что, хотя … , … .
To draw the conclusion, one can say that … . Подводя итог, можно сказать, что … .
So it’s up to everybody to decide whether … or not. Так что каждый должен решить для себя … ли … , или нет.
The arguments we have presented … suggest that … / prove that … / would indicate that … . Представленные нами аргументы … предполагают, что … / доказывают, что … / указывают на то, что … .
What to Know
- Highlight text or image > right-click text and select Link or Hyperlink > choose destination and enter info > OK.
- Next, select Existing File or Web Page and enter URL to link outside of document.
- Select Place in This Document > select location to link inside of document.
This article explains how to insert or remove a hyperlink in a Word document using Microsoft 365, Word 2019, Word 2016, Word 2013, Word 2010, and Word Starter 2010.
Insert and Remove a Hyperlink in Word
To add and delete hyperlinks in a Word document:
-
Highlight the text or image that you want to link.
-
Right-click the text and choose Link or Hyperlink (depending on the version of Microsoft Word).
-
Select the type of destination you want to link to, then fill in the appropriate information.
- Choose Existing File or Web Page, go to the Address text box, then enter a URL.
- Choose Place in This Document, then select a location within the document.
- Choose Create New Document, go to the Name of new document text box, then enter the name of a new document. If needed, in the Full path section, select Change to change the document folder. In the When to edit section, choose whether you want to edit the document now or later.
- Choose E-mail Address, go to the E-mail Address text box, then enter the email address you want readers to send email to. In the Subject text box, type the subject.
-
Select OK.
-
The text now shows up as a hyperlink in the document.
-
To remove a hyperlink, right-click the link text, then choose Remove Hyperlink.
Use the Right Kind of Hyperlink
There are different kinds of hyperlinks. Choose the one that points your readers to the most helpful information to supplement your document.
Existing File or Web Page Hyperlinks
When you choose this option, the hyperlink opens a website or file. For example, if you’re writing an article about your camping trip to Rocky Mountain National Park, provide a hyperlink to the appropriate section of the National Park Service so readers can quickly find the information they need to plan a similar trip.
Another use might be if you wrote an article about the National Park Service and the document is available to your readers, link to the Word file you created. When the reader selects the hyperlink, that file opens.
Place in This Document Hyperlinks
Another type of hyperlink jumps to a different place in the same document upon selection. Often called an anchor link, this type of link doesn’t take the reader away from the document.
When a document is long and includes sections or chapters that are formatted as headings, create a table of contents at the beginning of the document. Include hyperlinks in the table of contents so that readers can jump to a particular heading.
You could also use this type of hyperlink at the end of each section to return to the top of the document.
Create a New Document Hyperlink
A hyperlink can create a new document when selected. When adding this type of hyperlink, choose whether to make the document at the time you create the link or later. If you choose to make the new document when you create the hyperlink, a new document opens, which you can edit and save. After that, the hyperlink points to that document, exactly like the Existing File or Web Page option.
If you choose to make the document later, you’re prompted to create the new document when you select the hyperlink after the hyperlink has been created. This type of hyperlink is useful if you want to link new content to the current document but don’t want to create the new content yet. Instead, provide the hyperlink to it so you’ll remember to work on the document later. When you do create the document, it will be linked in the main document.
Email Address Hyperlinks
The last type of hyperlink you can make in Microsoft Word is one that points to an email address so that, when selected, the default email client opens and begins composing the message using the information from the hyperlink.
Choose a subject for the email and more than one email address that the message should be sent to. This information is pre-filled for readers when they select the hyperlink but they can change this information before they send the message.
This type of hyperlink is useful for situations when you want readers to contact you to set up a meeting or request additional information.
About Linking in a Word Document
A hyperlink in a Microsoft Word document enables readers to jump from the link to a different place in the document, to a different file or website, or to a new email message. In Word documents, hyperlink text is a different color than other text and is underlined. When you hover over a hyperlink, a preview shows where the link goes. When you select the link, you’re directed to the other content.
Thanks for letting us know!
Get the Latest Tech News Delivered Every Day
Subscribe
This is a complete guide to hyperlinking in Word.
In today’s guide you’ll learn how to perform the following tasks in Microsoft Word:
- How to insert Hyperlinks in Word.
- How to edit/Remove hyperlinks
- How to create a hyperlink in Word in the same document
- How to create a hyperlink in Word to a different document
But first of all, let’s learn what a hyperlink really is.
What are Hyperlinks in Word?
Hyperlinks are links that, when you click on them, takes you to a piece of new information, in another document or location.
Most Microsoft Word users never consider adding links to their documents, because they consider them as printed documents. However, if some readers may read your work onscreen, you should consider adding links.
In this article, I’ll teach you how to insert links into your Word document plus some other tricks concerning hyperlinking in Word.
How to manually insert a hyperlink in Word
Some Microsoft Word features automatically insert links by default. One good example is the automatic table of content. Another one is the AutoCorrect which converts website addresses into links as explained in the next chapter.
In this section, I’ll show you how to insert your own
hyperlinks in Word. This way, you get more flexibility as it enables you to
control how the hyperlink looks and behaves.
Obey the steps below to manually insert a common link into your Word document:
- Place the insertion pointer at where you want to
insert the link.
NOTE: If you want to hide the link behind a text or image, select the text or image before performing the steps below. After inserting the link, the link text will be colored blue and underlined showing that it is a link.

- Press Ctrl+K Or Right-Click on the text
and select Hyperlink or Link.

The insert link dialog will appear as seen in the screenshot
below:

- Click to select “Existing File or Web Page”
from the list of “Link To” buttons.

Bonus Step: Click Browsed Pages to see the list of pages you’ve recently visited. If the page you want to insert is found, then click to select it. Otherwise, you must type or copy and paste the address in the Address: text box.

- Type the website address in the Address:
text box.

- Click OK to insert the link into your
Word document.
As soon as you hit the OK button, the link will be inserted. The link is inserted if the link text changes to blue and underlined.
To make hyperlinks clickable in Word, or to be able to click hyperlinks in Word, press down the Ctrl key before you click on the link. If you don’t press Ctrl before clicking, Word will not follow the link
Word gives different formatting to hyperlinks to make it look different from the other text. For instance, most of the time, hyperlinks in Word are underlined and also has a blue color.
How to automatically insert a hyperlink in Word
If you are linking to somewhere on the web, using Microsoft’s
AutoCorrect feature, you can automatically insert hyperlinks into your Word
document.
To to do that, simply type a website address such as www.softwareaccountant.com, then press the spacebar key. Word will automatically convert the web address into a hyperlink. It also adds the HTTP:// protocol to the beginning of the URL, although that part is not visible.
Thus, when someone (Ctrl+clicks) the web address, Word will direct him or her to the website if there’s an internet connection.
This same trick works with email addresses too.
If you type an email address into your Word document, such as name@gmail.com, Word will automatically convert it into a hyperlink. And when you Ctrl+Click on this Email link, a default email program gets opened.
How to edit a hyperlink in word
You can also edit hyperlinks in word by obeying the instructions
below:
If you want to change the link text without really changing
the hyperlink itself, directly editing the text will do the job.
However, if you want to edit the hyperlink, follow the steps
below:
- Right-Click on the Link
- Select “Edit Hyperlink” from the shortcut
menu.

- In the “Edit Hyperlink” dialog, replace the old address in the “Address:” text box with the new address.

- Click OK to apply the changes.
As soon as you hit the OK button, the hyperlink will be updated. Confirm the change by placing your mouse pointer on the link to see the link that displays on the tooltip.
How to Remove a hyperlink in word
To remove hyperlinks in Word, obey the instructions below:
- Right-click on the link
- Click on “Remove Hyperlink” from the
shortcut menu

As soon as you hit the “Remove Hyperlink” button, the
link will be removed completely from the text.
The link is removed when the text changed to its normal formatting (with no more blue and underlined text).
How to create a hyperlink to another location in the same document
If your content refers to another section in the same document, you can add a link so that users can jump right to that particular location instead of scrolling all the way. This makes sense if you’re working with a long Word document.

To perform this task, obey the following steps:
- First, mark the spot you want the link to point to by bookmarking it.
To bookmark a spot in your document:
Place your cursor at where you want to insert the bookmark:

Go to the Insert tab, in the Links group,
click on Bookmark.

In the Bookmark window, type the name of your bookmark in the “Bookmark name:” text box, then click on the Add button.
NOTE: The bookmark name must begin with a letter, but can include numbers. It must not also include space.

After successfully adding a bookmark with the above instructions, the remaining steps below will teach you how to link to the bookmarked location.
- Highlight the text for the link. This should be the text that the user will click to jump to a different location (Bookmarked location). Use text that gives readers clear information about where the link points to.
- Press Ctrl+K to display the Insert Link dialog. Or right-click on the selected text and then click Link from the shortcut menu.
- Click to select “Place in This Document”
from the list of “Link To” buttons.

Word will display the list of all bookmarks and headings.
- Identify and select the Bookmark you want the
link to point to. - Click OK to apply the settings.
Word will now insert a link that points to a bookmarked
location within the same document.
How to create a hyperlink in Word to a different document
In MS Word, you can add a link to other documents on your computer or network. This way, when a user clicks on the link, another document will open.
Below will show you all the steps to create a hyperlink to a different document.
- Select the text that will contain the link.
- Press Ctrl+K to display the Insert Link dialog.
- Click to select “Existing File or Web Page” from the list of “Link To” buttons.
- Locate the document you want to link to, then Click OK.

Word will successfully insert a link in your document that points to another document on the computer or network.
This is one of the best guides on can get on hyperlinking in Word.
If you have any more questions regarding this topic or related topics, please let me know in the comments section.
Thanks very much for reading this blog.