
In some document layouts (e.g., magazines), you may need to run a series of text boxes that contain a
sequence of text. Word lets you flow text from one text box to another: When the first text box is full,
Word automatically moves to the next text box and fills it. If you add or delete text in a text box, Word
adjusts the text in the subsequent text boxes accordingly.

To make the text flow, you create a link between the text boxes. Follow these steps:
1. Insert the text boxes that you will link and position
them where you want them. Place all the content in the first text box. Most likely, only the first part
of it will appear in the text box.
2. Under Drawing Tools, on the Format tab, in
the Text group, click the Create Link button:

Word changes the mouse pointer to a pouring jug:
— In the first text box: ![]()
— In other text box displays a prompt telling you to move text here:

3. Click the next text box. Word creates the link and flows
the text from the first text box.
4. Choose the second text box, and then repeat the linking
process as needed.

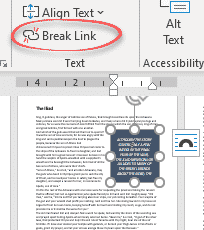
To break a link, select a linked text box, and then under Drawing Tools, on the Format
tab, in the Text group, click the Break Link button:

See also this tip in French:
Flux de texte d’une zone de texte à une autre.
Microsoft Word, MS Office, Office 2007, Office 2010, Office 2013, Office 2016, Office 2019, Office 365 /
14 May 2019
Separate text boxes in Microsoft Word can be linked so text in one box can automatically flow into another text box later on the same page or document.
Yet again with Word, there’s some extra tricks available beyond simple linking of boxes.
Linked boxes is a trick that’s a common feature in professional publishing and layout tools that was quietly added to Word.
Create Text Box Link
At its simplest, put two text boxes in a document. Click in the first one, then choose Format | Text | Create Link. The mouse pointer changes into a flowing cup to click into another text box.

Now the unseen text from the first text box appears in the linked box.
All the text will automatically flow between the boxes as needed, for example if you change the text inside the boxes or change the size of the text boxes. No cut/paste or juggling of text required.
Empty the text box
The target or ‘linked to’ text box has to be empty and that includes the placeholder text Microsoft adds to every new text box automatically.
Delete that text before trying to link.
Copy the text box
For consistency, we suggest making and formatting the first text box. Then duplicate (copy and paste) that box to other places in your document.
Text Boxes don’t have styles so changing the look of one box has to be manually copied to any others. If at all possible, format once then clone to other locations.
The text inside a text box can (and usually should) have a style applied to it.
Linking more than two text boxes
Multiple text boxes can be linked to make a chain of three or more. Do that by selecting the last box in the current chain and linking it to the next empty box.
Sadly, there’s no way to link multiple boxes at once.
Text is a single linked block
The text in linked text boxes is treated as a single entity by Word. Click inside a linked text box and press Ctrl + A (Select All) will select all the text in all linked text boxes (and not select text outside the boxes).
Text inside boxes all selected with a single Ctrl + A shortcut.
That makes it easy to reformat all the text.
But linked text boxes are not linked in other ways
Create Link only applies to text. Nothing else about the text boxes are linked.
A change in the look or size of a text box has no effect on any linked box.
Nor are text boxes grouped in the selection pane
Break the link
To unlink text boxes, click in the first or source text box then Format | Text | Break Link.

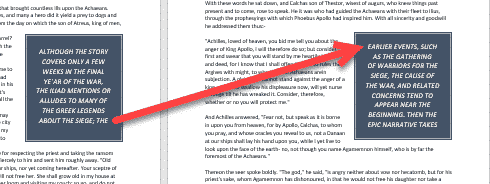
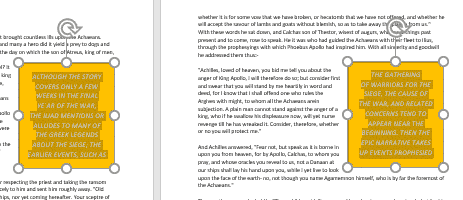
If you want to highlight portions of text in your document, you can insert text boxes. But what you might not know is that you can link these boxes in Microsoft Word and have the text within them flow continuously.
Maybe you have a brochure that uses text boxes to call out features of a product or service. Or maybe you have a document and use text boxes for helpful tips or pull quotes. By linking the text boxes together, you can type in one text box and have the overflow of text move to the next one.
RELATED: How to Add Sideheads and Pull Quotes to Microsoft Word Documents
You can use a preformatted text box or draw and format your own. Head to the Insert tab, click the Text Box drop-down arrow, and choose or draw your first text box. You can start typing your text in the first box or wait until you add and link the second one.

Follow the same steps to insert your second text box. If you choose a preformatted text box, you’ll need to remove the sample text inside. A requirement for linking one text box to another is that the second text box must be empty. Just select all of the text in the preformatted box and press Delete.
Click to select your first text box. Then go to the Shape Format tab and click “Create Link” in the text section of the ribbon.
You’ll see your cursor change to a pitcher. Move your pitcher to the second text box and click inside of it. This creates the link between the two.
Now when you type within the first text box and reach the bottom of the shape, the text will continue inside the second text box automatically.
You can continue to add text boxes and link those as well. So, if you want to add a third, select the second text box and create a link the same way to the third text box.
You can move text boxes to different pages or rotate the boxes without it affecting the linked ones.
RELATED: How to Make Diagonal Text in Word
Resize and Format Linked Text Boxes
If you resize a text box by dragging a corner or edge, the text inside adjusts between the linked boxes. As you can see in the screenshot below, we made the first text box smaller, so the overflow of text automatically moved to the second text box.
If you format the font inside of a text box, it does not affect the text in the linked text box. This allows you to use italics, bold, or a different font color in the various boxes.
Keep in mind, however: if the size of a text box changes and the text flows into the linked box, it will bring with it the formatting you applied as shown below.
Break a Text Box Link
If you decide later you want to unlink the text boxes, this is easy to do. Select the first text box, go to the Shape Format tab, and click “Break Link” in the Text section of the ribbon. Follow the same process to unlink your remaining text boxes if necessary.
When you break the link, all of the text in the second text box appears in the first. You may need to resize the first text box to see it all.
Linking text boxes in Microsoft Word is a good way to display a continuous short story, list of tips, set of instructions, or something similar without affecting the main part of your content. And to keep those boxes safe from editing, you can lock text boxes in Word as well.
READ NEXT
- › How to Mirror or Flip Text in Microsoft Word
- › How to Adjust and Change Discord Fonts
- › The New NVIDIA GeForce RTX 4070 Is Like an RTX 3080 for $599
- › This New Google TV Streaming Device Costs Just $20
- › Google Chrome Is Getting Faster
- › BLUETTI Slashed Hundreds off Its Best Power Stations for Easter Sale
- › HoloLens Now Has Windows 11 and Incredible 3D Ink Features
How-To Geek is where you turn when you want experts to explain technology. Since we launched in 2006, our articles have been read billions of times. Want to know more?
Connect text boxes
- Click Home > Draw Text Box, and drag the cross shaped cursor to draw a box where you want text.
- Click in the text box you want as the first text box in the story.
- On the Text Box Tools Format tab, in the Linking group, click Create Link.
- Click in the text box you want as the next in the story.
Contents
- 1 Can you link two text boxes in Word?
- 2 How do I link two text boxes in Word 2019?
- 3 How do I link multiple text boxes?
- 4 How do I link a cell in a text box?
- 5 How do you link a content control box in Word?
- 6 How do I move multiple text boxes in Word?
- 7 Can you reference a cell in a text box?
- 8 How do you link text?
- 9 How do I link boxes in Excel?
- 10 How do you make a text box appear on every page in Word?
- 11 How do I set up autofill in Word?
- 12 How do you link content controls in Word 2016?
- 13 How do you join two objects together in Word?
- 14 How do I group a text box and shape in Word?
- 15 What is dialog box launcher in MS Word?
- 16 How do I select a text box?
- 17 How do I copy everything in a text box?
- 18 How do I link two text boxes in Excel?
- 19 How do I link a text box to a chart in Excel?
- 20 How do you use concatenate?
Can you link two text boxes in Word?
In the page, click and drag the pointer to create a text box. , and then draw another text box. You now have two linked text boxes. When the first text box fills, text automatically flows into the next linked text box.
How do I link two text boxes in Word 2019?
At its simplest, put two text boxes in a document. Click in the first one, then choose Format | Text | Create Link. The mouse pointer changes into a flowing cup to click into another text box. Now the unseen text from the first text box appears in the linked box.
How do I link multiple text boxes?
Follow these steps:
- Insert the text boxes that you will link and position them where you want them.
- Under Drawing Tools, on the Format tab, in the Text group, click the Create Link button:
- Click the next text box.
- Choose the second text box, and then repeat the linking process as needed.
How do I link a cell in a text box?
You can do it with following steps: Step 1: Click the Text Box button under Insert tab, and insert a textbox in your worksheet. Step 2: While text box is selected put your cursor in the formula bar, type in = symbol and then click on the cell you want to link to, and finally press the Enter key.
How do you link a content control box in Word?
Simple Linked Content Controls
Right click and select “Copy.” Position the cursor where you need the text repeated. Using the Home tab click Paste>Paste Special and select the “Paste link” option button.
How do I move multiple text boxes in Word?
To move multiple text boxes or shapes, press and hold Ctrl while you click the borders. When the cursor changes to the four headed arrow, drag it to the new location. To move in small increments, press and hold Ctrl while pressing an arrow key.
Can you reference a cell in a text box?
Linked text box
A text box can be linked to a cell. This means you can use formulas and functions in a cell to create a dynamic heading, sentence or calculation, and then have the freedom to place it anywhere on the sheet.
How do you link text?
Select the text or picture that you want to display as a hyperlink. Press Ctrl+K. You can also right-click the text or picture and click Link on the shortcut menu. In the Insert Hyperlink box, type or paste your link in the Address box.
How do I link boxes in Excel?
How to Link Cells From Different Excel Files
- Open both Excel documents.
- In the second file (Help Desk Geek), choose a cell and type an equal symbol (=).
- Switch to the original file (Online Tech Tips), and click on the cell that you want to link to.
- Press Enter to complete the formula.
How do you make a text box appear on every page in Word?
1 Answer. You can insert a text box, format and position it exactly as you want it to appear, and even add default text to it. Then select the text box, and save it to the Text Box Gallery (on the Insert tab, in the Text group, click Text Box > Save Selection to Text Box Gallery).
How do I set up autofill in Word?
- Type the text you want AutoComplete to insert.
- Highlight the text.
- Click “Insert” in the Word menu bar.
- Click “OK” to add the text.
- Check the box labeled “Show AutoComplete Suggestions.” Click “OK.”
- Type “Iron” anywhere in your document.
- Press “Enter” to insert “Ironfoundersson Inc.” into your Word document.
How do you link content controls in Word 2016?
The example content control
- Position the cursor where you want to insert the content control and click the Developer tab.
- In the Controls group, click the Combo Box Content Control to insert the control.
- Click Properties in the Controls group.
How do you join two objects together in Word?
Select the shapes you want to merge: press and hold the Shift key while you select each shape in turn. (If you don’t select any shapes, then the Merge Shapes button in step 2 will be grayed out.) On the Drawing Tools Format tab, in the Insert Shapes group, select Merge Shapes, and then pick the option you want.
How do I group a text box and shape in Word?
Group shapes, pictures, or other objects
- Press and hold CTRL while you click the shapes, pictures, or other objects to group. You will need to select more than one shape, picture or object in order to enable the Group button.
- Select the Arrange button and choose Group.
What is dialog box launcher in MS Word?
A dialog box launcher is a button in the Ribbon of Microsoft Word, Excel, Outlook, and PowerPoint used to reveal additional tools available for use in that section of the Ribbon.In the picture of the Excel Ribbon below, there are four dialog box launchers highlighted by red boxes.
How do I select a text box?
To select the text box, you need to click the border of the text box, and the insertion point disappears. If you press Tab or Ctrl+Tab while the insertion point is visible in the text box, then you only modify the text in the text box; you don’t select the next object.
How do I copy everything in a text box?
Copy a text box
- Click the border of the text box that you want to copy.
- Press Ctrl+C. Note: Make sure the pointer is on the border of the text box, not inside it. If the pointer is inside, pressing Ctrl+C will copy the text, not the text box.
- Select a location and press Ctrl+V to paste the text box.
How do I link two text boxes in Excel?
On the Text Box Tools Format tab, in the Linking group, click Create Link. Click in the text box you want as the next in the story. This text box is now connected to the first box and any text in the overflow now appears in the next box. To connect more text boxes to the story, repeat steps 3 and 4.
How do I link a text box to a chart in Excel?
Insert a text box on a chart
- Click the chart to which you want to add a text box.
- On the Format tab, click Insert Shapes, and then click the Text Box icon .
- In the chart, click where you want to start a corner of the text box, and then drag until the text box is the size that you want.
How do you use concatenate?
There are two ways to do this:
- Add double quotation marks with a space between them ” “. For example: =CONCATENATE(“Hello”, ” “, “World!”).
- Add a space after the Text argument. For example: =CONCATENATE(“Hello “, “World!”). The string “Hello ” has an extra space added.
![]()
Written by Allen Wyatt (last updated June 24, 2019)
This tip applies to Word 2007 and 2010
Kylie wonders how, in Word 2010, she can link text boxes so that text flows from one text box to another. She knows how to do it in Word 2007 (right-click on the text box and choose «create text box link»), but it appears that option is not available in Word 2010.
Kylie is correct; it appears that the Context menu option she references is available in Word 2007 but missing in Word 2010. You can still create a link between text boxes, however, by following these steps:
- Create both of your text boxes.
- Place your text (even if it is very long) in the first text box.
- Make sure the second text box is empty—it should not contain any text.
- Place the insertion point within the first text box.
- Make sure the Format tab of the ribbon is visible. (This tab is only available if a text box is selected or if the insertion point is within a text box.)
- Click the Create Link tool, within the Text group. The mouse pointer changes to a cup containing a downward-pointing arrow.
- Click the mouse pointer within the second text box.
These steps will also work in Word 2007 as well as in Word 2010.
WordTips is your source for cost-effective Microsoft Word training.
(Microsoft Word is the most popular word processing software in the world.)
This tip (11668) applies to Microsoft Word 2007 and 2010.
Author Bio
With more than 50 non-fiction books and numerous magazine articles to his credit, Allen Wyatt is an internationally recognized author. He is president of Sharon Parq Associates, a computer and publishing services company. Learn more about Allen…
MORE FROM ALLEN
Deleting a File in a Macro
Macros give you a great deal of control over creating, finding, renaming, and deleting files. This tip focuses on this …
Discover More
Mail Merge Magic (Table of Contents)
The mail merge tool available in Word is powerful, allowing you to use data from a variety of sources to create hundreds …
Discover More
Calculating an Average within a Date Range
Need to find an average of the values that fall within a date range? Excel provides a number of ways you can do this, …
Discover More
More WordTips (ribbon)
Boxes in Boxes
When you insert a text box within another text box, you may expect any text in the outer text box to wrap around the …
Discover More
Resizing a Text Box
Text boxes allow you to «segment» information in your document and lay it out differently. You can easily resize these …
Discover More
Selecting Text in Linked Text Boxes
Text boxes are often used as design elements in a document layout. If you have linked text boxes, you may have noticed …
Discover More