
In a recent tutorial, we looked at how to insert table titles and figure captions in Microsoft Word. Today, we’re going to use those titles and captions to cross-reference tables and figures in Microsoft Word.
One benefit of using cross-references in Word is that they can be hyperlinked to the connected table or figure.
In addition, Word’s cross-references can be easily updated if you add or delete a table or figure, as shown in the second section below.
This tutorial is also available as a YouTube video showing all the steps in real time.
Watch more than 200 videos about Microsoft Word and Adobe Acrobat on my YouTube channel.
The images shown here are from Word for Microsoft 365. These steps will also work for Word 2021, Word 2019, Word 2016, Word 2013, and Word 2010. However, your interface may look slightly different in those older versions of the software.
Important Note: These steps only work with existing tables and figures that have titles or captions created with Word’s caption tool.
- Place your cursor where you want to insert the cross-reference.

- Select the References tab in the ribbon.

- Select Cross-reference in the Captions group.

Pro Tip: The Cross-reference option is also available in the Insert tab.
- Select Figure or Table from the Reference type menu in the Cross-reference dialog box.

- Select an option from the Insert reference to menu:
-
- Entire caption (This option includes the figure caption or table title with the label and number.)
- Only label and number (e.g., Table 10)
- Only caption text (This option includes the figure caption or table title without the label and number.)
- Page number
- Above/below (This option inserts the word “above” or “below” with no additional text related to your table or figure.)

- Select Insert as hyperlink if you want to give your readers the ability to select the cross-reference and move to the table or figure.

- Select the table or figure you want to cross-reference from the For which caption menu.

- Select the Insert button.

Pro Tip: You can move your cursor and insert additional cross-references while the Cross-reference dialog box is open.
Your cross-reference will be inserted into your text immediately.

- Select the Close button to close the Cross-reference dialog box.

Cross-references don’t update automatically as you add or delete tables or figures. So, in the next section, we’ll look at how to update them simultaneously in just five steps.
How to Update Cross-References to Tables and Figures
If you need help updating table or figure numbers, please see “How to Update Table and Figure Numbers in Microsoft Word.”
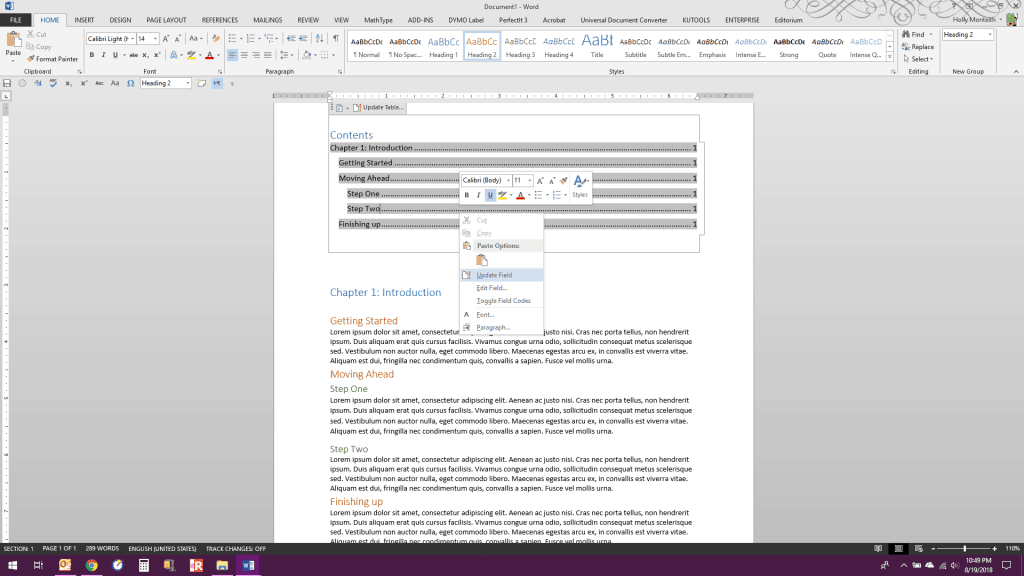
- Select one of the cross-references in your text.

- Select the Home tab in the ribbon.

- Select Select in the Editing group.

- Select Select Text with Similar Formatting from the menu.

All your cross-references should now be selected.
- Right-click one of the cross-references and select Update Field from the shortcut menu.

Your cross-references should update immediately.
Pro Tip: If you don’t want to update all your cross-references, you can select an individual one, right-click, and then select Update Field from the shortcut menu, as shown in figure 15.
Related Resources
How to Insert and Modify Images in Microsoft Word
How to Reference Tables and Figures in Text
How to Write Table Titles
How to Write Figure Captions for Graphs, Charts, Photos, Drawings, and Maps
How to Create and Update a List of Tables or Figures in Microsoft Word
How to Add Heading Numbers to Table Titles and Figure Captions in Microsoft Word (PC & Mac)
Updated March 13, 2023
In today’s digital age, much of the content you produce in Microsoft Word will be replicated beyond paper. Dissertations and theses are often published online. Authors of books, whether fiction or nonfiction, are choosing to self-publish, and that means making and distributing functional ebooks. Even if you write and publish long reports as a PDF, you must still consider the best way for readers to access and navigate your document.
This is where hyperlinking in Microsoft Word becomes important.
- For dissertation and thesis writers, not only will creating a linked table of contents make navigating your document easier for users but the table of contents will be more easily updatable as you revise your content. Every graduate student will agree that any time saved is golden!
- For self-publishers, readers expect a table of contents in their ebooks that is clickable, and most retailers of ebooks, Amazon included, require hyperlinking. This extends beyond tables of contents to URLs that appear in your text, endnote numbers, and the like. Oftentimes, creating these links in your Word document before you convert to EPUB or MOBI (i.e., Kindle) will automatically create the links in the ebook files, especially if you use conversion services, such as those offered by Draft2Digital or freeware like Calibre.
- For any long document published online, such as in PDF, a clickable table of contents and active URLs, email addresses, and links to other documents are, in a word, essential and, frankly, expected by readers.
This article describes, with the aid of screenshots, how to hyperlink content and create a linked table of contents (TOC). Let’s start with learning how to create simple hyperlinks.
Creating Simple Hyperlinks in Microsoft Word
This process is relatively straightforward. Let’s take a look.
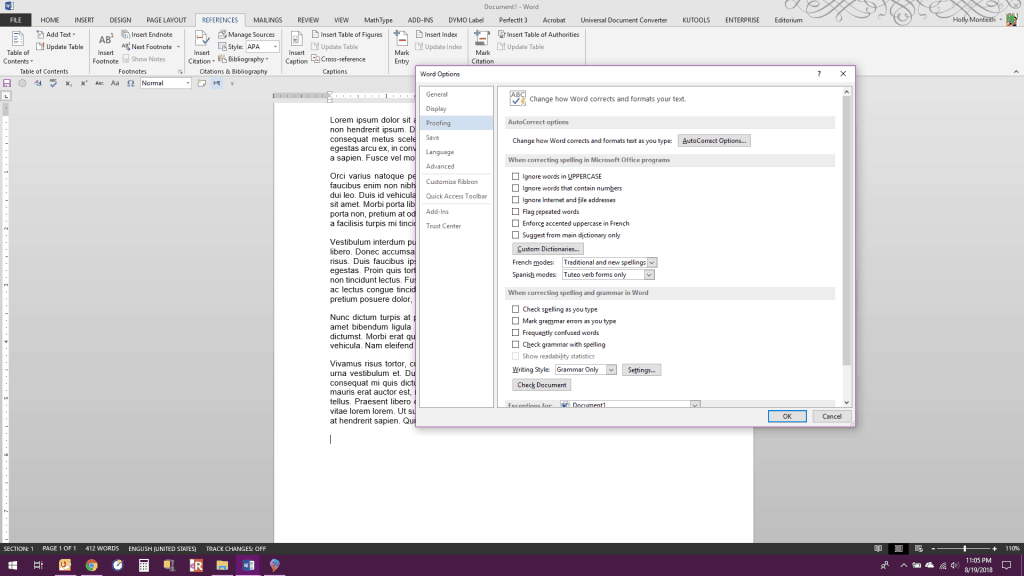
You have a document open in Word. Perhaps your document contains a URL. Oftentimes, your user settings will be specified to automatically convert a typed URL into a hyperlink. If you type a hyperlink, e.g., http://www.google.com/, and it does not automatically link, you can turn on this setting by going to FILE → Options, so this window opens:

From here, click on Proofing on the left-hand side, then on the AutoCorrect Options button toward the top:
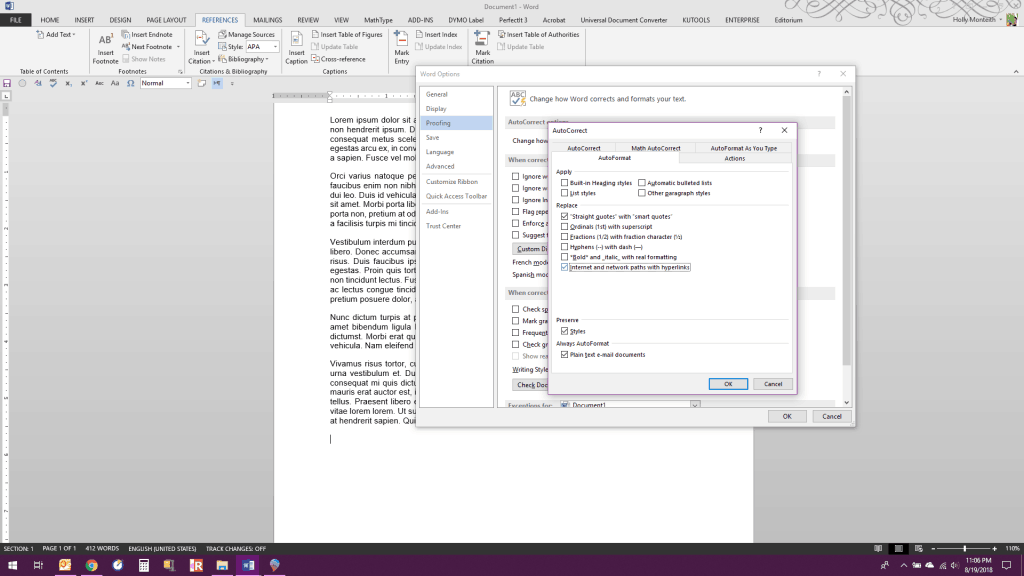
On the AutoFormat tab, make sure the box for “Internet and network paths with hyperlinks” is checked:
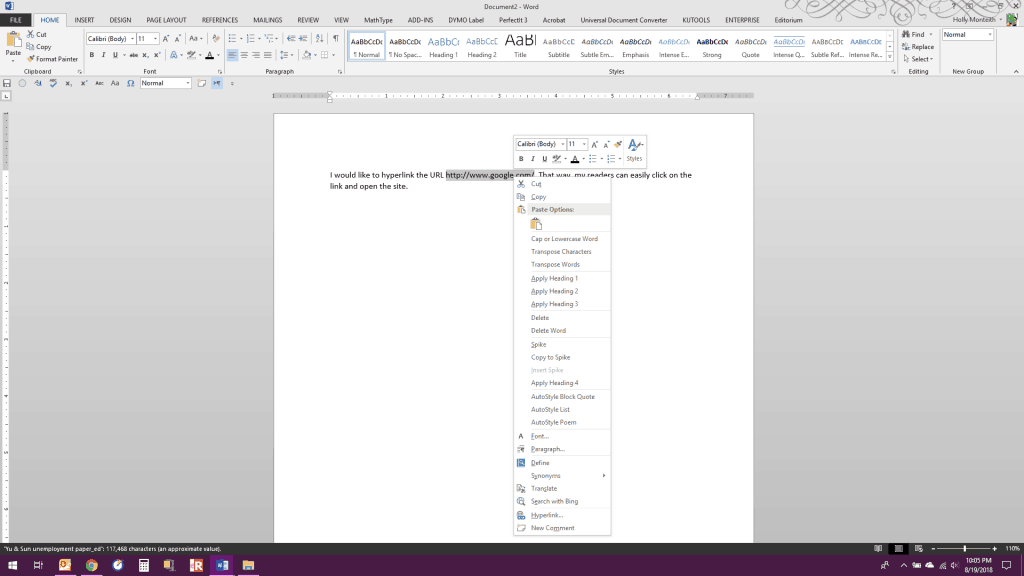
If you’re like me and would rather turn off such autoformatting, you can still create a hyperlink manually. First, type the URL into the document, then highlight it with your cursor:

Then, right click on the highlighted text and choose Hyperlink from the flyout menu (way down toward the bottom):
Doing so brings up a box:

At the top, you see “Text to display”; at the bottom, you see “Address.” To keep the URL text in the document, simply click the OK button—Word has automatically used the highlighted text as the “Text to display” and the same URL as the “Address”:
 Alternatively, you could replace the “Text to display” with something else. In this case, let’s replace it with “Google”:
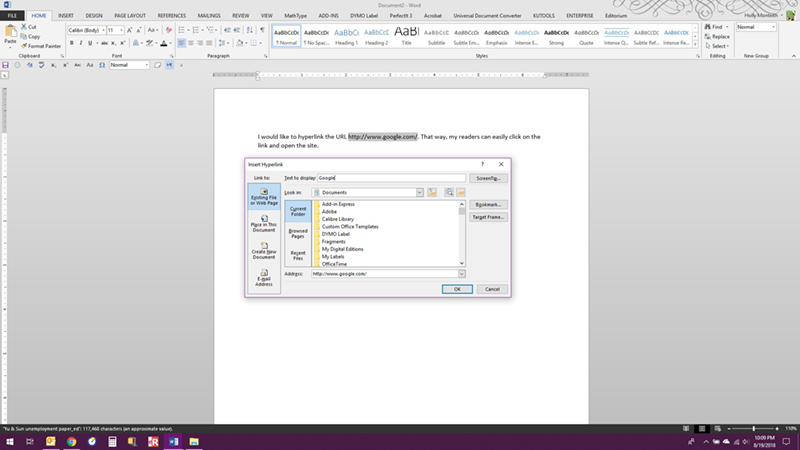
When you click OK, the URL you typed will now be replaced by the text “Google,” hyperlinked to http://www.google.com (because you kept that URL in the “Address” box at the bottom):

You can also, for example, simply type “Google” in your document, highlight it, right click, choose Hyperlink from the menu, and then type in the address http://www.google.com in the “Address” box. This will produce the same result.
You can use the hyperlink menu to link to other places within your document as well. For example, you may want to link a mention of a section to that actual section in your document. Consider the following text:

Here, we want to link the mention of “Section 2” in our text in Section 1 to the actual heading for Section 2, so that if our reader wants to jump to that section, he or she can do so with a click. (Let’s pretend that Section 2 is not right there!)
Before we can link, we need to tell Word that these are headings. We do this by using styles and formatting. Highlight both headings, then go to your HOME tab in the ribbon and choose a heading style. Word has some built in: let’s choose Heading 1. (There are a couple places this could be, depending on how Word is configured. The following two screenshots show some places you might find the styles menu.)

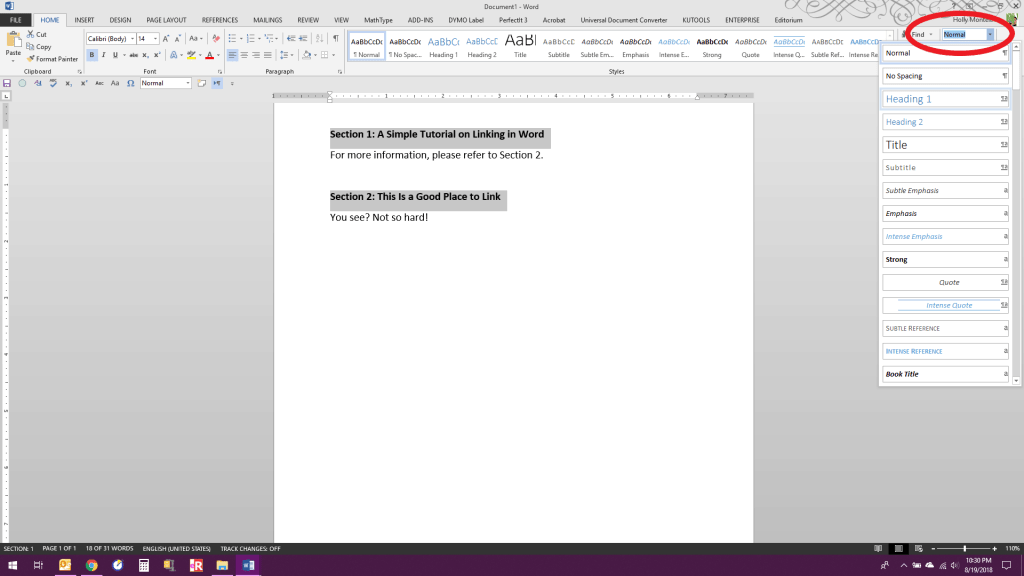
Now your headings are styled as headings. You can always change how they look in terms of color, size, etc. The important thing is that Word now knows they are headings. You’ve given them an ID bracelet.

Now, again, highlight the text to hyperlink and bring up the Hyperlinks box. This time, though, make sure you click on the box “Place in this document” all the way to the left. Because we have the headings formatted as headings, you’ll see that these headings are listed. Highlight the one to which you want to link and then click OK:
 Now “Section 2” in the text is linked to the heading for Section 2 of the document! If you click on the linked “Section 2,” you’ll see your cursor jump down to the Section 2 heading.
 You may have noticed that in the Hyperlink box, there is an option to the left for “E-mail address.” To insert a linked e-mail address, just type the address (or a name, or what have you) in the document, highlight it, bring up the Hyperlinks box, choose “E-mail address,” make sure “Text to display” says what you want it to, and then you can enter in the e-mail address and even a suggested subject line, which will automatically populate. Cool!
Now, you may be thinking that this is a good way to create a TOC as well. It is a possible way—you could type out the chapters and then link each one individually—but it’s not the most efficient. Let’s turn now to the best way to create a TOC in Word.
Creating Tables of Contents in Word
Word has a built-in TOC tool that automates the creation of TOCs and also, importantly, allows you to update them with just the click of a mouse.
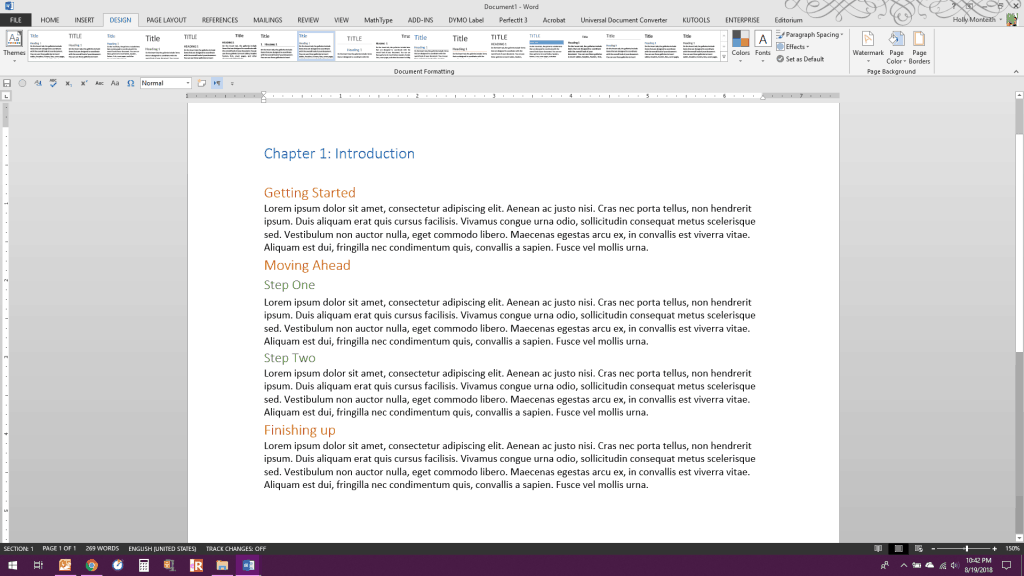
First thing’s first: you’ll need to go back to your styles and formatting and format each heading in your document according to its appropriate level. For example, you could call chapter titles Heading 1, first-level headings Heading 2, second-level headings Heading 3, and so on. You can actually name your styles anything you want by creating new styles, but let’s just stick with Word’s built-in heading styles for simplicity.
Consider the following document, which I have set up with one chapter heading (Heading 1), three level-one headings (Heading 2), and two level-three headings (Heading 3). (As a side note: Word has built in a number of different formatting schemes from which you can choose. Go to the DESIGN tab on the ribbon and click through all the options there until you find one you like!)
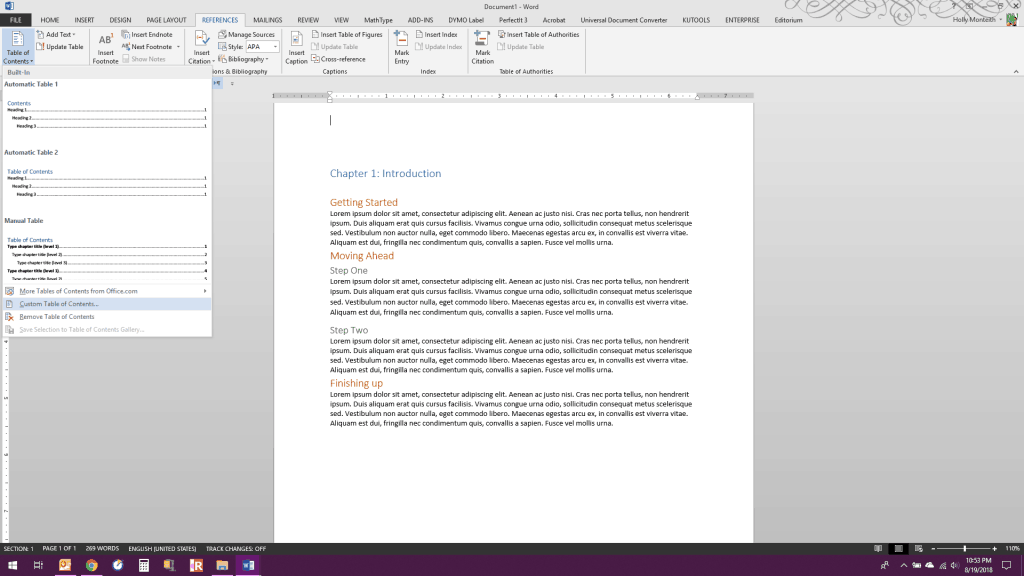
Now, let’s make a TOC. First, place your cursor where you want the TOC to appear. Then, go to REFERENCES on the ribbon and choose Table of Contents. Wow! You’ll see a couple automatic options that Word will format for you:
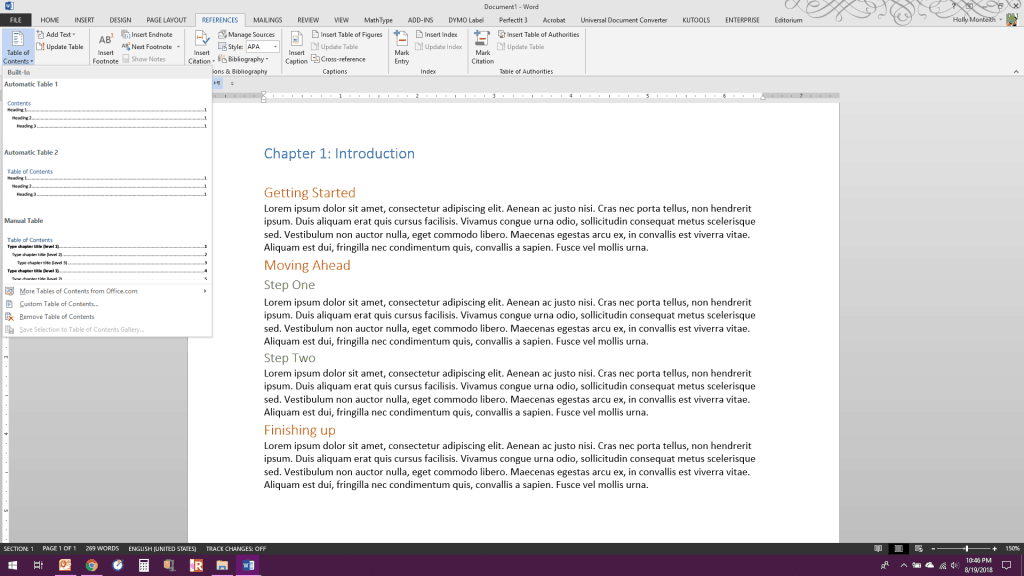 Let’s choose the first one!
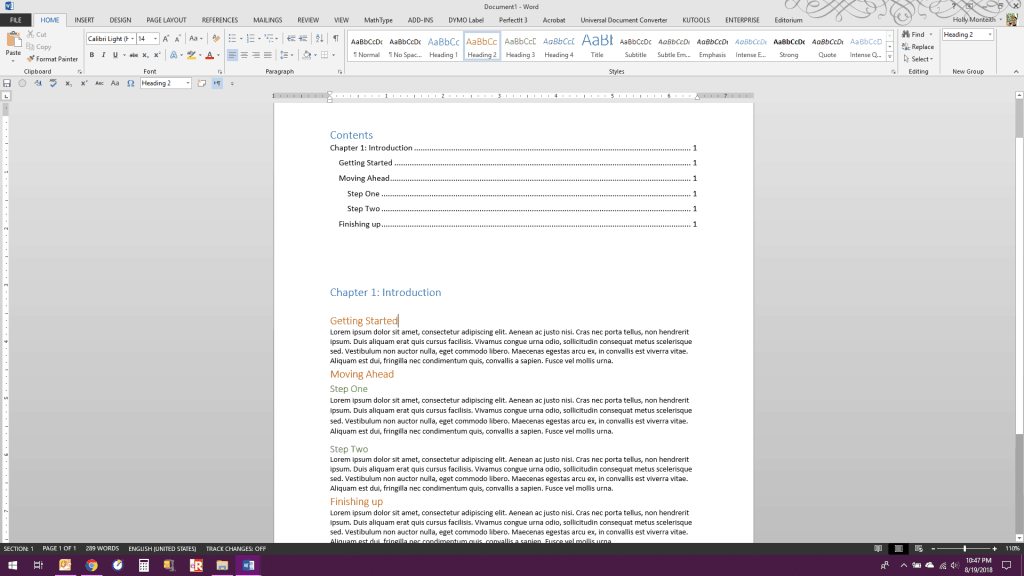
There it is!
The cool thing about this TOC is that you can update it with the click of a mouse. Let’s say you change a heading or perhaps you add some paragraphs so that headings appear on new pages. You can right click on the TOC and bring up a menu, from which you can choose Update Field:
Click on Update Field, and you’ll see an option to Update Page Numbers Only or Update Entire Table. If only the pages have changed, choose the first; if you’ve edited the text of headings, added new headings, or the like, choose the second option. Boom! New, updated TOC.
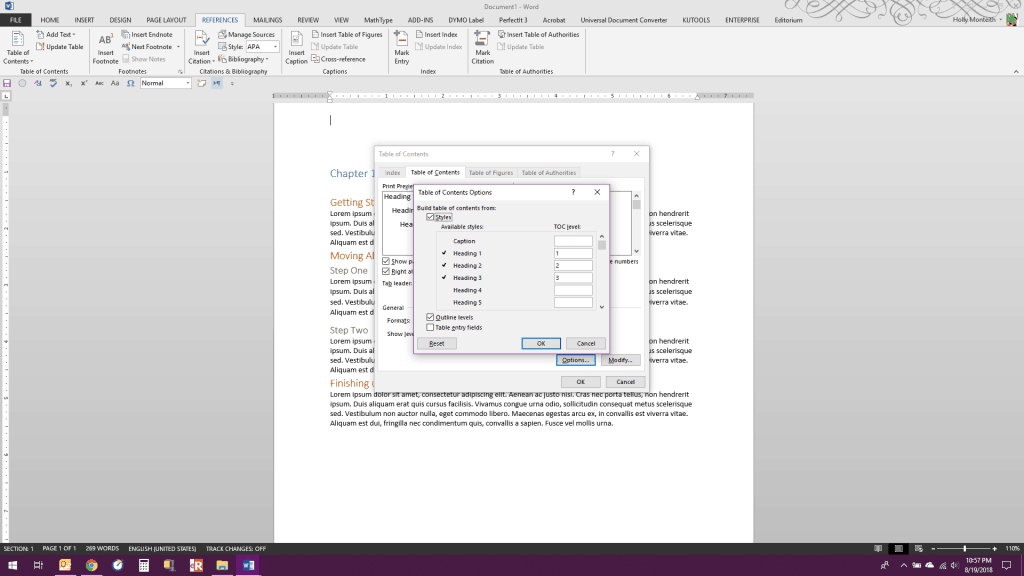
The more adventurous person, or more experienced Word user, can customize the appearance of the TOC by bypassing Word’s suggested TOCs and choosing Custom Table of Contents in REFERENCES –> Table of Contents:
 Here you’re able to decide how many levels to show, whether to include a dot leader, how to indent or space or color or what-have-you each level, and so on.

This is a more complicated process. You would begin by choosing your tab leader (dots, no dots, etc.) and the number of levels to include in the above screenshot. Make sure “Use hyperlinks” is unchecked if you don’t want the underlined, blue hyperlink “look.” Then, you’d click the Options button, where you’d tell Word which style corresponds to which level of heading, e.g., Heading 1 is level 1, Heading 2 is level 2:
 After clicking OK, you can then click the Modify button to tell Word how to style each level of heading, where TOC1is heading level 1, etc.
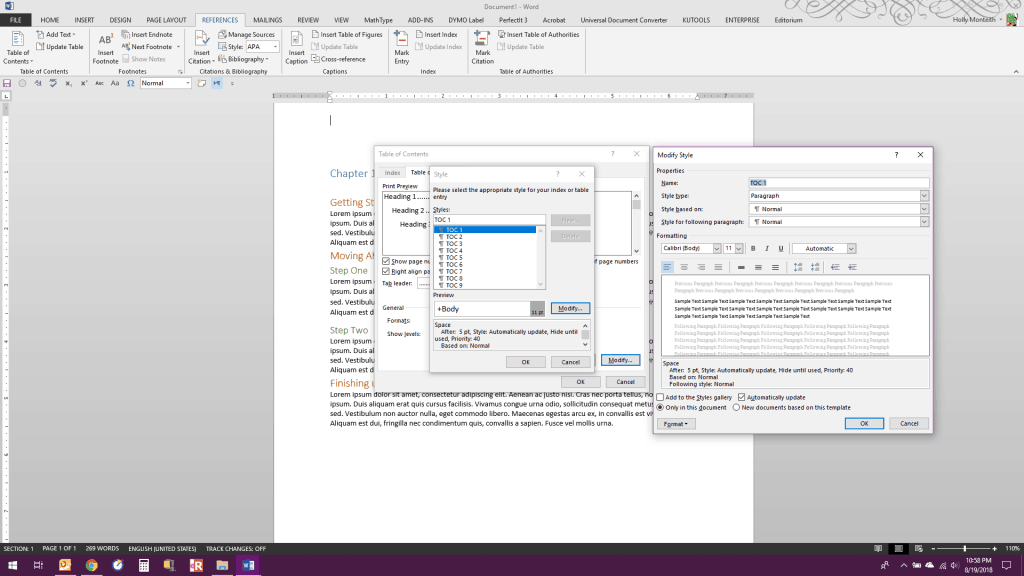
Once you’d made all your changes, you’d click through OK until the TOC is placed into the document.
This process is not for the faint of heart and takes some practice and experimentation to learn.
If you can’t find a formatting style that Word includes by default and don’t want to tackle the custom TOC process, you can, of course, simply go to the in-built TOC Word made for you and change things around in the normal way (change fonts, sizes, colors, etc.). However, keep in mind that if you do so and then later choose to update the table of contents, you’ll lose all your formatting.
Summing Up
That’s the gist of hyperlinking in Word. Remember that these steps are essential if you are producing a digital document or are planning to convert your document into an ebook.
Happy hyperlinking!
- Author
- Recent Posts

HOLLY MONTY is a nonfiction book editor, dissertation editor, and self-publishing consultant. She is an expert in Microsoft Word, Adobe Acrobat, Adobe InDesign, LaTeX, and APA Style.
Link an Excel file to a Word doc so the doc updates when the Excel data changes
Updated on March 11, 2022
What to Know
- Link: Copy cells. Right-click Link & Use Destination Styles or Link & Keep Source Formatting in Word.
- Embed: In Word, go to Insert > Object > Object > Create from File > Browse > choose Excel file > OK.
- Embed a spreadsheet table: In Word, go to Insert > Table > Excel Spreadsheet.
This article explains two ways to display Excel data in Word.
Instructions apply to Word for Microsoft 365, Word 2019, Word 2016, Word 2013, Word 2010, Excel for Microsoft 365, Excel 2019, Excel 2016, Excel 2013, and Excel 2010.
How to Link Excel to Word
To insert any part of an Excel worksheet in a Word document:
Maddy Price / Lifewire
-
Open the Word document where the worksheet will display.
-
Open the Excel worksheet that contains the data you want to link to the Word document.
-
In Excel, select and copy the range of cells to include. If you plan to insert more columns or rows into the worksheet, select the entire worksheet.
To select the entire worksheet, select the cell located in the upper-left corner at the juncture of the row numbers and column letters.
-
In the Word document, position the cursor where you want to insert the linked table.
-
Right-click and select Link & Use Destination Styles or Link & Keep Source Formatting.
Destination Styles uses the default Word table formatting, which usually results in a better-looking table. Keep Source Formatting uses the formatting from the Excel workbook.
-
The Excel data pastes directly into the Word document where the cursor was positioned. If changes are made to the source Excel file, the Word document updates with those changes automatically.
What Happens When You Link Excel to Word
Linking an Excel file to a Word document ensures that the Word document is updated every time the data in the Excel file changes. It works as a one-way link feed that brings the updated Excel data into the linked Word document. Linking an Excel worksheet also keeps your Word file small because the data doesn’t save to the Word document.
Linking an Excel worksheet to a Word document has a few limitations:
- If the Excel file moves, the link to the Word document needs to be re-established.
- If you plan to transport the Word file or use it on another computer, you must transport the Excel file along with it.
- You must do data editing in the Excel worksheet. It isn’t a problem unless you require different spreadsheet formats in the Word document.
How to Embed an Excel Spreadsheet in Word
The process of embedding an Excel worksheet in a Word document is essentially the same as linking to an Excel worksheet. It does require a few extra clicks, but it brings all data from the worksheet into your document, not only the selected range.
There are two ways to embed an Excel worksheet in Word. The first is to embed the worksheet as an object. The second is to insert a table.
When you embed a worksheet, Word uses the formatting from the Excel worksheet. Make sure that the data in the worksheet looks the way you want it to appear in the Word document.
Embed an Excel Worksheet as an Object
To embed an Excel worksheet as an object:
-
Open the Word document.
-
Go to the Insert tab.
-
Select Object > Object. In Word 2010, select Insert > Object.
-
In the Object dialog box, select the Create from File tab.
-
Select Browse, then choose the Excel worksheet that contains the data you want to embed.
-
Select OK.
-
The Excel worksheet is embedded in the Word document.
How to Embed an Excel Spreadsheet Table
An alternative is to insert the Excel worksheet as a table. This method inserts the worksheet the same way as if you embedded it as an object. The difference is that it opens a blank Excel worksheet for you to fill out. Choose this method if you haven’t created the Excel file yet.
To insert an Excel worksheet as a table in Word:
-
Open a Word document.
-
Place the cursor where you want to insert the Excel worksheet.
-
Go to the Insert tab, then select Table.
-
Select Excel Spreadsheet.
-
This menu option opens a blank Excel worksheet that you can fill with data. Either enter new data or paste data from another spreadsheet.
When you insert and fill out a new Excel worksheet, you have an Excel file that you can update at any time. The data in the Word table automatically updates to match the data in the Excel file.
FAQ
-
How do I embed a Microsoft Word document in Excel?
In Excel, select the Insert tab > Text > Object > Create from File. Next, select Browse to find the Word file > Insert > OK.
-
How do I create labels in Microsoft Word from an Excel list?
To create labels in Word from an Excel list, open a blank Word document > select Mailings > Start Mail Merge > Labels > choose the brand and product number for the labels. Then, choose Select Recipients > Use an Existing List > navigate to the Excel address list > OK. Add the merge mail fields to complete the merge.
Thanks for letting us know!
Get the Latest Tech News Delivered Every Day
Subscribe
I have two tables one just below another, and I can’t insert a new empty line of regular text between them.
- When I hit Enter, Microsoft Word only adds a new row to the first or the second table, or to the text contained in one of the tables.
- When I try to paste, the pasted contents (text, or table) also gets inserted into one of the tables (so I even got a table in a table…).
- I’ve tried the «Document Outline» mode too, but to no success either.
Any ideas?
![]()
shA.t
4884 silver badges18 bronze badges
asked Sep 14, 2012 at 9:57
![]()
3
Ctrl+Shift and Enter works for me on Word 14 (aka Word 2010 in Office 2010).
This works, if your cursor is at the start of the second table.
![]()
answered Apr 28, 2013 at 12:20
![]()
PauloPaulo
3813 silver badges2 bronze badges
5
It sounds like the tables are actually attached to each other if there is no line between them.
Don’t know what version you are using, but in Word 2010, I simply split the table.
Started with this;

Chose the row of the table where I wanted to split above and clicked the split button;

Result;

answered Sep 14, 2012 at 11:48
![]()
CharlieRBCharlieRB
22.5k5 gold badges55 silver badges104 bronze badges
2
Table Properties —
correct
- Text Wrapping = None
incorrect (causes the problem)
- Text Wrapping = Around
If you want to have text and lines between two tables, both tables must be «inline» with the text (Wrapping = None) in order to put text between them. If one of the two tables is floating above the text (Wrapping = Around) with the text moving around it, you can’t insert text in-between.
answered Mar 3, 2014 at 22:03
![]()
I had a similar problem with a table at the top of a new section—all the usual suggestions did not work. This was my answer, I suspect it will resolve your issue as well: https://superuser.com/a/175181/146915
![]()
answered Feb 6, 2013 at 22:05
![]()
MalcolmMalcolm
2732 silver badges9 bronze badges
I had the same problem, but I solved it. Maybe it’s not the most elegant solution, but it works. In the table above I added a row at the bottom (or at the top of the table below).
Select marked row and convert it into text.
Select Layout -> Data -> Convert to Text.
In this way I got a blank line between the tables.
![]()
answered Oct 5, 2013 at 8:28
![]()
Place the cursor at the end of the first table.
Then press Ctrl+Shift+Enter. It will break the last row of table to create a free row, where u could write the texts. Then the breaked table row can be deleted by selecting it and press Ctrl+X
answered Jul 23, 2017 at 7:33
![]()
Hah, just a moment after posting the question I invented some convoluted method which worked in my case:
- Added some empty newlines at the end of the document.
- Shift-selected text starting in the middle of the empty lines at the end and going Up ↑ till I had the whole second table selected.
- Cut (Ctrl-X)
- Leave some empty lines below the first table, go ↓ Down below them.
- Paste (Ctrl-V) the second table and what follows.
Still, I’d be more than happy to learn some simpler way to do that, especially that copy&paste has potential to break some layout etc. in M$ Word, so this method might not always work.
answered Sep 14, 2012 at 10:03
![]()
akavelakavel
7881 gold badge8 silver badges25 bronze badges
I had the same problem, caused by cutting two tables out of a web page and pasting them into Word. I kicked myself when I stopped to think — if it’s genuinely two tables as it was in my case, select the second one, cut it, add a new line or two below the first table then paste the second table back after the newline. Simples.
answered May 20, 2013 at 15:57
![]()
One solution is to right click and add a caption above the second table. Then you can simply replace the caption with normal text.
answered Feb 16, 2014 at 15:39
![]()
Click on the little box on the upper left hand side of the table to select it. Table Tools will show up on the ribbon. Click on layout and select «Split Table» in the Merge section.
answered Sep 17, 2014 at 19:24
![]()
⌘+Shift and Enter works for me in Word 2011 on OSX.
This works if your cursor is at the start of the second table.
![]()
answered Apr 29, 2015 at 9:56
![]()
Just place your cursor to the right of the table and hit Shift and Control and Enter at the same time.
![]()
Heptite
19.1k5 gold badges58 silver badges70 bronze badges
answered Jun 7, 2016 at 18:28
![]()
1
I know there are many answers here, this is what worked for me (and didn’t) in Word 2013:
- Position cursor to the right of the first table (where you want to insert space after that table and before the next)
- Press Shift+Enter (Alt+Enter seems to make a page break, Ctrl+Shift+Enter does something odd with the last row of the first table.)
![]()
answered May 8, 2017 at 22:39
![]()
1
Place your cursor at the end of the row you want to create space and then press Alt+Enter.
Bingo! its done.
answered Oct 21, 2014 at 18:27
![]()
2
When working with data in Excel, you would often have a need to copy some tables from Excel into an MS Word document.
While there is no built-in option in Excel to convert an entire Excel file to Word, you can easily copy and paste the data from an Excel document to Word.
In this tutorial, I will show you multiple ways to copy data from an Excel Worksheet into a Word document.
Copy Paste Excel Table as Plain Text in MS Word
If all you want is to copy and paste a table from Excel to Word, you can do that with a simple copy paste.
It allows you to get the static table in Word, where you can then format it (and change it if you want).
The downside of this method is that in case there are any formulas in the data, that won’t work. And since this is static table, any changes you make in Excel will not get reflected in the table you copied to Word.
But in most cases, this is exactly what you want.
Let’s see how to do this.
Suppose you have a dataset as shown below and you want to copy this data from Excel and insert it into Word.

Below are the steps to do this:
- Select the data in Excel that you want to copy to Word
- Right-click and then click on Copy (or use the keyboard shortcut Control + C in Windows or Command + C in Mac)

- Open the Word document where you want to insert this data
- Place the cursor where you want this data in the Word document
- Go to the Home tab in Word and click on Paste (or use the keyboard shortcut Control + V)

The above steps would copy the data from Excel and paste it as a static table in the Word document.

Once you have the table in Word, you can format and work with it just like any other table that you insert in Word.
A couple of things to note when using this method:
- If there are any formulas in the table in Excel, they won’t be copied. In my example, I have the formulas in the Total row, but when copied to Word, these are static values. If you make any changes to any data, you will have to manually adjust the formula values as well
- If you don’t want to get copy the formatting from Excel and would rather want to use the formatting of the Word document, you can use the option Use Destination Style option. It shows up when you click on the Paste Options icon after you have pasted the table in Word.
Embed Excel Table into Word (as a Linked Object)
In the above method, we copied the data from Excel and inserted it as a static table into Word.
Another option that you can use is to copy and paste the table into a Word document and keep the two tables linked.
This way, if you make any changes in the Excel table that you copied, you will see that these are reflected in real-time in the table in Word as well.
This is quite useful when there is a possibility that you may have to update the data in Excel and it would also need to be updated in Word. By having the linked table, you only need to make changes in Excel data and these would automatically get reflected in the table you copied to Word.
Let me show you how this works.
Suppose you have a table as shown below and you want to copy it from Excel to MS Word and keep this linked.
Below are the steps to do this:
- Select the data in Excel that you want to copy to Word
- Right-click and then click on Copy (or use the keyboard shortcut Control + C)
- Open the Word document where you want to insert this data
- Place the cursor where you want this data in the Word document
- Go to the Home tab in Word and click on Paste drop-down (click on the small inverted arrow below the Paste Special icon)

- In the options that show up, click on Paste Special

- In the Paste Special dialog box, select the ‘Paste link’ option

- Select Microsoft Excel Worksheet Object from the listed options

- Click OK
The above steps would insert the copied table in Word, where it’s still linked to the original table in Excel.
Now, if you go and make any changes in the table in Excel, you will see that the same is reflected in the table in Word (in real-time).
If for some reason your data doesn’t update in real-time, right-click on the table and click on the ‘Update Link’ option
Here are some things you need to know about this method:
- Since the two files are linked to each other, you will have to keep these together. If you’re sending the Word file to someone, you will also have to send them the Excel file, or the link would be broken and the data in Word would not update.
- Whenever the Word file opens, it will check for any updates in the Excel table. This works even if the Excel file is closed.
This method is best suited for situations where you have a large Excel file that has a lot of calculations/data/dashboards. By using this method, you can only copy a small part of the Excel file, while still being able to update the table when values change in Excel.
Embed Excel Table into Word
This is a really useful feature that MS Word offers. It allows you to embed an Excel document as a part of the Word document.
In the above method, I showed you how to keep the Excel and Word files together and keep them linked.
In this section, I will show you how to embed the Excel file within the Word document, so you won’t have to keep both the files (and only keep the Word file).
In layman terms, it’s as if you can open and work on an Excel worksheet from within the Word Document.
Let me show you what I mean.
Suppose you have a table in Excel as shown below that you want to copy to Word.
Below are the steps to insert this as an Embedded Excel object in Word:
- Select the data in Excel that you want to copy to Word
- Right-click and then click on Copy (or use the keyboard shortcut Control + C)
- Open the Word document where you want to insert this data
- Place the cursor where you want this data in the Word document
- Go to the Home tab in Word and click on Paste drop-down (click on the small inverted arrow below the Paste Special icon)
- In the options that show up, click on Paste Special
- In the Paste Special dialog box, make sure the ‘Paste’ option is selected

- Select Microsoft Excel Worksheet Object from the listed options

- Click OK
The above steps would insert the copied data from Excel to MS Word.
But what actually happnes in the backend in MS Word is that it creates a new Excel file (which is a part of the Word document itself) and shows you the table from that file.
If you double click on the table, you will notice that it opens the Excel file (from within the Word document). You get to see the familiar Excel interface while still being in the Word document.
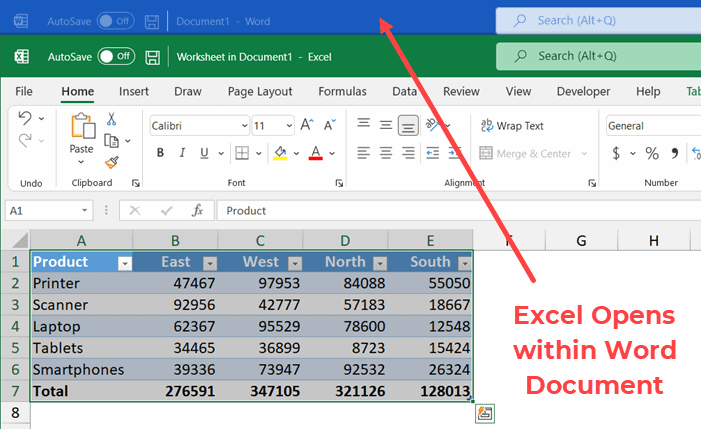
You can make any change and also use functionality such as conditional formatting, and that would be reflected in the table. Also, any formulas you have in place would continue to work.
The biggest benefit of using this method is that you don’t have to worry about two separate files. Unlike the previous method, in this method, the Excel file is a part of the Word document.
So, if you save the Word file or share it with someone else, the Excel file would remain with it and the data would remain intact.
On the downside, if you use multiple such tables or if the data is large, it will lead to a heavy Word document (as it has to also bear the weight of the embedded Excel file).
Copy Excel Table as a Satic Image
If you’re preparing a report and all you want is a really easy way to show some table (without any need to change the data), you can insert that data as an image.
Doing this is really easy and images are also easier to manage in Word (such as placement and resizing).
With copying an images, you also have an option to link the image to the table in Excel. This way, if you make any changes in Excel table, it would be reflected in the table image in Word.
Inserting Copied Table as a Static Image in Word
Suppose you have a table as shown below in Excel:
Below are the steps to copy this table and insert it as an image in MS Word:
- Select the data in Excel that you want to copy to Word
- Right-click and then click on Copy (or use the keyboard shortcut Control + C)
- Open the Word document where you want to insert this data
- Place the cursor where you want this data in the Word document
- Go to the Home tab in Word and click on Paste drop-down (click on the small inverted arrow below the Paste Special icon)
- In the options that show up, click on Paste Special
- In the Paste Special dialog box, make sure the ‘Paste’ option is selected

- Select ‘Picture’ from the listed options

- Click OK
The above steps would insert an image of the table in the Word document.
This is just like any other image and you can resize and format it.
Inserting Copied Table as a Linked Image in Word
If you like the flexibility of managing images in Word, and still want the table to be connected to the original Excel file, you can do that as well.
Suppose you have a table as shown below in Excel:
Below are the steps to copy this table and insert it as a linked image in MS Word:
- Select the table in Excel
- Right-click and then click on Copy (or use the keyboard shortcut Control + C)
- Open the Word document where you want to insert this data
- Place the cursor where you want this data in the Word document
- Go to the Home tab in Word and click on Paste Special
- In the Paste Special dialog box, select the ‘Paste Link’ option

- Select ‘Picture’ from the listed options

- Click OK
The above steps would again give you an image that you can easily resize and format.
But since this is linked to the original table in Excel, if you make any changes in the original table, these would also be reflected in the image.
Also, remember that since this image is linked to the original data, if you plan to share this Word document with someone else, you should also share the Excel File (in case you want the link to remain as is)
In case the excel file is not available or the name is changed, the image would be just like any other regular image.
So these are some of the ways you can use to copy a table for Excel and insert it into Word. In most cases, I prefer copying and pasting Excel tables as images, as these are easier to manage. In some cases, I also prefer the embed method which allows me to open the Excel file from within Word itself.
I hope you found this tutorial useful!
Other Excel tutorials you may also like:
- How to Save Excel Charts as Images (save as PNG, JPG, BMP)
- Microsoft Excel Won’t Open – How to Fix it! (6 Possible Solutions)
- How to Quickly Copy Chart (Graph) Format in Excel
- How to Copy Conditional Formatting to Another Cell in Excel
- How to Copy and Paste Formulas in Excel without Changing Cell References
- Copy and Paste Multiple Cells in Excel (Adjacent & Non-Adjacent)