
I had picture in document somewhere on page 2-3 inserted via MS WORD menu, and I want to crate a hyperlink in next pages to this picture, like for content table item or other place in document.
How to to it for picture?
asked Mar 1, 2014 at 9:11
![]()
Ok, I found it:
MS Word main menu (ribbon) > Insert > Links > Cross-refference
From selected dialog chose «figure» options in «Reference type», chose other options, desired picture and click «Insert» button, then close dialog (or click «Cancel» button).

answered Mar 1, 2014 at 9:30
![]()
ALZALZ
3672 gold badges4 silver badges9 bronze badges
How to insert images in a Microsoft Word document such that any changes made to the original image are auto-updated in the document(s) where these pictures are embedded.
This is a common issue in organizations where documents often contain common graphic elements — examples could include a company’s logo or an organization chart. For instance, if there’s a reshuffle in the company, updating every single Word document that contains the older version of the org chart may take lot of effort.
 Luckily, there’s a simple workaround. In the Insert Picture dialog box, click the down arrow next to the Insert button, and then click either “Link to File” or “Insert and Link”.
Here’s what the different options mean:
Option #1 — Link to File: When you link a picture file from a Word document, Microsoft Word creates a virtual connection with that picture without actually embedding it in the document.
This is very similar to embedding images in an HTML web page. So if you edit the linked picture, the change is reflected immediately in all the Word document(s) that use that picture.
Option #2 — Insert and Link: The drawback with the “Link to File” approach is that if you upload the document onto the web or share it via email, the recipient won’t see any of the pictures as the links have broken.
That’s where this “Insert and Link” command comes in handy. It’s like saying — link to the selected picture in the Word document but, to be on the safer side, also embed a copy of image so that if the original source file cannot be located, the recipients can still see the picture in the document.
Convert Linked Images to Embedded Images
If you are sharing documents externally, the “Insert and Link” approach should be preferred over “Link to File”.
However, if there’s a Word document that contains only linked images and you want to upload it to Google Docs, the first thing you need to do is convert these “linked” pictures into embedded graphic. To do so, click the Office button and select Prepare -> Edit Links to Files. Now you can easily save linked pictures in the document itself.

Bonus Tip: If you like to save all these embedded images out of the documents, just save your Word document as an HTML web page — this is similar to extracting pictures from PowerPoint slideshows.
Today and next week we have guest posts from Catherine Fitzsimons on placing images in Word documents. This is a tricky topic and one I’ve been wanting to write about for ages: Catherine does a lot of work with newsletters and other complex documents, which makes her the ideal person to write these posts for me!
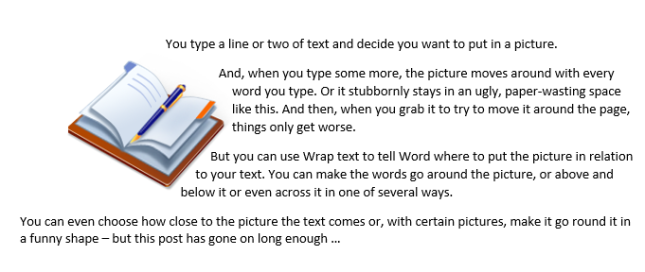
How do I combine text and pictures?
Have you ever tried to put a picture in Word and found your text, which started at the top of the page, suddenly moves down? And then, as you type more, or change the size of the picture* to make it fit better, things move to unexpected places? Or the picture stays where it is, but leaves you lots of blank space on the page? Then, when you try to move it around, things only get worse and you end up with something like this:

This is because Word assumes two things:
- That you want the picture (or, to be precise, the bottom left of it) to be placed where the cursor is. That means it goes immediately after the last thing you typed before choosing Insert|Picture and, when you try to move it, you can see a vertical line where it believes you want it to go.
- That you would like the text to run right up to the picture and carry on straight after it.
In other words Word treats your picture like an outsize character and refers to this option as having the picture ‘In Line with Text’.
However, you can change your picture to what is known as a ‘floating figure’ so you can put it where you like but, before we delve into all that, have a look at a handy shortcut in the ribbon versions of Word. If you select your picture, go to the Picture Tools|Format ribbon that appears and click the down arrow by Position, you will get a choice of nine places to place your picture without any fiddling around at all.

In fact, in Word 2013 some of these appear in a little pop-up menu that you can call up by clicking the thing that looks like a rainbow drawn on lined paper which hovers at the top right of a picture when you select it.

All wonderful, but what if you need more flexibility? Read on.
Once again, select the picture and go to the Picture Tools|Format ribbon but this time click the down arrow by Wrap Text. (Alternatively, or in older versions of Word, right click on the picture and choose Wrap Text from the menu that appears.)

Doing that brings up another menu which lets you choose the relationship between your text and picture. The icons helpfully explain the options:
Square means that the text will wrap all the way around your picture (strictly speaking around the ‘bounding box’ – the rectangle that appears when you select it). When you move the picture around the page the text flows above, below and to the sides – or one side if you put your picture up against a margin. Notice, though, that it doesn’t make text down the sides into columns – it reads across the picture. (If you want your picture in the middle of a page like this, it’s probably best to make your text into two columns first.)

Top and Bottom does exactly that. It looks just the same as if you had typed Enter before and after inserting your picture but with the important difference that the picture moves as an object, not a character, so it’s easy to place it somewhere new.
Tight only works with images which are not rectangular or, like some clip-art, have a transparent background. It wraps the text around the edges of the image (assuming these ‘wrap points’ have been defined) rather than around the bounding box.
 Through is a complicated one and I don’t know anyone who has used it. It works the same way as Tight except that it will also put words right down into any transparent sections of the picture that are linked to the background, again, providing that the wrap points have been set up properly.
Behind Text makes the words go over the top of your picture (which can work well so long as the image isn’t too detailed or too similar in colour to the font), whereas In Front of Text means that non-transparent parts of your image obliterate the words. Why might you want to do that? If you insert a an ellipse that has Shape Fill as ‘No Fill’ and Shape Outline red, and float it in front of text then you have a useful little shape for circling things you want to highlight.
 You can refine Square, Tight and Through further in Picture Tools|Format|Wrap Text|More Layout Options. As you can see, you can tell Word to put text on one side of the picture only – Left, Right or whichever has the most space for text. This is also the window you use if you want to make your text squish up closer to your picture — if it already has a lot of white space around it for example — or back off a bit if the words run right to the edge of your picture. Unsurprisingly, you can also adjust the spacing above and below for Top and Bottom wrapping.
 This version has text wrapped Tight to largest side only and the Distance from text adjusted to 0cm on Left and Right as well as top and bottom.
 So, that’s the official way to put the pictures into the correct place in your document. And, more often than not, it works. However if you are adding more than one image, or later add a text box or table (anything that Word calls an ‘object’), or if you revise what you have written then pictures you’ve put in sometimes jump around or even disappear. You can minimise the chances of that happening by typing all your text before thinking about layout and images but, even then, it still sometimes happens. I’ll explain why, and suggest how to stop it next week.
*But how do I change the size of a picture? See How do I change the size of a picture in Word? on my own blog.
Catherine Fitzsimons has the unenviable job of being my own editor for my books on business and other careers topics. Ever since she first started using Word she has been finding ways of getting pictures and text to sit together exactly the way she wants: first as a teacher making worksheets then doing layout for community magazines.
Other useful posts
On this blog:
How do I stop pictures jumping around in a Word document?
On Catherine’s blog:
How do I organise a lot of pictures on a page?
How do I change the size of a picture in Word?
Download PC Repair Tool to quickly find & fix Windows errors automatically
If you want to overlay multiple pictures or put one image on top of another image in a Word document, then this tutorial will help you. No third-party add-in is required since the in-built options in Microsoft Word does the job pretty well.
Let’s assume that you have two pictures, and you have to place one image on the top of another one for some reason. It is very straightforward if you are using image editing software on your PC. However, Word can do it as well.
To overlay multiple pictures in a Word document, follow these steps-
- Go to the Insert tab.
- Select the Pictures option and choose an image source.
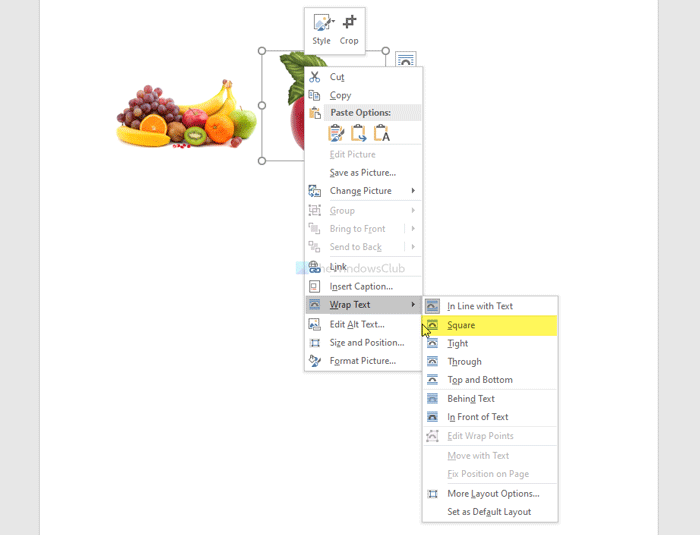
- Right-click on both pictures > Wrap Text > Square.
- Click on one image and drag it on top of another.
Let’s check out these steps in detail.
At first, you will have to insert the pictures that you want to use. If you already know the process, skip this step. Otherwise, go to the Insert tab and click on the Pictures option.
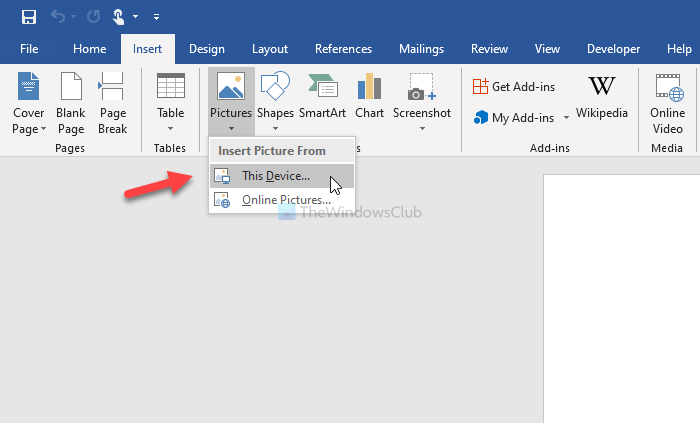
Then, you will have to select the image source. It can be This Device or Online Pictures. If you choose the Online Pictures option, you can search for an image in Bing and insert it from there. Otherwise, if you already have the desired pictures on your computer, you can select the first option.
After inserting both pictures, right-click on each of them, and select Wrap Text > Square.
Now you can drag one image on top of another.

It is possible to resize the image, remove the background, choose borders, effects, layout, etc. You can send an image forward or backward as well. Let’s assume that your desired image is not coming on top of another as it is placed in the background. In that case, select the image > go to the Format tab > select Bring Forward option > choose the Bring Forward option.
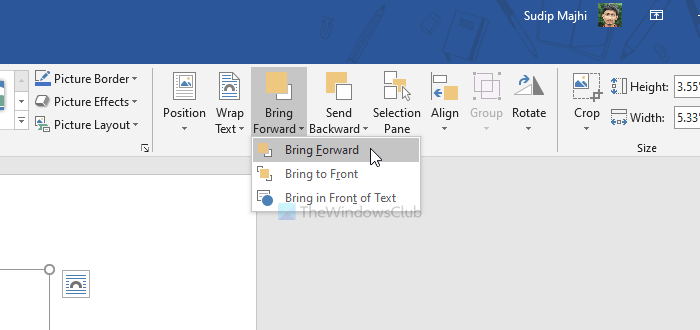
If you have multiple images, you will have to choose the Bring to Front option instead of Bring Forward.
The same thing is available when you want to send one image to the back as well. In that case, you will have to use the Send Backward or Send to Back option.
Hope this guide helps you.

When he is not writing about Microsoft Windows or Office, Sudip likes to work with Photoshop. He has managed the front end and back end of many websites over the years. He is currently pursuing his Bachelor’s degree.
Links to Web pages are everywhere, and most popular document editing tools include a way for you to add links to your creations. Microsoft Word 2013 is no different, and you may have even added text links to a document before.
But you can also add a link to an image if you find that you need this functionality. Whether the link is there to provide credit to the creator of the image, or to offer your document reader additional information about a topic, the ability to point them to another location can be very helpful. Our short how-to guide below will show you the steps needed in order to add a link to an image.
Hyperlink a Picture in Word 2013
The steps in this article will require you to know the Web address (URL) of the page to which you want your image to link. People will then be able to click the picture in your document and open that link in their default Web browser.
These steps assume that you already have a picture in your document to which you want to add the link. If you do not, then this article will show you how to add a picture to your document.
Step 1: Open the document containing the image to which you want to add a link.
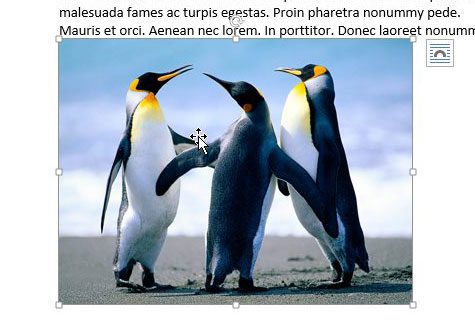
Step 2: Click the image to select it.
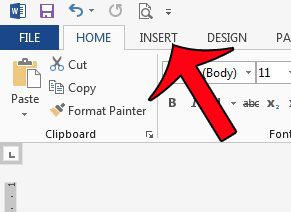
Step 3: Click the Insert tab at the top of the window.
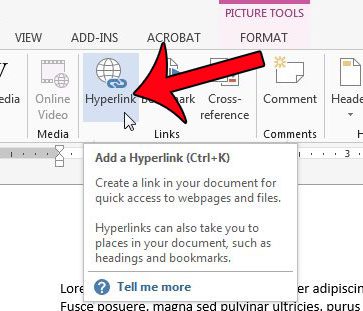
Step 4: Click the Hyperlink button in the Links section of the navigational ribbon at the top of the window.
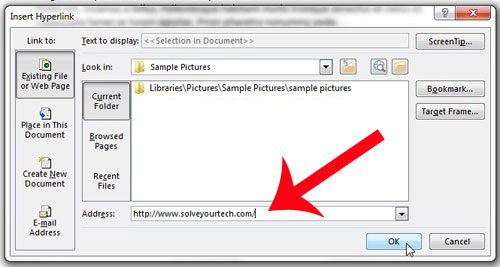
Step 5: Type the URL for the link into the Address field at the bottom of the window. Note that you can also copy and paste a link from a different location (such as an open Web browser tab) if you do not know or do not want to type the address yourself. The steps in this article will help if you are having difficulty copying and pasting a link from an open Web page. Click the OK button once the address has been entered.
Click in another location in the document so that the image is no longer selected, then you can hover over the image to see the link. If you hold down the Ctrl key on your keyboard and click the image, you will be taken to the Web page.
An alternative way to add a link would be to right-click the image, then click the Hyperlink option.

You can use a similar method to add a link to a picture in Excel 2013.

Matthew Burleigh has been writing tech tutorials since 2008. His writing has appeared on dozens of different websites and been read over 50 million times.
After receiving his Bachelor’s and Master’s degrees in Computer Science he spent several years working in IT management for small businesses. However, he now works full time writing content online and creating websites.
His main writing topics include iPhones, Microsoft Office, Google Apps, Android, and Photoshop, but he has also written about many other tech topics as well.
Read his full bio here.