
When you insert content as an object, you create a dynamic link between the content that you insert and the content that was created in another Microsoft Office program. Unlike when you paste content (such as by pressing CTRL+V), when you insert it as a linked or embedded object, you can work with it in the original program.
For example, if you insert worksheet cells into the document as an Excel object, Microsoft Office Word runs Excel when you double-click the cells, and you can use Excel commands to work with the worksheet content.
Understand the differences between linked objects and embedded objects
The main differences between linked objects and embedded objects are where the data is stored and how you update the data after you place it in the Word file.
You place either a link to the object or a copy of the object in the document. You can insert objects this way from any program that supports the technology of linking and embedding objects (object linking and embedding, or OLE).
For example, a monthly status report may contain information that is separately maintained in an Excel worksheet. If you link the report to the worksheet, the data in the report can be updated whenever the source file is updated. If you embed the worksheet in the report, your report contains a static copy of the data.
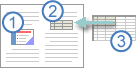
1. Embedded object
2. Linked object
3. Source file
Linked objects
When an object is linked, information can be updated if the source file is modified. Linked data is stored in the source file. The Word file, or destination file, stores only the location of the source file, and it displays a representation of the linked data. Use linked objects if file size is a consideration.
Linking is also useful when you want to include information that is maintained independently, such as data collected by a different department, and when you need to keep that information up-to-date in a Word document.
Embedded objects
When you embed an Excel object, information in the Word file doesn’t change if you modify the source Excel file. Embedded objects become part of the Word file and, after they are inserted, they are no longer part of the source file.
Because the information is totally contained in one Word document, embedding is useful when you don’t want the information to reflect changes in the source file, or when you don’t want the document recipients to be concerned with updating the linked information.
Need more help?
Want more options?
Explore subscription benefits, browse training courses, learn how to secure your device, and more.
Communities help you ask and answer questions, give feedback, and hear from experts with rich knowledge.
Word allows you to insert other files with data and functionality from another document or program directly into your Word document.
Microsoft calls these additions ‘Objects’ which makes it sound overly technical and difficult but it’s not. Don’t get fazed by all the nerd talk about ‘objects’, that’s programmer speak that’s leaked out into the real world.
Whenever you see the word ‘Object’ think ‘Another file’.
Objects are just other files or sometimes, parts of other files. Word or text files, graphs, Excel worksheets, PDF’s, PowerPoint files or a lot more.
You can either create a new object within your Word document or insert an existing file. You can also choose to either embed or link the object.
Embedding
Embedding an object just takes a snapshot or copy of the file at the time you embedded it. If you later change the original file, the changes are not reflected in your document.
- Use this to keep a copy of the file at a particular time like end of financial year or when contract is finalized.
- Embedding can also hide files and documents from prying eyes, that’s explained in our ebook Beating Bots, Spies and Cock-ups.
Linking
Linking an object creates a live link to the original file. If you make changes to the original file, the changes will appear in the object in your Word document. See Putting Excel into Word
To insert an object in Word, go to Insert | Object.

Insert all the Text from Another File
If you have another text document, such as another Word file, plain text file, or even a PDF file, you can easily insert all of the text from that file into your document.
To do this, select the Text from File option.

The Insert File dialog will open for you to navigate to the file that you want to insert.
NOTES:
- The content will be inserted along with all its formatting from the source file. If the original is a large, complex document, this may take some time.
- If you select a PDF document, Word will do the best it can to convert it into Word, along with all its formatting. It may not look exactly like the original file, especially if the source file contains a lot of graphics. Very complex PDF files may take excessive time or may not be able to be imported.
Insert a New Object
To insert any other kind of object other than a text file, select the Object option.

The Object dialog will open with the Create New tab selected by default. You will see that there is an extensive list of object types available to choose from. In this example we will choose to insert a new Excel worksheet in the document.

An Excel worksheet will appear in the document, and the Excel ribbon and tools will appear above it, just as if you are working in an Excel file.

You can now drag the edges to show as much of the worksheet as you wish, enter whatever data, and perform whatever functions you wish within the worksheet.
When you’re done, click anywhere outside the object, and the Excel ribbon will disappear, but the worksheet will still appear as a table in your document. You can then double-click within the object to enter and edit it again.
NOTES:
- When you insert a new object in this way, you can click within the object any time to edit it.
- If the Excel worksheet contains more data than fits in the visible window in your document, the part that you have visible when you click out of the object is what will appear in your document when you click out of the object.
Embed an Existing Object
To insert an existing object in your document, click the Create from File tab in the Object dialog and browse to the file you want to insert.

A section of the file will appear in the document, and the reader can double-click on it to open it and view the whole file. The part of the file that displays in the document varies depending on the type of file:
- A PowerPoint presentation will show the first slide only. Double-clicking will allow the reader to click through the whole presentation.
- An Excel file with multiple worksheets will display the worksheet that was open the last time the file was saved. Double-clicking will give access to all worksheets.
- A PDF file will display the first page of the document. (Unlike the Insert Text from File option, with this method the inserted object will still be a PDF file, not converted to Word.)

PowerPoint presentation embedded in a Word document
An Excel worksheet embedded in a Word document
For more see Putting Excel into Word
NOTES:
- An embedded object is just a snapshot of the file at the time you embedded it. It no longer has any link to the original file, and any subsequent changes made to the original will have no effect on the object in your document.
- If the object is an editable file, such as an Excel file, you can edit it after you have inserted it. Double-click on the object, and the interface of the original application will open within your document, just as described above for inserting a new object.
Link an Existing Object
To embed an object and maintain a live link between it and the original file, again, select the Create from File tab in the Object dialog, but this time also click the “Link to file” box.
The object will appear in the document just like an embedded object, but with one big difference. In this case, if any changes are made to the original file, those changes will be reflected in the object in your document. You also will not be able to edit the object in the document – double-clicking on, for example, an Excel object will open the original Excel document in a separate window.
Refreshing the Link
Sometimes a change to the original file will not immediately appear in the object in your document. To ensure that you are looking at the latest information, right-click on the object and select Update Link.

Displaying an Icon Instead of the Object
There is one more choice in the Object dialog that we have not touched on yet. Whether you are inserting a new object, or embedding or linking an existing object, you have the option to just display an icon in your document rather then the object itself. The reader or editor can then click on the icon to open the file to view or edit it.

By default, the icon for the program the file is created in will show, but you can click Change Icon and choose your own icon file to use instead. The Change Icon button also allows you to edit the caption that appears under the icon in your document.

Inserted objects displayed as icons
While inserting a file (such as Word, Excel, PowerPoint, PDF, image, etc.) as an object into a Word document, you can either create a new or use an existing file.
Create a new file and insert as an object
1. Place the mouse cursor where you want to create the object.
2. From the Ribbon, under the tab Insert, within the group Text, click Object. The object dialog box appears.
3. Select an object to create from the Object Type list.
4. Select the Display as icon check box.
5. Word creates an icon of the selected Program at the cursor position and opens the program to create a new file.
For example, if you select object type as “Microsoft Office Excel Worksheet”, an Excel icon is created at the cursor position and then Word opens the Excel program to create a new Excel document.

Insert an existing file as an object
1. You can insert an existing file into your document in two different ways: either embed the file or link the file.
2. Place your mouse cursor where you want to create the object
3. From the Ribbon, under the tab Insert, within the group Text, click Object. The object dialog box appears.
4. From the dialog box, click Create from File.
5. Click the Browse button to locate the file in your system.
6. Select the Display as icon check box.
7. The object icon is created at the cursor position. This way you can embed a file into your document.
8. If you want to link the file, also select the Link to File check box.
Difference between embedding and linking an existing file
If you want to update an embedded file, you have to double-click the object to open the file and then edit. Updating the source file will not update the embedded file.
However, if you are linking an existing file, then changes in the source file will be reflected in the linked file.

About wordknowhowhttp://wordknowhow.comThis blog site was started to help people with Microsoft Word. I use Word a lot at work, and I understand that some features are difficult to use. There were no simplified instructions online to help me use these features. It is for this reason that this site exists; to make your life easier with Word.
Feel free to post your comments, queries, suggestions, etc. I will do my best to help you!
3 4
Word provides two different ways for you to bring linked objects into your documents. You can use the Insert Object dialog box to place an existing object in your document, and you can use the Paste Special command to use the basic copy-and-paste procedure to establish and maintain a link with the source file.
Inserting a Linked Object
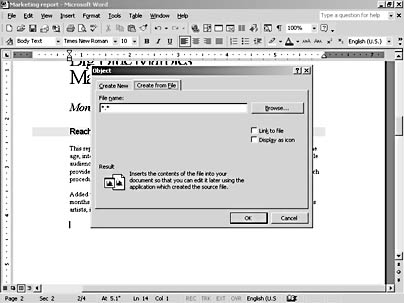
Suppose you have a great new banner ad design that you want to incorporate in the document you’re preparing for a client. Although the banner ad isn’t quite finished, you want to show the client how the ideas are developing in the presentation. You decide to add the entire presentation to your document as a link in the report.
To insert the object and create a link to the source file, follow these steps:
- Place the insertion point where you want to include the object.
- Choose Insert, Object. The Object dialog box appears.
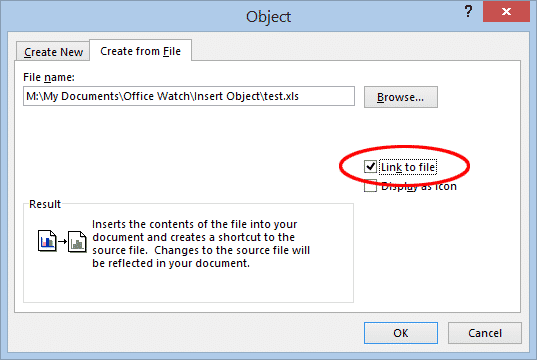
- Click the Create From File tab (see Figure 15-1). Here you can enter the name for the file you want to insert and choose whether to link or embed the file.

Figure 15-1. The Object dialog box gives you the means to link or embed objects.
- Click Browse. The Browse dialog box is displayed. Navigate to the folder in which the file you want to link is stored, select the file, and click Insert. You are returned to the Object dialog box.
- Select the Link To File check box. This tells Word to establish the link to the source.
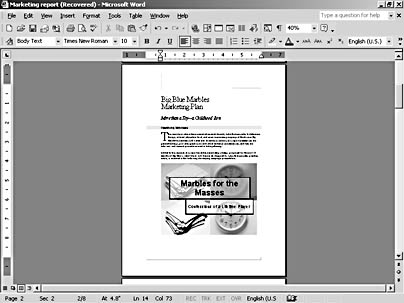
- Click OK. The object is inserted, as Figure 15-2 shows.
Figure 15-2. The object is placed at the insertion point.
Tip — Run a Presentation
If your linked object is a PowerPoint presentation, run the presentation by double-clicking it. You won’t be able to edit the presentation, however, without opening the source file.
Troubleshooting
The Linked Object Is Missing
So after you go through the steps to insert a linked object, it starts to appear in your file and then—nothing. Just an outline, no object. What’s going on?
If you have enabled Picture Placeholders in the Options dialog box, Word is saving memory and screen update time by showing only the outline of the object. You can fix this by choosing Tools, Options and clearing the Picture Placeholders check box on the View tab.
Tip — Create Objects with Create New
The process of embedding uses the Create New tab in the Object dialog box. Embedding an object enables you to include in your document objects you have created in other programs, and it also lets you actually create the objects from scratch while you are working with Word. When you use the items in the Create New tab to create an embedded object, Word launches the program you used to create the object; and then after you save and close the other program, you are returned to Word, and the object is embedded in your current document.
Adding Linked Objects with Paste Special
Another way to add a linked object in your document is to use Paste Special. This command (available from the Edit menu) copies and pastes not only the data but also a link to the source file. Start in the Word document to which you want to add the linked object, and then follow these steps:
- Position the insertion point where you want to add the object.
- Launch the program in which you have created the object to be linked. Select the section or object, and copy the item to the Clipboard.
- Return to Word, and choose Edit, Paste Special. The Paste Special dialog box appears. (For an example of the Paste Special dialog box, see Figure 15-5.)
- Click the Paste Link option, select the object type in the As list box, and click OK. Word adds the data and the link to your document. Note: The Paste Link option is available only for objects you’ve created in programs that support linking.
Tip
When you want to review the links in your current document, choose Edit, Links to display the Links dialog box.
Changing Linked Objects
Any editing you do on a linked object actually takes place in the source file. You can edit a linked object in several different ways:
- You can double-click the object to launch the source program.
- You can click the object, choose Edit, Linked Object, and click Edit Link.
- You can right-click the object to display the shortcut menu. You can then click Linked Object and select Edit Link (see Figure 15-3). This takes you to the source file so that you can make changes as needed.
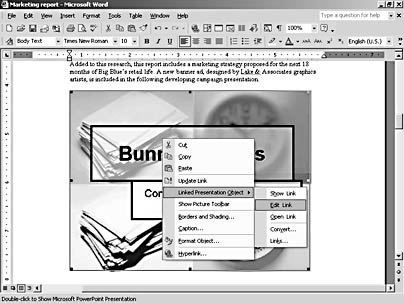
Figure 15-3. You can modify a linked object and update the changes.
To modify the source object directly, make your changes in the originating program. Save and close the object as you would normally.
When you return to the linked document, select the linked object and choose Edit, Update Link (or press F9). Depending on how you’ve set up your options for updates, the destination file might be updated as soon as you return to it or it might be delayed until you manually choose an update.
For more information on controlling the update of linked objects, see the section «Updating Links.»
Working with Links
The only tricky part to working with linked objects in your documents is that managing a variety of links can be confusing and a drain on your system’s resources. For this reason, Word pulls link management together in one place—the Links dialog box. To display this box, choose Edit, Links (see Figure 15-4).
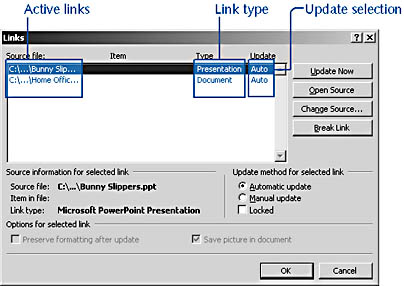
Figure 15-4. The Links dialog box gives you the means to review, change, update, and remove links to objects you’ve inserted in your document.
Reviewing Links
In the Source File section of the Links dialog box, you see a list of the currently active links in your document. You can scroll through the list to determine the following:
- The source file for the object
- The type of object that’s linked
- The type of update assigned to the object
Using the various options in the Links dialog box, you can change the update method of the link, check the source file, modify the location of the source file, and review information about the link. You can also lock the link or break it to protect the destination document from any further changes.
Tip — Update Now
It’s possible for you to have some links in the Source File list in the Links dialog box that show Auto updates and others that show Manual updates. You can force the update of a Manual link by selecting it in the Source File list and clicking Update Now.
Updating Links
By default, Word updates any links in your document. Each time you open the file, Word checks whether any links have changed—a process that can take a few minutes if you’ve added many links to your current document. Similarly, when you make a change to the source file and the destination file happens to be open, Word updates the destination file if you’ve got the updating options set to update automatically.
Manually Updating Links
Word gives you the option of updating links automatically or manually. Automatic is nice—you don’t have to worry about it—unless sharing files is an issue and you want to limit others’ ability to change or modify the linked document by editing the source. When you want to set a link in your document to be manually updated, follow these steps:
- Choose Edit, Links. The Links dialog box appears.
- Select the linked object in the Source File list.
- In the Update Method For Selected Link section, click the Manual Update option.
- Click OK. The object will be updated only when you choose Update Link from the Edit menu or press F9.
Locking a Link
When you get an object just the way you want it—your PowerPoint presentation is finished, for example, or that logo has finally been approved—you can protect the destination from further changes by locking the link. When you lock a link, it will no longer be updated, even if the source file is modified.
To lock a link, display the Links dialog box, select the linked object in the Source File list, and select the Locked check box in the Update Method For Selected Link section. You can unlock a link later if you choose by repeating the first two steps and clearing the Locked check box.
Troubleshooting
My Changes Are Lost
If Word crashes and then AutoRecover restores your document, you might find that your linked object has lost its most recent changes and is appearing as an outline instead of a fully displayed object. To fix these problems, save the document, click the object, and choose Tools, Options. Clear the Picture Placeholders check box on the View tab, and click OK to close the dialog box. Then, with the object still selected, press F9 to force a manual update. Word compares the object against the source file and updates any missing changes.
Going to the Source
When you want to look at the source file for your document, you can use the Open Source button in the Links dialog box to get to it. Simply select the link in the Source File list and click Open Source. The source program is opened and the file is displayed.
Tip — Edit Your Slide Show
If your source’s native application is PowerPoint, Open Source will run a slide show rather than displaying editing mode for the presentation. To launch PowerPoint so that you can make changes in the file, right-click the object in your Word document and choose either Edit Link or Open Link. The PowerPoint work area will be displayed with the first slide shown in Slide view.
Changing the Source
When you want to move a source file, the linked document needs to know a move has taken place. To tell Word the source has moved, choose Edit, Links and, with the link selected, click Change Source in the Links dialog box. The Change Source dialog box appears. Navigate to the folder where the source file is now located, click the file, and click Open. Click OK to close the Links dialog box.
Breaking Links
After you have a file in its finished state, you might want to break a link to keep the object from future modifications. To break the link of a selected object, follow these steps:
- Display the Links dialog box by choosing Edit, Links.
- In the Source File list, select the link you want to break.
- Click Break Link. Word displays a message box asking you to confirm that you want to proceed with the operation.
- Click Yes to break the link. The link is removed from the list, although the object remains in your document. Any further changes to the source file will not affect your document.
- Click Close to close the Links dialog box.
Note
If you want to re-establish the link you just broke, you can press Ctrl+Z or select Undo to re-establish the link.
Linking Considerations for Shared Files
As you can see, managing the links for your documents could be a fairly complicated process, especially if you create a number of links to each document and choose to have some updated automatically and others updated manually. Reviewing your links regularly, as well as keeping a list of active links for current files, is a way to ensure that an important source file doesn’t disappear 15 minutes before a major meeting.
If your document is linked to a source file on a network server, you run the risk that the document might be changed, moved, or deleted by another user. Although Word looks for the missing file, there’s no guarantee it will find it. Make sure that you keep active backups of important files and that you review your links often.
Another network consideration: If your source file is stored in a shared directory, it’s possible that another user can access your file and make a change without your knowledge. This is fine if the change makes things better, but what if the change introduces an error you miss? To control the access to the file, you can choose to manually update the link when you add the linked object.
Troubleshooting
The Source File Has Moved
If you get an error when you try to edit a linked or embedded object, check to see whether the source file has been moved. To do this, click the linked object, choose Edit, Links. Use the Change Source button in the Links dialog box to reconnect the links.
When you insert content as an object, you create a dynamic link between the content that you insert and the content that was created in another Microsoft Office program. Unlike when you paste content (such as by pressing CTRL+V), when you insert it as a linked or embedded object, you can work with it in the original program.
For example, if you insert worksheet cells into the document as an Excel object, Microsoft Office Word runs Excel when you double-click the cells, and you can use Excel commands to work with the worksheet content.
Understand the differences between linked objects and embedded objects
The main differences between linked objects and embedded objects are where the data is stored and how you update the data after you place it in the Word file.
You place either a link to the object or a copy of the object in the document. You can insert objects this way from any program that supports the technology of linking and embedding objects (object linking and embedding, or OLE).
For example, a monthly status report may contain information that is separately maintained in an Excel worksheet. If you link the report to the worksheet, the data in the report can be updated whenever the source file is updated. If you embed the worksheet in the report, your report contains a static copy of the data.
1. Embedded object
2. Linked object
3. Source file
Linked objects
When an object is linked, information can be updated if the source file is modified. Linked data is stored in the source file. The Word file, or destination file, stores only the location of the source file, and it displays a representation of the linked data. Use linked objects if file size is a consideration.
Linking is also useful when you want to include information that is maintained independently, such as data collected by a different department, and when you need to keep that information up-to-date in a Word document.
Embedded objects
When you embed an Excel object, information in the Word file doesn’t change if you modify the source Excel file. Embedded objects become part of the Word file and, after they are inserted, they are no longer part of the source file.
Because the information is totally contained in one Word document, embedding is useful when you don’t want the information to reflect changes in the source file, or when you don’t want the document recipients to be concerned with updating the linked information.