
Word for Microsoft 365 Word 2021 Word 2019 Word 2016 Accounting 2007 More…Less
If you have an object in one file that you’d like to put into another, such as a doc or a dynamic chart, embed or link to it.
Link or Embed a file
To insert a copy of your file into another, embed or link to it.
-
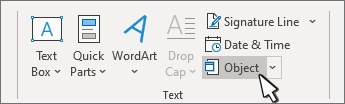
Go to Insert > Object.

-
Select Create from File.
-
Select Browse and choose the file you want to use.
-
Select Insert.
-
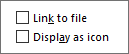
Choose Display as icon to embed, or Link to file for a link.
-
Select OK

Need more help?
What to Know
- Highlight text or image > right-click text and select Link or Hyperlink > choose destination and enter info > OK.
- Next, select Existing File or Web Page and enter URL to link outside of document.
- Select Place in This Document > select location to link inside of document.
This article explains how to insert or remove a hyperlink in a Word document using Microsoft 365, Word 2019, Word 2016, Word 2013, Word 2010, and Word Starter 2010.
Insert and Remove a Hyperlink in Word
To add and delete hyperlinks in a Word document:
-
Highlight the text or image that you want to link.
-
Right-click the text and choose Link or Hyperlink (depending on the version of Microsoft Word).
-
Select the type of destination you want to link to, then fill in the appropriate information.
- Choose Existing File or Web Page, go to the Address text box, then enter a URL.
- Choose Place in This Document, then select a location within the document.
- Choose Create New Document, go to the Name of new document text box, then enter the name of a new document. If needed, in the Full path section, select Change to change the document folder. In the When to edit section, choose whether you want to edit the document now or later.
- Choose E-mail Address, go to the E-mail Address text box, then enter the email address you want readers to send email to. In the Subject text box, type the subject.
-
Select OK.
-
The text now shows up as a hyperlink in the document.
-
To remove a hyperlink, right-click the link text, then choose Remove Hyperlink.
Use the Right Kind of Hyperlink
There are different kinds of hyperlinks. Choose the one that points your readers to the most helpful information to supplement your document.
Existing File or Web Page Hyperlinks
When you choose this option, the hyperlink opens a website or file. For example, if you’re writing an article about your camping trip to Rocky Mountain National Park, provide a hyperlink to the appropriate section of the National Park Service so readers can quickly find the information they need to plan a similar trip.
Another use might be if you wrote an article about the National Park Service and the document is available to your readers, link to the Word file you created. When the reader selects the hyperlink, that file opens.
Place in This Document Hyperlinks
Another type of hyperlink jumps to a different place in the same document upon selection. Often called an anchor link, this type of link doesn’t take the reader away from the document.
When a document is long and includes sections or chapters that are formatted as headings, create a table of contents at the beginning of the document. Include hyperlinks in the table of contents so that readers can jump to a particular heading.
You could also use this type of hyperlink at the end of each section to return to the top of the document.
Create a New Document Hyperlink
A hyperlink can create a new document when selected. When adding this type of hyperlink, choose whether to make the document at the time you create the link or later. If you choose to make the new document when you create the hyperlink, a new document opens, which you can edit and save. After that, the hyperlink points to that document, exactly like the Existing File or Web Page option.
If you choose to make the document later, you’re prompted to create the new document when you select the hyperlink after the hyperlink has been created. This type of hyperlink is useful if you want to link new content to the current document but don’t want to create the new content yet. Instead, provide the hyperlink to it so you’ll remember to work on the document later. When you do create the document, it will be linked in the main document.
Email Address Hyperlinks
The last type of hyperlink you can make in Microsoft Word is one that points to an email address so that, when selected, the default email client opens and begins composing the message using the information from the hyperlink.
Choose a subject for the email and more than one email address that the message should be sent to. This information is pre-filled for readers when they select the hyperlink but they can change this information before they send the message.
This type of hyperlink is useful for situations when you want readers to contact you to set up a meeting or request additional information.
About Linking in a Word Document
A hyperlink in a Microsoft Word document enables readers to jump from the link to a different place in the document, to a different file or website, or to a new email message. In Word documents, hyperlink text is a different color than other text and is underlined. When you hover over a hyperlink, a preview shows where the link goes. When you select the link, you’re directed to the other content.
Thanks for letting us know!
Get the Latest Tech News Delivered Every Day
Subscribe
Word allows you to insert other files with data and functionality from another document or program directly into your Word document.
Microsoft calls these additions ‘Objects’ which makes it sound overly technical and difficult but it’s not. Don’t get fazed by all the nerd talk about ‘objects’, that’s programmer speak that’s leaked out into the real world.
Whenever you see the word ‘Object’ think ‘Another file’.
Objects are just other files or sometimes, parts of other files. Word or text files, graphs, Excel worksheets, PDF’s, PowerPoint files or a lot more.
You can either create a new object within your Word document or insert an existing file. You can also choose to either embed or link the object.
Embedding
Embedding an object just takes a snapshot or copy of the file at the time you embedded it. If you later change the original file, the changes are not reflected in your document.
- Use this to keep a copy of the file at a particular time like end of financial year or when contract is finalized.
- Embedding can also hide files and documents from prying eyes, that’s explained in our ebook Beating Bots, Spies and Cock-ups.
Linking
Linking an object creates a live link to the original file. If you make changes to the original file, the changes will appear in the object in your Word document. See Putting Excel into Word
To insert an object in Word, go to Insert | Object.

Insert all the Text from Another File
If you have another text document, such as another Word file, plain text file, or even a PDF file, you can easily insert all of the text from that file into your document.
To do this, select the Text from File option.

The Insert File dialog will open for you to navigate to the file that you want to insert.
NOTES:
- The content will be inserted along with all its formatting from the source file. If the original is a large, complex document, this may take some time.
- If you select a PDF document, Word will do the best it can to convert it into Word, along with all its formatting. It may not look exactly like the original file, especially if the source file contains a lot of graphics. Very complex PDF files may take excessive time or may not be able to be imported.
Insert a New Object
To insert any other kind of object other than a text file, select the Object option.

The Object dialog will open with the Create New tab selected by default. You will see that there is an extensive list of object types available to choose from. In this example we will choose to insert a new Excel worksheet in the document.

An Excel worksheet will appear in the document, and the Excel ribbon and tools will appear above it, just as if you are working in an Excel file.

You can now drag the edges to show as much of the worksheet as you wish, enter whatever data, and perform whatever functions you wish within the worksheet.
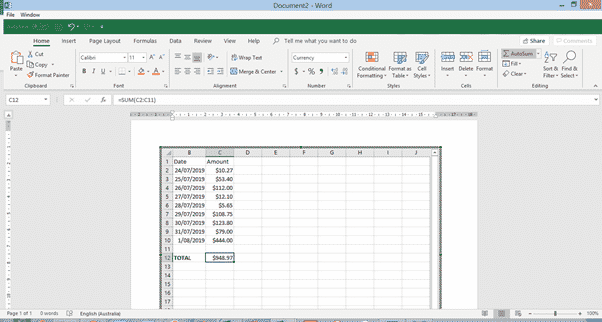
When you’re done, click anywhere outside the object, and the Excel ribbon will disappear, but the worksheet will still appear as a table in your document. You can then double-click within the object to enter and edit it again.
NOTES:
- When you insert a new object in this way, you can click within the object any time to edit it.
- If the Excel worksheet contains more data than fits in the visible window in your document, the part that you have visible when you click out of the object is what will appear in your document when you click out of the object.
Embed an Existing Object
To insert an existing object in your document, click the Create from File tab in the Object dialog and browse to the file you want to insert.

A section of the file will appear in the document, and the reader can double-click on it to open it and view the whole file. The part of the file that displays in the document varies depending on the type of file:
- A PowerPoint presentation will show the first slide only. Double-clicking will allow the reader to click through the whole presentation.
- An Excel file with multiple worksheets will display the worksheet that was open the last time the file was saved. Double-clicking will give access to all worksheets.
- A PDF file will display the first page of the document. (Unlike the Insert Text from File option, with this method the inserted object will still be a PDF file, not converted to Word.)

PowerPoint presentation embedded in a Word document
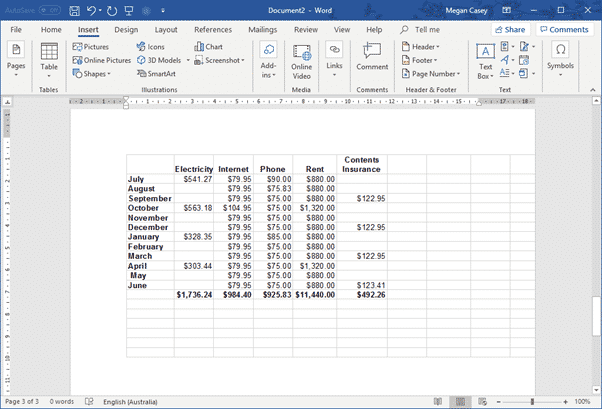
An Excel worksheet embedded in a Word document
For more see Putting Excel into Word
NOTES:
- An embedded object is just a snapshot of the file at the time you embedded it. It no longer has any link to the original file, and any subsequent changes made to the original will have no effect on the object in your document.
- If the object is an editable file, such as an Excel file, you can edit it after you have inserted it. Double-click on the object, and the interface of the original application will open within your document, just as described above for inserting a new object.
Link an Existing Object
To embed an object and maintain a live link between it and the original file, again, select the Create from File tab in the Object dialog, but this time also click the “Link to file” box.
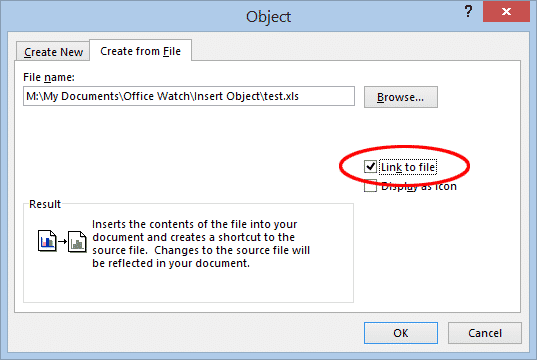
The object will appear in the document just like an embedded object, but with one big difference. In this case, if any changes are made to the original file, those changes will be reflected in the object in your document. You also will not be able to edit the object in the document – double-clicking on, for example, an Excel object will open the original Excel document in a separate window.
Refreshing the Link
Sometimes a change to the original file will not immediately appear in the object in your document. To ensure that you are looking at the latest information, right-click on the object and select Update Link.

Displaying an Icon Instead of the Object
There is one more choice in the Object dialog that we have not touched on yet. Whether you are inserting a new object, or embedding or linking an existing object, you have the option to just display an icon in your document rather then the object itself. The reader or editor can then click on the icon to open the file to view or edit it.

By default, the icon for the program the file is created in will show, but you can click Change Icon and choose your own icon file to use instead. The Change Icon button also allows you to edit the caption that appears under the icon in your document.

Inserted objects displayed as icons
In the following article, we will focus on introducing you 5 smart ways of how to link one Word document to another.
There are many times when we need to link two or more related documents, so an update in source file can also refresh the text pasted on another one. Speaking of this, Word provides several distinct solutions. Let’s take a look to find out more details.

Method 1: Use “Paste Link” Option
- Firstly, copy a range of text or the entire source document.
- Then put insertion pointer properly and click “Paste” under “Home” tab.
- Next choose “Paste Special” to open the same name dialog box.

- In the “Paste Special” box, select “Paste link”.
- And click to select a link type, such as “Formatted Text” or “Unformatted Text”.
- Lastly, click “OK”.


Any change made in source text should reflect in the new document if you update the link by right click and choosing “Update Link”.
Method 2: Insert an Object
- To begin with, click “Insert” tab then click “Object” in “Text” group.

- Next in “Object” box open, click “Create from File” tab first.
- Then click “Browse” to select a file.
- And check “Link to file” box.
- Finally, click “OK”.


Notice that you will insert the whole document into the new location. You can use the same way in method 1 to update the link.
Method 3: Create a Master Document Linking to Its Subdocument
It’s also a good choice to create a master document that link to subdocument to connect the two files. We have a previous article that explains every detailed step. You can refer to this link: How to Create a Master Document that Links to Multiple Subdocuments in Your Word
Method 4: Hyperlink a Bookmark from Source Document
- First and foremost, create a bookmark for a block of texts in the source document.
- Then in a new document, put insertion pointer at a proper location. Click “Insert” tab and choose “Hyperlink”.

- Put cursor at the “Address” text box and click “Browse for File” tab to select the file which contains the texts you need.
- Next click “Bookmark” tab to open the “Select Place in Document” box.
- Select the bookmark just created and click “OK” in both 2 boxes open.


You will get a hyperlink as bellow:
You can visit the source document through “Ctrl+ Click”.
Method 5: Utilize the “IncludeText” Field
- Click “Insert” tab first and the “Quick Parts” next.
- Then choose “Field” on the drop-down menu.

- In “Field” dialog box, choose “Links and References” for the “Categories”.
- Next select “IncludeText” field.
- Enter the file name of the source document.
- Lastly, click “OK”.


All texts of the source file shall be visible by now in the new document. To update the field, you can click on it and press “F9”.
Deal with Corrupt Word Documents
Once we end up with a damaged document, we certainly won’t discard it immediately. Instead we should try all out to bring a dead file back to life. One of the most important means to address doc corruption is to acquire an advanced recovering tool as soon as possible.
Author Introduction:
Vera Chen is a data recovery expert in DataNumen, Inc., which is the world leader in data recovery technologies, including Excel recovery and pdf repair software products. For more information visit www.datanumen.com

For quick access to a file, to create an email, or to jump to a different spot, you can create a link in a Word document easily.
To make things easier for yourself or your reader, you can link text to items in your Word document. You may already know that you can create a hyperlink to a web page. But you can also link text to another file, an email address, or a different spot in your document.
This is handy for quickly accessing a file related to your current document, giving your reader a fast way to send your company an email, or jumping to a specific location in the document.
The process for adding these links is similar, with only some small adjustments on Windows versus Mac. So if you’re ready to make your Microsoft Word document more functional and useful, let’s get to it!
Access the Link Tool
To link a file, email, or document location, you’ll follow the same initial process to open the Insert Hyperlink tool.
On Windows, select the text and then do one of the following:
- Right-click and pick Link.
- Go to the Insert tab, click Links, and choose Link.

On Mac, select the text and then do one of the following:
- Right-click and pick Hyperlink.
- Go to the Insert tab, click Links, and choose Link.
- Click Insert > Hyperlink from the menu bar.

Open a file related to your document without having to stop what you’re doing and navigate to it each time. You can link right to it!
With the Insert Hyperlink tool open, click Existing File or Web Page on the left.
Below Look In, you can select Current Folder or Recent Files. But you can also use the drop-down list, Up One Folder, or Browse for File buttons to the right.
After selecting the file from one of the above spots, you’ll see its exact location appear in the Address box. If this is the file you want, click OK.

You’ll see your text linked as indicated by the blue underlined font. To open the file, hold your Control key and click the link.

On Mac, pick Web Page or File, click Select to browse for and choose the file, and hit OK when you’re ready. You don’t have to hold the key to follow the link on Mac; just click it.

Link to an Email in a Word Document
If you link to an email address in the document, the user can then click the link, and a compose email window will open with their default email client or allow them to choose, depending on their platform.
In the Insert Hyperlink tool, click E-mail Address on the left. Complete the E-mail address field or choose a Recently used e-mail address.
Optionally, enter a Subject line which will prepopulate in the sender’s email. This can be helpful so that the recipient knows it’s related to this particular document or about a certain topic. Just note, the sender can change the subject line.
Click OK.

Like with the link to a file above, the user holds Control as they click the link to compose their email.

On Mac, the fields for linking to an email are the same, and you can click the link in the text to compose the email.

Link to a Location in a Word Document
Linking to a spot in your Word document is also convenient. The options for this type of link are a bit limited, however. You can choose the top of the document, a heading, or a bookmark.
In the Insert Hyperlink tool, click Place in This Document on the left. On the right, choose a document location. If you use headings, those will appear as selectable items. Click OK.

And as you’ve probably already guessed, hold Control and click to follow the link.

On Mac, select This Document, choose the location, and hit OK. Once more, you can click the link to follow it in Word on Mac.

More Resources With a Click in Word
Linking text in your Word document to files, emails, and locations can save you and your reader a lot of time.
For some helpful related tutorials, check out how you can follow these types of links in Word without using the Control key or how to stop Word from creating a link when you type a URL.
![]()