
PowerPoint for Microsoft 365 PowerPoint 2021 PowerPoint 2019 PowerPoint 2016 PowerPoint 2013 PowerPoint 2010 More…Less
If you are using PowerPoint 2013 or a newer version, you can link data from a saved Excel worksheet to your PowerPoint presentation. That way, if data in the worksheet changes, you can easily update it in your PowerPoint presentation.
Link an entire Excel worksheet to PowerPoint
-
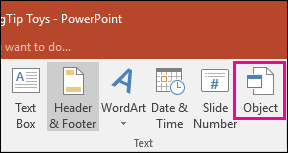
In PowerPoint, on the Insert tab, click or tap Object.

-
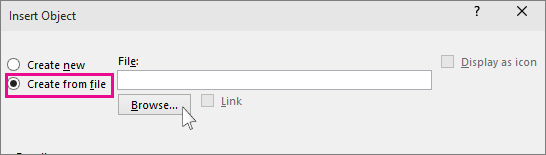
In the Insert Object dialog box, select Create from file.
-
Click or tap Browse, and in the Browse box, find the Excel workbook with the data you want to insert and link to.
-
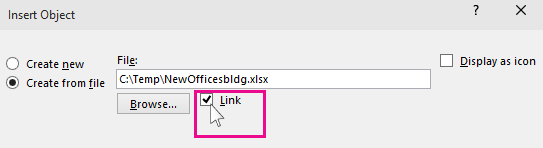
Before you close the Insert Object box, select Link, and click OK.
Important: The linked object in your presentation displays all the data from the active, top worksheet in the linked Excel workbook. When you save the Excel workbook, make sure the worksheet you want in your presentation is the one you see when you first open the workbook.
Link a section of data in Excel to PowerPoint
-
In Excel, open the saved workbook with the data you want to insert and link to.
-
Drag over the area of data you want to link to in PowerPoint, and on the Home tab, click or tap Copy.
-
In PowerPoint, click the slide where you want to paste the copied worksheet data.
-
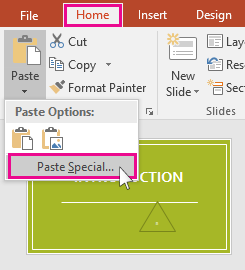
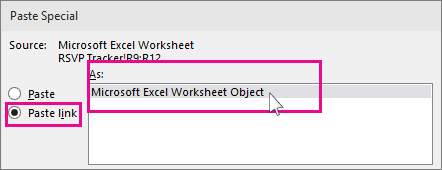
On the Home tab, click the arrow below Paste, and select Paste Special.
-
In the Paste Special box, click Paste link, and then, under As, select Microsoft Excel Worksheet Object.
Copy and paste (unlinked) Excel data in PowerPoint
In this case, the Excel data will not be linked to your PowerPoint presentation. You copy the data from an Excel worksheet and paste it into your presentation. The worksheet does not send automatic updates to PowerPoint.
-
In Excel, open the workbook with the data you want to copy.
-
Drag over the area of data you want to copy, and on the Home tab, click or tap Copy.
-
In PowerPoint, click the slide where you want to paste the copied worksheet data.
-
On the Home tab, in the Clipboard group, click the arrow below Paste.
-
Under Paste Options, pick one of the following. Move the mouse pointer over each Paste option to see a preview of what it would look like.
Use Destination Styles to copy the data as a PowerPoint table, using the format of the presentation
Keep Source Formatting to copy the Excel data as a PowerPoint table, using the format of the worksheet
Embed to copy the data as information that can be edited in Excel later
Picture to copy the data as a picture that can’t be edited in Excel
Keep Text Only to copy all the data as a single text box


See Also
Copy an Excel chart to another Office program
Insert a linked worksheet
To insert and link a saved Excel worksheet onto your PowerPoint slide, do the following:
Important: The linked object in your presentation displays all data from the active, top worksheet in the linked Excel workbook.
-
In PowerPoint 2010, on the Insert tab, in the Text group, click Object.
-
In the Insert Object dialog box, select Create from file.
-
Click Browse, and in the Browse dialog box, browse to and then select the Excel workbook that contains the information that you want to insert, and then click OK.
-
In the Insert Object dialog box, select Link and then click OK.
To edit a linked Excel worksheet, do one of the following:
-
To edit the data from within Excel, right-click the object on the slide, point to Linked Worksheet Object, and select Edit.
-
To update the data on the slide to match the data in the original Excel file, right-click the object on the slide, and click Update Link.
Insert a linked selection from a worksheet
To insert and link a selection of data from a saved Excel worksheet, do the following:
-
In Excel, open the workbook containing that data that you want to insert.
-
Select and copy the data that you want.
Keyboard shortcut You can press CTRL+C to copy the data.
-
In PowerPoint 2010, click the slide where you want to paste the copied worksheet data.
-
On the Home tab, in the Clipboard group, click the arrow below Paste, and select Paste Special.
-
In the Paste Special dialog box, under As, select a Microsoft Excel Worksheet Object.
-
Select the Paste link check box and click OK.
To edit a selection of cells from a linked Excel worksheet, do one of the following:
-
To edit the data from within Excel, right-click the object on the slide, point to Linked Worksheet Object, and select Edit.
-
To update the data on the slide to match the data in the original Excel file, right-click the object on the slide, and click Update Link.
Copy a selection of cells onto a slide
To paste a copy a selection of Excel data onto your PowerPoint slide, do the following:
Note: Data copied and pasted onto a PowerPoint slide does not automatically update when the data is changed in the Excel workbook. To link the data on the PowerPoint slide to the original Excel data source, see the «Insert a linked selection from a worksheet» section immediately above.
-
In Excel, open the workbook that contains the information that you want to copy.
-
Select and copy the data that you want.
Keyboard shortcut You can press CTRL+C to copy the data.
-
In PowerPoint 2010, click the slide where you want to paste the copied worksheet data.
-
On the Home tab, in the Clipboard group, click the arrow below Paste.
-
Under Paste Options, do one of the following:
-
Select Keep Source Formatting if you want to copy the data as a PowerPoint table, but want it keep the appearance of the original Excel worksheet.
-
Select Use Destination Styles if you want to copy the data as a PowerPoint table, but want it to assume the appearance of the PowerPoint presentation.
-
Select Embed if you want to copy the data as information that can be edited in PowerPoint.
-
Select Picture if you want to copy the data as an un-editable picture.
-
Select Keep Text Only if you want to copy all the data as a single text box.
-
See Also
Import content from other applications
Copy an Excel chart to another Office program
Need more help?
Want more options?
Explore subscription benefits, browse training courses, learn how to secure your device, and more.
Communities help you ask and answer questions, give feedback, and hear from experts with rich knowledge.
Get our FREE VBA eBook of the 30 most useful Excel VBA macros.
Automate Excel so that you can save time and stop doing the jobs a trained monkey could do.
Claim your free eBook

If you regularly create PowerPoint presentations that include information from Excel, you will know how frustrating it can be. Having to re-copy and re-paste the information every time a change is made in the original Excel documents. Have you come across the feature which enables you to link your Excel workbook directly into your PowerPoint presentation? When you use this feature, the presentation changes automatically each time your workbook changes. This is what we will be covering in this post.
Linking an Excel document to a PowerPoint presentation
The process of linking an Excel document to a PowerPoint presentation is pretty straightforward. Simply copy a range from Excel (Home -> Copy in the Ribbon, or Ctrl+C as a shortcut). Then, in PowerPoint click Home -> Paste -> Paste Special . . .
From the Paste Special window select Paste link, click Microsoft Excel Worksheet Object, then click OK.
The pasted image will now be linked to Excel. If the Excel file and PowerPoint presentation are both open any changes will update automatically.
Update and edit links
Once the links are created in the presentation, you may need to update them at a future point. If the Excel file is not open it is possible to update links using the following methods.
Updating when opening the presentation
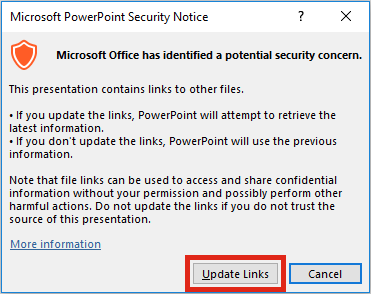
When opening a presentation, PowerPoint will ask if you wish to update the links. Just click the Update Links button and the presentation will be updated with the latest information.
Updating on demand
If you just want to update a single linked image you can right-click the image, then select Update Link from the menu.
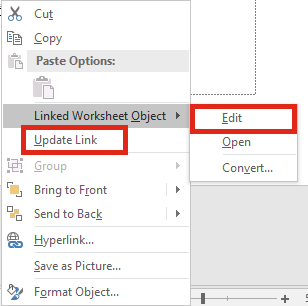
This menu also gives you the option to Edit the link to the original document.
Update with the “edit links” option
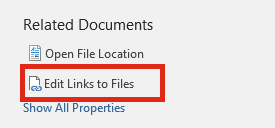
On the ribbon click File -> Info -> Edit Links to Files (it’s in the bottom right corner).
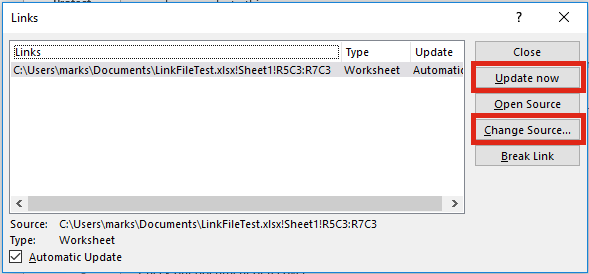
The Links window will open, which provides you with various options to update, edit and break links.
My top tips
If you link Excel files to PowerPoint presentations often, you will soon find it doesn’t always behave how you might expect. Here are my top tips to get the best results:
- Use named ranges. Adding rows and columns in a worksheet will not change the link reference in PowerPoint. For example, if PowerPoint is linked to Cell A1, then you inserted a new column at the start, Cell A1 would become Cell B1. But, PowerPoint still references Cell A1. This would now be the wrong cell. A named range helps to ensure the correct range is displayed in the presentation.
- PowerPoint updates links one at a time. If you have 100 links to the same Excel workbook it will open the same Excel workbook 100 times, which can be very time consuming. If you open the Excel document first the updating process is much faster.
- PowerPoint will not know if you change the name or file path of a linked file (see point 4 below for the exception). You need to ensure the most up-to-date version of the Excel file always has the same file name and file path, so that PowerPoint can find it.
- The fastest method of changing the source of an Excel file is to have both the Excel and linked PowerPoint files open. Then save the Excel file with a new path or file name. In this circumstance, PowerPoint will update the reference to the file.

About the author
Hey, I’m Mark, and I run Excel Off The Grid.
My parents tell me that at the age of 7 I declared I was going to become a qualified accountant. I was either psychic or had no imagination, as that is exactly what happened. However, it wasn’t until I was 35 that my journey really began.
In 2015, I started a new job, for which I was regularly working after 10pm. As a result, I rarely saw my children during the week. So, I started searching for the secrets to automating Excel. I discovered that by building a small number of simple tools, I could combine them together in different ways to automate nearly all my regular tasks. This meant I could work less hours (and I got pay raises!). Today, I teach these techniques to other professionals in our training program so they too can spend less time at work (and more time with their children and doing the things they love).
Do you need help adapting this post to your needs?
I’m guessing the examples in this post don’t exactly match your situation. We all use Excel differently, so it’s impossible to write a post that will meet everybody’s needs. By taking the time to understand the techniques and principles in this post (and elsewhere on this site), you should be able to adapt it to your needs.
But, if you’re still struggling you should:
- Read other blogs, or watch YouTube videos on the same topic. You will benefit much more by discovering your own solutions.
- Ask the ‘Excel Ninja’ in your office. It’s amazing what things other people know.
- Ask a question in a forum like Mr Excel, or the Microsoft Answers Community. Remember, the people on these forums are generally giving their time for free. So take care to craft your question, make sure it’s clear and concise. List all the things you’ve tried, and provide screenshots, code segments and example workbooks.
- Use Excel Rescue, who are my consultancy partner. They help by providing solutions to smaller Excel problems.
What next?
Don’t go yet, there is plenty more to learn on Excel Off The Grid. Check out the latest posts:
![]()
Download Article
![]()
Download Article
Linking Excel files to a PowerPoint presentation lets you to present and display complex data on a much simpler form that people can understand. This is very handy when you’re conducting business or academic presentations. What’s more is that it also allows you to easily create tables on presentations and conveniently modify the table’s data without editing the presentation itself.
-
1
Open the Excel file you wish to link with the PowerPoint presentation. Select Microsoft Excel from the Start menu to open it. Once you’ve launched Excel, you can either choose to open an existing Excel file or create a new one.
- If you choose to create a new document to link to a PowerPoint presentation, you need to save it first as an Excel file before you can do any kind of linking.
-
2
Open the PowerPoint file you wish to have the Excel file linked to. Launch Microsoft PowerPoint by selecting it on from the start menu. Once it launches, you can either open an existing PowerPoint presentation or create a new one by clicking the File button on the upper-left corner of the menu bar.


Advertisement
-
1
Choose where you want to insert the Excel file. On the PowerPoint presentation, click on the text field you want to insert an Excel file then click on the Insert tab on the upper-left section of the window to view the Insert toolbar.
-
2
Click on the Object button. This will open a small window called Insert Object.
-
3
Click on the “Create from file” radio button. This will allow you to insert an existing file to your PowerPoint presentation, in this case, the Excel document.
-
4
Select the file to insert. Still on the Insert Object window, click on the Browse button and use the Explorer to navigate to the location of the Excel file you want to link. Once you’ve found the file, select it and click Okay.
-
5
Check the Link option. Back on the Insert Object window, make sure that you check the Link option right beside the Browse button. By doing this, any changes made on the Excel file will be automatically reflected on the PowerPoint presentation.
- Click on Okay to finish inserting the file.
- The data table on your Excel file should now be displayed on the presentation slide. You can move it anywhere on the presentation and adjust its height and width by clicking and dragging its corner points across the slide.
-
6
Make sure that the link works. Go back to Microsoft Excel and change any data in any of the cells. Once you’ve edited one of the cells, go back again to PowerPoint. The data on the Excel object on your presentation should reflect the same changes you made on the Excel file.


Advertisement
Ask a Question
200 characters left
Include your email address to get a message when this question is answered.
Submit
Advertisement
Video
-
To link Excel documents to a PowerPoint presentation using older Microsoft Office suite, you need to resave the Excel file to a format that the old PowerPoint program can read.
-
You don’t need to save the Excel file first before the changes made are reflected on the presentation. The inserted object should mirror the change as you edit it.
Thanks for submitting a tip for review!
Advertisement
About This Article
Thanks to all authors for creating a page that has been read 84,478 times.
Is this article up to date?
Linking Excel and PowerPoint is a powerful solution to automate reports and a major time-saver. In this post, we will lay out the pros and cons of each link solution.
-
What are the main benefits of linking Excel and PowerPoint?
-
Method 1: using the regular «Paste» options to create the Excel-PowerPoint link
-
Method 2: using the «Paste Special» options to create the Excel-PowerPoint link
-
Method 3: using Power-user to create robust links between Excel and PowerPoint
What are the main benefits of linking Excel and PowerPoint?
Nowadays, PowerPoint, Excel and Word are still among the most widely used applications in business environment. No less than 1.2 billion people use Office globally.
Excel is by far the reference application for preparing, crunching and analyzing data, whether it is for sales analysis, survey results, budget reports or any kind of financial analysis. In most cases, the results and conclusions are then presented through PowerPoint which is easier for sharing them in a visual way, while providing context and comments around the data.
In many instances, analysts will prepare the data in Excel and then simply copy and paste their charts and tables into PowerPoint in order to present them.
If the data is updated, they will need to copy and paste all the updated charts and tables back into PowerPoint in order to update the presentation as well.
While manually copying and pasting is simple, it can quickly become a dangerous nightmare:
-
It is heavily time-consuming: if you have 100 tables and charts to update, you will likely spend an hour just copying and pasting them into PowerPoint. Oh, and what if you realize that there was some error in the data? Well, you can start all over again!
-
It requires you to reposition and reformat the charts each time
-
The risk of manual error is very high: humans are imperfect, and multiple copy-pasting like this will likely result in some chart being forgotten. Whilst perfectly understandable, this can greatly damage your reputation.
For these reasons, creating links between Excel and PowerPoint is an elegant solution for automating and securing reports. Not only will it save you time and reduce the risk of manual mistakes, it will also give you greater flexibility. Your boss needs a report udpated for a meeting in 5 minutes? No problem!
Oh, and icing on the cake: linking PowerPoint charts and tables to Excel data usually makes your presentation lighter, so you can email it more easily. Read more tips for reducing the size of you PowerPoint and Excel files.
So how can you do that?
Let’s see 3 different methods, each with their pros and cons.
Method 1: using the regular «Paste» options to create the Excel-PowerPoint link
This method is very easy and you might even use it without knowing it. Let’s see how it works.
Creating the link between Excel and PowerPoint 🔗
-
From Excel, select the chart
-
Right-click the chart and click «Copy» (or press CTRL+C)
-
Go to the PowerPoint slide on which you want to insert the chart
-
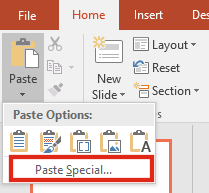
Go to the Home tab and click the arrow button under «Paste«, then select one of the following 2 options:
-
Choose «Use Destination Theme & Link Data» to convert the chart to your presentation’s colors and style
-
Choose «Keep Source Formatting & Link Data» to maintain the original appearance of the chart from Excel

That’s it, the chart in PowerPoint is now linked to the data from Excel!
Updating the link
Once the link is created, of course the next step will be to udpate the PowerPoint chart when your data in Excel has changed.
-
Just after creating the link, your charts in PowerPoint will be updated automatically if you change the data in the Excel workbook.
-
Later, select the chart in the PowerPoint presentation. Right-click it and hit «Edit data«. The Excel file will open to allow the update (if it was not open already).

Advantages ✅
-
Linked charts remain chart objects, so you can easily customize the format afterwards
-
Links do not trigger any security warning (unlike Method 2 that we will see just after)
-
Updates run fast
Limitations ⛔️
-
If you rename the closed Excel file, the links will be broken
-
If you duplicate the Excel file, the links will not work with the new version
-
If you move the closed Excel file, the links will be broken
-
If you email the files, the links will be broken for the recipient
-
If you move the source range of data in Excel while the PowerPoint is closed, the chart will still reference the old (hence wrong range of data)
-
These links cannot be created for tables
-
These links also do not allow linking values within your textboxes and shapes
👉🏻As you can see, these limitations are pretty severe. If the links get broken 🔌, instead of saving time, you might find yourself unexpectedly and urgently updating your reports manually in panic mode before your meeting. 😱
Method 2: using the «Paste Special» options to create the Excel-PowerPoint link
This is a little less-known, but once you know it, almost as easy as the previous one.
Creating the link between Excel and PowerPoint 🔗
-
From Excel, select the chart or range
-
Right-click and hit «Copy» (or press CTRL+C)
-
Go to the PowerPoint slide on which you want to insert the chart or table
-
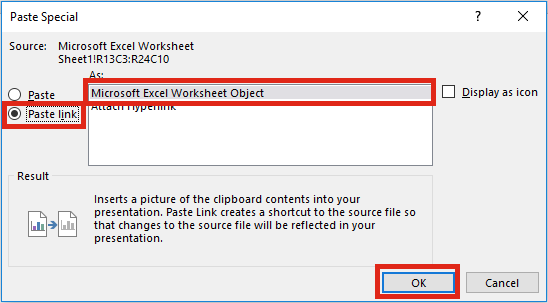
Go to the Home tab, click the arrow button under «Paste«, and hit «Paste Special«
-
The dialog box below will open. Select «Link» at the left and then «OK«.

Updating the link
After the link is created, you will be able to update like this:
-
Just after creating the link, your charts and tables in PowerPoint will be immediately updated when the data changes in Excel.
-
Later, open the PowerPoint presentation. A security prompt will show up, like the one below. Click «Update links» and all links will be updated at once. The Excel file does not need to be open.

-
Or, once PowerPoint is open, you can also update each chart or table individually. In the presentation, select the linked object, right-click it and hit «Update link«, like in the screenshot below. The Excel file does not need to be open.

Advantages ✅
-
Links can be created for charts as well as tables
Limitations ⛔️
-
Objects are pasted as pictures, so you will not be able to make any changes to their format. If you resize them, the picture could also get a bit blurry.
-
Updates are quite long to run, even for a single linked object.
-
Links trigger anoying security warnings everytime the PowerPoint presentation is opened
-
If you rename the closed Excel file, the links will be broken
-
If you duplicate the Excel file, the links will not work with the new version
-
If you move the closed Excel file, the links will be broken
-
If you email the files, the links will be broken for the recipient
-
If you move the source range of data in Excel while the PowerPoint is closed, the chart will still reference the old (hence wrong) range of data.
-
These links also do not let you link values within your textboxes and shapes
👉🏻That’s a long list!
And, again, there is a significant risk for the links to get broken and put you back in panic mode to update manually at the last minute. 😱
So the main interest for these links is clearly the ability to link tables while the first method cannot.
Method 3: using Power-user to create robust links between Excel and PowerPoint
Due to the limitations of Methods 1 and 2, many users prefer to rely on manual copy-pasting, and waste sometimes considerable amounts of time in the process.
To solve these issues, Power-user designed an intuitive and robust Excel-PowerPoint link allowing you to automate your reports. This link comes as part of the Power-user add-in which also includes dozens of features for PowerPoint, Excel & Word.
Creating a link between Excel and PowerPoint for a chart, table or range 🔗
-
From Excel, select the chart, table or range
-
Right-click and hit «Copy» (or press CTRL+C)
-
Go to PowerPoint
-
From the Home tab, click «Paste» (or press CTRL+V).
-
Click «Link» from the contextual button at the top left of the chart to create the link:

Inserting values in the middle of your PowerPoint texts that are linked to an Excel cell 🔗
This is a unique and very powerful feature that only Power-user offers. Not only can you automate your reports by updating charts and tables, but you can also write text comments in PowerPoint that include dynamic values linked to Excel data. This is the ultimate step to make truly automated reports.
For instance, you can have a slide title that says «Online sales stand at +17,2% this month» with the value «+17,2%» being automatically updated from a cell in Excel.
-
From PowerPoint, select a text and place the cursor where you want to insert a linked value
-
Right-click and then choose «Insert value from linked Excel cell«
-
Using the selection dialog that opens, navigate to the Excel cell you want to link with your presentation and validate
Updating and managing your links
After a link is created, you can easily update it by clicking the buttons at the top left.

From here, you can automatically update all the linked objects (charts, tables, texts) to take the new data from Excel.
You can also open the Link Manager, from where you will find additional options:
-
View the list of all linked objects and easily navigate from one to the other
-
Update each link independently, or all at once
-
See the location of the data source
-
Opens the folder containing the Excel source or go directly to the link source in Excel
-
See the date and time of the last update, and who made the last update
-
Break the link
-
…

Advantages ✅
-
Linked charts remain chart objects, so you can easily customize the format afterwards
-
You can link anything: charts, tables, ranges, cells and even values in your text
-
Links do not trigger any security warning
-
Updates run fast
-
The links will resist if you rename the files or have multiple versions (v1, v2, v3 etc.).
-
The links will resist if you move the files
-
The links will remain if you email the files
-
If you move the source range of data in Excel while the PowerPoint is closed, the link will resist
-
You will have easy access to multiple options for managing links
At any time, just open both the PowerPoint and the Excel file and hit update, it will re-establish the links with the currently opened version.
If the recipient doesn’t have Power-user installed, the links will be converted into Method 1 links to ensure compatibility.
What happens when we want to combine each app’s strengths? When you’re ready to take your data and charts from Excel to PowerPoint, you have options. There are different ways to paste and link your data between these apps.
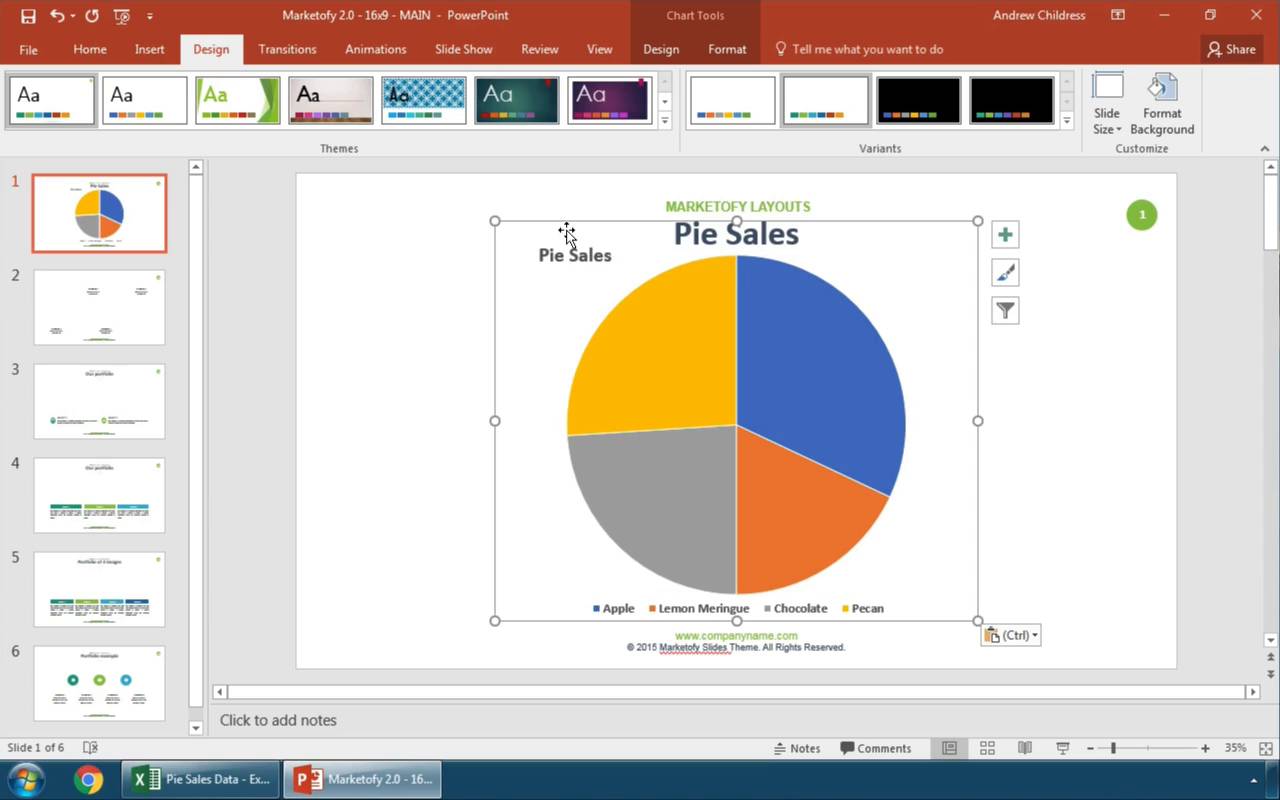
In this tutorial, you’ll learn how to embed or link an Excel file in PowerPoint. Soon, you’ll know how to embed Excel graphs and charts inside of a PowerPoint presentation. Embedding Excel into PowerPoint is a top skill in 2023, and you’ll find yourself doing it every day.
We also have a useful complement to this tutorial. Quickly grab it before you read on. Download our FREE eBook: The Complete Guide to Making Great Presentations, which will help you write, design, and deliver the perfect presentation.


How to Embed Excel Files & Link Data into PowerPoint (Quick Video)
In this quick three minute screencast below, I’ll show you how to work back and forth between Excel and PowerPoint. You’ll learn to embed Excel files in PowerPoint, link your data between the two apps, and can keep your data up to date.
Read on to learn more about different methods for working with data between Excel and PowerPoint.
In this video, we used the now-discontinued Marketofy PowerPoint Template from GraphicRiver. When you need an embedded Excel in PPT, turn to the vast Envato Elements library for thousands of custom PowerPoint options. You’ll find template designs for all topics.
How to Embed Excel Charts in PowerPoint
Imagine that we’ve built a great-looking Excel chart. It features plenty of data and a stylish design aesthetic. But Excel isn’t the best tool for sharing with an audience. It’s best to embed Excel in PowerPoint to present with.
Remember: Excel and PowerPoint are both part of the Microsoft Office suite of productivity apps. They work well together. You can finish styling the chart in PowerPoint.
But you might not be done making style changes. Fortunately, you’re in luck.


Throughout this tutorial, you’ll see the SIMPLECO PowerPoint template featured. It’s a robust premium design from Envato Elements. Download it today to follow along.
The tips in this section were written using Windows and Office 365. If you’ve got a different operating system or a different version of the apps, your steps may be slightly different.
Start Embedding Excel Into PowerPoint
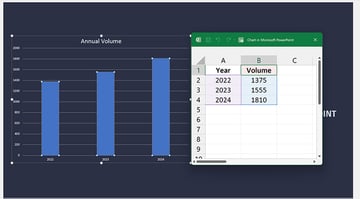
Now, let’s get started with the simplest way to make a PowerPoint embedded Excel. The first step is to click on your chart inside of Excel and make sure it’s selected. Then, you can press copy, either by pressing Ctrl + C on your keyboard or pressing the Copy button on Excel’s ribbon.


Now, let’s switch over to the SIMPLECO template, which is open in PowerPoint. Find some space on one of your slides. Then, press either Ctrl + V on your keyboard, or press the Paste button on PowerPoint’s ribbon. Below, you can see that the data and amounts match when you paste.


Notice that it brought over the same data from our Excel workbook, but it reformatted the style to match the PPT presentation. These are the default options to take charts from Excel to PowerPoint.
This is the most basic way to place an Excel chart inside your PowerPoint file. But as always, there’s more power hidden behind the scenes in PowerPoint.
Excel to PowerPoint Paste Options Explained
Maybe you want to paste your chart as a picture that the viewer can’t edit. Or maybe you want to link your Excel chart to PowerPoint so that they update data and stay synced.
When you’re taking charts from Excel to PowerPoint, you really have two choices to make:
- How do you want to handle the data — should it be linked to an Excel workbook, or embedded right inside the PowerPoint file?
- Should the style of the chart stay the same, or should it match the rest of your presentation?
These options are all available when you Right-click inside PowerPoint with a chart on your clipboard.


There are actually five ways that you can take data from Excel to PowerPoint, and each of them handles your data a bit differently. For your reference, here are the descriptions of each of the paste options in PowerPoint:
- Use Destination Theme and Embed Workbook
- Keep Source Formatting and Embed Workbook
- Use Destination Theme and Link Data
- Keep Source Formatting and Link Data
- Paste as picture
I think of the major categories as embedding, linking, and pasting as a picture. Let’s learn about each of those categories.
1. Embed Excel Workbook in PowerPoint
The first two icons (1 and 2) allow you to embed data inside the PowerPoint file. This means that PowerPoint stores the data behind the scenes inside the PowerPoint file.
Once you paste the file in and embed the workbook, the data is separated from the Excel file and stored inside the PowerPoint file.
If Excel’s data updates, the PowerPoint chart won’t update automatically.


To update the data inside of an embedded Excel file, you can right-click the chart and choose Edit Data from the menu. This opens an embedded Excel spreadsheet inside the PowerPoint file where you can edit the data in the chart.


Embedding data has many advantages. The charts in your presentation work whether or not you’ve got access to the original Excel file. Embedding does increase the size of your PowerPoint file.
The major downside to embedding data is that it doesn’t stay synced to the Excel file that you’re doing analysis and data review inside of. If you’re going back and forth between the two apps, linking might be a better choice.
2. Link Excel Data to PowerPoint
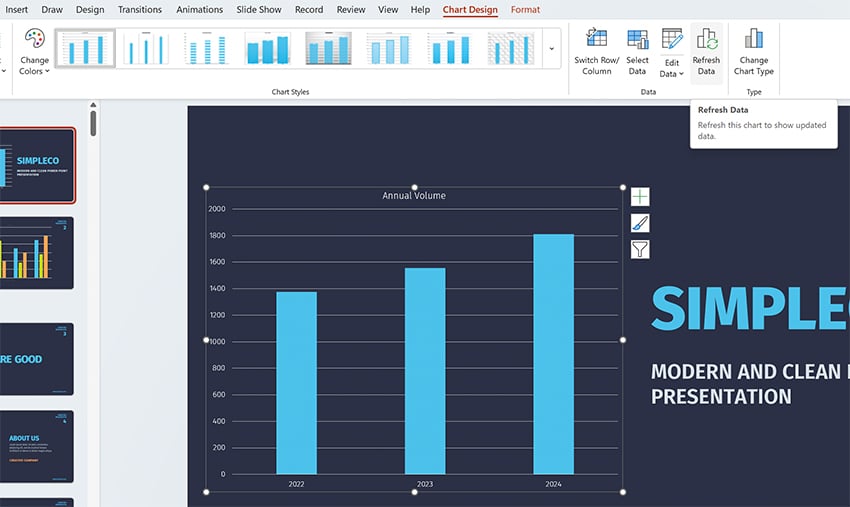
Linking data (icons 3 and 4) keeps your PowerPoint and Excel file in sync. If you change the data for the chart in Excel, you can update the pasted chart in PowerPoint to use the latest data.
When PowerPoint and Excel are both open at the same time, this happens automatically for linked data. Make a change in Excel, and the linked PowerPoint chart updates in real time.
If you’re working in Excel and PowerPoint at different times, you’ll want to update your data. Make sure to hit Refresh Data on the Chart Design tab on PowerPoint’s ribbon.


Linking is great to keep the data connected so that you don’t have to keep rebuilding your charts as you move from Excel to PowerPoint.
But linking your data directly to Excel isn’t always the right choice. The downside to using the linked option is two-fold:
- If you send your PowerPoint file to someone and they don’t have access to the Excel file, refreshing data won’t work.
- If others are changing the linked Excel file behind the scenes without your knowledge, you run the risk of updating your presentation with incorrect data.
If you’re still a bit fuzzy about choosing between embedding and linking data from Excel to PowerPoint, check out the official Microsoft help page to see a comparison of the two.
3. Paste Excel Chart as Picture in PowerPoint
The final option to place a chart in PowerPoint is to simply paste the chart you built in Excel as a flattened, non-editable picture.
When you paste a chart as a picture, the styles will appear the same as the Excel version of the chart and no longer be editable within PowerPoint.


This feature is handy when you want to ensure that the data isn’t changed or altered by the recipient. But pasting as a picture causes you to lose any ability to edit or change the chart.
Excel to PowerPoint Paste Formatting Options
Whether you choose to embed or link your data, you can choose how to handle the style of your charts when you move from Excel to PowerPoint. Both «embed» and «link» options have two choices for how to handle styling.
Let’s look at the difference between «Use Destination Theme» and «Keep Source Formatting.» These options don’t change the way we work with data—both options embed your data in the PowerPoint file—but they do change the appearance of the charts.
- Keep Source Formatting. Uses the same chart style used in Excel.
- Use Destination Theme. Matches the style of your chart to the PowerPoint theme.
In the screenshot below, you can see examples of each option. Using Keep Source Formatting kept the chart exactly the same as it appeared in Excel. Use Destination Theme helps your charts blend in with the rest of the presentation.


Once a chart is placed in the PowerPoint file, you can edit and restyle the presentation. Think of this paste option as the starting point.
We’ve learned about embedding Excel into PowerPoint. As you can see, linking the two apps is a seamless process. It helps you keep data and charts up to date to share with your audience. But sharing data can still seem daunting. What are some good rules of thumb? What do you need to do to succeed?
Read on for five of my favorite tips for effectively sharing data in PowerPoint. Embrace these ideas to succeed in 2023:
1. Opt for Colorful Styling
Bland, flat styles never inspired anyone. The trick is to use bright, colorful styles. You’ll enjoy several benefits when you do this. First, you’ll have shareable charts that are creative and engaging. You won’t bore your audience.


Plus, the creative use of color helps add contrast. For example, if you’re sharing charts, you can make each data series a different color. This makes your PowerPoint embedded Excel much easier to read and understand.
2. Animate to Control the Pace and Flow
Data is best shared as part of a narrative flow. In other words, you don’t always want your audience to see it all at once. That’s especially true if you’re providing details along the way. Data without context is “information overload” and can quickly become confusing.
Using animations in PowerPoint is a great way to control the pace and flow of your data slides. You can present Excel-based data in a certain order, rather than all at once.
Learn how with our full tutorial on PowerPoint’s Animation pane, the control center for slide animation:
3. Use Unconventional Charts and Infographics
Often, basic Excel charts and graphs work well for sharing your data. But sometimes, it pays to be creative. Unique infographics and charts help you share information in new and creative ways.


Even PowerPoint’s built-in chart features are robust enough to craft new designs. Next time you’re linking data to Excel, try out a funnel, waterfall, or sunburst chart. These are tailor-made for custom data sharing. You can use them all when you’re embedding Excel into PowerPoint.
4. Expand Beyond Numerical Data
When you think of data, it’s easy to think of numbers. And of course, that’s likely the most common type of data. But you can use charts and graphics to share data that isn’t numerical. Remember: these are tools to share ideas.
For example, you can use a chart to introduce your team and explain your organization’s structure. It’s a good way to illustrate an idea that may be hard to explain with words alone. And of course, you can embed this right from Excel using PPT tables and more.
For a detailed look at org charts in PPT, view our tutorial now:
5. Be Specific with Design
Premium PowerPoint themes from Envato Elements are available for any subject. Many are well-suited for any topic with a few quick edits. But others are specific and intentional with their themes.


For example, you’ll find many PPT templates geared toward a specific industry. This extends to their layouts, themes, and your ability to embed data. Why not choose a custom, themed template for your next project? These templates look amazing, and they deliver design inspiration on every slide.
Keep Learning More About Excel and PowerPoint
Keep in mind that there are different ways to manage your data based upon the paste option you use. On Envato Tuts+, we have a wealth of resources that help you master both apps!
Dig into more helpful Excel and PowerPoint tutorials on Envato Tuts+:
Make Great Presentations (Free eBook Download)


We have the perfect compliment to this tutorial, which will walk you through the complete presentation process. Learn how to write your presentation, design it like a pro, and prepare it to present powerfully.
Download our Book: The Complete Guide to Making Great Presentations. It’s available for free with a subscription to the Tuts+ Business Newsletter.
Now You Know How to Embed Excel in PowerPoint
Keeping your PowerPoint graphs linked to Excel data is handy. Embedded data gives you the flexibility to edit your data right inside the presentation. It comes down to how you want (or don’t want) to keep your data synced between Excel and PowerPoint.
With linked data, you don’t have to recreate and reformat your charts each time the original data changes. This embedded Excel in PPT approach ensures you won’t forget to make an update. Go practice it now with a presentation of your own!
Editor’s Note: This tutorial was first published in July of 2017. It’s been comprehensively updated for accuracy by Andrew Childress.