When you insert content as an object, you create a dynamic link between the content that you insert and the content that was created in another Microsoft Office program. Unlike when you paste content (such as by pressing CTRL+V), when you insert it as a linked or embedded object, you can work with it in the original program.
For example, if you insert worksheet cells into the document as an Excel object, Microsoft Office Word runs Excel when you double-click the cells, and you can use Excel commands to work with the worksheet content.
Understand the differences between linked objects and embedded objects
The main differences between linked objects and embedded objects are where the data is stored and how you update the data after you place it in the Word file.
You place either a link to the object or a copy of the object in the document. You can insert objects this way from any program that supports the technology of linking and embedding objects (object linking and embedding, or OLE).
For example, a monthly status report may contain information that is separately maintained in an Excel worksheet. If you link the report to the worksheet, the data in the report can be updated whenever the source file is updated. If you embed the worksheet in the report, your report contains a static copy of the data.

1. Embedded object
2. Linked object
3. Source file
Linked objects
When an object is linked, information can be updated if the source file is modified. Linked data is stored in the source file. The Word file, or destination file, stores only the location of the source file, and it displays a representation of the linked data. Use linked objects if file size is a consideration.
Linking is also useful when you want to include information that is maintained independently, such as data collected by a different department, and when you need to keep that information up-to-date in a Word document.
Embedded objects
When you embed an Excel object, information in the Word file doesn’t change if you modify the source Excel file. Embedded objects become part of the Word file and, after they are inserted, they are no longer part of the source file.
Because the information is totally contained in one Word document, embedding is useful when you don’t want the information to reflect changes in the source file, or when you don’t want the document recipients to be concerned with updating the linked information.
Need more help?
Word for Microsoft 365 Outlook for Microsoft 365 Word 2021 Outlook 2021 Word 2019 Outlook 2019 Word 2016 Outlook 2016 Word 2013 Outlook 2013 Word 2010 Outlook 2010 More…Less
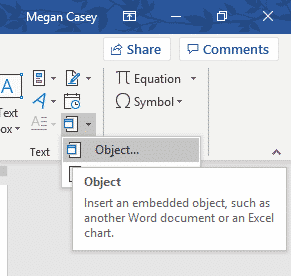
Depending on the version of Word or Outlook you’re using, you can insert a variety of objects (such as PDF files, Excel charts or worksheets, or PowerPoint presentations) into a Word document or an email message by linking or embedding them. To insert an object, click Object on the Insert tab.
Insert a new object
To create a new file that is inserted into your Word document or email message:
-
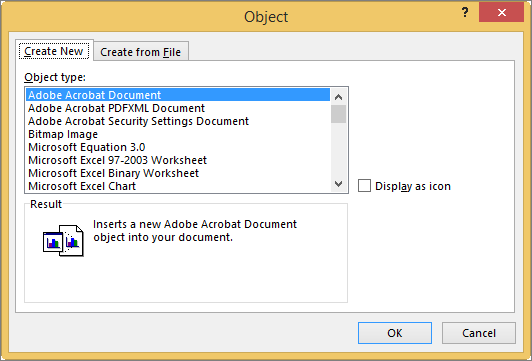
In the Object dialog box, click the Create New tab, and then select an option from the Object type list.
The default program for that file type opens, where you can enter any text or data you want. When you close the program, any added content or changes appear in your Word document or email message.
-
If you want the new file to appear as a clickable icon, rather than the first page of your new file, select Display as icon. If this check box is selected, you can choose a different icon by clicking Change Icon.
Tips:
-
The information in the Result section changes based on the selected object type and whether Display as icon is selected. Use this information to help you determine what you want to insert and how you want it to appear.
-
To edit the information in your inserted object, double-click the object.
-
In Outlook, the Display as icon option is only available if you format your email as RTF (Format Text > Format > Message Format > Rich Text).
Link or embed an existing file
To link or embed an object that’s already been created:
-
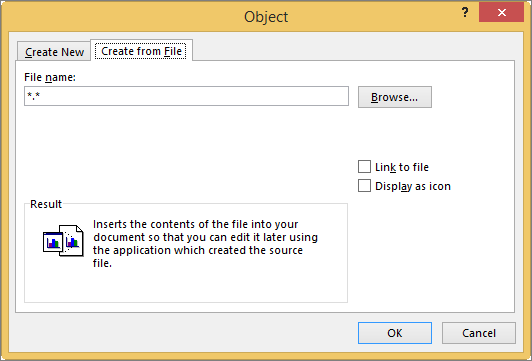
In the Object dialog box, select the Create from File tab, and then click Browse to find the file you want to insert.
-
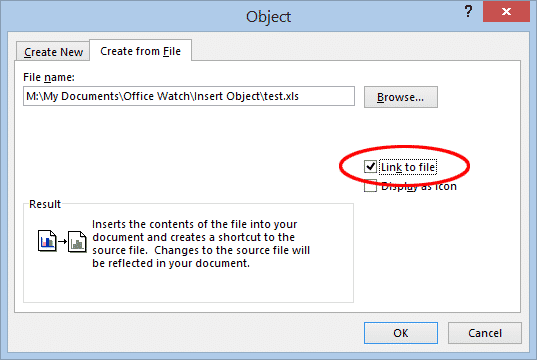
To link to the source file, rather than embedding it into your Word document or email message, select Link to file.
-
If you want the inserted file to appear as a clickable icon, rather than the first page of the file, select Display as icon. If this check box is selected, you can choose a different icon by clicking Change Icon.
Tip: The information in the Result section changes based on whether Link to file and Display as icon are selected. Use this information to help you determine what you want to insert and how you want it to appear.
Embedded objects vs. linked objects
Embedded objects become part of the Word file or email message and, after they are inserted, they are no longer connected to any source file.
Linked objects can be updated if the source file is modified. Linked data is stored in the source file. The Word file or email message (the destination file) stores only the location of the source file, and it displays a representation of the linked data. Use linked objects if file size is a consideration.
Need more help?
Word allows you to insert other files with data and functionality from another document or program directly into your Word document.
Microsoft calls these additions ‘Objects’ which makes it sound overly technical and difficult but it’s not. Don’t get fazed by all the nerd talk about ‘objects’, that’s programmer speak that’s leaked out into the real world.
Whenever you see the word ‘Object’ think ‘Another file’.
Objects are just other files or sometimes, parts of other files. Word or text files, graphs, Excel worksheets, PDF’s, PowerPoint files or a lot more.
You can either create a new object within your Word document or insert an existing file. You can also choose to either embed or link the object.
Embedding
Embedding an object just takes a snapshot or copy of the file at the time you embedded it. If you later change the original file, the changes are not reflected in your document.
- Use this to keep a copy of the file at a particular time like end of financial year or when contract is finalized.
- Embedding can also hide files and documents from prying eyes, that’s explained in our ebook Beating Bots, Spies and Cock-ups.
Linking
Linking an object creates a live link to the original file. If you make changes to the original file, the changes will appear in the object in your Word document. See Putting Excel into Word
To insert an object in Word, go to Insert | Object.
Insert all the Text from Another File
If you have another text document, such as another Word file, plain text file, or even a PDF file, you can easily insert all of the text from that file into your document.
To do this, select the Text from File option.
The Insert File dialog will open for you to navigate to the file that you want to insert.
NOTES:
- The content will be inserted along with all its formatting from the source file. If the original is a large, complex document, this may take some time.
- If you select a PDF document, Word will do the best it can to convert it into Word, along with all its formatting. It may not look exactly like the original file, especially if the source file contains a lot of graphics. Very complex PDF files may take excessive time or may not be able to be imported.
Insert a New Object
To insert any other kind of object other than a text file, select the Object option.
The Object dialog will open with the Create New tab selected by default. You will see that there is an extensive list of object types available to choose from. In this example we will choose to insert a new Excel worksheet in the document.
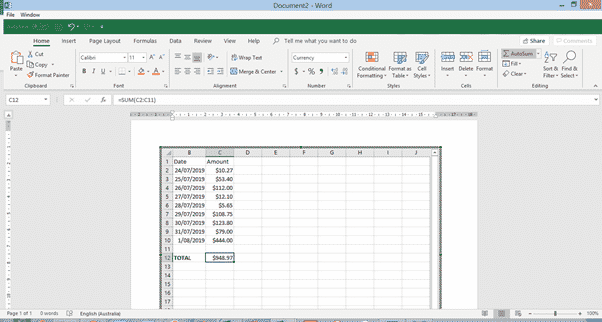
An Excel worksheet will appear in the document, and the Excel ribbon and tools will appear above it, just as if you are working in an Excel file.
You can now drag the edges to show as much of the worksheet as you wish, enter whatever data, and perform whatever functions you wish within the worksheet.
When you’re done, click anywhere outside the object, and the Excel ribbon will disappear, but the worksheet will still appear as a table in your document. You can then double-click within the object to enter and edit it again.
NOTES:
- When you insert a new object in this way, you can click within the object any time to edit it.
- If the Excel worksheet contains more data than fits in the visible window in your document, the part that you have visible when you click out of the object is what will appear in your document when you click out of the object.
Embed an Existing Object
To insert an existing object in your document, click the Create from File tab in the Object dialog and browse to the file you want to insert.
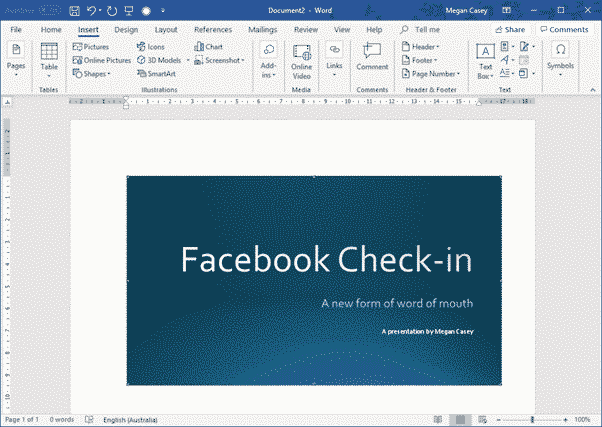
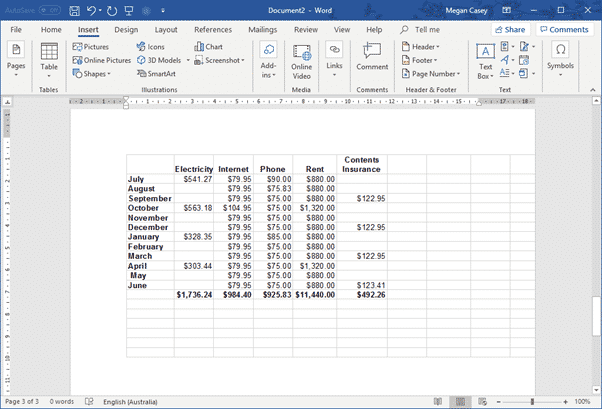
A section of the file will appear in the document, and the reader can double-click on it to open it and view the whole file. The part of the file that displays in the document varies depending on the type of file:
- A PowerPoint presentation will show the first slide only. Double-clicking will allow the reader to click through the whole presentation.
- An Excel file with multiple worksheets will display the worksheet that was open the last time the file was saved. Double-clicking will give access to all worksheets.
- A PDF file will display the first page of the document. (Unlike the Insert Text from File option, with this method the inserted object will still be a PDF file, not converted to Word.)
PowerPoint presentation embedded in a Word document
An Excel worksheet embedded in a Word document
For more see Putting Excel into Word
NOTES:
- An embedded object is just a snapshot of the file at the time you embedded it. It no longer has any link to the original file, and any subsequent changes made to the original will have no effect on the object in your document.
- If the object is an editable file, such as an Excel file, you can edit it after you have inserted it. Double-click on the object, and the interface of the original application will open within your document, just as described above for inserting a new object.
Link an Existing Object
To embed an object and maintain a live link between it and the original file, again, select the Create from File tab in the Object dialog, but this time also click the “Link to file” box.
The object will appear in the document just like an embedded object, but with one big difference. In this case, if any changes are made to the original file, those changes will be reflected in the object in your document. You also will not be able to edit the object in the document – double-clicking on, for example, an Excel object will open the original Excel document in a separate window.
Refreshing the Link
Sometimes a change to the original file will not immediately appear in the object in your document. To ensure that you are looking at the latest information, right-click on the object and select Update Link.
Displaying an Icon Instead of the Object
There is one more choice in the Object dialog that we have not touched on yet. Whether you are inserting a new object, or embedding or linking an existing object, you have the option to just display an icon in your document rather then the object itself. The reader or editor can then click on the icon to open the file to view or edit it.
By default, the icon for the program the file is created in will show, but you can click Change Icon and choose your own icon file to use instead. The Change Icon button also allows you to edit the caption that appears under the icon in your document.
Inserted objects displayed as icons
While inserting a file (such as Word, Excel, PowerPoint, PDF, image, etc.) as an object into a Word document, you can either create a new or use an existing file.
Create a new file and insert as an object
1. Place the mouse cursor where you want to create the object.
2. From the Ribbon, under the tab Insert, within the group Text, click Object. The object dialog box appears.
3. Select an object to create from the Object Type list.
4. Select the Display as icon check box.
5. Word creates an icon of the selected Program at the cursor position and opens the program to create a new file.
For example, if you select object type as “Microsoft Office Excel Worksheet”, an Excel icon is created at the cursor position and then Word opens the Excel program to create a new Excel document.
Insert an existing file as an object
1. You can insert an existing file into your document in two different ways: either embed the file or link the file.
2. Place your mouse cursor where you want to create the object
3. From the Ribbon, under the tab Insert, within the group Text, click Object. The object dialog box appears.
4. From the dialog box, click Create from File.
5. Click the Browse button to locate the file in your system.
6. Select the Display as icon check box.
7. The object icon is created at the cursor position. This way you can embed a file into your document.
8. If you want to link the file, also select the Link to File check box.
Difference between embedding and linking an existing file
If you want to update an embedded file, you have to double-click the object to open the file and then edit. Updating the source file will not update the embedded file.
However, if you are linking an existing file, then changes in the source file will be reflected in the linked file.
About wordknowhowhttp://wordknowhow.comThis blog site was started to help people with Microsoft Word. I use Word a lot at work, and I understand that some features are difficult to use. There were no simplified instructions online to help me use these features. It is for this reason that this site exists; to make your life easier with Word.
Feel free to post your comments, queries, suggestions, etc. I will do my best to help you!
Word documents are for word processing while Excel files are for data processing. But what if you need to combine the two? What if you need to display a part of your Excel data in, say a sales report that’s in a Word file?
You’re probably aware of the easiest technique that involves copying the table from Excel and pasting it into Word.
This technique, though quick and easy, has certain limitations.
However, there are other techniques to insert an Excel file into your Word document that allow for a lot more flexibility.
In this tutorial we will look at three ways to insert an Excel file into Word:
- By simple copy-pasting
- By Inserting as an embedded object
- By inserting as a linked object
Inserting an Excel File into Word by Simple Copy-Pasting
This first copy-paste method is the easiest. It’s just like copy-pasting data from one sheet in Excel into another.
In fact, you have probably already used this technique plenty of times. The method simply involves the following steps:
- Select the part of the Excel file that you want to insert into your Word file
- Press CTRL+C to copy (or right-click on the selection and then click on Copy)
- Open the Word file where you want to insert this data
- Place your cursor where you want to insert the Excel table
- Press CTRL+V to paste
Once you’ve pasted the data into Word, you get a table with the data that you copied. This works the same way as a regular Word table.
You can press the tab key to navigate through the table, you can edit the contents, you can delete rows and columns, or insert new rows and columns.
However, the changes you make to the pasted table do not get reflected in the original Excel file.
Moreover, any changes you make to the original Excel file will not automatically get reflected in your pasted table, unless you paste it again.
This method, though easy, does not offer much in terms of flexibility. It’s best used when you have a final table/data in Excel and you want it in Word (as a static table).
While this method works as expected in most cases, there are some minor issues you may face when using the simple copy paste to insert Excel data into Word:
- You might lose some of the formatting from your original table structure
- It will not be possible to copy larger tables
- If you have any formulas in the original Excel file, they will get pasted as values. So you cannot use Excel formulas in the table once it is pasted to Word
If you want to take advantage of Excel formulas inside Word, then the next two methods might work better for you.
Also read: Get File Names from a Folder into Excel
Inserting an Excel File into Word as an Embedded Object
An alternative way to insert an Excel file into Word is by inserting it as an embedded object.
An embedded object is an object that is created with one application and then embedded into a document that is created by another application.
For example when you embed an object or file created in Excel into a document created in Microsoft Word.
This is made possible by the Windows OLE technology (Object Linking and Embedding).
Embedding the object, rather than just pasting it, ensures that the object retains its original format.
Moreover, you get to alter the embedded object using the original program. This means that you can open the embedded Excel file from Word itself and make changes in it.
To embed an Excel file into a Word file, follow the steps below:
- Select the part of the Excel file that you want to insert into your Word file
- Press CTRL+C to copy (or right-click on the selection and then click on Copy)
- Open the Word file where you want to insert this data
- Place your cursor where you want to insert the Excel table.
- Under the Home tab, click on the dropdown of the Paste button (in the Clipboard group).
- Select the ‘Paste Special’ option.

- This will open the Paste Special dialog box. From this box, select Microsoft Excel Worksheet Object (in the group of options under ‘As’).

- Click OK
This will insert the copied cells into your Word doc.
The size of the embedded object might not fit correctly to your Word doc’s margins. So you can go ahead and resize it as required.
Note: The inserted table is not a regular Word table. It is, in fact, an Excel table. So you can apply formulas and work on it as a regular excel table.
If you want to edit the table, simply double-click inside the object. It will open the spreadsheet in an Excel interface (felt like pure magic when I first used it).
You can come out of edit mode when you click outside the object window.
It is important to note, however, that any changes you make to the object will not get reflected to the original Excel file. Similarly, any changes you make to the original Excel file will not get reflected in this object.
This is because the object is basically just a copy of the original file. It is not linked to it. If you want even more flexibility, the next method may be helpful for you.
Inserting an Excel File into Word as a Linked Object
You will get the most flexibility if you insert your Excel data into Word as a linked object.
A linked object is different from an embedded object in that the embedded object is like a snapshot or copy of the original file, while a linked object maintains an active connection between both files.
This means that editing the source file will cause the changes to also get reflected in the target file and vice-versa, provided that both documents are open.
So if I use this method and then change anything in the original Excel file, it would be reflected in the Word data as well.
To insert an Excel file into a Word file as a linked object, follow the steps below:
- Select the part of the Excel file that you want to insert into your Word file.
- Press CTRL+C to copy (or right-click on the selection and then click on Copy)
- Open the Word file where you want to insert this data
- Place your cursor where you want to insert the Excel table.
- Under the Home tab, click on the dropdown of the Paste button (in the Clipboard group).
- Select the ‘Paste Special’ option.
- This will open the Paste Special Dialog box. From this box, select Microsoft Excel Worksheet Object (in the group of options under ‘As’).
- Make sure that the ‘Paste link’ radio button (on the left side of the window) is checked.

- Click OK.
- This will insert the copied cells from MS Excel as a linked object into your MS Word document.
- Once again, resize the object in your Word doc as required.

You will notice that other than the addition of step 8, the procedure is more or less the same as inserting an embedded object.
The linked object works more or less like an embedded object, with an important difference.
When you double click the table in Word, the file will open in Excel.
If you make a change to the original file in Excel, the changes get updated to the table in Word, even if you don’t save the changes in the Excel file.
In case the changes are not updating automatically, right click on the table in Word and then click on Update Link.
Also, remember that for this method to work, it’s important that the source Excel file is also open. If you make any changes to the Excel file and close it, and it doesn’t get updated in the Word file, trying to update it by right-clicking and using the Update Link option wouldn’t work.
In this way, the linked object works almost like a live view of the Excel file from Word.
This method is especially useful if you’re trying to create something like a real-time dashboard in Word, displaying important tables from multiple Excel files.
These are three different ways in which you can insert an Excel file into Word.
As you must have noticed, all these methods have their pros and cons. Personally, if like the second method where we embedded Excel as an object into Word. That allows me to be a lot more flexible and use all the functionality of Excel from within the Word document.
Also, the methods covered here can also be used to insert an Excel file into other MS applications such as PowerPoint.
I hope this tutorial was useful and easy to follow.
Other Excel tutorials you may also like:
- How to Move a Chart to a New Sheet in Excel
- How to Start Excel in Safe Mode (3 Easy Ways)
- How to Find out What Version of Excel You Have (Easy Way)
- How to Open Excel File [xls, xlsx] Online (for FREE)
- Why does Excel Open on Startup (and How to Stop It)
- How to Convert a Text File to Excel?
- How to Merge Two Excel Files?
- How to Insert Sheet Name into Header or Footer in Excel?
- How to Convert PDF to Excel without Software?

