
Introduction
This article describes the complete steps for Microsoft Excel data import to SQL Server using linked servers technique.
The article describes the steps for all modern platforms:
- Microsoft SQL Server 2005-2016 on the x86/x64 platform.
- Microsoft Excel 2003-2016 files like *.xls, *.xlsx, *.xlsm, *.xlsb.
Bonus
You can develop amazing Microsoft Excel applications for working with Microsoft SQL Server using database development skills only!
Visit www.savetodb.com, download and install SaveToDB Add-In for Microsoft Excel.
That’s all!
Connect to tables, views, and stored procedures, edit the data and save it back to a database.
Add features to your Microsoft Excel applications step by step configuring apps via SQL.
Table of Contents
- Introduction
- The basics of Excel data import to SQL Server using linked servers
- Configuration steps for Excel data import to SQL Server using linked servers
- Install Microsoft.ACE.OLEDB.12.0 driver
- Grant rights to TEMP directory
- Configure ACE OLE DB properties
- Configure linked servers
- How-To: Import Excel 2003 to SQL Server x86
- How-To: Import Excel 2007 to SQL Server x86
- How-To: Import Excel 2003/2007 to SQL Server x64
- Conclusion
- See Also
The Basics of Excel Data Import to SQL Server Using Linked Servers
To import data from Microsoft Excel 2003 files to 32-bit SQL Server the Microsoft.Jet.OLEDB.4.0 provider can be used. Use the T-SQL code like this to add a linked server to Excel 2003 workbook:
EXEC sp_addlinkedserver
    @server = 'ExcelServer1',
    @srvproduct = 'Excel',
    @provider = 'Microsoft.Jet.OLEDB.4.0',
    @datasrc = 'C:Testexcel-sql-server.xls',
    @provstr = 'Excel 8.0;IMEX=1;HDR=YES;'
To import data from Microsoft Excel 2007 to 32-bit SQL Server or from any Microsoft Excel files to 64-bit SQL Server the Microsoft.ACE.OLEDB.12.0 provider should be used. Use the T-SQL code like this:
EXEC sp_addlinkedserver
    @server = 'ExcelServer2',
    @srvproduct = 'Excel',
    @provider = 'Microsoft.ACE.OLEDB.12.0',
    @datasrc = 'C:Testexcel-sql-server.xlsx',
    @provstr = 'Excel 12.0;IMEX=1;HDR=YES;'
IMEX=1 defines to import all Excel column data including data of mixed types.
HDR=YES defines that Excel data contain column headers.
The way to modify a linked server is to drop and create it again. Use the T-SQL code like this:
EXEC sp_dropserver
    @server = N'ExcelServer1',
    @droplogins='droplogins'
There are two ways to use linked server data. The first way is like this:
SELECT * FROM ExcelServer1...[Sheet1$]
and the second one is the use of the OPENQUERY function:
SELECT * FROM OPENQUERY(ExcelServer1, 'SELECT * FROM [Sheet1$]')
The use of the OPENQUERY function is more flexible because queries can contain Excel ranges unlike the entire sheet in the first case.
Configuration Steps for Excel Data Import to SQL Server Using Linked Servers
Install Microsoft.ACE.OLEDB.12.0 driver
To import Excel 2007-2016 files to SQL Server the Microsoft.ACE.OLEDB.12.0 driver should be installed.
To download the driver use the following link:
Microsoft Access Database Engine 2010 Redistributable
Don’t worry about «Access» in the name.
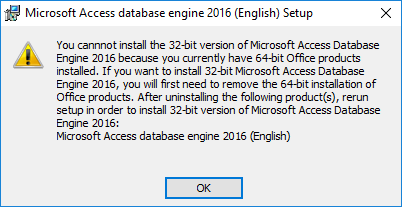
Warning! x64 driver cannot be installed if Microsoft Office 2007-2016 x86 is already installed!
So, there is no way to import Excel data to SQL Server x64 using Linked Servers technique on a machine with Microsoft Office x86!
The SQL Server Error Message if Microsoft.ACE.OLEDB.12.0 is not installed
OLE DB provider "Microsoft.ACE.OLEDB.12.0" for linked server "ExcelServer2" returned message "The Microsoft Access database engine cannot open or write to the file ''.
It is already opened exclusively by another user, or you need permission to view and write its data.".
Msg 7303, Level 16, State 1, Line 1
Cannot initialize the data source object of OLE DB provider "Microsoft.ACE.OLEDB.12.0" for linked server "ExcelServer2".
Grant rights to TEMP directory
This step is required only for 32-bit SQL Server with any OLE DB provider.
The main problem is that an OLE DB provider creates a temporary file during the query in the SQL Server temp directory using credentials of a user who run the query.
The default directory for SQL Server is a default directory for SQL Server service account.
If SQL Server is run under the Network Service account the temp directory is like:
C:WindowsServiceProfilesNetworkServiceAppDataLocalTemp
If SQL Server is run under the Local Service account the temp directory is like:
C:WindowsServiceProfilesLocalServiceAppDataLocalTemp
Microsoft recommends two ways for the solution:
- A change of SQL Server TEMP directory and a grant of full rights for all users to this directory.
- Grant of read/write rights to the current SQL Server TEMP directory.
See details: PRB: «Unspecified error» Error 7399 Using OPENROWSET Against Jet Database
Usually, only a few accounts are used for import operations. So, we can just add the rights for these accounts.
For example, icacls utility can be used for the rights setup:
icacls C:WindowsServiceProfilesNetworkServiceAppDataLocalTemp /grant vs:(R,W)
if SQL Server is started under Network Service and login «vs» is used to run the queries.
The SQL Server Error Message if a user has no rights for SQL Server TEMP directory
OLE DB provider "Microsoft.Jet.OLEDB.4.0" for linked server "ExcelServer1" returned message "Unspecified error".
Msg 7303, Level 16, State 1, Line 1
Cannot initialize the data source object of OLE DB provider "Microsoft.Jet.OLEDB.4.0" for linked server "ExcelServer1".
or the message for Microsoft.ACE.OLEDB.12.0 provider:
OLE DB provider "Microsoft.ACE.OLEDB.12.0" for linked server "ExcelServer2" returned message "Unspecified error".
Msg 7303, Level 16, State 1, Line 1
Cannot initialize the data source object of OLE DB provider "Microsoft.ACE.OLEDB.12.0" for linked server "ExcelServer2".
Configure ACE OLE DB properties
This step is required only if the Microsoft.ACE.OLEDB.12.0 provider is used.
Use the following T-SQL code:
EXEC sp_MSset_oledb_prop N'Microsoft.ACE.OLEDB.12.0', N'AllowInProcess', 1
GO
EXEC sp_MSset_oledb_prop N'Microsoft.ACE.OLEDB.12.0', N'DynamicParameters', 1
GO
The SQL Server Error Messages if OLE DB properties are not configured
Msg 7399, Level 16, State 1, Line 1
The OLE DB provider "Microsoft.ACE.OLEDB.12.0" for linked server "ExcelServer2" reported an error. The provider did not give any information about the error.
Msg 7330, Level 16, State 2, Line 1
Cannot fetch a row from OLE DB provider "Microsoft.ACE.OLEDB.12.0" for linked server "ExcelServer2".
Configure linked servers
The configuring of linked servers is discussed in the Basics topic.
Use the T-SQL code like this for Excel 2003 linked servers:
EXEC sp_addlinkedserver
    @server = 'ExcelServer1',
    @srvproduct = 'Excel',
    @provider = 'Microsoft.Jet.OLEDB.4.0',
    @datasrc = 'C:Testexcel-sql-server.xls',
    @provstr = 'Excel 8.0;IMEX=1;HDR=YES;'
Use the T-SQL code like this for Excel 2007 linked servers or on SQL Server x64:
EXEC sp_addlinkedserver
    @server = 'ExcelServer2',
    @srvproduct = 'Excel',
    @provider = 'Microsoft.ACE.OLEDB.12.0',
    @datasrc = 'C:Testexcel-sql-server.xlsx',
    @provstr = 'Excel 12.0;IMEX=1;HDR=YES;'
How-To: Import Excel 2003 to SQL Server x86
Step 1. Grant rights to TEMP directory
icacls C:WindowsServiceProfiles<SQL Server Account>AppDataLocalTemp /grant <User>:(R,W)
The most commonly used paths:
C:WindowsServiceProfilesNetworkServiceAppDataLocalTemp
C:WindowsServiceProfilesLocalServiceAppDataLocalTemp
Step 2. Configure linked server using Microsoft.Jet.OLEDB.4.0 provider
EXEC sp_addlinkedserver
    @server = 'ExcelServer1',
    @srvproduct = 'Excel',
    @provider = 'Microsoft.Jet.OLEDB.4.0',
    @datasrc = 'C:Testexcel-sql-server.xls',
    @provstr = 'Excel 8.0;IMEX=1;HDR=YES;'
How-To: Import Excel 2007 to SQL Server x86
Step 1. Install the 32-bit Microsoft.ACE.OLEDB.12.0 driver
Microsoft Access Database Engine 2010 Redistributable
Step 2. Grant rights to TEMP directory
icacls C:WindowsServiceProfiles<SQL Server Account>AppDataLocalTemp /grant <User>:(R,W)
The most commonly used paths:
C:WindowsServiceProfilesNetworkServiceAppDataLocalTemp
C:WindowsServiceProfilesLocalServiceAppDataLocalTemp
Step 3. Configure ACE OLE DB properties
EXEC sp_MSset_oledb_prop N'Microsoft.ACE.OLEDB.12.0', N'AllowInProcess', 1
GO
EXEC sp_MSset_oledb_prop N'Microsoft.ACE.OLEDB.12.0', N'DynamicParameters', 1
GO
Step 4. Configure linked server using Microsoft.ACE.OLEDB.12.0 provider
EXEC sp_addlinkedserver
    @server = 'ExcelServer2',
    @srvproduct = 'Excel',
    @provider = 'Microsoft.ACE.OLEDB.12.0',
    @datasrc = 'C:Testexcel-sql-server.xlsx',
    @provstr = 'Excel 12.0;IMEX=1;HDR=YES;'
How-To: Import Excel 2003/2007 to SQL Server x64
Step 1. Install 64-bit Microsoft.ACE.OLEDB.12.0 driver
Microsoft Access Database Engine 2010 Redistributable
Step 2. Configure ACE OLE DB properties
EXEC sp_MSset_oledb_prop N'Microsoft.ACE.OLEDB.12.0', N'AllowInProcess', 1
GO
EXEC sp_MSset_oledb_prop N'Microsoft.ACE.OLEDB.12.0', N'DynamicParameters', 1
GO
Step 3. Configure linked server using Microsoft.ACE.OLEDB.12.0 provider
EXEC sp_addlinkedserver
    @server = 'ExcelServer2',
    @srvproduct = 'Excel',
    @provider = 'Microsoft.ACE.OLEDB.12.0',
    @datasrc = 'C:Testexcel-sql-server.xlsx',
    @provstr = 'Excel 12.0;IMEX=1;HDR=YES;'
Conclusion
Using the described techniques you can import data from Microsof Excel 2003-2016 to SQL Server 2005-2016 on the 32-bit or 64-bit platform.
See Also
- References
- OPENQUERY (Transact-SQL)
- How-To
- How to use Excel with SQL Server linked servers and distributed queries
- Downloads
- Microsoft Access Database Engine 2010 Redistributable
- Microsoft Access Database Engine 2016 Redistributable
| title | description | author | ms.author | ms.date | ms.service | ms.subservice | ms.topic | monikerRange |
|---|---|---|---|---|---|---|---|---|
|
Import data from Excel to SQL Server or Azure SQL Database |
This article describes methods to import data from Excel to SQL Server or Azure SQL Database. Some use a single step, others require an intermediate text file. |
rwestMSFT |
randolphwest |
03/30/2023 |
sql |
data-movement |
conceptual |
=azuresqldb-current||>=sql-server-2016||>=sql-server-linux-2017||=azuresqldb-mi-current |
Import data from Excel to SQL Server or Azure SQL Database
[!INCLUDE SQL Server Azure SQL Database]
There are several ways to import data from Excel files to [!INCLUDE ssnoversion-md] or to Azure SQL Database. Some methods let you import data in a single step directly from Excel files; other methods require you to export your Excel data as text (CSV file) before you can import it.
This article summarizes the frequently used methods and provides links for more detailed information. A complete description of complex tools and services like SSIS or Azure Data Factory is beyond the scope of this article. To learn more about the solution that interests you, follow the provided links.
List of methods
There are several ways to import data from Excel. You may need to install SQL Server Management Studio (SSMS) to use some of these tools.
You can use the following tools to import data from Excel:
| Export to text first ([!INCLUDE ssnoversion-md] and SQL Database) | Directly from Excel ([!INCLUDE ssnoversion-md] on-premises only) |
|---|---|
| Import Flat File Wizard | SQL Server Import and Export Wizard |
| BULK INSERT statement | SQL Server Integration Services (SSIS) |
| BCP | OPENROWSET function |
| Copy Wizard (Azure Data Factory) | |
| Azure Data Factory |
If you want to import multiple worksheets from an Excel workbook, you typically have to run any of these tools once for each sheet.
[!IMPORTANT]
To learn more, see limitations and known issues for loading data to or from Excel files.
Import and Export Wizard
Import data directly from Excel files by using the [!INCLUDE ssnoversion-md] Import and Export Wizard. You also can save the settings as a SQL Server Integration Services (SSIS) package that you can customize and reuse later.
-
In [!INCLUDEssManStudioFull], connect to an instance of the [!INCLUDEssNoVersion] [!INCLUDEssDE].
-
Expand Databases.
-
Right-click a database.
-
Select Tasks.
-
Choose to Import Data or Export Data:
:::image type=»content» source=»../../integration-services/import-export-data/media/start-wizard-ssms.jpg» alt-text=»Start wizard SSMS»:::
This launches the wizard:
:::image type=»content» source=»media/excel-connection.png» alt-text=»Connect to an Excel data source»:::
To learn more, review:
- Start the SQL Server Import and Export Wizard
- Get started with this simple example of the Import and Export Wizard
Integration Services (SSIS)
If you’re familiar with SQL Server Integration Services (SSIS) and don’t want to run the [!INCLUDE ssnoversion-md] Import and Export Wizard, create an SSIS package that uses the Excel Source and the [!INCLUDE ssnoversion-md] Destination in the data flow.
To learn more, review:
- Excel Source
- SQL Server Destination
To start learning how to build SSIS packages, see the tutorial How to Create an ETL Package.
:::image type=»content» source=»media/excel-to-sql-data-flow.png» alt-text=»Components in the data flow»:::
OPENROWSET and linked servers
[!IMPORTANT]
In Azure SQL Database, you cannot import directly from Excel. You must first export the data to a text (CSV) file.
[!NOTE]
The ACE provider (formerly the Jet provider) that connects to Excel data sources is intended for interactive client-side use. If you use the ACE provider on [!INCLUDE ssnoversion-md], especially in automated processes or processes running in parallel, you may see unexpected results.
Distributed queries
Import data directly into [!INCLUDE ssnoversion-md] from Excel files by using the Transact-SQL OPENROWSET or OPENDATASOURCE function. This usage is called a distributed query.
[!IMPORTANT]
In Azure SQL Database, you cannot import directly from Excel. You must first export the data to a text (CSV) file.
Before you can run a distributed query, you have to enable the ad hoc distributed queries server configuration option, as shown in the following example. For more info, see ad hoc distributed queries Server Configuration Option.
sp_configure 'show advanced options', 1;
RECONFIGURE;
GO
sp_configure 'ad hoc distributed queries', 1;
RECONFIGURE;
GO
The following code sample uses OPENROWSET to import the data from the Excel Sheet1 worksheet into a new database table.
USE ImportFromExcel;
GO
SELECT * INTO Data_dq
FROM OPENROWSET('Microsoft.ACE.OLEDB.12.0',
    'Excel 12.0; Database=C:TempData.xlsx', [Sheet1$]);
GO
Here’s the same example with OPENDATASOURCE.
USE ImportFromExcel;
GO
SELECT * INTO Data_dq
FROM OPENDATASOURCE('Microsoft.ACE.OLEDB.12.0',
    'Data Source=C:TempData.xlsx;Extended Properties=Excel 12.0')...[Sheet1$];
GO
To append the imported data to an existing table instead of creating a new table, use the INSERT INTO ... SELECT ... FROM ... syntax instead of the SELECT ... INTO ... FROM ... syntax used in the preceding examples.
To query the Excel data without importing it, just use the standard SELECT ... FROM ... syntax.
For more info about distributed queries, see the following articles:
- Distributed Queries (Distributed queries are still supported in [!INCLUDE sssql19-md], but the documentation for this feature hasn’t been updated.)
- OPENROWSET
- OPENDATASOURCE
Linked servers
You can also configure a persistent connection from [!INCLUDE ssnoversion-md] to the Excel file as a linked server. The following example imports the data from the Data worksheet on the existing Excel linked server EXCELLINK into a new [!INCLUDE ssnoversion-md] database table named Data_ls.
USE ImportFromExcel;
GO
SELECT * INTO Data_ls FROM EXCELLINK...[Data$];
GO
You can create a linked server from SQL Server Management Studio (SSMS), or by running the system stored procedure sp_addlinkedserver, as shown in the following example.
DECLARE @RC INT;
DECLARE @server NVARCHAR(128);
DECLARE @srvproduct NVARCHAR(128);
DECLARE @provider NVARCHAR(128);
DECLARE @datasrc NVARCHAR(4000);
DECLARE @location NVARCHAR(4000);
DECLARE @provstr NVARCHAR(4000);
DECLARE @catalog NVARCHAR(128);

-- Set parameter values
SET @server = 'EXCELLINK';
SET @srvproduct = 'Excel';
SET @provider = 'Microsoft.ACE.OLEDB.12.0';
SET @datasrc = 'C:TempData.xlsx';
SET @provstr = 'Excel 12.0';

EXEC @RC = [master].[dbo].[sp_addlinkedserver] @server,
    @srvproduct,
    @provider,
    @datasrc,
    @location,
    @provstr,
    @catalog;
For more info about linked servers, see the following articles:
- Create Linked Servers
- OPENQUERY
For more examples and info about both linked servers and distributed queries, see the following article:
- How to use Excel with SQL Server linked servers and distributed queries
Prerequisite — Save Excel data as text
To use the rest of the methods described on this page — the BULK INSERT statement, the BCP tool, or Azure Data Factory — first you have to export your Excel data to a text file.
In Excel, select File | Save As and then select Text (Tab-delimited) (*.txt) or CSV (Comma-delimited) (*.csv) as the destination file type.
If you want to export multiple worksheets from the workbook, select each sheet, and then repeat this procedure. The Save as command exports only the active sheet.
[!TIP]
For best results with data importing tools, save sheets that contain only the column headers and the rows of data. If the saved data contains page titles, blank lines, notes, and so forth, you may see unexpected results later when you import the data.
The Import Flat File Wizard
Import data saved as text files by stepping through the pages of the Import Flat File Wizard.
As described previously in the Prerequisite section, you have to export your Excel data as text before you can use the Import Flat File Wizard to import it.
For more info about the Import Flat File Wizard, see Import Flat File to SQL Wizard.
BULK INSERT command
BULK INSERT is a Transact-SQL command that you can run from SQL Server Management Studio. The following example loads the data from the Data.csv comma-delimited file into an existing database table.
As described previously in the Prerequisite section, you have to export your Excel data as text before you can use BULK INSERT to import it. BULK INSERT can’t read Excel files directly. With the BULK INSERT command, you can import a CSV file that is stored locally or in Azure Blob storage.
USE ImportFromExcel;
GO
BULK INSERT Data_bi FROM 'C:Tempdata.csv'
   WITH (
      FIELDTERMINATOR = ',',
      ROWTERMINATOR = 'n'
);
GO
For more info and examples for [!INCLUDE ssnoversion-md] and SQL Database, see the following articles:
- Import Bulk Data by Using BULK INSERT or OPENROWSET(BULK…)
- BULK INSERT
BCP tool
BCP is a program that you run from the command prompt. The following example loads the data from the Data.csv comma-delimited file into the existing Data_bcp database table.
As described previously in the Prerequisite section, you have to export your Excel data as text before you can use BCP to import it. BCP can’t read Excel files directly. Use to import into [!INCLUDE ssnoversion-md] or SQL Database from a test (CSV) file saved to local storage.
[!IMPORTANT]
For a text (CSV) file stored in Azure Blob storage, use BULK INSERT or OPENROWSET. For an examples, see Example.
bcp.exe ImportFromExcel..Data_bcp in "C:Tempdata.csv" -T -c -t ,
For more info about BCP, see the following articles:
- Import and Export Bulk Data by Using the bcp Utility
- bcp Utility
- Prepare Data for Bulk Export or Import
Copy Wizard (ADF)
Import data saved as text files by stepping through the pages of the Azure Data Factory (ADF) Copy Wizard.
As described previously in the Prerequisite section, you have to export your Excel data as text before you can use Azure Data Factory to import it. Data Factory can’t read Excel files directly.
For more info about the Copy Wizard, see the following articles:
- Data Factory Copy Wizard
- Tutorial: Create a pipeline with Copy Activity using Data Factory Copy Wizard.
Azure Data Factory
If you’re familiar with Azure Data Factory and don’t want to run the Copy Wizard, create a pipeline with a Copy activity that copies from the text file to [!INCLUDE ssnoversion-md] or to Azure SQL Database.
As described previously in the Prerequisite section, you have to export your Excel data as text before you can use Azure Data Factory to import it. Data Factory can’t read Excel files directly.
For more info about using these Data Factory sources and sinks, see the following articles:
- File system
- SQL Server
- Azure SQL Database
To start learning how to copy data with Azure data factory, see the following articles:
- Move data by using Copy Activity
- Tutorial: Create a pipeline with Copy Activity using Azure portal
Common errors
Microsoft.ACE.OLEDB.12.0″ hasn’t been registered
This error occurs because the OLEDB provider isn’t installed. Install it from Microsoft Access Database Engine 2010 Redistributable. Be sure to install the 64-bit version if Windows and [!INCLUDE ssnoversion-md] are both 64-bit.
The full error is:
Msg 7403, Level 16, State 1, Line 3
The OLE DB provider "Microsoft.ACE.OLEDB.12.0" has not been registered.
Cannot create an instance of OLE DB provider «Microsoft.ACE.OLEDB.12.0» for linked server «(null)»
This indicates that the Microsoft OLEDB hasn’t been configured properly. Run the following Transact-SQL code to resolve this:
EXEC sp_MSset_oledb_prop N'Microsoft.ACE.OLEDB.12.0', N'AllowInProcess', 1;
EXEC sp_MSset_oledb_prop N'Microsoft.ACE.OLEDB.12.0', N'DynamicParameters', 1;
The full error is:
Msg 7302, Level 16, State 1, Line 3
Cannot create an instance of OLE DB provider "Microsoft.ACE.OLEDB.12.0" for linked server "(null)".
The 32-bit OLE DB provider «Microsoft.ACE.OLEDB.12.0» cannot be loaded in-process on a 64-bit SQL Server
This occurs when a 32-bit version of the OLD DB provider is installed with a 64-bit [!INCLUDE ssnoversion-md]. To resolve this issue, uninstall the 32-bit version and install the 64-bit version of the OLE DB provider instead.
The full error is:
Msg 7438, Level 16, State 1, Line 3
The 32-bit OLE DB provider "Microsoft.ACE.OLEDB.12.0" cannot be loaded in-process on a 64-bit SQL Server.
The OLE DB provider «Microsoft.ACE.OLEDB.12.0» for linked server «(null)» reported an error.
Cannot initialize the data source object of OLE DB provider «Microsoft.ACE.OLEDB.12.0» for linked server «(null)»
Both of these errors typically indicate a permissions issue between the [!INCLUDE ssnoversion-md] process and the file. Ensure that the account that is running the [!INCLUDE ssnoversion-md] service has full access permission to the file. We recommend against trying to import files from the desktop.
The full errors are:
Msg 7399, Level 16, State 1, Line 3
The OLE DB provider "Microsoft.ACE.OLEDB.12.0" for linked server "(null)" reported an error. The provider did not give any information about the error.
Msg 7303, Level 16, State 1, Line 3
Cannot initialize the data source object of OLE DB provider "Microsoft.ACE.OLEDB.12.0" for linked server "(null)".
Next steps
- Get started with this simple example of the Import and Export Wizard
- Import data from Excel or export data to Excel with SQL Server Integration Services (SSIS)
- bcp Utility
- Move data by using Copy Activity
There are many ways to import data from an Excel file to a SQL Server database using:
- SQL Server Integration Services (SSIS)
- the OPENROWSET and OPENDATASOURCE functions
- SQL Server linked servers
- the SQL Server Import and Export Wizard
In this article, steps for importing data from an Excel file to a SQL Server database will be explained using the SQL Server Import and Export Wizard including some of problems that can occur during the processes.
To start the process of importing data from an Excel file to a SQL Server database using the SQL Server Import and Export Wizard the SQL Server Import and Export Wizard needs to be launched. There are several ways to do that, and this can be seen on the How to import/export data to SQL Server using the SQL Server Import and Export Wizard page
The first page that appears when the SQL Server Import and Export Wizard launched is Welcome page:
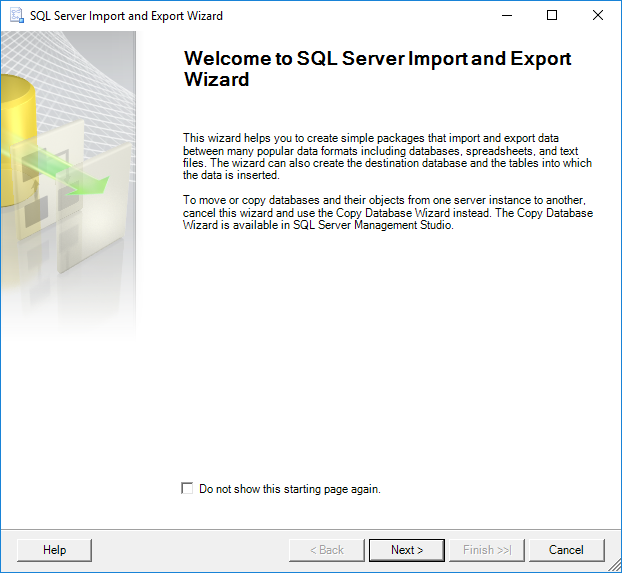
On this page, only a quick introduction of the SQL Server Import and Export Wizard is shown.
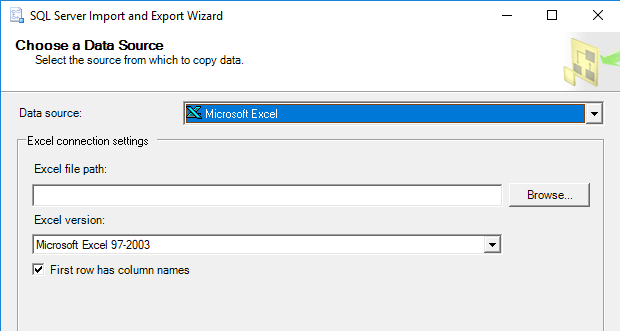
Click the Next button to continue. The next page in the SQL Server Import and Export Wizard is Choose a Data Source page:
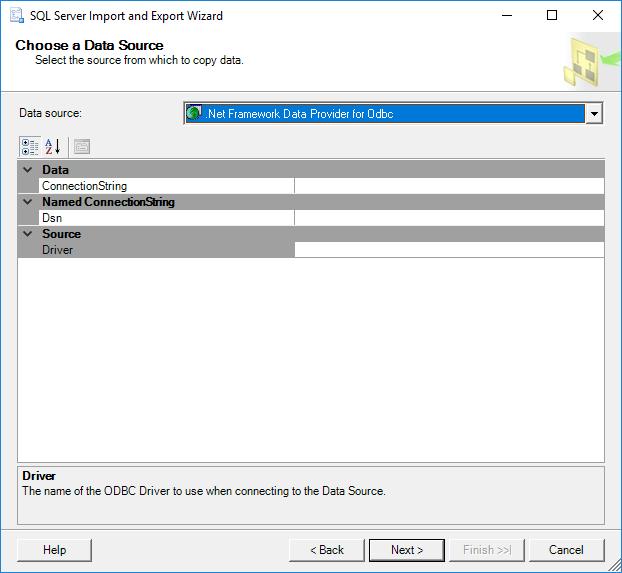
In the Choose a Data Source page, in order to continue with importing data from Excel to SQL Server the data source provider and way of connecting with data source must be provided. In our case, the provider for connecting to the Excel file is the Microsoft Excel provider.
From the Data source drop down box, select the Microsoft Excel provider:
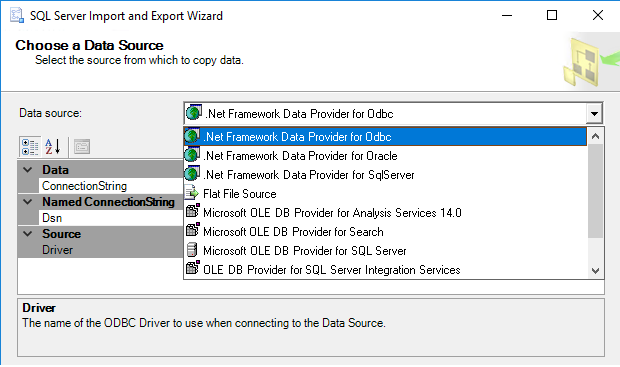
As you can see, there is no Microsoft Excel provider in the list of the Data source drop down box. There are several reasons for this. The first reason could be that Microsoft Office isn’t installed. But there is no need to install Microsoft Office (Microsoft Excel) in order to see the Microsoft Excel provider in the Data source drop down box list.
To see the Microsoft Excel provider in the list, install Microsoft Access Database Engine 2016 Redistributable. The latest version of Microsoft Access Database Engine can open the earlier version of Excel, so make sure that you have the latest one.
The Microsoft Access Database Engine 2016 Redistributable comes with two versions:
- AccessDatabaseEngine.exe is 32-bit version
- AccessDatabaseEngine_X64.exe is 64-bit version
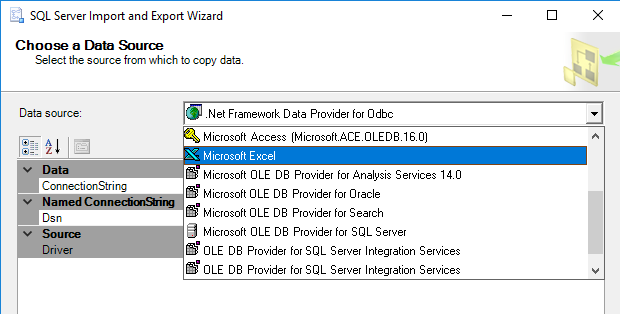
Now, when Microsoft Access Database Engine 2016 Redistributable is installed, we should see the Microsoft Excel provider in the list, but unfortunately the Microsoft Excel provider does not show in the list of the Data source drop down box.
This is because you may run a wrong version of the SQL Server Import and Export Wizard. For example, the AccessDatabaseEngine.exe is installed and the SQL Server Import and Export Wizard 64-bit version is launched. In this case, in order to see the Microsoft Excel provider in the list of the Data source drop down box, launch the SQL Server Import and Export Wizard 32-bit version and the Microsoft Excel provider will appear in the list:
Now, when all is installed, from the list, select the Microsoft Excel provider. On the Choose a Data Source page, additional options appear:
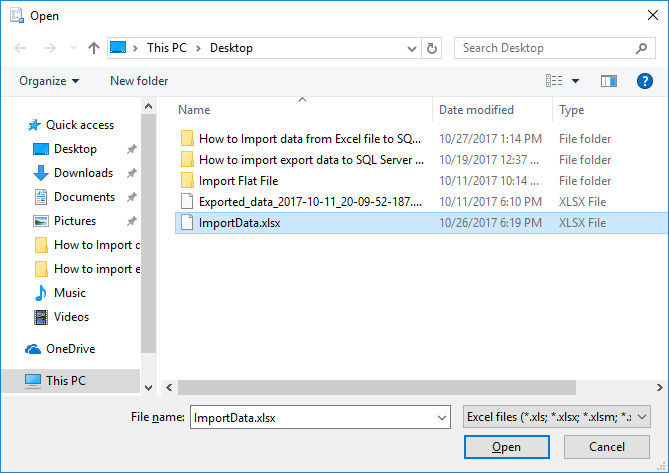
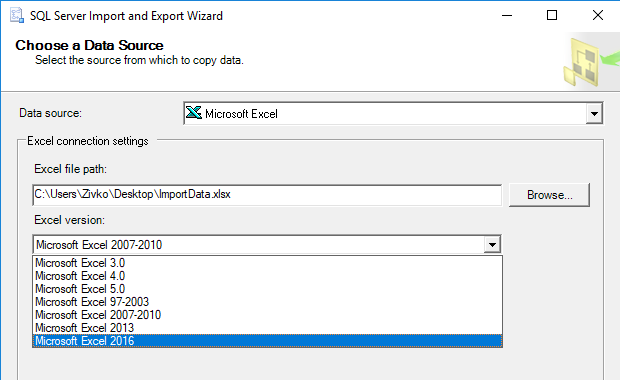
In the Excel file path box, type the location to the Excel file or use the Browse button to navigate to the location:
From the Excel version drop down box, choose the version of Excel that uses the source workbook. In our case, that is the Microsoft Excel 2016 version:
The latest option on this page is the First row has column names check box:
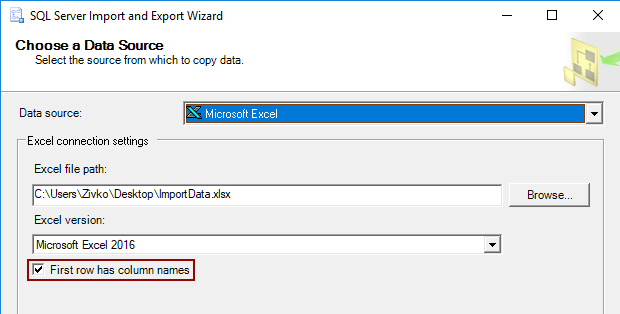
By default, this option is checked. It treads the first rows of the data source as the column names:
But if this option is enabled and data source does not contain column names, the SQL Server Import and Export Wizard will add the column names, starting with the name F1 for the first column name:
If this option is disabled and data source contain the column names the SQL Server Import and Export Wizard treats these columns as the first row of data:
Now, when everything is set on the Choose a Data Source page of the SQL Server Import and Export Wizard, click the Next button to continue.
The following warning message may appear after clicking the Next button:
The operation could not be completed.
Additional information:
The ‘Microsoft.ACE.OLEDB.16.0’ provider is not registered on the local machine. (System.Data)
Typically, this warning message appears when the SQL Server Import and Export Wizard is launched via SQL Server Management Studio (SSMS) which is a 32-bit application and the 32-bit version of the SQL Server Import and Export Wizard is launched, but you have installed the Microsoft Access Database Engine 2016 Redistributable 64 bit version.
There are two solutions for resolving this problem:
- The first is to launch the 64-bit version of the SQL Server Import and Export Wizard via the Start menu
- The second resolution is to install the Microsoft Access Database Engine 2016 Redistributable 32 bit version and continue using the SQL Server Import and Export Wizard via SSMS, but first, you need to uninstall the 64-bit version of Microsoft Access Database Engine 2016 Redistributable, otherwise the following warning message will appear when launching the installation package:
Note: The Microsoft Access Database Engine 2016 Redistributable can be installed in quiet mode.
Open the Command Prompt window and run the following:
For 32-bit version
C:Users<User_Name>DownloadsAccessDatabaseEngine.exe /quiet
For 64-bit version
C:Users<User_Name>DownloadsAccessDatabaseEngine_X64.exe /quiet

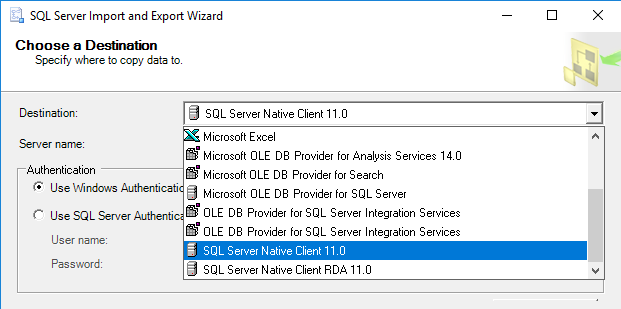
The next page on the SQL Server Import and Export Wizard is the Choose a Destination page:
On this page, determine the destination where data from the data source (Excel file) will be placed. In our case, the destination will be a SQL Server database.
Under the Destination drop down box, choose a provider that can connect to a SQL Server database.
One of providers that can connect to SQL Server is:
- .NET Framework Data Provider for SqlServer
- Microsoft OLE DB Provider for SQL Server
- SQL Server Native Client 11.0
In this case, the SQL Server Native Client 11.0 will be selected from the Destination list:
From the Server name combo box, select the SQL Server instance:
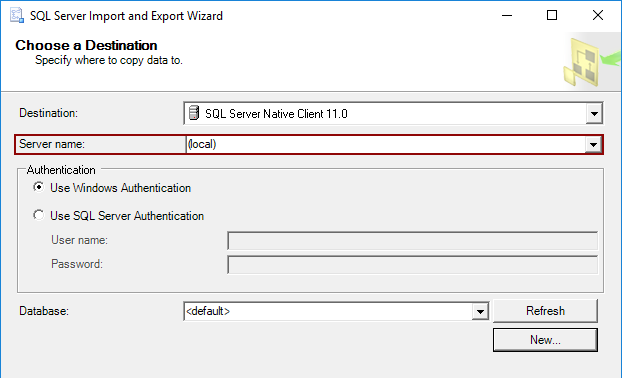
In the Authentication section, determine how it will be connected to SQL Server by using Windows or SQL Server Authentication mode.
From the Database drop down box, pick a database in which data from data source (Excel file) will be placed:
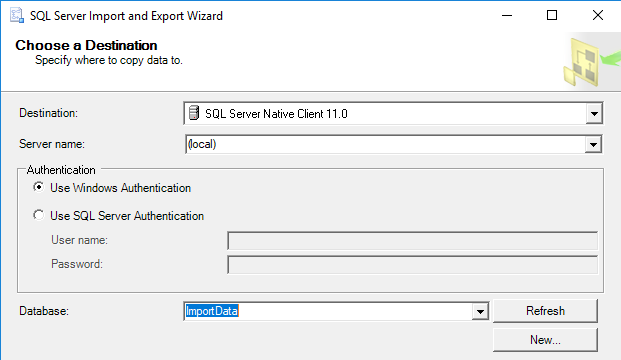
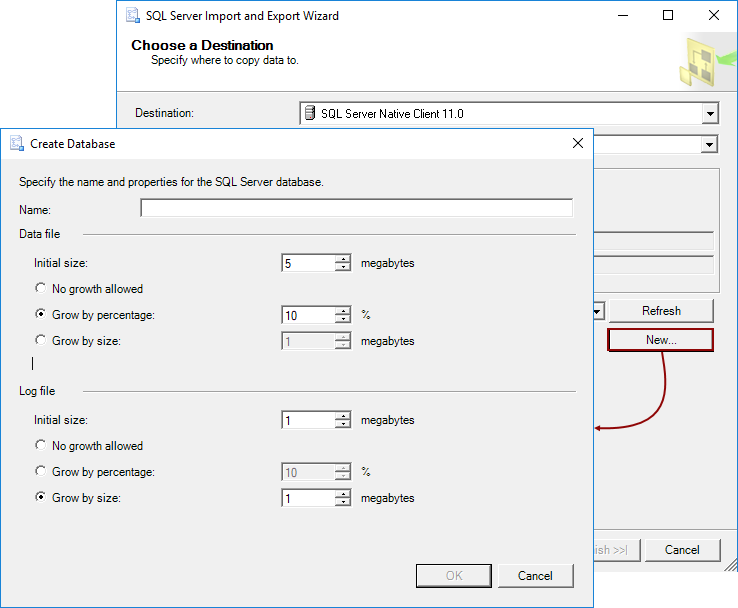
Or, create a new database as a destination for data from data source.
To do that, click the New button and in the Create Database dialog, set the parameters for the new SQL Server destination database:
When everything is set on the Choose a Destination page, click the Next button to proceed.
On the Specify Table Copy or Query page, determine how data from the data source will be copied to the destination:
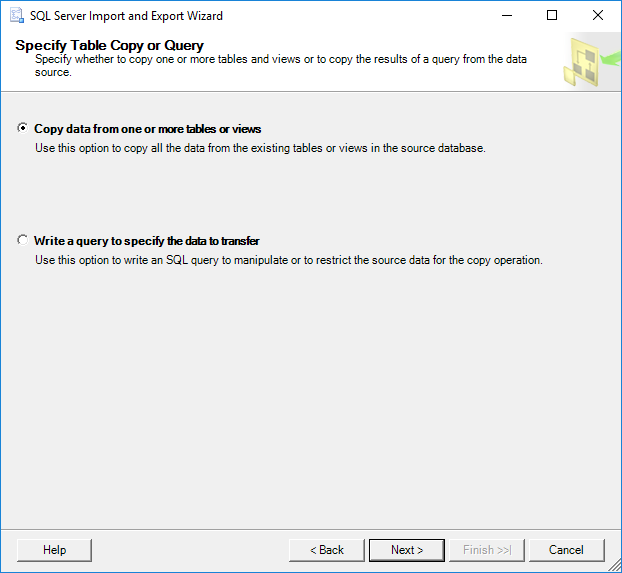
If the Copy data from one or more tables or views radio button is selected then all data from the chosen worksheets will be copied.
If the Write a query to specify the data to transfer is chosen, then only data that are specified in a SQL query will be copied from an Excel worksheet to a destination SQL Server database.
If the Write a query to specify the data to transfer in the Choose a Destination page is chosen, then the Provide a Source Query page will be shown when the Next button is pressed:
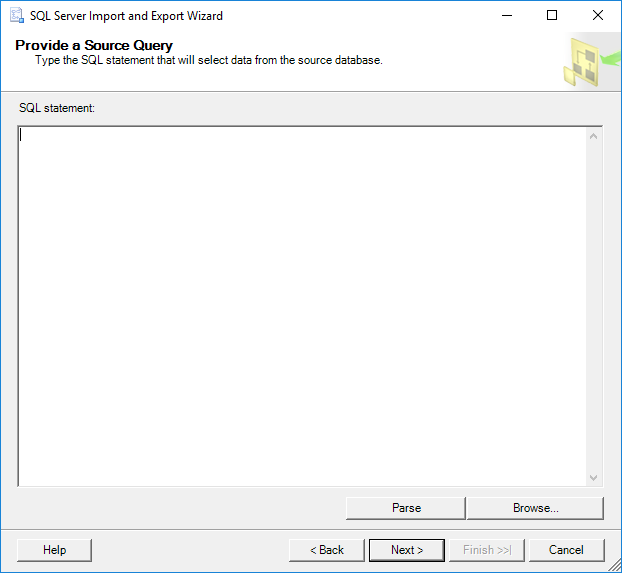
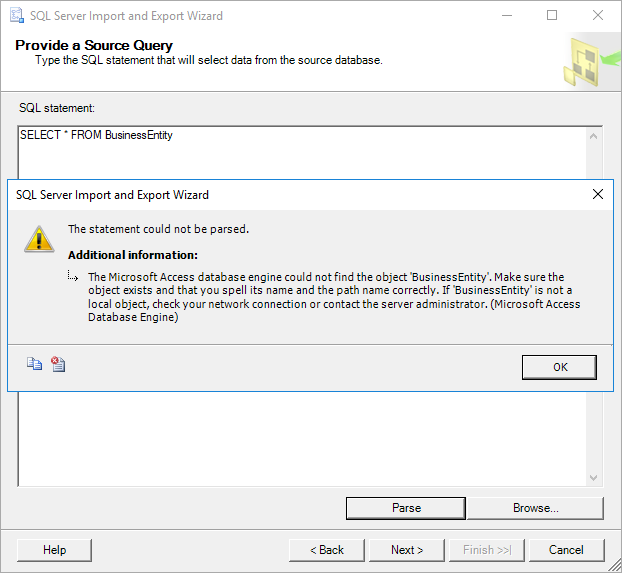
In the SQL statement text box, type the query that will select the data to copy form the Excel file to the SQL Server database or load a query using the Browse button.
To successfully query a worksheet the $ to the end of the sheet name and the brackets around sheet name, ([BusinessEntity$]) must be added, otherwise the following warning messages may appear:
The statement could not be parsed.
Additional information:
The Microsoft Access database engine could not find the object ‘BusinessEntity’. Make sure the object exists and that you spell its name and the path name correctly. If ‘BusinessEntity’ is not a local object, check your network connection or contact the server administrator. (Microsoft Access Database Engine)
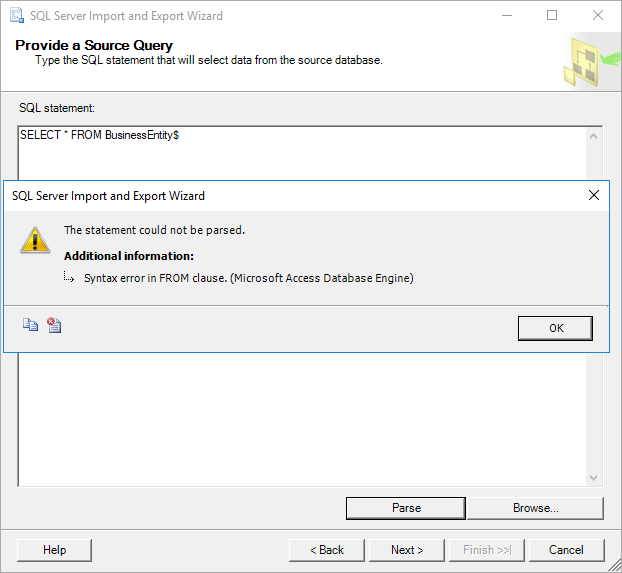
Or this:
The statement could not be parsed.
Additional information:
Syntax error in FROM clause. (Microsoft Access Database Engine)
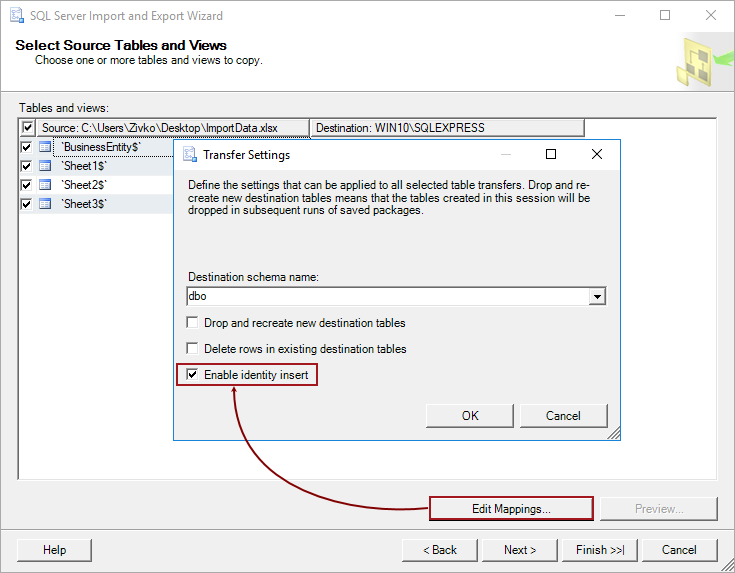
If the Copy data from one or more tables or views radio button is chosen, when the Next button is pressed, the Select Source Tables and Views page will be shown:
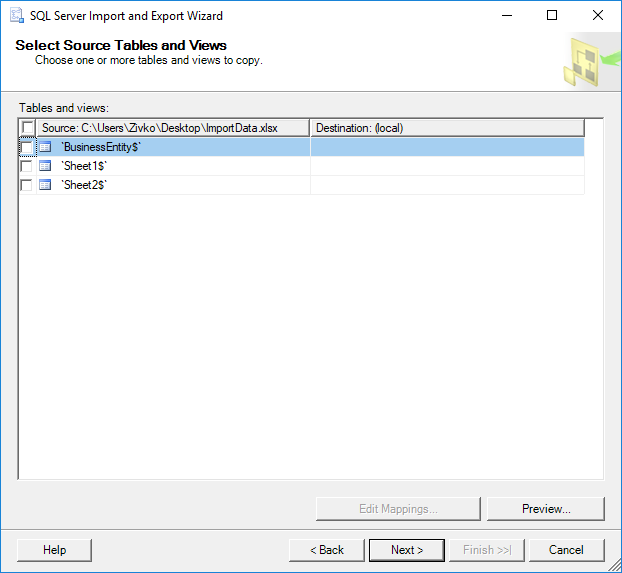
On this page, all worksheets for the Excel file (ImportData.xlsx) will be listed under the Source column. From the Source list, choose from which worksheets you want to import data to the SQL Server database by clicking the check box next to the name of the worksheets. The selected worksheets will appear in the Destination column:
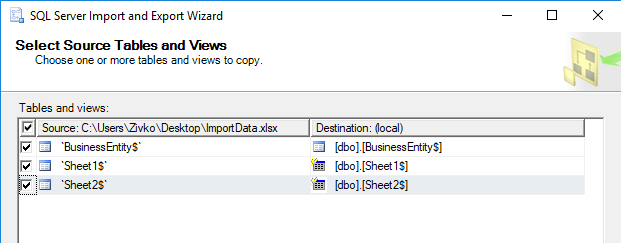
The name of the tables in the SQL Server database by default will be the names of the selected worksheets from the Source column, but these names can be changed by clicking on the name in the Destination column:
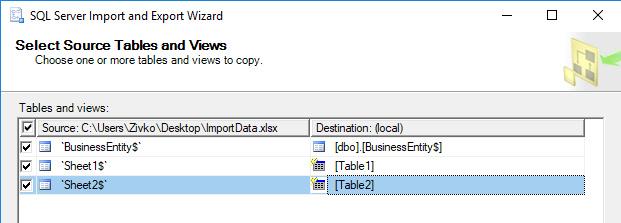
As it may be noticed, the icon in the Destination column for the BusinessEntity$ field is different from the Table1 and Table2 fields. This is because the table in the SQL Server database that is chosen as a destination already exists and for the Table1 and Table2 fields, new tables will be created.
When using an existing table, make sure that the destination table has the same number of columns that have data source, otherwise the columns from the data source that does not have an adequate destination column will be by default ignored (<ignore>) and the data from that columns will not be imported to a destination table:
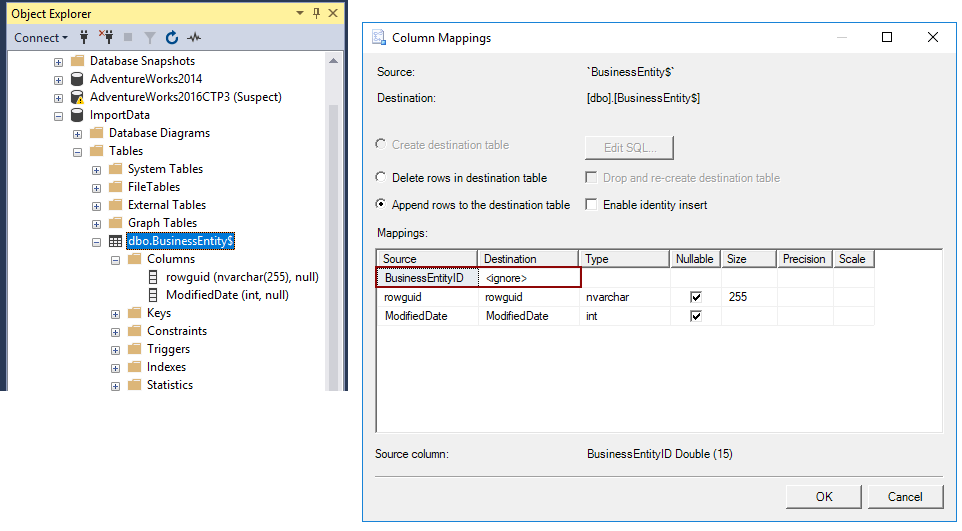
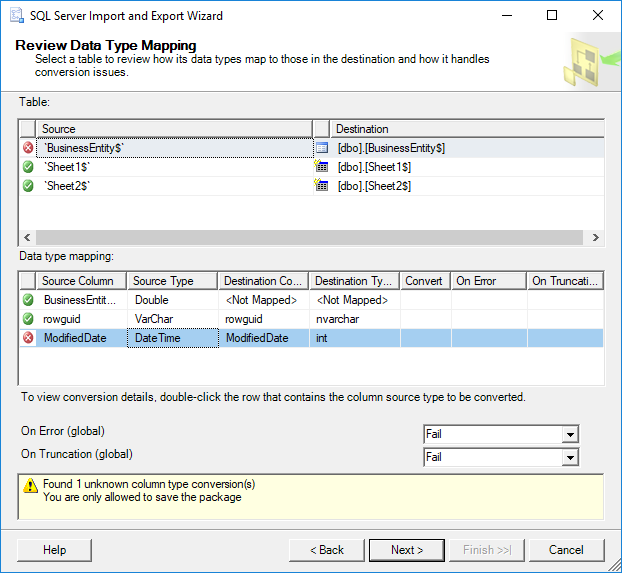
Also, make sure that columns in the destination table have data types that are compatible with the data types in the columns of the source data, otherwise the following error may appear:
Found 1 unknown column type conversion(s) You are only allowed to save the package
When the appropriate columns and the data types are set, click the Next button, the Save and Run Package page of the SQL Server Import and Export Wizard will appear:
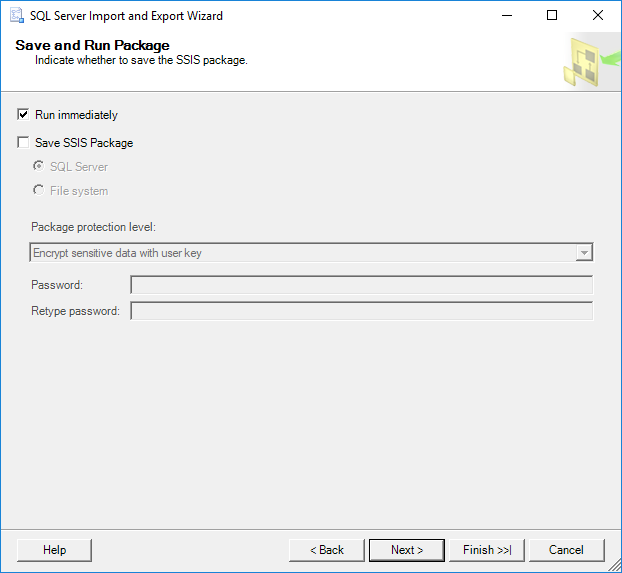
Click the Next button if want to import data from an Excel file to a SQL Server database, but if want to save the SSIS package for the later use, check the Save SSIS Package button.
On the Complete the Wizard page, choices that are made in the previous wizard pages are shown:
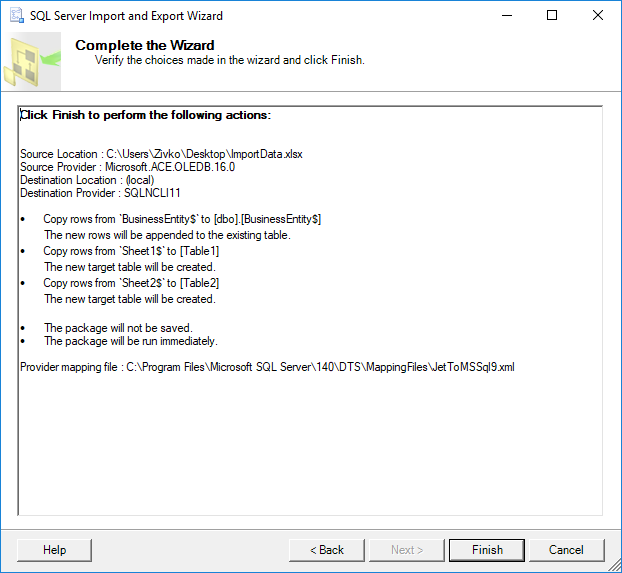
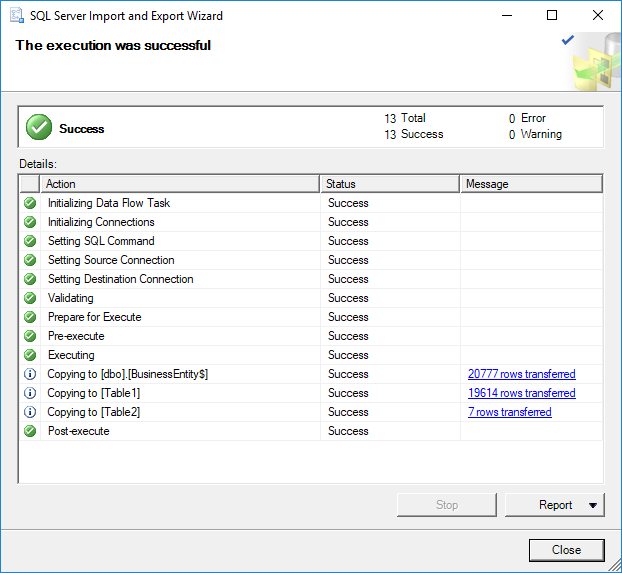
Click the Next button to import data from an Excel file to a SQL Server database. The Performing Operation page shows the status of the importing process if it is finished successfully or with the errors:
If the error occurs during the process of importing data from Excel file to the SQL Server database the Messages… word will appear in the Message column for the action that failed:
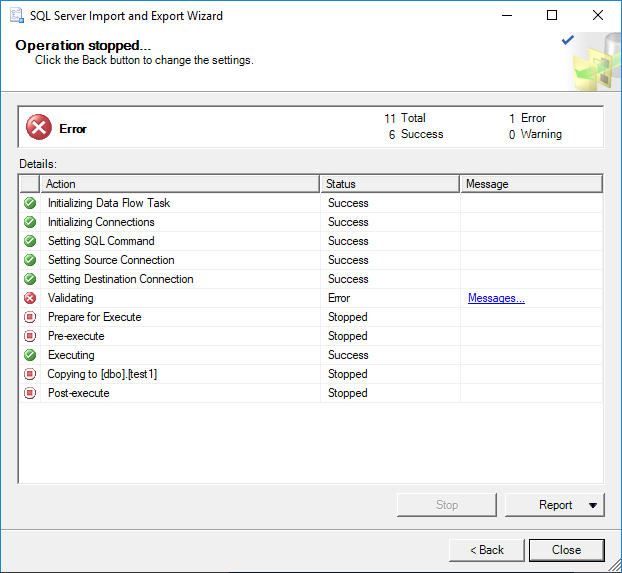
When click on the Messages…, the View Report dialog will appear with detailed information about the error:
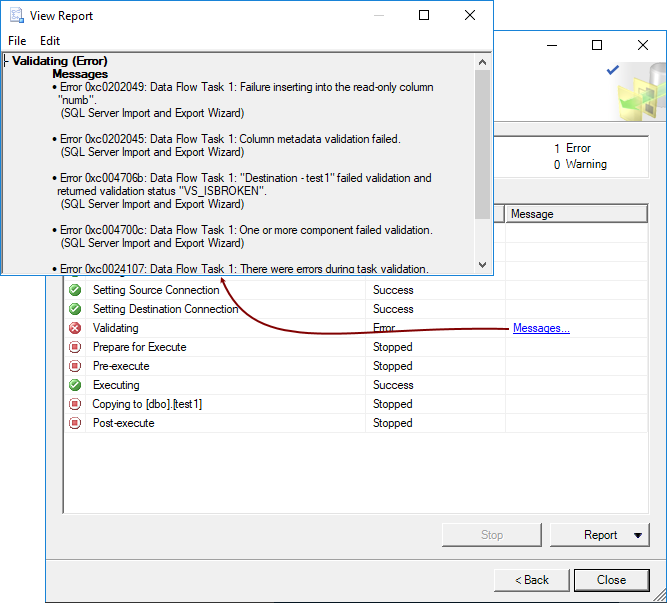
This error:
– Validating (Error)
Messages
- Error 0xc0202049: Data Flow Task 1: Failure inserting into the read-only column “numb”.
(SQL Server Import and Export Wizard)
- Error 0xc0202045: Data Flow Task 1: Column metadata validation failed.
(SQL Server Import and Export Wizard)
- Error 0xc004706b: Data Flow Task 1: “Destination – test1” failed validation and returned validation status “VS_ISBROKEN”.
(SQL Server Import and Export Wizard)
- Error 0xc004700c: Data Flow Task 1: One or more component failed validation.
(SQL Server Import and Export Wizard)
- Error 0xc0024107: Data Flow Task 1: There were errors during task validation.
(SQL Server Import and Export Wizard)
Typically, it appears when the destination table has an IDENTITY column. To resolve this, turn back to the Select Source Tables and Views page, select the tables that have identity property and press the Edit Mappings button. From the Transfer Settings dialog, select the Enable identity insert check box:
Also, another common problem that may appear when importing data from data source to the destination SQL Server tables is the FOREIGN KEY Constraints problem. In the error below two destination tables test1 and test2 are shown. The test2 table is referenced to the test1 table:
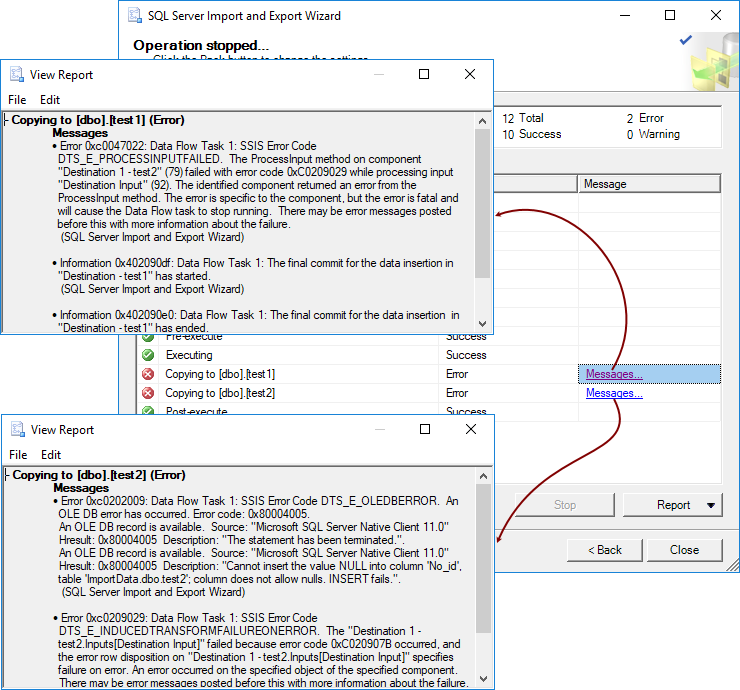
– Copying to [dbo].[test1] (Error)
Messages
- Error 0xc0047022: Data Flow Task 1: SSIS Error Code DTS_E_PROCESSINPUTFAILED. The ProcessInput method on component “Destination 1 – test2” (79) failed with error code 0xC0209029 while processing input “Destination Input” (92). The identified component returned an error from the ProcessInput method. The error is specific to the component, but the error is fatal and will cause the Data Flow task to stop running. There may be error messages posted before this with more information about the failure.
(SQL Server Import and Export Wizard)
- Information 0x402090df: Data Flow Task 1: The final commit for the data insertion in “Destination – test1” has started.
(SQL Server Import and Export Wizard)
- Information 0x402090e0: Data Flow Task 1: The final commit for the data insertion in “Destination – test1” has ended.
(SQL Server Import and Export Wizard)
– Copying to [dbo].[test2] (Error)
Messages
- Error 0xc0202009: Data Flow Task 1: SSIS Error Code DTS_E_OLEDBERROR. An OLE DB error has occurred. Error code: 0x80004005.
An OLE DB record is available. Source: “Microsoft SQL Server Native Client 11.0” Hresult: 0x80004005 Description: “The statement has been terminated.”.
An OLE DB record is available. Source: “Microsoft SQL Server Native Client 11.0” Hresult: 0x80004005 Description: “Cannot insert the value NULL into column ‘No_id’, table ‘ImportData.dbo.test2’; column does not allow nulls. INSERT fails.”.
(SQL Server Import and Export Wizard)
-
Error 0xc0209029: Data Flow Task 1: SSIS Error Code DTS_E_INDUCEDTRANSFORMFAILUREONERROR. The “Destination 1 – test2.Inputs[Destination Input]” failed because error code 0xC020907B occurred, and the error row disposition on “Destination 1 – test2.Inputs[Destination Input]” specifies failure on error. An error occurred on the specified object of the specified component. There may be error messages posted before this with more information about the failure.
(SQL Server Import and Export Wizard)
To resolve this problem, disable constraint for referenced table (test2) by executing the following code in SSMS:
|
ALTER TABLE test2 NOCHECK CONSTRAINT ALL |
After importing data from data source to the destination SQL Server database, execute the following code in SSMS to enable constraint for the test2 table:
|
ALTER TABLE test2 WITH CHECK CHECK CONSTRAINT ALL |
In some cases, the warning message like from the image below may appear:
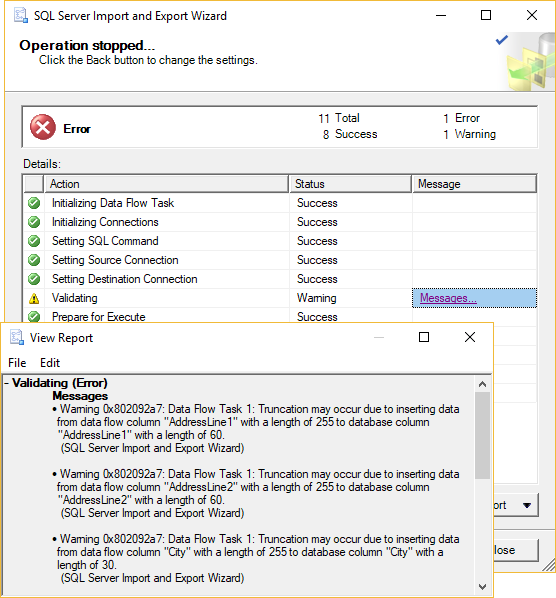
– Validating (Warning)
Messages
- Warning 0x802092a7: Data Flow Task 1: Truncation may occur due to inserting data from data flow column “AddressLine1” with a length of 255 to database column “AddressLine1” with a length of 60.
(SQL Server Import and Export Wizard)
- Warning 0x802092a7: Data Flow Task 1: Truncation may occur due to inserting data from data flow column “AddressLine2” with a length of 255 to database column “AddressLine2” with a length of 60.
(SQL Server Import and Export Wizard)
- Warning 0x802092a7: Data Flow Task 1: Truncation may occur due to inserting data from data flow column “City” with a length of 255 to database column “City” with a length of 30.
(SQL Server Import and Export Wizard)
- Warning 0x80049304: Data Flow Task 1: Warning: Could not open global shared memory to communicate with performance DLL; data flow performance counters are not available. To resolve, run this package as an administrator, or on the system’s console.
(SQL Server Import and Export Wizard)
To resolve this, go to the SQL Server destination table and increase the column size for the columns that are listed in the warning message.
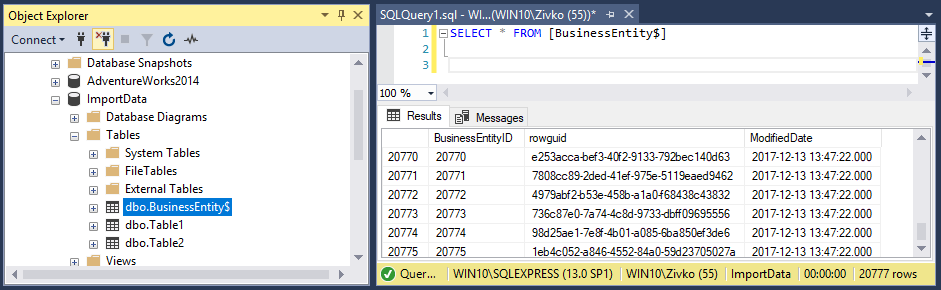
To verify that the data from the Excel file are imported to the SQL Server database, go to SSMS, find the database in which data are imported and list all data from the tables:
References:
- Import data from Excel to SQL Server or Azure SQL Database
- How to import/export data to SQL Server using the SQL Server Import and Export Wizard
- How to query Excel data using SQL Server linked servers
- Import and Export Data with the SQL Server Import and Export Wizard
- Author
- Recent Posts

Marko aka “Zivko” is a senior software analyst from Nis, Serbia focusing on SQL Server and MySQL as well as client technologies like SSMS, Visual Studio, and VSCode. He has extensive experience with quality assurance, issue escalation/resolution, and product evangelism.
He is a prolific author of authoritative content related to SQL Server including a number of “platinum” articles (top 1% in terms of popularity and engagement). His writing covers a range of topics on MySQL and SQL Server including remote/linked servers, import/export, LocalDB, SSMS, and more.
In his part-time, Zivko likes basketball, foosball (table-soccer), and rock music.
See more about Marko at LinkedIn
View all posts by Marko Zivkovic
For those who are using SQL SERVER 2012+ you can use the Microsoft OLEDB 12.0 Provider that comes with SQL Server 2012+ and which allows you to use Excel 2007-2013 xlsx files for adhoc distributed queries or as a linked server. Examples below.
The Excel workbook ‘Application.xlsx’ has 3 worksheets Application,Device,User
First Activate Ad Hoc Queries on the Server.
USE MSDB
GO
sp_configure 'show advanced options', 1
GO
RECONFIGURE WITH OverRide
GO
sp_configure 'Ad Hoc Distributed Queries', 1
GO
RECONFIGURE WITH OverRide
GO

EXEC master . dbo. sp_MSset_oledb_prop N'Microsoft.ACE.OLEDB.12.0' , N'AllowInProcess' , 1
GO

EXEC master . dbo. sp_MSset_oledb_prop N'Microsoft.ACE.OLEDB.12.0' , N'DynamicParameters' , 1
For Ad Hoc Queries use the OPENROWSET Function.
SELECT * FROM
OPENROWSET('Microsoft.ACE.OLEDB.12.0', 'Excel   8.0;Database=C:UsersAdministratorDesktopApplication.xlsx;HDR=YES', 'SELECT * FROM [Application$]');

SELECT * FROM
OPENROWSET('Microsoft.ACE.OLEDB.12.0', 'Excel   8.0;Database=C:UsersAdministratorDesktopApplication.xlsx;HDR=YES', 'SELECT * FROM [Device$]');

SELECT * FROM
OPENROWSET('Microsoft.ACE.OLEDB.12.0', 'Excel  8.0;Database=C:UsersAdministratorDesktopApplication.xlsx;HDR=YES', 'SELECT * FROM [User$]');
For Creating a Linked Server for Excel 2007-2013 format:
USE MSDB
GO
EXEC sp_addLinkedServer
@server= 'XLSX_MATRIX',
@srvproduct = 'ACE 12.0',
@provider = 'Microsoft.ACE.OLEDB.12.0',
@datasrc = 'C:UsersAdministratorDesktopApplication.xlsx',
@provstr = 'Excel 12.0; HDR=Yes'
Now, query your excel file in two ways:
SELECT * FROM OPENQUERY (XLSX_MATRIX, 'Select * from [Application$]')
SELECT * FROM OPENQUERY (XLSX_MATRIX, 'Select * from [Device$]')
SELECT * FROM OPENQUERY (XLSX_MATRIX, 'Select * from [User$]')

SELECT * FROM XLSX_MATRIX...[Application$]
SELECT * FROM XLSX_MATRIX...[Device$]
SELECT * FROM XLSX_MATRIX...[User$]
Dear readers of our blog, we’d like to recommend you to visit the main page of our website, where you can learn about our product SQLS*Plus and its advantages.
SQLS*Plus — best SQL Server command line reporting and automation tool! SQLS*Plus is several orders of magnitude better than SQL Server sqlcmd and osql command line tools.
Enteros UpBeat offers a patented database performance management SaaS platform. It proactively identifies root causes of complex revenue-impacting database performance issues across a growing number of RDBMS, NoSQL, and deep/machine learning database platforms. We support Oracle, SQL Server, IBM DB2, MongoDB, Casandra, MySQL, Amazon Aurora, and other database systems.
18 August 2020

Microsoft SQL Server allows you to import data from an Excel file into a database using the built-in T-SQL language in an SQL query. Today I will tell you in detail how it is done, what conditions need to be fulfilled to make this operation successful, tell you about the features of import for the most common cases of SQL server configurations and give specific procedures and practical examples.
I will start by saying that you can import data from Excel to Microsoft SQL Server using “Distributed Queries” and “Linked Servers”. You probably already know this, as I have written about it more than once (references to the relevant materials are given above).
You can access the Excel file and import data into Microsoft SQL Server using T-SQL instructions OPENDATASOURCE, OPENROWSET or OPENQUERY.
However, in the above articles I have missed several important points, one of which is that all SQL Server configurations are different, due to which many have different problems and errors during the execution of distributed queries and calls to related servers.
I also described the way to download data from Excel, which is now outdated, so today I will try to give you a little more information on how to import data from Excel file to Microsoft SQL Server in T-SQL language.
Introduction
So, as I said, the configuration of the SQL server plays a very important role here, in particular, which version of the server is installed, x86 or x64.
If we talk about the latest versions of Microsoft SQL Server 2016-2019, they are only x64 and are installed on 64-bit versions of Windows.
On this basis, I will divide the article into several parts, in each of which I will tell you about features of importing data from Excel for the most common configuration cases and give you a specific order of action.
In order to quickly find out which version of SQL Server is installed on your computer, you can make a simple SQL query
SELECT @@VERSION;
Access to the Excel file and, accordingly, data import into Microsoft SQL Server is performed by special providers (vendors). To work with Excel in Microsoft SQL Server are usually used:
- Jet.OLEDB.4.0
- ACE.OLEDB.12.0
In all examples below, I will send a simple SELECT query to select data from an Excel file to check access to the data in the Excel file. To import data (upload data to the database), you can use any method convenient for you, e.g. SELECT INTO or INSERT INTO construction.
In addition, it is recommended to close the Excel file when accessing it in distributed queries, as well as to specify the path to the file without spaces (although modern SQL server can work with spaces).
Import data from Excel 2003 (xls file) into Microsoft SQL Server x86
Step 1 – Check for Microsoft.Jet.OLEDB.4.0 provider on SQL Server
The first thing we need to start with is to check if Microsoft.Jet.OLEDB.4.0 provider is registered on SQL Server, because in this case we need to use that provider. This can be done using the following SQL instruction
EXEC sp_enum_oledb_providers;
The resulting dataset should contain a string with Microsoft.Jet.OLEDB.4.0. If there is no such provider, then most likely there is no Excel 2003 installed in the system and, accordingly, it should be installed.
Step 2 – Granting user rights to a temporary directory
The peculiarity of distributed queries and work with related Excel servers in x86 versions of SQL Server is that regardless of the name of which account sends an SQL query to Excel, this account must have rights to write to the temporary directory of the account under which the SQL Server service itself operates.
Since the OLE DB vendor creates a temporary file during the query in the temporary directory of SQL Server using the credentials of the user executing the query.
Thus, if the SQL Server service runs on behalf of either a local or a network service, it is necessary to give the appropriate permissions to the temporary directory of these services to all users who will send distributed queries and contact the associated Excel server (if the server runs on behalf of the user who sends SQL queries, then such permissions are not required, it already has them).
This can be done using the built-in command line utility icacls.
For example, for a local service, the command will look like this.
icacls C:WindowsServiceProfilesLocalServiceAppDataLocalTemp /grant UserName:(R,W)
For network service
icacls C:WindowsServiceProfilesNetworkServiceAppDataLocalTemp /grant UserName:(R,W)
In place of UserName, provide the name of the user who sends the request.
Step 3 – Enable distributed queries on SQL Server
By default, the ability to use distributed queries, particularly the OPENDATASOURCE and OPENROWSET functions, is prohibited in Microsoft SQL Server, so this feature must be enabled first.
It is enabled using the system stored procedure sp_configure, which is responsible for system parameters of the server. We need to set the Ad Hoc Distributed Queries parameter to 1, to do this we execute the following SQL instruction.
sp_configure 'show advanced options', 1;
RECONFIGURE;
GO
sp_configure 'Ad Hoc Distributed Queries', 1;
RECONFIGURE;
GO
Step 4 – Execute SQL query, access to Excel file
Below I will give you some options for accessing the Excel file (TestExcel.xls).
OPENROWSET
SELECT * FROM OPENROWSET
(
'Microsoft.Jet.OLEDB.4.0',
'Excel 8.0; Database=D:TestExcel.xls',
'SELECT * FROM [List 1$]'.
);
OPENDATASOURCE
SELECT * FROM OPENDATASOURCE('Microsoft.Jet.OLEDB.4.0'),
'Data Source=D:TestExcel.xls;
Extended Properties=Excel 8.0')...[List1$];
Linked Server
--Creation of a linked server
EXEC sp_addlinkedserver @server = 'TEST_EXCEL',
@srvproduct = 'Excel',
@provider = 'Microsoft.Jet.OLEDB.4.0',
@datasrc = 'D:TestExcel.xls',
@provstr = 'Excel 8.0;IMEX=1;HDR=YES;';
--Security settings (authorization)
EXEC dbo.sp_addlinkedsrvlogin @rmtsrvname='TEST_EXCEL',
@useself= 'False',
@locallogin=NULL,
@rmtuser=NULL,
@rmtpassword=NULL;
-- Address to the associated server
SELECT * FROM OPENQUERY (TEST_EXCEL, 'SELECT * FROM [List1$]');
--or
SELECT * FROM TEST_EXCEL...[List1$];
Import of data from Excel 2007 and higher (xlsx file) into Microsoft SQL Server x86
Step 1 – Check for Microsoft.ACE.OLEDB.12.0 provider on SQL Server
Just like in the previous example, we first check if we have the ISP we need installed, in this case we need Microsoft.ACE.OLEDB.12.0.
EXEC sp_enum_oledb_providers;
Step 2 – Installing Microsoft.ACE.OLEDB.12.0 (32-bit) Provider
If there is no provider, it must be installed. Here’s a link to the ISP download: https://www.microsoft.com/en-us/download/details.aspx?id=13255
Select and download the file corresponding to the x86 architecture (i.e. in the name without x64).
Step 3 – Granting user rights to a temporary directory
In this case, we also give rights to the temporary directory of local or network service to all users who will send SQL queries to the Excel file.
We use the same command line utility icacls.
For local service:
icacls C:WindowsServiceProfilesLocalServiceAppDataLocalTemp /grant UserName:(R,W)
For network service:
icacls C:WindowsServiceProfilesNetworkServiceAppDataLocalTemp /grant UserName:(R,W)
In place of UserName, provide the name of the user who sends the request.
Step 4 – Enable Distributed Queries on SQL Server
Enable the ability to use OPENDATASOURCE and OPENROWSET on Microsoft SQL Server, I repeat that this feature is disabled by default.
sp_configure 'show advanced options', 1;
RECONFIGURE;
GO
sp_configure 'Ad Hoc Distributed Queries', 1;
RECONFIGURE;
GO
Step 5 – Configuring Microsoft.ACE.OLEDB.12.0 provider
In this case you will need to additionally configure the provider Microsoft.ACE.OLEDB.12.0. To do this, enable the following provider parameters (specify 0 instead of 1 to disable).
EXEC sp_MSset_oledb_prop N'Microsoft.ACE.OLEDB.12.0', N'AllowInProcess', 1
GO
EXEC sp_MSset_oledb_prop N'Microsoft.ACE.OLEDB.12.0', N'DynamicParameters', 1
GO
If these parameters are not included, an error is likely to appear, approximately the following
“Message 7399, level 16, state 1, line 25.
The provider of OLE DB “Microsoft.ACE.OLEDB.12.0” for the associated server “(null)” reported an error. The provider did not provide the error data.
Message 7330, level 16, state 2, line 25
We failed to get the string from the OLE DB provider “Microsoft.ACE.OLEDB.12.0” for the associated server “(null)”.
Step 6 – Execute SQL query, access to Excel file
Examples of accessing the Excel file (TestExcel.xlsx).
OPENROWSET
SELECT * FROM OPENROWSET
(
'Microsoft.ACE.OLEDB.12.0',
'Excel 12.0;
Database=D:TestExcel.xlsx',
'SELECT * FROM [List 1$]'.
);
OPENDATASOURCE
SELECT * FROM OPENDATASOURCE('Microsoft.ACE.OLEDB.12.0'),
'Data Source=D:TestExcel.xlsx;
Extended Properties=Excel 12.0')...[List1$];
Linked Server
--Creation of a linked server
EXEC sp_addlinkedserver @server = 'TEST_EXCEL',
@srvproduct = 'Excel',
@provider = 'Microsoft.ACE.OLEDB.12.0',
@datasrc = 'D:TestExcel.xlsx',
@provstr = 'Excel 12.0;IMEX=1;HDR=YES;';
--Security settings (authorization)
EXEC dbo.sp_addlinkedsrvlogin @rmtsrvname='TEST_EXCEL',
@useself= 'False',
@locallogin=NULL,
@rmtuser=NULL,
@rmtpassword=NULL;
-- Address to the associated server
SELECT * FROM OPENQUERY (TEST_EXCEL, 'SELECT * FROM [List1$]');
-or
SELECT * FROM TEST_EXCEL...[List1$];
Import of data from Excel (any files) into Microsoft SQL Server x64
Step 1 – Check for Microsoft.ACE.OLEDB.12.0 provider on SQL Server
In this case we also use Microsoft.ACE.OLEDB.12.0 provider, first check if it is registered on the server.
EXEC sp_enum_oledb_providers;
Step 2 – Installing Microsoft.ACE.OLEDB.12.0 (64-bit) provider
In case the provider is not installed, it must be downloaded and installed: https://www.microsoft.com/en-us/download/details.aspx?id=13255
Download the x64 file.
Step 3 – Enable distributed queries on SQL Server
There is also a need to enable the ability to use distributed queries (OPENDATASOURCE and OPENROWSET) on Microsoft SQL Server x64, so first enable it by following exactly the same instruction.
sp_configure 'show advanced options', 1;
RECONFIGURE;
GO
sp_configure 'Ad Hoc Distributed Queries', 1;
RECONFIGURE;
GO
Step 4 – Configuring Microsoft.ACE.OLEDB.12.0 provider
In this case, most likely, the provider configuration is not required, so first try to execute SQL queries (refer to data in Excel), and if an error occurs (all with the same message 7399 and 7330), then try to enable the parameters AllowInProcess and DynamicParameters (to disable, specify 0 instead of 1).
EXEC sp_MSset_oledb_prop N'Microsoft.ACE.OLEDB.12.0', N'AllowInProcess', 1
GO
EXEC sp_MSset_oledb_prop N'Microsoft.ACE.OLEDB.12.0', N'DynamicParameters', 1
GO
Step 5 – Execute SQL query, access to Excel file
Here the same parameters are used in SQL queries as in the previous example. For convenience, I will duplicate them once again.
Examples of accessing the Excel file (TestExcel.xlsx):
OPENROWSET
SELECT * FROM OPENROWSET
(
'Microsoft.ACE.OLEDB.12.0',
'Excel 12.0;
Database=D:TestExcel.xlsx',
'SELECT * FROM [List 1$]'.
);
OPENDATASOURCE
SELECT * FROM OPENDATASOURCE('Microsoft.ACE.OLEDB.12.0'),
'Data Source=D:TestExcel.xlsx;
Extended Properties=Excel 12.0')...[List1$];
Linked Server
--Creation of a linked server
EXEC sp_addlinkedserver @server = 'TEST_EXCEL',
@srvproduct = 'Excel',
@provider = 'Microsoft.ACE.OLEDB.12.0',
@datasrc = 'D:TestExcel.xlsx',
@provstr = 'Excel 12.0;IMEX=1;HDR=YES;';
--Security settings (authorization)
EXEC dbo.sp_addlinkedsrvlogin @rmtsrvname='TEST_EXCEL',
@useself= 'False',
@locallogin=NULL,
@rmtuser=NULL,
@rmtpassword=NULL;
--Address to the associated server
SELECT * FROM OPENQUERY (TEST_EXCEL, 'SELECT * FROM [List1$]');
--or
SELECT * FROM TEST_EXCEL...[List1$];
Summing up
Finally, I will group the actions to be performed depending on the release of SQL Server (x68 or x64) and the version of the Excel file (xls or xlsx) into one table for your convenience.
| Action / Configure | Import Excel 2003 (xls file) into SQL Server x86 | Import Excel 2007 (xlsx file) into SQL Server x86 | Import Excel (any files) into SQL Server x64 |
| Installing Excel 2003 | Yes | No | No |
| Installing Microsoft.ACE.OLEDB.12.0 provider | No | Yes (x86) | Yes (x64) |
| Granting rights to a temporary service directory (if the SQL server is running on behalf of services) | Yes | Yes | No |
| Configuring Microsoft.ACE.OLEDB.12.0 provider | No | Yes | No (as required) |
| Connection parameters in SQL queries | Microsoft.Jet. OLEDB.4.0 and Excel 8.0 | Microsoft.ACE. OLEDB.12.0 and Excel 12.0 | Microsoft.ACE. OLEDB.12.0 and Excel 12.0 |
| Enabling distributed queries on SQL Server | Yes | Yes | Yes |
That’s all for today, good luck in learning T-SQL!
Import data from Excel to SQL Server table
Tags: Microsoft SQL Server, SQL, sql server, sqls, sqls ms, T-SQL, TSQL