
You can add hyperlinks to your document that give your readers instant access to information in another part of the same document. The hyperlink can be text or graphics. By using hyperlinks, you can provide information to your readers without repeating the same information on different pages.
To add links that jump from one part of a document to another part of the same document, mark the destination and then add a link to it.
Mark the destination
Mark the hyperlink destination with a bookmark or a heading style.
Insert a bookmark
-
Select text or an item, or click where you want to insert a bookmark.
-
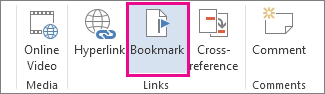
Click Insert > Bookmark.

-
Under Bookmark name, type a name.
Note: Bookmark names need to begin with a letter. They can include both numbers and letters, but not spaces. If you need to separate words, you can use an underscore ( _ )—for example, First_heading.
-
Click Add.

Apply a heading style
Headings are automatically marked as a destination. All you need to do is apply one of the built-in heading styles.
-
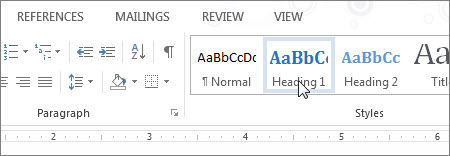
Select the text to which you want to apply a heading style.
-
On the Home tab, click the style you want.
Add the link
After you’ve marked the destination, you’re ready to add the link.
-
Select the text or object you want to use as a hyperlink.
-
Right-click and then click Hyperlink
. -
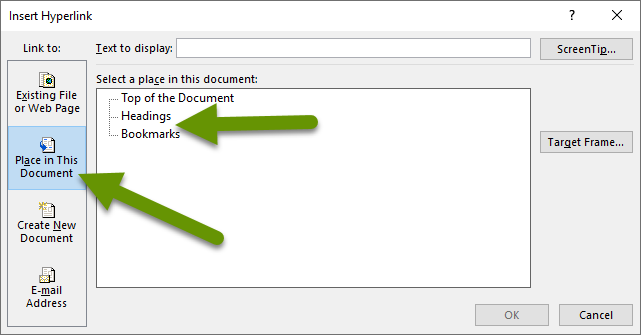
Under Link to, click Place in This Document.
-
In the list, select the heading or bookmark that you want to link to.
Note: To customize the Screen Tip that appears when you rest the pointer over the hyperlink, click ScreenTip, and then type the text that you want.
 .
.See Also
Add or delete bookmarks in a Word document or Outlook message
Add a PDF to your Office file
Use hyperlinks in a table of contents
Create a table of contents
Need more help?
When using Word to create a document that is long, has steps, or covers many areas of content, it is a good idea to create titles or headings that can be linked to sections in the document. The benefit of using links is it allows users to jump right to the information they need.
Using links to connect to information in a document is one of the easiest ways to navigate a document. Not only is it a time saver for the recipients of the document, but it can also be helpful for the document creator. This post discusses the best of two ways to add links in a Word document.
For a video demonstrating the same information:
The Best Way to Link to Different Sections in a Word Document
Linking a word, phrase, or title to the place in the document where that particular topic is discussed is a great way to organize a document. Unfortunately, linking content within the same Word document is limited to one of two ways:
- Headings
- Bookmarks
Of the two options, when you are working with bulleted lists of any kind, using bookmarks to link sections is far easier than linking headings. To see why bookmarks are better, you first need to understand how using headings works.
Headings
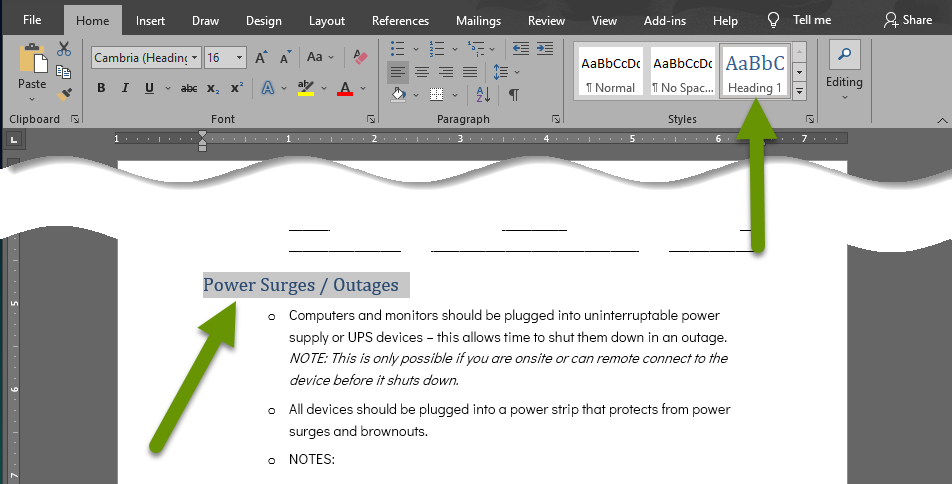
Using headings simply means linking titles to content in another area of the document that has been formatted into a heading style. Only content that has been styled as a heading will be available to link to when creating links.
In this example we have a document with a page of titles that need to be linked to sections in the document that match these titles. Once we style the content titles within the document as headings, we can link to them from the first page.
To create headings that can be linked to:
- Select the title or text in the document that represents the desired link destination.
- On the Home tab, click any of the Heading styles available in the Styles section to change the formatting of the text.
- With the text changed to a heading, you will notice much of its formatting has changed. Beyond that, it no longer has a bullet and is not part of the list.
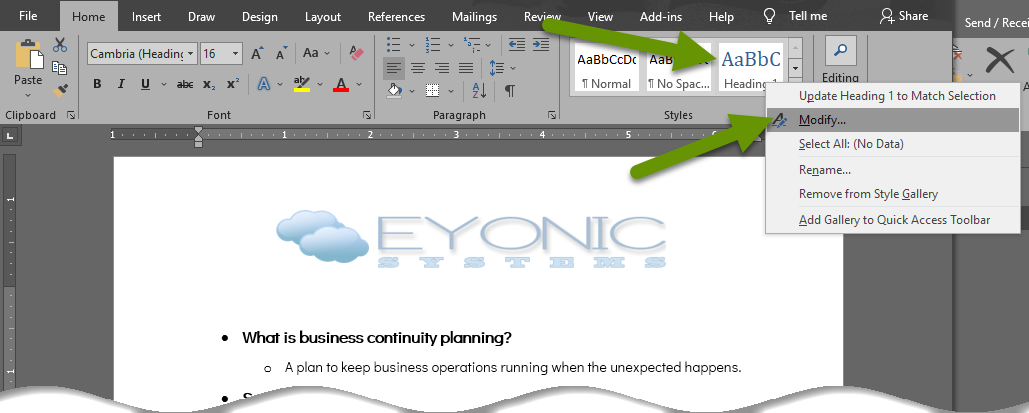
NOTE: The types of changes made by formatting content as a heading — the font size, type, color, etc., can be adjusted in many ways. These changes fall outside the scope of this post because they do not affect linking the text beyond the fact that the text has to be formatted as a heading. However, if you want to see what can be modified, right-click the heading style box and select «Modify» in the pop-up window.
Here is a comparison of the original content, still in list form, as well as the same content changed to a heading, where the list formatting was lost.

The longer the document you are working with, the more drastic having an element be removed from a list can be. Sometimes this can also affect sub-lists and you could spend a great deal of time chasing this down and trying to get your list righted. Luckily, there is a better way to link titles to content in a document when that content is part of any list.
Bookmarks
While styling content as a heading so it can be linked to, adding a bookmark that can be linked to does not change the content in any way. This means bookmarks do not break any lists the content is a part of either.
To create bookmarks that can be linked to:
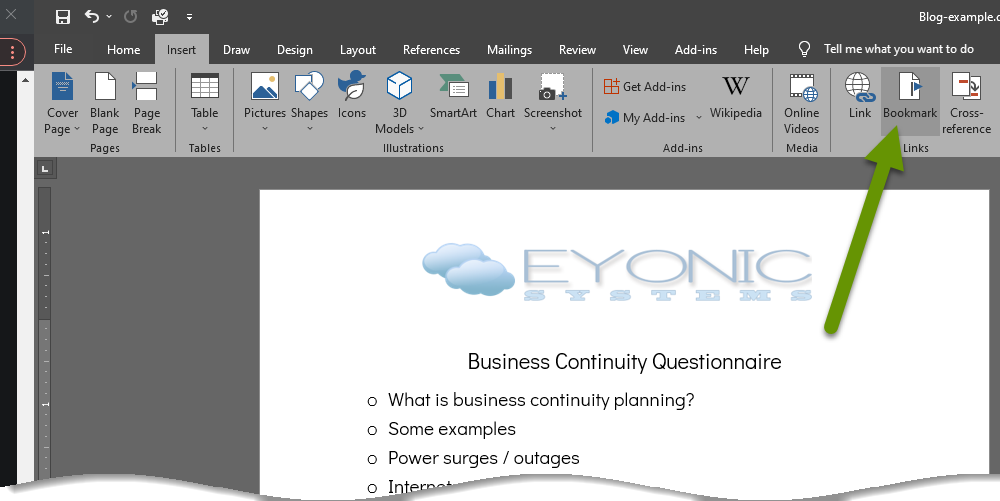
- Click in the document next to content that will be the destination of a link you are going to create.
- Click on the «Insert» tab and click «Bookmark» in the Links section.
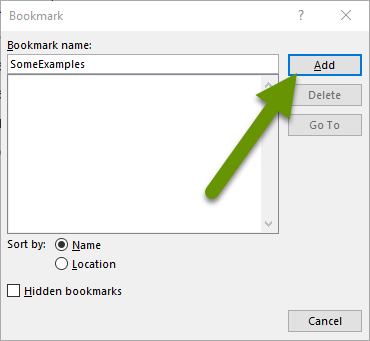
- Enter a name for the bookmark. This can be as specific or as vague as you want, but keep in mind you will likely be making several bookmarks and will want to know what to link together after creating them all. NOTE: Bookmarks do not allow you to enter spaces in their names. If you add a space, the Add button will be disabled until you remove it.
- Once the bookmark has been named, click the «Add» button.
- Continue creating bookmarks by moving to a new location in the document and following the same insert bookmark process.
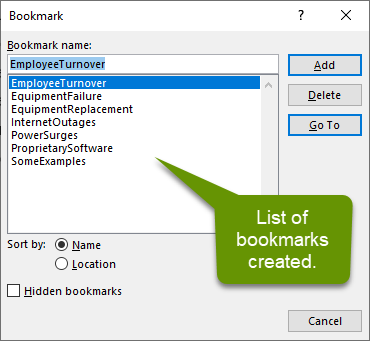
NOTE: Setting the bookmarks to sort by Name is often more effective in long documents where you are searching for a name that matches the title where sorting by Location may make more sense in shorter documents. Click the radio button next to whichever sort type best suits your needs, knowing you can change this at any time.
To link titles to bookmarks:
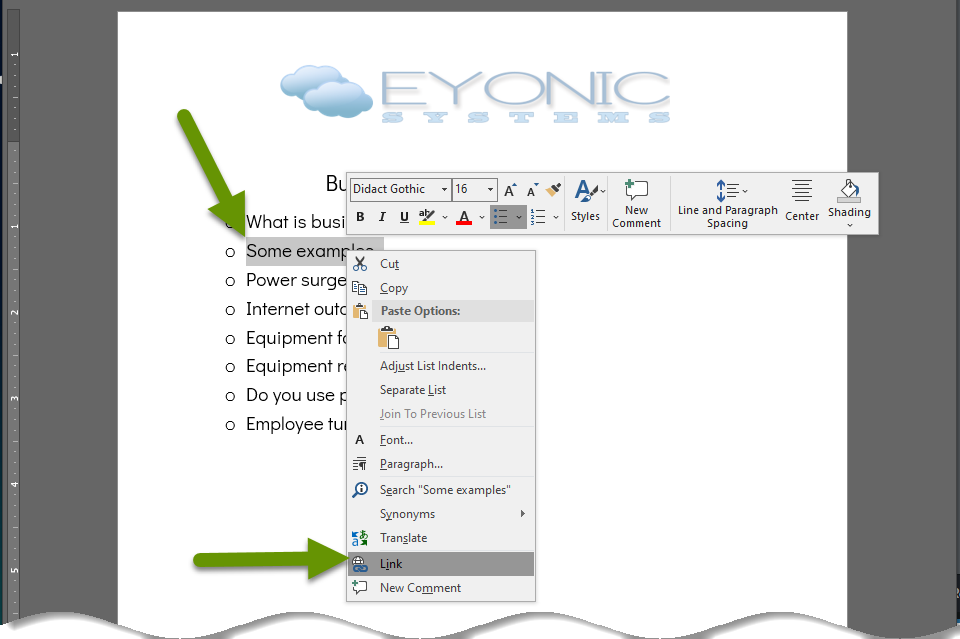
- Highlight the content in the document, usually the first page, where you want to create the link and right-click on the highlighted text.
- Select «Link» from the bottom of the menu.
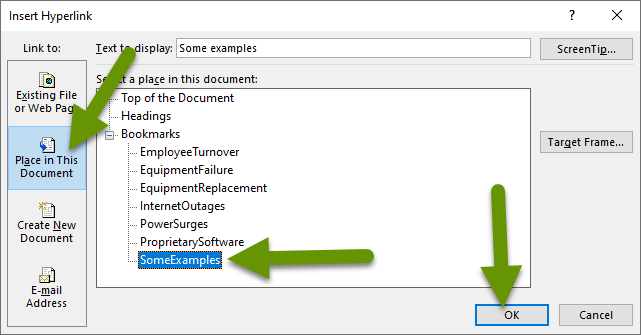
- In the Insert Hyperlink box, click on the «Place in This Document» tab in the left pane.
- Click on the corresponding bookmark under the heading «Select a place in this document:» and click the «OK» button.
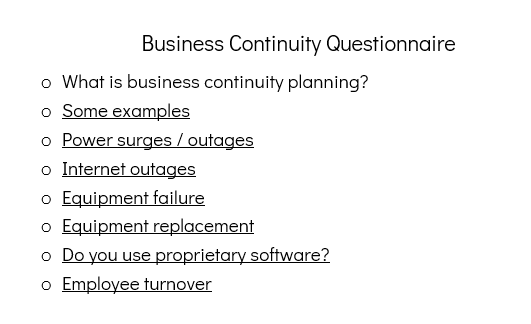
- Repeat the process of highlighting titles and linking them to the appropriate bookmark until all links have been created.
- If desired, change the blue font or underlining applied to the linked titles.
Anyone accessing this document can press the Ctrl key and click on a link to go directly to the link destination. Additionally, if the document is saved as a .pdf, users can click on any link and go directly to the destination in the document.
Adding titles or a table of contents to a large document is a great way to make the information in it more accessible. There are two ways to create links within documents: using headings and bookmarks. When you have a document with items in a list, using bookmarks is a much more efficient way to create links to content. Once links are created, they can be used in Word or .pdf format.
As always, there is often more than one way to accomplish the same thing, but understanding what makes one way better than another can save a lot of time and frustration!
How to Add and Edit Links in Word Documents
Insert hyperlinks quickly
Updated on February 11, 2021
What to Know
- Highlight text you want to hyperlink. Right-click it and choose Link. Alternatively, select Insert > Links > Link.
- Then, enter the URL in the Address field.
- Remove a link: Right-click the hyperlink text and choose Remove Hyperlink.
Microsoft Word is primarily used to create word processing documents, but you can also work with hyperlinks and HTML code used in websites. Learn how to insert, remove, or edit hyperlinks using Word for Microsoft 365, Word 2019, Word 2016, Word 2013, and Word 2010.
Insert Links
To link to other documents or web pages from a Word document, insert a hyperlink.
-
Select the text that you want to apply the hyperlink to. This can be the text of a URL, a single word, a phrase, a sentence, or a paragraph.
-
Right-click the text and select Link or Hyperlink to open the Insert Hyperlink dialog box. Or, go to the Insert tab and select Links > Link.
-
In the Address field, enter the URL address of the document or website you want to link to. For online assets, the URL must include the protocol (for example, http, https, or ftp).
The Text to display text box defaults to the text you selected in step 1. You can change this text here if you like.
-
Select OK.
-
The selected text appears as a hyperlink that can be clicked to open the linked document or website.
To make changes to the link, right-click the hyperlink and select Edit Hyperlink.
Remove Hyperlinks
When you type a URL into Word, it automatically inserts a hyperlink that connects to the website. This feature is handy if you distribute documents electronically, but it can be a nuisance when printing documents.
To remove a hyperlink, right-click the link and select Remove Hyperlink.
In Word for Mac, right-click then select Hyperlink. In the slide-out menu, select Edit Hyperlink, then choose Remove Link.
More About Editing Hyperlinks
When you work in the Insert Hyperlink dialog box and the Edit Hyperlink dialog box, several other features are available on the left side of the dialog box.
Existing File or Web Page
This tab is selected by default in the Insert Hyperlink and the Edit Hyperlink dialog boxes. This tab displays the text for the hyperlink and the URL of that hyperlink
In the middle of the window, there are three tabs:
- Current Folder displays files that are located in the same folder location as the current document. If you want the selected link to link to a document located in this folder, locate the file and choose it. The Address field changes to reflect the document location on your computer. The Text to display field also changes to the file address, so you may want to edit this field to change the text that displays in the Word document.
- Browsed Pages shows a list of recent documents and web pages you have accessed. Select one of these as the new link destination.
- Recent Files displays a list of recent files you’ve worked on in Word. This is handy if you’re working on a series of separate documents and want to create links to these files quickly.
Place in This Document
This tab displays sections and bookmarks contained in the current document. Use it to link to specific locations within the current document.
Create New Document
Go to this tab to create a new document to which the link will connect. This feature is useful if you’re creating a series of documents but haven’t created the document you want to link to. Define the name of the new document in the labeled field.
If you don’t want to edit the new document you create from here, select Edit the new document later.
Email Address
This section creates a link that will generate a new email when someone clicks it and populates several of the new email fields with the defaults you define. Enter the email address where you want the new email to be sent, and add the subject that will appear in the new email by filling in the appropriate fields.
If you have used this feature recently for other links, any email addresses you used in those will appear in the Recently used e-mail addresses list.
Thanks for letting us know!
Get the Latest Tech News Delivered Every Day
Subscribe
Hello, my fellow Word users/combatants!
In an attempt to provide a service to humanity, I thought I’d start writing out some of the tricks I’ve learned over the years about using Microsoft Word for reports and other business documents.
Don’t get me wrong. Word is a powerful tool. I use Word daily because it is capable of decent desktop publishing in a way that Google Docs doesn’t yet come close to. But like any tool, Word can be dangerous if you don’t know how to use it properly.
To start this ongoing series, I thought I’d address one of those most common frustrations I hear from clients: section breaks that mess up the headers/footers.
Section breaks are a major nemesis for anyone who works with long and/or complicated documents in Word. They are great for inserting landscape figures or tables or just to help readers know exactly where they are in the document. But expect the wrath of Word if you are not extremely careful with your breaks, because your file can be transformed instantly from a document so organized that Martha Stewart would approve to something more of a dog’s dinner.
[For those of you who prefer an over-the-shoulder-style tutorial, now’s a good time to click Play in the video above. For those who prefer written explanations, keep reading.]
The key to header/footer happiness is deceptively simple-sounding: the Link to Previous feature. This nasty little default (and no, you can’t turn off its default-ness) is great if your pages are all oriented the same and all use the same header/footer text and images. But what fun is that?
After many painful experiences in Word, I have learned how to insert sections the hard way. Let me save you some stress.
- Insert two next-page section breaks, one after the other. (This is assuming that you want to insert a section between other content. If you are just creating the next new section, then just put in one break.)
- IMMEDIATELY turn off the Same as Previous/Link to Previous feature in the ribbon (i.e., the command area underneath the main menu dropdowns). Make sure this feature is off for both the section you just created and any other sections in the doc, either after or before the new one. I cannot underscore how important it is to do this right away!
- Adjust the header/footer of the new section to what you want and you’re on your merry way.
[Author’s note: The principles about headers/footers are the same if you use continuous-page section breaks. I just don’t use those as often.]
I know what you’re thinking. That’s too easy. This can’t be that big of a deal.
Sadly, neglecting this little default for any length of time will cause ripple effects that can mess up headers and footers all over your document, particularly if you are using an older version of Word. I once had to create an entirely new document comprised of many, many sections, and then copy all the content from the very large old file section by section to the new file, all because the footers got so messed up and then they froze that way. That’s two hours of my life I will never get back, and I’m still peeved about it.
I will grant you that my new version of Word 365 for Mac seems smarter about section breaks than older versions were, particularly in that it doesn’t seem to turn on the Same as Previous feature for sections that occur before the inserted section. But it still affects anything that comes after it. Half of chaos is still more chaos than I’m willing to deal with. We all have better things to do with our time.
Once you get used to how the Same as Previous feature works, you can try linking sections together if you feel like skirting the Word event horizon. But don’t expect that to save you any time if your document has any complexity to it at all, or if it has multiple authors. Generally speaking, it is far easier to manually adjust your headers and footers for each section than it is to untangle the knots that will result from leaving this feature on and «dealing with it later.» The difference is that the manual adjustment only needs to happen once, and the «later» option may require large donations to your family or company swear jar. I can’t predict what kind of footer black hole you’ll end up in if you leave Same as Previous on; I can only be sure you’ll be happier if you don’t.
Was this post helpful? Email me your burning writing and Word questions. If I can answer your question, I’ll craft a new post that addresses your issue and email you when your answer goes live.

If you want to highlight portions of text in your document, you can insert text boxes. But what you might not know is that you can link these boxes in Microsoft Word and have the text within them flow continuously.
Maybe you have a brochure that uses text boxes to call out features of a product or service. Or maybe you have a document and use text boxes for helpful tips or pull quotes. By linking the text boxes together, you can type in one text box and have the overflow of text move to the next one.
RELATED: How to Add Sideheads and Pull Quotes to Microsoft Word Documents
You can use a preformatted text box or draw and format your own. Head to the Insert tab, click the Text Box drop-down arrow, and choose or draw your first text box. You can start typing your text in the first box or wait until you add and link the second one.

Follow the same steps to insert your second text box. If you choose a preformatted text box, you’ll need to remove the sample text inside. A requirement for linking one text box to another is that the second text box must be empty. Just select all of the text in the preformatted box and press Delete.
Click to select your first text box. Then go to the Shape Format tab and click “Create Link” in the text section of the ribbon.
You’ll see your cursor change to a pitcher. Move your pitcher to the second text box and click inside of it. This creates the link between the two.
Now when you type within the first text box and reach the bottom of the shape, the text will continue inside the second text box automatically.
You can continue to add text boxes and link those as well. So, if you want to add a third, select the second text box and create a link the same way to the third text box.
You can move text boxes to different pages or rotate the boxes without it affecting the linked ones.
RELATED: How to Make Diagonal Text in Word
Resize and Format Linked Text Boxes
If you resize a text box by dragging a corner or edge, the text inside adjusts between the linked boxes. As you can see in the screenshot below, we made the first text box smaller, so the overflow of text automatically moved to the second text box.
If you format the font inside of a text box, it does not affect the text in the linked text box. This allows you to use italics, bold, or a different font color in the various boxes.
Keep in mind, however: if the size of a text box changes and the text flows into the linked box, it will bring with it the formatting you applied as shown below.
Break a Text Box Link
If you decide later you want to unlink the text boxes, this is easy to do. Select the first text box, go to the Shape Format tab, and click “Break Link” in the Text section of the ribbon. Follow the same process to unlink your remaining text boxes if necessary.
When you break the link, all of the text in the second text box appears in the first. You may need to resize the first text box to see it all.
Linking text boxes in Microsoft Word is a good way to display a continuous short story, list of tips, set of instructions, or something similar without affecting the main part of your content. And to keep those boxes safe from editing, you can lock text boxes in Word as well.
READ NEXT
- › How to Mirror or Flip Text in Microsoft Word
- › How to Adjust and Change Discord Fonts
- › The New NVIDIA GeForce RTX 4070 Is Like an RTX 3080 for $599
- › This New Google TV Streaming Device Costs Just $20
- › Google Chrome Is Getting Faster
- › BLUETTI Slashed Hundreds off Its Best Power Stations for Easter Sale
- › HoloLens Now Has Windows 11 and Incredible 3D Ink Features
How-To Geek is where you turn when you want experts to explain technology. Since we launched in 2006, our articles have been read billions of times. Want to know more?