
I had picture in document somewhere on page 2-3 inserted via MS WORD menu, and I want to crate a hyperlink in next pages to this picture, like for content table item or other place in document.
How to to it for picture?
asked Mar 1, 2014 at 9:11
![]()
Ok, I found it:
MS Word main menu (ribbon) > Insert > Links > Cross-refference
From selected dialog chose «figure» options in «Reference type», chose other options, desired picture and click «Insert» button, then close dialog (or click «Cancel» button).

answered Mar 1, 2014 at 9:30
![]()
ALZALZ
3672 gold badges4 silver badges9 bronze badges
Word for Microsoft 365 Outlook for Microsoft 365 Word 2021 Outlook 2021 Word 2019 Outlook 2019 Word 2016 Outlook 2016 Word 2013 Outlook 2013 Word 2010 Outlook 2010 More…Less
Depending on the version of Word or Outlook you’re using, you can insert a variety of objects (such as PDF files, Excel charts or worksheets, or PowerPoint presentations) into a Word document or an email message by linking or embedding them. To insert an object, click Object on the Insert tab.
Insert a new object
To create a new file that is inserted into your Word document or email message:
-
In the Object dialog box, click the Create New tab, and then select an option from the Object type list.

The default program for that file type opens, where you can enter any text or data you want. When you close the program, any added content or changes appear in your Word document or email message.
-
If you want the new file to appear as a clickable icon, rather than the first page of your new file, select Display as icon. If this check box is selected, you can choose a different icon by clicking Change Icon.
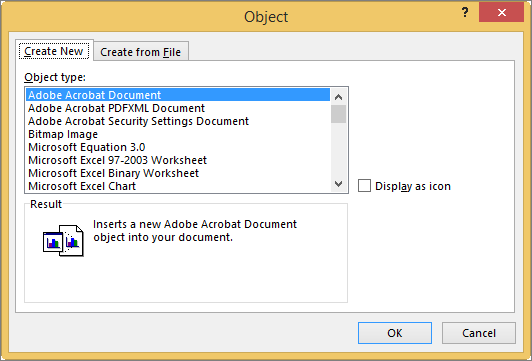
Tips:
-
The information in the Result section changes based on the selected object type and whether Display as icon is selected. Use this information to help you determine what you want to insert and how you want it to appear.
-
To edit the information in your inserted object, double-click the object.
-
In Outlook, the Display as icon option is only available if you format your email as RTF (Format Text > Format > Message Format > Rich Text).
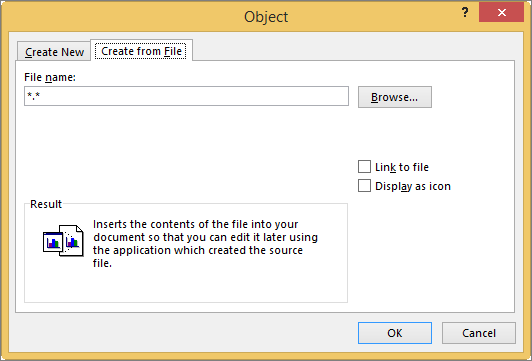
Link or embed an existing file
To link or embed an object that’s already been created:
-
In the Object dialog box, select the Create from File tab, and then click Browse to find the file you want to insert.
-
To link to the source file, rather than embedding it into your Word document or email message, select Link to file.
-
If you want the inserted file to appear as a clickable icon, rather than the first page of the file, select Display as icon. If this check box is selected, you can choose a different icon by clicking Change Icon.
Tip: The information in the Result section changes based on whether Link to file and Display as icon are selected. Use this information to help you determine what you want to insert and how you want it to appear.
Embedded objects vs. linked objects
Embedded objects become part of the Word file or email message and, after they are inserted, they are no longer connected to any source file.
Linked objects can be updated if the source file is modified. Linked data is stored in the source file. The Word file or email message (the destination file) stores only the location of the source file, and it displays a representation of the linked data. Use linked objects if file size is a consideration.
Need more help?
Want more options?
Explore subscription benefits, browse training courses, learn how to secure your device, and more.
Communities help you ask and answer questions, give feedback, and hear from experts with rich knowledge.
How to insert images in a Microsoft Word document such that any changes made to the original image are auto-updated in the document(s) where these pictures are embedded.
This is a common issue in organizations where documents often contain common graphic elements — examples could include a company’s logo or an organization chart. For instance, if there’s a reshuffle in the company, updating every single Word document that contains the older version of the org chart may take lot of effort.
 Luckily, there’s a simple workaround. In the Insert Picture dialog box, click the down arrow next to the Insert button, and then click either “Link to File” or “Insert and Link”.
Here’s what the different options mean:
Option #1 — Link to File: When you link a picture file from a Word document, Microsoft Word creates a virtual connection with that picture without actually embedding it in the document.
This is very similar to embedding images in an HTML web page. So if you edit the linked picture, the change is reflected immediately in all the Word document(s) that use that picture.
Option #2 — Insert and Link: The drawback with the “Link to File” approach is that if you upload the document onto the web or share it via email, the recipient won’t see any of the pictures as the links have broken.
That’s where this “Insert and Link” command comes in handy. It’s like saying — link to the selected picture in the Word document but, to be on the safer side, also embed a copy of image so that if the original source file cannot be located, the recipients can still see the picture in the document.
Convert Linked Images to Embedded Images
If you are sharing documents externally, the “Insert and Link” approach should be preferred over “Link to File”.
However, if there’s a Word document that contains only linked images and you want to upload it to Google Docs, the first thing you need to do is convert these “linked” pictures into embedded graphic. To do so, click the Office button and select Prepare -> Edit Links to Files. Now you can easily save linked pictures in the document itself.

Bonus Tip: If you like to save all these embedded images out of the documents, just save your Word document as an HTML web page — this is similar to extracting pictures from PowerPoint slideshows.
![]()
Written by Allen Wyatt (last updated March 4, 2019)
This tip applies to Word 97, 2000, 2002, and 2003
You already know that when you insert a picture into your document, you can either place it inline (in the text) or in a text box or frame. You can also control how Word manages that graphic. You can either have the graphic file added to your document, as an integral part of it, or you can have it simply linked to your document.
The next time you insert a graphic, take a look at the Insert Picture dialog box. Notice that beside the Insert button there is a drop-down arrow. If you click this arrow you’re presented with a number of options for inserting the picture. The first option, Link to File, causes Word to create an active link between the graphic in your document and the original graphic file. This allows you to automatically or manually update the graphic in your document by having Word recopy it into your document.
Note that the drop-down option also includes one named Insert and Link. This results in not only a link being established with the graphic file, but also a copy of the file being saved in the Word document. Choosing to insert the graphic in this manner can result in significantly increased document sizes.
If you are using Word 97, there is no drop-down arrow next to the Insert Picture dialog box. Instead, the dialog box includes a couple of check boxes that control graphic linking. One check box is entitled Link to File; it functions the same as the Link to File option already discussed. If you click the checkbox, then Word 97 creates an active link for the picture.
If you choose the Link to File checkbox, Word 97 then allows you to choose the Save Picture in Document check box. If this option is selected, a copy of the picture is saved as a part of your document, instead of a simple link to the picture. Choosing both check boxes is the same as choosing Insert and Link in later versions of Word.
WordTips is your source for cost-effective Microsoft Word training.
(Microsoft Word is the most popular word processing software in the world.)
This tip (396) applies to Microsoft Word 97, 2000, 2002, and 2003.
Author Bio
With more than 50 non-fiction books and numerous magazine articles to his credit, Allen Wyatt is an internationally recognized author. He is president of Sharon Parq Associates, a computer and publishing services company. Learn more about Allen…
MORE FROM ALLEN
Counting Consecutive Negative Numbers
If you have a range of values that can be either positive or negative, you might wonder how to determine the largest …
Discover More
Sorting ZIP Codes
Sorting ZIP Codes can be painless, provided all the codes are formatted the same. Here’s how to do the sorting if you …
Discover More
Getting Rid of an Unwanted AutoCorrect
Word uses its AutoCorrect feature to help improve your typing. Sometimes, however, AutoCorrect can cause problems with …
Discover More
While inserting a file (such as Word, Excel, PowerPoint, PDF, image, etc.) as an object into a Word document, you can either create a new or use an existing file.
Create a new file and insert as an object
1. Place the mouse cursor where you want to create the object.
2. From the Ribbon, under the tab Insert, within the group Text, click Object. The object dialog box appears.
3. Select an object to create from the Object Type list.
4. Select the Display as icon check box.
5. Word creates an icon of the selected Program at the cursor position and opens the program to create a new file.
For example, if you select object type as “Microsoft Office Excel Worksheet”, an Excel icon is created at the cursor position and then Word opens the Excel program to create a new Excel document.

Insert an existing file as an object
1. You can insert an existing file into your document in two different ways: either embed the file or link the file.
2. Place your mouse cursor where you want to create the object
3. From the Ribbon, under the tab Insert, within the group Text, click Object. The object dialog box appears.
4. From the dialog box, click Create from File.
5. Click the Browse button to locate the file in your system.
6. Select the Display as icon check box.
7. The object icon is created at the cursor position. This way you can embed a file into your document.
8. If you want to link the file, also select the Link to File check box.
Difference between embedding and linking an existing file
If you want to update an embedded file, you have to double-click the object to open the file and then edit. Updating the source file will not update the embedded file.
However, if you are linking an existing file, then changes in the source file will be reflected in the linked file.

About wordknowhowhttp://wordknowhow.comThis blog site was started to help people with Microsoft Word. I use Word a lot at work, and I understand that some features are difficult to use. There were no simplified instructions online to help me use these features. It is for this reason that this site exists; to make your life easier with Word.
Feel free to post your comments, queries, suggestions, etc. I will do my best to help you!
![]()
Download Article
Link your pictures using a variety of methods
![]()
Download Article
- Using HTML
- Adding Links to Images in Web Editors
- Adding Hyperlinks to Images in Word
- Using Social Media & Image Hosting Sites
- Video
- Expert Q&A
|
|
|
|
|
Do you want to link to a picture in code or do you want someone to be able to click a picture to see a website? With a single line of HTML code or some settings, you can add a clickable image nearly anywhere! Since an image is often larger than text, it offers a larger clickable area (increasing the chances that someone will follow your link!). This wikiHow article teaches you how to add a link to a picture with methods that you can use whether you’re on a computer, phone, or tablet.
Things You Should Know
- To make a picture a clickable link, use the HTML code: <a href=»https://www.wikihow.com»><img src=»full-path-to-image.jpg»></a>.
- Web editors like WordPress and Wix as well as email programs and image platforms like Gmail and Canva have built-in functionality to add a link when you select your image.
- In Word, right-click the picture and select «Link.» Finally, add the URL and click «Ok.»
-
Enter the following code to make your image clickable. Select and copy the HTML code below, and then paste it into your open index.html file.
<a href="DESTINATION URL"><img src="full-path-to-image.jpg"></a>
- In this case, the «full-path-to-image» will redirect to your «DESTIONATION URL».
- If you have access to the HTML of a page, you can use this anywhere!

Advertisement
-
Services like WordPress, Wix, Canva, and email programs like Gmail and Outlook have almost the same image functionality. There’s a button when you’re uploading an image to make it a link (it usually looks like an icon of a chain link).
- If you don’t immediately see that link icon, click to select your image and it should be available near the text editing tools.

-
1
Insert the image to your Word document. To add an image, go to Insert > Pictures.
-
2
Right-click the image and select Link. Further decide if you want the image to link to a website, a file on your computer, another location in the document, a new Word document, or to an email address.
- If you share this Word document and have this picture linked to a file on your computer, the other users may not be able to see the other file unless it’s shared too.
- Since this article is about linking websites to a picture, you’ll want to leave it on «Existing File or Web Page.»
-
3
Enter the destination URL. Next to the «Address» field, enter the URL.
- Click OK to add the link to your image.
- When you share that Word document, anyone who clicks on that picture will be redirected to that link!
- You can also add videos to Google Docs and Slides as well as overlay pictures in Google Docs!


Advertisement
-
Most online platforms assign a link to a picture, so people can click it for a larger view. For example, if you upload a picture to Facebook, you can see a URL to that picture when you click it. Paste that address anywhere to link to your Facebook picture (privacy settings might prevent random people from seeing your picture).
- This method works for uploading pictures to almost all online platforms including Flickr, Imgur, Facebook, Instagram, Google Drive, and Apple iCloud.
- Only use this method if you want to insert a link that redirects people to your picture on these sites. It’s not a method for adding a link to a picture.

Add New Question
-
Question
How do I add a link to a page in WordPress?

Martin Aranovitch is a WordPress Trainer and Educator and a WordPress Writer for WPMU DEV. With over 18 years of digital marketing and website maintenance experience, Martin specializes in providing comprehensive instruction for people looking to use WordPress effectively. He holds a Bachelor’s degree in Science and Technology Studies from The University of New South Wales. Martin is also a digital publisher and the author of multiple WordPress guides and training manuals for people of all learning levels.
WordPress Trainer & Educator
Expert Answer
Create or edit a new/existing post or page. Then, select and highlight the text that you want to hyperlink. Click on the linking tool in the inline editor menu, select or type your destination URL (this can be an internal or external link), and choose whether or not to open the link in a new tab. Then, just click on the «Apply» button or hit your «Enter» key.

Ask a Question
200 characters left
Include your email address to get a message when this question is answered.
Submit
Advertisement
Video
Thanks for submitting a tip for review!
About This Article
Thanks to all authors for creating a page that has been read 342,749 times.
Is this article up to date?
Hi,
I’m trying to figure out how does Word 2007 handles image links as opposed to previous versions.
Any help in answering the following questions, or at least in pointing me to an article or thread in the Web, will be highly appreciated.
1) What is the concept behind «linked» pictures in Word 2007? If I convert document.dotx to document.zip and look inside the corresponding folder, the pictures there are thumbnails or what?
2) Is there a way to link pictures with
relative (not absolute) paths in Word 2007?
3) Is there a way to force Word 2007 to respect the names of the linked images? If I convert document.dotx to document.zip and look inside the corresponding folder, all the linked pictures are named image1, image2, image3, etc. That does not help in comparing
the actual linked external images and the thumbnails or whatever I can see in the document’s internal folder. Also, I need to import the Word 2007 files into MadCap Flare and I don’t want to lose the original names of the image files (I don’t want them replaced
with some default names).
4) Is there a macro to extract (copy) all linked images to a specific folder? If so… Is it possible to make changes to the extracted pictures in this folder and then place them back in the Word 2007 file?
Thanks a lot!