
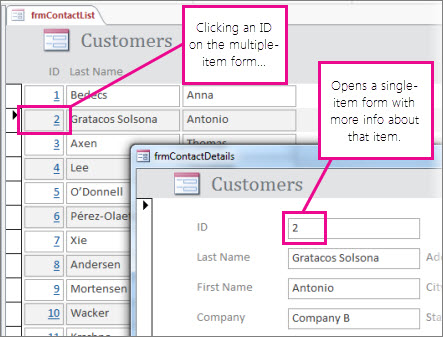
If you have a long multiple-item form, sometimes you want to quickly “drill down” to see more information about a single item. You can do this in Access by linking the multiple-item form to a single-item form. When you click an item in the multiple-item form, the single-item form opens to show the details.
Notes:
-
This article doesn’t apply to Access web apps – the kind of database you design with Access and publish online.
-
If you meant something else by “linking”, see Other types of form linking at the end of this article.
Create the forms
In most cases, the two forms in a drill-down configuration are based on the same table or query. If you already have a pair of forms you want to use (one being a datasheet or multiple item form, and the other being a single-item or “detail” form), you can skip this section. Otherwise, use these procedures to create them:
Create a datasheet or multiple-item form:
-
In the Navigation Pane, select the table or query that contains the data you want on the datasheet form.
-
Click Create > More Forms, then click Multiple Items or Datasheet, depending on which kind you want.
-
Make any design changes you want. Consider deleting as many columns as you can, leaving just enough information to identify each item.
-
Save and close the form.
For more information about Multiple Item forms, see Create a form by using the Multiple Items tool.
Create a single-item or “detail” form:
-
In the Navigation Pane, select the table or query that contains the data you want on the detail form. This will likely be the same table or query that you used for the first form.
-
Click Create > Form.
-
Make any design changes you want, and then save and close the form.
For more information, see Create a form by using the Form tool.
Add the logic that opens the detail form
Now to add a little macro to the multiple-item or datasheet form. The macro opens the detail form and makes sure the correct item is displayed.
Don’t worry if you haven’t done much work with macros; you can just copy and paste the XML that you’ll find in this procedure.
-
If you’re using a datasheet form, double-click it in the Navigation Pane to open it. For a multiple-item form, right-click it in the Navigation Pane and then click Layout View.
-
Press F4 to open the Property Sheet if it’s not already open.
-
Click the column that you want to add the macro to. This will be the column that you click to open the detail form when the macro is finished. In the picture above, the macro is added to the ID column of frmContactList.
Tip: You can add the macro to more than one column.
-
On the Event tab of the Property Sheet, click in the On Click or On Dbl Click property box (depending on whether you want the form to open by single-clicking or double-clicking the field), and then click the Build button
 .
. -
If Access prompts you to choose a builder, select Macro Builder and click OK.
-
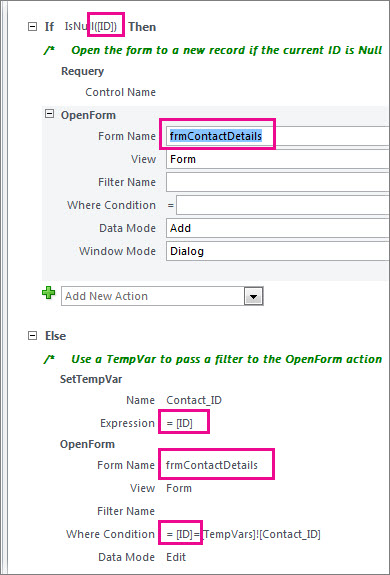
Select this block of XML, and then press Ctrl+C to copy it to the clipboard:
<?xml version=»1.0″ encoding=»UTF-16″ standalone=»no»?> <UserInterfaceMacros xmlns=»http://schemas.microsoft.com/office/accessservices/2009/11/application»> <UserInterfaceMacro For=»ID» Event=»OnClick»><Statements><Action Name=»OnError»><Argument Name=»Goto»>Macro Name</Argument><Argument Name=»MacroName»>ErrorHandler</Argument></Action> <ConditionalBlock><If><Condition>[Form].[Dirty]</Condition><Statements><Action Name=»SaveRecord»/></Statements></If></ConditionalBlock> <ConditionalBlock><If><Condition>IsNull([ID])</Condition><Statements><Comment>Open the form to a new record if the current ID is Null</Comment><Action Name=»OpenForm»><Argument Name=»FormName»>frmContactDetails</Argument><Argument Name=»DataMode»>Add</Argument><Argument Name=»WindowMode»>Dialog</Argument></Action><Action Name=»Requery»/></Statements></If><Else><Statements><Comment>Use a TempVar to pass a filter to the OpenForm action</Comment><Action Name=»SetTempVar»><Argument Name=»Name»>Contact_ID</Argument><Argument Name=»Expression»>[ID]</Argument></Action><Action Name=»OpenForm»><Argument Name=»FormName»>frmContactDetails</Argument><Argument Name=»WhereCondition»>[ID]=[TempVars]![Contact_ID]</Argument><Argument Name=»DataMode»>Edit</Argument><Argument Name=»WindowMode»>Dialog</Argument></Action><Action Name=»RemoveTempVar»><Argument Name=»Name»>Contact_ID</Argument></Action><Action Name=»RefreshRecord»/></Statements></Else></ConditionalBlock> </Statements></UserInterfaceMacro></UserInterfaceMacros>
-
Click in the blank area of the Macro Builder (just underneath the Add New Action drop-down list), and then press Ctrl+V to paste in the macro actions. If all goes well, you won’t see the XML in the Macro Builder at all—it will expand out into the more readable macro blocks as shown in the next step.
-
If necessary, replace the form name (frmContactDetails) and the linking column name (ID) with the name of your form and the column you’re using to link the two forms. The picture below shows where you might need to make edits to match your own identifier names:
-
On the Design tab, click Save and then Close.
-
If you want the clickable column(s) to appear like a hyperlink so people know they can click it, make sure the column is still selected, and in the Property Sheet, click the Format tab, and set the Display As Hyperlink property to Always.
-
Save and close the form, then reopen it and test the macro by clicking or double-clicking the column you modified.
 .
. 
For more information about macros in desktop databases, see Add logic to a control in a desktop database.
Other types of form linking
To create a form/subform combination and link them together, see Create a form that contains a subform (a one-to-many form).
To create a form that is linked to a data source such as a table or query, see Create a form by using the Form tool.
Need more help?
How to Add and Edit Links in Word Documents
Insert hyperlinks quickly
Updated on February 11, 2021
What to Know
- Highlight text you want to hyperlink. Right-click it and choose Link. Alternatively, select Insert > Links > Link.
- Then, enter the URL in the Address field.
- Remove a link: Right-click the hyperlink text and choose Remove Hyperlink.
Microsoft Word is primarily used to create word processing documents, but you can also work with hyperlinks and HTML code used in websites. Learn how to insert, remove, or edit hyperlinks using Word for Microsoft 365, Word 2019, Word 2016, Word 2013, and Word 2010.
Insert Links
To link to other documents or web pages from a Word document, insert a hyperlink.
-
Select the text that you want to apply the hyperlink to. This can be the text of a URL, a single word, a phrase, a sentence, or a paragraph.
-
Right-click the text and select Link or Hyperlink to open the Insert Hyperlink dialog box. Or, go to the Insert tab and select Links > Link.
-
In the Address field, enter the URL address of the document or website you want to link to. For online assets, the URL must include the protocol (for example, http, https, or ftp).
The Text to display text box defaults to the text you selected in step 1. You can change this text here if you like.
-
Select OK.
-
The selected text appears as a hyperlink that can be clicked to open the linked document or website.
To make changes to the link, right-click the hyperlink and select Edit Hyperlink.
Remove Hyperlinks
When you type a URL into Word, it automatically inserts a hyperlink that connects to the website. This feature is handy if you distribute documents electronically, but it can be a nuisance when printing documents.
To remove a hyperlink, right-click the link and select Remove Hyperlink.
In Word for Mac, right-click then select Hyperlink. In the slide-out menu, select Edit Hyperlink, then choose Remove Link.
More About Editing Hyperlinks
When you work in the Insert Hyperlink dialog box and the Edit Hyperlink dialog box, several other features are available on the left side of the dialog box.
Existing File or Web Page
This tab is selected by default in the Insert Hyperlink and the Edit Hyperlink dialog boxes. This tab displays the text for the hyperlink and the URL of that hyperlink
In the middle of the window, there are three tabs:
- Current Folder displays files that are located in the same folder location as the current document. If you want the selected link to link to a document located in this folder, locate the file and choose it. The Address field changes to reflect the document location on your computer. The Text to display field also changes to the file address, so you may want to edit this field to change the text that displays in the Word document.
- Browsed Pages shows a list of recent documents and web pages you have accessed. Select one of these as the new link destination.
- Recent Files displays a list of recent files you’ve worked on in Word. This is handy if you’re working on a series of separate documents and want to create links to these files quickly.
Place in This Document
This tab displays sections and bookmarks contained in the current document. Use it to link to specific locations within the current document.
Create New Document
Go to this tab to create a new document to which the link will connect. This feature is useful if you’re creating a series of documents but haven’t created the document you want to link to. Define the name of the new document in the labeled field.
If you don’t want to edit the new document you create from here, select Edit the new document later.
Email Address
This section creates a link that will generate a new email when someone clicks it and populates several of the new email fields with the defaults you define. Enter the email address where you want the new email to be sent, and add the subject that will appear in the new email by filling in the appropriate fields.
If you have used this feature recently for other links, any email addresses you used in those will appear in the Recently used e-mail addresses list.
Thanks for letting us know!
Get the Latest Tech News Delivered Every Day
Subscribe
- Remove From My Forums
-
Вопрос
-
Hello all,
I am working on a book that covers the Procert labs Word Expert 2010 objectives and can’t figure out objective 5.3.3 which is written, «Link a form to a database.»
I have rigorously searched the internet for any clues, and the only thing I came up with was using VB code or XML code to accomplish this task. To me, that is way above what should be covered in the expert objectives, which leads me to believe that there
is an easier way to do it. If anyone has any ideas I would be very appreciative if you shared them : )Also, I have searched these forums for anything related to this objective and failed to find an answer.
Ответы
-
It cannot be done without programming. If you want that, you should use an Access form.
If you want to do it with a form in Word, see the last of the following series of articles:
http://www.mousetrax.com/techpage.html#autoforms
Please Fill Out This Form
Part 1: Create professional looking forms in Word
http://www.computorcompanion.com/LPMArticle.asp?ID=22Part 2: Adding Automation to your Word forms.
http://www.computorcompanion.com/LPMArticle.asp?ID=46Part 3: Learn more VBA (macros) to automate your forms.
http://www.computorcompanion.com/LPMArticle.asp?ID=119Part 4: Use custom dialog boxes in your Word forms
http://www.computorcompanion.com/LPMArticle.asp?ID=127Part 5: Connect your AutoForm to a database to save input time and keep
better records!
http://www.computorcompanion.com/LPMArticle.asp?ID=136— Hope this helps.
Doug Robbins — Word MVP,
dkr[atsymbol]mvps[dot]org
Posted via the Community Bridge«Ian Rutkosky» wrote in message news:c90972df-69b8-436e-863a-0e8a563e549f@communitybridge.codeplex.com…
Doug,
Thanks for the assistance, but I guess I need to clarify what I am looking for in more detail. This is what I am thinking the objective wants:
1. Make a Form using Word
2. Link that Form in Word to an Access database — meaning what the person enters in the word form will populate an access database table
aka… Word —-> Access not Access —-> Word
3. There should NOT be any programming involved in this process… people using word should NOT be expected to write programming code to complete this objective.
The full objective is listed as follows:
5.3. Create Forms
5.3.1 Use the Controls group
5.3.2 Add Help content to form fields
5.3.3 Link a form to a database
5.3.4 Lock a form
So, I can do all of them but 5.3.3.
Again thanks for the help and thanks in advance for future help!
Ian Rutkosky
Doug Robbins — Word MVP dkr[atsymbol]mvps[dot]org
-
Помечено в качестве ответа
28 октября 2010 г. 6:38
-
Помечено в качестве ответа
I am creating a form in Word 2007, using the controls available in the Developer tab.

On my first page, I have the user enter a name into a text control. I want to have a control on the second page to automatically fill in with the same text as the first one.
Is there any way to link these controls together?
![]()
asked Jan 11, 2010 at 19:19
![]()
Jared HarleyJared Harley
12.5k3 gold badges40 silver badges51 bronze badges
You can do it using VBA:
- Give each textbox a name (in Design mode, right-click each of them and get properties and fill in the Name property)
- Right click the first text box and choose View Code
- Add the code at the bottom of this answer into the VBA editor (assuming you called the page 1 textbox Box1 and the page 2 textobx Box2)
Exit design mode and then type something into the textbox on page 1. You should see that the textbox on page2 has the same value.
Note that people who open the form have to have their security settings set to enable the running of macros for this to work.
Private Sub Box1_Change()
    Box2.Value = Box1.Value
End Sub
answered Jan 11, 2010 at 19:41
![]()
While inserting a file (such as Word, Excel, PowerPoint, PDF, image, etc.) as an object into a Word document, you can either create a new or use an existing file.
Create a new file and insert as an object
1. Place the mouse cursor where you want to create the object.
2. From the Ribbon, under the tab Insert, within the group Text, click Object. The object dialog box appears.
3. Select an object to create from the Object Type list.
4. Select the Display as icon check box.
5. Word creates an icon of the selected Program at the cursor position and opens the program to create a new file.
For example, if you select object type as “Microsoft Office Excel Worksheet”, an Excel icon is created at the cursor position and then Word opens the Excel program to create a new Excel document.

Insert an existing file as an object
1. You can insert an existing file into your document in two different ways: either embed the file or link the file.
2. Place your mouse cursor where you want to create the object
3. From the Ribbon, under the tab Insert, within the group Text, click Object. The object dialog box appears.
4. From the dialog box, click Create from File.
5. Click the Browse button to locate the file in your system.
6. Select the Display as icon check box.
7. The object icon is created at the cursor position. This way you can embed a file into your document.
8. If you want to link the file, also select the Link to File check box.
Difference between embedding and linking an existing file
If you want to update an embedded file, you have to double-click the object to open the file and then edit. Updating the source file will not update the embedded file.
However, if you are linking an existing file, then changes in the source file will be reflected in the linked file.

About wordknowhowhttp://wordknowhow.comThis blog site was started to help people with Microsoft Word. I use Word a lot at work, and I understand that some features are difficult to use. There were no simplified instructions online to help me use these features. It is for this reason that this site exists; to make your life easier with Word.
Feel free to post your comments, queries, suggestions, etc. I will do my best to help you!
![]()
Download Article
A user-friendly guide to creating interactive links in Microsoft Word
![]()
Download Article
- Linking to Another Document or Website
- Linking to a Blank Email Message
- Linking to a Place in the Same Document
- Video
- Q&A
- Tips
|
|
|
|
|
Do you want to add a clickable link in your Microsoft Word document? You can easily turn any text or image in your document into a hyperlink. When clicked, a hyperlink can bring readers to another place in the document, an external website, a different file, and even a pre-addressed email message. This wikiHow article will walk you through creating different types of hyperlinks in your Word document.
Things You Should Know
- To link to a website or document, highlight the text. Click the «Insert» tab, then «Link». Find your file or paste your website link. Click «OK».
- Click «E-mail Address» in the Hyperlink menu. Enter an email address and subject, then click «OK».
- Click «Insert», then «Bookmark» to save a position in the document. Click «Place in This Document» in the Hyperlink menu, then click the bookmark.
-
1
-
2
Select the text or image that you want to turn into a link. You can turn any text or image in your document into a link. Highlight the text or click the image that you want to convert into a hyperlink.
- To insert an image into your document, click the Insert tab and select «Pictures.» You’ll be able to browse your computer for an image file to add. You can also insert clip art to use as a link.
Advertisement
-
3
Press ⌘ Command+K (Mac) or Ctrl+K (Windows). This opens the Insert Hyperlink window. You can also get to this menu by clicking the Insert tab and then clicking the Link button in the toolbar.
-
4
Select Existing File or Web Page from the left panel. More options will appear in the right panel.
-
5
Select a file or enter a web address. You can choose to link to an existing document, a new document, or a website.
- To link to a website or a file that’s accessible on the web, type or paste the full address (including the «https://» at the beginning) into the «Address» field near the bottom of the window.
- To link to a file on your computer or local network, select that file in the center panel. If it’s in the current folder, click Current folder to open its contents. If you opened it recently, click Recent Files to browse those. You can also use the menus at the top to navigate to the correct folder and select the file.
- To create a new blank document instead of opening a certain file, click Create a new document in the left menu, then choose a location for the document.
-
6
Set a ScreenTip (optional). You can change the text that appears when the user hovers the cursor over the link by clicking the ScreenTip button at the top-right corner and specifying your text.
- If you don’t change it, the screen tip will display the website address or file path.
-
7
Click OK to save your link. To open the link within the Word document, hold Command (Mac) or CTRL (Windows) and click the link.
- If you want to remove the hyperlink, right-click the hyperlink and select Remove Hyperlink.[2]
- If you want to remove the hyperlink, right-click the hyperlink and select Remove Hyperlink.[2]


Advertisement
-
1
Open a project in Microsoft Word. This looks like a W on top of a blue square.
- You must have a subscription to use Office 365.
-
2
Select the text or click the image you want to turn into an email link. You can use any text or image in your document. When you’re finished with this method, clicking the selected text or image will bring up a new email message to the address of your choice.
-
3
Press ⌘ Command+K (Mac) or Ctrl+K (Windows). This opens the Insert Hyperlink window. You can also get to this menu by clicking the Insert tab and then clicking the Link button in the toolbar.
-
4
Click E-Mail Address in the left panel. This allows you to set up the blank message.
-
5
Enter the e-mail address and subject. This will be the address that the reader will be sending the email to. What you enter into the «Subject» field will be automatically filled in for the reader, but they will be able to change it if they want.
- If you use Outlook, you’ll see recently used email addresses in the field at the bottom of the window. Feel free to select one of those.
- Some mail apps, especially web-based email apps, may not recognize the subject line.
-
6
Set a ScreenTip (optional). You can change the text that appears when the user hovers the cursor over the link by clicking the ScreenTip button at the top-right corner and specifying your text. If you don’t change it, the screen tip will show the email address.
-
7
Click OK to save your link. To open the link within the Word document, hold Command (Mac) or CTRL (Windows) and click the link.
- If you want to remove the hyperlink, right-click the hyperlink and select Remove Hyperlink.


Advertisement
-
1
Open a project in Microsoft Word. This looks like a W on top of a blue square.
- You must have a subscription to use Office 365.
-
2
Place your cursor at the location you want to link to. You can use the Bookmark tool to create links to specific spots in your document. This is great for tables of contents, glossaries, and citations. You can highlight a portion of text, select an image, or just place your cursor in the spot you want.
-
3
Click the Insert tab. It’s in the menu bar at the top of Word, between Home and Draw.
-
4
Click the Bookmark icon. It’s in the toolbar at the top of Word in the «Links» section.
-
5
Enter a name for the bookmark. Make sure the name is descriptive enough that you’ll be able to recognize it. This is especially important if you are using a lot of bookmarks or more than one person is editing the document.
- Bookmark names have to start with letters but can also contain numbers. You can’t use spaces, but you can use underscores instead (e.g. «Chapter_1»).
-
6
Click Add to insert the bookmark. Bookmarks will appear on the page surrounded by brackets. You won’t see the bookmark on the page if you’re using the current version of Word, but in earlier versions, it may be surrounded by brackets.
- If you want to see brackets around the bookmark so you don’t forget where you placed it, click the File menu, select Options, and click Advanced in the left panel. Then, scroll down the right panel and check the box next to «Show bookmarks» under the «Show document content» header.
-
7
Select the text or image you want to create the link from. Highlight the text or click the image that you want to turn into a link to your bookmark.
-
8
Press ⌘ Command+K (Mac) or Ctrl+K (Windows). This opens the Insert Hyperlink window. You can also get to this menu by clicking the Insert tab and then clicking the Link button in the toolbar.
-
9
Click Place in This Document in the left panel. This displays a navigation tree with your heading styles and bookmarks.
-
10
Select the bookmark you want to link to. Expand the «Bookmarks» tree if it isn’t already and select the bookmark you created. You can also select from heading styles you’ve applied throughout the document.
-
11
Set a ScreenTip (optional). To change the text that appears when the user rests the cursor over the link, click the Screen Tip button at the top-right corner. If you don’t change the text, the screen tip will display the website address or file path.
-
12
Click OK to save your link. To test the hyperlink, hold Command (Mac) or CTRL (Windows) and click the link.
- This will recenter the view to the line on which you placed the bookmark.
- If you want to remove the hyperlink, right-click the hyperlink and select Remove Hyperlink.


Advertisement
Add New Question
-
Question
What hyperlinks are inserted into a document by default?

A link to any website or a file with a url will become a hyperlink automatically after you press the space bar, tab key, or return/enter key.
-
Question
How can I add hyperlinks to Microsoft Word?
Edit>Add Hyperlink>add the link. To test the link, Ctrl+Click and it should get you there.
-
Question
How can I embed a hyperlink into a word or phrase in a Word document?
Highlight the word/phrase you want to embed a link into, got into the insert tab, press link. A box that says «insert hyperlink» on the top should pop up, copy/type the link you want into the box at the bottom that says «address» and then press «ok» and you are done!
Ask a Question
200 characters left
Include your email address to get a message when this question is answered.
Submit
Advertisement
-
If you type a URL into a document (e.g., https://www.wikihow.com), Word will automatically make that text a clickable link.
-
You can remove a hyperlink by right-clicking it and selecting Remove Hyperlink.
-
Looking for money-saving deals on Microsoft Office products? Check out our coupon site for tons of coupons and promo codes on your next subscription.
Thanks for submitting a tip for review!
Advertisement
About This Article
Article SummaryX
1. Select the text or object you want to turn into a hyperlink.
2. Click the Insert tab.
3. Click the Link button in the toolbar.
4. Click Existing File or Web Page in the left and enter the URL.
5. To link to another file instead of a website, leave the «»Address»» bar blank and select the file instead.
6. Click OK.
Did this summary help you?
Thanks to all authors for creating a page that has been read 675,210 times.