
Note: Microsoft Access doesn’t support importing Excel data with an applied sensitivity label. As a workaround, you can remove the label before importing and then re-apply the label after importing. For more information, see Apply sensitivity labels to your files and email in Office.
You can bring the data from an Excel workbook into Access databases in many ways. You can copy data from an open worksheet and paste it into an Access datasheet, import a worksheet into a new or existing table, or link to a worksheet from an Access database.
This topic explains in detail how to import or link to Excel data from Access desktop databases.
What do you want to do?
-
Understand importing data from Excel
-
Import data from Excel
-
Troubleshoot missing or incorrect values
-
Link to data in Excel
-
Troubleshoot #Num! and other incorrect values in a linked table
Understand importing data from Excel
If your goal is to store some or all of your data from one or more Excel worksheets in Access, you should import the contents of the worksheet into a new or existing Access database. When you import data, Access creates a copy of the data in a new or existing table without altering the source Excel worksheet.
Common scenarios for importing Excel data into Access
-
You are a long-time user of Excel but, going forward, you want to use Access to work with this data. You want to move the data in your Excel worksheets into one or more new Access databases.
-
Your department or workgroup uses Access, but you occasionally receive data in Excel format that must be merged with your Access databases. You want to import these Excel worksheets into your database as you receive them.
-
You use Access to manage your data, but the weekly reports you receive from the rest of your team are Excel workbooks. You would like to streamline the import process to ensure that data is imported every week at a specific time into your database.
If this is the first time you are importing data from Excel
-
There is no way to save an Excel workbook as an Access database. Excel does not provide functionality to create an Access database from Excel data.
-
When you open an Excel workbook in Access (in the File Open dialog box, change the Files of Type list box to Microsoft Office Excel Files and select the file you want), Access creates a link to the workbook instead of importing its data. Linking to a workbook is fundamentally different from importing a worksheet into a database. For more information about linking, see the section Link to data in Excel, later in this article.
Import data from Excel
The steps in this section explain how to prepare for and run an import operation, and how to save the import settings as a specification for later reuse. As you proceed, remember that you can import data from only one worksheet at a time. You cannot import all the data from a whole workbook at the same time.
Prepare the worksheet
-
Locate the source file and select the worksheet that contains the data that you want to import to Access. If you want to import only a portion of a worksheet, you can define a named range that includes only the cells that you want to import.
Define a named range (optional)
-
Switch to Excel and open the worksheet that has data that you want to import.
-
Select the range of cells that contain the data that you want to import.
-
Right-click within the selected range and then click Name a Range or Define Name.
-
In the New Name dialog box, specify a name for the range in the Name box and click OK.
Remember that you can import only one worksheet at a time during an import operation. To import data from multiple worksheets, repeat the import operation for each worksheet.
-
-
Review the source data and take action as described in this table.
Element
Description
Number of columns
The number of source columns that you want to import cannot exceed 255, because Access does not support more than 255 fields in a table.
Skipping columns and rows
It is a good practice to include only the rows and columns that you want to import in the source worksheet or named range.
Rows You cannot filter or skip rows during the import operation.
Columns You cannot skip columns during the operation if you choose to add the data to an existing table.
Tabular format
Ensure that the cells are in tabular format. If the worksheet or named range includes merged cells, the contents of the cell are placed in the field that corresponds to the leftmost column, and the other fields are left blank.
Blank columns, rows, and cells
Delete all unnecessary blank columns and blank rows in the worksheet or range. If the worksheet or range contains blank cells, try to add the missing data. If you are planning to append the records to an existing table, ensure that the corresponding field in the table accepts null (missing or unknown) values. A field will accept null values if its Required field property is set to No and its ValidationRule property setting doesn’t prevent null values.
Error values
If one or more cells in the worksheet or range contain error values, such as #NUM and #DIV, correct them before you start the import operation. If a source worksheet or range contains error values, Access places a null value in the corresponding fields in the table. For more information about ways to correct those errors, see the section Troubleshoot missing or incorrect values, later in this article.
Data type
To avoid errors during importing, ensure that each source column contains the same type of data in every row. Access scans the first eight source rows to determine the data type of the fields in the table. We highly recommend that you ensure that the first eight source rows do not mix values of different data types in any of the columns. Otherwise, Access might not assign the correct data type to the column.
Also, it is a good practice to format each source column in Excel and assign a specific data format to each column before you start the import operation. Formatting is highly recommended if a column includes values of different data types. For example, the FlightNo column in a worksheet might contain numeric and text values, such as 871, AA90, and 171. To avoid missing or incorrect values, do the following:
-
Right-click the column header and then click Format Cells.
-
On the Number tab, under Category, select a format. For the FlightNo column, you would probably choose Text.
-
Click OK.
If the source columns are formatted, but still contain mixed values in the rows following the eighth row, the import operation might still skip values or convert values incorrectly. For troubleshooting information, see the section Troubleshoot missing or incorrect values.
First row
If the first row in the worksheet or named range contains the names of the columns, you can specify that Access treat the data in the first row as field names during the import operation. If your source worksheet or range doesn’t include the names, it is a good idea to add them to the source before you start the import operation.
Note: If you plan to append the data to an existing table, ensure that the name of each column exactly matches the name of the corresponding field. If the name of a column is different from the name of the corresponding field in the table, the import operation will fail. To see the names of the fields, open the table in Design view in Access.
-
-
Close the source workbook, if it is open. Keeping the source file open might result in data conversion errors during the import operation.
Prepare the destination database
-
Open the Access database where the imported data will be stored. Ensure that the database is not read-only, and that you have permissions to make changes to the database.
-or-
If you don’t want to store the data in any of your existing databases, create a blank database. To do so:
Click the File tab, click New, and then click Blank Database.
-
Before you start the import operation, decide whether you want to store the data in a new or existing table.
Create a new table If you choose to store the data in a new table, Access creates a table and adds the imported data to this table. If a table with the specified name already exists, Access overwrites the contents of the table with the imported data.
Append to an existing table If you choose to add the data to an existing table, the rows in the Excel worksheet are appended to the specified table.
Remember that most failures during append operations occur because the source data does not match the structure and field settings of the destination table. To avoid this, open the destination table in Design view and review the following:
-
First row If the first row of the source worksheet or named range does not contain column headings, ensure that the position and data type of each column in the source worksheet matches those of the corresponding field in the table. If the first row contains column headings, the order of columns and fields do not need to match, but the name and data type of each column must exactly match those of its corresponding field.
-
Missing or extra fields If one or more fields in the source worksheet do not exist in the destination table, add them before you start the import operation. However, if the table contains fields that don’t exist in the source, you do not need to delete those fields from the table if they accept null values.
Tip: A field will accept null values if its Required property is set to No and its ValidationRule property setting doesn’t prevent null values.
-
Primary key If the table contains a primary key field, the source worksheet or range must have a column that contains values that are compatible with the primary key field, and the imported key values must be unique. If an imported record contains a primary key value that already exists in the destination table, the import operation displays an error message.
-
Indexed fields If the Indexed property of a field in the table is set to Yes (No Duplicates), the corresponding column in the source worksheet or range must contain unique values.
Go to the next steps to run the import operation.
-
Start the import operation
-
The location of the import/link wizard differs slightly depending upon your version of Access. Choose the steps that match your Access version:
-
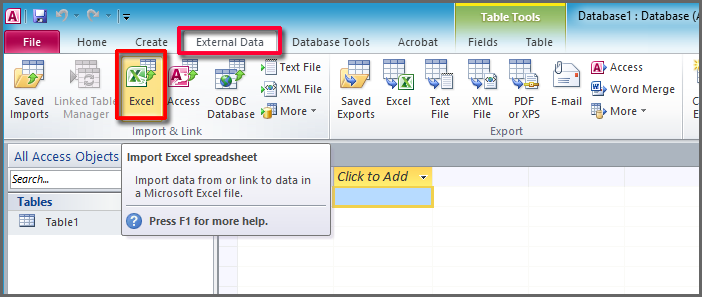
If you’re using the latest version of the Microsoft 365 subscription version of Access or Access 2019, on the External Data tab, in the Import & Link group, click New Data Source > From File > Excel.
-
If you’re using Access 2016, Access 2013, or Access 2010, on the External Data tab, in the Import & Link group, click Excel.
Note: The External Data tab is not available unless a database is open.
-
-
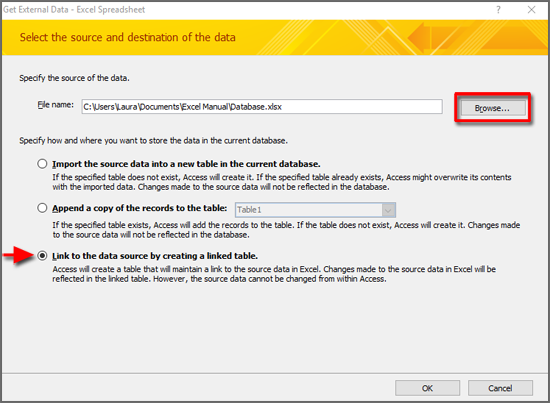
In the Get External Data — Excel Spreadsheet dialog box, in the File name box, specify the name of the Excel file that contains the data that you want to import.
-or-
Click Browse and use the File Open dialog box to locate the file that you want to import.
-
Specify how you want to store the imported data.
To store the data in a new table, select Import the source data into a new table in the current database. You will be prompted to name this table later.
To append the data to an existing table, select Append a copy of the records to the table and select a table from the drop-down list. This option is not available if the database has no tables.
To link to the data source by creating a linked table, see the section Link to data in Excel, later in this article.
-
Click OK.
The Import Spreadsheet Wizard starts, and leads you through the import process. Go to the next set of steps.
Use the Import Spreadsheet wizard
-
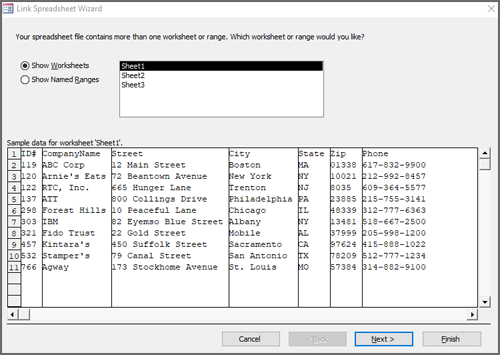
On the first page of the wizard, select the worksheet that contains the data that you want to import, and then click Next.
-
On the second page of the wizard, click either Show Worksheets or Show Named Ranges, select either the worksheet or the named range that you want to import, and then click Next.
-
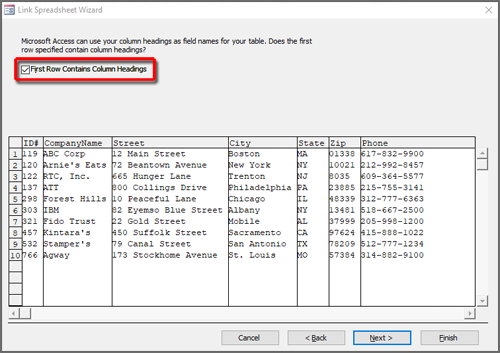
If the first row of the source worksheet or range contains the field names, select First Row Contains Column Headings and click Next.
If you are importing the data into a new table, Access uses these column headings to name the fields in the table. You can change these names either during or after the import operation. If you are appending the data to an existing table, ensure that the column headings in the source worksheet exactly match the names of the fields in the destination table.
If you are appending data to an existing table, skip directly to step 6. If you are adding the data to a new table, follow the remaining steps.
-
The wizard prompts you to review the field properties. Click a column in the lower half of the page to display the corresponding field’s properties. Optionally, do any of the following:
-
Review and change, if you want, the name and data type of the destination field.
Access reviews the first eight rows in each column to suggest the data type for the corresponding field. If the column in the worksheet contains different types of values, such as text and numbers, in the first eight rows of a column, the wizard suggests a data type that is compatible with all the values in the column — most often, the text data type. Although you can choose a different data type, remember that values that are incompatible with the data type that you choose will be either ignored or converted incorrectly during the import process. For more information about how to correct missing or incorrect values, see the section Troubleshoot missing or incorrect values, later in this article.
-
To create an index on the field, set Indexed to Yes.
-
To completely skip a source column, select the Do not import field (Skip) check box.
Click Next after you finish selecting options.
-
-
In the next screen, specify a primary key for the table. If you select Let Access add primary key, Access adds an AutoNumber field as the first field in the destination table, and automatically populates it with unique ID values, starting with 1. Click Next.
-
In the final wizard screen, specify a name for the destination table. In the Import to Table box, type a name for the table. If the table already exists, Access displays a prompt that asks whether you want to overwrite the existing contents of the table. Click Yes to continue or No to specify a different name for the destination table, and then click Finish to import the data.
If Access was able to import some or all the data, the wizard displays a page that shows you the status of the import operation. In addition, you can save the details of the operation for future use as a specification. Conversely, if the operation completely failed, Access displays the message An error occurred trying to import file.
-
Click Yes to save the details of the operation for future use. Saving the details helps you repeat the operation at a later time without having to step through the wizard each time.
See Save the details of an import or export operation as a specification to learn how to save your save your specification details.
See Run a saved import or export specification to learn how to run your saved import or link specifications.
See Schedule an import or export specification to learn how to schedule import and link tasks to run at specific times.
Troubleshoot missing or incorrect values
If you receive the message An error occurred trying to import file, the import operation completely failed. Conversely, if the import operation displays a dialog box that prompts you to save the details of the operation, the operation was able to import all or some of the data. The status message also mentions the name of the error log table that contains the description of any errors that occurred during the import operation.
Important: Even if the status message indicates a completely successful operation, you should review the contents and structure of the table to ensure that everything looks correct before you start using the table.
-
Open the destination table in Datasheet view to see whether all data was added to the table.
-
Open the table in Design view to review the data type and other property settings of the fields.
The following table describes the steps that you can take to correct missing or incorrect values.
Tip: While you are troubleshooting the results, if you find just a few missing values, you can add them to the table manually. Conversely, if you find that entire columns or a large number of values are either missing or were not imported properly, you should correct the problem in the source file. After you have corrected all known problems, repeat the import operation.
|
Issue |
Resolution |
||||||||||||
|---|---|---|---|---|---|---|---|---|---|---|---|---|---|
|
Graphical elements |
Graphical elements, such as logos, charts, and pictures cannot be imported. Manually add them to the database after completing the import operation. |
||||||||||||
|
Calculated values |
The results of a calculated column or cells are imported, but not the underlying formula. During the import operation, you can specify a data type that is compatible with the formula results, such as Number. |
||||||||||||
|
TRUE or FALSE and -1 or 0 values |
If the source worksheet or range includes a column that contains only TRUE or FALSE values, Access creates a Yes/No field for the column and inserts -1 or 0 values in the field. However, if the source worksheet or range includes a column that contains only -1 or 0 values, Access, by default, creates a numeric field for the column. You can change the data type of the field to Yes/No during the import operation to avoid this problem. |
||||||||||||
|
Multivalued fields |
When you import data to a new table or append data to an existing table, Access does not enable support for multiple values in a field, even if the source column contains a list of values separated by semicolon (;). The list of values is treated as a single value and is placed in a text field. |
||||||||||||
|
Truncated data |
If data appears truncated in a column in the Access table, try increasing the width of the column in Datasheet view. If that doesn’t resolve the issue, the data in a numeric column in Excel is too large for the field size of the destination field in Access. For example, the destination field might have the FieldSize property set to Byte in an Access database but the source data contains a value greater than 255. Correct the values in the source file and try importing again. |
||||||||||||
|
Display format |
You might have to set the Format property of certain fields in design view to ensure that the values are displayed correctly in Datasheet view. For example:
Note: If the source worksheet contains rich text formatting such as bold, underline, or italics, the text is imported, but the formatting is lost. |
||||||||||||
|
Duplicate values (key violation error) |
Records that you are importing might contain duplicate values that cannot be stored in the primary key field of the destination table or in a field that has the Indexed property set to Yes (No Duplicates). Eliminate the duplicate values in the source file and try importing again. |
||||||||||||
|
Date values off by 4 years |
The date fields that are imported from an Excel worksheet might be off by four years. Excel for Windows can use two date systems:
You can set the date system in Excel Options: File > Options > Advanced > Use 1904 date system. Note If you import from a .xlsb workbook, it always uses the 1900 Date System regardless of the Date System setting. Before you import the data, change the date system for the Excel workbook or, after appending the data, perform an update query that uses the expression [date field name] + 1462 to correct the dates. Excel for the Macintosh only uses the 1904 Date System. |
||||||||||||
|
Null values |
You might see an error message at the end of the import operation about data that was deleted or lost during the operation, or when you open the table in Datasheet view, you might see that some field values are blank. If the source columns in Excel are not formatted, or the first eight source rows contain values of different data types, open the source worksheet and do the following:
The preceding steps can help minimize the appearance of null values. The following table lists cases in which you will still see null values:
|
||||||||||||
|
Date values replaced by numeric values |
You will see seemingly random five-digit numbers instead of the actual date values in the following situations:
|
||||||||||||
|
Numeric values replaced by date values |
You will see seemingly random date values instead of the actual numeric values in the following situations:
To avoid this, replace the numeric values with date values in the source column and then try importing again. |
In addition, you might want to review the error log table (mentioned in the last page of the wizard) in Datasheet view. The table has three fields — Error, Field, and Row. Each row contains information about a specific error, and the contents of the Error field should help you troubleshoot the problem.
Error strings and troubleshooting hints
|
Error |
Description |
|---|---|
|
Field Truncation |
A value in the file is too large for the FieldSize property setting for this field. |
|
Type Conversion Failure |
A value in the worksheet is the wrong data type for this field. The value might be missing or might appear incorrect in the destination field. See the previous table for more information how to troubleshoot this issue. |
|
Key Violation |
This record’s primary key value is a duplicate — it already exists in the table. |
|
Validation Rule Failure |
A value breaks the rule set by using the ValidationRule property for this field or for the table. |
|
Null in Required Field |
A null value isn’t allowed in this field because the Required property for the field is set to Yes. |
|
Null value in AutoNumber field |
The data that you are importing contains a Null value that you attempted to append to an AutoNumber field. |
|
Unparsable Record |
A text value contains the text delimiter character (usually double quotation marks). Whenever a value contains the delimiter character, the character must be repeated twice in the text file; for example: 4 1/2″» diameter |
Top of Page
Link to data in Excel
By linking an Access database to data in another program, you can use the querying and reporting tools that Access provides without having to maintain a copy of the Excel data in your database.
When you link to an Excel worksheet or a named range, Access creates a new table that is linked to the source cells. Any changes that you make to the source cells in Excel appear in the linked table. However, you cannot edit the contents of the corresponding table in Access. If you want to add, edit, or delete data, you must make the changes in the source file.
Common scenarios for linking to an Excel worksheet from within Access
Typically, you link to an Excel worksheet (instead of importing) for the following reasons:
-
You want to continue to keep your data in Excel worksheets, but be able to use the powerful querying and reporting features of Access.
-
Your department or workgroup uses Access, but data from external sources that you work with is in Excel worksheets. You don’t want to maintain copies of external data, but want to be able to work with it in Access.
If this is the first time you are linking to an Excel worksheet
-
You cannot create a link to an Access database from within Excel.
-
When you link to an Excel file, Access creates a new table, often referred to as a linked table. The table shows the data in the source worksheet or named range, but it doesn’t actually store the data in the database.
-
You cannot link Excel data to an existing table in the database. This means that you cannot append data to an existing table by performing a linking operation.
-
A database can contain multiple linked tables.
-
Any changes that you make to the data in Excel are automatically reflected in the linked table. However, the contents and structure of a linked table in Access are read-only.
-
When you open an Excel workbook in Access (in the File Open dialog box, change the Files of Type list box to Microsoft Excel, and select the file you want), Access creates a blank database and automatically starts the Link Spreadsheet Wizard.
Prepare the Excel data
-
Locate the Excel file and the worksheet or range that has the data you want to link to. If you don’t want to link to the entire worksheet, consider defining a named range that includes only the cells you want to link to.
Create a named range in Excel (optional – useful if you only want to link to some of the worksheet data)
-
Switch to Excel and display the worksheet in which you want to define a named range.
-
Select the range of cells that contain the data you want to link to.
-
Right-click within the selected range and click Name a Range or Define Name.
-
In the New Name dialog box, specify a name for the range in the Name box and then click OK.
Note that you can link to only one worksheet or range at a time during a link operation. To link to data in multiple places in a workbook, repeat the link operation for each worksheet or range.
-
-
Review the source data, and take action as described in the following table:
Element
Description
Tabular format
Ensure that the cells are in tabular format. If the range includes merged cells, the contents of the cell are placed in the field that corresponds to the leftmost column and the other fields are left blank.
Skipping columns and rows
You cannot skip source columns and rows during the linking operation. However, you can hide fields and filter records by opening the linked table in Datasheet view after you have imported them into Access.
Number of columns
The number of source columns cannot exceed 255, because Access does not support more than 255 fields in a table.
Blank columns, rows, and cells
Delete all unnecessary blank columns and blank rows in the Excel worksheet or range. If there are blank cells, try to add the missing data.
Error values
If one or more cells in a worksheet or range contain error values, correct them before you start the import operation. Note that if a source worksheet or range contains error values, Access inserts a null value in the corresponding fields in the table.
Data type
You cannot change the data type or size of the fields in the linked table. Before you start the linking operation, you must verify that each column contains data of a specific type.
We highly recommend that you format a column if it includes values of different data types. For example, the FlightNo column in a worksheet might contain numeric and text values, such as 871, AA90, and 171. To avoid missing or incorrect values, do the following:
-
Right-click the column and then click Format Cells.
-
On the Number tab, under Category, select a format.
-
Click OK.
First row
If the first row in the worksheet or named range contains the names of the columns, you can specify that Access should treat the data in the first row as field names during the link operation. If there are no column names in the worksheet, or if a specific column name violates the field naming rules in Access, Access assigns a valid name to each corresponding field.
-
-
Close the source file, if it is open.
Prepare the destination database
-
Open the database in which you want to create the link. Ensure that the database is not read-only and that you have the necessary permissions to make changes to it.
-
If you don’t want to store the link in any of your existing databases, create a blank database: Click the File tab, click New, and then click Blank Database. Note, if you’re using Access 2007, click the Microsoft Office Button and then click New.
You are now ready to start the linking operation.
Create the link
-
The location of the import/link wizard differs slightly depending upon your version of Access. Choose the steps that match your Access version:
-
If you’re using the latest version of the Microsoft 365 subscription version of Access or Access 2019, on the External Data tab, in the Import & Link group, click New Data Source > From File > Excel.
-
If you’re using Access 2016, Access 2013, or Access 2010, on the External Data tab, in the Import & Link group, click Excel.
Note: The External Data tab is not available unless a database is open.
-
-
In the Get External Data — Excel Spreadsheet dialog box, in the File name box, specify the name of the Excel source file.
-
Select Link to the data source by creating a linked table, and then click OK.
The Link Spreadsheet Wizard starts and guides you through the linking process.
-
On the first page of the wizard, select a worksheet or a named range and click Next.
-
If the first row of the source worksheet or range contains the field names, select First row contains column headings. Access uses these column headings to name the fields in the table. If a column name includes certain special characters, it cannot be used as a field name in Access. In such cases, an error message is displayed that tells you that Access will assign a valid name for the field. Click OK to continue.
-
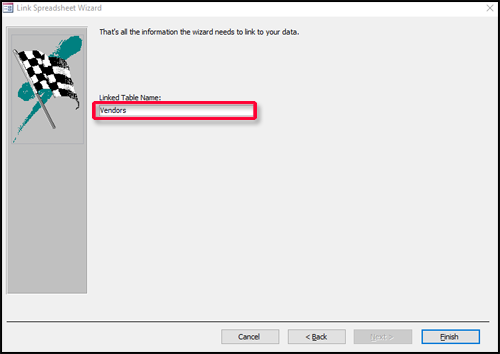
On the final page of the wizard, specify a name for the linked table and then click Finish. If the table with the name you specify already exists, you are asked if you want to overwrite the existing table or query. Click Yes if you want to overwrite the table or query, or click No to specify a different name.
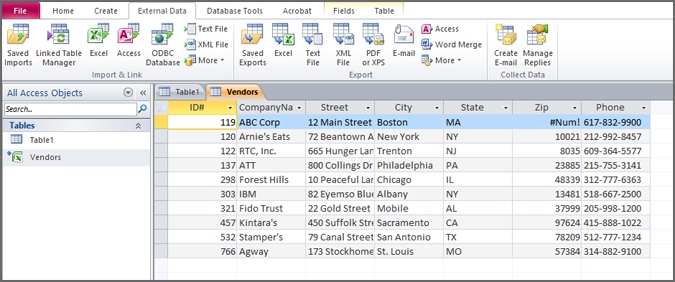
Access tries to create the linked table. If the operation succeeds, Access displays the Finished linking table message. Open the linked table and review the fields and data to ensure that you see the correct data in all the fields.
If you see error values or incorrect data, you must troubleshoot the source data. For more information about how to troubleshoot error values or incorrect values, see the next section.
Top of Page
Troubleshoot #Num! and other incorrect values in a linked table
Even if you receive the message Finished linking table, you should open the table in Datasheet view to ensure that the rows and columns show the correct data.
If you see errors or incorrect data anywhere in the table, take correct action as described in the following table, and then try linking again. Remember that you cannot add the values directly to the linked table, because the table is read-only.
|
Issue |
Resolution |
|---|---|
|
Graphical elements |
Graphical elements in an Excel worksheet, such as logos, charts, and pictures, cannot be linked to in Access. |
|
Display format |
You might have to set the Format property of certain fields in Design view to ensure that the values are displayed correctly in Datasheet view. |
|
Calculated values |
The results of a calculated column or cells are displayed in the corresponding field, but you cannot view the formula (or expression) in Access. |
|
Truncated text values |
Increase the width of the column in Datasheet view. If you still don’t see the entire value, it could be because the value is longer than 255 characters. Access can only link to the first 255 characters, so you should import the data instead of linking to it. |
|
Numeric field overflow error message |
The linked table might appear to be correct, but later, when you run a query against the table, you might see a Numeric Field Overflow error message. This can happen because of a conflict between the data type of a field in the linked table and the type of data that is stored in that field. |
|
TRUE or FALSE and -1 or 0 values |
If the source worksheet or range includes a column that contains only TRUE or FALSE values, Access creates a Yes/No field for the column in the linked table. However, if the source worksheet or range includes a column that contains only -1 or 0 values, Access, by default, creates a numeric field for the column, and you will not be able to change the data type of the corresponding field in the table. If you want a Yes/No field in the linked table, ensure that the source column includes TRUE and FALSE values. |
|
Multivalued fields |
Access does not enable support for multiple values in a field, even if the source column contains a list of values separated by semicolon (;). The list of values will be treated as a single value, and placed in a text field. |
|
#Num! |
Access displays the #Num! error value instead of the actual data in a field in the following situations:
Do the following to minimize the instances of null values in the table:
|
|
Numeric values instead of date values |
If you see a seemingly random five-digit number in a field, check to see if the source column contains mostly numeric values but also includes a few date values. Date values that appear in numeric columns get incorrectly converted to a number. Replace the date values with numeric values and then try linking again. |
|
Date values instead of numeric values |
If you see a seemingly random date value in a field, check to see if the source column contains mostly date values but also includes a few numeric values. Numeric values that appear in date columns get incorrectly converted to a date. Replace the numeric values with date values and then try linking again. |
Top of Page
Примечание: Microsoft Access не поддерживает импорт данных Excel с примененной меткой конфиденциальности. В качестве обходного решения можно удалить метку перед импортом, а затем повторно применить метку после импорта. Дополнительные сведения см. в статье «Применение меток конфиденциальности к файлам и электронной почте в Office».
Существуют различные способы переноса данных из книги Excel в базы данных Access. Можно скопировать данные с открытого листа и вставить их в таблицу Access, импортировать лист в новую или существующую таблицу либо связать лист с базой данных Access.
В этой статье приведено подробное описание процедуры импорта или связывания данных Excel с классическими базами данных Access.
В этой статье
-
Общее представление об импорте данных из Excel
-
Импорт данных из Excel
-
Разрешение вопросов, связанных с отсутствующими и неверными значениями
-
Связывание с данными Excel
-
Разрешение вопросов, связанных со значением #Число! и другими неверными значениями в связанной таблице
Общее представление об импорте данных из Excel
Если требуется сохранить данные одного или нескольких листов Excel в Access, следует импортировать содержимое листа в новую или существующую базу данных Access. При импорте данных в Access создается их копия в новой или существующей таблице, а исходный лист Excel не изменяется.
Стандартные сценарии импорта данных Excel в Access
-
Опытному пользователю Excel требуется использовать Access для работы с данными. Для этого необходимо переместить данные из листов Excel в одну или несколько новых таблиц Access.
-
В отделе или рабочей группе используется Access, но иногда данные поступают в формате Excel, и их необходимо объединять с базами данных Access. Требуется выполнить импорт полученных листов Excel в базу данных.
-
Пользователь применяет Access для управления данными, однако получает еженедельные отчеты от остальных участников команды в виде книг Excel. Требуется организовать процесс импорта таким образом, чтобы данные импортировались в базу данных каждую неделю в заданное время.
Первый импорт данных из Excel
-
Сохранить книгу Excel в виде базы данных Access невозможно. В Excel не предусмотрена функция создания базы данных Access с данными Excel.
-
При открытии книги Excel в Access (для этого следует открыть диалоговое окно Открытие файла, выбрать в поле со списком Тип файлов значение Файлы Microsoft Office Excel и выбрать файл) создается ссылка на эту книгу, но данные из нее не импортируются. Связывание с книгой Excel кардинально отличается от импорта листа в базу данных. Дополнительные сведения о связывании см. ниже в разделе Связывание с данными Excel.
Импорт данных из Excel
В этом разделе описано, как подготовиться к операции импорта, выполнить ее и как сохранить параметры импорта в виде спецификации для повторного использования. Помните, что данные можно одновременно импортировать только из одного листа. Импортировать все данные из книги за один раз невозможно.
Подготовка листа
-
Найдите исходный файл и выделите лист с данными, которые требуется импортировать в Access. Если необходимо импортировать лишь часть данных листа, можно задать именованный диапазон, содержащий только те ячейки, которые требуется импортировать.
Определение именованного диапазона (необязательно)
-
Перейдите в Excel и откройте лист, данные из которого нужно импортировать.
-
Выделите диапазон ячеек, содержащих данные, которые необходимо импортировать.
-
Щелкните выделенный диапазон правой кнопкой мыши и выберите пункт Имя диапазона или Определить имя.
-
В диалоговом окне Создание имени укажите имя диапазона в поле Имя и нажмите кнопку ОК.
Имейте в виду, что в ходе одной операции импорта можно импортировать лишь один лист. Чтобы импортировать данные нескольких листов, операцию импорта следует повторить для каждого листа.
-
-
Просмотрите исходные данные и выполните необходимые действия в соответствии с приведенной ниже таблицей.
Элемент
Описание
Число столбцов
Число исходных столбцов, которые необходимо импортировать, не должно превышать 255, т. к. Access поддерживает не более 255 полей в таблице.
Пропуск столбцов и строк
В исходный лист или именованный диапазон рекомендуется включать только те строки и столбцы, которые требуется импортировать.
Смещ_по_строкам В ходе операции импорта невозможно фильтровать или пропускать строки.
Столбцы. В ходе операции экспорта невозможно пропускать столбцы, если данные добавляются в существующую таблицу.
Табличный формат
Убедитесь, что ячейки имеют табличный формат. Если лист или именованный диапазон включает объединенные ячейки, их содержимое помещается в поле, соответствующее крайнему левому столбцу, а другие поля остаются пустыми.
Пустые столбцы, строки и ячейки
Удалите все лишние пустые столбцы и строки из листа или диапазона. При наличии пустых ячеек добавьте в них отсутствующие данные. Если планируется добавлять записи к существующей таблице, убедитесь, что соответствующие поля таблицы допускают использование пустых (отсутствующих или неизвестных) значений. Поле допускает использование пустых значений, если свойство Обязательное поле (Required) имеет значение Нет, а свойство Условие на значение (ValidationRule) не запрещает пустые значения.
Значения ошибок
Если одна или несколько ячеек на листе или в диапазоне содержат значения ошибок, например #ЧИСЛО или #ДЕЛ, исправьте эти значения до начала операции импорта. Если исходный лист или диапазон содержит значения ошибок, соответствующее поле таблицы Access остается пустым. Дополнительные сведения о способах исправления таких ошибок см. ниже в разделе Разрешение вопросов, связанных с отсутствующими и неверными значениями.
Тип данных
Чтобы избежать ошибок во время импорта, убедитесь, что каждый исходный столбец содержит один и тот же тип данных в каждой строке. Access сканирует первые восемь строк источника, чтобы определить тип данных полей в таблице. Настоятельно рекомендуется убедиться, что первые восемь строк источника не смешивают значения различных типов данных ни в одной из столбцов. В противном случае Access может не назначить столбцу правильный тип данных.
Рекомендуется также отформатировать все исходные столбцы в Excel и назначить им определенный формат данных перед началом операции импорта. Форматирование является необходимым, если столбец содержит значения с различными типами данных. Например, столбец «Номер рейса» может содержать числовые и текстовые значения, такие как 871, AA90 и 171. Чтобы исключить отсутствующие или неверные значения, выполните указанные ниже действия.
-
Щелкните заголовок столбца правой кнопкой мыши и выберите пункт Формат ячеек.
-
На вкладке Числовой в группе Категория выберите формат. Для столбца «Номер рейса» лучше выбрать значение Текстовый.
-
Нажмите кнопку ОК.
Если исходные столбцы отформатированы, но все же содержат смешанные значения в строках, следующих за восьмой строкой, в ходе операции импорта значения могут быть пропущены или неправильно преобразованы. Сведения о разрешении этих вопросов см. в разделе Разрешение вопросов, связанных с отсутствующими и неверными значениями.
Первая строка
Если первая строка листа или именованного диапазона содержит имена столбцов, в Access можно указать, что данные первой строки должны рассматриваться в ходе операции импорта как имена полей. Если исходный лист или диапазон не содержит имен, рекомендуется добавить их в исходные данные до операции импорта.
Примечание: Если планируется добавить данные в существующую таблицу, убедитесь, что имя каждого столбца в точности соответствует имени поля. Если имя столбца отличается от имени соответствующего поля в таблице, операция импорта завершится неудачей. Чтобы просмотреть имена полей, откройте таблицу в Access в режиме конструктора.
-
-
Закройте исходную книгу, если она открыта. Если исходный файл остается открытым в ходе операции импорта, могут возникнуть ошибки преобразования данных.
Подготовка конечной базы данных
-
Откройте базу данных Access, в которой будут храниться импортируемые данные. Убедитесь, что база данных доступна не только для чтения и что есть права на ее изменение.
-или-
Если ни одна из существующих баз данных не подходит для хранения импортируемых данных, создайте пустую базу данных. Для этого выполните указанные ниже действия.
Откройте вкладку Файл, нажмите кнопку Создать и выберите пункт Пустая база данных.
-
Перед началом операции импорта следует определить, в какой таблице будут храниться данные: в новой или существующей.
Создание новой таблицы. Если необходимо сохранить данные в новой таблице, в Access создается таблица, в которую добавляются импортируемые данные. Если таблица с указанным именем уже существует, содержимое существующей таблицы перезаписывается импортируемыми данными.
Добавление в существующую таблицу. При добавлении данных в существующую таблицу строки из листа Excel добавляются в указанную таблицу.
Следует помнить, что ошибки в ходе операции добавления зачастую объясняются тем, что исходные данные не соответствуют структуре и параметрам полей в конечной таблице. Чтобы избежать таких ошибок, откройте таблицу в режиме конструктора и проверьте указанные ниже параметры.
-
Первая строка. Если первая строка исходного листа или диапазона не содержит заголовки столбцов, убедитесь, что расположение и тип данных каждого столбца соответствуют нужному полю таблицы. Если же первая строка содержит заголовки столбцов, совпадение порядка следования столбцов и полей необязательно, но имя и тип данных каждого столбца должны в точности совпадать с именем и типом данных соответствующего поля.
-
Отсутствующие или лишние поля. Если одно или несколько полей исходного листа отсутствуют в конечной таблице, их следует добавить до начала операции импорта. Если же таблица содержит поля, которые отсутствуют в исходном файле, их не требуется удалять из таблицы при условии, что они допускают использование пустых значений.
Совет: Поле допускает использование пустых значений, если его свойство Обязательное поле (Required) имеет значение Нет, а свойство Условие на значение (ValidationRule) не запрещает пустые значения.
-
Первичный ключ. Если таблица содержит поле первичного ключа, исходный лист или диапазон должен содержать столбец, содержащий значения, совместимые с полем первичного ключа, а импортированные значения ключа должны быть уникальными. Если импортируемая запись содержит значение первичного ключа, которое уже существует в таблице, отображается сообщение об ошибке.
-
Индексированные поля. Если свойство Индексировано поля таблицы имеет значение Да (без повторов), соответствующий столбец исходного листа или диапазона должен содержать уникальные значения.
Для выполнения операции импорта перейдите к указанным ниже действиям.
-
Запуск операции импорта
-
Расположение мастера импорта или связывания зависит от используемой версии Access. Выполните действия, которые соответствуют вашей версии Access.
-
Если вы используете последнюю версию подписки Microsoft 365 Access или Access 2019, на вкладке «Внешние данные» в группе «Импорт & Link» щелкните «Создать источник данных > из файлового > Excel«.
-
Если вы используете Access 2016, Access 2013 или Access 2010, на вкладке Внешние данные в группе Импорт и связи нажмите кнопку Excel.
Примечание: Вкладка Внешние данные доступна только в том случае, если открыта база данных.
-
-
В диалоговом окне Внешние данные — Электронная таблица Excel в поле Имя файла укажите имя файла Excel, содержащего данные, которые необходимо импортировать.
-или-
Чтобы указать импортируемый файл, нажмите кнопку Обзор и воспользуйтесь диалоговым окном Открытие файла.
-
Укажите способ сохранения импортируемых данных.
Чтобы сохранить данные в новой таблице, выберите вариант Импортировать данные источника в новую таблицу в текущей базе данных. Позднее будет предложено указать имя этой таблицы.
Чтобы добавить данные в существующую таблицу, выберите параметр Добавить копию записей в конец таблицы и выберите таблицу в раскрывающемся списке. Этот параметр недоступен, если база данных не содержит таблиц.
Сведения о связывании с источником данных путем создания связанной таблицы см. ниже в разделе Связывание с данными Excel.
-
Нажмите кнопку ОК.
Будет запущен мастер импорта электронных таблиц, который поможет выполнить импорт. Перейдите к дальнейшим действиям.
Использование мастера импорта электронных таблиц
-
На первой странице мастера выберите лист, содержащий данные, которые необходимо импортировать, и нажмите кнопку Далее.
-
На второй странице мастера щелкните элемент листы или именованные диапазоны, выберите лист или именованный диапазон, который необходимо импортировать, и нажмите кнопку Далее.
-
Если первая строка исходного листа или диапазона содержит имена полей, выберите вариант Первая строка содержит заголовки столбцов и нажмите кнопку Далее.
Если данные импортируются в новую таблицу, заголовки столбцов используются в Access в качестве имен полей в таблице. Эти имена можно изменить в ходе операции импорта или после ее завершения. Если данные добавляются к существующей таблице, убедитесь, что заголовки столбцов исходного листа в точности соответствуют именам полей конечной таблицы.
Если данные добавляются к существующей таблице, перейдите к действию 6. Если данные добавляются в новую таблицу, выполните оставшиеся действия.
-
Мастер предложит просмотреть свойства полей. Щелкните столбец в нижней части страницы, чтобы отобразить свойства нужного поля. При необходимости выполните указанные ниже действия.
-
Просмотрите и измените имя и тип данных конечного поля.
В Access выполняется проверка первых восьми строк каждого столбца, чтобы определить тип данных для соответствующего поля. Если первые восемь строк столбца на листе содержат значения разных типов, например текст и числа, мастер предлагает тип данных, совместимый со всеми значениями столбца — как правило, это текстовый тип данных. Хотя можно выбрать и другой тип данных, следует помнить, что значения, несовместимые с этим типом, будут в ходе импорта пропущены или преобразованы неправильно. Дополнительные сведения о том, как исправить неверные или отсутствующие значения, см. ниже в разделе Разрешение вопросов, связанных с отсутствующими и неверными значениями.
-
Чтобы создать индекс для поля, присвойте свойству Индексировано (Indexed) значение Да.
-
Чтобы пропустить весь исходный столбец, установите флажок Не импортировать (пропустить) поле.
Настроив параметры, нажмите кнопку Далее.
-
-
На следующем экране задайте первичный ключ для таблицы. При выборе варианта автоматически создать ключ Access добавляет поле счетчика в качестве первого поля конечной таблицы и автоматически заполняет его уникальными значениями кодов, начиная с 1. После этого нажмите кнопку Далее.
-
На последнем экране мастера укажите имя целевой таблицы. в поле Импорт в таблицу. Если таблица уже существует, в Access появится запрос на перезапись существующего содержимого таблицы. Нажмите кнопку « Да «, чтобы продолжить, или «Нет», чтобы указать другое имя целевой таблицы, а затем нажмите кнопку « Готово», чтобы импортировать данные.
Если импорт части или всех данных в Access завершится успешно, в мастере откроется страница с состоянием операции импорта. Кроме того, сведения об операции можно сохранить в виде спецификации для дальнейшего использования. Если операция завершится неудачей, появится сообщение Ошибка при попытке импорта файла.
-
Нажмите кнопку Да, чтобы сохранить сведения об операции для использования в будущем. Сохранение сведений позволяет выполнять операцию повторно без использования мастера.
Сведения о том, как сохранить спецификацию, см. в статье Сохранение параметров операции импорта или экспорта в виде спецификации.
Сведения о том, как запустить сохраненную спецификацию импорта или экспорта, см. в статье Запуск сохраненной спецификации импорта или экспорта.
Сведения о том, как запланировать выполнение задач импорта и связывания в определенное время, см. в статье Планирование спецификации импорта или экспорта.
Разрешение вопросов, связанных с отсутствующими и неверными значениями
Сообщение Ошибка при попытке импорта файла свидетельствует о том, что операция импорта завершилась неудачей. Если же после операции импорта отображается диалоговое окно, в котором предлагается сохранить сведения об операции, это означает, что данные успешно импортированы полностью или частично. В сообщении о состоянии указывается также имя таблицы, которая содержит описание всех ошибок, возникших в ходе операции импорта.
Важно: Даже если в сообщении о состоянии указано, что операция завершилась успешно, перед использованием таблицы следует просмотреть ее содержимое и структуру, чтобы убедиться в правильности всех данных.
-
Откройте целевую таблицу в режиме таблицы, чтобы убедиться, что в таблицу были добавлены все данные.
-
Откройте таблицу в режиме конструктора, чтобы проверить типы данных и другие свойства полей.
В приведенной ниже таблице описаны действия по разрешению проблем, связанных с отсутствующими или неверными значениями.
Совет: Если при устранении неполадок обнаружено лишь несколько отсутствующих значений, можно добавить их в таблицу вручную. Если же отсутствует или неправильно импортирован целый столбец либо большой объем данных, следует исправить исходный файл. После устранения всех возможных проблем повторите операцию импорта.
|
Проблема |
Решение |
||||||||||||
|---|---|---|---|---|---|---|---|---|---|---|---|---|---|
|
Графические элементы |
Графические элементы, такие как логотипы, диаграммы и рисунки, не импортируются. Их следует добавить в базу данных вручную после завершения операции импорта. |
||||||||||||
|
Вычисляемые значения |
Импортируются результаты вычисляемого столбца или ячейки, но не базовая формула. В ходе операции импорта можно указать тип данных, совместимый с результатами формулы, например числовой. |
||||||||||||
|
Значения TRUE или FALSE и -1 или 0 |
Если исходный лист или диапазон включает столбец, который содержит только значения TRUE или FALSE, в Access для этого столбца создается логическое поле, в которое вставляется значение -1 или 0. Если же исходный лист или диапазон включает столбец, который содержит только значения -1 и 0, в Access для этого столбца по умолчанию создается числовое поле. Чтобы избежать этой проблемы, можно изменить в ходе импорта тип данных поля на логический. |
||||||||||||
|
Многозначные поля |
При импорте данных в новую или существующую таблицу приложение Access не поддерживает многозначные поля, даже если исходный столбец содержит список значений, разделенных точками с запятой (;). Список значений обрабатывается как одно значение и помещается в текстовое поле. |
||||||||||||
|
Усеченные данные |
В случае усечения данных в столбце таблицы Access попытайтесь увеличить ширину столбца в режиме таблицы. Если не удается решить проблему с помощью этого способа, это означает, что объем данных в числовом столбце Excel слишком велик для конечного поля в Access. Например, в базе данных Access свойство FieldSize конечного поля может иметь значение Байт, а исходные данные могут содержать значение больше 255. Исправьте значения в исходном файле и повторите операцию импорта. |
||||||||||||
|
Формат отображения |
Чтобы обеспечить правильное отображение значений в режиме таблицы, может потребоваться изменить свойство Формат некоторых полей в режиме конструктора. Ниже приведены примеры.
Примечание: Если исходный лист содержит элементы форматирования RTF, например полужирный шрифт, подчеркивание или курсив, текст импортируется без форматирования. |
||||||||||||
|
Повторяющиеся значения (нарушение уникальности ключа) |
Импортируемые записи могут содержать повторяющиеся значения, которые невозможно сохранить в поле первичного ключа в конечной таблице или в поле, для которого свойству Индексировано присвоено значение Да (без повторов). Удалите повторяющиеся значения в исходном файле и повторите операцию импорта. |
||||||||||||
|
Значения дат, сдвинутые на 4 года |
Значения полей дат, импортированных с листа Excel, оказываются сдвинуты на четыре года. Excel для Windows может использовать две системы дат:
Вы можете задать систему дат в excel Options: File > Options > Advanced> Use 1904 date system. Примечание При импорте из книги XLSB всегда используется система дат 1900 независимо от параметра системы дат. Прежде чем импортировать данные, измените систему дат для книги Excel или выполните после добавления данных запрос на обновление, используя выражение [имя поля даты] + 1462 для корректировки дат. Excel для macintosh использует только систему дат 1904. |
||||||||||||
|
Пустые значения |
В конце операции импорта может отобразится сообщение об ошибке с данными, которые были удалены или потеряны во время операции, или при открытии таблицы в режиме таблицы может отобразится, что некоторые значения полей пусты. Если исходные столбцы в Excel не отформатированы или первые восемь строк источника содержат значения различных типов данных, откройте исходный лист и выполните следующие действия:
Описанные выше действия позволяют свести к минимуму количество пустых значений. В приведенной ниже таблице представлены ситуации, в которых пустые значения все же будут появляться.
|
||||||||||||
|
Значения дат, замененные числовыми значениями |
Случайные пятизначные числа отображаются вместо фактических значений дат в указанных ниже случаях.
|
||||||||||||
|
Числовые значения, замененные значениями даты |
Случайные значения даты отображаются вместо фактических числовых значений в указанных ниже случаях.
Чтобы избежать этой проблемы, замените числовые значения значениями дат в исходном столбце и повторите попытку импорта. |
Кроме того, может потребоваться просмотреть таблицу ошибок, о которой говорится на последней странице мастера, в режиме таблицы. Эта таблица содержит три поля: «Ошибка», «Поле» и «Строка». В каждой ее строке содержатся сведения об определенной ошибке, и данные в поле «Ошибка» можно использовать при разрешении вопросов.
Строки ошибок и советы по устранению неполадок
|
Ошибка |
Описание |
|---|---|
|
Обрезка полей |
Значение в поле превышает размер, заданный свойством FieldSize этого поля. |
|
Ошибка преобразования типа |
Значение на листе не соответствует типу данных поля. Это значение может быть заменено пустым или неверным значением в конечном поле. Дополнительные сведения об устранении этой проблемы см. в предыдущей таблице. |
|
Нарушение уникальности ключа |
Значение первичного ключа записи совпадает со значением, уже имеющимся в таблице. |
|
Нарушение условия на значение |
Значение не соответствует правилу, заданному для этого поля или таблицы с помощью свойства ValidationRule. |
|
Пустое значение в обязательном поле |
Данное поле не может иметь пустое значение, поскольку его свойство Обязательное поле (Required) имеет значение Да. |
|
Пустое значение в поле счетчика |
Импортируемые данные содержат пустое значение (NULL), и была выполнена попытка добавить его в поле счетчика. |
|
Неинтерпретируемая запись |
Текстовое значение содержит знак разделителя (как правило, это прямые кавычки). Если значение содержит знак разделителя, он должен содержаться в текстовом файле дважды, например: Диаметр 4 1/2″» |
К началу страницы
Связывание с данными Excel
Связав базу данных Access с данными другой программы, можно использовать инструменты запросов и отчетов Access без обслуживания копии данных Excel в базе данных.
При связывании с листом или именованным диапазоном Excel в Access создается новая таблица, связанная с исходными ячейками. Любые изменения, вносимые в исходные ячейки в Excel, отражаются в связанной таблице. При этом изменить содержимое соответствующей таблицы в Access невозможно. Если требуется добавить, изменить или удалить данные, изменения необходимо внести в исходный файл.
Стандартные сценарии связывания с листом Excel из Access
Обычно связывание с листом Excel (вместо импорта) выполняют по указанным ниже причинам.
-
Требуется хранить данные в листах Excel с возможностью использовать удобные функции запросов и отчетов Access.
-
В отделе или рабочей группе используется Access, однако приходится также работать с внешними источниками данных, такими как листы Excel. Создавать копии внешних данных нецелесообразно, однако необходимо работать с данными в Access.
Первое связывание с листом Excel
-
В Excel невозможно создать связь с базой данных Access.
-
При связывании с файлом Excel в Access создается новая таблица, которая называется также связанной таблицей. В ней отображаются данные исходного листа или именованного диапазона; при этом они не сохраняются в базе данных.
-
Данные Excel невозможно связать с существующей таблицей базы данных. Это означает, что операция связывания не позволяет добавлять данные в существующую таблицу.
-
База данных может содержать несколько связанных таблиц.
-
Все изменения данных в Excel автоматически отражаются в связанной таблице. Однако содержимое и структура связанной таблицы Access доступны только для чтения.
-
При открытии книги Excel в Access (для этого в диалоговом окне Открытие файла необходимо выбрать в поле со списком Тип файлов значение Microsoft Excel и выбрать нужный файл) в Access создается пустая база данных и автоматически запускается мастер связи с электронной таблицей.
Подготовка данных Excel
-
Найдите файл Excel и лист или диапазон, содержащий нужные данные. Если нет необходимости создавать связь со всем листом, можно определить именованный диапазон, включающий только нужные ячейки.
Создание именованного диапазона в Excel (необязательно — целесообразно лишь для связывания отдельных данных на листе)
-
Перейдите в Excel и откройте лист, в котором нужно определить именованный диапазон.
-
Выделите диапазон ячеек, содержащих данные, на которые необходимо создать ссылку.
-
Щелкните выделенный диапазон правой кнопкой мыши и выберите пункт Имя диапазона или Определить имя.
-
В диалоговом окне Создание имени укажите имя диапазона в поле Имя и нажмите кнопку ОК.
Имейте в виду, что в ходе одной операции связывания можно создать связь лишь с одним листом или диапазоном. Чтобы создать связь с несколькими местами в книге, следует повторить операцию связывания для каждого листа или диапазона.
-
-
Просмотрите исходные данные и выполните необходимые действия в соответствии с приведенной ниже таблицей.
Элемент
Описание
Табличный формат
Убедитесь, что ячейки имеют табличный формат. Если диапазон включает объединенные ячейки, их содержимое помещается в поле, соответствующее крайнему левому столбцу, а другие поля остаются пустыми.
Пропуск столбцов и строк
Во время операции связывания нельзя пропустить исходные столбцы и строки. Однако можно скрыть поля и отфильтровать записи, открыв связанную таблицу в режиме таблицы после их импорта в Access.
Число столбцов
Число исходных столбцов не должно превышать 255, т.к. Access поддерживает не более 255 полей в таблице.
Пустые столбцы, строки и ячейки
Удалите все лишние пустые столбцы и строки из листа Excel или диапазона. При наличии пустых ячеек попытайтесь добавить отсутствующие данные.
Значения ошибок
Если одна или несколько ячеек на листе или в диапазоне содержат значения ошибок, исправьте эти значения до начала операции импорта. Имейте в виду, что если исходный лист или диапазон содержит значения ошибок, в Access в соответствующее поле таблицы вставляется пустое значение.
Тип данных
Изменить тип данных и размер полей в связанной таблице невозможно. Перед началом связывания следует проверить тип данных в каждом столбце.
Настоятельно рекомендуется отформатировать все столбцы, которые содержат значения с разными типами данных. Например, столбец «Номер рейса» может содержать числовые и текстовые значения, такие как 871, AA90 и 171. Чтобы исключить отсутствующие или неверные значения, выполните указанные ниже действия.
-
Щелкните столбец правой кнопкой мыши и выберите пункт Формат ячеек.
-
На вкладке Числовой в группе Категория выберите формат.
-
Нажмите кнопку ОК.
Первая строка
Если первая строка листа или именованного диапазона содержит имена столбцов, можно указать, что приложение Access должно в ходе связывания обрабатывать данные в первой строке как имена полей. Если лист не содержит имен или какое-либо имя столбца не соответствует правилам именования полей в Access, каждому полю назначается допустимое имя.
-
-
Закройте исходный файл, если он открыт.
Подготовка конечной базы данных
-
Откройте базу данных, в которой требуется создать связь. Убедитесь, что база данных доступна не только для чтения и что у вас есть права на внесение в нее изменений.
-
Если вы не хотите хранить ссылку ни в какой из существующих баз данных, создайте пустую базу данных: перейдите на вкладку «Файл», нажмите кнопку «Создать» и выберите пункт «Пустая база данных». Обратите внимание: если вы используете Access 2007, нажмите кнопку Microsoft Office и выберите пункт Создать.
После этого можно начать операцию связывания.
Создание связи
-
Расположение мастера импорта или связывания зависит от используемой версии Access. Выполните действия, которые соответствуют вашей версии Access.
-
Если вы используете последнюю версию подписки Microsoft 365 Access или Access 2019, на вкладке «Внешние данные» в группе «Импорт & Link» щелкните «Создать источник данных > из файлового > Excel«.
-
Если вы используете Access 2016, Access 2013 или Access 2010, на вкладке Внешние данные в группе Импорт и связи нажмите кнопку Excel.
Примечание: Вкладка Внешние данные доступна только в том случае, если открыта база данных.
-
-
В диалоговом окне Внешние данные — Электронная таблица Excel в поле Имя файла укажите имя исходного файла Excel.
-
Выберите вариант Создать связанную таблицу для связи с источником данных и нажмите кнопку ОК.
Откроется мастер связи с электронной таблицей, который поможет выполнить связывание.
-
На первой странице мастера выберите лист или именованный диапазон с нужными данными и нажмите кнопку Далее.
-
Если первая строка исходного листа или диапазона содержит имена полей, выберите вариант Первая строка содержит заголовки столбцов. В Access эти заголовки столбцов используются в качестве имен полей в таблице. Если имя столбца включает специальные знаки, его невозможно использовать как имя поля в Access. В таких случаях отображается сообщение об ошибке, в котором говорится, что полю в Access будет назначено допустимое имя. Нажмите кнопку ОК для продолжения.
-
На последней странице мастера укажите имя связанной таблицы и нажмите кнопку Готово. Если таблица с указанным именем уже существует, будет предложено перезаписать существующую таблицу или запрос. Нажмите кнопку Да, чтобы перезаписать таблицу или запрос, или кнопку Нет, чтобы указать другое имя.
Приложение Access попытается создать связанную таблицу. В случае успешного завершения операции появится сообщение Завершено связывание таблицы. Откройте связанную таблицу и просмотрите поля и данные, чтобы убедиться в их правильности.
При наличии ошибок или неверных данных необходимо устранить ошибки в исходных данных. Дополнительные сведения об устранении ошибок или неверных значений см. в следующем разделе.
К началу страницы
Разрешение вопросов, связанных со значением #Число! и другими неверными значениями в связанной таблице
Даже если появится сообщение Завершено связывание таблицы, откройте таблицу в режиме таблицы и убедитесь, что строки и столбцы содержат правильные данные.
При наличии в таблице ошибок или неверных данных необходимо выполнить действия, описанные в приведенной ниже таблице, и повторить попытку связывания. Следует помнить, что добавить значения непосредственно в связанную таблицу невозможно, т.к. она доступна только для чтения.
|
Проблема |
Решение |
|---|---|
|
Графические элементы |
Графические элементы листов Excel, такие как логотипы, диаграммы и рисунки, не могут быть включены в связь с Aсcess. |
|
Формат отображения |
Чтобы обеспечить правильное отображение значений в режиме таблицы, может потребоваться изменить свойство Формат некоторых полей в режиме конструктора. |
|
Вычисляемые значения |
В Access в соответствующем поле отображаются результаты вычисляемого столбца или ячейки, но не формула (выражение). |
|
Усеченные текстовые значения |
Увеличьте ширину столбца в режиме таблицы. Если даже после этого значение не отображается целиком, возможно, его длина превышает 255 знаков. В Access связывание возможно только для первых 255 знаков, поэтому вместо связывания следует выполнить импорт данных. |
|
Сообщение о переполнении числового поля |
Даже если таблица кажется правильной, впоследствии при выполнении запроса с использованием этой таблицы может быть выведено сообщение об ошибке Переполнение числового поля. Это может объясняться конфликтом между типом данных поля в связанной таблице и типом данных, хранящихся в этом поле. |
|
Значения TRUE или FALSE и -1 или 0 |
Если исходный лист или диапазон включает столбец, который содержит только значения TRUE или FALSE, в Access в связанной таблице для этого столбца создается логическое поле. Если же исходный лист или диапазон включает столбец, который содержит только значения -1 или 0, в Access для этого столбца по умолчанию создается числовое поле, тип данных которого невозможно изменить в таблице. Если требуется, чтобы в связанной таблице было создано логическое поле, убедитесь, что исходный столбец содержит значения TRUE и FALSE. |
|
Многозначные поля |
В Access многозначные поля не поддерживаются, даже если исходный столбец содержит список значений, разделенных точками с запятой (;). Список значений обрабатывается как одно значение и помещается в текстовое поле. |
|
#Число! |
В Access значение ошибки #Число! отображается в полях вместо данных в указанных ниже случаях.
Чтобы свести к минимуму число пустых значений в таблице, выполните указанные ниже действия.
|
|
Числовые значения, замененные значениями дат |
Если поле содержит случайные пятизначные числа, проверьте исходный столбец с числовыми значениями на наличие значений дат. Значения дат в числовых столбцах преобразуются в числа. Замените значения дат числовыми значениями и повторите попытку связывания. |
|
Значения дат, замененные числовыми значениями |
Если поле содержит случайные значения дат, проверьте исходный столбец со значениями дат на наличие числовых значений. Числовые значения в столбцах дат преобразуются в даты. Замените числовые значения значениями дат и повторите попытку связывания. |
К началу страницы
I run a sports program where i have a master roll of who is in which class in excel. I want to link this to a database in access that stores the other information about each athlete, e.g. address, parents name, school, medical details. I want to be able to add names to class in the excel speadsheet and have this automatically generate a record for that person in access. There also needs to be some failsafe for athletes that are in multiple classes. I was also doing class roles as pivot tables out of the access database so i need to code for classes and also have this allow for athletes in multiple classes/disciplines.
![]()
Jon Seigel
12.2k8 gold badges57 silver badges92 bronze badges
asked Feb 13, 2010 at 10:50
![]()
It is easy enough to update an Access table from Excel via ADO, after that it is very much about your tables and indexes. If you are not familiar with relational databases, you might like to read http://r937.com/relational.html. That being said, it would be a lot easier to work in Access and output to Excel when necessary.
answered Feb 13, 2010 at 15:59
![]()
FionnualaFionnuala
90.1k7 gold badges110 silver badges148 bronze badges
3
I agree I think this is a classic case of trying to get excel to do something its not best for. If you try to create some kind of hybrid system with excel pushing data into access then it will end in tears at some point.
The best thing in this case would be to port the whole thing to some kind of database. If the number of uses and the usage falls into the range for access/jet then that would be a great choice. If more users/higher usage is going to be needed then maybe look to SQL express to hold the data and access as a front end.
There was a thread a few days ago about someone being sick when maintaining an access DB, he wanted to rewrite it in .net. The point of that thread boiled down to using the correct tool for the correct job. No one can blankly say “Access sucks, everything should be in SQL server/.net” because if used in the correct way and for the correct projects access is a great tool.
So to bring it back to this thread it looks like you have “outgrown” excel and should be looking at some kind of database with access being a strong candidate
answered Feb 15, 2010 at 10:53
![]()
Kevin RossKevin Ross
7,1452 gold badges21 silver badges27 bronze badges
If you want to display the data in Excel (so you can do sorts, filters, etc.) then you could store the data in Access as has been suggested, then instead of exporting a report every time you want to use it, link your Excel file to Access using a Database Query.
In Excel 2003 go to Data->Import External Data->New Database Query and create a new data source to your Access mdb.
That way your data is stored in a much better way, whilst still having the Excel viewability that everyone(?) loves.
answered Feb 15, 2010 at 12:23
![]()
oharaboharab
4,3853 gold badges19 silver badges15 bronze badges
Нет, вы не совсем меня поняли…
Хранить данные в excel вообще не нужно, нужно хранить в базе access.
Смотрите что я хочу…
Есть предположим кнопочка в excel которая выполняет вот такой макрос
Sub GetMyData()
Const strDb As String = «C:Documents and SettingsAdminРабочий столТАНЕКО.mdb»
Const strQry As String = «SELECT * from Главная»
Dim rs As ADODB.Recordset
Dim cn As ADODB.Connection
Set cn = New ADODB.Connection
cn.Open «Provider=Microsoft.Jet.OLEDB.4.0; Data Source=» & strDb & «;»
Set rs = New ADODB.Recordset
With rs
Set .ActiveConnection = cn
.Open strQry
End With
Worksheets(«Лист1»).Range(«A1»).CopyFromRecordset rs
rs.Close: cn.Close
Set rs = Nothing: Set cn = Nothing
End Sub
Он выводит из базы access все данные в таблички excel, там пользователи что то изменяют или добавляют, и ЗАТЕМ МНЕ НУЖНО ЭТО ВСЕ ВЕРНУТЬ В ACCESS, как это сделать???
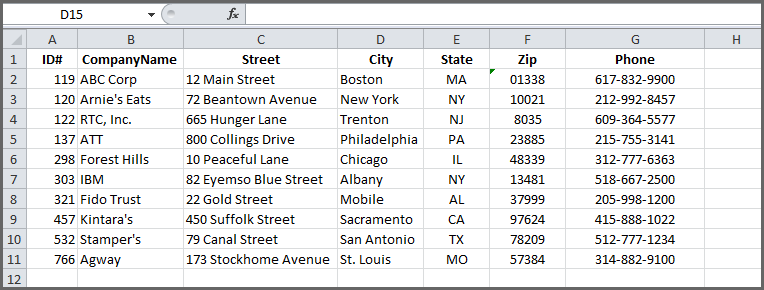
If you have data in Excel, you can bring that data into an Access table. For example, the following is a small database in Excel.
You can link the Excel table into Access by clicking on the Excel icon in the Import & Link section of the External Data tab.
When the Get External Data – Excel Spreadsheet dialog opens, you have the following 3 options:
- Import the source data.
- Append a copy of the records to a table.
- Link to the data source by creating a linked table.
If you choose the third option, the Excel data will be imported as a live link into Access. Any changes made to the Excel file will be reflected in the Access file, but you won’t be able to change the Excel data from Access.
When you click on OK, the Link Spreadsheet Wizard will appear. If your Excel file has multiple sheets or ranges, you will have the opportunity here to identify them.
When you click on Next> you can specify the fact that your table has column headings.
The next step in the Link Spreadsheet Wizard will allow you to give your new table a name.
Now your new table is imported. If any changes are made to the Excel file, they won’t be immediately visible until you close that table in Access and open it again.
You can use this table to create reports, forms, and queries.
We can use Microsoft Access to store a wide range of information for reporting and analysis. In this tutorial, we will learn how to Import Excel Data into a new or existing table in the Access database or link Excel Data to Access. When we import data, Access simply creates a copy of our source data, without making any changes to it.
 Figure 1 – How to import excel into access
How to Import Excel Data into New table in the Access Database
- If we are using Access 2010 or 2013, we will go to the External Data Tab, and select the Excel option in the Import & Link group
- If we are using Access 2007, we will go to the External Data Tab, click on the Excel option in the Import Group
- If we are using the Access 2019, 2016 or Office 365, we will go to the External Data tab and select New Data Source in the Import & Link group. Next, we will select From File and then, Excel
 Figure 2 – Importing access data into excel
- We will be directed to the External Data dialog box
 Figure 3 – Import excel into access
- In the Get External Data dialog box, we will select the location of the file we want to import
 Figure 4 – Import excel data into access
- We will mark “Import the source data into a new table in the current database” option
 Figure 5 – Microsoft access import from excel
- In the Import Spreadsheet Wizard, we will mark “first Row contains Headings” and we will click Next.
 Figure 6 – Import excel data into access
- Next, we can specify the format for each category.
 Figure 7 – How to import excel data into access
- We will define our Primary Key, which is the unique signature to our table. We will let Access define this key for the sake of our tutorial.
 Figure 8 – Import excel data into access
- We may choose to save Import steps
 Figure 9 – How to import excel data into access
- We will enter our desired name for the Table
 Figure 10 – Enter the desired name for our table
- Now, if we click on the My New Data Table, we will see our created table
 Figure 11 – The New imported Table from Excel
How to import Excel Data into an existing table in the Access Database
We can add a different Excel worksheet to the already existing table in the Access Database. But we have to make sure that the column headings of the new table match with the existing table.
- We will go to the External Data Tab on the Ribbon
- In the Import and Link Group, we will go to From File and choose the Excel Button
- In the Get External Data dialog box, we will select the location of the file we want to import
- We will mark “Append a copy to the records to the table” option and specify the table we want to add our new data.
 Figure 12 – Importing excel to access
- We will click Next
 Figure 13 – Use Import Spreadsheet Wizard
- Our New Table will be added into the existing table in Access.
How to Link Excel Data to Access
We can link Excel Data to access so that we can make use of reporting and querying tools without storing a copy of our data inside the Access Database. When we link Data to Access, it will simply create a new table that contains links to the source cells. Whenever we modify the source cells, this will appear automatically in the linked table.
- In the Get External Data-Excel Spreadsheet dialog box, we will specify the location of the Excel sheet
 Figure 14 – Link Excel Data to Access
- Next, we will mark “Link to a data source by creating a linked table”
 Figure 15– Import Excel data into access
- We will specify that the first row contains headings
 Figure 16 – Access Importing data from Excel
- We will name the Table
 Figure 17 – Link Table to Access
- We will verify that we want to click Table by selecting OK.
 Figure 18 – Excel Data into access
- When we click on My Linked Table, the result is the next figure
 Figure 19 – New Excel Table from Access
Instant Connection to an Excel Expert
Most of the time, the problem you will need to solve will be more complex than a simple application of a formula or function. If you want to save hours of research and frustration, try our live Excelchat service! Our Excel Experts are available 24/7 to answer any Excel question you may have. We guarantee a connection within 30 seconds and a customized solution within 20 minutes.
- Remove From My Forums
-
Question
-
Hi All,
I have a number of excel work books, all with three work sheets, in which data of only 1st sheet is of interest.Data in first sheet of all the work books are of same format, First Row contains the headings. All the work books are stored
in the same folder with suitable naming convention.I would like to create a data base of all these data where each work book(first work sheet) becoming a table. I prefer to link the excel sheets rather than importing the data as it would prevent database becoming huge in size.
My idea is to create user form which helps the user to locate the excel workbook he wants to link, the rest should happen programmatically—select the first sheet, keep the same column names and save it as a table with the same name as that of the
work book. As I don’t want the user to have admin access, I can not let him link the excel workbook through the conventional linking option available in Access.Please guide me in how to proceed on this. Thanks in advance.
Deepu
Answers
-
Hi Deepu,
to link Excel file programmatically you should use DoCmd.TransferSpreadsheet method (http://msdn.microsoft.com/en-us/library/aa220766(office.11).aspx).
DoCmd.TransferSpreadsheet acLink, , "Your table name","Path to your workbook file", True, "Sheet1!RangeYouNeed"
You should also use one of the OpenFile dialogs to let your user choose a file needed.
Andrey V Artemyev | Saint-Petersburg, Russia
-
Marked as answer by
Monday, November 15, 2010 12:03 PM
-
Marked as answer by
-
Deepu,
if you specify acLinc rather than acImport, the Linked table will be created rather than imported one. And yes, in the article I’ve provided above there is an example with acImport. But I saw it and provided you an example which should meet your criterias.
Just try to create a blank form with 1 button and to use this code in button’s Click event. Try acImport firstly and then acLink. You’ll see the difference.
Andrey V Artemyev | Saint-Petersburg, Russia
-
Marked as answer by
Deepu2010
Monday, November 15, 2010 12:03 PM
-
Marked as answer by