
Link an Excel file to a Word doc so the doc updates when the Excel data changes
Updated on March 11, 2022
What to Know
- Link: Copy cells. Right-click Link & Use Destination Styles or Link & Keep Source Formatting in Word.
- Embed: In Word, go to Insert > Object > Object > Create from File > Browse > choose Excel file > OK.
- Embed a spreadsheet table: In Word, go to Insert > Table > Excel Spreadsheet.
This article explains two ways to display Excel data in Word.
Instructions apply to Word for Microsoft 365, Word 2019, Word 2016, Word 2013, Word 2010, Excel for Microsoft 365, Excel 2019, Excel 2016, Excel 2013, and Excel 2010.
How to Link Excel to Word
To insert any part of an Excel worksheet in a Word document:
Maddy Price / Lifewire
-
Open the Word document where the worksheet will display.
-
Open the Excel worksheet that contains the data you want to link to the Word document.
-
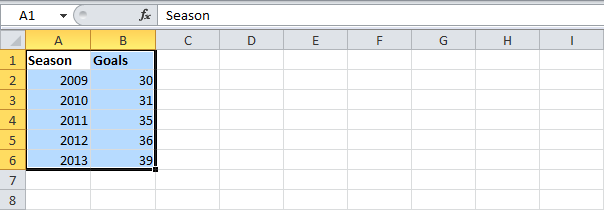
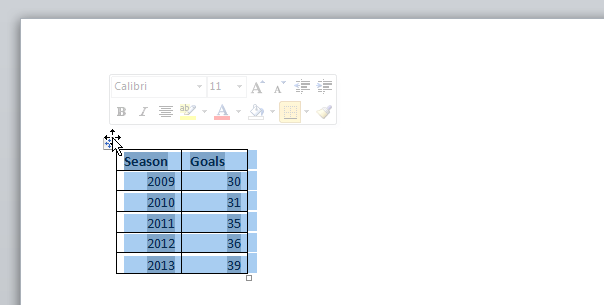
In Excel, select and copy the range of cells to include. If you plan to insert more columns or rows into the worksheet, select the entire worksheet.
To select the entire worksheet, select the cell located in the upper-left corner at the juncture of the row numbers and column letters.
-
In the Word document, position the cursor where you want to insert the linked table.
-
Right-click and select Link & Use Destination Styles or Link & Keep Source Formatting.
Destination Styles uses the default Word table formatting, which usually results in a better-looking table. Keep Source Formatting uses the formatting from the Excel workbook.
-
The Excel data pastes directly into the Word document where the cursor was positioned. If changes are made to the source Excel file, the Word document updates with those changes automatically.
What Happens When You Link Excel to Word
Linking an Excel file to a Word document ensures that the Word document is updated every time the data in the Excel file changes. It works as a one-way link feed that brings the updated Excel data into the linked Word document. Linking an Excel worksheet also keeps your Word file small because the data doesn’t save to the Word document.
Linking an Excel worksheet to a Word document has a few limitations:
- If the Excel file moves, the link to the Word document needs to be re-established.
- If you plan to transport the Word file or use it on another computer, you must transport the Excel file along with it.
- You must do data editing in the Excel worksheet. It isn’t a problem unless you require different spreadsheet formats in the Word document.
How to Embed an Excel Spreadsheet in Word
The process of embedding an Excel worksheet in a Word document is essentially the same as linking to an Excel worksheet. It does require a few extra clicks, but it brings all data from the worksheet into your document, not only the selected range.
There are two ways to embed an Excel worksheet in Word. The first is to embed the worksheet as an object. The second is to insert a table.
When you embed a worksheet, Word uses the formatting from the Excel worksheet. Make sure that the data in the worksheet looks the way you want it to appear in the Word document.
Embed an Excel Worksheet as an Object
To embed an Excel worksheet as an object:
-
Open the Word document.
-
Go to the Insert tab.
-
Select Object > Object. In Word 2010, select Insert > Object.
-
In the Object dialog box, select the Create from File tab.
-
Select Browse, then choose the Excel worksheet that contains the data you want to embed.
-
Select OK.
-
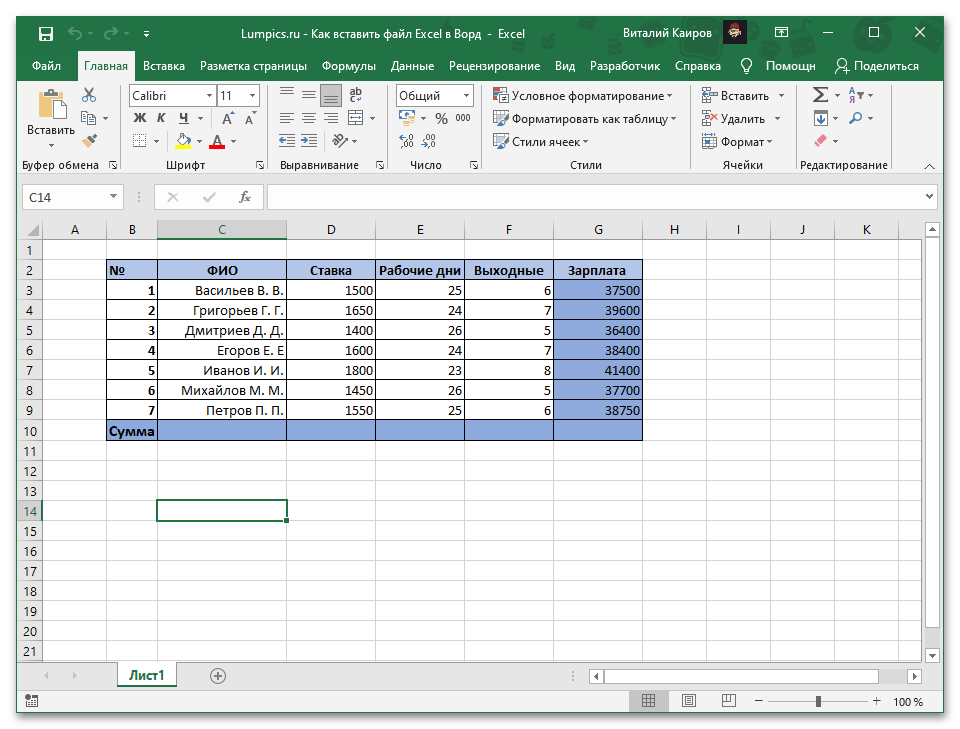
The Excel worksheet is embedded in the Word document.
How to Embed an Excel Spreadsheet Table
An alternative is to insert the Excel worksheet as a table. This method inserts the worksheet the same way as if you embedded it as an object. The difference is that it opens a blank Excel worksheet for you to fill out. Choose this method if you haven’t created the Excel file yet.
To insert an Excel worksheet as a table in Word:
-
Open a Word document.
-
Place the cursor where you want to insert the Excel worksheet.
-
Go to the Insert tab, then select Table.
-
Select Excel Spreadsheet.
-
This menu option opens a blank Excel worksheet that you can fill with data. Either enter new data or paste data from another spreadsheet.
When you insert and fill out a new Excel worksheet, you have an Excel file that you can update at any time. The data in the Word table automatically updates to match the data in the Excel file.
FAQ
-
How do I embed a Microsoft Word document in Excel?
In Excel, select the Insert tab > Text > Object > Create from File. Next, select Browse to find the Word file > Insert > OK.
-
How do I create labels in Microsoft Word from an Excel list?
To create labels in Word from an Excel list, open a blank Word document > select Mailings > Start Mail Merge > Labels > choose the brand and product number for the labels. Then, choose Select Recipients > Use an Existing List > navigate to the Excel address list > OK. Add the merge mail fields to complete the merge.
Thanks for letting us know!
Get the Latest Tech News Delivered Every Day
Subscribe
![]()
Download Article
![]()
Download Article
Need to reference an Excel chart, table, or data set in your Word document? You can easily add a quick link to any Excel file in a Word document, or even embed the file within the document to avoid the possibility broken links. This wikiHow article will teach you how to create a quick link to any Excel file in your Microsoft Word document.
-

1
Open your Word document. You can either open it from Word by going to File > Open or you can right-click the .doc(x) file and select Open with > Word.
-
2
Click the Insert tab. It’s in the editing ribbon above your document.
- On Mac, this tab is along the top of your screen instead.
Advertisement
-
3
Click Object and Object. It’s in the Text grouping and will open an Object Dialog Box.
-
4
Click the Create from File tab. It’s at the top of the window.
-
5
Click Browse. Your file manager (File Explorer for Windows and Finder for Mac) will open so you can look for your Excel file.
-
6
Double-click to select your Excel file. Alternatively, you can single-click the file to select it, then click Open/OK to choose it.
-
7
Check the box next to «Link to file» and click OK. This will create a link to your file that others can click to view the Excel data. Clicking the link will open the Excel data at its original location.
- If you’d rather embed the Excel file within your Word document, check the box next to «Display as an icon» and click OK.
- If you have a chart or table from Excel that you’d like to insert in your Word document, copy the chart in Excel (Ctrl + C (Windows) or Cmd + C (Mac)) and paste it into Word (Ctrl + V (Windows) or Cmd + V (Mac)). Update the chart in Word after you’ve changed it in Excel by clicking the chart in Word, then going to Chart Design/Chart Tools Design > Data > Refresh.[1]


Advertisement
Add New Question
-
Question
How do I dynamically embed an XLSX table in a DOCX file?

This answer was written by one of our trained team of researchers who validated it for accuracy and comprehensiveness.
wikiHow Staff Editor
Staff Answer
You can copy your chart in Excel then paste it in Word. To update it in Word, select your chart, then go to «Chart Design» or «Chart Tools Design» and click Data > Refresh.

Ask a Question
200 characters left
Include your email address to get a message when this question is answered.
Submit
Advertisement
Thanks for submitting a tip for review!
References
About This Article
Article SummaryX
1. Open your Word document.
2. Click the Insert tab.
3. Click Object and Object.
4. Click the Create from File tab.
5. Click Browse.
6. Double-click to select your Excel file.
7. Click to check the box next to «Link to file» and click OK.
Did this summary help you?
Thanks to all authors for creating a page that has been read 73,133 times.
Is this article up to date?
Many of us use Microsoft Word and Excel every single day. Both apps are part of Microsoft’s Office suite of productivity tools. It’s even more powerful when you learn how to embed Excel into Word for tight integration.


There are several options for embedding Excel in Word. You’ll see in this tutorial that there are multiple ways to embed Excel files in Word that stay connected to the original data. Let’s learn how to link Word to Excel and keep your data and docs in sync.
Why Link Word to Excel?
Word is a powerful word processor used to edit and format text. Excel is a leading spreadsheet app to work with numbers and data. Each app has a very different purpose. But they can work together seamlessly!
This is a productivity tool that you should be using now. When you learn how to link Word to Excel, you’ll find yourself working smarter. Why? Because although each app is different, they’ve got complementary purposes. One app can make your work in the other better and easier.
Think of Word as a communication tool. It’s where you create documents to share. With a full suite of graphics features, Word helps you create stylish written files. It’s geared towards text. You won’t use Word to do data analysis. But Word is the perfect way to share your conclusions.


Similarly, Excel is a data-heavy tool. With less emphasis on visuals, Excel is meant to analyze large volumes of information. Microsoft Word and Excel have separate, but related, functions. Keeping that in mind, why should we learn how to link Word to Excel?
Because Word documents can benefit from Excel’s data prowess. While Word isn’t built for data analysis, you may want to include that in your work. When you get a document written, it’s often helpful to share supporting data. With embedded Excel in Word, you can do exactly that.
Word offers several ways to insert or link to Excel files. All are easy, and you can find the one that works best for you. It depends on the level of control and flexibility that you need. Let’s learn how, in just a few quick steps.
How to Paste Excel Tables in Word
One embed Excel file in Word technique is to paste the table right into Word. It takes only a few clicks, and you can easily move large volumes of data in seconds. But that doesn’t mean you sacrifice creative control. Using Word’s paste options, you can manage exactly how data appears and performs.
In Word, there are two main ways to paste Excel tables by linking them. Let’s look at each. We’ll explore the advantages of both and showcase the end results.
The tips in this section were written using Windows and Office 365. If you’ve got a different operating system or a different version of Excel or Word, your steps may be slightly different.
1. Link and Keep Source Formatting
Linking is how to link Word to Excel by building a connection. In other words, it adds Excel data to Word that’ll update in real-time. If you make a change in Excel, it’ll automatically reflect in your Word doc. There won’t be any need to continually paste or type in new values when you make a change.
The first paste technique is to link and keep source formatting. This means that the table in Word looks exactly like it does in Excel. If you’ve added style elements like borders or font effects, they’ll carry over into Word.


To make an embedded Excel in Word this way, begin by opening an Excel spreadsheet. Find the table that you want to paste into Word. Click and drag your cursor over the table to select it. Then, press Ctrl + C on your keyboard. This copies the Excel table onto your clipboard. It’s ready to paste between Microsoft Word and Excel.
Then, go to your open Word file. Place your cursor in the open spot where you want to paste the Excel table. Then, right-click once. On the menu that appears, notice the Paste Options section. In it, you’ll see an array of buttons. These control how your Excel table will paste into Word.


To link and keep source formatting, you’ll want the third option from the left. Hovering over it, you’ll see that it’s labeled Link & Keep Source Formatting. Click this, and your Excel table will paste onto your Word document.
As you can see, the styles applied in Excel effortlessly transfer over. This keeps styles synced between Microsoft Word and Excel. You won’t have to redo any formatting work.
2. Link and Use Destination Styles
We’ve just learned a great way to link Microsoft Word and Excel. In the example, styles and design formatting copied from Excel into Word. Now, imagine that you want your table to blend in with your Word document’s existing styles. But you don’t want to spend a long time redoing the format of the table by hand.
Fortunately, Word has you covered. To learn how, repeat the earlier step of selecting an Excel table and copying it to your clipboard. But this time, when you right-click to paste, choose a different option.
Try out the fourth option, Link & Use Destination Styles. The table will paste into Word, and the design updates to fit the style aesthetic that you’ve built in Word.


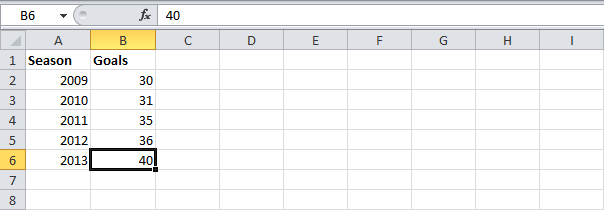
No matter the paste and linking option you select, Word updates the table values if you make a change in Excel. It’s easy to demonstrate. Simply type a new value into one of the table’s cells in Excel. This is how to link Word to Excel for realtime data.
Then, return to Word. You’ll see that the Word table has automatically changed to show the latest data.
How to Paste Without Connection
In the options above, we learned to paste Excel tables into Word by linking them. Changes made in Excel after pasting reflect in Word by default when you use this method.
Sometimes, it’s useful to paste in static data. In other words, you may not want Microsoft Word to update the table values, even if you change them in Excel. This way, you can share a snapshot of your table in Word from a moment in time. It won’t change unless you physically make an edit in Word itself.
I like to use this technique when building Word docs, and it’s amazingly easy. You’ll start by doing the exact same copying process that we used above — select your table in Excel, and press Ctrl + C.
When you return to Word and right-click, you’ll want to use the first two thumbnails in Paste Options. These are labeled Keep Source Formatting and Use Destination Styles.
Just like before, this controls how your table displays in Word. Using Keep Source Formatting, you’ll get a visual copy of the Excel table. But with Use Destination Styles, the design and format merge into the Word doc’s own design.


Again, the process here is the same. But these techniques merely paste data values from Excel. They don’t link, meaning the Word table won’t update if you change the Excel version. Microsoft Word and Excel disconnect with this option.
For updates, you’ll need to paste the table again, or type the values into Word. It’s another top option when you think of how to add Excel to Word document files in 2022.
How to Embed an Excel File in Word
You’ve already learned how to link Word to Excel using the suite of paste features. These methods give you precise control over your data and how it appears in Word. Another option is to embed an Excel file directly into Word without pasting.
Consider times where you don’t actually want to display an Excel table. Imagine for example that you’ve got a Word document describing a study that you performed with thousands of data points. Putting all this data in the file would be too complex, but there’s another option.
This is a case where embedding an Excel file in Word is a winning choice. You can include your Excel data in Word, without actually displaying it. Instead, readers see an Excel thumbnail that they can click on to view an entire spreadsheet.
To embed Excel files in Word, find the Insert tab on Word’s ribbon. If you’re unfamiliar, the ribbon is the series of menus across the top of the screen: Home, Insert, Draw, and so on. Choose Insert and look at the options. On the right, you’ll see the Text group, specifically the Object dropdown arrow.
Click on the Object dropdown, then choose Object. The Object window launches with an array of choices. We’ll embed an Excel file in Word with the Create from File tab.


Once there, choose Browse. Find an Excel file that you’ve got saved on your computer, click it once, and press Insert. Finally, click on the Display as Icon checkbox to activate it. Then, click OK.
This is how to embed Excel into Word. You (and other users) see an Excel spreadsheet icon within Word. Double-clicking it launches the spreadsheet in Excel. Your data isn’t shown, but with an embed Excel file in Word option, it’s available behind the scenes.


This way, your spreadsheet data is easily accessible. But it won’t clutter up your Word doc. Use an embedded excel in Word when it’s simply too much info for the doc itself. As you can see, this is another fast way to connect Microsoft Word and Excel.
The Best Microsoft Word and Office Templates (With Unlimited Use)
No matter what Microsoft Office app you’re using, premium templates are your best friend. Stylish Word documents help you share content in style. And premium PowerPoint decks let you present with confidence.
The top source for premium templates in 2022 is Envato Elements. For a low monthly rate, you’ve got unlimited downloads of Word templates, PPT decks, and so much more. With thousands of options, you’re certain to find the perfect one for all of your projects.
Explore Word Templates


What’s more: Elements includes fonts, stock photos, and so much more. When you choose templates from Envato Elements, you’ll enjoy these key advantages:
- Expertly-crafted styles. Each template is handmade by a creative expert.
- Design inspiration. With fill-in-the-blank templates, you won’t have to create designs from scratch. You can simply drop in your own content.
- Premium features you won’t find anywhere else. Explore infographics, sleek image placeholders, and so much more.
Envato Elements is your best friend as a creative in 2022. With unlimited downloads come unlimited possibilities. So why wait? Join Envato Elements today and start downloading your favorite templates.
Now You Know How to Embed Excel Into Word
With our tips, you now know how to add Excel to Word documents for data-driven files. Whether you use an embedded Excel in Word or connect a table, your documents are more helpful.
Now, it’s your turn! You know how to link Word to Excel with a few methods. Practice using embedded Excel in Word with a sample document. Soon, you’ll see the power of how to link Word to Excel.
Did you find this post useful?

I believe that life is too short to do just one thing. In college, I studied Accounting and Finance but continue to scratch my creative itch with my work for Envato Tuts+ and other clients. By day, I enjoy my career in corporate finance, using data and analysis to make decisions.
I cover a variety of topics for Tuts+, including photo editing software like Adobe Lightroom, PowerPoint, Keynote, and more. What I enjoy most is teaching people to use software to solve everyday problems, excel in their career, and complete work efficiently. Feel free to reach out to me on my website.
Перейти к содержанию
На чтение 2 мин Опубликовано 28.08.2015
- Вставить
- Связать
Узнайте, как обмениваться данными Excel с документами Word и другими файлами.
Вставить
Чаще всего вам нужно будет просто вставлять статические данные Excel в документ Word. Для этого:
- Выделите данные в Excel.
- Кликните правой кнопкой мыши и выберите в контекстном меню пункт Копировать (Copy) или нажмите Ctrl+C.
- Откройте документ Word.
- На вкладке Главная (Home) нажмите команду Вставка (Paste) > Специальная вставка (Paste Special).
- Выберите переключатель Вставить (Paste), а затем в списке Как (As) щелкните по строке Формат HTML (HTML Format).
- Нажмите ОК.
Примечание: Вместо выполнения шагов 4-6, просто нажмите Ctrl+V.
- Кликните по значку в левом верхнем углу таблицы и добавьте границы.
Результат:

Примечание: Чтобы удалить таблицу, щелкните правой кнопкой мыши по значку в верхнем левом углу таблицы, а затем нажмите кнопку Удалить таблицу (Delete Table).
Связать
Вы можете связать исходные данные Excel с данными, вставленными в Word. Если изменить данные в Excel, данные в Word будут обновляться автоматически.
- Повторите шаги с 1 по 4, приведенные ранее.
- Щелкните по переключателю Связать (Paste link). Затем выберите строку Формат HTML (HTML Format).
- Нажмите ОК.
- Кликните по значку в левом верхнем углу таблицы и добавьте границы.
Результат:
- Измените данные в Excel.
Результат:

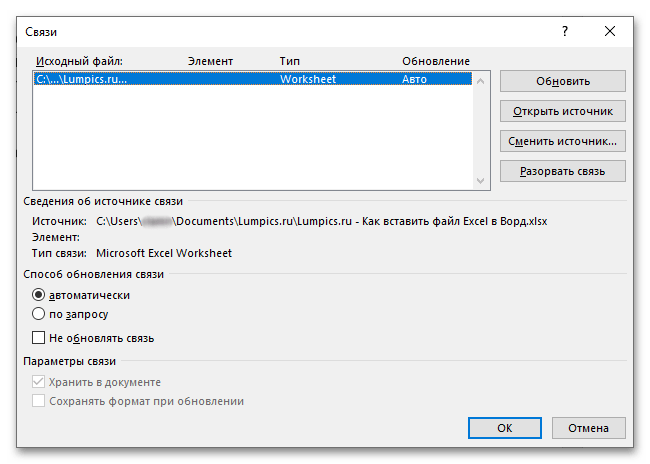
Примечание: В документе Word на вкладке Файл (File) выберите Сведения (Info). Затем в нижнем правом углу нажмите кнопку Изменить связи с файлами (Edit Links to files), чтобы открыть диалоговое окно Связи (Links). Здесь вы можете разорвать связь, изменить расположение файла Excel и т.д.
Оцените качество статьи. Нам важно ваше мнение:
Содержание
- Вариант 1: Обычная вставка
- Вариант 2: Вставка со связкой
- Вариант 3: Вставка объекта
- Вариант 4: Вставка в виде ссылки
- Вариант 5: Вставка таблицы
- Вопросы и ответы

Обратите внимание! Первые четыре из рассмотренных далее вариантов вставки книги Excel в текстовый документ Word подразумевают добавление именно файла, а не его содержимого. Если же вам требуется перенести таблицу, переходите к последней части статьи.
Вариант 1: Обычная вставка
Если вам необходимо добавить в текстовый документ Ворд файл Эксель в его законченном виде, то есть когда в дальнейшем никаких изменений в изначальную книгу вносить не планируется, выполните следующее:
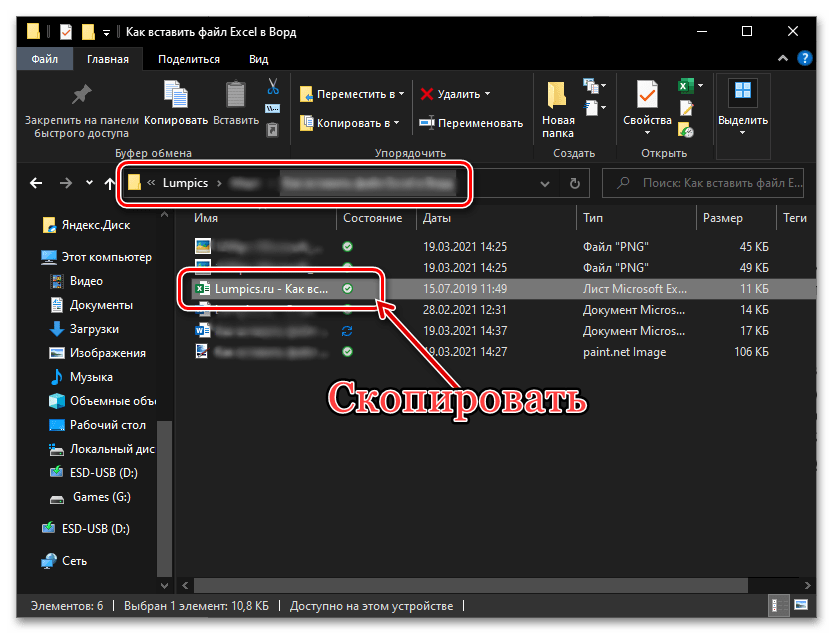
- Перейдите в папку с файлом таблицы, выделите его и скопируйте, воспользовавшись соответствующим пунктом контекстного меню или сочетанием клавиш «Ctrl+C».

Читайте также: Горячие клавиши для удобной работы в Word
- Откройте документ Ворд и установите указатель курсора в том месте, где должна быть выполнена вставка. Любым удобным способом вставьте скопированную книгу Excel, например, выбрав пункт в контекстном меню или воспользовавшись сочетанием «Ctrl+V».
- Отдельно стоит рассмотреть вставку содержимого буфера обмена через соответствующую кнопку на панели инструментов – непосредственное нажатие на нее интегрирует файл электронной таблицы в текстовый документ аналогично использованию клавиш.

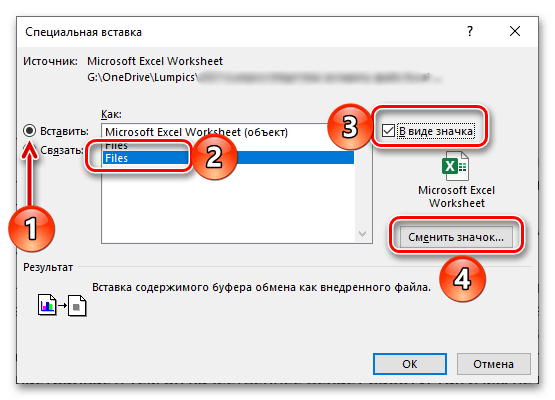
Если же вызвать меню этой кнопки и выбрать пункт «Специальная вставка», появится окно с дополнительными параметрами:

- Установите в нем маркер возле пункта «Вставить»;
- Убедитесь, что в области «Как» отмечено «Files»;
- Правее установите галочку возле пункта «В виде значка»;
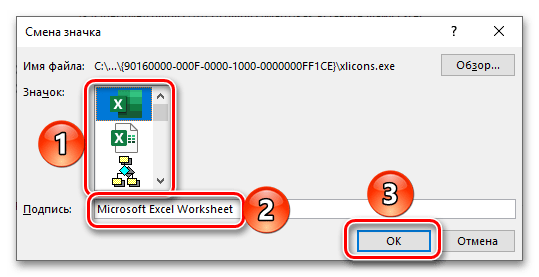
- По необходимости «Смените значок»,

выбрав один из шаблонных вариантов. Измените или оставьте изначальную «Подпись» (название файла);
- Нажмите «ОК» в обоих диалоговых окнах для их закрытия.

Читайте также: Как вставить скопированный текст в документ Word
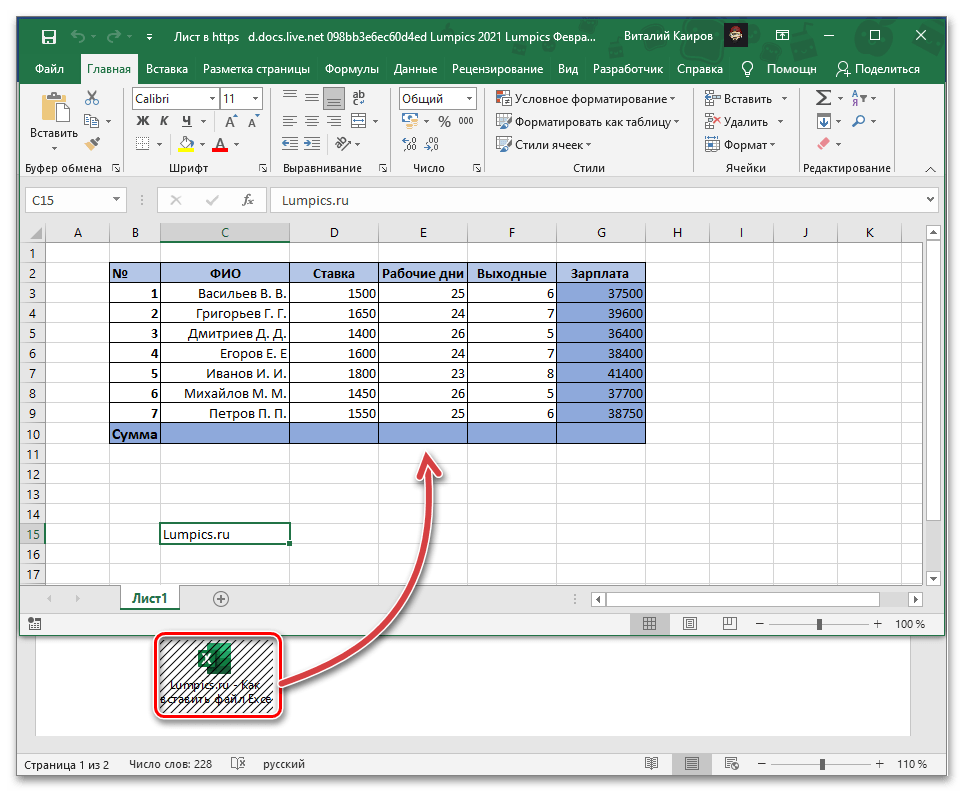
Файл с таблицей будет добавлен в виде активного ярлыка, который можно открыть двойным нажатием левой кнопки мышки (ЛКМ).


Это действие запустит приложение Эксель с отдельным экземпляром книги, которая, по сути, является независимой копией своей изначальной версии и никак с ней не связана – в нее можно вносить изменения и сохранять их, но это будет отражаться исключительно на внедренном в документ Ворд объекте.
Вариант 2: Вставка со связкой
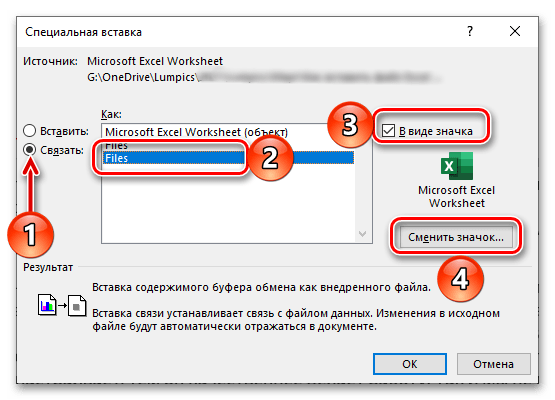
В том же случае, если требуется сделать так, чтобы вносимые в изначальную книгу Excel изменения отражались на ее копии в документе Word и наоборот, в меню специальной вставки, рассмотренном на последнем шаге инструкции выше, потребуется изменить один из параметров.

- Скопируйте файл таблицы и перейдите к текстовому документу. Установите указатель курсора в нужном месте.
- Разверните меню кнопки «Вставить» на ленте и выберите пункт «Специальная вставка».
- Установите маркер напротив расположенного слева параметра «Связать», в основной области выберите «Files»,
поставьте галочку в чекбоксе «В виде значка», по необходимости смените его и подпись.
Для подтверждения внесенных изменений нажмите «ОК».


Как и в рассмотренном выше случае, в документ будет добавлена электронная книга Эксель в виде ярлыка. По двойному нажатию ЛКМ на нем будет открыто окно табличного процессора с изначальным файлом, который можно редактировать и сохранять. Даже если вносить изменения напрямую, то есть без запуска этого объекта через текстовый редактор, они все равно будут синхронизированы и применены.
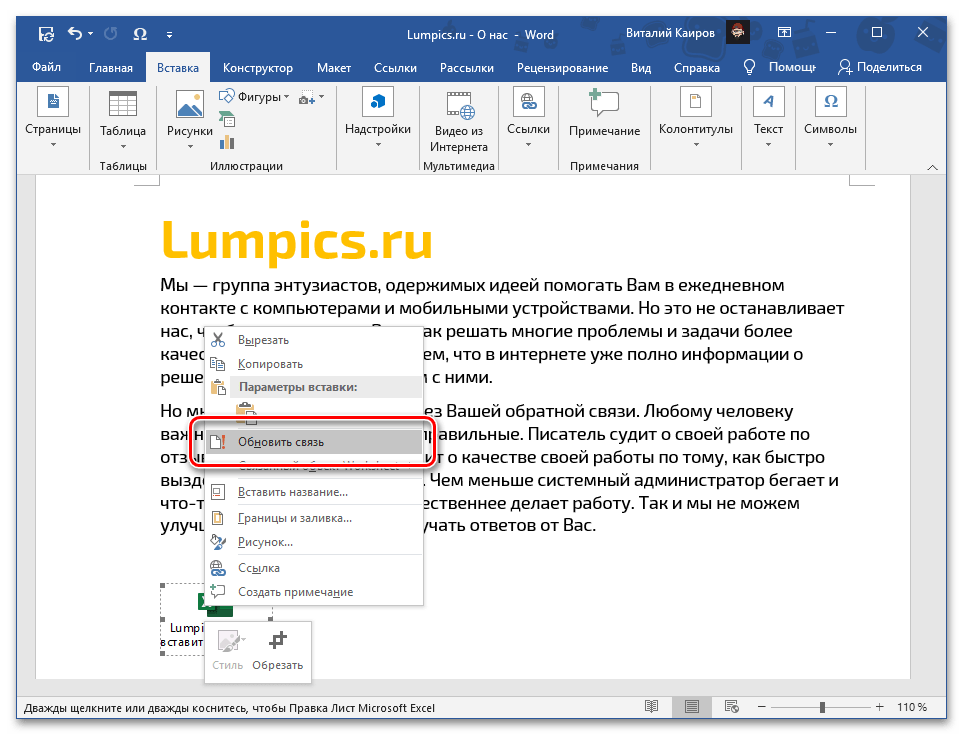
Если этого не произойдет автоматически, «Обновить связь» можно через контекстное меню, там же доступны и дополнительные параметры, которые мы рассмотрим в конце следующей части статьи.

При каждом новом запуске документа также будет предложено обновить связь.

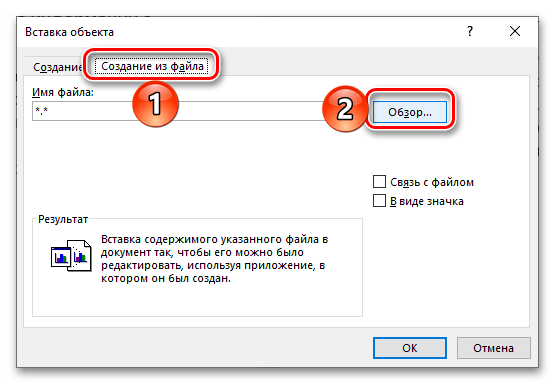
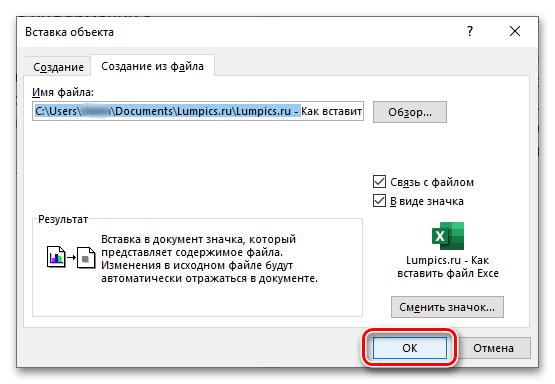
Вариант 3: Вставка объекта
Оба предложенных выше решения работают только с локальными файлами, используемыми на конкретном ПК, то есть если вы передадите документ Word с внедренной в него таким образом таблицей Excel, открыть ее не получится по причине фактического отсутствия самого файла. Для того чтобы такая возможность стала доступной, книгу нужно добавлять в виде объекта. Делается это следующим образом:
- Установите указатель курсора в том месте документа, куда требуется добавить файл таблицы, и перейдите во вкладку «Вставка».
- Разверните меню кнопки «Объект» и выберите в нем одноименный пункт.
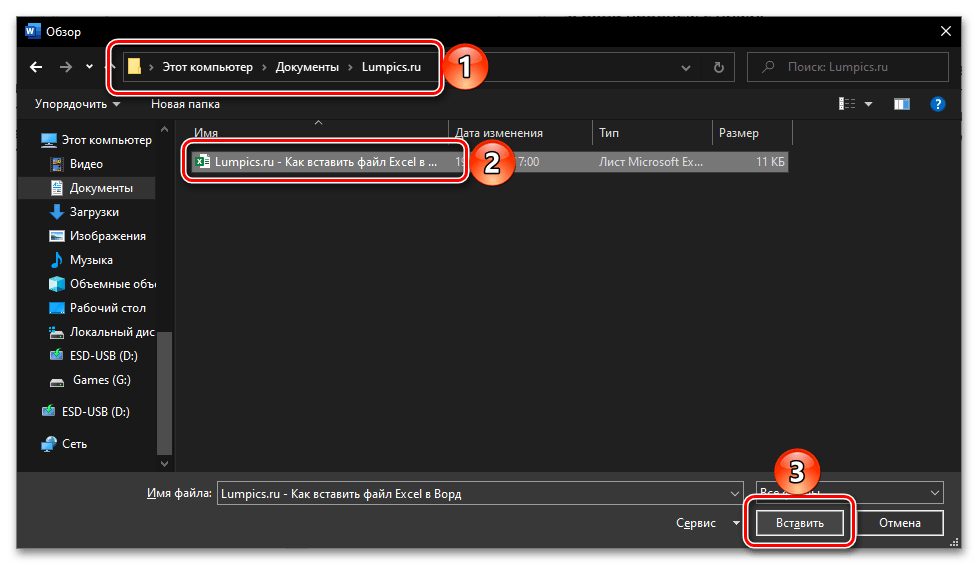
- В открывшемся окне перейдите во вкладку «Создание из файла» и нажмите на кнопку «Обзор».
- С помощью системного «Проводника» переместитесь к папке с книгой Эксель, выделите ее и нажмите «Вставить».
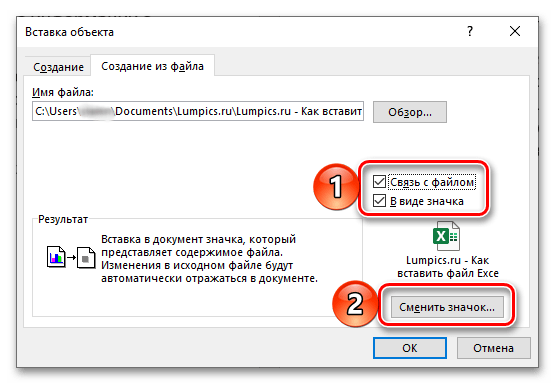
- Установите отметку в чекбоксе «В виде значка». Если хотите сохранить «Связь с файлом» (аналогично решению из части «Вариант 2» настоящей статьи), отметьте соответствующий пункт.

Важно! Сохранение связи вложенного файла с исходным работает только в рамках конкретного компьютера, на котором они создавались и редактировались.
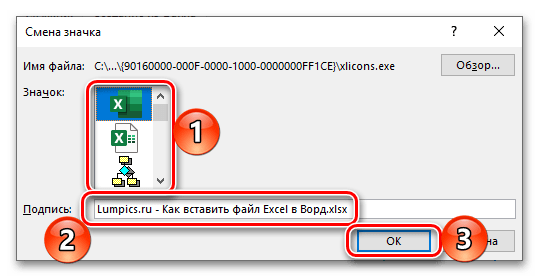
- По желанию «Смените значок» и «Подпись» (название).
- Нажмите «ОК» для закрытия окон и подтверждения вставки.
Файл с таблицей будет добавлен в текстовый документ и доступен для редактирования.

В зависимости от того, связали вы его с изначальной копией или нет, изменения в обоих объектах будут синхронизироваться или нет.

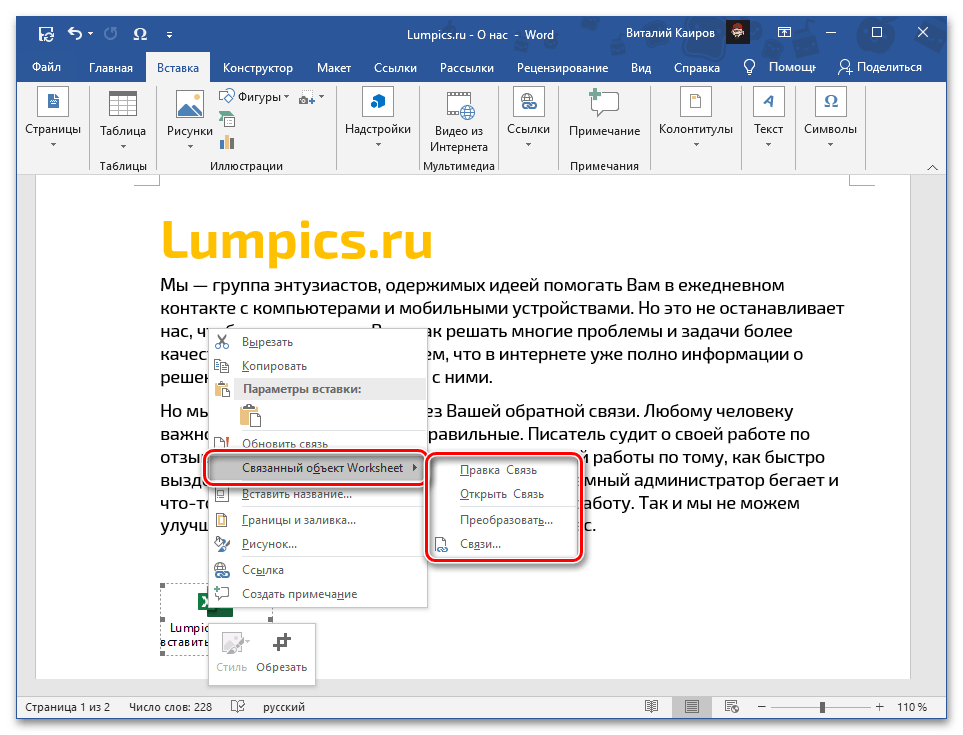
При наличии связи ее можно принудительно обновить через контекстное меню,
в нем же доступны дополнительные параметры, такие как правка и преобразование,
а также более детальная настройка.


Если вы передадите такой документ Word пользователю или сами захотите открыть его на другом компьютере, содержимое таблицы Excel будет доступно для просмотра и редактирования, так как это уже не просто ярлык, а полноценный файл. Однако при наличии связи его не получится даже открыть.
Вариант 4: Вставка в виде ссылки
Альтернативой предыдущему методу, причем во многих случаях более универсальной и простой в своей реализации, является добавление файла Эксель в виде предварительной созданной и полученной публичной ссылки на него. Стоит отметить, что такой подход работает как с локальными, так и с удаленными документами (например, сохраненными в облаке) и, в отличие от предложенного выше решения, позволяет сохранить связь между ними с возможностью полноценного редактирования и синхронизацией изменений. Узнать же более детально обо всех его особенностях можно из отдельной инструкции.
Подробнее: Как вставить документ из облака в Ворд
Вариант 5: Вставка таблицы
Если же ваша задача заключается в добавлении не непосредственно файла Эксель, как объекта, а электронной таблицы, действовать нужно несколько иначе, чем в любом из предложенных выше решений. На выбор доступно несколько вариантов, подразумевающих сохранение исходного форматирования, его объединение с текущим или полную очистку, создание связи и некоторые другие, дополнительные параметры. Более детально обо всех нюансах данной процедуры можно узнать из следующей статьи на нашем сайте.
Подробнее: Как вставить таблицу из Excel в Word
Еще статьи по данной теме:
Помогла ли Вам статья?
Import Linked or Unlinked Excel Worksheet Data into Word Files
by Avantix Learning Team | Updated February 1, 2021
Applies to: Microsoft® Excel® and Word® 2010, 2013, 2016, 2019 or 365 (Windows)
You can easily copy or import Excel worksheet data into Word documents. When you import from an Excel file, you can choose to import linked or unlinked data. If it’s linked, you will be able to update, change and remove the links.
The following are three easy ways to import Excel data into Word by copying and pasting:
- Copy the data in the Excel file, switch to the Word document and then paste the data where you want it to appear as a static copy.
- Import the Excel data into the Word document as a linked OLE (Object Linking and Embedding) object so that when the Excel file changes, the Word document will update as well.
- Create links to the Excel data in a Word table so that when the Excel file changes, the table will update.
If you choose the second or third method, you will need to ensure that the Excel file remains in the same location with the same name or manage the link(s) using Edit Links.
Recommended article: How to Create a Table of Contents in Word
Do you want to learn more about Microsoft Word? Check out our virtual classroom or live classroom Word courses >
Inserting unlinked Excel data
You can easily copy data from Excel and paste it into a Word document. Use this method if you do not need to update the Word file when the Excel data changes.
To insert unlinked Excel data into Word:
- Open the Excel file.
- Select the data you want to copy into the Word file.
- Press Ctrl + C or right-click and select Copy from the drop-down menu.
- Open the Word file.
- Position the insertion point where you want the Excel data to appear.
- Press Ctrl + V or right-click and choose Paste Values from the drop-down menu.
With this method, the Excel data will be copied into Word as a table and the Word file will not update when the Excel file changes. Because the data is pasted into a table, you can use Word’s table tools to format it and the file will be smaller because the data is not linked.
Inserting Excel data as a linked OLE object
You can insert an OLE (Object Linking and Embedding) object when you want to insert a linked copy of Excel data. However, one of the problems with this method is that the OLE object is like a picture of the cells and you would need to format the data in Excel to appear the way you want in the Word file.
To insert Excel data into Word as a linked OLE object:
- Open the Excel source workbook.
- Select the data you want to place in the Word file.
- Press Ctrl + C or right-click and choose Copy from the drop-down menu.
- Open the Word destination document.
- Position the insertion point where you want the linked Excel data to appear.
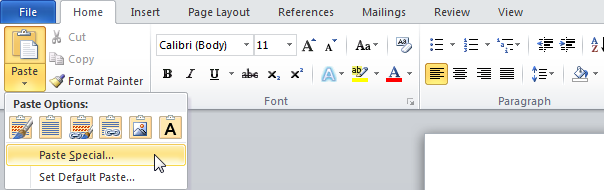
- Click the Home tab in the Ribbon and select the arrow below Paste. A drop-down menu appears.
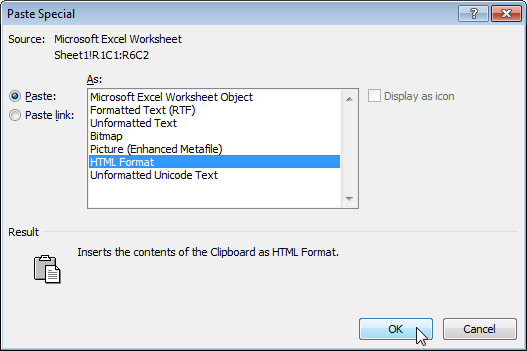
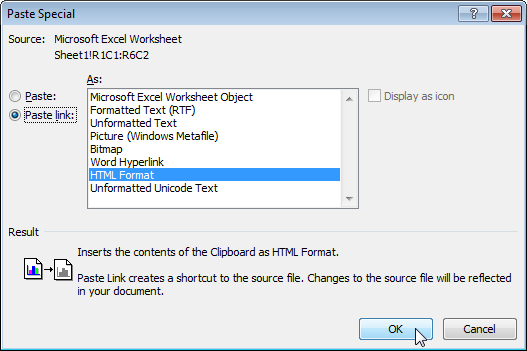
- Select Paste Special. A dialog box will appear.
- Click Paste Link.
- Under As, select Microsoft Excel Worksheet Object.
- Click OK.
Note the Paste link option on the left of the Paste Special dialog box:

You can double-click an OLE object to jump to the source Excel file.
Inserting linked Excel data into a Word table
You can insert Excel data as a table in Word where each cell is linked to the Excel data source. This is a great method because you can maintain links but format the data the way you want in Word.
To insert linked Excel data into a Word table:
- Open the Excel source workbook.
- Select the data you want to place in the Word file.
- Press Ctrl + C or right-click and choose Copy from the drop-down menu.
- Open the Word destination document.
- Position the insertion point where you want the linked Excel data to appear.
- Click the Home tab in the Ribbon and select the arrow below Paste. A drop-down menu appears.
- Select Paste Special. A dialog box will appear.
- Click Paste Link.
- Under As, select HTML Format.
- Click OK.
HTML format is selected by default in the Paste Special dialog box:

Click in the table in the Word document. As long as Field Shading When Selected is set in Word Options, each cell will appear with gray shading indicating that it is a field linked to Excel. You can format the table in Word.
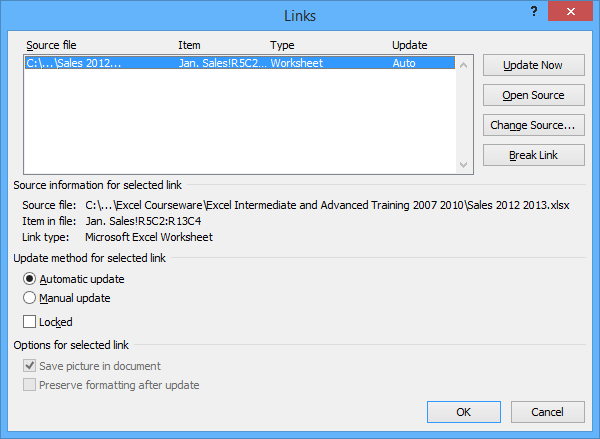
Updating or managing links
One of the benefits of linking data is that information in a destination document updates when you change information in the source document. This typically occurs automatically if both documents are open. However, if you open a Word document with links and the Excel file is not open, Word should prompt you to update the links. You may also need to update links yourself or re-establish a link if the original Excel file has been moved or renamed.
To update or manage links:
- Right-click a linked object or HTML table. A drop-down menu appears.
- Choose Linked Worksheet Object and then Edit Links. A dialog box appears.
- Under Update method for selected link, Automatic update is selected by default. You can choose Manual update if you do not want the data to update automatically. You would then need to click the link and click Update Now to update.
- Make any other changes (such as breaking a link of changing the source for a link).
- Click OK.
The Links dialog box below displays one link:
It’s not difficult to import Excel data into Word. Typically, the biggest issue occurs when other users move or rename the source Excel file but this can be managed using Edit Links and changing the source.
This article was first published on March 13, 2016 and has been updated for clarity and content.
Subscribe to get more articles like this one
Did you find this article helpful? If you would like to receive new articles, join our email list.
More resources
How to View Word Count in Word (4 Ways)
14+ Word Selection Shortcuts to Quickly Select Text
How to Superscipt or Subscript in Word (with Shortcuts)
How to Format Microsoft Word Tables Using Table Styles
How to Insert a Check Mark or Tick Mark in Word (5 Ways)
Related courses
Microsoft Word: Intermediate / Advanced
Microsoft Excel: Intermediate / Advanced
Microsoft PowerPoint: Intermediate / Advanced
Microsoft Word: Long Documents Master Class
Microsoft Word: Styles, Templates and Tables of Contents
Microsoft Word: Designing Dynamic Word Documents Using Fields
VIEW MORE COURSES >
Our instructor-led courses are delivered in virtual classroom format or at our downtown Toronto location at 18 King Street East, Suite 1400, Toronto, Ontario, Canada (some in-person classroom courses may also be delivered at an alternate downtown Toronto location). Contact us at info@avantixlearning.ca if you’d like to arrange custom instructor-led virtual classroom or onsite training on a date that’s convenient for you.
Copyright 2023 Avantix® Learning
Microsoft, the Microsoft logo, Microsoft Office and related Microsoft applications and logos are registered trademarks of Microsoft Corporation in Canada, US and other countries. All other trademarks are the property of the registered owners.
Avantix Learning |18 King Street East, Suite 1400, Toronto, Ontario, Canada M5C 1C4 | Contact us at info@avantixlearning.ca
Word documents are for word processing while Excel files are for data processing. But what if you need to combine the two? What if you need to display a part of your Excel data in, say a sales report that’s in a Word file?
You’re probably aware of the easiest technique that involves copying the table from Excel and pasting it into Word.
This technique, though quick and easy, has certain limitations.
However, there are other techniques to insert an Excel file into your Word document that allow for a lot more flexibility.
In this tutorial we will look at three ways to insert an Excel file into Word:
- By simple copy-pasting
- By Inserting as an embedded object
- By inserting as a linked object
Inserting an Excel File into Word by Simple Copy-Pasting
This first copy-paste method is the easiest. It’s just like copy-pasting data from one sheet in Excel into another.
In fact, you have probably already used this technique plenty of times. The method simply involves the following steps:
- Select the part of the Excel file that you want to insert into your Word file
- Press CTRL+C to copy (or right-click on the selection and then click on Copy)

- Open the Word file where you want to insert this data
- Place your cursor where you want to insert the Excel table
- Press CTRL+V to paste

Once you’ve pasted the data into Word, you get a table with the data that you copied. This works the same way as a regular Word table.
You can press the tab key to navigate through the table, you can edit the contents, you can delete rows and columns, or insert new rows and columns.
However, the changes you make to the pasted table do not get reflected in the original Excel file.
Moreover, any changes you make to the original Excel file will not automatically get reflected in your pasted table, unless you paste it again.
This method, though easy, does not offer much in terms of flexibility. It’s best used when you have a final table/data in Excel and you want it in Word (as a static table).
While this method works as expected in most cases, there are some minor issues you may face when using the simple copy paste to insert Excel data into Word:
- You might lose some of the formatting from your original table structure
- It will not be possible to copy larger tables
- If you have any formulas in the original Excel file, they will get pasted as values. So you cannot use Excel formulas in the table once it is pasted to Word
If you want to take advantage of Excel formulas inside Word, then the next two methods might work better for you.
Also read: Get File Names from a Folder into Excel
Inserting an Excel File into Word as an Embedded Object
An alternative way to insert an Excel file into Word is by inserting it as an embedded object.
An embedded object is an object that is created with one application and then embedded into a document that is created by another application.
For example when you embed an object or file created in Excel into a document created in Microsoft Word.
This is made possible by the Windows OLE technology (Object Linking and Embedding).
Embedding the object, rather than just pasting it, ensures that the object retains its original format.
Moreover, you get to alter the embedded object using the original program. This means that you can open the embedded Excel file from Word itself and make changes in it.
To embed an Excel file into a Word file, follow the steps below:
- Select the part of the Excel file that you want to insert into your Word file
- Press CTRL+C to copy (or right-click on the selection and then click on Copy)
- Open the Word file where you want to insert this data
- Place your cursor where you want to insert the Excel table.
- Under the Home tab, click on the dropdown of the Paste button (in the Clipboard group).
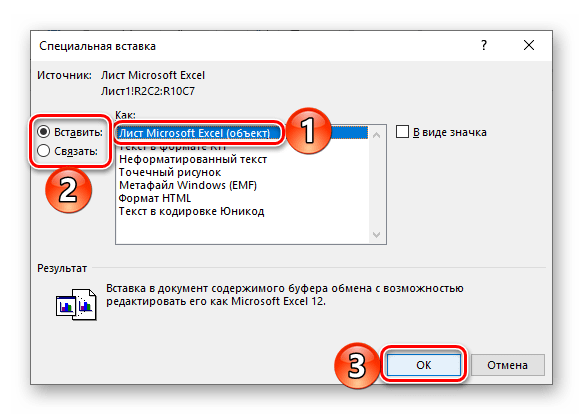
- Select the ‘Paste Special’ option.

- This will open the Paste Special dialog box. From this box, select Microsoft Excel Worksheet Object (in the group of options under ‘As’).

- Click OK
This will insert the copied cells into your Word doc.

The size of the embedded object might not fit correctly to your Word doc’s margins. So you can go ahead and resize it as required.

Note: The inserted table is not a regular Word table. It is, in fact, an Excel table. So you can apply formulas and work on it as a regular excel table.
If you want to edit the table, simply double-click inside the object. It will open the spreadsheet in an Excel interface (felt like pure magic when I first used it).

You can come out of edit mode when you click outside the object window.
It is important to note, however, that any changes you make to the object will not get reflected to the original Excel file. Similarly, any changes you make to the original Excel file will not get reflected in this object.
This is because the object is basically just a copy of the original file. It is not linked to it. If you want even more flexibility, the next method may be helpful for you.
Inserting an Excel File into Word as a Linked Object
You will get the most flexibility if you insert your Excel data into Word as a linked object.
A linked object is different from an embedded object in that the embedded object is like a snapshot or copy of the original file, while a linked object maintains an active connection between both files.
This means that editing the source file will cause the changes to also get reflected in the target file and vice-versa, provided that both documents are open.
So if I use this method and then change anything in the original Excel file, it would be reflected in the Word data as well.
To insert an Excel file into a Word file as a linked object, follow the steps below:
- Select the part of the Excel file that you want to insert into your Word file.
- Press CTRL+C to copy (or right-click on the selection and then click on Copy)
- Open the Word file where you want to insert this data
- Place your cursor where you want to insert the Excel table.
- Under the Home tab, click on the dropdown of the Paste button (in the Clipboard group).
- Select the ‘Paste Special’ option.
- This will open the Paste Special Dialog box. From this box, select Microsoft Excel Worksheet Object (in the group of options under ‘As’).
- Make sure that the ‘Paste link’ radio button (on the left side of the window) is checked.

- Click OK.
- This will insert the copied cells from MS Excel as a linked object into your MS Word document.
- Once again, resize the object in your Word doc as required.

You will notice that other than the addition of step 8, the procedure is more or less the same as inserting an embedded object.
The linked object works more or less like an embedded object, with an important difference.
When you double click the table in Word, the file will open in Excel.

If you make a change to the original file in Excel, the changes get updated to the table in Word, even if you don’t save the changes in the Excel file.
In case the changes are not updating automatically, right click on the table in Word and then click on Update Link.
Also, remember that for this method to work, it’s important that the source Excel file is also open. If you make any changes to the Excel file and close it, and it doesn’t get updated in the Word file, trying to update it by right-clicking and using the Update Link option wouldn’t work.
In this way, the linked object works almost like a live view of the Excel file from Word.
This method is especially useful if you’re trying to create something like a real-time dashboard in Word, displaying important tables from multiple Excel files.
These are three different ways in which you can insert an Excel file into Word.
As you must have noticed, all these methods have their pros and cons. Personally, if like the second method where we embedded Excel as an object into Word. That allows me to be a lot more flexible and use all the functionality of Excel from within the Word document.
Also, the methods covered here can also be used to insert an Excel file into other MS applications such as PowerPoint.
I hope this tutorial was useful and easy to follow.
Other Excel tutorials you may also like:
- How to Move a Chart to a New Sheet in Excel
- How to Start Excel in Safe Mode (3 Easy Ways)
- How to Find out What Version of Excel You Have (Easy Way)
- How to Open Excel File [xls, xlsx] Online (for FREE)
- Why does Excel Open on Startup (and How to Stop It)
- How to Convert a Text File to Excel?
- How to Merge Two Excel Files?
- How to Insert Sheet Name into Header or Footer in Excel?
- How to Convert PDF to Excel without Software?