
Excel for Microsoft 365 Word for Microsoft 365 PowerPoint for Microsoft 365 Excel for Microsoft 365 for Mac Word for Microsoft 365 for Mac PowerPoint for Microsoft 365 for Mac Excel for the web Word for the web PowerPoint for the web Excel for iPad Word for iPad PowerPoint for iPad Word Web App Excel for iPhone Word for iPhone PowerPoint for iPhone Word for Android tablets Excel for Android tablets PowerPoint for Android tablets Excel for Android phones PowerPoint for Android phones Word for Android phones More…Less
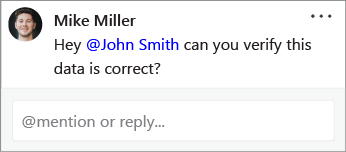
The enhanced @mention feature makes it much easier for you to connect with specific colleagues and needed resources as you collaborate on creating documents, presentations and spreadsheets. Use of the @-sign can open up immediate access to context-relevant media – even anticipating your potential resource needs.
Notes:
-
Search, pick and tag people by name, alias or email-id
-
Rapid, near-instant suggestion results
-
Photos presented in tiles for easy identification
-
Items suggested before you type (Zero Query)

-
Sign in to Microsoft 365 with your work or school account, and go to a document that’s saved in a SharePoint library or OneDrive for work or school.
Note: For this feature to work, you’ll need to be signed in to Outlook on your PC.
-
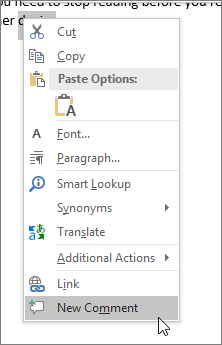
Add a comment from the context menu or from Review > New Comment.

-
Type @ and the first few letters of the person’s first or last name, and then pick the name you want (If they don’t already have permission to open the document, you’ll be asked to provide that).
Tip: To be more casual, feel free to delete everything except the person’s first name in the @mention. To include more people, type @ again and mention someone else.
-
Sign in to Microsoft 365 with your work or school account, and go to a document that’s saved in a SharePoint library or OneDrive for work or school.
Note: For this feature to work, you’ll need to be signed in to Outlook for Mac.
-
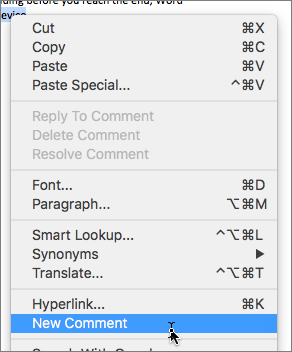
Add a comment from the context menu or from Review > New Comment.
-
Type @ and the first few letters of the person’s first or last name, and then pick the name you want (If they don’t already have permission to open the document, you’ll be asked to provide that).
Tip: To be more casual, feel free to delete everything except the person’s first name in the @mention. To include more people, type @ again and mention someone else.
-
Sign in to Office.com with your work or school Microsoft 365 account, and go to a document that’s saved in a SharePoint library or OneDrive for work or school.
-
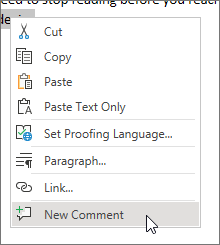
Add a comment from the context menu or from Review > New Comment.
-
Type @ and the first few letters of the person’s first or last name, and then pick the name you want (If they don’t already have permission to open the document, you’ll be asked to provide that).
Tip: To be more casual, feel free to delete everything except the person’s first name in the @mention. To include more people, type @ again and mention someone else.
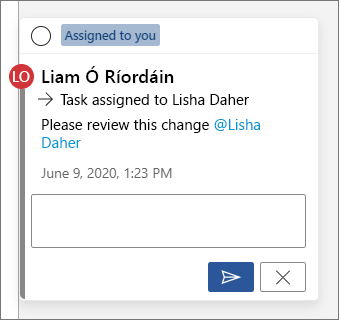
Assign tasks using @mentions
In Word or Excel for web, you can use @mentions to assign a task to another user when you post a comment or a reply. When you create the task, it’s tracked through all interactions and reassignments, so you can see its history. However, since tasks are only available at this time for enterprise users in Word and Excel for the web, you can’t reassign tasks in other apps. However, you can still reply to the comment, resolve the task by resolving the comment, and reopen the task by reopening the comment thread. You can also see the comment history in those apps, but you won’t see the task history. For example, if you assign a task in Word for the web and later open the document in Word for the desktop, you’ll see the comment, but not the task. If you reopen the document in Word for the web, the task is visible again and you can interact with it.
To create a task:
-
Add a new comment or reply to an existing comment.
-
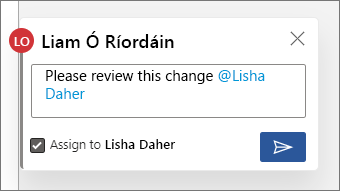
Use an @mention in the comment. The option appears to assign the comment as a task to the person mentioned.
-
Select the Assign to checkbox.
-
Post the comment or reply. The person the task is assigned to will receive an email notifying them that they’ve been assigned a task. In the comment, they’ll see the task assigned to them.
To reassign a task:
-
Use an @mention in the response field.
-
Select the Reassign to check box.
-
Post the reply. The person the task has been reassigned to will receive an email notifying them that they’ve been assigned the task.

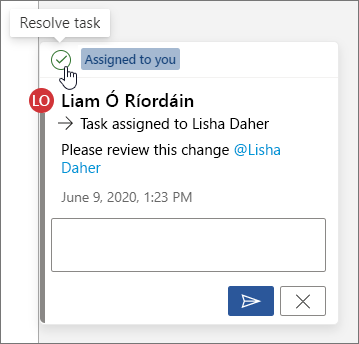
To resolve a task assigned to you:
-
In the top of the comment, hover over the circle next to Assigned to you. A check mark appears in the circle.
-
Click the circle with the checkmark to resolve the task.
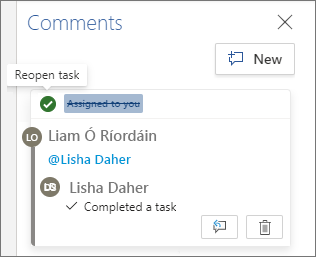
To reopen a resolved task:
-
Open the comments pane.
-
In the top of the resolved comment, click the green circle with the checkmark.
Note: Tenants with conditional access will not be able to create @mentions. Please contact your IT Administrator for more information.
-
On your device, go to a document that’s saved in a SharePoint library or OneDrive for work or school.
-
Select words in the document, and then tap New Comment.
-
Type @ and the first few letters of the person’s first or last name, and then pick the name you want (If they don’t already have permission to open the document, you’ll be asked to provide that).

Tip: To be more casual, feel free to delete everything except the person’s first name in the @mention. To include more people, type @ again and mention someone else.
Note: Tenants with conditional access will not be able to create @mentions. Please contact your IT Administrator for more information.
-
On your device, go to a document that’s saved in a SharePoint library or OneDrive for work or school.
-
Select words in the document, and then tap New Comment.
-
Type @ and the first few letters of the person’s first or last name, and then pick the name you want (If they don’t already have permission to open the document, you’ll be asked to provide that).
Tip: To be more casual, feel free to delete everything except the person’s first name in the @mention. To include more people, type @ again and mention someone else.
Quickly find and respond to @mentions
In Word, Excel, and PowerPoint, when someone mentions you in a comment, you’ll receive an email notification that includes a link that takes you to the comment in the file.
In addition, in certain versions of Word, Excel, and PowerPoint, the email notification also shows you a preview of the text and comment thread associated with the comment (also known as context preview), and you can respond to the comment directly from the email notification (also known as inline replies).
If you’re mentioned more than once, you’ll receive the links in a single email.
Note: This feature isn’t available for customers using Microsoft 365 operated by 21Vianet.
Requirements
Email notifications will include context preview and inline replies if the comment is added by someone using the following versions of Word, Excel, and PowerPoint:
|
Windows |
Mac |
Web |
Mobile (Android/iOS) |
|
|---|---|---|---|---|
|
Word |
Not yet |
Not yet |
Yes |
Yes |
|
Excel |
Yes (version 1911 or later) |
Yes (version 16.31 or later) |
Yes |
Yes |
|
PowerPoint* |
Not yet |
Not yet |
Yes |
Not yet |
*PowerPoint does not yet support inline replies
To reply to a comment from the notification email, you must be using Outlook for Windows, Outlook on the web, or Outlook Mobile. Support for Outlook for Mac and dark mode in Outlook on the web is coming soon.
How to turn off context previews
Admins can use a SharePoint PowerShell cmdlet to turn off context previews:
-
Install the latest version of the SharePoint Online Services Module for Windows PowerShell.
-
Connect to your tenant using Connect-SPOService.
-
Run the following cmdlet: Set-SPOTenant -AllowCommentsTextOnEmailEnabled:$false
Note: Email notifications for comments made in file that are Rights Protected or marked as sensitive via DLP rules won’t include a context preview or inline replies, regardless of whether the feature is turned on or off.
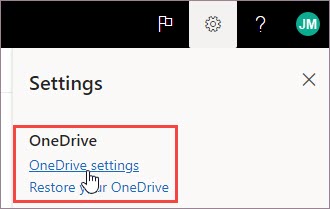
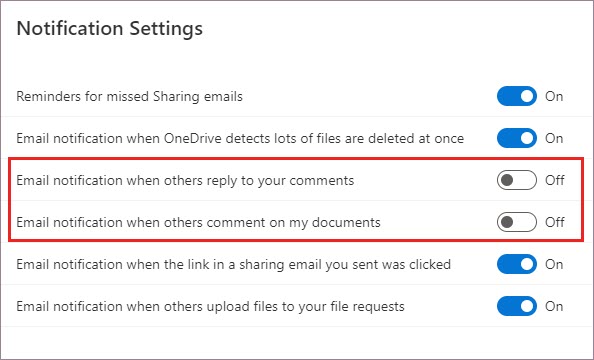
How to turn off notifications for comments in OneDrive
By default, the original document creator and any participants in a comment thread are notified whenever someone creates or updates a comment thread. If the thread is long and involves multiple users, you may want to stop notifications and keep your inbox from being overwhelmed.
There is no global setting for turning off comment notifications. Participants in a thread must do that for themselves in OneDrive. To turn off notifications for comments, do the following:
-
In a new tab in your Microsoft Edge browser, select App launcher, and then select OneDrive.
-
Go to Settings > OneDrive Settings.
-
Under Notification Settings, turn off Email notification when others reply to your comments and Email notification when others comment on my documents.
How to turn off notifications in Outlook
At the bottom of a notification email you receive in Outlook is a setting that allows you to turn off notifications for any further comments or updates to a comment thread made in the file by the original document creator or any participants.
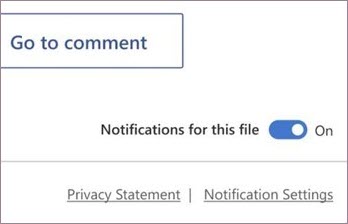
This setting works for just one file. If you’re receiving notifications for comments in multiple files, you’ll need to turn off Notifications for this file for each file.
Security of comment data
Microsoft does not store any comment data internally. All comments among participants in a thread are stored only on your end. Microsoft has no access to see any of your comments.
Need more help?
Want more options?
Explore subscription benefits, browse training courses, learn how to secure your device, and more.
Communities help you ask and answer questions, give feedback, and hear from experts with rich knowledge.
Not a Word Expert By Any Means
I am a dedicated rather than expert Word user. The editor is something I’ve used most days since I first opened Word 2.0 in 1993 and concluded it was a better word processor than DECwrite, an editor that ran on VAX workstations at the time. Word 2.0 ran on a 286 PC with 4 MB of memory, so it’s fair to say that it was a lot cheaper to use than its VMS counterpart.
Word is Like an Old Slipper
Over the best part of three decades I have grown comfortable with Word. Most of the time, I use the same features and don’t go looking for new functionality unless I need to perform a task. Recently, I found that Word (click to run or Office 365 ProPlus, now horribly renamed as Microsoft 365 Enterprise Apps suite) combines @mentions in comments with the ability to share documents. The feature is useful when you collaborate to create documents, which I need to do often.
Comment or @Mention
Using version 2004 (build 12730.20150) of Word, I noticed that the old insert comment command is now Comment or @Mention. Clicking the command brings up the usual dialog to enter a comment (for example, “what horrible text – you need to change this!”) with the added option to insert an @mention.
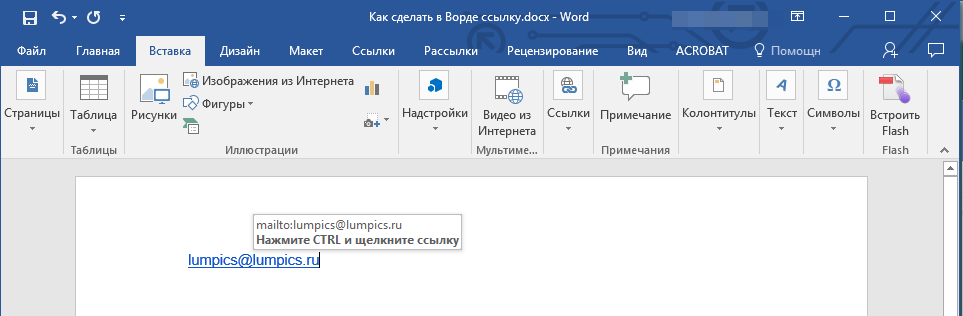
Type @ and the first few characters of someone’s display name. Word checks to find the person to mention. It looks like Word uses Outlook’s auto-complete list of email addresses because I noticed names from outside the tenant that I had previously emailed (Figure 1).

You can also add an @mention comment from the right-click insert menu.
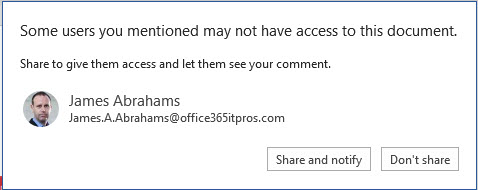
For good reason, @mentioning someone only works for documents stored in SharePoint Online or OneDrive for Business. After selecting the name, you can enter the comment. If that person doesn’t currently have access to the document, Word offers to give them access (share) so that they can open and view the comment and the associated text (Figure 2).
The standard sharing mechanism available in OneDrive for Business or SharePoint Online is used, so the document must be stored in Office 365. If you open the document properties, you can see the share access granted to the @mentioned person (Figure 3).

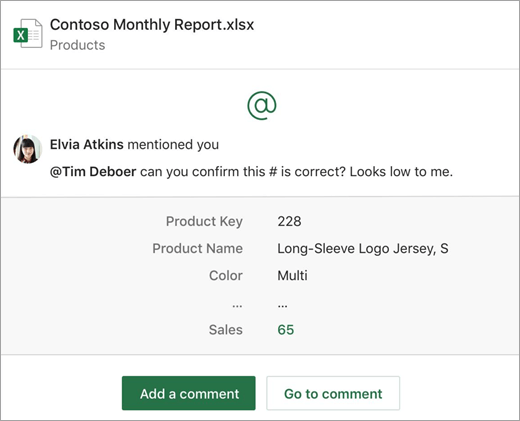
Email Notifications for @Mentions
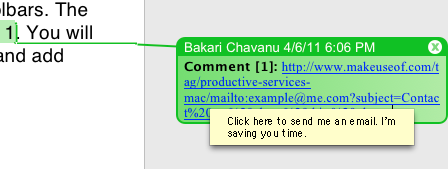
People @mentioned in a comment receive an email notification to tell them that they should go to the document to respond. The notifications sent by Office 365 applications are becoming smarter. OWA users can respond to Yammer conversations without leaving the client, and the Teams missed activity messages are a different take on the same idea. @Mention notifications contain information to help the recipient decide how quickly they need to respond by including the context of the comment (Figure 4). And when the time comes to respond, the link opens the document in the browser positioned at the comment.

Updated Comments
Once you involve other people in a document, it is likely that multiple people will edit the document concurrently. Collaborative co-authoring is not new, but I was pleased to see how responses to comments appeared in documents soon after they were added. Updates are not immediate because they depend on the autosave mechanism to capture and distribute changes to everyone who has a document open, but responses show up quicker than they would in a document circulated by email.
@Mentions for All
According to this Microsoft support article, PowerPoint, Word, and Excel are supposed to have the same @mention capabilities. This is certainly true of the online versions of the apps, but I only see @mentions in the desktop versions of Word and PowerPoint. Adding the feature to the desktop version of Excel might be a little more complicated.
The Office 365 for IT Pros eBook does not cover the desktop or online apps. However, we use Word to write the book and this feature exploits the Office 365 sharing mechanism, so we thought you’d like to know about it.
Содержание
- Создаем настраиваемую гиперссылку
- Создаем гиперссылку на пустое электронное сообщение
- Создаем гиперссылку на другое место в документе
- Как отметить место назначения ссылки?
- Добавляем закладку
- Используем стиль заголовка
- Добавляем ссылку
- Создаем гиперссылку на место в стороннем документе или созданной веб-странице
- Отмечаем место назначения гиперссылки
- Добавляем ссылку
- Быстро создаем гиперссылку на другой файл
- Создаем гиперссылку посредством перетаскивания содержимого со стороннего документа
- Создаем гиперссылку на содержимое веб-страницы посредством его перетаскивания
- Создаем гиперсслыку на содержимое листа Excel путем копирования и вставки
- Вопросы и ответы
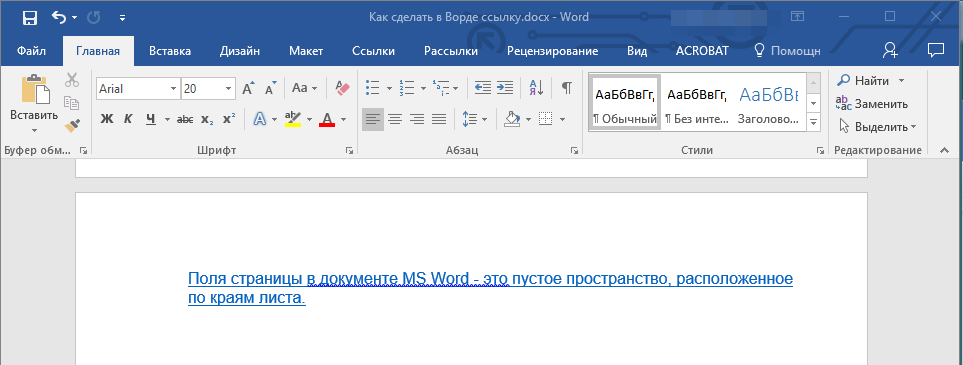
Программа MS Word автоматически создает активные ссылки (гиперссылки) после ввода или вставки URL-адреса веб-страницы и последующего нажатия клавиш “Space” (пробел) или “Enter”. Кроме того, сделать активную ссылку в Ворде можно и вручную, о чем и пойдет речь в нашей статье.
Создаем настраиваемую гиперссылку
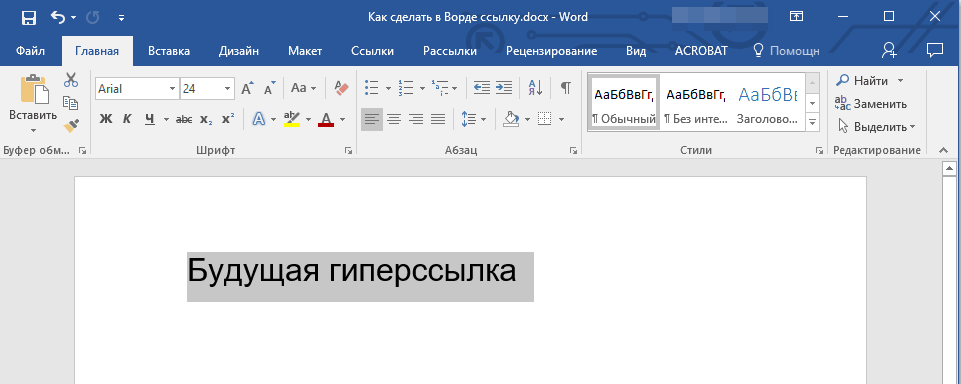
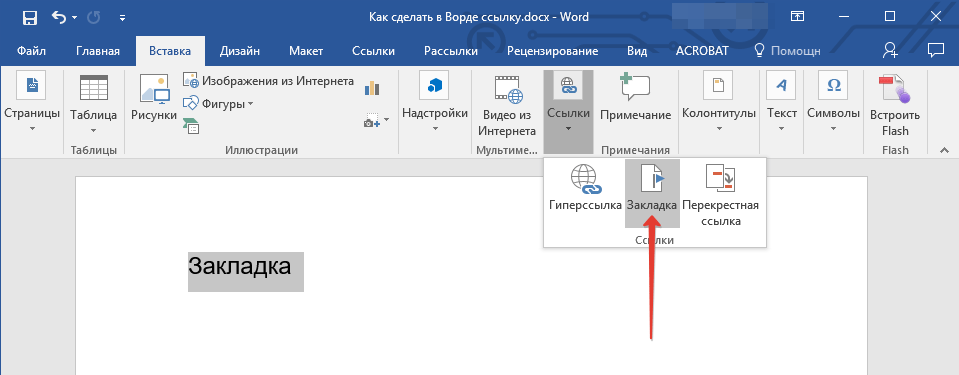
1. Выделите текст или изображение, которое должно представлять собой активную ссылку (гиперссылку).
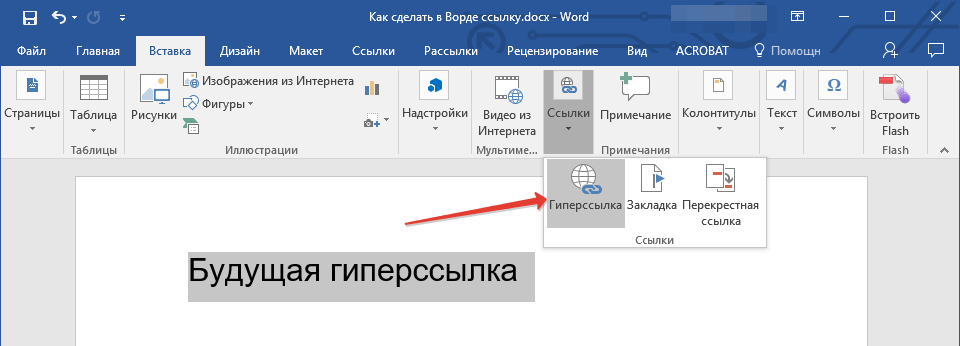
2. Перейдите ко вкладке “Вставка” и выберите там команду “Гиперссылка”, расположенную в группе “Ссылки”.
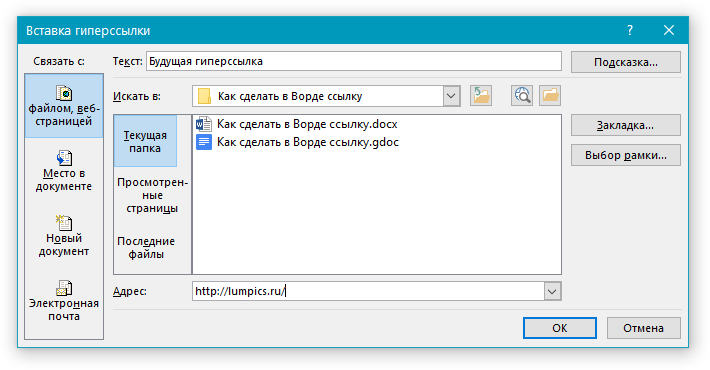
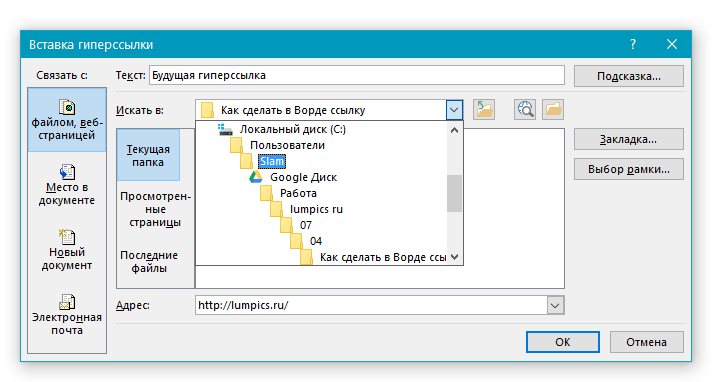
3. В диалоговом окне, которое появится перед вами, выполните необходимое действие:
- Если вы хотите создать ссылку на какой-либо существующий файл или веб-ресурс, выберите в разделе “Связать с” пункт “файлом, веб-страницей”. В появившемся поле “Адрес” введите URL-адрес (к примеру, /).
-
Совет: Если вы делаете ссылку на файл, адрес (путь) которого вам неизвестен, просто нажмите на стрелочку в списке “Искать в” и перейдите к файлу.
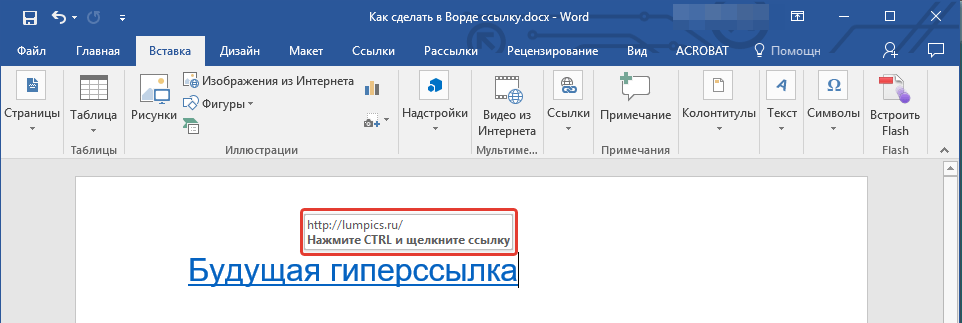
- Если вы хотите добавить ссылку на файл, который пока не был создан, выберите в разделе “Связать с” пункт “новым документом”, после чего введите имя будущего файла в соответствующее поле. В разделе “Когда вносить правку в новый документ” выберите необходимый параметр “сейчас” или “позже”.
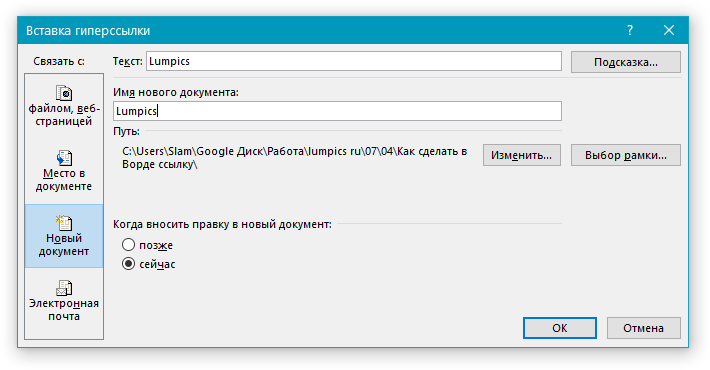
-
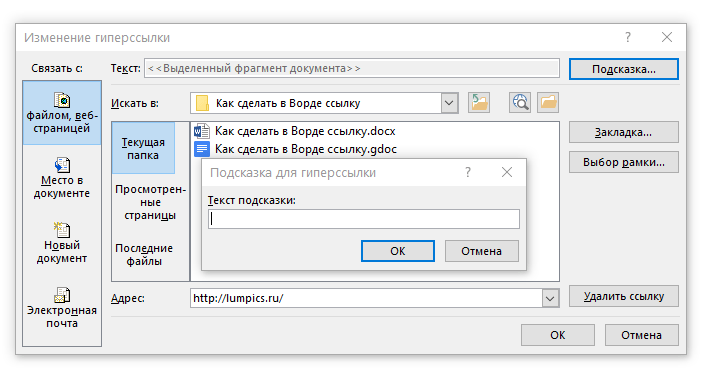
Совет: Помимо создания самой гиперссылки, вы можете изменить подсказку, которая всплывает при наведении курсора на слово, фразу или графический файл, содержащий активную ссылку.
Чтобы это сделать, нажмите кнопку “Подсказка”, а затем введите необходимую информацию. Если же подсказка не задана вручную, в качестве таковой используется путь к файлу или его адрес.
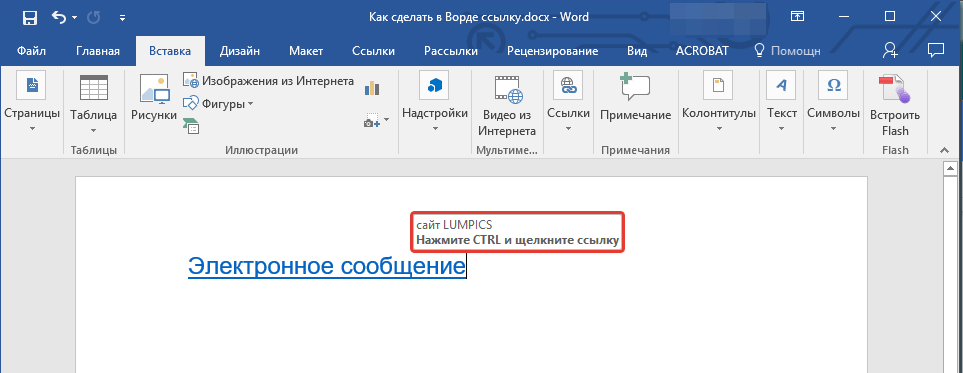
Создаем гиперссылку на пустое электронное сообщение
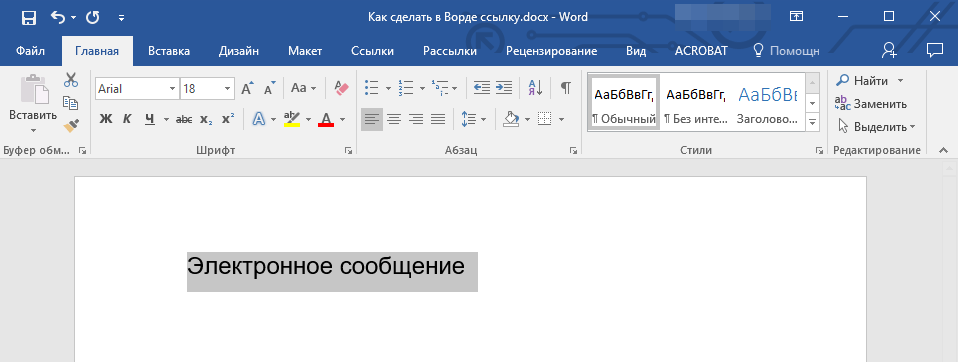
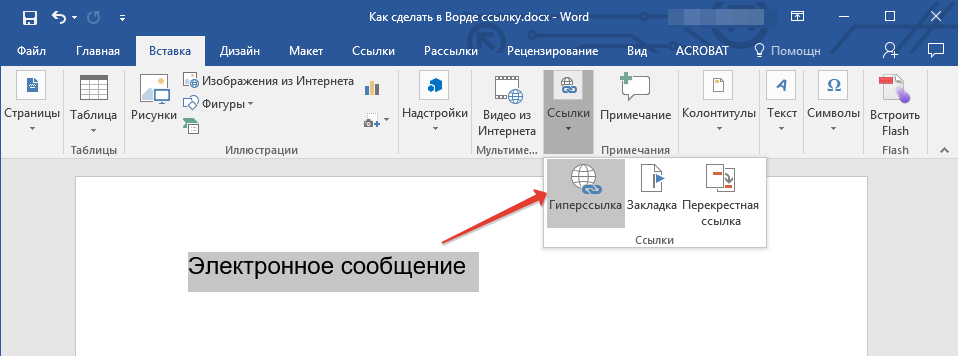
1. Выделите изображение или текст, который вы планируете преобразовать в гиперссылку.

2. Перейдите ко вкладке “Вставка” и выберите в ней команду “Гиперссылка” (группа “Ссылки”).
3. В диалоговом окне, которое перед вами появится, в разделе “Связать с” выберите пункт “электронной почтой”.
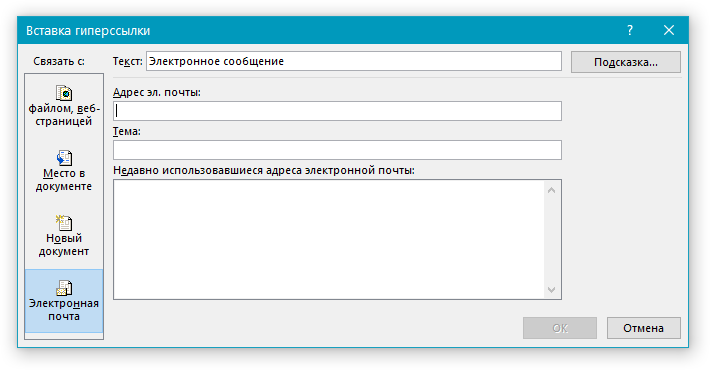
4. Введите в соответствующее поле необходимый адрес электронного ящика. Также, можно выбрать адрес из списка недавно использовавшихся.
5. Если это необходимо, введите тему сообщения в соответствующем поле.
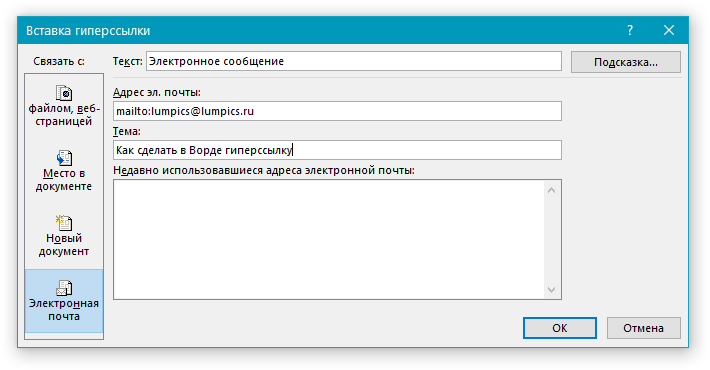
Примечание: Некоторыми браузерами и почтовыми клиентами строка темы не распознается.
-
Совет: Подобно тому, как можно настроить подсказку для обычной гиперссылки, вы также можете настроить всплывающую подсказку для активной ссылки на электронное сообщение. Для этого просто нажмите кнопку “Подсказка” и в соответствующем поле введите необходимый текст.
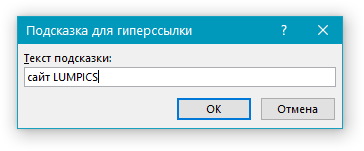
Если вы не введете текст всплывающей подсказки, MS Word автоматически будет выводить “mailto”, а вслед за этим текстом будет указан введенный вами адрес электронной почты и тема письма.
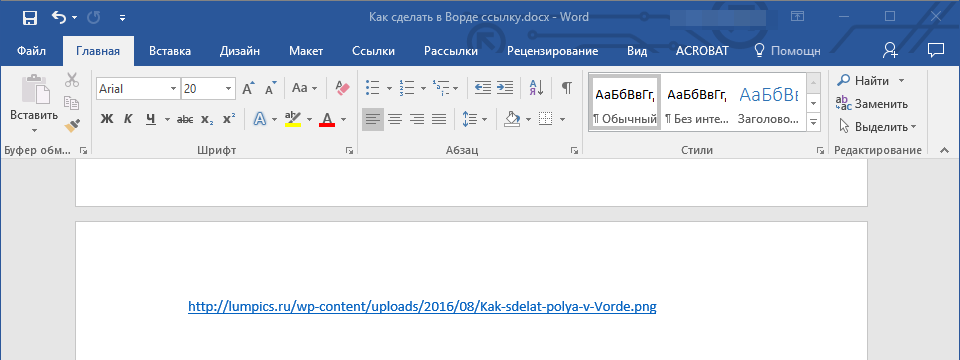
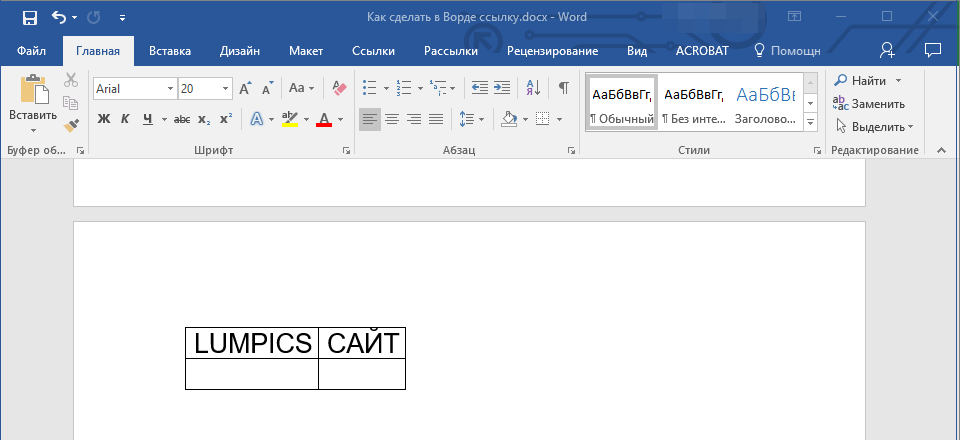
Кроме того, вы можете создать гиперссылку на пустое электронное сообщение, введя в документе адрес почты. К примеру, если ввести “lumpics@lumpics.ru” без кавычек и нажать пробел или “Enter”, автоматически создастся гиперссылка с подсказкой по умолчанию.
Создаем гиперссылку на другое место в документе
Для того, чтобы создать активную ссылку на то или иное место в документе или же на веб-странице, созданной вами в Ворде, для начала необходимо отметить точку, в которую эта ссылка будет вести.
Как отметить место назначения ссылки?
Используя закладку или заголовок, можно отметить место назначения ссылки.
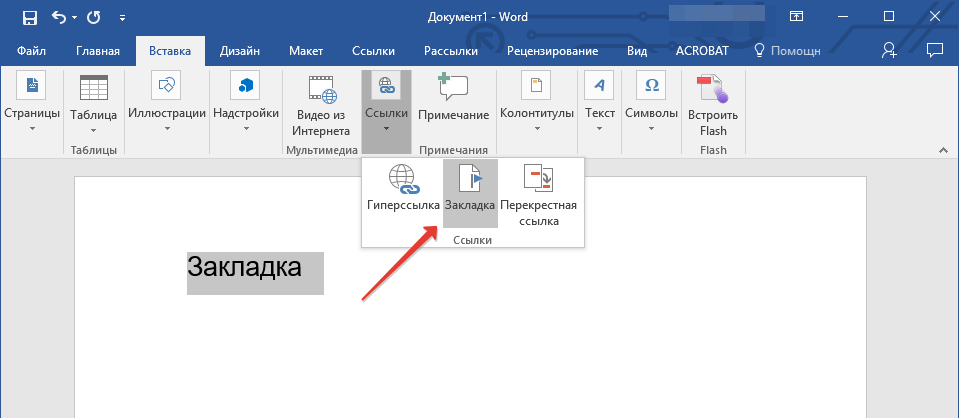
Добавляем закладку
1. Выделите объект или текст, с которым требуется связать закладку, либо же кликните левой кнопкой мышки по тому месту документа, где ее требуется вставить.
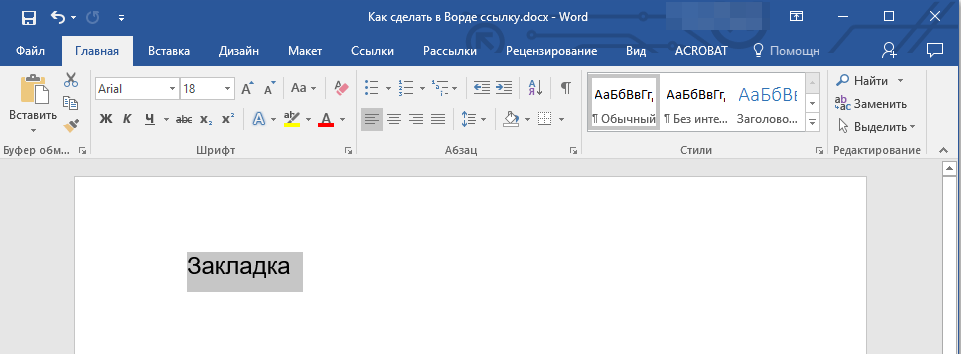
2. Перейдите ко вкладке “Вставка”, нажмите кнопку “Закладка”, расположенную в группе “Ссылки”.
3. Введите имя закладки в соответствующем поле.
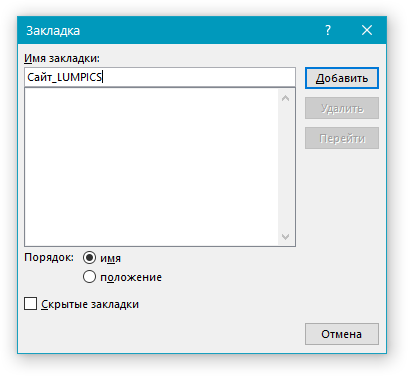
Примечание: Имя закладки обязательно должно начинаться с буквы. Однако, в имени закладки могут содержаться и цифры, а вот пробелов быть не должно.
-
Совет: Если вам необходимо разделить слова в название закладки, воспользуйтесь символом подчеркивания, к примеру, “сайт_lumpics”.
4. Выполнив вышеописанные действия, нажмите “Добавить”.
Используем стиль заголовка
К тексту, расположенному в том месте, куда должна вести гиперссылка, можно использовать один из шаблонных стилей заголовков, доступных в MS Word.
1. Выделите фрагмент текста, к которому необходимо применить конкретный стиль заголовка.
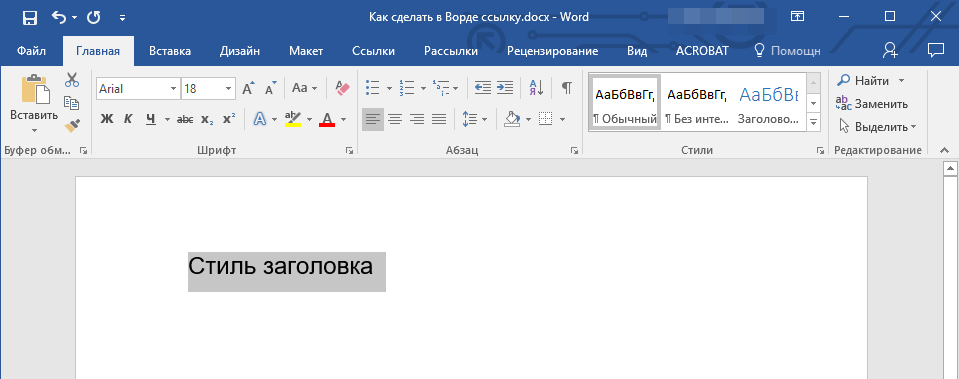
2. Во вкладке “Главная” выберите один из доступных стилей, представленных в группе “Стили”.

-
Совет: Если выделен текст, который должен выглядеть, как основной заголовок, можно выбрать для него соответствующий шаблон из доступной коллекции экспресс-стилей. Например, “Заголовок 1”.
Добавляем ссылку
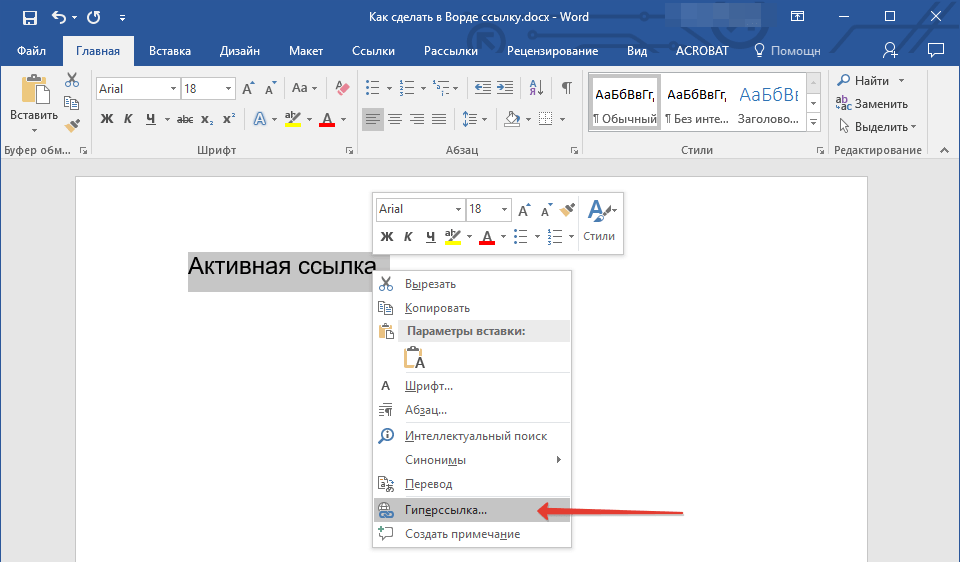
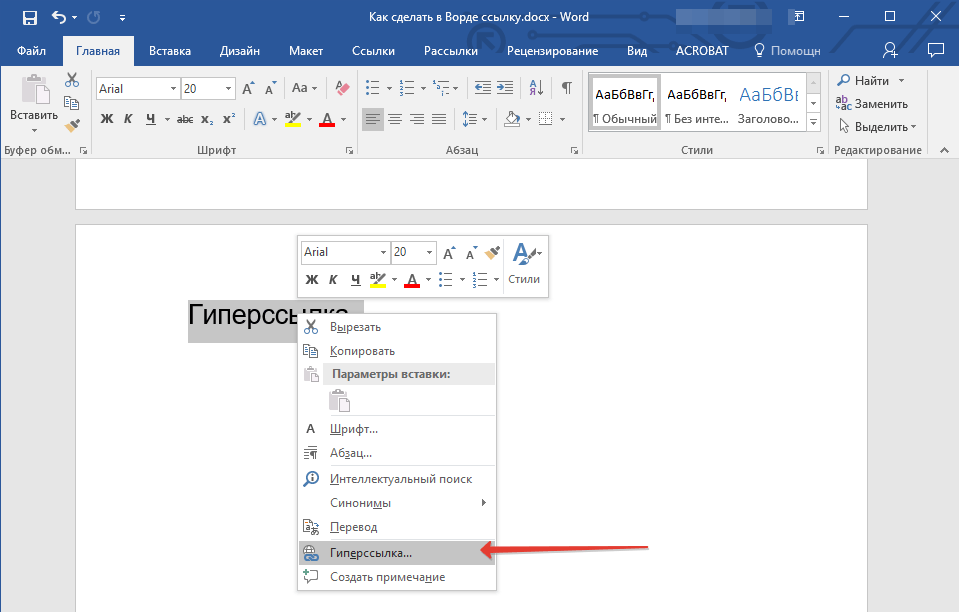
1. Выделите тот текст или объект, который в дальнейшем будет представлять собой гиперссылку.
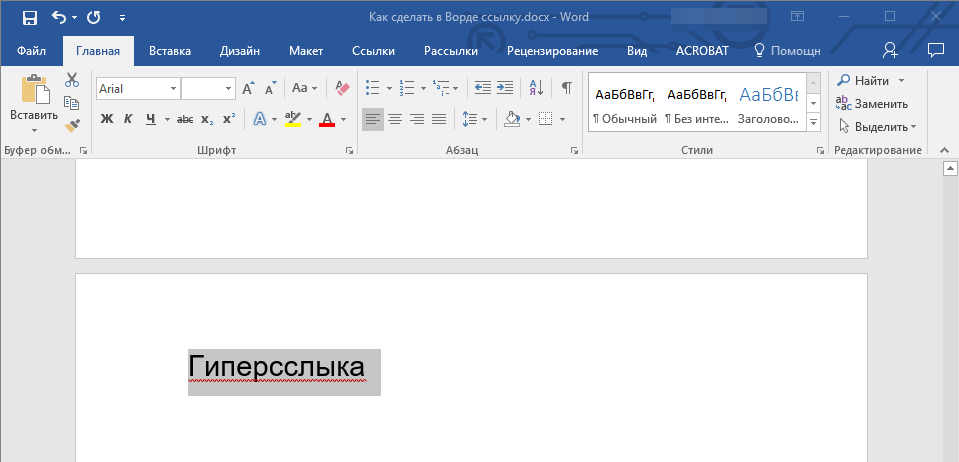
2. Кликните правой кнопкой мышки по этому элементу, и в открывшемся контекстном меню выберите пункт “Гиперссылка”.
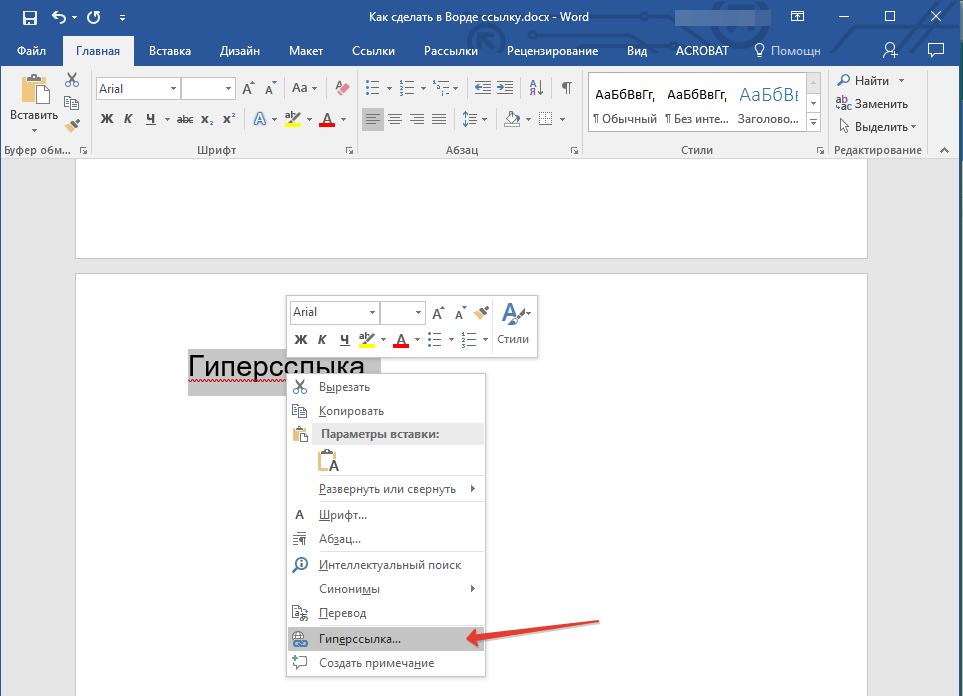
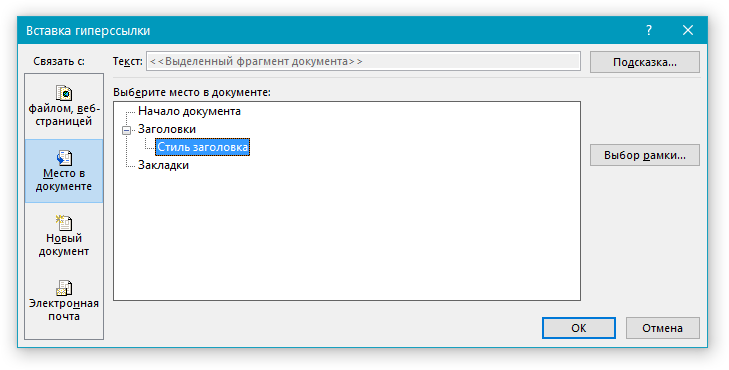
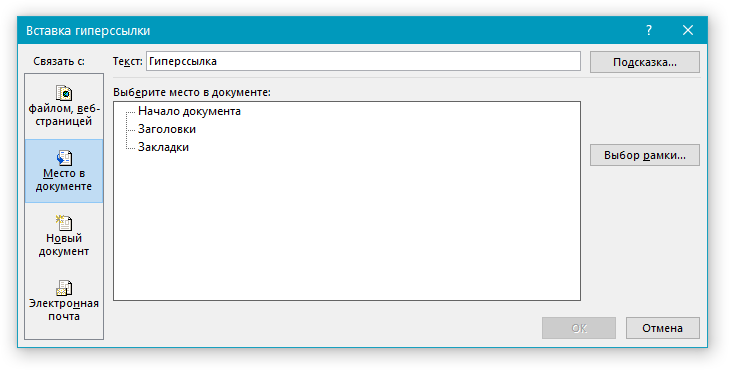
3. Выберите в разделе “Связать с” пункт “Место в документе”.
4. В появившемся списке выберите закладку или заголовок, куда будет ссылаться гиперссылка.
-
Совет: Если вы хотите изменить подсказку, которая будет выводиться при наведении курсора на гиперссылку, нажмите кнопку “Подсказка” и введите необходимый текст.
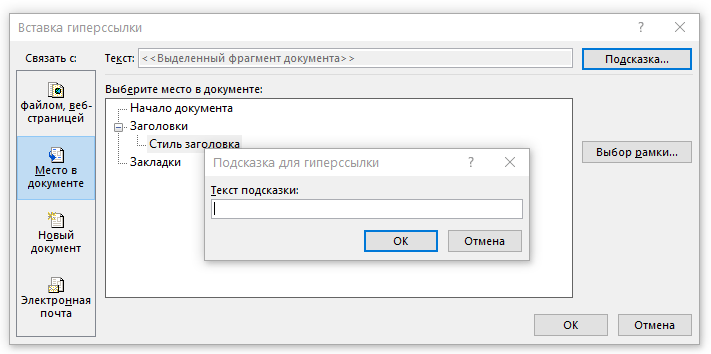
Если подсказка не будет задана вручную, то для активной ссылки на закладку будет использоваться “имя закладки”, а для ссылки на заголовок “Текущий документ”.
Создаем гиперссылку на место в стороннем документе или созданной веб-странице
Если вы желаете создать активную ссылку на то или иное место в текстовом документе или веб-странице, созданной вами в Ворде, для начала необходимо отметить точку, к которой эта ссылка будет вести.
Отмечаем место назначения гиперссылки
1. Добавьте закладку в конечный текстовый документ или созданную веб-страницу, используя метод, описанный выше. Закройте файл.
2. Откройте файл, в котором должна быть размещена активная ссылка на конкретное место ранее открытого документа.
3. Выделите объект, который эту гиперссылку должен содержать.

4. Кликните правой кнопкой мышки на выделенном объекте и выберите в контекстном меню пункт “Гиперссылка”.
5. В появившемся окне выберите в группе “Связать с” пункт “файлом, веб-страницей”.
6. В разделе “Искать в” укажите путь к файлу, в котором вы создали закладку.
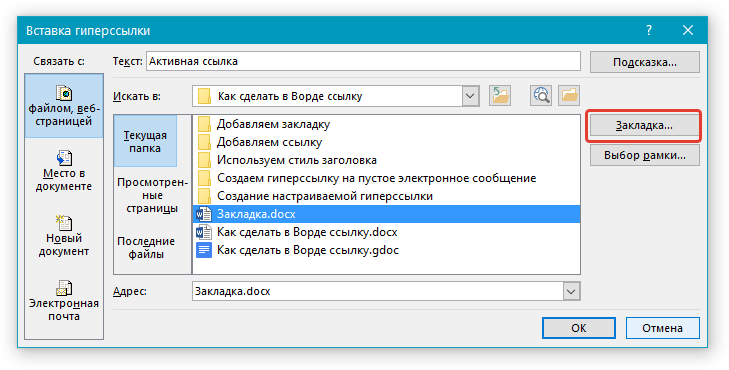
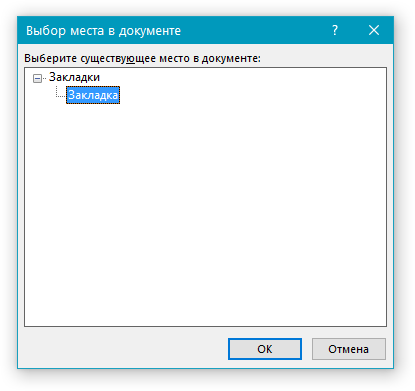
7. Кликните по кнопке “Закладка” и выберите в диалоговом окне необходимую закладку, после чего нажмите “ОК”.
8. Нажмите “ОК” в диалоговом окне “Вставка ссылки”.
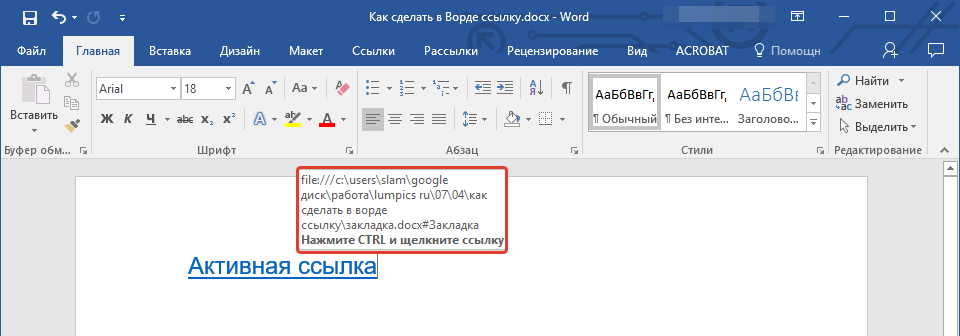
В созданном вами документе появится гиперссылка на место в другом документе либо же на веб-странице. Подсказка, которая будет отображаться по умолчанию — это путь к первому файлу, содержащему в себе закладку.
О том, как изменить подсказку для гиперссылки, мы уже писали выше.
Добавляем ссылку
1. В документе выделите текстовый фрагмент или объект, который в дальнейшем будет представлять собой гиперссылку.

2. Кликните на нем правой кнопкой мышки и в открывшемся контекстном меню выберите пункт “Гиперссылка”.
3. В открывшемся диалоговом окне, в разделе “Связать с” выберите пункт “Место в документе”.
4. В появившемся списке выберите закладку или заголовок, куда в дальнейшем должна ссылаться активная ссылка.

Если вам необходимо изменить подсказку, появляющуюся при наведении на гиперссылку указателя, воспользуйтесь инструкцией, описанной в предыдущих разделах статьи.
Совет: В документах Microsoft Office Word можно создавать активные ссылки на конкретные места в документах, созданных в других программах офисного пакета. Эти ссылки могут быть сохранены в форматах приложений Excel и PowerPoint.
Так, если вы хотите создать ссылку на место в книге MS Excel, для начала создайте в ней имя, затем в гиперссылке в конце имени файла введите “#” без кавычек, а за решеткой укажите созданное вами имя XLS-файла.
Для гиперссылки на PowerPoint проделайте ровно то же самое, только после символа “#” укажите номер конкретного слайда.
Быстро создаем гиперссылку на другой файл
Чтобы быстро создать гиперссылку, в том числе и вставить ссылку на сайт в Ворде, отнюдь не обязательно прибегать к помощи диалогового окна “Вставка гиперссылки”, которое упоминалось во всех предыдущих разделах статьи.
Сделать это можно также и с помощью функции drag-and-drop, то есть, путем банального перетаскивания выбранного текстового или графического элемента из документа MS Word, URL-адрес или активную ссылку из некоторых веб-обозревателей.
Кроме этого, можно также просто скопировать предварительно выбранную ячейку или диапазон таковых из таблицы Microsoft Office Excel.
Так, к примеру, вы можете самостоятельно создать гиперссылку на развернутое описание, которое содержится в другом документ. Также можно сослаться и на новость, размещенную на той или иной веб-странице.
Важное примечание: Текст следует копировать из файла, который был предварительно сохранен.
Примечание: Создавать активные ссылки посредством перетаскивания объектов-рисунков (например, фигур) невозможно. Чтобы сделать гиперссылку для таких графических элементов, следует выделить объект-рисунок, кликнуть по нему правой кнопкой мышки и в контекстном меню выбрать “Гиперссылка”.
Создаем гиперссылку посредством перетаскивания содержимого со стороннего документа
1. Используйте в качестве конечного документа файл, на который требуется создать активную ссылку. Предварительно выполните его сохранение.
2. Откройте документ MS Word, в который требуется добавить гиперссылку.
3. Откройте конечный документ и выделите фрагмент текста, изображение или любой другой объект, к которому и будет вести гиперссылка.
Совет: Вы можете выделить несколько первых слов раздела, на который будет создаваться активная ссылка.
4. Кликните правой кнопкой мышки по выделенному объекту, перетащите его на панель задач, а затем наведите на документ Ворд, в который и требуется добавить гиперссылку.
5. В контекстном меню, которое перед вами появится, выберите пункт “Создать гиперссылку”.
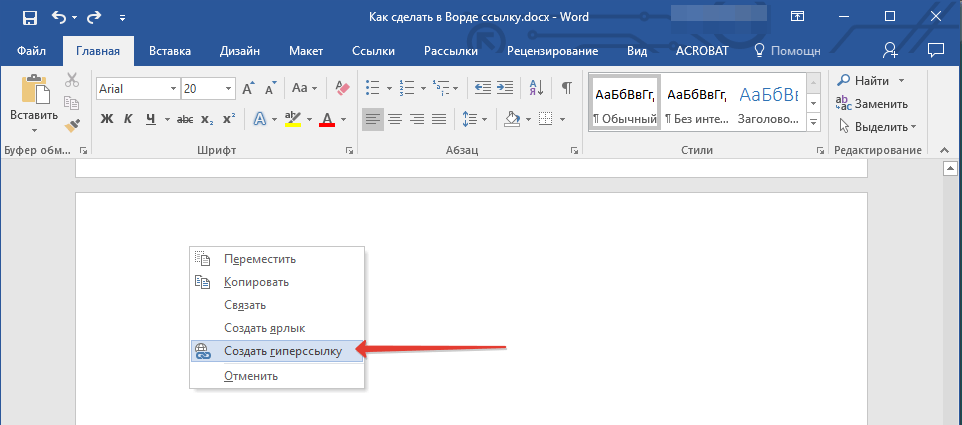
6. Выделенный вами фрагмент текста, изображение или другой объект станет гиперссылкой и будет ссылаться на созданный вами ранее конечный документ.
Совет: При наведении курсора на созданную гиперссылку, в качестве подсказки по умолчанию будет отображаться путь к конечному документу. Если же вы кликните левой кнопкой мышки по гиперсслыке, предварительно зажав клавишу “Ctrl”, вы перейдете к месту в конечном документе, на которое гиперссылка ссылается.
Создаем гиперссылку на содержимое веб-страницы посредством его перетаскивания
1. Откройте текстовый документ, в который необходимо добавить активную ссылку.
2. Откройте страницу сайта и кликните правой кнопкой мышки по предварительно выделенному объекту, к которому должна вести гиперссылка.
3. Теперь перетащите выбранный объект на панель задач, а затем наведите на документ, в который необходимо добавить ссылку на него.
4. Отпустите правую кнопку мышки, когда будете находиться внутри документа, и в открывшемся контекстном меню выберите пункт “Создать гиперсслыку”. В документе появится активная ссылка на объект с веб-страницы.
Кликнув по ссылке с предварительно зажатой клавишей “Ctrl”, вы перейдете непосредственно к выбранному вами объекту в окне браузера.
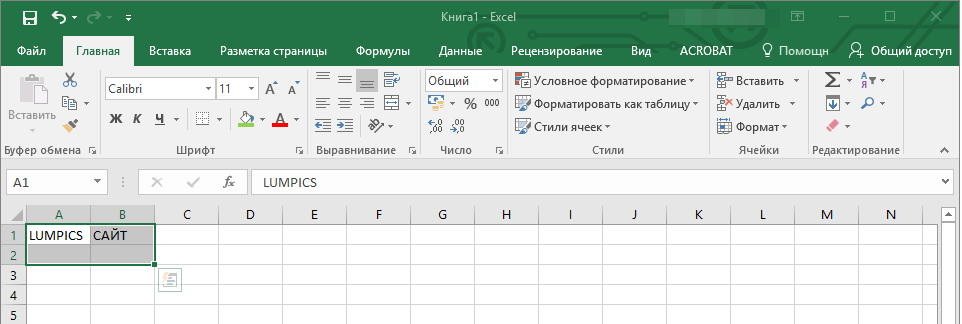
Создаем гиперсслыку на содержимое листа Excel путем копирования и вставки
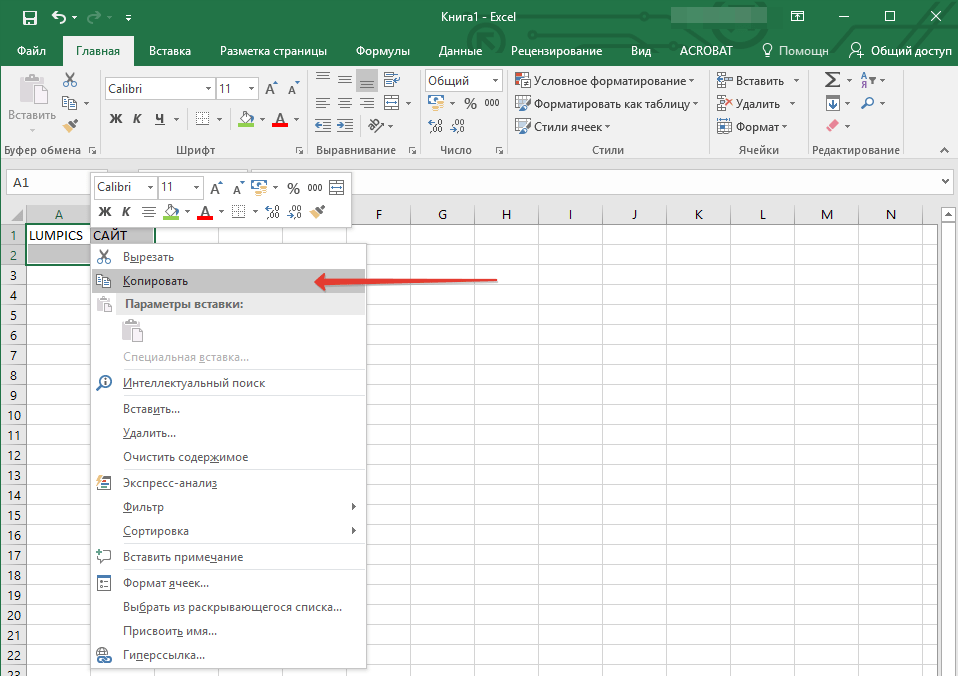
1. Откройте документ MS Excel и выделите в нем ячейку или диапазон таковых, на которые будет ссылаться гиперссылка.
2. Кликните по выделенному фрагменту правой кнопкой мышки и выберите в контекстном меню пункт “Копировать”.
3. Откройте документ MS Word, в который требуется добавить гиперссылку.
4. Во вкладке “Главная” в группе “Буфер обмена” кликните по стрелке “Вставить”, после чего в развернувшемся меню выберите “Вставить как гиперссылку”.
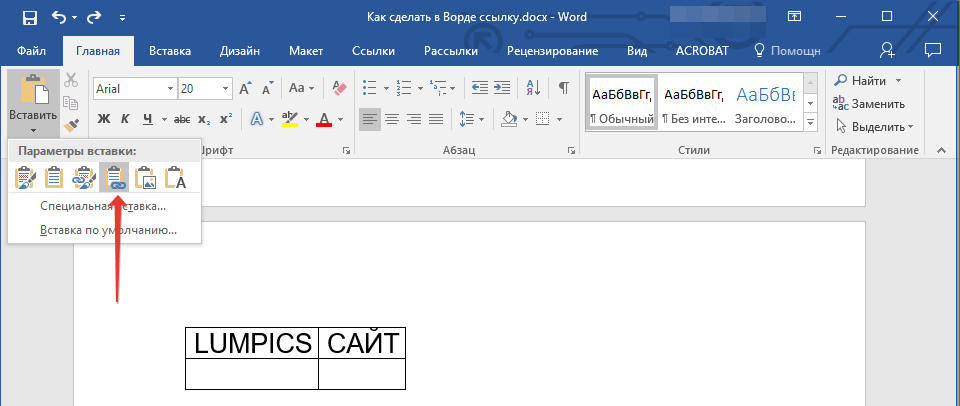
Гиперссылка на содержимое документа Microsoft Excel будет добавлена в Ворд.
На этом все, теперь вы знаете, как сделать активную ссылку в документе MS Word и знаете, как добавлять разные гиперссылки на разного рода содержимое. Желаем вам продуктивной работы и результативного обучения. Успехов в покорение Майкрософт Ворд.
How to Add and Edit Links in Word Documents
Insert hyperlinks quickly
Updated on February 11, 2021
What to Know
- Highlight text you want to hyperlink. Right-click it and choose Link. Alternatively, select Insert > Links > Link.
- Then, enter the URL in the Address field.
- Remove a link: Right-click the hyperlink text and choose Remove Hyperlink.
Microsoft Word is primarily used to create word processing documents, but you can also work with hyperlinks and HTML code used in websites. Learn how to insert, remove, or edit hyperlinks using Word for Microsoft 365, Word 2019, Word 2016, Word 2013, and Word 2010.
Insert Links
To link to other documents or web pages from a Word document, insert a hyperlink.
-
Select the text that you want to apply the hyperlink to. This can be the text of a URL, a single word, a phrase, a sentence, or a paragraph.
-
Right-click the text and select Link or Hyperlink to open the Insert Hyperlink dialog box. Or, go to the Insert tab and select Links > Link.
-
In the Address field, enter the URL address of the document or website you want to link to. For online assets, the URL must include the protocol (for example, http, https, or ftp).
The Text to display text box defaults to the text you selected in step 1. You can change this text here if you like.
-
Select OK.
-
The selected text appears as a hyperlink that can be clicked to open the linked document or website.
To make changes to the link, right-click the hyperlink and select Edit Hyperlink.
Remove Hyperlinks
When you type a URL into Word, it automatically inserts a hyperlink that connects to the website. This feature is handy if you distribute documents electronically, but it can be a nuisance when printing documents.
To remove a hyperlink, right-click the link and select Remove Hyperlink.
In Word for Mac, right-click then select Hyperlink. In the slide-out menu, select Edit Hyperlink, then choose Remove Link.
More About Editing Hyperlinks
When you work in the Insert Hyperlink dialog box and the Edit Hyperlink dialog box, several other features are available on the left side of the dialog box.
Existing File or Web Page
This tab is selected by default in the Insert Hyperlink and the Edit Hyperlink dialog boxes. This tab displays the text for the hyperlink and the URL of that hyperlink
In the middle of the window, there are three tabs:
- Current Folder displays files that are located in the same folder location as the current document. If you want the selected link to link to a document located in this folder, locate the file and choose it. The Address field changes to reflect the document location on your computer. The Text to display field also changes to the file address, so you may want to edit this field to change the text that displays in the Word document.
- Browsed Pages shows a list of recent documents and web pages you have accessed. Select one of these as the new link destination.
- Recent Files displays a list of recent files you’ve worked on in Word. This is handy if you’re working on a series of separate documents and want to create links to these files quickly.
Place in This Document
This tab displays sections and bookmarks contained in the current document. Use it to link to specific locations within the current document.
Create New Document
Go to this tab to create a new document to which the link will connect. This feature is useful if you’re creating a series of documents but haven’t created the document you want to link to. Define the name of the new document in the labeled field.
If you don’t want to edit the new document you create from here, select Edit the new document later.
Email Address
This section creates a link that will generate a new email when someone clicks it and populates several of the new email fields with the defaults you define. Enter the email address where you want the new email to be sent, and add the subject that will appear in the new email by filling in the appropriate fields.
If you have used this feature recently for other links, any email addresses you used in those will appear in the Recently used e-mail addresses list.
Thanks for letting us know!
Get the Latest Tech News Delivered Every Day
Subscribe
Though Microsoft Word can sometimes feel like a big clunky program with too many bells and whistles, there are still some powerful time saving tools under its hood. One of them is the Comments tool, which can be used sort of like little yellow sticky notes. Comments in Word can serve many purposes but, like other digital technology, provides a lot more than putting pen to paper.

Though Microsoft Word can sometimes feel like a big clunky program with too many bells and whistles, there are still some powerful time saving tools under its hood that you should know about. One of them is the Comments tool, which can be used sort of like little yellow sticky notes as you write, revise, and edit your research paper, manuscript, business report, or your next great novel.
Comments in Word can serve many purposes, but they work like writing comments in the margins of a paper document. But of course, using Comments in Word, like other digital technology, provides a lot more than putting pen to paper. You can include external links to web resources, internal links to different parts of a document, and set up a pre-addressed email link for your readers. You can also send your Word file to someone or a group of people who in turn can add comments to your document.
In Microsoft Word 2007-2011, you can add comments (when you’re writing in the Print Layout or Web Layout views) by first selecting one or more words in your document, and then clicking on Insert > New Comment in the menu bar. Note, I’m using Word 2011 for Mac for this tutorial, but the Comment tool and features are similar for the PC version of Word as well.
You can of course access this tool in Word’s Toolbar, or what is called the Ribbon of Word 2010 or Mac 2011 edition, to create a new note using one single click. Or better yet, create a keyboard shortcut for the New Comment menu item.

When you add a note, you can write as much as you like in it. Your notes will appear as “balloons” on the side of the page where you selected to add the comment. All comments must be attached to piece of selected text. Comments are useful in the writing process for making notes to yourself, especially when you’re in the flow of writing and you don’t want to stop and check a fact or a resource. You can make a note to do it later.
You or another reader of your document could use Comments to ask questions, make suggested changes, or make references to other sources in your document. The comments you add don’t show up when you print your document.
When your balloon comments get too distracting or take up too much precious space on the screen, you can simply click View > Markup to hide them. Do the same to bring them back. You can delete comments one at a time by clicking the “x” button in the upper-right of the Comment’s title bar.
URL Link
What is useful about Comments is that you can include links to webpages, a mailto link, or links to designated parts of your existing document.
To add to a URL, select a piece of text, and add a comment note. Next, either type in your URL or locate the webpage and drag the URL into the note.
Mailto Link
Sometimes when another reader or editor of your document is reading your added comments, you might want them to contact you directly by email concerning something you wrote in the document. Considering how lazy we computer users have become, Word enables you to include a mailto link in a comment or attach it directly to piece of text. That way, the lazy reader doesn’t have to stop and create a new mail and add your or someone else’s designated address. You can do it all that work for them.
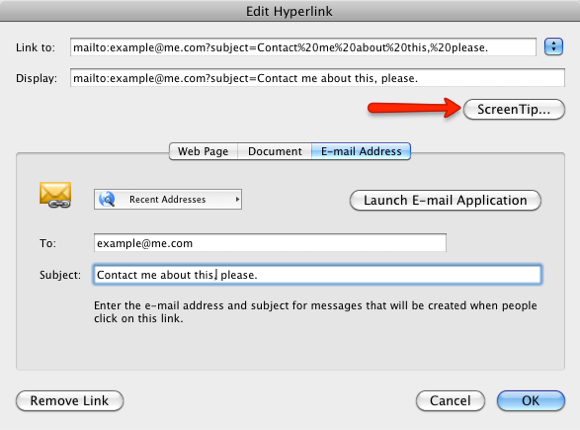
To add a mailto link, select the Comment box and go to Insert > Hyperlink, or Command+K. In the dialogue box, enter the email address and subject line of the pre-addressed email. If you want to get more fancy, notice that little ScreenTip button above? You can type in a custom message to the reader when they hover their cursor over the resulting link.
Now when a reader clicks on the mailto link, a new email will open with your address and subject line inserted for them, so they don’t have to take their precious time doing it themselves.
Document Link
If you’re creating a long document, say a 150-page dissertation, you’ll know how unwieldy things can become when you need to find and locate important parts of your text file. You could use a comment in one part of your document to link to another part. However, the process for doing this requires a few more steps to set up.
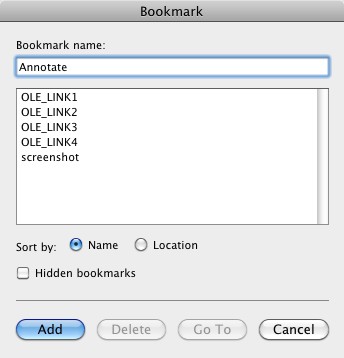
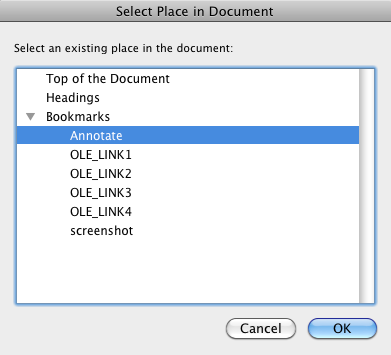
First off, you need to create a bookmark(s) link to your document. To do this, select the text for the bookmark, and go to Insert > Bookmark. Change the “OLE_Link1” to a custom name. Click Add.
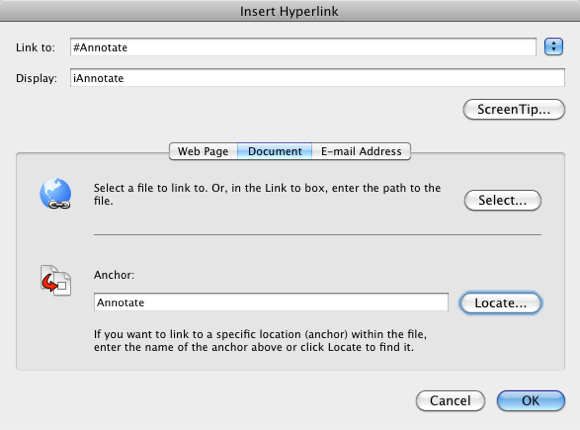
When you want to add your document link in a comment or to a piece of selected text in your document, you need to click Insert > Hyper Link. Select the Document button. Click the Locate… button and your bookmarked anchor should be listed under bookmarks. Your bookmarked text will be highlighted in blue.
To remove hyperlinks, simply select the link and click Delete. Likewise, you can edit the Hyperlink by control-clicking on the link and choosing Insert > Edit Hyperlink.

Let me know what you think about this tutorial, and also what other Word tools you find useful. Also check out our other articles about Word, including How To Make Use Of Research Feature in Microsoft Word 2007, How To Build a Mind Map In Microsoft Word, and How to Make Index Cards in Microsoft Word 2007.
-
1
Double-click a Word document you wish to change. Doing so will open the document in Microsoft Word.
-
2
Click and drag your cursor across some text. This will highlight the text. You’ll want to highlight everything on which you wish to leave a comment (e.g., an entire sentence or paragraph).
Advertisement
-
3
Right-click or two-finger click the selected text. Doing this will prompt a drop-down menu.
-
4
Click New Comment. It’s at the bottom of the right-click menu.
-
5
Type your comment. It will appear on the right side of the Microsoft Word window.
-
6
Click anywhere on the document. Doing so will cement your comment, allowing you to move on to the next section of text that needs commenting.
- Be sure to save your document before closing, or your comments won’t be saved.


Advertisement
-
1
Double-click a Word document you wish to change. Doing so will open the document in Microsoft Word.
-
2
Click the Review tab. It’s in the blue section at the top of the document’s page. Doing so will open a new set of options related to editing your document.
-
3
Click Track Changes. This option is at the top of the Word page, near the middle of the screen. Clicking it will enable Microsoft Word’s «Track Changes» feature.
-
4
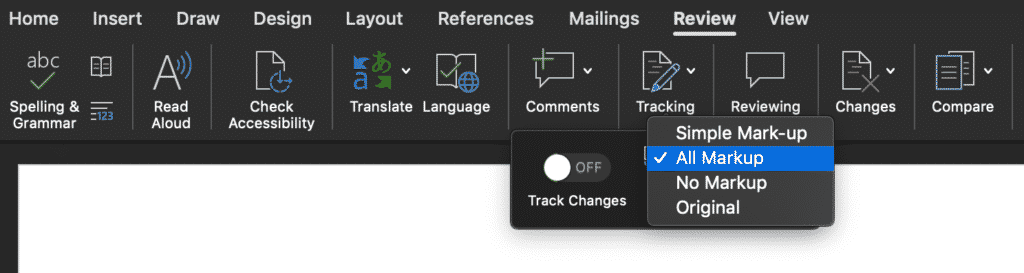
Click the drop-down box next to Track Changes. Doing so will present you with the following editing options:
- Simple Markup — Draws a vertical red line on the far left side of any added or deleted text, but shows no other edits.
- All Markup — Displays all changes you make to your document in red text and comment boxes on the left side of the page.
- No Markup — Displays your changes in addition to the original document, but no red text or comment boxes appear.
- Original — Displays the original document without your changes.
-
5
Click All Markup. This option allows you to leave comments for other users to review if need be.
-
6
Click and drag your cursor across some text. This will highlight the text. You’ll want to highlight everything on which you wish to leave a comment (e.g., an entire sentence or paragraph).
-
7
Click the New Comment button. It’s near the center of the «Review» row of tools at the top of the Word window.
-
8
Type in your comment. It will appear on the right side of the Microsoft Word window.
-
9
Click anywhere on the document. Doing so will cement your comment, allowing you to move on to the next section of text that needs commenting.
- Be sure to save your document before closing to make sure that your comments are preserved.


Advertisement
-
1
Double-click a Word document you wish to change. Doing so will open the document in Microsoft Word.
-
2
Click the Review tab. It’s in the blue section at the top of the document’s page. Doing so will open a new set of options related to editing your document.
-
3
Click Track Changes. This option is at the top of the Word page, near the middle of the screen. Clicking it will enable Microsoft Word’s «Track Changes» feature.
-
4
Click the drop-down box next to Track Changes. Doing so will present you with the following editing options:
- Simple Markup — Draws a vertical red line on the far left side of any added or deleted text, but shows no other edits.
- All Markup — Displays all changes you make to your document in red text and comment boxes on the left side of the page.
- No Markup — Displays your changes in addition to the original document, but no red text or comment boxes appear.
- Original — Displays the original document without your changes.
-
5
Click All Markup. This option allows you to leave comments for other users to review if need be.
-
6
Click Ink Comment. It’s in the top-right corner of the «Comments» section of the toolbar at the top of the page.
-
7
Write your comment. You’ll do so in the pane on the right side of the page.
- If your computer doesn’t have a touchscreen, you can click and drag the mouse to draw.
- The horizontal lines in the pane will disappear when you submit your comment.
-
8
Click or tap anywhere on the document. Doing so will cement your comment, allowing you to move on to the next section of text that needs commenting.
- Be sure to save your document before closing to make sure that your comments are preserved.


Advertisement
-
1
Double-click an edited Word document. Doing so will open the document in Microsoft Word.
-
2
Hover the cursor over a comment. You’ll see a couple of options appear below the comment.
-
3
Click Reply. It’s the leftmost option below your selected comment.
-
4
Type in your reply. It will appear indented below the original comment.
-
5
Click anywhere on the document. Doing so will cement your reply to the comment.


Advertisement
Ask a Question
200 characters left
Include your email address to get a message when this question is answered.
Submit
Advertisement
-
You can click Resolve below a comment to remove it from the right-hand editing pane.
Thanks for submitting a tip for review!
Advertisement
About This Article
Article SummaryX
1. Open a Word document.
2. Highlight text on which you wish to comment.
3. Right-click the highlighted text.
4. Click New Comment.
5. Type in your comment.
6. Click anywhere in the document.
Did this summary help you?
Thanks to all authors for creating a page that has been read 510,153 times.
Is this article up to date?
Add, Edit or Remove Links or Hyperlinks in Word Documents
by Avantix Learning Team | Updated October 14, 2022
Applies to: Microsoft® Word® 2010, 2013, 2016, 2019, 2021 and 365 (Windows)
You can easily add links or hyperlinks in Microsoft Word documents to add interactivity and make it easy for users to click a link to jump to another location in your document, to another file or web page or even to an email. You can also edit hyperlinks and remove individual hyperlinks or all hyperlinks.
Hyperlinks are often used to:
- Take the user to an external website.
- Take the user to another document or file on the same network or another place in the same document.
- Add a layer of text information over a word or phrase.
Hyperlinks can be displayed as full source URLs or internet addresses such as http://abccompany.ca, as descriptive text, as an image or as a drawing object.
Text as a hyperlink appears underlined and in a color (normally blue) and coordinates with the color theme in your document. In Word, the text color changes automatically after you Ctrl – click hyperlink text. Hyperlink objects do not change color.
Recommended article: 3 Microsoft Word Tricks to Keep Text Together
Do you want to learn more about Word? Check out our virtual classroom or live classroom Word courses >
Insert a hyperlink automatically
You can insert hyperlinks to web sites by typing the address of an existing web page (such as https://abccompany.com) and then pressing Enter or Spacebar. Word will automatically convert the text to a hyperlink using AutoCorrect.
Insert a hyperlink to an existing web page
To insert a hyperlink to an existing file or web page:
- Click where you want to insert a hyperlink or select the text, shape or image you want to use as a hyperlink.
- Click the Insert tab in the Ribbon.
- In the Links group, click Link or Hyperlink. The Insert Hyperlink dialog box appears.
- Under Link to, select Existing File or Web Page.
- If you are using a text hyperlink, enter the descriptive text that will become the link text in the Text to display field.
- In the Address field, enter or choose the address or location where the link should lead. For external references, enter or copy the URL in the Address field.
- Click OK.
You can also press Ctrl + K to insert or edit a hyperlink.
Below is the Hyperlink dialog box:

Insert a hyperlink to an existing file
To insert a hyperlink to an existing file:
- Click where you want to insert a hyperlink or select the text, shape or image you want to use as a hyperlink.
- Click the Insert tab in the Ribbon.
- In the Links group, click Link or Hyperlink. The Insert Hyperlink dialog box appears.
- Under Link to, select Existing File or Web Page.
- If you are using a text hyperlink, enter the descriptive text that will become the link text in the Text to display field.
- In the Look in field, click the down arrow and select the desired location. Navigate to the appropriate drive and folder and then double-click the file.
- Click OK.
Use relative or absolute hyperlink addresses to external files
If you are creating hyperlinks to external files, it’s important to understand the difference between a relative and absolute address. A relative hyperlink uses the address relative to the address of the containing document whereas an absolute hyperlink uses the full address of the destination document including the drive location.
The following example uses an absolute hyperlink address (full path address):
C:DocumentsJanuaryBudget.docx
The following relative hyperlink contains only the relative address or path to a Budget document.
JanuaryBudget.docx
You may want to use a relative hyperlink address or path if you want to move or to copy your files to another location such as another server.
Create a hyperlink using the context menu
Another method of creating or editing hyperlinks is to right-click and use the context menu (you can also press Shift + F10 to display the context menu).
To insert a hyperlink using the context menu:
- Click where you want to insert a hyperlink or select the text, shape or image you want to use as a hyperlink.
- Right-click and choose Link or Hyperlink from the menu. The Insert Hyperlink dialog box appears.
- Select the appropriate button under Link to. If you are creating an external link to a webpage or another document, select Existing File or Web Page. If you are creating an internal link within the document, select Place in This Document.
- If you are using a text hyperlink, enter the descriptive text that will become the link text in the Text to display field.
- In the address field, enter or choose the address or location where the link should lead. For external references, enter or copy the URL in the Address field. For place in the same document, select the appropriate item.
- Click OK.
Insert a hyperlink to a location in the same document
To create a hyperlink to a bookmarked location in the same Word document:
- Select the location, text, image or shape that you want to use as the destination for the hyperlink.
- Click the Insert tab in the Ribbon and in the Links group, click Bookmark. A dialog box appears.
- In the Bookmark name box, type a unique name for the bookmark and then click Add. You may not use spaces in the name of a bookmark.
- Click where you wish to insert a hyperlink or select the text, shape or image you wish to use as a hyperlink.
- Right-click and choose Link or Hyperlink from the menu. The Insert Hyperlink dialog box appears.
- Under Link to, select Place in This Document.
- Select the bookmark that you want to use as the destination hyperlink. Microsoft Word has a default bookmark to jump to the top of the document.
- Click OK.
Below is the Bookmark dialog box in Microsoft Word:

To create a hyperlink to a built-in heading style in the same document:
- Click where you want to insert a hyperlink or select the text, shape or image you want to use as a hyperlink.
- Right-click and choose Link or Hyperlink from the menu. The Insert Hyperlink dialog appears.
- Under Link to, select Place in This Document.
- Select the heading that you want to use as the destination hyperlink. You must have applied built-in heading styles such as Heading 1, Heading 2, etc. in your document (normally through the Styles gallery in the Home tab in the Ribbon).
- If you are using a text hyperlink, enter the descriptive text that will become the link text in the Text to display field.
- Click OK.
In the following example, note both the headings and bookmarks that appear in the Hyperlink dialog box in a Word file that uses the built-in heading styles:

If you create a table of contents in Word using built-in heading styles, it normally contains hyperlinks to headings in the document. For more information, check out this article on Creating a Table of Contents in Microsoft Word.
Edit a hyperlink
To edit a hyperlink:
- Right-click the hyperlink.
- In the context menu, select Edit Hyperlink or Edit Link. The Edit Hyperlink dialog box appears.
- Select the desired options.
- Click OK.
You can also select a hyperlink and press Ctrl + K to edit it.
Add screen tips
You can include screen tip text that appears when you hover your cursor over a hyperlink.
To add screen tip text:
- Place your cursor over the hyperlink to which you want to add a screen tip.
- Right-click and select Edit Hyperlink or Edit Link from the drop-down menu. The Edit Hyperlink dialog appears.
- Click ScreenTip on the top right.
- Type your text in the ScreenTip text box.
- Click OK twice.
Below is the Hyperlink ScreenTip dialog box:

Jump to a hyperlink
Hyperlinks become active when you save your document as a PDF (portable document format) or web page (HTML) file and users will be able to simply click them. However, in Microsoft Word, to jump to a hyperlink, you will need to point to the hyperlink then Ctrl-click the link.
Remove a single hyperlink
To remove a hyperlink:
- Right-click the hyperlink you want to remove.
- In the context menu, select Remove Hyperlink or Remove Link.
Removing all hyperlinks
To remove all hyperlinks:
- Press Ctrl + A to select all.
- Press Ctrl + Shift + F9. All hyperlinks (and other fields) will be converted to text.
Hyperlinks can add a new dimension of interactivity to your Microsoft Word documents and when the files are saved in other formats such as PDF, they become active hyperlinks.
Subscribe to get more articles like this one
Did you find this article helpful? If you would like to receive new articles, JOIN our email list.
More resources
How to Hide Comments in Word (or Display Them)
How to Compress Images in Microsoft Word
3 Strikethrough Shortcuts in Microsoft Word
Related courses
Microsoft Word: Intermediate / Advanced
Microsoft Word: Designing Dynamic Word Documents Using Fields
Microsoft Word: Long Documents Master Class
Microsoft Word: Accessible Word Documents
Microsoft PowerPoint: Intermediate / Advanced
VIEW MORE COURSES >
Our instructor-led courses are delivered in virtual classroom format or at our downtown Toronto location at 18 King Street East, Suite 1400, Toronto, Ontario, Canada (some in-person classroom courses may also be delivered at an alternate downtown Toronto location). Contact us at info@avantixlearning.ca if you’d like to arrange custom instructor-led virtual classroom or onsite training on a date that’s convenient for you.
Copyright 2023 Avantix® Learning
Microsoft, the Microsoft logo, Microsoft Office and related Microsoft applications and logos are registered trademarks of Microsoft Corporation in Canada, US and other countries. All other trademarks are the property of the registered owners.
Avantix Learning |18 King Street East, Suite 1400, Toronto, Ontario, Canada M5C 1C4 | Contact us at info@avantixlearning.ca
You’re working on a Microsoft Word Document and can’t figure out how to see all of the comments at the same time.
This article will show you how to view all of the comments in your Word doc at the click of a button.
How to show all comment lines in your Word Document
Follow these 4 easy steps to view all comments:
- Open the Word document.
- In the toolbar, click Review.
- Find and click Tracking.
- Tick All Markups.
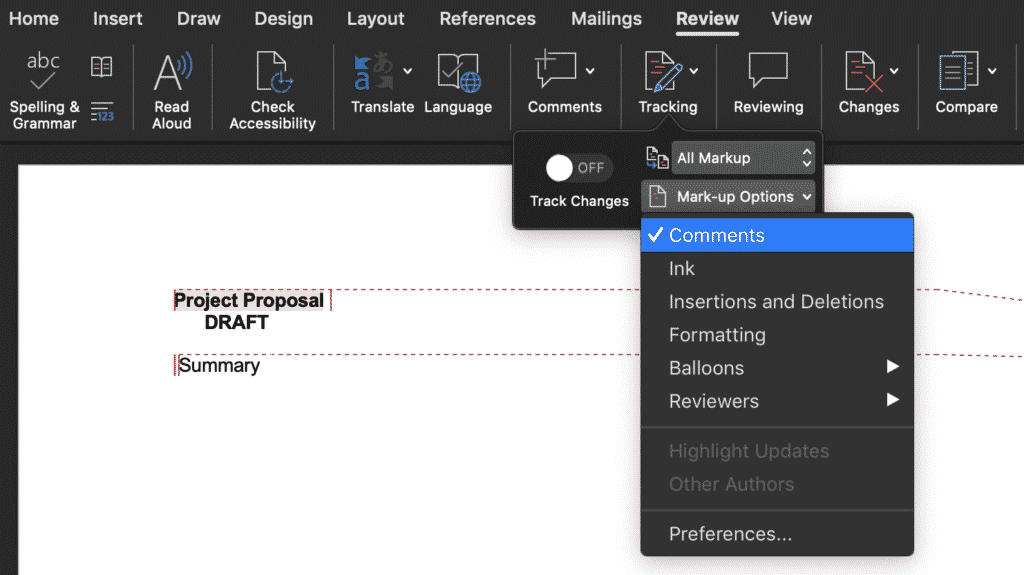
Only want to see the comments not all changes?
If your Microsoft Word Document is full of tracked changes, comments and formatting updates and you want to clear the air for comments only here’s how you do it:
- Open the Word document.
- In the toolbar, click Review.
- Find and click Tracking.
- Click Mark-up Options.
- Clear everything except Comments.
Need a better way to collaborate on Microsoft Word Documents?
You’re working on a word document with your team, each of you adding comments and tracking changes along the way. Then you realise two people have been working on the same document at once and you no longer have all of the changes in the one file.
You start googling ‘How to merge Word documents with comments?’ and think there has to be a better way!
Enter purpose-built tools, such as Simul Docs, designed to help you seamlessly collaborate on Microsoft Word documents with your team.
Simul Docs is an easy to use tool that works to keep track of a Word document as your team make edits. Automatically saving new versions each time the document is opened and edited, tracking all changes (even if you forget to turn track changes on).
Simul also recognises when two people are editing a document at the same time, saving each person’s changes in a separate ‘branch’ so no one’s work is overridden.

You can then ‘merge’ these two branches with the click of a button. Bringing both author’s changes back into the same document, allowing you to easily identify the differences. It’s that easy!

We like books. But one thing that you can’t do on paper is link to another book. On that level at least, electronic media has a distinct advantage. And with Microsoft Word, it’s easy to add a hyperlink in a document.
But how does this work? In this post, we look at how to add a link in Microsoft Word, as well as how to edit and remove hyperlinks in a document.
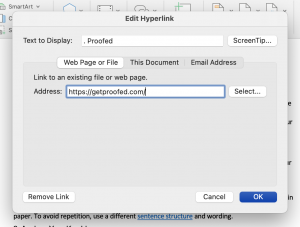
How to Embed a Hyperlink in a Document
Whether you’re writing website copy, where hyperlinks enable navigation, or simply adding links to useful internet resources in a document, Microsoft Word makes it simple. For instance, if you type a web address and hit space or return, MS Word will automatically format it as a link.
However, most of the time, you’ll want to embed a link in the text. To do this:
- Highlight the text you want to use as a link
- Go to Insert > Links > Link (or right click the text and select Link)
- Type the URL for the link destination into the Address field
- Click OK to create your hyperlink
Link options in the contextual menu.
The highlighted text will then become a hyperlink.
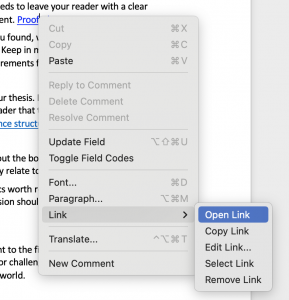
To test the link, hold CTRL and left click (or right click and select Open Hyperlink). This will open the destination in your default web browser.
You can use this same process to link to another file on your computer.
To link to a file, simply select it via the Insert Hyperlink menu and click OK. Keep in mind, though, that this link will only work on your computer/network, since this is where the destination file is stored.
How to Edit Hyperlinks
You can edit a hyperlink in the same way as you would any text in a document: simply place the cursor in the hyperlinked text and type.
Find this useful?
Subscribe to our newsletter and get writing tips from our editors straight to your inbox.
Alternatively, if you right click the link you can select Edit Hyperlink. In the window that opens, you can then change both:
- The text that will be used for the hyperlink
- The destination of the link (i.e., file path or URL)
If you then click OK when you’re done, the link will be updated automatically.
How to Format Hyperlinks
By default, Microsoft Word formats links with blue, underlined text. However, you can edit hyperlinks with the standard formatting options, so you can use these to change the appearance of any links in a document.
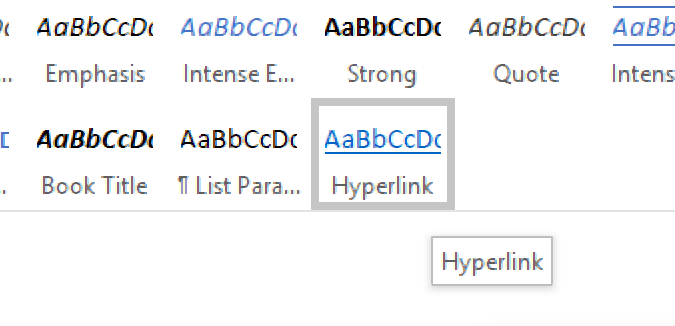
And if you want to change the default hyperlink style, simply:
- Open the Styles menu
- Find the style named “Hyperlink”
- Right click the style name and select Modify…
- Apply any formatting options as required and click OK
This will update the default hyperlink formatting, including any links you had added to the document previously. And if you then add more new links while editing, they will all use your updated hyperlink formatting.
How to Remove a Hyperlink in Microsoft Word
To remove a hyperlink from document, you can simply delete it. But this will also remove the text you’d formatted as a link.
To remove a link and keep the text, though, you have two options.
- Go to Insert > Links > Link and select Remove Link in the menu
- Right click the link and select Remove Hyperlink from the menu
MS Word will then remove the link and any formatting from the selected text.
Proofreading Hyperlinks
If you have a document containing hyperlinks, why not submit it for proofreading? As well as checking your spelling, grammar and punctuation, we can make sure your links work properly, saving you from encountering any unfortunate “404 Error – Page Not Found” messages when it counts.