
Word for Microsoft 365 Word for Microsoft 365 for Mac Word 2021 Word 2021 for Mac Word 2019 Word 2019 for Mac Word 2016 Word 2016 for Mac Word 2013 Word 2010 Word 2013 Developer Word Starter 2010 More…Less
Sometimes, putting a border around text will work better in your document than inserting a text box or a one-cell table, to achieve a similar look.
-
Select a word, line, or paragraph.
-
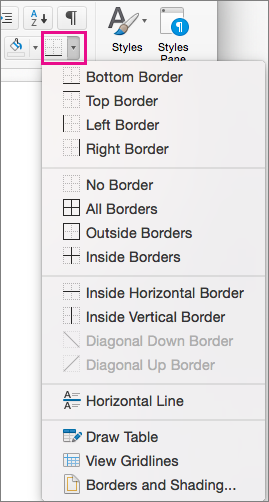
Go to Home > Borders, and then open the menu of border choices.

-
Choose the type of border you want:
Customize the border
-
After you’ve selected your text and found the basic type of border you’d like, open the Borders menu again, and choose Borders and Shading.
-
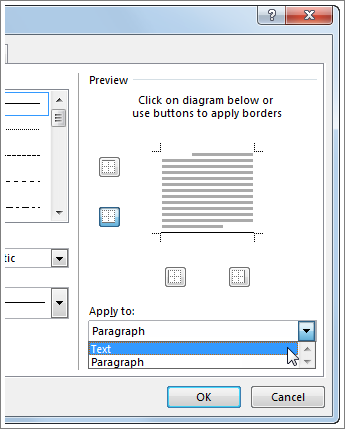
Make your choices for style, color, and width, and then apply the choice with the buttons in the Preview section of the dialog box. When the preview is the way you want it, click OK.
Note: Make sure that the Apply to box has the correct setting: Text or Paragraph.
See Also
Add, change, or delete borders from documents or pictures
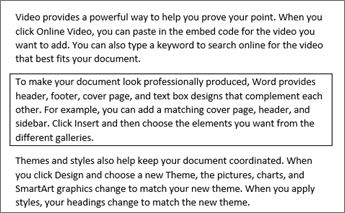
You can add a border to an individual word, a line of text, or an entire paragraph. You can make borders as plain or fancy as you want.
You can also add a border to a picture, put a border around a table, add a border to an individual page.
Add a border to selected text
-
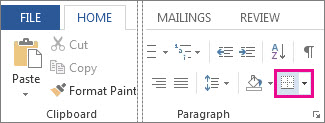
Select a word, line, or paragraph.
-
On the Home tab, click the arrow next to the Borders button.
-
In the Borders gallery, click the border style that you want to apply.
Customize the text border
-
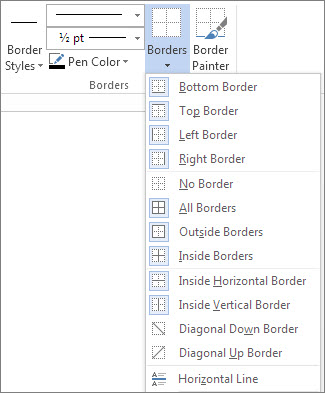
After you’ve selected your text and found the basic type of border you’d like, click the arrow next to the Borders button again, and then click Borders and Shading.
-
In the Borders and Shading dialog box, change Setting, Style, Color, and Width to create the border style that you want.
Note: To make sure the border style is correctly applied, set Apply to to Text or Paragraph. If you haven’t selected any text, you can only set Apply to to Paragraph.
-
Click OK to apply your selected border styles.
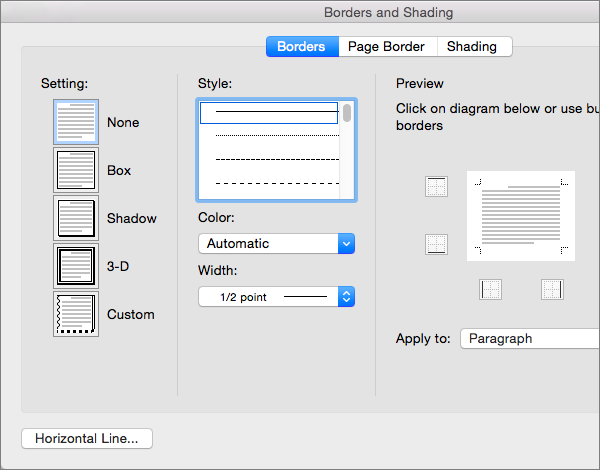
Tip: You can also fill the area of your selected text with color. In the Borders and Shading dialog box, click Shading to select a color and patterns. The color you pick in the Fill list fills the rectangular area; the color you select from the Color menu is applied to the rectangular area in a pattern you select from the Style list.
See Also
Add, change, or delete borders from documents or pictures
Add a border to a table
Need more help?
![]()
Download Article
![]()
Download Article
Want to create an outline around certain letters in your Word document? There are two easy ways you can surround words and phrases with colored outlines in Word—using Text Effects, and using Word Art. We’ll show you how to make any font in your Microsoft Word document stand out by outlining it in color.
-
1
Type the word or phrase you want to outline. The lines around your text will look better on larger characters, so make your font a bit larger than the rest of your text.
- You can make the letters any color you want before creating an outline around them. Just highlight the word or phrase, and then select a color from the «Font» panel at the top of Word.
-
2
Highlight the text you want to outline. Just click and drag the mouse around the text to select it.
Advertisement
-
3
Click the Text Effects and Typography tool. This is the «A» surrounded by a blue glowing outline in the «Font» panel at the top of Word.
- If you don’t see this icon, click the Home tab at the top of Word.
-
4
Select the Outline menu. Now you’ll see all of the options you can use to create an outline around the selected letters.
-
5
Select an outline color. To choose the color of the line that surrounds your text, choose one of the colors displayed on the menu, or select More Outline Colors… to select a custom color.
-
6
Use the Weight menu to select the thickness of the outline. The larger the number, the thicker the outline around the letters.
- If you go too thick, you might make the text unreadable. You can always undo the last action in word by pressing Control + Z (PC) or Command + Z (Mac).
-
7
Use the Dashes menu to stylize the outline. If you’d rather have a dotted, dashed, or otherwise stylized line around your word or phrase instead of a solid line, you can select any of the options in this menu.


Advertisement
-
1
Click the Insert tab at the top of Word. WordArt is a tool that can help you create all types of vibrant text designs, including color outlines. You’ll find it on the Insert tab.
-
2
Click the WordArt menu. It’s the icon of a tiled blue «A» on the Insert tab in Word. A menu with several text styles will appear.[1]
-
3
Select an outline style. Not all WordArt styles have outlines, but several do. Don’t worry about the colors you see in the sample—you’ll be able to change those if you don’t like them. Once you click a style, you’ll see some sample text appear on the page.
-
4
Replace the sample text with your own. The text you type will appear in the selected outline style.
-
5
Select the Shape Format tab. It’ll appear at the top of the screen while you’re editing WordArt. This tab should already be active, but if it’s not, click it now.
-
6
Click the small arrow at the bottom-right corner of the WordArt Styles panel. It’s at the top of Word. This expands the «Format Shape» panel on the right side of Word.
-
7
Click the Text Fill and Outline icon. It’s the «A» with a line under it in the right panel.
-
8
Click Text Fill to select a color. When you choose this option, you’ll be able to choose the color of the actual text—you can choose an outline color separately.
-
9
Click Text Outline to design your outline. On this menu option, you can select a color, width, and even pattern (such as dotted or dashed) for the lines that surround your letters.


Advertisement
Add New Question
-
Question
How do I outline text in Windows 10?

Under WordArt Tools, on the Format tab, in the WordArt Styles group, click Shape Outline, and then do one of the following: To add or change an outline color, click the color that you want. To choose no color, click No Outline.
Ask a Question
200 characters left
Include your email address to get a message when this question is answered.
Submit
Advertisement
Thanks for submitting a tip for review!
About This Article
Article SummaryX
1. Create or Open a Word document.
2. Type the text you want in outline.
3. Highlight the text.
4. Click on the «Text Effects» tool.
5. Click on Outline.
6. Customize the Outline effect.
Did this summary help you?
Thanks to all authors for creating a page that has been read 498,291 times.
Is this article up to date?
 Please Note:
This article is written for users of the following Microsoft Word versions: 2007, 2010, 2013, 2016, 2019, and Word in Microsoft 365. If you are using an earlier version (Word 2003 or earlier), this tip may not work for you. For a version of this tip written specifically for earlier versions of Word, click here: Using Text Boundaries.
![]()
Written by Allen Wyatt (last updated August 10, 2019)
This tip applies to Word 2007, 2010, 2013, 2016, 2019, and Word in Microsoft 365
If you work often in Print Layout view, you may find text boundaries helpful. These are dotted lines that appear in your document to mark the limits of text elements. For instance, when you use text boundaries, dotted lines appear around the margins of your text, as well as around headers, footers, footnotes, etc.
To control the display of text boundaries, follow these steps:
- Display the Word Options dialog box. (In Word 2007 click the Office button and then click Word Options. In Word 2010 or a later version, display the File tab of the ribbon and then click Options.)
- Click Advanced at the left side of the dialog box.
- Scroll through the options until you see the Show Document Content section. (You’ll need to scroll down a ways.) (See Figure 1.)
- Use the Show Text Boundaries check box to control whether Word uses text boundaries or not. Click on the check box to turn the feature on and off; a check in the box means it is enabled.
- Click on OK.
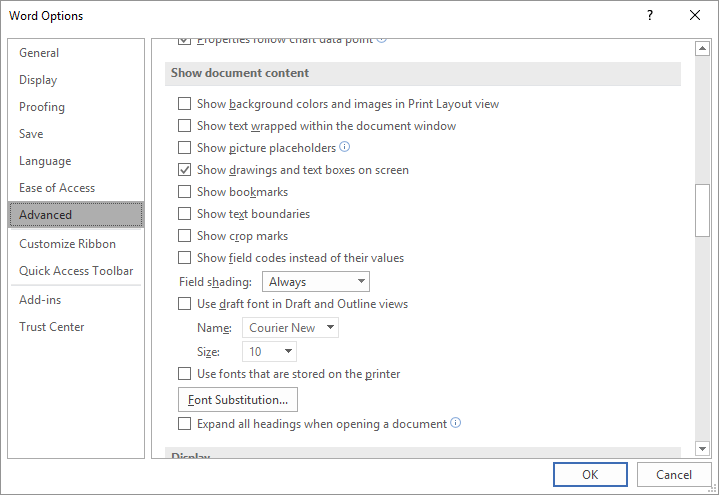
Figure 1. The Advanced options of the Word Options dialog box.
The way that text boundaries are implemented in Word has changed over time. In Word 2007 and 2010, when you turn text boundaries on you will generally see the boundary of the body of the page—in other words, you can see where your page margins are.
Beginning with Word 2013, text boundaries were modified to include paragraphs as an element of the page. This means that text boundaries show around each paragraph on the page. This has been frustrating to many users, but there is no way to «go back» to the old way of indicating text boundaries, as far as we’ve been able to figure out.
WordTips is your source for cost-effective Microsoft Word training.
(Microsoft Word is the most popular word processing software in the world.)
This tip (8840) applies to Microsoft Word 2007, 2010, 2013, 2016, 2019, and Word in Microsoft 365. You can find a version of this tip for the older menu interface of Word here: Using Text Boundaries.
Author Bio
With more than 50 non-fiction books and numerous magazine articles to his credit, Allen Wyatt is an internationally recognized author. He is president of Sharon Parq Associates, a computer and publishing services company. Learn more about Allen…
MORE FROM ALLEN
Using the Drawing Grid
One of the lesser-known drawing tools provided in Word is the drawing grid. You can easily turn this feature on and use …
Discover More
Avoiding the «Check Remainder» Dialog Box
Need to check grammar using a macro? Word includes a couple of different ways to perform the check, and what you see …
Discover More
Swapping Two Strings
Part of developing macros is learning how to use and manipulate variables. This tip examines a technique you can use to …
Discover More
More WordTips (ribbon)
Changing the Style Area Font
The style area, displayed at the left side of your document, can be helpful in understanding how styles are used in your …
Discover More
Turning Off Paste Options
Paste information into a document and you’ll immediately see a small icon next to the pasted information. This icon …
Discover More
Displaying the Ruler
The ubiquitous ruler appears at the top of every Word document. It is so commonplace, that you may forget that it is easy …
Discover More
How to create a border around text in Word
- Once the text is highlighted, click the Home tab.
- On the Home tab, click the down arrow on the border to get border options, like those shown in the picture.
- Select the type of border you want to use. If you want a single border around the text, click Outside Borders.
Contents
- 1 How do you put a box around text in Word?
- 2 How do I surround a textbox in Word?
- 3 How do I put a border around text in Word?
- 4 How do you put a border around text in Word?
- 5 How do I insert border in Word?
- 6 How do you put a box around a border in Word?
- 7 How do you make a lined text box in Word?
- 8 How do I turn a text box into a frame?
- 9 How do you insert a border line in Word?
- 10 How do I add a border to a box in Word?
- 11 How do you add a decorative border in Word?
- 12 How do I put a border around a paragraph in Word?
- 13 How do you outline text in Word?
- 14 How do you put a box around text in Word Online?
- 15 How do you put a border above text in Word?
- 16 How do you put a border around a text box?
- 17 How do you shade text in Word?
- 18 How do you text wrap in Word?
- 19 How do I hide the outline of a text box in Word?
- 20 Where is the Borders button in Word?
How do you put a box around text in Word?
Add a text box
- Go to Insert > Text Box, and then select Draw Text Box.
- Click or tap in the document, and drag to draw the text box the size that you want.
- To add text to a text box, select inside the text box, and then type or paste text. Notes:
How do I surround a textbox in Word?
Boxing text or paragraphs
Select the text you want to box in. Choose the Borders and Shading command from the bottom of the Border menu. The Borders and Shading dialog box appears. If you want to apply the border to only text (words) and not to the entire paragraph, choose Text from the Apply To drop-down list.
How to create a border around text in Word
- Once the text is highlighted, click the Home tab.
- On the Home tab, click the down arrow on the border to get border options, like those shown in the picture.
- Select the type of border you want to use. If you want a single border around the text, click Outside Borders.
How do you put a border around text in Word?
Add a border to selected text
- Select a word, line, or paragraph.
- On the Home tab, click the arrow next to the Borders button.
- In the Borders gallery, click the border style that you want to apply.
How do I insert border in Word?
Add a border to a page
- Go to Design > Page Borders.
- Make selections for how you want the border to look.
- To adjust the distance between the border and the edge of the page, select Options. Make your changes and select OK.
- Select OK.
How do you put a box around a border in Word?
Select the texts you will add borders, click Home > Borders > Borders and Shading. See screenshot: 2. In the Borders and Shading dialog box, select the Up, Down, Left and Right border boxes in the Preview section, select Text from the Apply to drop-down, and then click the OK button.
How do you make a lined text box in Word?
Place the insertion point where you want the ruling line (underlining). On the Format menu, click Font. In the Underline style box, select the line style you want, and then click OK. For every blank space you want to underline, press CTRL+SHIFT+SPACEBAR.
How do I turn a text box into a frame?
Converting a Text Box to a Frame
- Right-click on the text box. Word displays a Context menu.
- Choose the Format Text Box from the Context menu. Word displays the Format Text Box dialog box.
- Click on the Text Box tab. (See Figure 1.)
- Click on Convert to Frame.
- Click on OK.
How do you insert a border line in Word?
Inserting a line using the Borders button
- Select the paragraph(s) to which you want to add a line.
- Click the Home tab in the Ribbon.
- Click Borders in the Paragraph group. A drop-down menu appears.
- Select the line you want to use.
How do I add a border to a box in Word?
Add a border
- Open Microsoft Word.
- Click the Page Layout tab.
- In the Page Background group, click the Page Borders option.
- In the Borders and Shading window (shown below), if not already selected, click the Page Border tab.
- Select Box if you want a square border around your page.
How do you add a decorative border in Word?
To create a custom page border in Word:
- Open Word and click on the Design tab. Under Page Layout, click Page Borders. Click Page Border in the Borders and Shading window.
- Select the Custom option from the list of choices. This is when the real fun begins.
- Click OK to create the border.
How do I put a border around a paragraph in Word?
Adding Borders to Paragraphs
- Position the insertion point in the paragraph to which you want the border added.
- Display the Home tab of the ribbon.
- Click the down-arrow next to the Borders tool, in the Paragraph group.
- Choose Borders and Shading.
- Make sure the Borders tab is selected.
How do you outline text in Word?
Select your text or WordArt. Click Home > Text Effects. Click the effect you want. For more choices, point to Outline, Shadow, Reflection, or Glow, and then click the effect you want.
How do you put a box around text in Word Online?
Inserting a Text Box
- Make sure you can see, on your screen, the general area where you want to insert the text box.
- Make sure the Insert tab of the ribbon is displayed.
- Click on the Text Box tool in the Text group.
- Choose Draw Text Box.
- Position the crosshairs where you want the upper-left corner of the text box.
How do you put a border above text in Word?
- Open the Word document and scroll to the section with the line.
- Click the Insert tab, then click the “Text Box” button.
- Click inside the text box to type any text you want above the line.
- Handwrite any text you want to appear above the line.
- Click the orange Text Box Tools tab, then click the “Shape Outline” menu.
How do you put a border around a text box?
Add a custom border
- Right-click the text box, AutoShape, picture, or object that you want to add the border to.
- Select the appropriate Format

When you need to highlight a portion of text, it’s not always convenient to use a text box. To emphasize a paragraph while keeping it within the main content, you can put a border around that text in Word instead.
You can put a border around specific text, such as a single sentence, or an entire paragraph. Let’s look at how to do both as well as customize the border.
Select the text you want to surround with a border and go to the Home tab. Click the drop-down arrow next to Borders and choose “Borders and Shading.”

Use a Setting option on the left or the buttons below Preview on the right to add the border around the text. You can also adjust the Style, Color, and Width settings in the center of the window to customize the line for the border.
RELATED: How to Add Borders to or Change Borders on a Table in Word
In the Apply To drop-down box on the right side, select “Text” and when you finish, click “OK” to apply the border.
You’ll then see your text outlined with a border.
Put a Border Around a Paragraph
If you have an entire paragraph you’d like to place a border around, the process is similar. However, you have a few extra customization options.
RELATED: How to Put Borders Around Images in Microsoft Word
Select the paragraph you want to surround with a border and head to the Home tab. Click the Borders drop-down arrow and pick one of the quick border options such as Outside Borders or All Borders.
This places the border around the paragraph from margin to margin on each side and gives you a fast way to add the border. But you can also customize the border and adjust the space between the border and the text.
Select the bordered paragraph, click the drop-down arrow next to Borders on the Home tab, and choose “Borders and Shading.”
Like with customizing the border for specific text, you can change the Style, Color, and Width for the border line. Confirm that “Paragraph” is selected in the Apply To drop-down box. Then, to adjust the spacing, click “Options” on the right side of the window.
At the top, use the arrows or enter the number of points for the spacing on the top, bottom, left, and right of the border in relation to the text. As you make the changes, you’ll see a preview directly below. Click “OK” when you finish.
Make any other adjustments you want in the Borders and Shading window and click “OK” when you’re done to apply the border.
RELATED: How to Change Page Margins in Word
Remove a Border From Text in Word
If you decide later to remove a border you’ve added, it takes only a few clicks. Select the text or paragraph containing the border and revisit the Home tab. Click the drop-down arrow next to Borders and pick “No Border.”
Text boxes in Word are great ways to call out portions of text. But if you want to keep your text in line with the rest and simply highlight a small piece, consider surrounding it in a border. For other types of borders, take a look at how to create a page border in Word.
READ NEXT
- › How to Outline Text in Adobe Photoshop
- › How to Mirror or Flip Text in Microsoft Word
- › HoloLens Now Has Windows 11 and Incredible 3D Ink Features
- › Google Chrome Is Getting Faster
- › BLUETTI Slashed Hundreds off Its Best Power Stations for Easter Sale
- › How to Adjust and Change Discord Fonts
- › This New Google TV Streaming Device Costs Just $20
- › The New NVIDIA GeForce RTX 4070 Is Like an RTX 3080 for $599
How-To Geek is where you turn when you want experts to explain technology. Since we launched in 2006, our articles have been read billions of times. Want to know more?
Insert Lines in Microsoft Word Documents
by Avantix Learning Team | Updated October 9, 2021
Applies to: Microsoft® Word® 2010, 2013, 2016, 2019 and 365 (Windows)
You can insert a line in Word using the Ribbon or by using keyboard shortcuts. It’s best to avoid drawing lines and instead insert border lines in Microsoft Word (normally paragraph borders) so the line or lines will move as you edit the document.
In this article, we’ll focus on inserting lines using borders attached to paragraphs. In Microsoft Word, anything with a hard return after it is a paragraph. If you use border lines, you can customize the type of border, line thickness and color. You can also include paragraph border lines in styles so they will appear throughout your document. If you draw lines using Insert Shapes, you’ll have to worry about the line being inline or floating.
You can insert a line in Word in 3 ways using borders:
- Use the Borders command on the Home tab in the Ribbon
- Select and apply different types of lines using the Borders and Shading dialog box
- Insert different types of lines using keyboard shortcuts (which add lines using AutoCorrect)
Recommended article: How to Keep Text Together in Microsoft Word
Do you want to learn more about Microsoft Word? Check out our virtual classroom or live classroom Word courses >
Inserting a line using the Borders button
To insert a line in Word above and / or below a paragraph using the Borders button:
- Select the paragraph(s) to which you want to add a line.
- Click the Home tab in the Ribbon.
- Click Borders in the Paragraph group. A drop-down menu appears.
- Select the line you want to use.
Below is the Borders command in the Ribbon in Word:
![]()
Removing lines using the Borders command
To remove a border line or lines from one or more paragraphs:
- Select the paragraph(s) with the border lines you want to remove.
- Click the Home tab in the Ribbon and then click Borders. A drop-down menu appears.
- Choose No Border from the drop-down menu.
Inserting a line using the Borders and Shading dialog box
You can apply a line or custom border lines to one or more paragraphs using the Borders and Shading dialog box.
To insert a line in Word above and / or below a paragraph using the Borders and Shading dialog box:
- Select the paragraph(s) to which you want to add a line.
- Click the Home tab in the Ribbon.
- Click Borders in the Paragraph group. A drop-down menu appears.
- Select Borders and Shading. A dialog box appears.
- Select a border style, color and width.
- Click between the guides in the sample area on the right (above or below the sample).
- Click Options (if required), enter any offset amounts to control the distance between the line and the paragraph and click OK.
- In Apply to, ensure Paragraph is selected.
- Click OK.
Below is the Borders and Shading dialog box where you can add a line or lines to paragraphs:

Removing lines using the Borders and Shading dialog box
To remove lines from one or more paragraphs using the Borders and Shading dialog box:
- Select the paragraph(s) with the lines you want to remove.
- Click the Home tab in the Ribbon and click Borders. A drop-down menu appears.
- Select Borders and Shading. A dialog box appears.
- Click None in the Setting area.
- In Apply to, ensure Paragraph is selected.
- Click OK.
Inserting a line using keyboard shortcuts
You can also insert a horizontal line using keyboard shortcuts (which insert border lines as AutoCorrect entries).
Type the following characters and then press Enter or Return to insert lines:
- To insert a plain single line, type three hyphens (—).
- To insert a plain double line, type three equal signs (===).
- To insert a dotted line, type three asterisks (***).
- To insert a bold single line, type three underlines (___).
- To insert a wavy line, type three tildes (~~~).
- To insert a triple line, type three number signs or hash tags (###).
To remove these lines, select the paragraph with the line, click the Borders button on the Home tab and select No Border.
Subscribe to get more articles like this one
Did you find this article helpful? If you would like to receive new articles, join our email list.
More resources
How to Double Space in Word (4 Ways)
14 Shortcuts to Quickly Select Text in Microsoft Word
4 Ways to Insert or Type the Pound Symbol in Word (£)
How to Create a Hanging Indent or First Line Indent in Microsoft Word
How to Insert an Em or En Dash in Microsoft Word (4 Ways with Shortcuts)
Related courses
Microsoft Word: Intermediate / Advanced
Microsoft Excel: Intermediate / Advanced
Microsoft PowerPoint: Intermediate / Advanced
Microsoft Word: Long Documents Master Class
Microsoft Word: Styles, Templates and Tables of Contents
Microsoft Word: Designing Dynamic Word Documents Using Fields
VIEW MORE COURSES >
Our instructor-led courses are delivered in virtual classroom format or at our downtown Toronto location at 18 King Street East, Suite 1400, Toronto, Ontario, Canada (some in-person classroom courses may also be delivered at an alternate downtown Toronto location). Contact us at info@avantixlearning.ca if you’d like to arrange custom instructor-led virtual classroom or onsite training on a date that’s convenient for you.
Copyright 2023 Avantix® Learning
Microsoft, the Microsoft logo, Microsoft Office and related Microsoft applications and logos are registered trademarks of Microsoft Corporation in Canada, US and other countries. All other trademarks are the property of the registered owners.
Avantix Learning |18 King Street East, Suite 1400, Toronto, Ontario, Canada M5C 1C4 | Contact us at info@avantixlearning.ca
Whether you want to separate your text into two columns or create a border around your text, learning how to insert a vertical line in Word is useful.
A few days back, we shared how to insert a horizontal line. In this post, we will share simple techniques to insert a vertical line.
Learning this function is especially beneficial for creating newsletters or pages of a newspaper, as you would have to separate the text into different columns.
- Using shapes
- Adding a paragraph border
- Adding a page border
- Adding a bar tab
- Adding columns
Let’s get started.
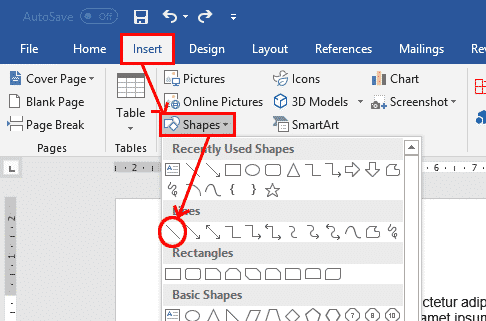
Method 1: Using shapes
The most basic method of adding a vertical line in Word is by using the Shapes tool. The benefit of this method is that you can choose the type of line you want to add (e.g. a line with an arrow) and you can insert it anywhere on the page.
Step 1: Open your Word document.
Open an existing document or create a new one using one of the several templates Word offers.

Step 2: Click on the Insert tab.
This tab is located between the Home and Draw tabs. Click on it to find the different types of items that you can insert in your document.

Step 3: Click on the Illustrations button.
The Illustrations button is between the Table and Add-ins buttons. When you click on it, you will see the Shapes option.

Step 4: Click on the Shapes option.
You have several options for shapes. The second row consists of the different types of lines you can add in your document.

Step 5: Choose a line template.
Choose the line template that you would like to add to your document. For example, you can choose the straight line with no arrows or the line with an arrow at only one of the ends.

Step 6: Draw the line.
Click on the line that you would like to draw then drag the pointer across the page. To ensure that your line is vertical, press the Shift key on your keyboard as you’re drawing the line.

You can insert this line anywhere in your document, even next to the text on the page and on it.


Method 2: Adding a paragraph border
The next method of adding a vertical line in your Word doc is by adding a border. You can try this method if you just want to add borders to your page and don’t want to insert a vertical line in the middle of the page.
Step 1: Click on the Home tab.
The Home tab is the default tab that you’re on when you open your Word document.
However, if you’re on a different tab, click on the Home tab to add the borders.

Step 2: Click on the Borders option.
The Borders option is located in the third group in the Home tab. You will find it among other tools like the Spacing and Fill tools.

Once you click on this option, you will see the different options you have for borders.

Step 3: Choose one or more border types.
The two types of vertical borders you can choose are left and right borders. Pick one or both of them depending on how you want to format your text.
This is how the page looks with only the left border:

This is how it looks with only the right border:

And finally, this is how it looks with both borders:

Alternative Step 3: Choose the Borders and Shading option to create a custom border.
Word also gives you the freedom to create a border of your choice. Click on the Borders and Shading option from the drop-down menu.

This will open up a box where you can customize your border.

You can change the style of your border by choosing from several options, including dotted and wavy styles. You can also change the color and width of your border to anything you want- the sky’s the limit!

A great thing is that you can preview what your vertical border is going to look like before making a selection. You can make sure that you’re only adding vertical borders by deselecting the top and bottom options.

Here’s a look at an example of a custom border:
Note that this line moves along with your paragraphs: so, it will extend if you add more paragraphs and shorten if you delete any paragraphs.
Method 3: Adding a page border
The borders that we discussed so far are paragraph borders. They only apply to the individual paragraphs on the page. In this section, we will learn how to apply borders to the entire page.
Step 1: Click on the Borders option.
Once again, you have to open the drop-down menu by clicking on the Borders option in the Home tab.
Step 2: Select the Borders and Shading option and go to Page Border.
The second option at the top of the box is Page Border. Click on this.

Step 3: Customize your page border.
Similar to the paragraph border, you can customize the style, color, and width of your page border as well. You can deselect the top and bottom options to make sure that you’re only adding vertical lines.

One really interesting option you have in this case is the Art option. Instead of having simple vertical lines, you can choose an icon to add as a border.

Here’s a tacky example:

Again, you can choose from several different options and preview your border before making a selection.
Method 4: Adding bar tabs
You can also use the Tab tool to add a vertical line in your Word documents. You can add these tabs anywhere in your document.
Step 1: Make sure that you can see the ruler.
Having the ruler visible will help you find the right position for your tabs. If it isn’t already, you can show your ruler by going to the View tab and checking the Ruler box.

Step 2: Open the Line and Paragraph Spacing dialog box.
Go to the Home tab and click on the Line and Paragraph Spacing button. There, you will find Line Spacing Options. Click on this to open a dialog box.


Step 3: Click on Tabs.
At the bottom left corner of the box, you can see the Tabs option.

Step 4: Click on Bar and customize other features of your bar tab.
In the Alignment section, choose the Bar option. You can also change the other features of your bar tab, such as the Tab Stops. You can use the ruler to figure out the right stops for your bar tab.
For example, assuming that your text starts at 0, you can enter -0.5 to insert a bar tab to the left of the text and 7 to insert it to the right of the text.
This type of vertical line is also applied to the paragraphs, so its length changes with the length of the paragraphs on the page.
Method 5: Adding columns
You can also organize your text into columns and insert lines between the columns.
Step 1: Click on the Layouts tab.
This tab is located between the Design and References tabs. Click on it.

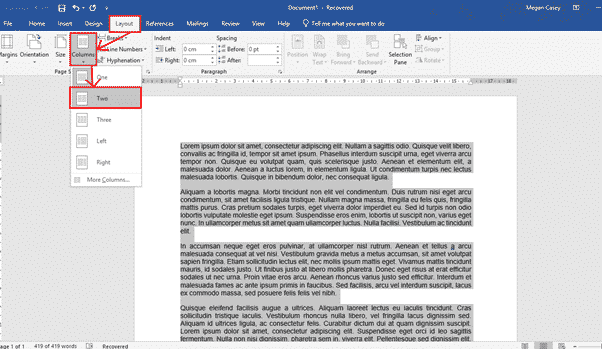
Step 2: Click on the Columns button.
This button is at the top left corner of the page. It will open up a drop-down menu. Click on the More Columns option and add the number of columns that you would like to divide your text into. Then, click on the Line Between option.

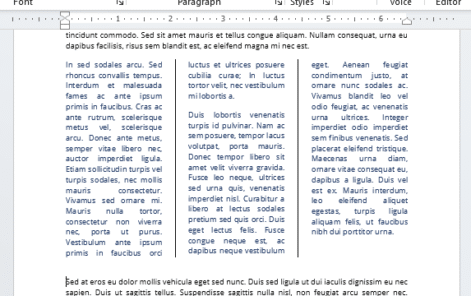
Your text may look something like this:

Conclusion
So there you have it- five methods that you can use to add a vertical line in your Word doc. It’s always useful to learn more than one method as you never know when they may come in handy.
There are at least five six ways to add a vertical line in Word. Vertical lines can help accentuate a piece of text in Word, but knowing how to add them is not as intuitive as adding a horizontal line.
- Adding a border
- Or a Page Border
- Using the shape tool
- Adding a bar tab
- Adding lines to columns
- Add lines either side of text
These are most common options available. With all the features in Word there are other more complicated choices. We thought of four more vertical formatting tricks in Word
Adding a Border
Add a vertical line next to a paragraph is to simply add a side border to the paragraph.
Highlight the paragraph you wish to add a line to, go to Home | Paragraph, and click the Borders dropdown.

This gives you options to insert borders in various locations. To insert a vertical line to the left or right of the text, select Left Border or Right Border.
The Left or Right border options insert a plain black line next to the text. If you want to have more control over the color or style of your line, instead select Borders and Shading at the bottom of the list.
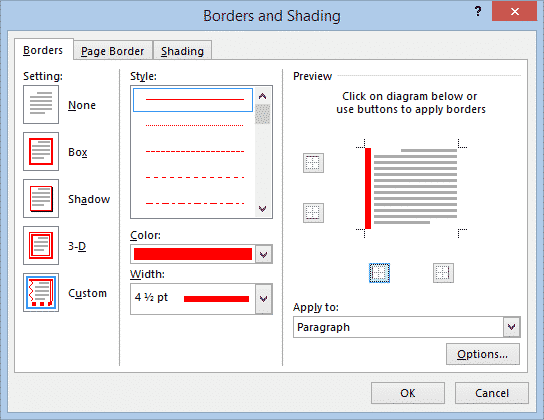
Custom Borders
Click Custom on the left-hand side of the dialog box, to enable you to choose individual borders to add. In the middle section, you can select the style, color and width of the line. On the right-hand side, click the box to indicate where you want the border to appear (top, bottom, left or right). The preview will give you an indication of how your line will appear.
Note that the boxes for the border positions are toggle keys, so if a border that you don’t want is appearing in the preview, just click the appropriate box to remove it.
A line inserted by this method is anchored to the paragraph(s) it is applied to and will move if you move a paragraph.
Add a Page Border
The same thing can be done at the page level.
Design | Page Background } Page Borders | Page Border.

Like a paragraph border, select the style of border you want then click the Preview sides. Remove the top and bottom borders, leaving left or right depending on your needs.
To add a vertical line using the shape tool, go to Insert | Shapes and select the Line tool.
Place the cursor where you want the line to start, and drag to where you want the other end of the line to be. Holding the Shift key while you drag will ensure that the line is straight.
Once you have finished creating the line, the Format tab becomes live on the ribbon, where you can change the color, shape and style of the line.
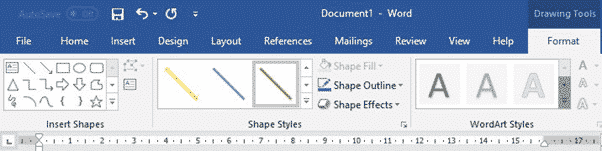
Click the Layout button next to the line to see options regarding how you want the line to interact with your text.
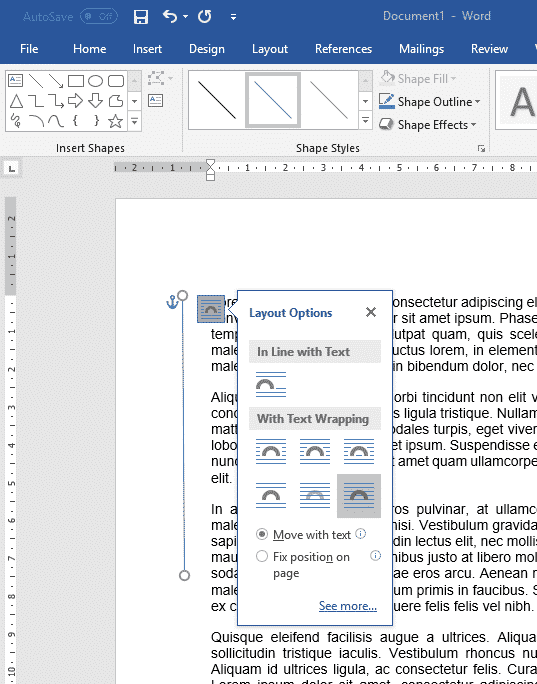
To move or resize the line, grab one of the end points and move it. If you hold the Control key while you move, both ends of the line will move as if around a fulcrum.
Adding a Bar Tab
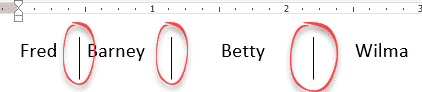
Another way to add a vertical line to text is to use the Tab feature, but instead of inserting a tab, you will add a ‘bar’ or vertical line. Bar tabs are the lesser known Tab formatting option which separate tabbed items with a visible bar like this:
The shape tool can be used to add a line in any location and of any length, a bar tab can only be applied to whole paragraphs.
Make the ruler is visible at the top of your document, to help you find the correct position for the bar tab. If you cannot see the ruler, go to View | Show, and tick the Ruler box.
To insert a bar tab, select the paragraphs that you want the bar to appear beside, go to Home | Paragraph and open the Paragraph dialog box. Then click the Tabs button at the bottom of the dialog box.
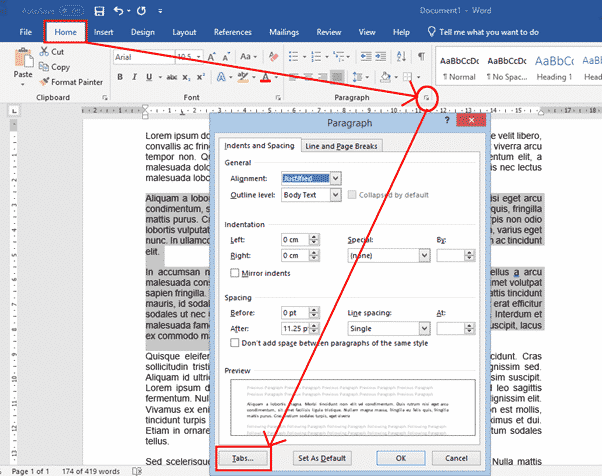
Tab Stop Positions
In the Tab Stop Position box, enter the position where you want the line to appear. You can use the ruler at the top of the screen to work out what value to enter. In the example pictured, the text starts at 0 on the ruler, so if you want the line to appear to the left of the existing text, you may enter “-0.5”. If you want it to appear to the right of the text, you may enter “17”.
Then select Bar under Alignment and click OK.
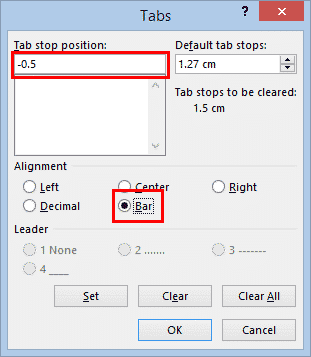
With the values entered in the above figure, the text would then look like this:
Note that a line inserted by this method is anchored to the paragraph(s) it is applied to. If you move a paragraph around, the line will go with the paragraph to its new location.
If you wish to later delete the line, highlight the paragraph, open the tab dialog again and click Clear.
Adding Lines to Columns
If you are arranging your text into columns, you can insert a vertical line between the columns.
To arrange your text into columns, select the text, go to Layout | Columns and select the number of columns you want.
Now that your text is arranged into columns, click anywhere within the columns, and go to Layout | Columns again, but this time select More Columns at the bottom of the list. In the dialog box, simply tick the Line Between box, and click OK.

Vertical lines either side of text
One way to put vertical lines on both sides of text is to add empty columns either side using Layout | Breaks | Column Break. Three column breaks will do the job, two to make empty columns plus one at the bottom of the middle text column.
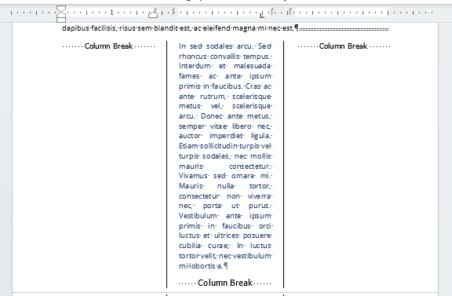
Note that if you wish to add a line to the left or right of the columns, this can be done using any of the other methods described above.
See Color the Column dividing line in Word
Four more vertical formatting tricks in Word
Word’s Position and Wrap Text features help arrange images and text on the page. Position features automatically place the object at the location of your choice on the page (see how to position figures in Word for more details). Text Wrap features determine how text wraps around an image or other objects on the page, depending on the chosen option.
Wrap Text features work for figures in a Word document (see text wrapping for tables). Figures in Word mean any visual objects except tables and equations. So, using the same Wrap Text features can be used for images, ClipArt objects, charts, text boxes, diagrams, and SmartArt objects.
Change text wrapping
By default, Word inserts (see examples below):
- Pictures (images and photos), charts in line with the text.
- Text boxes, shapes in front of the text.
- WordArt objects behind the text.
To change the way how text should wrap the object, select it, then do one of the following:
- On the Picture Format (Shape Format, Graphics Format) tab, in the Arrange group, click the Wrap Text button:

- Right-click on the object, then choose Wrap Text in the popup menu:

or

- Click the Layout Options button that appears next to the selected figure:


From the Wrap Text list, choose the option you prefer:
- In Line with Text places an object in a paragraph on the same line as the surrounding text. The text does not wrap around it.

- Square wraps the text around the picture or shape on all sides at right angles (a square pattern) as if it is rectangular. The text fills the remaining rectangular region.
This option is the most common form of text wrapping.

- Tight wraps the text around the edges of the figure. The text follows the shape.
This option is most useful for larger images covering most of the page width.

- Through wraps the text around the picture or shape edges, including any white gaps. If there is no white space in the image or shape, text wrapping works the same as Tight.
This option is an advanced setting because you pull or drag image and shape points in and out of their original borders:
See how to edit hyphenation points.
- Top and Bottom wraps the text above and below the figure to keep the image on its line. There is no text on either side of it.
- Behind Text places the figure behind, or underneath, any existing text. The text does not wrap around it.
The picture looks like a watermark or background image.
Note: Use the Selection pane when working with objects behind the text.
- In Front of Text places the object on top of the text. The text is not wrapped, so some of it may be blocked depending on the figure’s transparency.


Note: Figures that use the Square, Tight, Through, Top and Bottom, Behind Text, or In Front of Text wrapping style are all considered floating.
Position a figure to a paragraph or page
Also, Word offers two options for all wrapping styles except In line with Text (for floating figures):

or

- Move with Text moves the figure along with the surrounding text.
If a figure is positioned inside the paragraph, and you delete or add any content before the paragraph, the figure moves with the paragraph. See more about Positioning a picture, text box, or shape on the page.
- Fix Position on Page keeps the figure at the same place on the page when text is added or removed.
If the paragraph where the figure is located (that paragraph contains anchor) moves to the next page, the figure moves and keeps its position relative to the page.
Note: The same options you can find in the Layout dialog box, on the Position tab, in the Options section:

Checking the Move object with text check box is equivalent to the Move with Text option from the Wrap Text dropdown list. Unchecking the Move object with text check box is equivalent to the Fix Position on Page option.
Wrap text on both sides, or one side only
To change additional options, choose More Layout Options… from the Wrap Text dropdown list or the See more… link in the Layout Options menu.
In the Layout dialog box, on the Text Wrapping tab:

- In the Wrapping style group, choose any style exact In line with text (see above).
- In the Wrap text group (available for the Square, Tight, and Thought wrapping styles), choose any of the additional options:
- Both sides wraps text around either side of the image or shape:
- Left only wraps text around only the left side of the image or shape:
- Right only wraps text around only the right side of the image or shape:
- Largest only wraps text on the side of the image or shape with the larger distance from the margin.
- Both sides wraps text around either side of the image or shape:


Change the distance between text and object
To change the distance between text and the visual object, open the Layout dialog box by one of the following methods:
- On the Picture Format (Shape Format, Graphics Format) tab, in the Arrange group, click the Wrap Text button, then select More Layout Options…
- Right-click on the object, click the Wrap Text list, then select More Layout Options… in the popup menu.
- Click the See more… link in the Layout Options menu.
In the Layout dialog box, on the Text Wrapping tab, in the Distance from text section, enter custom values for the distance between the text and the picture independently for:
- Top and Bottom (available for the Square, Tight, Thought, and Top and Bottom wrapping styles),
- Left and Right (available for the Square, Tight, and Thought wrapping styles).
For example, with the 0.3-inch distance on all sides:

Edit hyphenation points
To use the Tight or Through options effectively, you may need to adjust the wrapping points for the image or shape. To edit wrap points, select the object, then activate the Edit Wrap Points view by one of the following methods:
- Picture Format (Shape Format, Graphics Format) tab, in the Arrange group, click the Wrap Text button. Then choose Edit Wrap Points from the Wrap Text dropdown list:

- Right-click on the object and select Wrap Text -> Edit Wrap Points in the popup menu:


In the Edit Wrap Points view, drag the red lines to adjust where the text wraps:

Note: There is no way to add points. You can move existing wrap points however you want.
Be careful! After changing a text wrapping option or copy-pasting the picture, Word lost the changes of Wrap Points.