

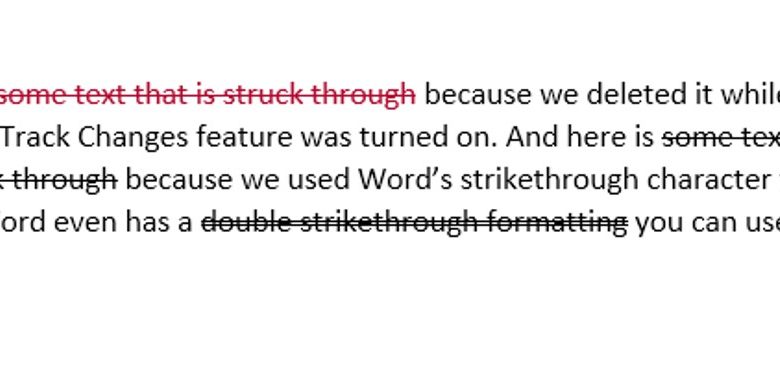
When working in Microsoft Word, you’ve probably seen two different kinds of text with lines through it (commonly called a “strikethrough”). Red text with a red line through it happens when you delete text while the collaborative Track Changes feature is on. Black text with a black line just has special character formatting applied. Here’s how it works.
Why Would You Want to Strike Through Text, Anyway?
It’s a good question. Why cross out words when you can just delete them? When you’re tracking changes in Word so that you can collaborate with other people, keeping that deleted text visible, but struck through, lets them know what has changed. They can even review those changes and accept or deny them.
We have a full guide on keeping track of changes made to a Word document, so we’re not going to cover all that in this article. It’s a good read, though, if you’re collaborating on a document.
Instead, we’re going to focus on how to apply strikethrough character formatting and why you might want to.
So, why bother? Well, you might be collaborating with someone and not want to use the Track Changes feature. Maybe they don’t use Word or Microsoft Office, and you’re sending it to them to view in Google Docs, or as a PDF they can print out.
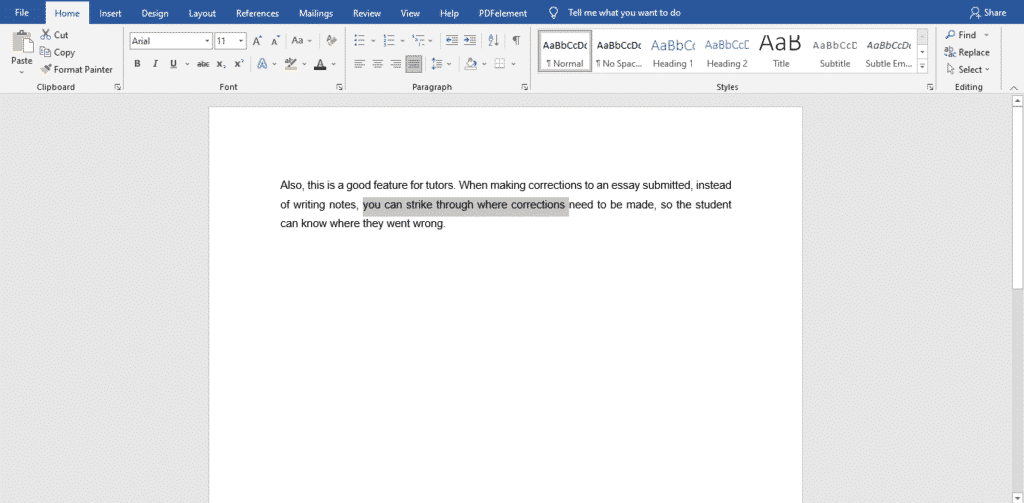
Either way, you can strike through text as a suggestion that it be deleted, but leave it in place for them to see. This is particularly useful in a situation where, for example, you’re tutoring a student in a subject like a foreign language. It’s much easier for the student to learn if they can go back and see the mistakes along with the corrections.
Some writers also use strikethrough text (and occasionally often overuse it) to show a change of thinking in a document. Or maybe you just want to be annoying funny.
Whatever the reason, we’re here to show you how to do it.
RELATED: How to Apply Strikethrough to Text in Google Docs
How to Apply Strikethrough Formatting to Text
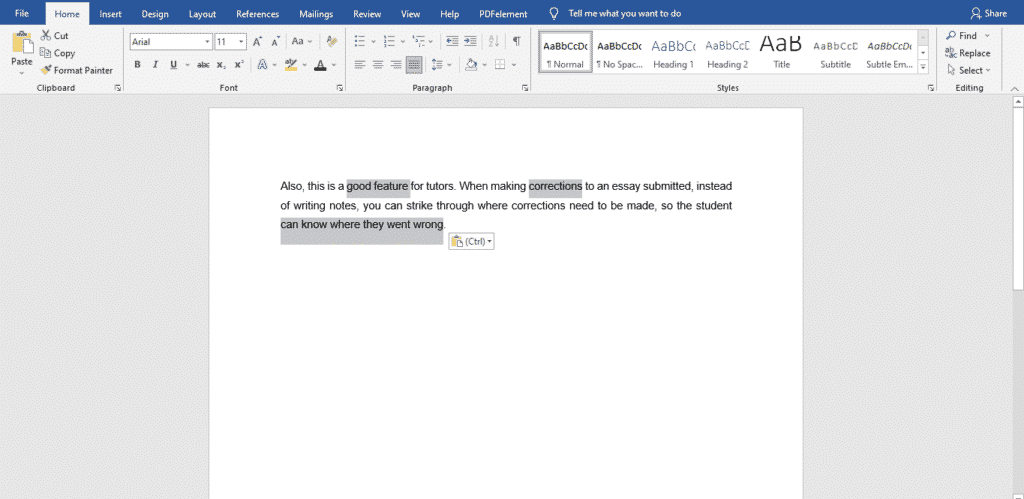
Applying strikethrough formatting is pretty easy. Start by selecting the text you want to strike through. You can do this by clicking and dragging over the text (or just double-clicking a word), but when you do this, Word likes to select the space after the text, as well. If you don’t want that to happen, click to place your insertion point at the beginning of the text, and then Shift-click at the end of the text for a more precise selection.
If you want to get fancy and select multiple words spread out through the document at the same time, you can do that, too. Select the first bit of text the regular way, and then hold down the Ctrl key while selecting additional text in different places. We suggest only doing this a paragraph at a time because it’s frustrating when you accidentally let go of the Ctrl key and have to start over.

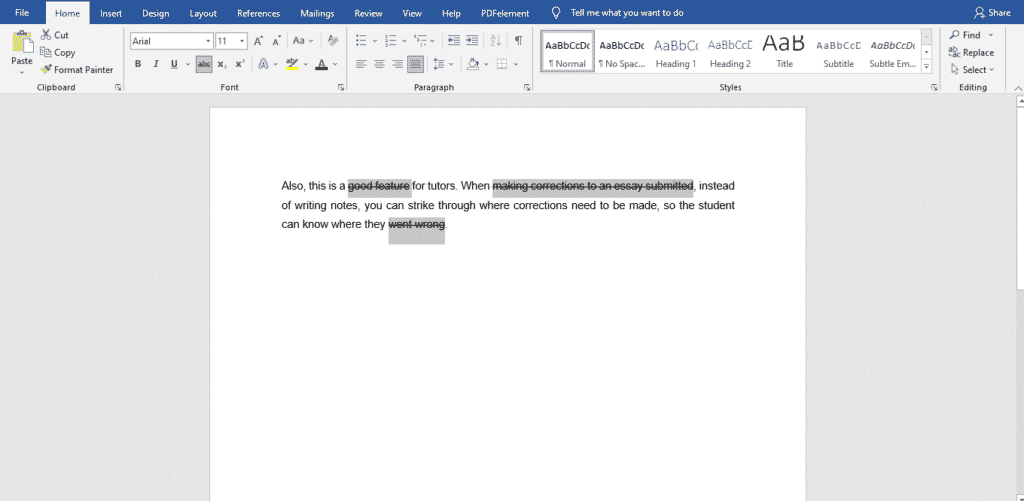
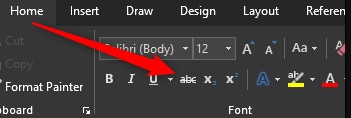
When you have your text selected, look on the “Home” tab of Word’s Ribbon. In the “Font” group, click the Strikethrough button (it’s the three letters with a line drawn through them).
Now, any text you had selected should be struck through.
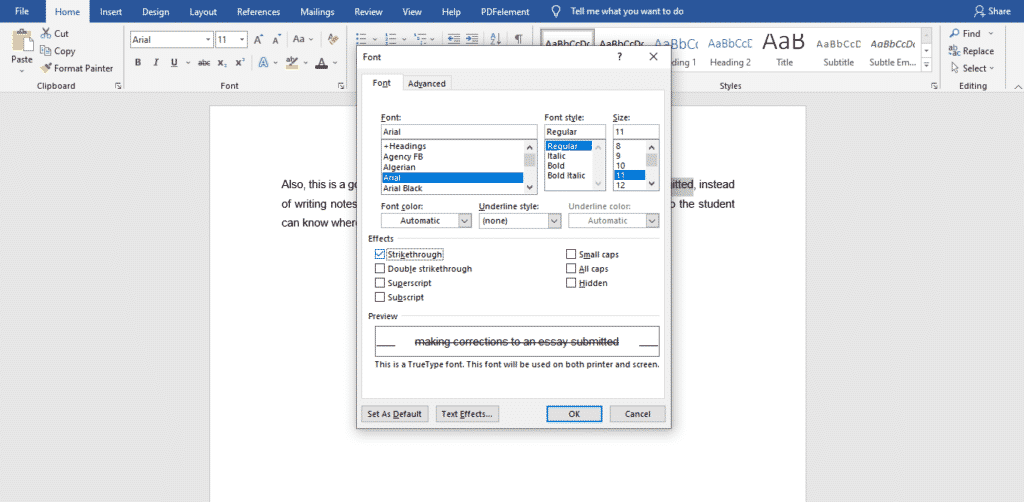
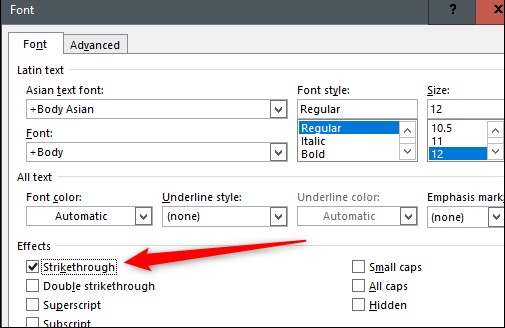
You can also apply strikethrough formatting using the Font window. Select your text, and then press Ctrl+D on Windows or Cmd+d on Mac to open that window up. Here, you can select not only the regular “Strikethrough” option but a “Double Strikethrough” option if you want to go that way, instead. Make your selection, and then click the “OK” button.
Make Things Easier By Creating a Keyboard Shortcut
Microsoft Word has loads of keyboard shortcuts, including a bunch for applying formatting. Unfortunately, there’s no built-in shortcut for applying strikethrough formatting. If it’s something you do a lot, though, you can create your own key combo.
Start by opening that Font window back up. Now, press Ctrl+Alt+Plus on Windows (you might have to use the Plus key on your number pad). Your cursor should very briefly turn into a clover shape. After that happens, click the “Strikethrough” option and a Customize Keyboard window should open.
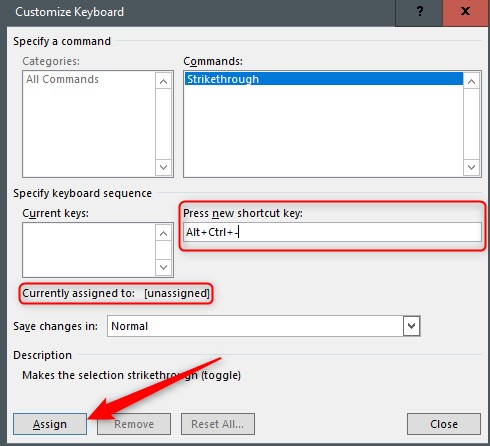
Here, you can assign your preferred keyboard combo by clicking once in the “Press New Shortcut Key” box and then pressing the keys you want to use. If the combination you choose already has a shortcut function, Word will let you know that it’s currently assigned to something else. You can, of course, still use it even if it’s assigned to something else, but it’s better to try to find a combination that doesn’t have any current functions. We find Ctrl+Alt+- (minus) is pretty easy to remember and doesn’t have any other use in Word.
Press the “Assign” button, and then go back to your Word doc and try it out.
Now you have your customized strikethrough shortcut!
READ NEXT
- › How to Insert a Line in Microsoft Word
- › How to Apply Strikethrough to Text in Google Docs
- › How to Strikethrough in Microsoft Outlook
- › How to Strikethrough in Microsoft Excel
- › How to Use the Ink Features in Microsoft Office
- › This New Google TV Streaming Device Costs Just $20
- › How to Adjust and Change Discord Fonts
- › Google Chrome Is Getting Faster
When reading word documents, you might have come across words or sentences with a line drawn through them. This is what is referred to as strikethrough.
It is a font feature that makes text appear crossed out with a neatly drawn horizontal line.
Why use the strikethrough feature instead of deleting
One may ask why anyone would use the strikethrough feature instead of just deleting the text.
There are several reasons for this:
Sometimes, more than one person may be working on a word document at once. Because of this, they may make changes to the same document and keep forwarding it to each other until one final copy is drafted.
Instead of memorising the changes or hoping the recipient notices them, you can strike through the corrections and request them to either reject or accept them.
Striking through texts allows a reader and editor to follow the changes made to a document from the beginning. This is what is called a collaborative track feature.
So, how do we strike through text in a word document?
Easy steps to draw a line through text in Microsoft word
1. Select the text you want to strikethrough
Open the word document with the text you want to strike through and select it.
You can click and drag over the text or double-click if it is a word. If you are using a mouse, you can hold the left button down and drag over the words with the mouse.
Note: Instead of highlighting one word or sentence at a time, you can also select all the texts you plan on drawing a line through first to save time.
Follow step one
After selecting your first word or sentence, hold the Ctrl key down, and click and drag over all the other texts to highlight them.
Do not release the Ctrl button until you finish.
However, do this a few words or sentences at a time, say every paragraph, avoid losing all the highlights if you make an error somewhere, or accidentally press a wrong key.
- Now that you have selected your text, look to the ‘home’ tab at the top of your screen. You will see ‘abc’ with a line drawn through it. This is the strikethrough feature. Click it.

Alternatively, you can apply strikethrough formatting using the font window after you have selected your text, press Ctrl + D.
A new window will open up. On the font column, select strikethrough under ‘effects.’
It should be the first option. Click OK.
Any text you had previously selected will have a line drawn through it.
Do you ever have to work on written projects with colleagues but cannot find an organised and structured way to do it?
Group projects are already hectic, but we cannot run away from them. They are either mandatory for work or school.
You do not know who should write the first draft, who should edit or how long it will take, which word processor to use. Besides, many things always go wrong because of the many people involved.
Fortunately for you, Simul Docs can solve all these problems.
Download Simul Docs and get started. After writing your first draft in Microsoft Word, upload it to Simul Docs. This will automatically make it the first version. Now, another colleague can open it and make their edits. This will create another version different from the first. Every time another person opens a version and makes edits, a new version is created, with the latest changes. The best part is, even if you forget to turn on tracked changes, they are automatically documented!
Since it is a collaboration, a bonus feature is the ability to add comments to the document. If you want a colleague to review the changes by a specific time, or any other instructions, you can let them know in the comment section.
Let us say another co-worker is supposed to include their input, but they do not have Simul Docs. All you have to do is download the document or forward it by email. Alternatively, you can upload it to any storage software like one drive, and once their changes have been made, they can forward it to you once again, and you can open it in Simul Docs.
Once all the necessary edits have been made, you can save the final version containing all the modifications with one click.
Simul is the most convenient collaborative tool yet. Centralising your written project avoids mishaps like losing your work or losing its original format.
Visit simuldocs.com and simplify group edits today.
. Красный текст с красной линией через него происходит, когда вы удаляете текст, когда включена функция отслеживания совместной работы. Черный текст с черной линией через него имеет специальное форматирование символов. Вот как они работают.")
Почему бы вам вообще не ударить текст?
Это хороший вопрос. Зачем перечеркивать слова, когда вы можете просто удалить их? Когда вы отслеживаете изменения в Word, чтобы вы могли сотрудничать с другими людьми, сохраняя этот удаленный текст видимым, но пробиваясь, позволяет им узнать, что изменилось. Они могут даже просмотреть эти изменения и принять или отказать им. У нас есть полное руководство по отслеживанию изменений, внесенных в документ Word, поэтому мы не будем охватывать все это в этой статье. Это хорошо прочитано, хотя, если вы сотрудничаете с документом.
Вместо этого мы собираемся сосредоточиться на том, как применять форматирование символов strikethrough и почему вы, возможно, захотите.
Итак, зачем беспокоиться? Ну, вы можете сотрудничать с кем-то и не хотите использовать функцию отслеживания изменений. Возможно, они не используют Word, и вы отправляете их им для просмотра в Документах Google или в виде PDF, которые они могут распечатать. В любом случае вы можете нанести удар по тексту как предложение о его удалении, но оставите его на месте, чтобы они могли видеть. Это особенно полезно в ситуации, когда, например, вы обучаете ученика по предмету, подобному иностранному. Студенту намного легче узнать, могут ли они вернуться и увидеть ошибки вместе с исправлениями.
Некоторые авторы также используют зачеркнутый текст (и время от времени часто злоупотребляют им), чтобы показать изменение мышления в документе. Или, может быть, вы просто хотите быть досадливыми.
Какова бы ни была причина, мы здесь, чтобы показать вам, как это сделать.
Как применить форматирование Strikethrough к тексту
Применение форматирования strikethrough довольно просто. Начните с выбора текста, который вы хотите пробить. Вы можете сделать это, щелкнув и перетащив текст (или просто дважды щелкнув слово), но когда вы это сделаете, Word любит выбирать пространство после текста. Если вы не хотите, чтобы это произошло, нажмите, чтобы поместить точку ввода в начало текста, а затем нажмите Shift в конце текста для более точного выбора.
Если вы хотите получить фантазию и одновременно выбрать несколько слов, распространяемых через документ, вы тоже можете это сделать. Выберите первый бит текста обычным способом, а затем удерживайте клавишу Ctrl при выборе дополнительного текста в разных местах. Мы предлагаем только сделать это абзацем за раз, потому что это неприятно, когда вы случайно отпустили клавишу Ctrl и должны начать все заново.
.")


Сделать вещи проще при создании ярлыка клавиатуры
Word имеет множество сочетаний клавиш, включая пучок для форматирования. К сожалению, нет встроенного ярлыка для применения форматирования strikethrough. Если это то, что вы делаете много, вы можете создать свою собственную комбинацию клавиш.
Начните с открытия окна Font. Теперь нажмите Ctrl + Alt + Plus (возможно, вам придется использовать клавишу «Плюс» на вашей цифровой клавиатуре). Ваш курсор должен очень коротко превратиться в форму клевера. После этого нажмите кнопку «Зачеркнутый», и откроется окно «Настройка клавиатуры».
Здесь вы можете назначить предпочтительную комбинацию клавиш, щелкнув один раз в поле «Нажмите клавишу« Новый ярлык », а затем нажав клавиши, которые вы хотите использовать. Если выбранная вами комбинация уже имеет функцию быстрого доступа, Word сообщит вам, что она в настоящее время назначена на что-то еще. Вы, конечно, можете использовать его, даже если он назначен кому-то другому, но лучше попытаться найти комбинацию, которая не имеет никаких текущих функций. Мы находим Ctrl + Alt + — (минус) довольно легко запомнить и не имеет другого использования в Word.
Нажмите кнопку «Назначить», а затем вернитесь к документу Word и попробуйте его.

When dealing with Word, you’ve most likely seen 2 different type of text with lines through it (something we call “strikethrough”). Red text with a red line through it occurs when you delete text while the collaborative Track Changes feature is on. Black text with a black line through it just has special character format used. Here’s how both work.
Why Would You Want to Strike Through Text, Anyway?
It’s an excellent question. Why erase words when you can just delete them? When you’re tracking changes in Word so that you can work together with other individuals, keeping that erased text visible, but struck through, lets them know what has actually altered. They can even evaluate those change and accept or reject them. We’ve got a full guide on tracking changes made to a Word file, so we’re not going to cover all that in this post. It’s an excellent read, however, if you’re collaborating on a document.
Rather, we’re going to concentrate on how to use strikethrough character formatting and why you may want to.
So, why bother? Well, you might be collaborating with somebody and not want to utilize the Track Changes include. Perhaps they don’t use Word, and you’re sending it to them to see in Google Docs, or as a PDF they can print out. Either way, you can strike through text as an idea that it be erased, but leave it in location for them to see. This is especially useful in a circumstance where, for instance, you’re tutoring a student in a topic like a foreign language. It’s a lot easier for the student to find out if they can return and see the errors along with the corrections.
Some writers likewise utilize strikethrough text (and occasionally often overuse it) to reveal a modification of believing in a document. Or maybe you just want to be bothersome amusing.
Whatever the factor, we’re here to reveal you how to do it.
How to Apply Strikethrough Formatting to Text
Applying strikethrough format is pretty easy. Start by picking the text you want to strike through. You can do this by clicking and dragging over the text (or simply double-clicking a word), but when you do this, Word likes to select the space after the text, too. If you do not want that to happen, click to place your insertion point at the start of the text, and after that Shift-click at the end of the text for a more exact selection.
If you want to get expensive and select numerous words expanded through the file at the exact same time, you can do that, too. Select the very first little bit of text the regular way, and after that hold down the Ctrl key while picking additional text in various places. We suggest just doing this a paragraph at a time because it’s frustrating when you mistakenly released the Ctrl secret and have to begin over.
When you’ve got your text selected, look on the “Home” tab of Word’s Ribbon. In the “Font” group, click the “Strikethrough” button (it’s the 3 letters with a line drawn through them).
Now, any text you had selected must be struck through.
You can also use strikethrough format using the Font window. Select your text, and then press Ctrl+D to open that window up. Here, you can choose not only the routine “Strikethrough” choice however a “Double Strikethrough” option if you wish to go that way, instead. Make your selection, and then click the “OKAY” button.
Make Things Easier By Creating a Keyboard Shortcut
Word has loads of keyboard shortcuts, including a bunch for applying format. There’s no integrated shortcut for applying strikethrough format. If it’s something you do a lot, though, you can produce your own key combo.
Start by opening that Font window back up. Now, press Ctrl+Alt+Plus (you may need to utilize the Plus key on your number pad). Your cursor needs to extremely quickly turn into a clover shape. After that happens, click the “Strikethrough” alternative and a Customize Keyboard window ought to open.
Here, you can appoint your favored keyboard combination by clicking when in the “Press New Shortcut Key” box and after that pressing the secrets you want to utilize. If the combination you choose already has a shortcut function, Word will let you understand that it’s presently appointed to something else. You can, of course, still use it even if it’s assigned to something else, however it’s much better to try to find a mix that doesn’t have any present functions. We discover Ctrl+Alt+- (minus) is pretty simple to bear in mind and doesn’t have any other usage in Word.
Press the “Assign” button, and then return to your Word doc and attempt it out.
Now you have your tailored strikethrough faster way!
Red text with a red line through it occurs when you erase text while the collective Track Changes feature is on. When you’re tracking changes in Word so that you can team up with other people, keeping that erased text noticeable, but struck through, lets them know what has altered. You can do this by clicking and dragging over the text (or just double-clicking a word), but when you do this, Word likes to pick the space after the text. Select the first bit of text the regular way, and then hold down the Ctrl key while picking additional text in various locations. When you’ve got your text chosen, look on the “Home” tab of Word’s Ribbon.
When working with Word, you’ve likely seen two various types of text with lines through it (something we call “strikethrough”). Red text with a red line through it happens when you erase text while the collective Track Changes include is on. Dark text with a dark line through it simply has unique person arranging applied. Here’s the manner by which both work.
Why Would You Want to Strike Through Text, Anyway?
It’s a decent inquiry. Why cross out words when you can simply erase them? At the point when you’re following changes in Word so you can team up with others, keeping that erased text apparent, however, struck through, tells them what has changed. They can even survey those changes and acknowledge or deny them. We have a full aide on monitoring changes made to a Word report, so we’re not going to cover all that in this article. It’s a decent read, however, in case you’re working together on a report.
All things considered, we will zero in on the most proficient method to apply strikethrough character organizing and why you may need to.
All in all, what’s the point? All things considered, you may be teaming up with somebody and not have any desire to utilize the Track Changes highlight. Perhaps they don’t utilize Word, and you’re sending it to them to see in Google Docs, or as a PDF they can print out. Regardless, you can strike through text as an idea that it be erased, yet pass on it set up for them to see. This is especially valuable in a circumstance where, for instance, you’re coaching an understudy in a subject like an unknown dialect. It’s a lot simpler for the understudy to learn on the off chance that they can return and see the mix-ups alongside the redresses.
A few essayists likewise use strikethrough text (and infrequently regularly abuse it) to show a difference in thinking in a report. Or then again perhaps you simply need to be irritating interesting.
Whatever the explanation, we’re here to tell you the best way to do it.
How to Apply Strikethrough Formatting to Text
Applying strikethrough organizing is quite simple. Start by choosing the text you need to strike through. You can do this by clicking and hauling over the text (or simply double-tapping a word), however when you do this, Word likes to choose the space after the text, too. In the event that you don’t need that to occur, snap to put your inclusion point toward the start of the message, and afterward Shift-click toward the finish of the message for a more exact determination.
Assuming you need to get extravagant and select various words spread out through the record simultaneously, you can do that, as well. Select the principal piece of text the standard way, and afterward hold down the Ctrl key while choosing extra text in better places. We recommend just doing this a passage at a time because it’s disappointing when you incidentally let go of the Ctrl key and need to begin once again.
At the point when you have your text chosen, look on the “Home” tab of Word’s Ribbon. In the “Text style” bunch, click the “Strikethrough” button (it’s the three letters with a line drawn through them).
You can likewise apply strikethrough designing utilizing the Font window. Select your text, and afterward press Ctrl+D to open that window up. Here, you can choose the standard “Strikethrough” choice however a “Twofold Strikethrough” choice assuming you like to go as such, all things being equal. Make your determination, and afterward click the “Alright” button.
Make Things Easier By Creating a Keyboard Shortcut
Word has heaps of console alternate routes, including a bundle for applying to organize. Sadly, there’s no underlying easy route for applying strikethrough designing. In case it’s something you do a ton, however, you can make your own key combo.
Start by opening that Font window back up. Presently, press Ctrl+Alt+Plus (you may need to utilize the Plus key on your number cushion). Your cursor ought to momentarily transform into a clover shape. After that occurs, click the “Strikethrough” choice and a Customize Keyboard window should open.
Here, you can dole out your favored console combo by clicking once in the “Press New Shortcut Key” box and afterward squeezing the keys you need to utilize. On the off chance that the mix you pick as of now has an alternate way to work, Word will tell you that it’s right now relegated to something different. You can, obviously, still use it regardless of whether it’s appointed to something different, however better to attempt to discover a mix that doesn’t have any current capacities. We discover Ctrl+Alt+-(short) is quite simple to recollect and doesn’t have some other use in Word.
Press the “Allow” button, and afterward return to your Word doc and give it a shot.
Presently you have your modified strikethrough easy route!

Tech Stormy is a Tech innovation blog, Where you get the latest news, information and trends about technology,