How can I set line spacing with CSS, like we can set it in MS Word?
![]()
asked Oct 2, 2010 at 11:22
![]()
Try the line-height property.
For example, 12px font-size and 4px distant from the bottom and upper lines:
line-height: 20px; /* 4px +12px + 4px */
Or with em units
line-height: 1.7em; /* 1em = 12px in this case. 20/12 == 1.666666 */
answered Oct 2, 2010 at 11:27
![]()
MJCMJC
3,8024 gold badges22 silver badges34 bronze badges
8
You can also use a unit-less value, which is the number of lines: line-height: 2; is double spaced, line-height: 1.5; is one and a half, etc.
answered Jun 19, 2013 at 18:46
![]()
Mike GMike G
4,2129 gold badges45 silver badges65 bronze badges
5
You cannot set inter-paragraph spacing in CSS using line-height, the spacing between <p> blocks. That instead sets the intra-paragraph line spacing, the space between lines within a <p> block. That is, line-height is the typographer’s inter-line leading within the paragraph is controlled by line-height.
I presently do not know of any method in CSS to produce (for example) a 0.15em inter-<p> spacing, whether using em or rem variants on any font property. I suspect it can be done with more complex floats or offsets. A pity this is necessary in CSS.
![]()
answered Mar 4, 2015 at 2:37
![]()
3
If you want condensed lines, you can set same value for font-size and line-height
In your CSS file
.condensedlines {
    font-size:   10pt;
    line-height: 10pt;  /* try also a bit smaller line-height */
}
In your HTML file
<p class="condensedlines">
bla bla bla bla bla bla <br>
bla bla bla bla bla bla <br>
bla bla bla bla bla bla <br>
</p>
—> Play with this snippet on jsfiddle.net
You can also increase line-height for fine line spacing control:
.mylinespacing {
    font-size:   10pt;
    line-height: 14pt; /* 14 = 10 + 2 above + 2 below */
}
answered Nov 7, 2014 at 9:54
![]()
oHooHo
50.2k27 gold badges163 silver badges198 bronze badges
Try this property
line-height:200%;
or
line-height:17px;
use the increase & decrease the volume
![]()
KV Prajapati
93.2k19 gold badges147 silver badges185 bronze badges
answered Oct 12, 2012 at 5:33
![]()
ANANTH.SANANTH.S
1091 silver badge7 bronze badges
1
I am not sure if this is what you meant:
line-height: size;
answered Oct 2, 2010 at 11:26
![]()
Alan Haggai AlaviAlan Haggai Alavi
72.2k19 gold badges101 silver badges127 bronze badges
0
Try line-height property; there are many ways to assign line height
![]()
Tony
9,5683 gold badges50 silver badges73 bronze badges
answered Oct 2, 2010 at 11:31
![]()
Harsha M VHarsha M V
53.6k124 gold badges349 silver badges527 bronze badges
Yup, as everyone’s saying, line-height is the thing.
Any font you are using, a mid-height character (such as a or ■, not going through the upper or lower) should go with the same height-length at line-height: 0.6 to 0.65.
<div style="line-height: 0.65; font-family: 'Fira Code', monospace, sans-serif">
aaaaa<br>
aaaaa<br>
aaaaa<br>
aaaaa<br>
aaaaa
</div>
<br>
<br>

<div style="line-height: 0.6; font-family: 'Fira Code', monospace, sans-serif">
■■■■■■■■■■<br>
■■■■■■■■■■<br>
■■■■■■■■■■<br>
■■■■■■■■■■<br>
■■■■■■■■■■<br>
■■■■■■■■■■<br>
■■■■■■■■■■<br>
■■■■■■■■■■<br>
■■■■■■■■■■<br>
■■■■■■■■■■
</div>
<br>
<br>
<strong>BUT</strong>
<br>
<br>
<div style="line-height: 0.65; font-family: 'Fira Code', monospace, sans-serif">
ddd<br>
ƒƒƒ<br>
ggg
</div>
answered Aug 25, 2019 at 18:30
![]()
RubenVergRubenVerg
452 silver badges8 bronze badges
lineSpacing is used in React Native (or native mobile apps).
For web you can use letterSpacing (or letter-spacing)
answered Jun 5, 2019 at 14:57
![]()
Eric KimEric Kim
10.2k4 gold badges29 silver badges31 bronze badges
![]()
Download Article
![]()
Download Article
Adding extra space between words and paragraphs in HTML is very different than in apps like Microsoft Word. But don’t tear out your hair just yet—we’ll show you the easiest ways to control spacing between words and lines of text, as well as how to add extra space to the beginning of each paragraph so they are properly indented on the page. This wikiHow article teaches you different ways you can add spaces to your HTML code.
-

1
Open your HTML code in a text editor. You can use any text editor, such as Notepad for Windows, or TextEdit for macOS, to edit your code. If you press the spacebar multiple times to add extra space between words or characters, you won’t see those extra spaces on your webpage—HTML automatically converts multiple spaces into a single space. You can fix this by using non-breaking space characters instead of pressing the spacebar.
-
2
Type where you want to insert an extra space. Add one non-breaking space character for every space you want to add. Unlike pressing the spacebar multiple times in your HTML code, typing more than once creates as many spaces as there are instances of .[1]
- For example, let’s say you want three spaces between the words «What will you learn» and «today?» Instead of pressing the spacebar three times, just type between the two segments. Here’s an example:
<!DOCTYPE html> <html> <head> <title>wikiHow: How-to instructions you can trust.</title> </head> <body> <p>What will you learn&nbsp;&nbsp;&nbsp;today?</p> </body> </html>
Basically, just translates to «one space» in HTML.
Advertisement
- For example, let’s say you want three spaces between the words «What will you learn» and «today?» Instead of pressing the spacebar three times, just type between the two segments. Here’s an example:
-
3
Use other spacing characters as shortcuts. If you want to insert two spaces, four spaces, or indent the beginning of a line, you don’t have to type multiple times:
- Two spaces: Type  
- Four spaces: Type  


Advertisement
-
1
Open your HTML code. Another way to add more spaces to your code is to use the HTML <pre> tag. This tag essentially displays the text exactly as you type or paste it, spaces and all. Start by opening your code in a text editor like Notepad for Windows or TextEdit for macOS.
-
2
Type <pre> </pre> tags in the body of your document. Any text you want to keep preformatted with a particular amount of spaces and/or line breaks will go between these tags:
<!DOCTYPE html>
<html>
<head>
<title>wikiHow: How-to instructions you can trust.</title>
</head>
<body>
<pre>  </pre>
</body>
</html>
-
3
Type or paste text exactly as intended between the «<pre>» and »<pre>» tags. In this example, we’re creating three spaces between words, as well as a line break. When pre-formatting text, any spaces between words, as well as line breaks you create by pressing «Enter» or «Return,» will be displayed on the webpage.[2]
<!DOCTYPE html>
<html>
<head>
<title>wikiHow: How-to instructions you can trust.</title>
</head>
<body>
<pre>What   will   you
learn   today?</pre>
</body>
</html>


Advertisement
-
1
Open your HTML code in a text editor. Do you want to add extra space between paragraphs or other elements on the page? Pressing Enter or Return a bunch of times in your code won’t do the trick, but adding a line break tag <br> will! Start by opening the HTML code of the page you want to edit.
-
2
Type <br> on each line you want to make blank. For example, if you want to insert just one extra blank horizontal line between two paragraphs, you’d just type one <br> once. But if you wanted to add three line breaks, you could type it three times: <br><br><br>.
- In this example, we’re adding two lines of extra space between our sentences:
<!DOCTYPE html>
<html>
<head>
<title>wikiHow: How-to instructions you can trust.</title>
</head>
<body>
<pre>What   will   you
learn   today?</pre>
<br><br>
<p>You will learn a lot!</p>

</body>
</html>
- In this example, we’re adding two lines of extra space between our sentences:


Advertisement
-
1
Open an HTML document. Let’s say you want to indent the beginning a paragraph with some space—let’s say 10 pixels. The best way to do this would be to use CSS (Cascading Style Sheets). We’ll cover two ways to do this—one lets you indent each paragraph manually, and another indents all paragraphs at once. Start by opening up your HTML document in a text editor.
-
2
Indent a single paragraph. If we want to indent the paragraph in our example, we can do so by adding the text-indent property to its <p> tag. In this example, we’ll be indenting our paragraph by 10px:
<!DOCTYPE html>
<html>
<head>
<title>wikiHow: How-to instructions you can trust.</title>
</head>
<body>
<p style="text-indent:10px">Welcome to wikiHow, the most trusted how-to site on the internet. wikiHow is where trusted research and expert knowledge come together.</p>
<p> Since 2005, wikiHow has helped billions of people learn how to solve problems large and small. We work with credentialed experts, a team of trained researchers, and a devoted community to create the most reliable, comprehensive and delightful how-to content on the Internet.</p>
</body>
</html>
- Since we added the text-indent property to just the first paragraph, that is the only paragraph that will be indented. Read on to learn how to indent all paragraphs on the page the same way instead of just one!
-
3
Create a style section for your CSS. If we want to indent all paragraphs on our page, we can do so by defining the paragraph style in CSS. The style section goes into the head of your HTML code, or on a separate style sheet. Let’s add ours to the head, which is between the <head> and </head> tags:
<!DOCTYPE html>
<html>
<head>
<title>wikiHow: How-to instructions you can trust.</title>
<style>
</style>
</head>
<body>
<p style="text-indent:10px">Welcome to wikiHow, the most trusted how-to site on the internet. wikiHow is where trusted research and expert knowledge come together.</p>
<p>Since 2005, wikiHow has helped billions of people learn how to solve problems large and small. We work with credentialed experts, a team of trained researchers, and a devoted community to create the most reliable, comprehensive and delightful how-to content on the Internet.</p>
</body>
</html>
-
4
Type the indenting code into the style area. So, we want every paragraph to begin with 10px of space, not just one. This means we’ll need to create a style for the paragraph tag (<p>) that automatically adds 10px of space to the beginning of the first word in each paragraph. We’ll also want to remove the text-indent property from our original example, as it won’t be needed anymore. The property should look like this:
<!DOCTYPE html>
<html>
<head>
<title>wikiHow: How-to instructions you can trust.</title>
<style>
p {
	text:indent: 10px;
</style>
</head>
<body>
<p>Welcome to wikiHow, the most trusted how-to site on the internet. wikiHow is where trusted research and expert knowledge come together.</p>
<p>Since 2005, wikiHow has helped billions of people learn how to solve problems large and small. We work with credentialed experts, a team of trained researchers, and a devoted community to create the most reliable, comprehensive and delightful how-to content on the Internet.</p>
</body>
</html>
- You can adjust the number of spaces by typing a different number after «text-indent:».
- You can use unites other than pixels to define the size of your indent, such as percentage (i.e. «text-indent: 15%;») or measurements (e.g., «text-indent: 3mm;»).
-
5
Type <p> at the beginning of each paragraph. Since we’ve added specific instructions to indent the <p> tag, every paragraph on the page will be indented 2.5em. This goes for our existing paragraphs, and any new paragraphs we add to the page.


Advertisement
Sample HTML Code
Add New Question
-
Question
If I define lines of text as individual paragraphs, I get a blank space between lines. How do I get rid of that space?

Use a line break instead of the paragraph break.
-
Question
Can I specify more than one CSS class for any HTML element?
Yes, it’s very simple too. Inside the class attribute, add all the classes you want the element to have, separated by a space. For example, if you had a tag needing the classes «blueFont» and «underline,» the class attribute would be:
class=»blueFont underline»
-
Question
How do I space HTML code vertically?
The most basic is to simply style it with margin and/or padding. Alternatively, read into absolutely positioning an element, then you can specify exactly where on the page you want in, pixel for pixel.
See more answers
Ask a Question
200 characters left
Include your email address to get a message when this question is answered.
Submit
Advertisement
-
If your spaces turn into strange symbols on the web browser, it’s most likely caused by extra data stored in the word processing format not intended for online display. Avoid this by using a plaintext editor like Notepad or TextEdit.
-
CSS is a much more powerful and predictable way to lay out your page, including the spacing of your text.
Thanks for submitting a tip for review!
Advertisement
About This Article
Article SummaryX
1. Type « » to add a single space.
2. Type «&ensp» to add 2 spaces.
3. Type «&emsp» to add 4 spaces.
4. Use the non-breaking space (nbsp) 4 times to insert a tab.
5. Use «br» to add a line break.
Did this summary help you?
Thanks to all authors for creating a page that has been read 5,948,131 times.
Is this article up to date?
When coding html pages for a website, the line spacing of the text content is probably one of attributes that is usually left as default. Most of the time, you do not even think about it and the default works the best in most browsers.
The line spacing or line height is the vertical height between lines of text in a rendered html page. Almost always this spacing value is set to an appropriate value by the browser or the rendering engine. This value is usually dependent on the font of the rendered page, resolution of the page and several other factors.
Having said that it rarely needs to be changed, once in a while you do run into situations where you would want to change this property. You might find that the font you are using creates either too little or too much line height by default. It might also be a special requirement, for example the lines needs to separated more than usual for emphasis.
First of all, let us see what the default is that is used by most browsers. In most modern day browsers, the line spacing is usually set to either 110% or 120% of the pixel size or font size. This works great in almost all cases, making the text legible enough to be read.
In order to modify the line spacing, you will typically use the cascading style sheet (css). The CSS property that handles this is named line-height and can be used with most HTML tags that surrounds the text on the webpage.
You can specify the value for line-height just as you would specify any other size in CSS, either as a number, pixel size or as a percentage. Just as any other style you can specify them at any tag level, using any of the css techniques. You can inline it as well, if needed. In this post, we will use the style attribute of the p tag as examples, but you can use it in other tags as well such as body, span or div.
Using Relative Numbers
When you specify the values as a number, it is based of the current font size as the base. The current font size is multiplied by the number that you specify to calculate the line height or space between lines.
<p style="line-height:1.4">
Paragraph content here
</p>
You can also use other methods for specify the values, such as em, rem, pt etc. As an example, let’s see how to use px or pixel size.
Using Percentages
When you use percentages, it works similar to using the relative numbers. It is based of the current font size of the element. The percentage is actually a different way of specifying the relative size equivalent to the relative number.
<p style="line-height:134%">
Paragraph content here now has a spacing equivalent to 1.34
</p>
If you want to reduce the height, then you would use a value that is less than 100% (or less than 1 in the relative number method). An example would be
<p style="line-height:85%">
Paragraph content here has a spacing equivalent to 0.85.
</p>
Using em unit
Another unit you can use is the em unit. Here the size is calculated relative to the font size of the element.
<p style="line-height:2em">
paragraph content here will have spacing twice that of the element's font size.
</p>
Using rem unit
Another relative unit that you can use is the rem, which is similar to em unit in the above example, but the value is computed based on the font size of the root element, not the size of the current element. This can be pretty handy to deal with nested tags that modify the font sizes.
<p style="line-height:3rem">
The paragraph content is spaced three times the size of the root font size.
</p>
Using pixel size
You can also specify the line height using the pixel size. This makes the spacing independent of the font that is being used, which may not always be a great idea.
<p style="line-height:16px">
Paragraph content here
</p>
As you would expect, negative values are not allowed in the line-height property. As a rule of thumb, always try to use either of the unit less values (percentage or number). This gives it some flexibility when it comes to different fonts that might be used. This also works well with different resolutions of the devices where your webpage might be viewed.
Although I have used the inline style as example, you can very well use the same syntax in the CSS (cascading style sheets) files or any place you defined styles.
As I mentioned, the default works the best in most cases. Make sure to test your webpage rendering in as many devices and browsers as possible.
 CSS line spacing is a formatting technique possible through the line-height property. Moreover, it lets you set the line height of various HTML elements especially lines of text. In this guide, you will learn how to use the property with practical examples.
Do go ahead and keep on reading to level up your website’s design with CSS.
Contents
- Using CSS Line-height Property: Syntax
- CSS Line Spacing Values
- How To Get Line Spacing Right
- – Best Practices
- Coding Example
- Defining the Best Value
- Using Pixels
- Using Ems and Rems
- Conclusion
Using CSS Line-height Property: Syntax
With CSS, the line-height property lets you set the height associated with a line box. A line box refers to the lines that constitute a box. Furthermore, the property lets you add a space between paragraphs. By adjusting line height, you can change the spacing between lines of text on a site.
Actually, it is a lot like formatting text inside Microsoft Word to your liking such as making it double spaced. The syntax for this property is:
#element {
line-height: value;
}
Also, you can use the line-height property to set CSS space after paragraph on your web page.
CSS Line Spacing Values
The line-height property in CSS accepts five different values:
- Percentage: When you assign the line-height property with a percentage value, the line spacing will be relative to the font size. Thus, assigning it 125 percent means the spacing will be 25 percent bigger than the font.
- Normal: Using the “normal” value allows the browser to determine line spacing depending on font size. Usually, it is approximately 1.2 depending on the browser.
- Number: You can give the line-height property a number value without a unit. Then, the browser multiplies the font size with the value to get the line spacing value. So, if you assign line height a value of 1.25, it means that line spacing will be 25 percent bigger than the font.
- Inherit: It lets line spacing take the line spacing for the parent element. Thus, if you set line-height for the body tag at 40 percent bigger than the font size, then the paragraph tags with the inherited value will also have the same line spacing.
- Length: Also, you can give the line-height property a value with measurement units. It sets the exact space between lines. For instance, giving it a value of 1.35 millimeters will result in 1.35 millimeters spacing between lines.
How To Get Line Spacing Right
Line spacing is one of the most important aspects of user experience, as it has a big effect on the readability of text on a website or an app. If you get it right, no user experience designers or typographers will notice. However, if you fail, your users will notice something wrong with your text.
Moreover, the ability to render a block of text easy to read makes line spacing important. The common measure of line space is a percentage of the font size. So, for readability, you should ensure you set the line spacing between 130 percent and 150 percent.
Actually, any value between 120 percent and 200 percent is acceptable. However, 140 percent seems to be the sweet spot. Besides, it is up to you to experiment to establish what works best for your text.
Saying that, the two main risks of line spacing include having either having too little or too much. For instance, if you set your line spacing to 100 percent it allows letters on adjacent lines to touch since there is no extra space between them, so it will be poor for readability. Also, if you set the line spacing to less than 100 percent you make your text completely unreadable. Thus, you should avoid this at all costs.
– Best Practices
Like we said before, you should focus on setting line spacing between 140 percent and 180 percent for optimum readability. If you set a smaller spacing value, you will congest the text and make it difficult to read. On the other hand, if you set a much larger spacing value, it becomes harder to keep track of the text.
Moreover, you should restrict the line length to between 70 and 80 characters. If you use longer lines it becomes easier for the eye to lose track of text especially when reading on a screen. However, in case you must use long lines, ensure you increase the line spacing.
Then, at least the font size should be 16 pixels; this is one of the long-standing rules of thumb when it comes to line spacing. However, for applications meant for larger displays like televisions, you will need to ensure the font size is 32 pixels.
Moreover, you should check line spacing whenever you alter font or font size, as fonts have different maximum heights even when the size is the same. So, ensure you establish how the spacing feels for readability purposes every time you change the font.
Coding Example
Say you are creating an “About Us” page for your local store. The page will have a heading and a paragraph of text describing the store, so you should ensure the text is properly spaced. For instance, you may decide to set text spacing to 1.6 rem for the web page.
You can accomplish this in CSS like so:
p{
font-size: 16px;
line-height: 1.6rem;
}
In this example, two properties are set. First, you need to set the font size. In this case, set it to 16 pixels. Next, the example sets the line-height property to 1.6rem for all the paragraphs on your page.
Using the rem unit which stands for root element defines the line height relative to the size of the font. Thus, since the font is 16 pixels, the line height for the paragraph is going to be 25.6 pixels. It will adequately space the text in the paragraph to ensure it never overlaps.
Defining the Best Value
Often, using the default line spacing, which is “normal”, is the best choice. It ensures text is readable and never demands anything special from you. However, setting a different line spacing value adds a unique feel to your text.
The most flexible font-size values are percentages and ems. So, if you set the font size using these values, you should also define line spacing using the same values. This will give you the most flexible way of paragraph spacing CSS, and will allow the reader to resize the font while retaining the same aspect ratio of your line spacing.
Furthermore, if you decide to use a number to set line spacing on your web page, ensure the value is at least 1.5; any lower can make it difficult for users who are visually impaired to use your site. So, as you decide to set custom line spacing, always take into account accessibility.
Moreover, when setting line spacing for print, use the point(pt) value. Also, ensure the font size is in points too. Avoid using pixels and other absolute units since it is hard to predict what may happen once you update or change your font.
Using Pixels
As we previously mentioned, CSS lets you define line spacing using pixels. Using pixel values defines absolute line spacing. However, the problem is that having an absolute value for line spacing can result in strange behavior. For instance, it may be an issue when a user visits your site on a device with custom font size settings.
If you wish to set line spacing in pixels, you can accomplish it like so:
p {
font-size: 16px;
line-height: 24px;
}
Using Ems and Rems
The em and rem values allow you to set line spacing relative to the font size. So, if you decide to set line-height to 1em you will have line spacing that is equal to the text size. Then, should you decide to set line-height to 2em, line spacing will be double the size of the font, and so on.
Both values let you define line spacing relative to the font size. However, unlike em, rem does not compound values. For instance, if you set the line height to 2em for a paragraph within an element with similar line spacing, the line spacing for the inner paragraph will be equal to 4em.
For example, say you have a <div> tag with id name “para” and within it, you have a paragraph that shares the same font size value in em. That is when you should notice how you can increase CSS space between paragraphs using em.
Here is the HTML for this scenario:
This is the text for the div tag. Try running it to notice the difference.
<p> This is the text for the paragraph tag. Try running it to notice the difference. </p>
</div>
Next, set the font size and line spacing like so:
p{
font-size: 2em;
line-height: 2em;
}
#para {
font-size: 2em;
line-height: 2em;
}
Conclusion
With the line-height property in CSS, you can define line spacing. In this guide, you learned about how to add CSS spacing between paragraphs and how text spacing CSS works. Here is a recap:
- Line-height property in CSS lets you space lines of text
- The property accepts five different values
- These are normal, percentage, length, number, and inherit
- To guarantee readability set line spacing between 1.5 and 1.8
- If you are using percentages for line spacing, ensure that you are using 140 to 180 percent of line spacing
- Always ensure there is enough space between lines
 Now, with this knowledge, keep on experimenting with CSS paragraph spacing like an expert.
- Author
- Recent Posts

Your Go-To Resource for Learn & Build: CSS,JavaScript,HTML,PHP,C++ and MYSQL. Meet The Team
Updated: 07/31/2022 by

Creating extra blank space, or whitespace, in your HTML on a web page can be achieved in many ways depending on the space you want to create. The following sections contains different ways to create extra space using both HTML and CSS in an HTML editor like Dreamweaver or a text editor like Notepad.
Creating extra spaces before or after text

One of the most confusing things to new users who’re creating a web page is that they cannot press the spacebar multiple times to make additional spaces. To create extra spaces before, after, or in-between your text, use the (non-breaking space) extended HTML character.
For example, with the phrasing «extra space» using a double space, we have the following code in our HTML.
extra space
Note
If you are using a WYSIWYG editor to enter the code above, you must be in the HTML tab or editing the HTML code.
Keep spacing in text that is pasted to a page
If you are pasting text with extra spaces or tabs, you can use the HTML <pre> tag to keep the text formatted. Below is an example of how to paste text with extra spaces using the <pre> tag.
This text has lots of spaces
The example above is done using the below HTML code.
<pre class="tab">This text has lots of spaces</pre>
- See our HTML <pre> tag page for further information on this tag.
Note
If you are using a WYSIWYG editor to enter the code above, you must be in the HTML tab or editing the HTML code.
Creating extra space around an element or object
Any HTML element can have additional spacing added to the top, right, bottom, or left. However, make sure you understand the difference between margin and padding before deciding the type of space you want to add around the element or object. As seen in the picture below, padding surrounds the element, within the border, and the margin outside the border.
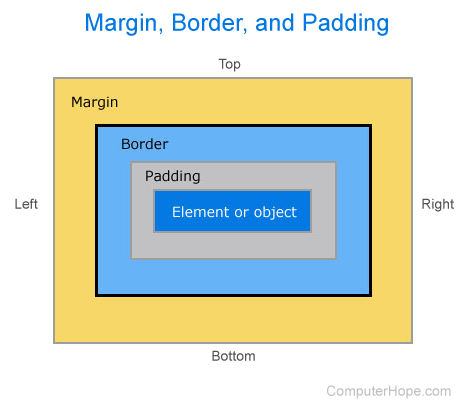
The example below shows our paragraph surrounded by a border, indented with a margin, and with spacing on the right and bottom.
An example of a paragraph with margin and padding.
The example above was created using the code below.
<p style="margin-left: 2.5em;padding: 0 7em 2em 0;border-width: 2px; border-color: black; border-style:solid;">Example of a paragraph with margin and padding.</p>
In the first section of the code, «margin-left: 2.5em;» adds a left margin of 2.5 em, which gives the appearance of indented text. As shown by the example, this spacing is outside of the border. In the next section, «padding: 0 7em 2em 0;» is defining the top, right, bottom, and left (clockwise) padding. There is «0» top padding, «7em» right padding, «2em» bottom padding, and 0 left padding. The remainder of this example is defining how the border should look.
Creating a tab using CSS and HTML
A tab can be created in HTML by adjusting the left margin of an element. For example, this paragraph has a left margin of 2.5 em from the element containing the text. The CSS to create this left margin is shown below.
.tab {
 margin-left: 2.5em
}
After placing this code in our CSS file, we can apply the «tab» class to any text to create the appearance of a tab. The value of the margin-left can be increased or decreased depending on your needs.
Although we recommend the method above, the margin-left CSS can also be added inline, as shown in the example below.
<p style="margin-left:2.5em">An example of a 5em left margin.</p>
An example of a 5em left margin.
- How to indent or tab text on a web page or in HTML.
To add extra space below a line or paragraph of text, or push text down lower on the page once, you can use the <br> tag. Below is an example of how this technique can be applied.
<p>This sentence contains  example text.<br>
<br>
As you can see, two breaks add the space above.</p>
The code above creates the text shown below.
This sentence contains example text.
As you can see, two breaks add the space above.
Additional breaks can be added if needed. However, we suggest using the CSS method mentioned earlier to add padding and spacing around your text if being done in multiple places on a page.
Add line spacing between text lines
The spacing between lines of text can be adjusted by increasing and decreasing the line-height using CSS to make the text easier to read. Below is an example of extra line spacing being added to a paragraph of text.
<p style="line-height:3.5em;">Text shown below with extra spacing</p>
The code above creates the text shown below.
This example text is an example of how extra space between lines could be added to text. However, we would not recommend using this much line space because it does make it more difficult to read. We’re only using this much line spacing as an example.
In our example above, we used 3.5 em as the line-height to help emphasize the spacing between the lines. However, for readability, we recommend using around 1.7em. Adding some additional spacing between lines always improves the readability of your text. However, adding too much can make it more difficult to follow and scan.
Add spacing around an image
To add extra space around an image, use CSS. To push text down lower on the page, you can use the <br> tag. Below are examples of how these techniques can be applied.
CSS example
<html><head>
  <title>Add Space Around An Image</title>
  <style>
  <!--
  img {
    padding:20px; // adds 20 pixels of space around the image.
  }
  -->
  </style>
</head>
<body>
<div id="bodyDiv">
<h3>Add Space Around An Image</h3>
<p>CSS, Image Outside of Paragraph Tags</p>
<p>Some text.</p>
<img src="anonymous.jpg" alt="Anonymous" width="350" height="266"/>
<p>Some text.</p>
</body>
</html>

Example with <br> tag
<html><head>
<title>Add Space Around An Image</title>
<style>
<!--
img { border: 1px black solid; }
-->
</style>
</head>
<body>
<div id="bodyDiv">
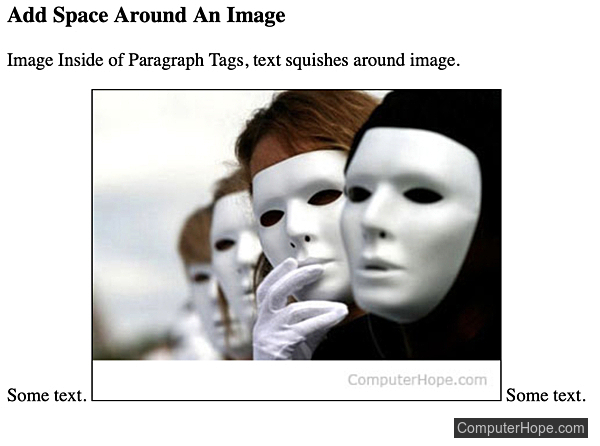
<h3>Add Space Around An Image</h3>
<p>Image Inside of Paragraph Tags, text squishes around image.</p>
<p>Some text.
<img src="anonymous.jpg" alt="Anonymous" width="350" height="266"/>
Some text.</p>
</body>
</html>
<html><head>
<title>Add Space Around An Image</title>
<style>
<!--
img { border: 1px black solid; }
-->
</style>
</head>
<body>
<div id="bodyDiv">
<h3>Add Space Around An Image</h3>
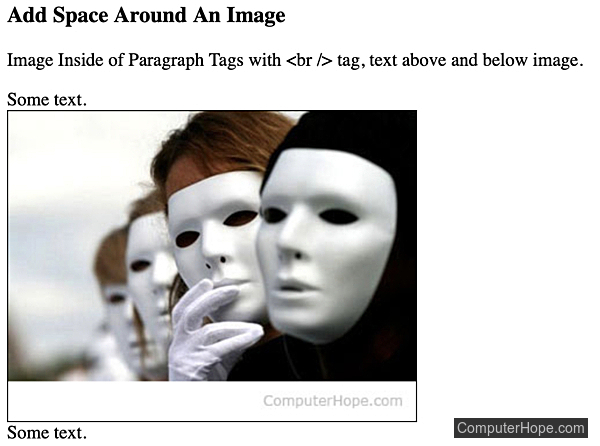
<p>Image Inside of Paragraph Tags with <br /> tag, text above and below image.</p>
<p>Some text.<br />
<img src="anonymous.jpg" alt="Anonymous" width="350" height="266"/><br />
Some text.</p>
</body>
</html>