
Word for Microsoft 365 Word for Microsoft 365 for Mac Word for the web Word 2021 Word 2021 for Mac Word 2019 Word 2019 for Mac Word 2016 Word 2016 for Mac Word 2013 Word 2010 Word for Mac 2011 More…Less
You can control the vertical space between the lines of text in your document by setting the line spacing. Or, you can change the vertical space between paragraphs in your document by setting the spacing before or spacing after paragraphs. You can also choose to keep lines of text together or keep paragraphs together on a page.
Change the line spacing in an entire document
-
Go to Design > Paragraph Spacing.
-
Choose an option. To single space your document, select No Paragraph Space.
To return to the original settings later, go to Design > Paragraph Spacing and choose the option under Style Set. This may be Default or the name of style you’re currently using.
Change the line spacing in a portion of the document
-
Select one or more paragraphs to update. Press Ctrl + A to select all.
-
Go to Home > Line and Paragraph Spacing

-
Select Line Spacing Options and choose an option in the Line spacing box.
-
Adjust the Before and After settings to change spacing between paragraphs.
-
Select OK.

For more info, see Adjust indents and spacing.
Change the line spacing in an entire document
-
Go to Design > Paragraph Spacing.
-
Choose the option you want. If you want to single space your document, choose No Paragraph Space.

This overrides the settings of the style you’re currently using. If you decide later to return to the original settings, go to Design > Paragraph Spacing and choose the option under Style Set. The option might be Default, as shown above, or it will show the name of style you’re currently using.
Change the line spacing in a portion of the document
-
Select the paragraphs you want to change.
-
Go to Home > Line and Paragraph Spacing.
-
Choose the number of line spaces you want or select Line Spacing Options, and then select the options you want under Spacing.
-
To change the spacing before or after each of the paragraphs in the text you selected, click the arrow next to Before or After and enter the amount of space that you want.
-
Select OK.

-
Select the paragraph whose lines you want to keep together.
-
Go to Format > Paragraph >Line and Page Breaks.
-
Select Keep lines together.
-
Select the first of the two paragraphs that you want to keep together.
Tip: If you want to keep more than two paragraphs together, select all but the last paragraph.
-
Go to Format > Paragraph.
-
Go to Line and Page Breaks.
-
Select Keep with next.
-
Select OK.
-
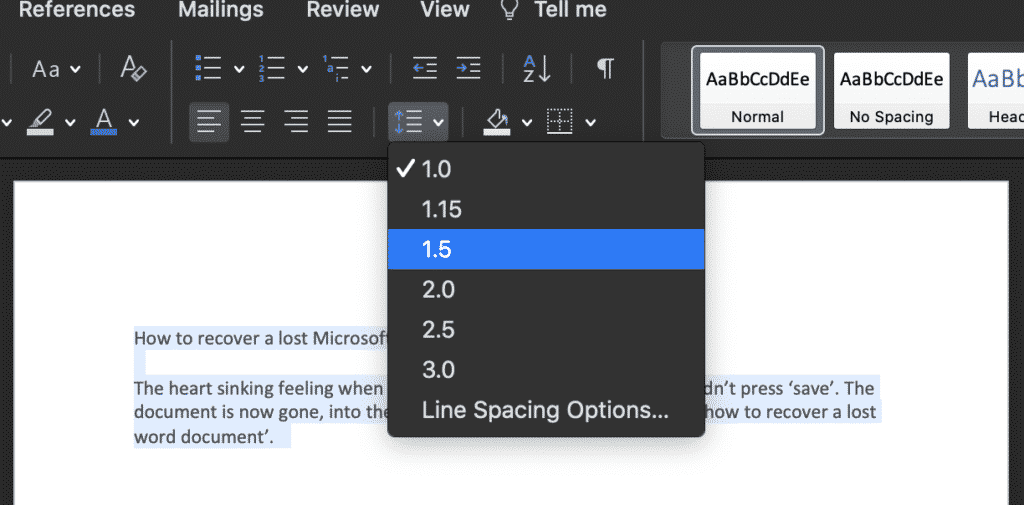
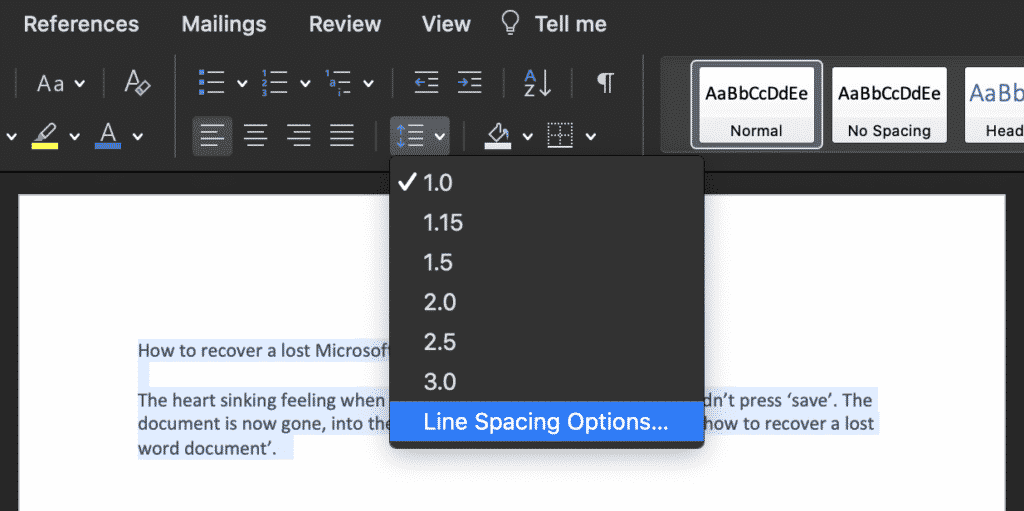
Select the paragraphs you want to change, or press Ctrl+A to select everything.
-
Go to Home > Line Spacing.
-
Choose the number of line spaces you want, or select Line Spacing Options and then select the options you want in the Paragraph dialog box under Spacing:
Tip: If you want to change the spacing before or after the selected paragraphs, select the arrows in the Before or After boxes, or type a number directly.
Need more help?
Want more options?
Explore subscription benefits, browse training courses, learn how to secure your device, and more.
Communities help you ask and answer questions, give feedback, and hear from experts with rich knowledge.

There are several ways to adjust line spacing in Microsoft Word. Today’s tutorial explains the basic method using the ribbon and a more advanced method using the Paragraph dialog box.
See the Quick Tip at the bottom of this tutorial to learn how to single-space an entire document from the Paragraph dialog box.
This tutorial is available as a YouTube video showing all the steps in real time.
Watch more than 150 other document software tutorials on my YouTube channel.
The images below are from Word for Microsoft 365.The steps are the same in Word 2021, Word 2019, and Word 2016, and similar for Word 2013 and Word 2010. However, your interface may look slightly different in those older versions of the software.
Basic Method: Adjust Line Spacing from the Ribbon
- Select the Home tab in the ribbon.

- (Optional Step) Select the Show/Hide button in the Paragraph group to show paragraph break symbols and other formatting that may affect line spacing.

- Select the text with the line spacing that needs to be changed.

- Select the Line and Paragraph Spacing button in the Paragraph group.

- Select an option from the drop-down menu:
A. Numbers 1.0 through 3.0 add space between lines.
B. Add Space Before Paragraph adds space before paragraphs but not before the lines within them.
C. Remove Space After Paragraph removes space after paragraphs but not after the lines within them.
These three options are based on your current font size with 1.0 being the equivalent of single-spacing.

Your changes will be applied immediately.

Note that you can apply the individual line spacing (the numbers 1.0 through 3.0) and the paragraph spacing to the same text to further customize your results.
- (Optional Step) Select the Show/Hide button again to hide paragraph symbols and other formatting (see figure 2).
Now, let’s move on to an advanced method offering additional spacing options.
Advanced Method: Adjust Line Spacing from the Paragraph Dialog Box
- Select the Home tab in the ribbon (see figure 1).
- (Optional Step) Select the Show/Hide button in the Paragraph group to show paragraph break symbols and other formatting that may affect line spacing (see figure 2).
- Select the text with the line spacing that needs to be changed (see figure 3).
Pro Tip: PC users can press Ctrl + A to select the entire document if all the line spacing needs to be changed. However, this includes items you may not want to alter, including headings, tables, table titles, figure captions, tables of contents, footnotes, endnotes, and reference lists.
- Select the dialog box launcher in the Paragraph group.

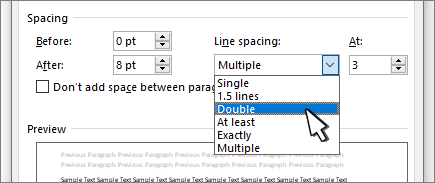
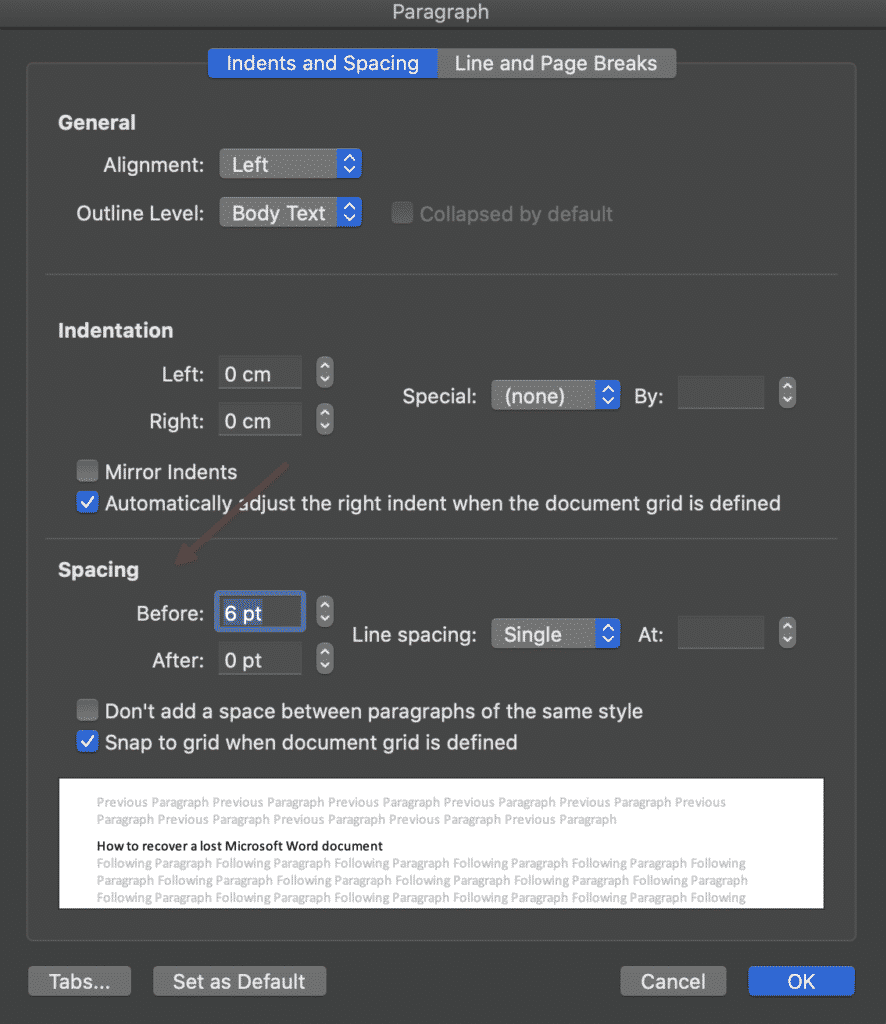
- Make changes in the Spacing section of the Paragraph dialog box:
A. The Before and After boxes represent the spaces before and after paragraphs measured in points with one point being 1/72 of an inch tall. Use the increment arrows to choose a whole number or enter a number with a decimal (e.g., 2.75) directly into the box.
B. The Line spacing drop-down menu offers six options:
1. Single—Creates single-spacing based on your current font size.
2. 1.5 Lines—Creates a space and a half as large as your current font size.
3. Double—Creates double-spacing based on your current font size.
4. At Least—Determines the minimum amount of space between lines based on the number of points entered in the At box.
5. Exactly—Creates space between lines based on the number of points entered in the At box.
6. Multiple—Creates spacing multiplied by the number entered in the At box. For example, if you enter four in the At box, your spacing will be four times as large as your current single-spacing.
C. Don’t add space between paragraphs of the same style—For many users, this will remove spaces between all paragraphs because general documents commonly have only one paragraph style.

Note that the Preview box updates as you make adjustments in the Spacing section.
- Select the OK button to close the Paragraph dialog box.

- (Optional Step) Select the Show/Hide button again to hide paragraph symbols and other formatting (see figure 2).
Quick Tip: Single-Space an Entire Document from the Paragraph Dialog Box
- Select the Home tab in the ribbon (see figure 1).
- Select the entire document. (PC users can press Ctrl + A.)
- Select the dialog box launcher in the Paragraph group (see figure 7).
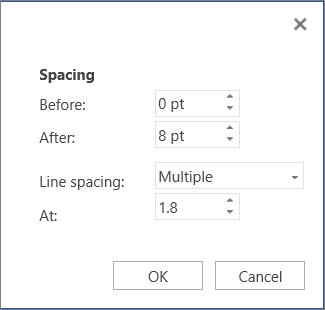
- Enter 0 in the Before box in the Paragraph dialog box (see figure 8).
- Enter 0 in the After box in the Paragraph dialog box (see figure 8).
- Select Single in the Line spacing drop-down menu (see figure 8).
- Select the OK button (see figure 9).
Related Resources
How to Adjust Letter Spacing in Microsoft Word (PC & Mac)
How to Adjust the Space between Words in Microsoft Word
How to Adjust Page Margins in Microsoft Word
Updated June 25, 2022
You may have heard of single or double line spacing, or even used them yourself.
Single line spacing is inserting one empty line between each line.
Double line spacing is inserting two empty lines between each line.
This method limits you to whole line spacings and also to the font size you are using, we’ve all tried to reduce or increase a line space by changing the font from font 12 to font 5 within the blank line….but it doesn’t need to be that difficult or manual.
Microsoft has a line spacing functionality that gives you a few popular pre-set options to quickly select from – 1 line space, 1.5 line space, 2 line spaces and so on or the ability to create a custom line space through their advanced options. Making line spacing easy!
In this article, we will walk you through how to insert a line space using one of Microsofts pre-set options and how to customise the line space to something more specific.
Changing the line spacing in Microsoft Word
- Open Word
- Select the text you would like to change the line spacing within
- Found under the Home tab, click Line and Paragraph Spacing
- To customise the spacing, click Line Spacing Options…
- Under spacing, manually type the spacing you would like between each highlighted line
- Press OK
You have now successfully changed the line spacing within your Microsoft Word file.
Often we find the line spacing to be too large within a shared document, you can reduce the line spacing by following the steps above, selecting a new, smaller line space.
Looking for an easier solution to your collaboration frustrations?
When collaborating in Microsoft Word, your email inbox can quickly become filled with updated versions of a document being sent back and forward between colleagues.
John made an edit, sent an email ‘see updated attached’.
Then Lucy made an edit, sent an email 30minutes later ‘updated version attached’, and it goes on for days.
Sending updated versions via email is one way to know a new version is available and required your attention. But it can also clutter your inbox with internal emails, with a single line or sometimes nobody of text in the email.

The alternative is to send them via a group chat channel such as Slack or Microsoft Teams, but you should make a new channel for the document updates so that you don’t miss one, or lose it in an open channel as other conversations start happening around the document being sent.
With overflowing inboxes and your slack channel constantly telling you there are un-read messages there needs to be a solution for collaborating alone. Somewhere your updated versions can live in peace, with no other noise around them to allow you to easily review and check them at any time.
The solution is here and it comes in the form of a great new purpose-built tool called Simul Docs.
Simul was built just for Microsoft Word and for you, to help you collaborate with ease.
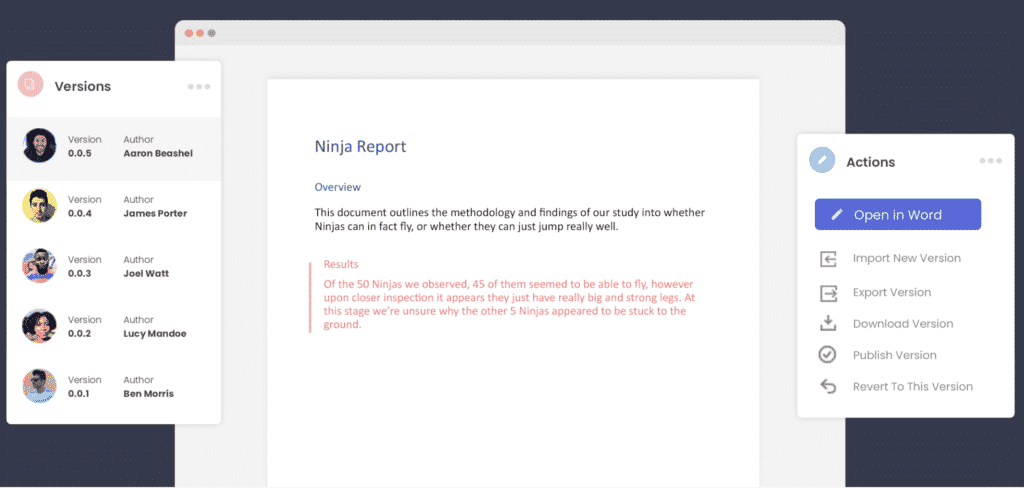
First and foremost, Simul will store and manage every version of your document in an easy to navigate toolbar that you can access from anywhere you have an internet connection (or offline if you do a quick download before losing your connection).
As a new version of your document is created, Simul will automatically save the file under a numerical version number that makes sense. The first version is named 0.0.1, the second 0.0.2, the third 0.0.3 and so on. Making it easy for you to keep track of how many versions have been made and which one is the most recent.

But what about any extra notes or comments the author wanted to make, ones they would usually put in the email such as ‘Tim, this is my final round of edits before we send onto client’? No worries, Simul allows you to add comments and notes to any version as well, so your team can see what is going on at all times.
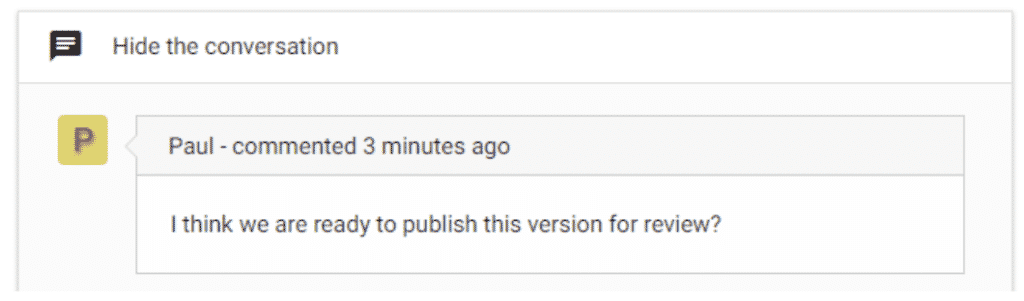
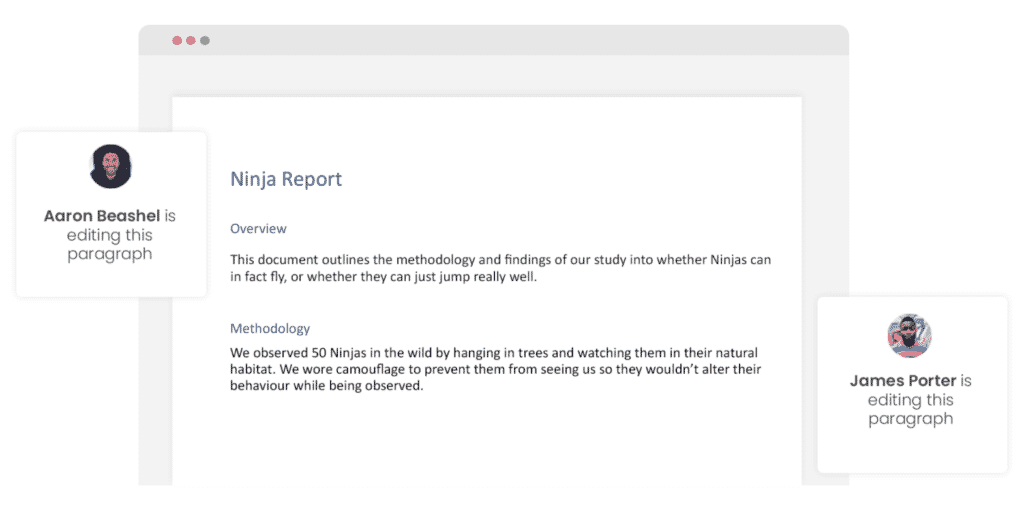
Speaking of comments and notes, Simul will also track every comment, change or edit made to a version for you, without you having to remember to turn tracked changes on. That’s pretty cool, right?
So a tool that manages your version control, saves your files and stores them and tracks all of your edits and changes without you thinking about any of it, it sounds too good to be true or as though it would be difficult to use or implement. Well, don’t worry it’s not, it’s here and it is called Simul Docs and it’s so easy to use, after walking through the in-app tutorial we had it down within 3 minutes.
It’s a bit like an apple product, it just makes sense. It’s clean and simple, nothing too complicated, but with everything you need all in the one spot.
If you’re not convinced already, head over to Simul now and give their free trial a go.
Collaboration just got a whole lot easier with Simul Docs.
Lesson 9: Line and Paragraph Spacing
/en/word/indents-and-tabs/content/
Introduction
As you design your document and make formatting decisions, you will need to consider line and paragraph spacing. You can increase spacing to improve readability and reduce it to fit more text on the page.
Optional: Download our practice document.
Watch the video below to learn how to adjust line and paragraph spacing in your document.
Line spacing
Line spacing is the space between each line in a paragraph. Word allows you to customize the line spacing to be single spaced (one line high), double spaced (two lines high), or any other amount you want. The default spacing in Word is 1.08 lines, which is slightly larger than single spaced.
In the images below, you can compare different types of line spacing. From left to right, these images show default line spacing, single spacing, and double spacing.

Line spacing is also known as leading (pronounced to rhyme with wedding).
To format line spacing:
- Select the text you want to format.

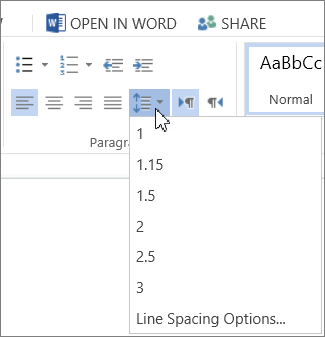
- On the Home tab, click the Line and Paragraph Spacing command, then select the desired line spacing.

- The line spacing will change in the document.


Adjusting line spacing
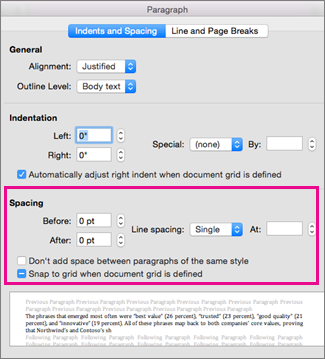
Your line spacing options aren’t limited to the ones in the Line and Paragraph Spacing menu. To adjust spacing with more precision, select Line Spacing Options from the menu to access the Paragraph dialog box. You’ll then have a few additional options you can use to customize spacing.
- Exactly: When you choose this option, the line spacing is measured in points, just like font size. For example, if you’re using 12-point text, you could use 15-point spacing.
- At least: Like the the Exactly option, this lets you choose how many points of spacing you want. However, if you have different sizes of text on the same line, the spacing will expand to fit the larger text.
- Multiple: This option lets you type the number of lines of spacing you want. For example, choosing Multiple and changing the spacing to 1.2 will make the text slightly more spread out than single-spaced text. If you want the lines to be closer together, you can choose a smaller value, like 0.9.


Paragraph spacing
Just as you can format spacing between lines in your document, you can adjust spacing before and after paragraphs. This is useful for separating paragraphs, headings, and subheadings.
To format paragraph spacing:
In our example, we’ll increase the space before each paragraph to separate them a bit more. This will make it a little easier to read.
- Select the paragraph or paragraphs you want to format.

- On the Home tab, click the Line and Paragraph Spacing command. Click Add Space Before Paragraph or Remove Space After Paragraph from the drop-down menu. In our example, we’ll select Add Space Before Paragraph.

- The paragraph spacing will change in the document.


From the drop-down menu, you can also select Line Spacing Options to open the Paragraph dialog box. From here, you can control how much space there is before and after the paragraph.

You can use Word’s convenient Set as Default feature to save all of the formatting changes you’ve made and automatically apply them to new documents. To learn how to do this, read our article on Changing Your Default Settings in Word.
Challenge!
- Open our practice document.
- Select the the date and the address block. This starts with April 13, 2016, and ends with Trenton, NJ 08601.
- Change the spacing before the paragraph to 12 pt and the spacing after the paragraph to 30 pt.
- Select the body of the letter. This starts with I am exceedingly and ends with your consideration.
- Change the line spacing to 1.15.
- When you’re finished, your page should look like this:


/en/word/lists/content/
In the old days, getting a document written up neatly involved having a medieval monk painstakingly copy everything out by hand in elaborate illuminated script.
Thankfully, now we have word processors, which makes life much simpler. As well as eliminating the need to hire a scribe, programs like Microsoft Word provide a range of formatting options to make sure your work is easy to read.
In this post, for example, we take a look at how to set line spacing in Microsoft Word.
What is Line Spacing? Why Does it Matter?
Line spacing is the gap between lines of text in your document. College students are often told to use double spacing (i.e., a gap twice the height of the font) to enhance the clarity of their written work and so markers have space to leave feedback on a paper.
How to Set Line Spacing
Adjusting the spacing in a document is reassuringly easy thanks to the pre-defined settings in Microsoft Word (instructions apply to Word 2007 onwards):
- Select the text you want to adjust
- Find the “Paragraph” section on the “Home” tab
- Click on the line and paragraph spacing button to open the dropdown menu
- Select the desired line spacing (standard options range from 1.0 to 3.0)
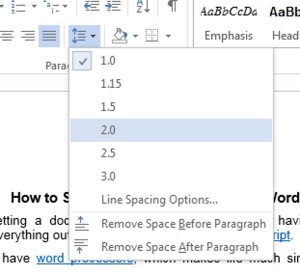 To double-space your document, simply click “2.0.” If you pick “Line Spacing Options” from the dropdown menu, you can also customize the spacing to suit your requirements.
Taking Shortcuts
If you find yourself regularly adjusting the spacing in your work, you could save time by using the keyboard shortcuts in Microsoft Word. For line spacing, these are:
|
Line Spacing |
PC |
Mac |
|
1.0 |
Ctrl + 1 |
Command + 1 |
|
1.5 |
Ctrl + 5 |
Command + 5 |
|
2.0 |
Ctrl + 2 |
Command + 2 |
To set the spacing in your document this way, simply select the passage(s) you want to modify and use the shortcut for the spacing desired. To select all text in the document, use “Ctrl + A” on PC or “Command + A” on Mac.
Find this useful?
Subscribe to our newsletter and get writing tips from our editors straight to your inbox.