
![]()
Download Article
![]()
Download Article
Want to create an outline around certain letters in your Word document? There are two easy ways you can surround words and phrases with colored outlines in Word—using Text Effects, and using Word Art. We’ll show you how to make any font in your Microsoft Word document stand out by outlining it in color.
-

1
Type the word or phrase you want to outline. The lines around your text will look better on larger characters, so make your font a bit larger than the rest of your text.
- You can make the letters any color you want before creating an outline around them. Just highlight the word or phrase, and then select a color from the «Font» panel at the top of Word.
-
2
Highlight the text you want to outline. Just click and drag the mouse around the text to select it.
Advertisement
-
3
Click the Text Effects and Typography tool. This is the «A» surrounded by a blue glowing outline in the «Font» panel at the top of Word.
- If you don’t see this icon, click the Home tab at the top of Word.
-
4
Select the Outline menu. Now you’ll see all of the options you can use to create an outline around the selected letters.
-
5
Select an outline color. To choose the color of the line that surrounds your text, choose one of the colors displayed on the menu, or select More Outline Colors… to select a custom color.
-
6
Use the Weight menu to select the thickness of the outline. The larger the number, the thicker the outline around the letters.
- If you go too thick, you might make the text unreadable. You can always undo the last action in word by pressing Control + Z (PC) or Command + Z (Mac).
-
7
Use the Dashes menu to stylize the outline. If you’d rather have a dotted, dashed, or otherwise stylized line around your word or phrase instead of a solid line, you can select any of the options in this menu.


Advertisement
-
1
Click the Insert tab at the top of Word. WordArt is a tool that can help you create all types of vibrant text designs, including color outlines. You’ll find it on the Insert tab.
-
2
Click the WordArt menu. It’s the icon of a tiled blue «A» on the Insert tab in Word. A menu with several text styles will appear.[1]
-
3
Select an outline style. Not all WordArt styles have outlines, but several do. Don’t worry about the colors you see in the sample—you’ll be able to change those if you don’t like them. Once you click a style, you’ll see some sample text appear on the page.
-
4
Replace the sample text with your own. The text you type will appear in the selected outline style.
-
5
Select the Shape Format tab. It’ll appear at the top of the screen while you’re editing WordArt. This tab should already be active, but if it’s not, click it now.
-
6
Click the small arrow at the bottom-right corner of the WordArt Styles panel. It’s at the top of Word. This expands the «Format Shape» panel on the right side of Word.
-
7
Click the Text Fill and Outline icon. It’s the «A» with a line under it in the right panel.
-
8
Click Text Fill to select a color. When you choose this option, you’ll be able to choose the color of the actual text—you can choose an outline color separately.
-
9
Click Text Outline to design your outline. On this menu option, you can select a color, width, and even pattern (such as dotted or dashed) for the lines that surround your letters.


Advertisement
Add New Question
-
Question
How do I outline text in Windows 10?

Under WordArt Tools, on the Format tab, in the WordArt Styles group, click Shape Outline, and then do one of the following: To add or change an outline color, click the color that you want. To choose no color, click No Outline.
Ask a Question
200 characters left
Include your email address to get a message when this question is answered.
Submit
Advertisement
Thanks for submitting a tip for review!
About This Article
Article SummaryX
1. Create or Open a Word document.
2. Type the text you want in outline.
3. Highlight the text.
4. Click on the «Text Effects» tool.
5. Click on Outline.
6. Customize the Outline effect.
Did this summary help you?
Thanks to all authors for creating a page that has been read 498,291 times.
Is this article up to date?
Apply or Remove Strikethrough Using Shortcuts in Word
by Avantix Learning Team | Updated March 14, 2021
Applies to: Microsoft® Word® 2010, 2013, 2016, 2019 and 365 (Windows)
You can apply strikethrough to text in Word to cross out or create a line through text. This can be effective to show that something has been removed or deleted. Although you can use Strikethrough on the Home tab in the Ribbon or use the Font dialog box, you can also write your own Strikethrough keyboard shortcut in Microsoft Word.
Recommended article: How to Insert a Line in Word (3+ Ways)
Do you want to learn more about Microsoft Word? Check out our virtual classroom or live classroom Word courses >
What is strikethrough?
Strikethrough is a character format that can be applied to text where a line appears through the selected text. Because it’s a format, it can be removed easily. The most common way to apply strikethrough is to select the text and then click Strikethrough in the Font group on the Home tab in the Ribbon (as an ab with a line through it):

You can also press Alt > H > 4 (Alt, then H and then 4).
Using keyboard shortcuts to access the Font dialog box
To access the Font dialog box using a keyboard shortcut and then apply Strikethrough:
- Select the text you want to strikethrough.
- Press Ctrl + D. The Font dialog box appears.
- Press Alt + K to select Strikethrough (note that k is the underlined letter).
- Press Enter.
Below is the Font dialog box:

Adding Strikethrough to the Quick Access Toolbar
You can also add Strikethrough to the Quick Access Toolbar and then access it using Alt.
It’s usually easier to work with the Quick Access Toolbar if you display it below the Ribbon. If the Quick Access Toolbar is above the Ribbon, click the down arrow to the right of the Quick Access Toolbar and select Show Below the Ribbon from the drop-down menu.
To add Strikethrough to the Quick Access Toolbar:
- Right-click Strikethrough in the Font group on the Home tab in the Ribbon. A drop-down menu appears.
- Select Add to Quick Access Toolbar.
- Click the down arrow to the right of the Quick Access Toolbar and select More commands from the drop-down menu. The Options dialog box appears.
- In the list of commands on the right side of the dialog box, click Strikethrough.
- Click the up arrow that appears on the far right until the button appears at the top of the list (you can move it to the second position, third position, etc.).
- Click OK.
- Press Alt. Key tips appear on the Quick Access Toolbar. If you have moved Strikethrough to the first position, press 1 to apply it. If you have moved Strikethrough to the second position, press 2 to apply it and so on. These are sequential shortcuts, so press Alt and then the number.
Creating a custom keyboard shortcut
You can also create your own keyboard shortcuts in Microsoft Word by customizing the keyboard. This is a great way to create a strikethrough shortcut.
In Microsoft Word (unlike Excel and PowerPoint), you can use File Options to customize your keyboard (note the Customize command at the bottom of the Customize Ribbon category):

To create your own keyboard shortcut for Strikethrough using File Options:
- Click the File tab in the Ribbon.
- Click Options. A dialog box appears.
- In the left panel, click Customize Ribbon.
- In the panel on the right, beside Keyboard Shortcuts, click Customize. The Customize Keyboard dialog box appears.
- Under Categories, click Home Tab.
- Under Commands, click Strikethrough.
- Click in the box below Press new shortcut key.
- Press the keys you want to assign (at the same time). You can press Ctrl + Alt + a letter so that it is less likely to have a conflict with a previously assigned shortcut. You don’t want to reassign common shortcuts such as Ctrl + P. In this case, you could press Ctrl + Alt + S.
- Click Assign.
- Beside Save changes in, select Normal (to save the changes globally). Normal is the default global template.
- Click Close.
- Click OK in the Options dialog box.
Now you can select text and use the keyboard shortcut you assigned (such as Ctrl + Alt + S) to apply strikethrough. Strikethrough is a toggle, so you can use the same shortcut to remove strikethrough.
Below is the Customize Keyboard dialog box:

You can assign keyboard shortcuts to many other commands using this strategy.
Because the keyboard assignments are typically saved in the Normal template, when you exit Word, be sure to save the Normal template when prompted.
Subscribe to get more articles like this one
Did you find this article helpful? If you would like to receive new articles, join our email list.
More resources
How to Generate Random Text in Word
How to Hide Comments in Word (or Display Them)
How to Insert Greek Letters or Symbols in Word (6 Ways)
How to Superscript or Subscript in Microsoft Word (with Shortcuts)
3 Strikethrough Shortcuts in Excel to Cross Out Text or Values in Cells
Related courses
Microsoft Word: Intermediate / Advanced
Microsoft Excel: Intermediate / Advanced
Microsoft PowerPoint: Intermediate / Advanced
Microsoft Word: Long Documents Master Class
Microsoft Word: Styles, Templates and Tables of Contents
Microsoft Word: Designing Dynamic Word Documents Using Fields
VIEW MORE COURSES >
Our instructor-led courses are delivered in virtual classroom format or at our downtown Toronto location at 18 King Street East, Suite 1400, Toronto, Ontario, Canada (some in-person classroom courses may also be delivered at an alternate downtown Toronto location). Contact us at info@avantixlearning.ca if you’d like to arrange custom instructor-led virtual classroom or onsite training on a date that’s convenient for you.
Copyright 2023 Avantix® Learning
Microsoft, the Microsoft logo, Microsoft Office and related Microsoft applications and logos are registered trademarks of Microsoft Corporation in Canada, US and other countries. All other trademarks are the property of the registered owners.
Avantix Learning |18 King Street East, Suite 1400, Toronto, Ontario, Canada M5C 1C4 | Contact us at info@avantixlearning.ca
Contents
- 1 How to Strikethrough in Word with Font Formatting
- 2 How to Put a Line Through Text in Word Using the Font Dialog Box
- 3 How to Add Strikethrough in Word to the Quick Access Toolbar
- 4 How to Create a Word Strikethrough Shortcut
- 5 How to Put a Line Through Any Text Using Unicode
- 6 How to Clear Formatting in Word or Turn Text Upside Down
Though it’s rare, there are times when we need to show that text should be removed from a document without actually removing it. The best way to do this is to learn how to strikethrough text in Word or your respective editing or social media application. Today we’re going walk you through just that, but first a word about what strikethrough is.
What is strikethrough?
Strikethrough text, also known as crossed-out text, lets you put a line through words. In Word, strikethrough takes the form of a character format, which allows you to easily add and remove it at will.
In other applications, you may have to use an online tool to generate your strikethrough text. Or, if the application supports markdown, you may also be able to use the double tilde symbol (~~) before and after your text to achieve the effect.
Today we’ll be showing you how to put a line through text in Word using several methods, but also share an online tool you can use for any application. Let’s start:
How to Strikethrough in Word with Font Formatting
The most user-friendly way to strikethrough text in Word is via the ever-familiar font formatting panel. Here’s how you access it:
- Select your text, open the Font dialog, and press the strikethrough symbol
You can find the font panel in the “Home” tab of your ribbon. It’s where you have bold, underline, and other formatting options. The button will look something like this:
ab. Click it and it will automatically put a line through your selected text.If you want to do this faster, you can also press Alt > H > 4 on your keyboard.


How to Put a Line Through Text in Word Using the Font Dialog Box
If you need an alternate method to above, you can strikethrough text in Word quite quickly by using the Font dialog box and some handy keyboard shortcuts. Here’s how:
- Select your text and press Ctrl + D
You should see the font dialog box pop up with all of its normal options.

- Press Alt + K, then Enter
Alt + K will tick the strikethrough box without you needing to take your fingers of the keyboard. The Enter key applies the changes.

- Check your crossed out text in Word
You should see that the text you selected has a line through it, just as intended. With a bit of practice, you should be able to complete this whole process in less than a second.


How to Add Strikethrough in Word to the Quick Access Toolbar
For faster access to strikethrough in Word, you can add it to your quick access toolbar, which will both make it more visible and easier to access via keyboard shortcut. Here’s how you can do so:
- Right-click the strikethrough button in the “Home” tab and select “Add to Quick Access Toolbar”
Depending on the size of your Word window, you may have to click the “Font” button to expand the font panel.

- Press the Quick Access dropdown arrow and press “More Commands…”
Depending on your Word settings, the quick settings dropdown will either be just above or just below your ribbon.

- Select Strikethrough from the right-hand list and change its position
You can press the up and down arrows on the right-hand side to move it to wherever make the most sense to you. Bear in mind that the position in the list will determine the number you have to press to apply it with a shortcut. If it was first in the list, for example, the button would be Alt + 1. Click “OK” to save the changes.

- Select your text and press the relevant keyboard shortcut
If your strikethrough is second in Quick Access list like ours, this will be Alt + 2. Otherwise, it could be Alt + 1, Alt + 3, Alt + 4, etc.


How to Create a Word Strikethrough Shortcut
The default Word Strikethrough shortcut is a bit of a pain, requiring you to press Alt, then H, then 4. We can change this by creating a custom strikethrough shortcut:
- Click “File”

- Select “More… > Options” from the sidebar

- Select “Customize Ribbon” and press “Customize” next to “Keyboard shortcuts:”
This button should be located underneath the left-hand list.

- Click “Home tab” in the left column and “Strikethrough” in the right

- Click in the “Press new shortcut key” box and press the shorcut you’d like on your keyboard.
In our case, we went for Alt + Ctrl + S. Note that you probably shouldn’t use just Ctrl + S as that’s reserved for saving your document. Once you’ve decided, press “Assign”.

- Select “Normal.dotm” in the “Save changes in:” dropdown
This will ensure the shortcut applies across all documents, rather than just the one you’re currently using. You can safely press “Close” when you’re done. Make sure you save the normal template when prompted when you exit Word.

- Press “OK” in the Word Options window
You can now test your Word strikethrough shortcut on some text if you’d like.


How to Put a Line Through Any Text Using Unicode
Outside of Word, you can easily put a line through text using online strikethrough text tools that convert text to unicode. You simply paste your text, press a button, and copy and paste it back into your document or message. This however only works with apps and forms that support such unicode strikethrough text characters.
We’ll be using SaijoGeorge in this tutorial, but you can use any of the many freely available online tools.
- Enter your text in the white textbox and press “StrikeEm”

- Click on the strikethrough text and press Ctrl +X to copy the text from the pop-up

- Example: Press Ctrl + V to paste the crossed-out text in your Word processor

- Example: Press Ctrl + V to paste the text into a chat message


How to Clear Formatting in Word or Turn Text Upside Down
Now that you know how to strikethrough in Word, you may be wondering whether you can remove the effect from a piece of text again. The answer is yes, and our tutorial on how to clear formatting in Word will tell you everything you need to know. If you’d rather play around with other text effects, however, you can read our how to turn text upside down tutorial.
Word for Microsoft 365 Outlook for Microsoft 365 Word 2021 Outlook 2021 Word 2019 Outlook 2019 Word 2016 Outlook 2016 Word 2013 Outlook 2013 Word 2010 Outlook 2010 Word 2007 Outlook 2007 More…Less
You can add horizontal lines, sometimes called horizontal rules, to a document or email message to help separate sections of text and add visual appeal.
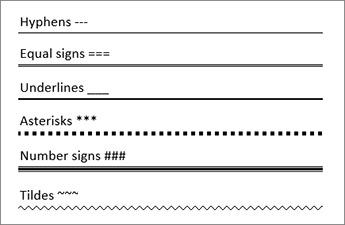
By default, Word and Outlook have a three-character shortcuts that inserts a full-width horizontal rule in your document or message. The appearance of that rule—thinner, thicker, double-line, dotted, wavy—depends on which shortcut you use, as illustrated in the image below.
If this automatic line feature doesn’t suit you, you can turn off this feature in Word or turn it off in Outlook.
If you want to draw a line for illustration purposes, see Draw a line in Word or Outlook instead.
Insert a horizontal line by typing a few characters
The fastest way to add a horizontal line or rule is to use the AutoFormat feature. When you type certain characters three times in their own paragraph and then press Enter, those characters instantly become a full-width horizontal line.
-
Place the cursor where you want to insert the horizontal line.
-
Type three of the characters illustrated below, and then press Enter.
The line is inserted for the full width of the page. When inserted into a column, the line is inserted to match the width of the column. To add text above the line, put your cursor where you want the text and begin typing.
Format the horizontal line after you create it
The shortcut described above creates an empty paragraph with a bottom border. You can change the look of that border line by using the Borders options:
-
In Word, on the Home tab of the ribbon, select the down arrow next to
Borders.In Outlook, on the Format Text tab of the ribbon, select the down arrow next to
Borders. -
At the bottom of the menu, select Borders and Shading.
-
In the dialog, you can change the line’s style (solid, dotted, wavy, double, and so on), color, or width as you see fit.
-
When you’re done formatting the line, select OK. Then, on the ribbon, select the
Borders button to apply your changes.
 Borders.
 Borders button to apply your changes.
 Word: Turn off the automatic line feature
To prevent Word or Outlook from automatically inserting a horizontal line when you type the three shortcut characters, do the following:
-
On the ribbon, select File > Options.
-
In the dialog box, select Proofing > AutoCorrect Options > AutoFormat As You Type.
-
Clear the Border Lines option.
-
Select OK.
Outlook: Turn off the automatic line feature
-
On the ribbon, select File > Options.
-
In the dialog box, select the Mail tab, then select Editor Options.
-
On the Proofing tab, select AutoCorrect Options > AutoFormat As You Type.
-
Under Apply as you type, clear the Border Lines option.
-
Select OK.
Want to draw a line?
See Draw a line in Word or Outlook.
See Also
Add a border to some text
Draw shapes
Need more help?
Want more options?
Explore subscription benefits, browse training courses, learn how to secure your device, and more.
Communities help you ask and answer questions, give feedback, and hear from experts with rich knowledge.
Горизонтальная линия в Ворде — элемент дизайна, который служит для оформления текста или разделения документа на части. Добавление этого элемента в документ улучшает восприятие и удобство при чтении содержимого файла Word.
Вставка линий в Word помогает отформатировать документ, придать ему необходимый вид. Горизонтальная линия Word может сделать текст более легким для чтения, наличие линий делает документ более привлекательным.
Содержание:
- Как вставить горизонтальную линию в Ворде с помощью клавиатуры (1 способ)
- Как провести горизонтальную линию в Ворде с помощью добавления границы (2 способ)
- Как нарисовать горизонтальную линию в Ворде с помощью «Фигуры» (3 способ)
- Как в Ворде прочертить горизонтальную линию с помощью таблицы (4 способ)
- Как добавить горизонтальную линию в Ворде подчеркиванием (5 способ)
- Выводы статьи
- Как добавить горизонтальную линию в Word (видео)
Применение этого элемента дизайна в Microsoft Word поможет вашей работе выглядеть четко и профессионально как для личного, так и для корпоративного использования.
Из этого руководства вы узнаете, как сделать горизонтальную линию в Ворде, с помощью различных инструментов в текстовом редакторе Microsoft Word. Мы предложим вам три классических метода решения задачи и два нестандартных варианта. Инструкции этой статьи подходят для версий программы Microsoft Word: Word для Microsoft 365, Word 2021, Word 2019, Word 2016, Word 2013, Word 2010 и Word 2007.
Как вставить горизонтальную линию в Ворде с помощью клавиатуры (1 способ)
В этом методе мы используем функцию автоформата, чтобы разместить линию между строками текста, а не непосредственно в текстовой строке. Функция автоформата работает, когда до или после того места, где вы хотите поместить линию, нет текста.
Пройдите несколько шагов, чтобы вставить горизонтальную линию Word с помощью сочетаний клавиш клавиатуры:
- Откройте документ Word, а затем щелкните курсором мыши по тому месту документа, куда необходимо вставить горизонтальную линию.
- Введите три или более символов подряд для нужного стиля линии.
- Нажмите на клавишу «Enter» на клавиатуре.
Это действие превращает набранные символы в сплошную линию, которая доходит до края страницы под последней строкой текста.
Вы можете создавать различные стили для линий, вводя три или более определенных последовательных символа в строке. Ознакомьтесь со списком символов, которые вы можете ввести для создания линий, оформленных в разных стилях:
- Дефисы (—) образуют обычную простую линию.
- Знаки равенства (===) создают простую двойную линию.
- Звездочки (***) образуют пунктирную строку.
- Подчеркивание (___) создает одну жирную строку.
- Тильды (~~~) создают волнистую линию.
- Цифровые знаки с решеткой (###) образуют тройную линию с толстым центром.

Как провести горизонтальную линию в Ворде с помощью добавления границы (2 способ)
Сейчас мы расскажем, как добавить горизонтальную линию в Word без использования параметров автоформата или автозамены. Мы используем встроенный инструмент «Границы» из настроек оформления абзаца, расположенный на ленте приложения.
Выполните следующие действия:
- В окне открытого документа Word поместите курсор в то место документа, куда вы хотите вставить линию.
- Во вкладке «Главная» войдите в группу «Абзац», а затем щелкните по стрелке около кнопки «Границы».
- В раскрывающемся меню выберите пункт «Горизонтальная линия».

- Это действие помещает линию в указанное место на странице документа MS Word.

- Дважды щелкните левой кнопкой мыши по линии, чтобы отредактировать внешний вид этого элемента оформления документа.
- Откроется диалоговое окно «Формат горизонтальной линии», в котором можно изменить ширину, высоту, цвет и выравнивание линии.

- Нажмите на кнопку «ОК», чтобы применить эти настройки для оформления вида созданной горизонтальной линии.
Как нарисовать горизонтальную линию в Ворде с помощью «Фигуры» (3 способ)
Сейчас вы узнаете о третьем методе, с помощью которого можно нарисовать линию на странице документа Word. Меню «Фигуры» содержит несколько параметров линий, в том числе линии со стрелками на одном или обоих концах.
После того, как вы нарисуете линию, настройте цвет и внешний вид этого элемента. Линию можно нарисовать не по ширине листа, а произвольной длины.
Вам нужно пройти шаги, которые помогут вам вставить линию с помощью функции «Фигуры»:
- Откройте документ Word, перейдите во вкладку «Вставка».
- В группе «Иллюстрации» щелкните по значку «Фигуры».
- В открывшемся меню выберите форму линии в опции «Линии».

- Нарисуйте линию в любом месте документа, используя выбранный шаблон линии.
Чтобы нарисовать строго горизонтальную линию, сразу после выбора вида фигуры, нажмите и удерживайте клавишу «Shift», а затем проведите линию в нужном месте на странице документа.
- Во вкладке «Формат фигуры» (в некоторых версиях Word — Формат) измените внешний вид линии, цвет, примените другие эффекты.

Как в Ворде прочертить горизонтальную линию с помощью таблицы (4 способ)
Это не самый удобный нестандартный способ вставки линии в документ Word, но им также можно воспользоваться.
Выполните следующее:
- На странице документа Word установите в нужном месте указатель мыши.
- Откройте вкладку «Вставка».
- Щелкните по кнопке «Таблица» в группе «Таблица».
- В выпадающем меню выберите одну ячейку из предложенного макета таблицы.

- Во вкладке «Конструктор таблиц» щелкните по стрелке значка «Границы» в группе «Обрамление».
- В открывшемся меню поочередно снимите выделение с пунктов «Левая граница», «Правая граница», а также с одного из двух пунктов: «Верхняя граница» или «Нижняя граница», в зависимости от того, верхнюю или нижнюю линию вы хотите оставить на странице.

Рассмотрим еще один необычный способ создания горизонтальной линии в документе Word. Это не совсем правильный метод, но и этим вариантом можно воспользоваться, если вам будет удобно.
Проделайте следующие действия:
- Установите курсор мыши в нужном месте на открытой странице документа Word.
- В группе «Шрифт» нажмите на значок «Подчеркнутый».

Если вы хотите изменить обычный прямой вид подчеркивания по умолчанию, нажмите на стрелку у кнопки «Подчеркнутый», и выберите другой подходящий вариант.

- Нажимайте на клавишу «Space» (Пробел) до того места, где по вашему мнению должна заканчиваться горизонтальная линия.
- В самом конце напечатайте точку.
- В результате у нас появилась горизонтальная линия в документе Word.

- Выделите точку, а затем измените цвет точки на белый, который соответствует фону страницы Word, для скрытия этого символа.
Если необходимо измените цвет линии, сделайте следующее:
- Выделите линию на странице документа Microsoft Word.
- Войдите в группу «Шрифт».
- В опции «Цвета темы» выберите подходящий цвет из предложенных или воспользуйтесь палитрой с другими цветами.

Выводы статьи
Во время редактирования документа некоторые пользователи не знают, как начертить горизонтальную линию в Ворде. Этот элемент оформления придает документу привлекательность и удобство. Вы можете добавить горизонтальную линию в Word несколькими способами: при помощи клавиатуры, из настроек границ оформления абзаца, нарисовать с помощью функции фигуры, создать линию из таблицы или использовать метод подчеркивания.
Как добавить горизонтальную линию в Word (видео)
Похожие публикации:
- Как сделать вертикальный текст в Word — 5 способов
- Как написать дробь в Ворде
- Голосовой набор текста в Word — 3 способа
- Как перевернуть текст в Word — 5 способов
- Как сделать нумерацию страниц в Word