

![]()
Office Timeline Pro+ is here!
Align programs and projects on one slide with multi-level Swimlanes.
This step-by-step Word timeline tutorial explains how to create professional timelines right inside the popular word processor.
Microsoft Word allows users to build a basic timeline that they can manually customize and adjust to their project’s requirements. However, since the tool is designed mainly for editing copy, it may lack the flexibility that one needs to create more professional-looking visuals and update them easily.
Those who need to constantly create and update project visuals for presentations to clients or executives may find it easier to build their timelines using PowerPoint. On this page, we will show you how to make a timeline both manually in Word and automatically in PowerPoint.
Which tutorial would you like to see?
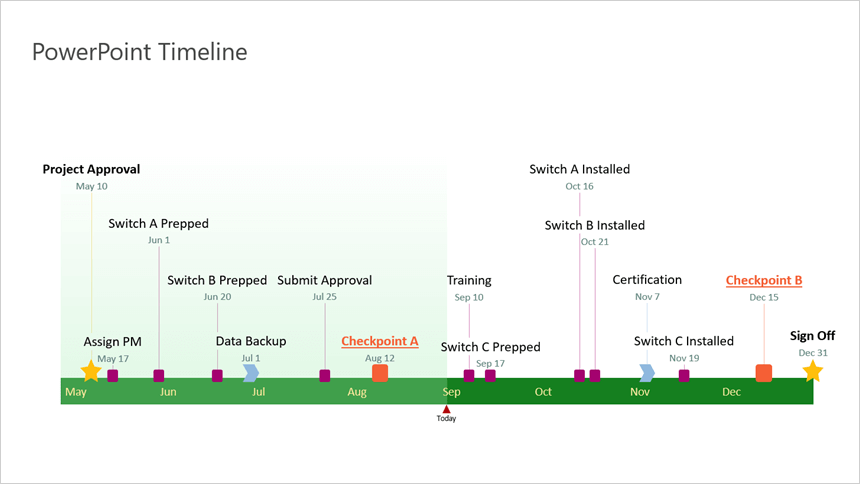
1. Create a basic timeline.
-
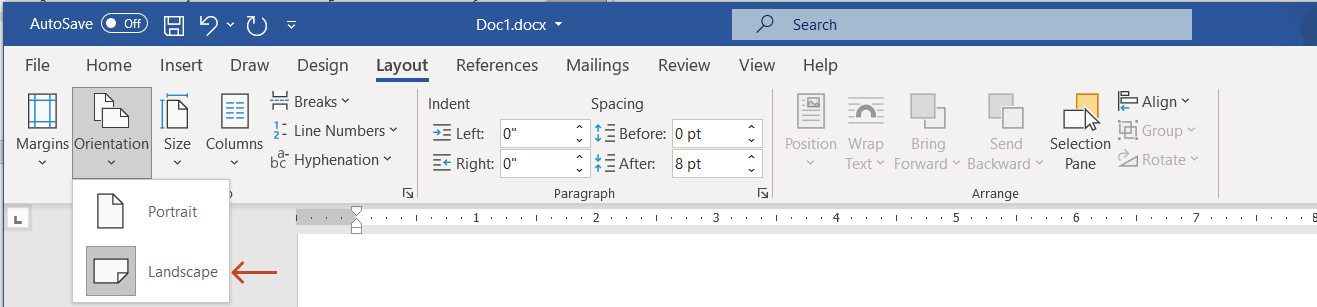
Open a new Word document and change the page orientation from Portrait to Landscape, which will make room for more items to be placed on the timeline. To do so, go to the Layout tab on the Word ribbon and click on Orientation.

-
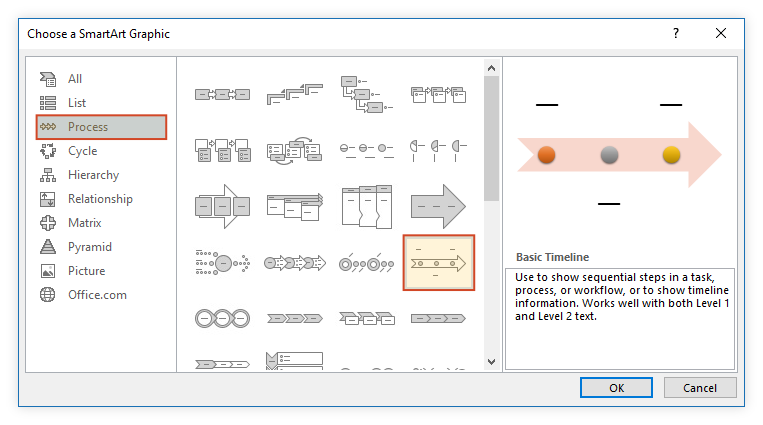
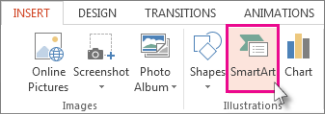
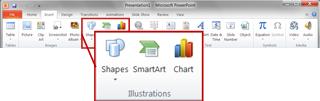
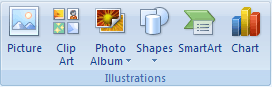
Select the Insert tab and click on the SmartArt button in the Illustrations section.
-
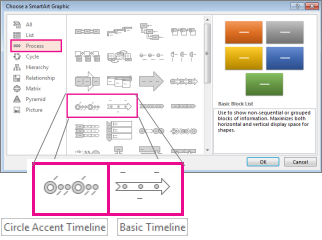
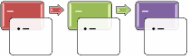
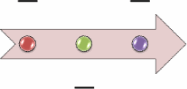
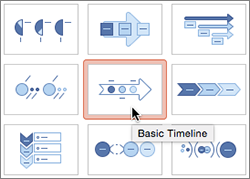
Select the Process category within the window that pops up and pick the graphic type that you want to use for your Word timeline. You have a variety of options to choose from, but for a simple timeline that shows the main milestones of a project, we’d recommend going with the Basic Timeline, which you can see bordered below.
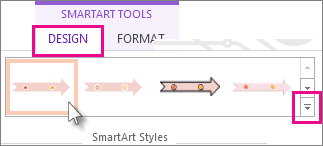
If you want to try out different layouts for your timeline, you can always change the style and colors from the SmartArt Design tab on the ribbon.

2. Enter your data.
-
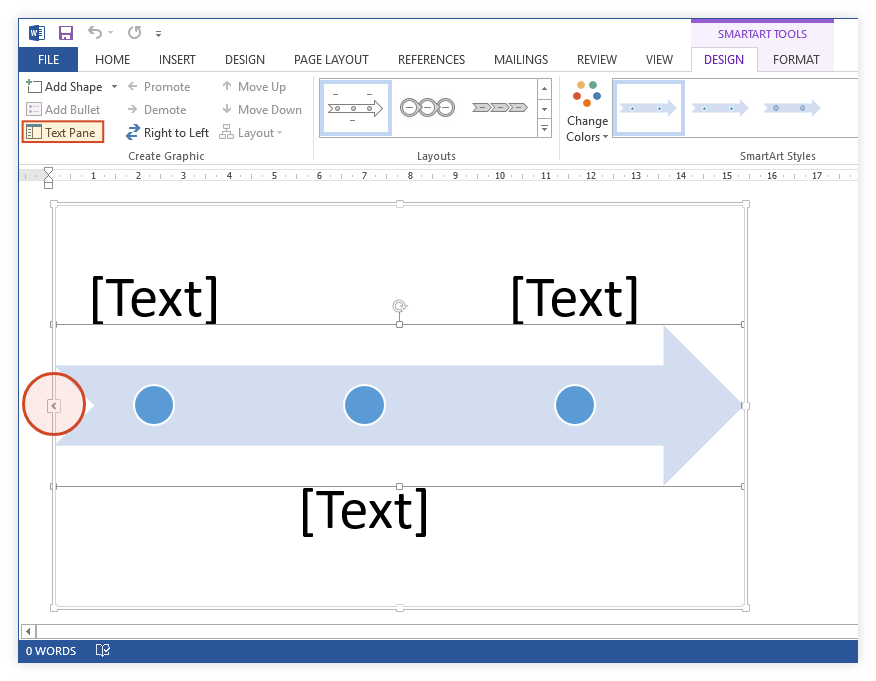
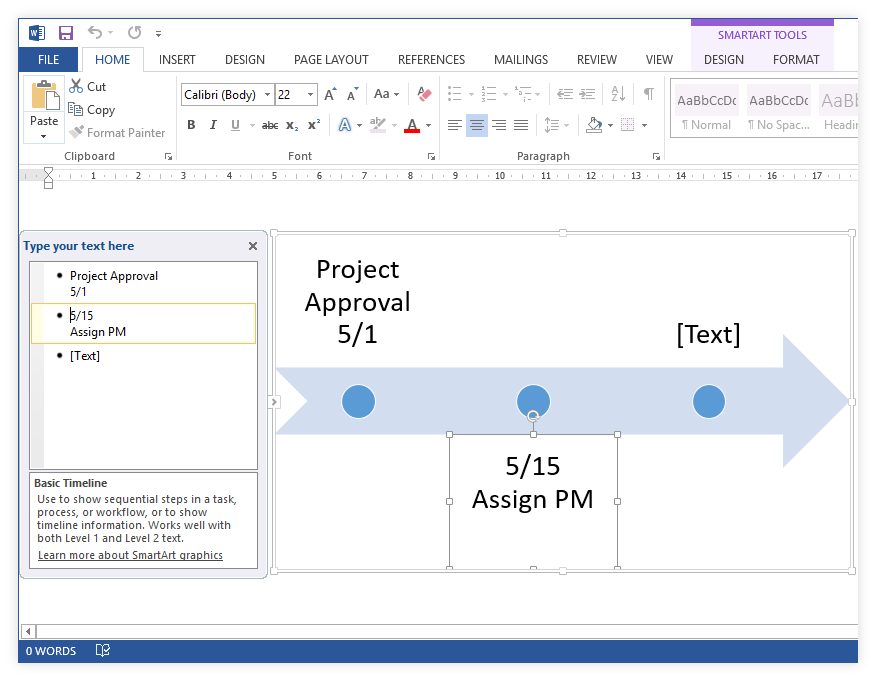
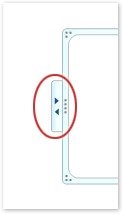
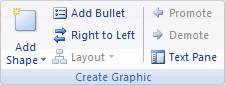
Once Word has generated your basic timeline, open the Text Pane by clicking on whichever of the two areas bordered in the image below. You’ll find that updating the default graphic is much easier this way than entering your data directly in the input fields on the timeline.
-
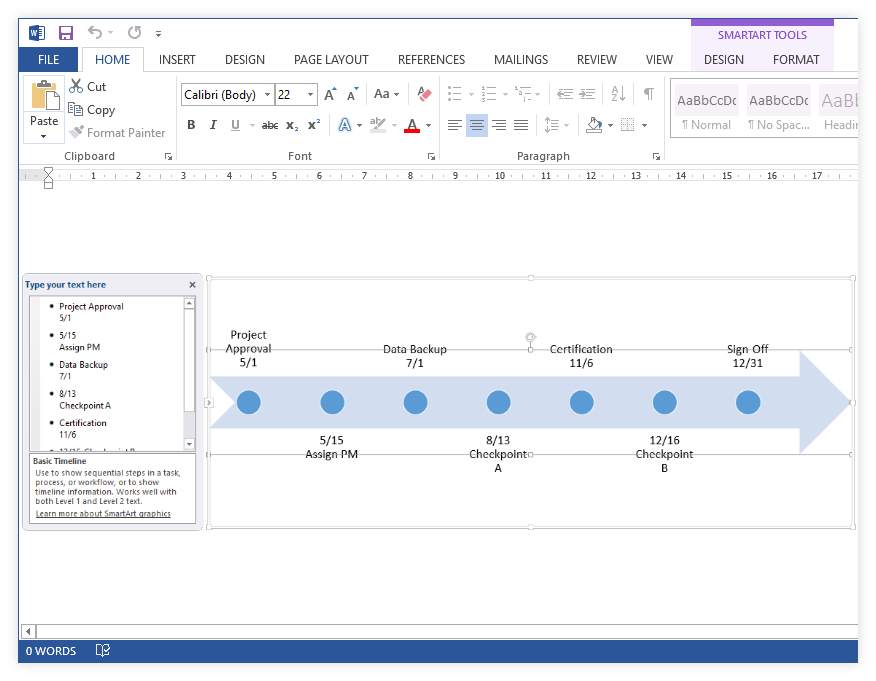
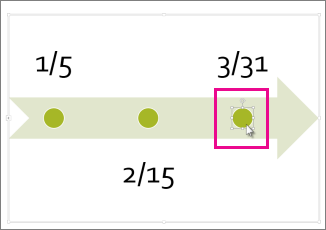
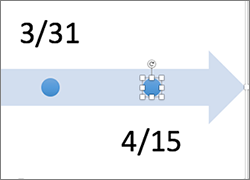
Enter your milestone dates and descriptions inside the Text Pane — the graphic will be automatically updated. To show a milestone’s date below or above its description, you can insert a line break using Shift + Enter.
Note: Since Word is not able to automatically calculate time intervals between milestone dates, your milestones will be placed at equal distances on the timeline regardless of the number of days between them. You have the option of manually dragging them closer or farther from one another, but the graphic will get distorted as you add more items. This is why we recommend leaving them as they are.
-
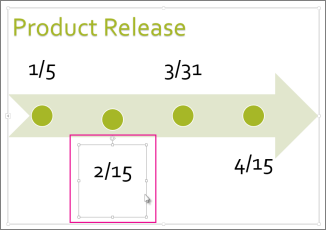
To insert extra events or deliverables on your timeline, simply press Enter after an existing milestone label inside the Text Pane. The more events you add, the more the text size will shrink. This is why a maximum of 7 milestones is recommended to make sure that your data remains legible.
Note: Manually increasing the text size for improved readability may ruin the entire layout of your timeline. A better alternative would be for you to expand the graphic box, which will automatically make the texts larger too.
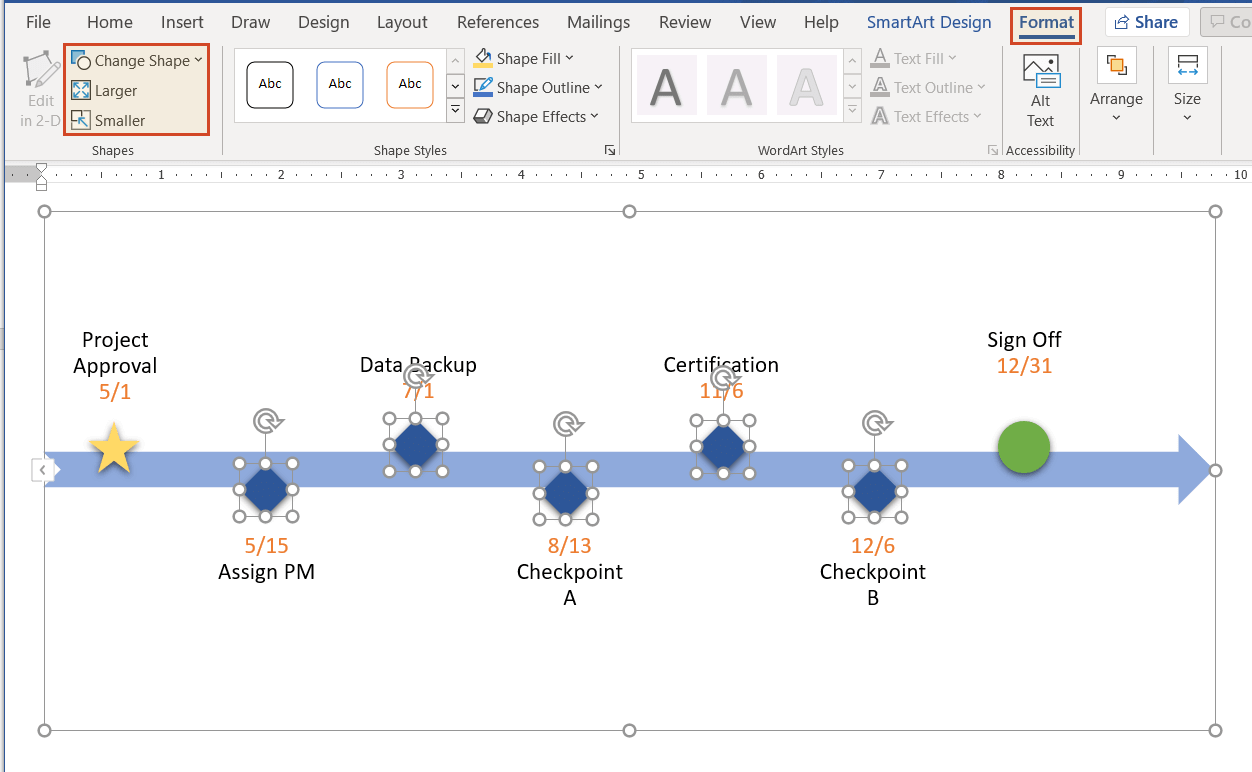
3. Customize your timeline.
-
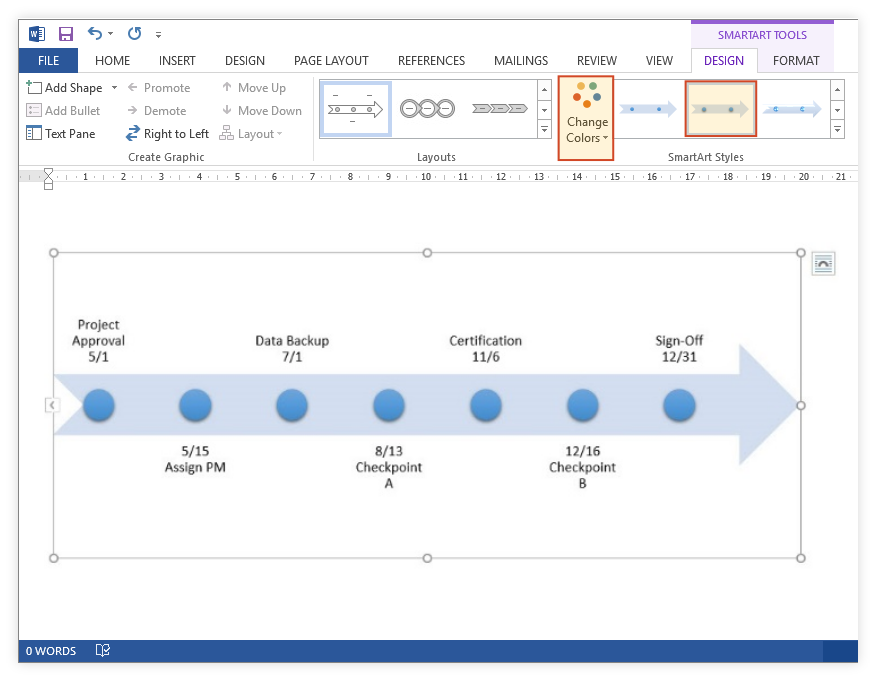
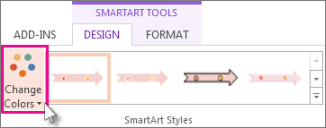
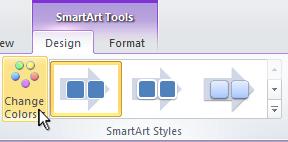
Now that your basic timeline is outlined, you can customize its overall look by changing its primary color theme from the Change Colors dropdown menu or by selecting a different style from the SmartArt Styles section. In our example, we applied the Intense Effect style, which made the milestone shapes more prominent.
-
To customize individual items on the timeline, use the formatting options available in the small window that appears once you right-click on the specific element you want to personalize. For example, you can change the color of a milestone or of the arrow-shaped band using Shape Fill, and that of the text using Font Color.
-
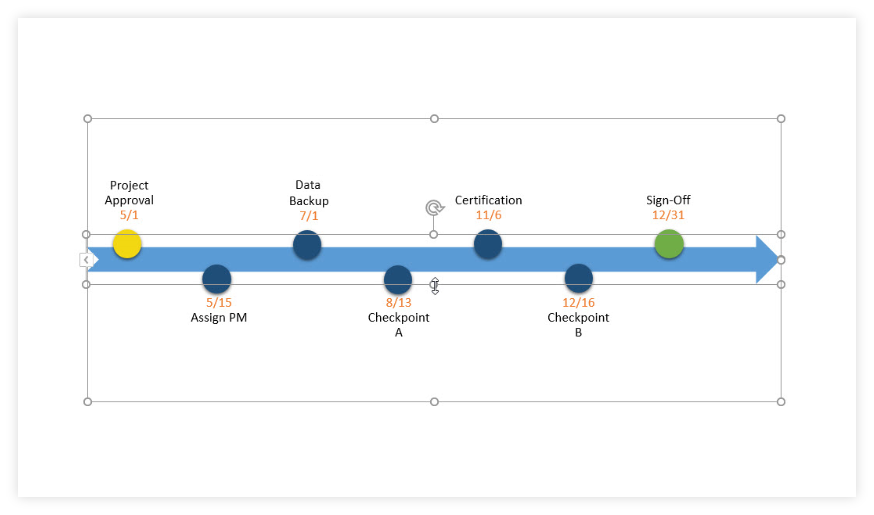
Next, you can use Drag & Drop to decrease the width of the arrow shape and move the circles a little higher or lower on the timeline to position them closer to their corresponding descriptions. This should make it easier for your audience to follow the succession of milestones.
-
Finally, to make certain milestones stand out even more, you can also resize them or change their shape using the options in the Format tab. Select more items at once by pressing and holding the Ctrl key while you click on the needed items.
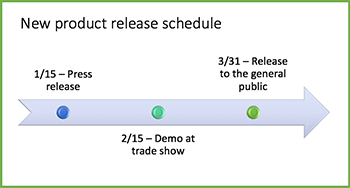
After experimenting with several shape and size options, our MS Word timeline looks like this:


How to make a timeline in PowerPoint automatically
Apart from being time-consuming, manually creating a timeline in Word may also get frustrating if you want to apply custom changes or need to regularly update the visuals for important presentations.
PowerPoint is better suited than MS Word for building visuals to present in client meetings or executive reviews. Below, we will demonstrate how to automatically create and update your graphic using a simple add-in for PowerPoint called Office Timeline. To get started, you first need to install Office Timeline,
which will add a timeline maker tab to the PowerPoint ribbon.
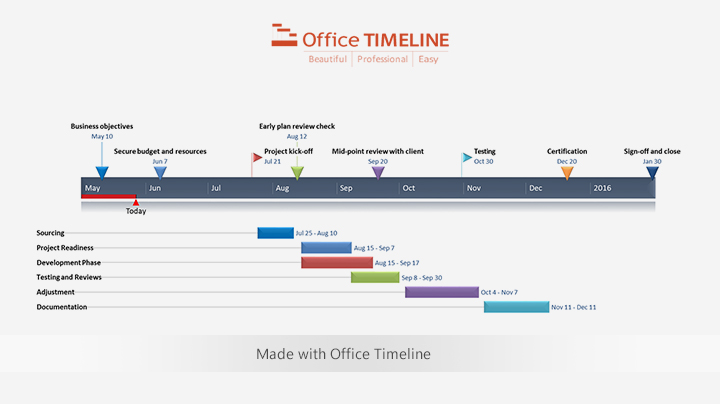
1. Open PowerPoint and enter your data into the Office Timeline Wizard.
-
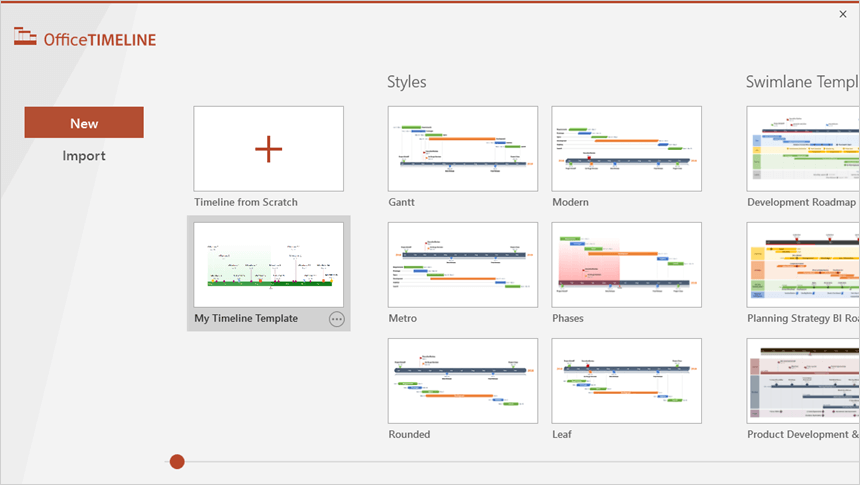
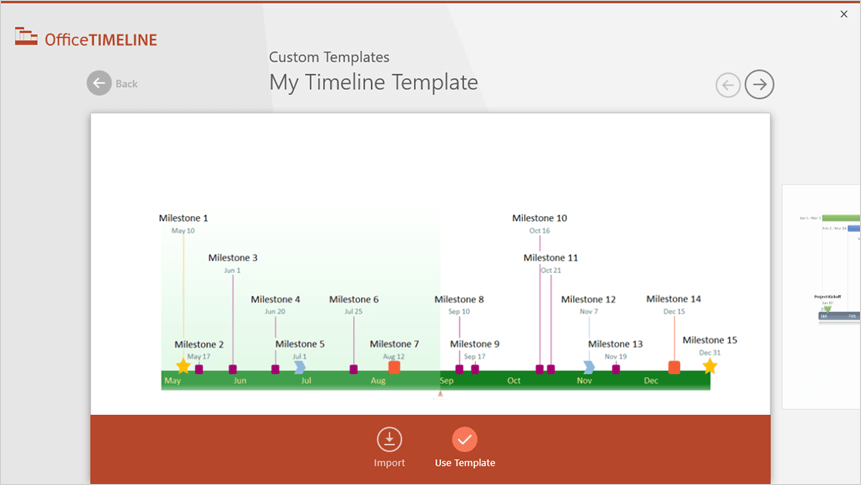
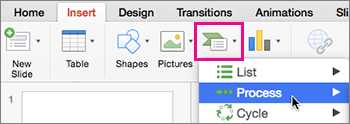
Go to the Office Timeline tab you’ll see on the PowerPoint ribbon and click on New.
You will be taken to a gallery where you can choose from a variety of styles and templates that you can use for your timeline.
-
Double-click on the template or style you prefer and then select Use Template in the preview window to open the Data Entry Wizard. For our example, we chose a custom template made earlier, which you can
download here.
-
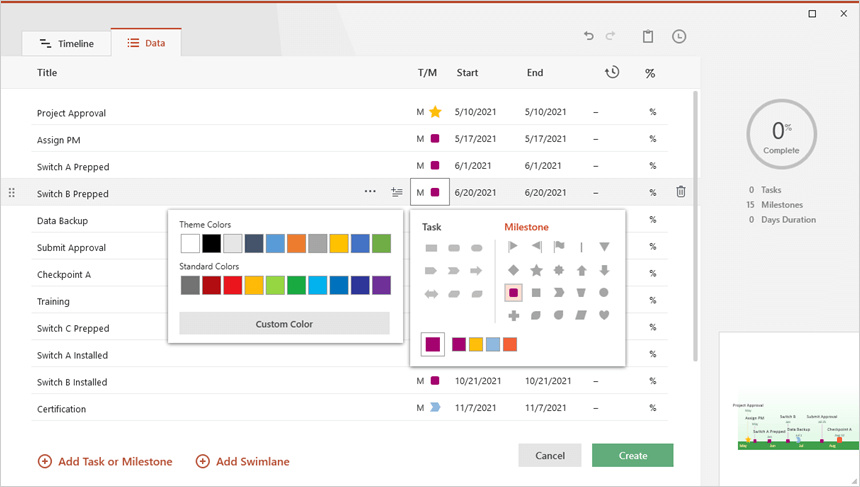
In the Data Entry window, you can either manually enter your milestones and set their dates, or you can copy and paste them from an existing Excel file. This is also a good place to start making a few quick customizations, such as changing the color or shape of each item you’ve added. Once you finish, click the Create button.

2. A new timeline slide will be instantly generated in PowerPoint.
-
Depending on your template choice and the customizations you make, your timeline can look similar to this:
-
Once you’ve built your timeline, you can easily
restyle or update it automatically
using Office Timeline. For instance, you can change the color, position and date format of any milestone or add new ones on the fly as your plans change, or you can insert tasks as well to create a Gantt chart.
![]()
Download auto-generated timeline slide
For more information on
how to make timelines using other office or Google tools, check out our comprehensive tutorials.
Watch how to build a PowerPoint timeline in less than a minute:
![]()
Play Video
FAQs about making timelines in Word
Is there a timeline template in Word?
MS Word does not have any in-built predesigned timeline templates, but there are some online samples that you can download and use with the word processor. You can find them on Office.com (https://templates.office.com/en-us/timelines) or other websites. However, these often prove limited and unsuitable when you work with more complex data or higher customization requirements.
This is why we suggest using PowerPoint timelines instead as they are better suited for professional-looking presentations. Such visuals can be easily produced with specialized automated tools like Office Timeline, helping you save a lot of time.
Where is a timeline in Word?
Word does not have a default timeline template, but you can insert a basic timeline in your document going to the Insert tab and selecting SmartArt. Then, in the Choose a SmartArt Graphic gallery, click Process and select one of the two timeline formats there — Basic Timeline or Circle Accent Timeline.
How do you insert a timeline in Word?
Follow the steps below to insert a timeline in Word:
- Go to Insert, select SmartArt.
- In the Choose a SmartArt Graphic gallery, click Process.
- Select a timeline layout (Basic Timeline or Circle Accent Timeline) and then click OK.
- Edit text and change items format and colors as needed.
- You can also change the layout (SmartArt Design > Layouts) and apply a different style (SmartArt Design > SmartArt Styles).
As an alternative to these rather limited visuals, you can use any of the free templates below to create stylish, more refined timelines that can be easily customized and saved as images.
See our free timeline template collection

Incident Response Plan
Free, downloadable timeline graphic using hours and minutes to give a clear overview on how an organization needs to plan its reaction to incidents so that outage be limited and activity resumed as soon as possible.

Crisis Management Plan
Professionally-designed timeline example structured in swimlanes that covers all the steps and processes one needs to follow in a crisis management process, from when the crisis occurs to response, business continuity process, recovery, and review.

Swimlane Diagram
Swimlane PowerPoint template that clearly lays out the framework of a project, from scheduling activities to task assignment and resource management.

Marketing Swimlanes Roadmap
Swimlane diagram example that provides a crisp, well-structured illustration of the tasks and milestones of your marketing campaign, according to the phase of the campaign to which they belong.

Marketing Plan
Free marketing timeline model that, once customized, effectively outlines your overall marketing strategy and serves as a solid visual aid to support marketing plan presentations.

Project Plan
Intuitive PowerPoint slide that serves as a quick yet visually effective alternative to complex project management tools to produce clear, well-laid-out plans for launching a project.

Sales Plan
Easy-to-edit sales plan sample for sales leaders, marketers or account executives to lay out objectives against a timeband in weeks; it can be customized to show campaign plans and targets in months, quarters or years.

Example Timeline
Visual template with Today’s Date indicator that helps enterprise workers get a quick start on creating timelines for project reviews, status reports, or any presentations that require a simple project schedule.

Blank Timeline
Generic timeline example that can be easily customized to quickly make an impressive, high-level summary of important events in a chronological order.
Как сделать шаблон временной шкалы с помощью Microsoft Word — Вокруг-Дом — 2021
Table of Contents:
Чтобы создать собственный файл временной шкалы, который можно повторно использовать для различных проектов, используйте параметр шаблона, доступный в Microsoft Word. После настройки макета страницы и добавления SmartArt или ваших собственных форм линий в документ вы можете сохранить его. Затем, когда вы захотите создать новую временную шкалу, просто введите новые детали.
Используйте SmartArt для создания забавных и образовательных временных линий. Кредит: andresrimaging / iStock / Getty Images
Настройка макета страницы
Перед началом шаблона временной шкалы сначала решите, хотите ли вы, чтобы временная шкала была горизонтальной или вертикальной. Если вам нужна горизонтальная временная шкала, измените альбомную ориентацию страницы, нажав «Макет страницы» в новом пустом документе и выбрав «Пейзаж» в параметре «Ориентация». Для длинной временной шкалы, которую вы можете распечатать позже, выберите «Размер» на вкладке «Макет страницы» и измените ее на «Правовая». Конечно, если вы не будете печатать временные шкалы, выберите «Больше размеров бумаги» и измените ширину и высоту на любые размеры, которые вы хотите.
Вставка SmartArt
Microsoft Office 2013 имеет множество SmartArt, которые используются для эффективных сроков. Чтобы просмотреть галерею SmartArt, выберите «SmartArt» после нажатия вкладки «Вставить». Для простой временной шкалы, посмотрите на категорию списка. Категория Process также имеет соответствующий SmartArt для временных шкал, например, стрелки процесса или Closed Chevron Process. Графика Accent Process может хорошо иллюстрировать дату и событие. Если у вас много данных, рассмотрите возможность использования графика «Подробный процесс», в котором есть место для дополнительного текста.
Настройка SmartArt
После вставки SmartArt убедитесь, что он выбран, щелкнув его при необходимости, а затем перейдите на вкладку Word «Дизайн», которая отображает раздел «Инструменты SmartArt» на вкладках в верхней части окна. Выберите «Дизайн» SmartArt, чтобы изменить цвета, изменить другой графический макет или добавить дополнительные фигуры. Перейдите на вкладку «Формат» SmartArt, чтобы быстро изменить форматирование на новый стиль или настроить формы и стили WordArt по своему усмотрению.
Вставка линий и объектов
Чтобы создать собственную временную шкалу с нуля или добавить ее в существующий SmartArt, взгляните на формы, линии и стрелки, доступные при выборе «Фигуры» в меню «Вставка». Чтобы нарисовать основную временную шкалу, выберите линию и перетащите ее концы, чтобы расположить ее на странице. Чтобы добавить события и даты на временную шкалу, выберите любую форму выноски, которую вы можете подключить. После вставки фигуры или линии выберите ее, чтобы открыть вкладку «Формат инструментов рисования», с помощью которой можно изменить стиль, толщину линии и цвета.
Сохранение вашего шаблона
Когда ваша временная шкала завершена, вы можете сохранить ее как обычный файл DOCX, чтобы использовать его позже, или как файл шаблона. Чтобы создать шаблон, выберите «Сохранить как» в меню «Файл» и выберите любое место на вашем компьютере. Когда откроется диалоговое окно «Сохранить как», введите имя файла, затем нажмите «Сохранить как тип» и выберите «Шаблон Word» в раскрывающемся меню. Если вы хотите создать новую временную шкалу, выберите «Новый» в меню «Файл», нажмите «Личные», а затем выберите свой шаблон. Чтобы добавить текст в форму SmartArt, просто выберите его и начните вводить текст.
Применение Timeline в образовательном процессе
Для визуализации учебного материала удобно создавать и использовать инфографику. Одним из видов инфографики является таймлайн или временная шкала (timeline). Таймлайн — инструмент для группировки информации в хронологической последовательности. По сути таймлайн представляет собой вертикальную или горизонтальную линию, на которой отмечают по времени разные элементы. Таймлайн также включает заголовок и подзаголовок с объяснением того, какой теме он посвящен, отметки с датами и изображения.

Зачем использовать таймлайн в образовательном процессе?
Этот инструмент:
- дает понимание хронологии и периодизации;
- способствует развитию навыка работы с информацией;
- позволяет делать широкие обобщения для лучшего восприятия темы;
- помогает представить данные наглядно.
Не только история как учебный предмет содержит множество дат, хронологических структур. В любой науке есть важные даты. Для любого ученика очень сложно выучить любую периодизацию, так как чаще всего она не наглядна.Таймлайн решает эту проблему. Он особенно полезен для понимания взаимосвязи между событиями и выстраивания параллелей. Ниже приведены два примера, первый, распространенный и профессионально сделанный, пример из биологии и второй, нетипичный, сделанный самостоятельно, для урока литературы. Оба они наглядны и легко воспринимаются:


В образовательном процессе создание временных шкал полезно при демонстрации определенного процесса, связей между элементами учебного материала. Таймлайн можно использовать для проектной работы учеников. Самостоятельная работа над инфографикой будет способствовать быстрой усвояемости учебного материала. Существует еще несколько преимуществ использования временных шкал для уроков и проектов:
- не нужно думать, как вызвать интерес у учеников, в таймлайне много визуального материала;
- ученики начинают использовать навыки критического мышления и анализа информации;
- ученики обобщают и классифицируют контент, что помогает преподавателю использовать их проекты как наработки для следующих уроков.
На уроке необходимо объяснить ученикам, что такое таймлайн и как правильно его сделать (подобрать информацию и иллюстрации, выбрать программу для создания, придумать заголовок и текст для пояснения). После этого каждый ученик выбирает тему для исследования, а учитель ставит сроки выполнения задания. Ниже приведено еще несколько примеров использования таймлайнов на уроке.
Примеры использования таймлайнов на уроке
1. Для работы в группе
Использование временной шкалы для изучения новой темы кажется сложной задачей. Однако при наличии контекстных подсказок, которые помогут учащимся связать события друг с другом, он становится хорошим инструментом для освоения нового материала.
Пример. Запишите события на отдельные листочки, чтобы их можно было сложить в одну временную ленту. Попросите учеников индивидуально или в группе разложить листки в правильном порядке. Разрешите использование учебников, если чувствуете, что ученикам нужна помощь. Можно использовать магниты для доски, прищепки с веревками.
2. Для изучения биографий
Предложите составить ученикам таймлайн по биографии важных для предмета личностей, с указанием дат, которые ученики считают значительными и подобрать картинки под каждую дату. Результатом станет схема, сделанная от руки или на компьютере.
Пример. Дайте задание ученикам подготовить таймлайн жизни и творчества М.Ю. Лермонтова. Основными вехами в этом случае будут: дата рождения, годы учебы, создание первого произведения, служба в гусарском полку, дуэль и т.д. Для каждой записи ученики должны предоставить как можно больше подробностей в 2-3 предложениях, добавить соответствующую фотографию или иллюстрацию.
3. Для анализа темы
Здесь уже используется готовый вариант таймлайна. Но в нем нет всех пояснений и отсутствуют некоторые важные даты. Ученикам в этом случае нужно проанализировать учебный материал и вписать недостающую информацию.
Пример. Ученикам дается инфографика с главными изобретениями Средневековья. На временной шкале им нужно отметить не указанные изобретения и написать, как они повлияли на технический прогресс и какое имели значение для общества.
How to Make a Timeline in Microsoft Word
Smartsheet Contributor Kate Eby on Feb 18, 2019
A timeline is essential for managing a complex project and juggling dozens of due dates. It allows you to quickly visualize the sequence of events in a project or event, and clearly convey the timing to team members.
In this article, you’ll learn how to make a timeline in Microsoft Word. You can also download a free Microsoft Word timeline template and we’ll show you how to customize it to meet your needs.
And lastly, you’ll see how to create a timeline using Smartsheet, a collaboration and project management tool in a simple spreadsheet layout. You can organize and collaborate on project information in Smartsheet, then integrate with Office Timeline to create beautiful, visual timelines.
How would you like to create your timeline?
Time to complete: 3 minutes
Time to complete: 30 minutes
Download Our Free Timeline Template in Word

Quickly create a timeline in Word with this free template. Enter your own project information in the text boxes, change the colors, or even choose a different timeline layout.
To learn how to customize this timeline template, scroll down to the “How to Customize Your Timeline in Word” section.
See how Smartsheet can help you be more effective

Watch the demo to see how you can more effectively manage your team, projects, and processes with real-time work management in Smartsheet.
How to Make a Timeline in Word
Although Microsoft Word is traditionally used to develop and edit copy, you can still create a visual timeline using SmartArt graphics. You can choose from dozens of timeline layouts and customize the colors to fit your project.
Before you start, we recommend changing the orientation of your Word document from portrait to landscape (go to the Page Layout tab and click Orientation).
Note: We are using Windows running Word 2013 in this example.
Select a Timeline Style
- Open a blank document in Microsoft Word.
- In the Insert tab, click SmartArt.

Add Project Information to the Timeline in Word
- To add an entry to the timeline, you can either double-click on the [Text] blurbs in the Word document or type directly in the floating box.


How to Customize Your Timeline in Word
Once you’ve added your project information and dates, it’s easy to modify the timeline. You can add a title, switch to a different timeline layout, and customize the color palette.
Add a Title
- Double-click on the header area of the Word document (the very top of the document).
- You’ll see a line appear with a little grey box that says Head e r. You’ll also see your cursor appear in the header area. Start typing your timeline’s title here.


Choose a Different Timeline Layout
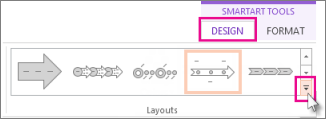
Double-click on the light blue part of the arrow.
In the Design tab, in the Layouts group, click the bottom arrow on the right side. Here, you can access all the different SmartArt graphic options. Click on the timeline layout you’d like to use.
Change the Timeline Color
- To change the background color of the timeline, click the image and in the Format tab, click Shape Fill. Select the new background color you’d like.
- To change the color of the circles, click on a circle, hold down Shift and click the other circles. Select Shape Fill again to pick the color you’d like.
- To change the font and font size of the tasks on the timeline, click on the text in the Word document and in the Home tab, in the Font group, adjust the size, type, and color.

How to Use Smartsheet to Make a Timeline
Smartsheet is a work management tool in a simple spreadsheet layout. With robust communication and collaboration capabilities, Smartsheet makes it easy to collect and organize information with your team and connect with Office Timeline to easily create a visual timeline.
Here’s how to use Smartsheet and Office Timeline:
Choose a Smartsheet Timeline Template
- Log in to your Smartsheet account or start a free, 30-day trial.
Try Smartsheet for Free

Enter Your Own Project Information
- You’ll see that the template is already pre-filled with sections, subtasks, and other fields. Simply double-click on the cells to delete the pre-filled copy and add your own timeline information. Use the cells titled Section 1, Section 2 and Section 3 to establish hierarchy.
- Add dates by clicking on a cell in the Start Date and End Date columns and either manually type the date or click the calendar icon to choose a date from the calendar.
- Assign tasks to certain team members in the Assigned To column and convey progress with the % Complete column. You can also flag at-risk tasks in the far left column.

Connect Smartsheet Data with Office Timeline
Connect information stored in Smartsheet with Office Timeline to visually highlight the most important parts of your project. The Smartsheet and Office Timeline integration allows you to easily create a customizable timeline and share the image with others as an image, .PDF, or PowerPoint slide.
Note: You must have Windows and PowerPoint to use Office Timeline. Mac users will need to run Office Timeline using a virtual machine like Parallels Desktop, Fusion, or VirtualBox.
- You can get a free, 15-day trial of Office Timeline, and you can download and install the trial version here. After the trial ends, you’ll need to buy a license to continue using the Office Timeline and Smartsheet integration.
- Open PowerPoint and create a new slide. Click the Office Timeline tab and select New >Import Data >Import from Smartsheet.


Improve Visibility with Real-Time Work Management in Smartsheet
Empower your people to go above and beyond with a flexible platform designed to match the needs of your team — and adapt as those needs change.
The Smartsheet platform makes it easy to plan, capture, manage, and report on work from anywhere, helping your team be more effective and get more done. Report on key metrics and get real-time visibility into work as it happens with roll-up reports, dashboards, and automated workflows built to keep your team connected and informed.
When teams have clarity into the work getting done, there’s no telling how much more they can accomplish in the same amount of time. Try Smartsheet for free, today.
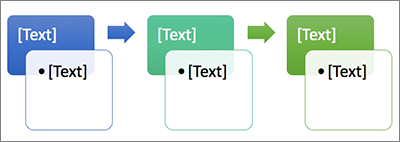
If you want to create a graphical representation of a sequence of events, such as the milestones in a project or the main events of a person’s life, you can use a SmartArt graphic timeline. After you create the timeline, you can add more dates, move dates, change layouts and colors, and apply different styles.
Create a timeline
-
On the Insert tab, click SmartArt.
-
In the Choose a SmartArt Graphic gallery, click Process, and then double-click a timeline layout.
Tip: There are two timeline SmartArt graphics: Basic timeline and Circle Accent Timeline, but you can also use almost any process-related SmartArt graphic.
-
Click [Text], and then type or paste your text in the SmartArt graphic.
Note: You can also open the Text Pane and type your text there. If you do not see the Text Pane, on the SmartArt ToolsDesign tab, click Text Pane.
-
Click a shape in the timeline.
-
On the SmartArt ToolsDesign tab, do one of the following:
-
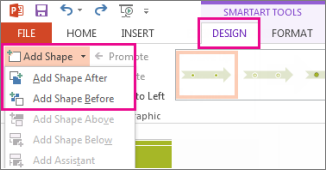
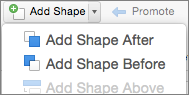
To add an earlier date, click Add Shape, and then click Add Shape Before.
-
To add a later date, click Add Shape, and then click Add Shape After.
-
-
In the new date box, type the date that you want.
-
On the timeline, click the date you want to move.
-
On the SmartArt ToolsDesign tab, do one of the following:
-
To move a date sooner than the selected date, click Move Up.
-
-
To move a date later than the selected date, click Move Down.
-
Click the SmartArt graphic timeline.
-
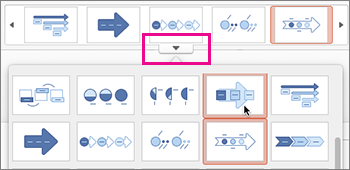
On the SmartArt ToolsDesign tab, in the Layouts group, click More
.Note: To view only the timeline and process-related layouts, at the bottom of the layouts list, click More Layouts, and then click Process.
-
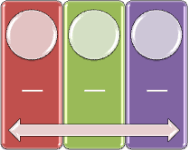
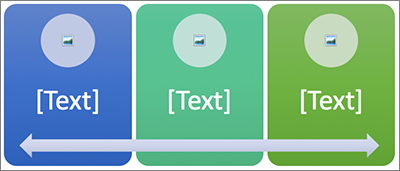
Pick a timeline or process-related SmartArt graphic, like the following:
-
To show progression in a timeline, click Accent Process.
-
To create a timeline with pictures or photos, click Continuous Picture List. The circular shapes are designed to contain pictures.
-
 .
.
-
Click the SmartArt graphic timeline.
-
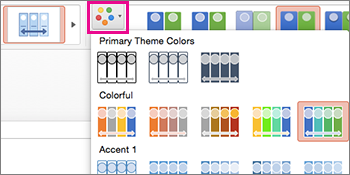
On the SmartArt ToolsDesign tab, click Change Colors.
Note: If you don’t see the SmartArt ToolsDesign tab, make sure you’ve selected the timeline.
-
Click the color combination that you want.
Tip: Place your pointer over any combination to see a preview of how the colors look in your timeline.
A SmartArt style applies a combination of effects, such as line style, bevel, or 3-D perspective, in one click, to give your timeline a professionally polished look.
-
Click the timeline.
-
On the SmartArt ToolsDesign tab, click the style you want.
Tip: For more styles, click More
, in the lower right corner of the Styles box.
See also
-
Create a timeline in Visio
-
Import and export timeline data between Visio and Project
-
Create a timeline in Project
-
Get Microsoft timeline templates
Create a timeline
-
On the Insert tab, in the Illustrations group, click SmartArt.
-
In the Choose a SmartArt Graphic gallery, click Process, and then double-click a timeline layout (such as Basic Timeline).
-
To enter your text, do one of the following:
-
Click [Text] in the Text pane, and then type your text.
-
Copy text from another location or program, click [Text] in the Text pane, and then paste your text.
Note: If the Text pane is not visible, click the control.
-
Click in an entry in the SmartArt graphic, and then type your text.
Note: For best results, use this option after you add all of the entries that you want.
-
Other timeline tasks
-
Click the SmartArt graphic that you want to add another entry to.
-
Click the existing entry that is located closest to where you want to add the new entry.
-
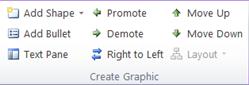
Under SmartArt Tools, on the Design tab, in the Create Graphic group, click the arrow next to Add Shape.
If you don’t see the SmartArt Tools or Design tabs, make sure that you’ve selected the SmartArt graphic. You might have to double-click the SmartArt graphic to open the Design tab.
-
Do one of the following:
-
To insert an entry after the selected entry, click Add Shape After.
-
To insert an entry before the selected entry, click Add Shape Before.
-
To delete an entry from your timeline, do one of the following:
-
In the SmartArt graphic, select the text for the textbox for the entry that you want to delete, and then press DELETE.
-
In the Text pane, select the all of the text for the entry that you want to delete, and then press DELETE.
Notes:
-
To add a shape from the Text pane:
-
At the shape level, place your cursor at the end of the text where you want to add a new shape.
-
Press ENTER, and then type the text that you want in your new shape.
-
-
-
In the text pane, select the entry that you want to move.
-
Do one of the following:
-
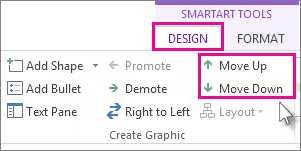
To move the entry to an earlier date, under SmartArt Tools, on the Design tab, in the Create Graphic group, click Move Up.
-
To move the entry to a later date, under SmartArt Tools, on the Design tab, in the Create Graphic group, click Move Down.
If you don’t see the SmartArt Tools or Design tabs, make sure that you’ve selected the SmartArt graphic. You might have to double-click the SmartArt graphic to open the Design tab.
-
-
Right-click the timeline that you want to change, and then click Change Layout.
-
Click Process, and then do one of the following:
-
For a simple but effective timeline, click Basic Timeline.
-
To show a progression, a timeline, or sequential steps in a task, process, or workflow, click Accent Process.
-
To illustrate a timeline with pictures or photos, click Continuous Picture List. The circular shapes are designed to contain pictures.
-
Note: You can also change the layout of your SmartArt graphic by clicking a layout option in the Layouts group on the Design tab under SmartArt Tools. When you point to a layout option, your SmartArt graphic changes to show you a preview of how it would look with that layout.
To quickly add a designer-quality look and polish to your SmartArt graphic, you can change the colors or apply a style to your timeline. You can also add effects, such as glows, soft edges, or 3-D effects. Using Microsoft PowerPoint 2010, you can also animate your timeline.
You can apply color combinations that are derived from the theme colors to the entries in your SmartArt graphic.
-
Click the SmartArt graphic whose color you want to change.
-
Under SmartArt Tools, on the Design tab, in the SmartArt Styles group, click Change Colors.
If you don’t see the SmartArt Tools or Design tabs, make sure that you’ve selected the SmartArt graphic.
-
Click the color combination that you want.
Tip: When you place your pointer over a thumbnail, you can see how the colors affect your SmartArt graphic.
-
In the SmartArt graphic, right-click the border of the entry you want to change, and then click Format Shape.
-
To change the color of the entry’s border, click Line Color, click Color
, and then click the color that you want. -
To change the style of the entry’s border, click Line Style, and then choose the line styles you want.
 , and then click the color that you want.
-
Click the SmartArt graphic you want to change.
-
Right-click the border of an entry, and then click Format Shape.
-
Click Fill, and then click Solid fill.
-
Click Color
, and then click the color that you want.
To change the background to a color that is not in the theme colors, click More Colors, and then either click the color that you want on the Standard tab, or mix your own color on the Custom tab. Custom colors and colors on the Standard tab are not updated if you later change the document theme.
To specify how much you can see through the background color, move the Transparency slider, or enter a number in the box next to the slider. You can vary the percentage of transparency from 0% (fully opaque, the default setting) to 100% (fully transparent).
A SmartArt Style is a combination of various effects, such as line style, bevel, or 3-D perspective that you can apply to the entries in your SmartArt graphic to create a unique and professionally-designed look.
-
Click the SmartArt graphic you want to change.
-
Under SmartArt Tools, on the Design tab, in the SmartArt Styles group, click the SmartArt Style that you want.
To see more SmartArt Styles, click the More button
.

 .
.Note: When you place your pointer over a thumbnail, you can see how the SmartArt Style affects your SmartArt graphic.
See also
-
Create a timeline in Visio
-
Import and export timeline data between Visio and Project
-
Create a timeline in Project
Create a timeline
-
On the Insert tab, in the Illustrations group, click SmartArt.
-
In the Choose a SmartArt Graphic gallery, click Process, and then double-click a timeline layout (such as Basic Timeline).
-
To enter your text, do one of the following:
-
Click [Text] in the Text pane, and then type your text.
-
Copy text from another location or program, click [Text] in the Text pane, and then paste your text.
Note: If the Text pane is not visible, click the control.
-
Click in an entry in the SmartArt graphic, and then type your text.
Note: For best results, use this option after you add all of the entries that you want.
-
Other timeline tasks
-
Click the SmartArt graphic that you want to add another entry to.
-
Click the existing entry that is located closest to where you want to add the new entry.
-
Under SmartArt Tools, on the Design tab, in the Create Graphic group, click the arrow under Add Shape.
If you don’t see the SmartArt Tools or Design tabs, make sure that you’ve selected the SmartArt graphic.
-
Do one of the following:
-
To insert an entry after the selected entry, click Add Shape After.
-
To insert an entry before the selected entry, click Add Shape Before.
-
To delete an entry from your timeline, click the entry you want to delete, and then press DELETE.
Notes:
-
To add a shape from the Text pane:
-
At the shape level, place your cursor at the end of the text where you want to add a new shape.
-
Press ENTER, and then type the text that you want in your new shape.
-
To add an assistant box, press ENTER while an assistant box is selected in the Text pane.
-
-
To move an entry, click the entry, and then drag it to its new location.
-
To move an entry in very small increments, hold down CTRL while you press the arrow keys on your keyboard.
-
Right-click the timeline that you want to change, and then click Change Layout.
-
Click Process, and then do one of the following:
-
For a simple but effective timeline, click Basic Timeline.
-
To show a progression, a timeline, or sequential steps in a task, process, or workflow, click Accent Process.
-
To illustrate a timeline with pictures or photos, click Continuous Picture List. The circular shapes are designed to contain pictures.
-
Note: You can also change the layout of your SmartArt graphic by clicking a layout option in the Layouts group on the Design tab under SmartArt Tools. When you point to a layout option, your SmartArt graphic changes to show you a preview of how it would look with that layout.
To quickly add a designer-quality look and polish to your SmartArt graphic, you can change the colors or apply a SmartArt Style to your timeline. You can also add effects, such as glows, soft edges, or 3-D effects. Using PowerPoint 2007 presentations, you can animate your timeline.
You can apply color combinations that are derived from the theme colors to the entries in your SmartArt graphic.
-
Click the SmartArt graphic whose color you want to change.
-
Under SmartArt Tools, on the Design tab, in the SmartArt Styles group, click Change Colors.
If you don’t see the SmartArt Tools or Design tabs, make sure that you’ve selected the SmartArt graphic.
-
Click the color combination that you want.

Tip: When you place your pointer over a thumbnail, you can see how the colors affect your SmartArt graphic.
-
In the SmartArt graphic, right-click the border of the entry you want to change, and then click Format Shape.
-
To change the color of the entry’s border, click Line Color, click Color
, and then click the color that you want. -
To change the style of the entry’s border, click Line Style, and then choose the line styles you want.
-
Click the SmartArt graphic you want to change.
-
Right-click the border of an entry, and then click Format Shape.
-
Click Fill, and then click Solid fill.
-
Click Color
, and then click the color that you want.
To change the background to a color that is not in the theme colors, click More Colors, and then either click the color that you want on the Standard tab, or mix your own color on the Custom tab. Custom colors and colors on the Standard tab are not updated if you later change the document theme.
To specify how much you can see through the background color, move the Transparency slider, or enter a number in the box next to the slider. You can vary the percentage of transparency from 0% (fully opaque, the default setting) to 100% (fully transparent).
A SmartArt Style is a combination of various effects, such as line style, bevel, or 3-D, that you can apply to the entries in your SmartArt graphic to create a unique and professionally designed look.
-
Click the SmartArt graphic you want to change.
-
Under SmartArt Tools, on the Design tab, in the SmartArt Styles group, click the SmartArt Style that you want.
To see more SmartArt Styles, click the More button
.
-
When you place your pointer over a thumbnail, you can see how the SmartArt Style affects your SmartArt graphic.
-
You can also customize your SmartArt graphic by moving entries, resizing entries, adding a fill or effect, and adding a picture.
If you’re using PowerPoint 2007, you can animate your timeline to emphasize each entry.
-
Click the timeline that you want to animate.
-
On the Animations tab, in the Animations group, click Animate, and then click One by one.

Note: If you copy a timeline that has an animation applied to it to another slide, the animation is also copied.
See also
-
Create a timeline in Visio
Create a timeline
When you want to show a sequence of events, such as project milestones or events, you can use a SmartArt graphic timeline. After you create the timeline, you can add events, move events, change layouts and colors, and apply different styles.
-
On the Insert tab, click SmartArt > Process.
-
Click Basic Timeline or one of the other process-related graphics.
-
Click the [Text] placeholders and enter the details of your events.
Tip: You can also open the Text Pane and enter your text there. On the SmartArt Design tab, click Text Pane.
-
Click a shape in the timeline.
-
On the SmartArt Design tab, click Add Shape, and then click Add Shape Before or Add Shape After.
-
Enter the text you want.
-
On the timeline, click the text of the event you want to move.
-
On the SmartArt Design tab, click Move Up (left), or Move Down (right).

-
Click the timeline.
-
On the SmartArt Design tab, point to the layout panel and click the down arrow.
-
Pick a timeline or process-related SmartArt graphic, like the following:
-
To show progression in a timeline, click Accent Process.
-
To create a timeline with pictures or photos, click Continuous Picture List. The circular shapes are designed to contain pictures.
-
-
Click the timeline.
-
On the SmartArt Design tab, click Change Colors, and then click the color combination you want.
Give your timeline a professional look by using a SmartArt style to apply a combination of effects, such as line style, bevel, or 3-D perspective.
-
Click the timeline.
-
On the SmartArt Design tab, click the style you want.

Do you need to create a timeline? A Microsoft Word timeline can help. A Microsoft Word timeline can help. In this tutorial, learn how to make a timeline in Microsoft Word quickly with a template.


Timelines are often used to measure progress in projects and they’re sometimes for planning. There are two types of Microsoft Word timelines that you can use:
- Timelines that show when future events are expected to take place.
- Timelines that show when past events took place.
If you consider making a timeline, choose which timeline is right for your needs.
Once you’ve chosen which timeline is best for you, the next decision is whether you want to add a Microsoft Word timeline to a premium template or make a timeline without a template. In this article, you’ll learn how to make a timeline in Microsoft Word without a template.
Why Make a Timeline in Word?
A timeline is a graphic that shows time passing. So, this can be used in any situation where you need to show the passage of time. Timelines can be used for educational purposes and for professional purposes.
Here are just a few business uses for a timeline:
- Show how long each phase of a project took to complete or a projection of when a project will be completed.
- Reveal when the various stages of a business launch are expected to happen.
- Show a marketing plan and the dates when marketing materials will be published.
- Illustrate milestones in a company’s history.
There are many different uses for timelines. Once you become comfortable with creating timelines, you’ll find your own uses.
The best way to save time when creating a timeline is to use a template. Using a template saves you time because it can be used as your base. All the hard design work is already done.
Creating Your Microsoft Word Timeline (With Unlimited Templates)
To use a template, just download it and add information into it. That’s how easy it is! Premium templates can easily be customized if you need to make changes.
Some templates could include Microsoft Word timelines. If you find one that includes a Microsoft Word Timeline, easily add your own information to the template. You can also add a Microsoft Word timeline you created to a variety of template types.


Envato Elements is a premium subscription service where you can download as many templates as you need. All the templates are professionally designed to look nice and professional. Envato Elements has more than just templates. They’ve got fonts, audio, stock photos, and more.
To have access to these digital assets, just subscribe and pay a low monthly fee. Once subscribed, you’ll have access to thousands of high-quality templates.
Let’s take a peek at some of the various templates of available on Elements.
5 Best Premium Business Microsoft Word Template
All these timelines have a Microsoft Word timeline in the template or would be ideal for adding a timeline to:
1. Business Plan


This business plan template can have a Microsoft Word timeline added to it. The design of this template is simple, making it easy to edit.
The Business Plan template has two pages in A4 size. Use this template in both Microsoft Word and Adobe InDesign.
2. Corporate Business Flyer Vol.44


This Corporate business flyer is easily editable, so you can add a Microsoft Word Timeline to the template. Here are some highlights:
- A4 size
- modern design
- nice layout
3. Company Profile Word Template


Company Profile Word Template can have a Microsoft Word timeline added to show your company timeline or a budget timeline.
This template comes with sixteen pages in A4 size that are print-ready. Everything in this template can be easily edited, including text, colors, and images.
4. Project Proposal


A Microsoft Word timeline can be used in a project proposal to show how long you expect a project to take or how long the finished project took. Here are some highlights of this template:
- easily editable
- A4 size
- comes with four pages
This template has a nice classic design that’ll impress the reader.
5. Business Proposal


In this Business Proposal, you can easily add a Microsoft Word timeline. The timeline could be used to show how long a project will take to complete or how long it’ll take to launch a business. This template comes with 22 pages in A4 size and can be used in both Microsoft Word and Adobe InDesign.
How to Make a Timeline in Word Without a Template
Timeline templates can be useful. But you may not have one available. Do you know how to make a timeline in Microsoft Word without a template?
There are two different ways that you can make a Microsoft Word timeline:
- Draw your own timeline.
- Use SmartArt.
SmartArt is a graphic tool included in many Microsoft Office programs such as Excel, PowerPoint, and Word. SmartArt layouts are more detailed and interactive than ordinary shape tools in Word.
Let’s learn both methods.
Create a Timeline in Microsoft Word By Drawing an Arrow
To create a timeline from scratch (without a template), let’s use a graphic arrow. Let’s get started by creating a simple timeline:
1. Create the Arrow
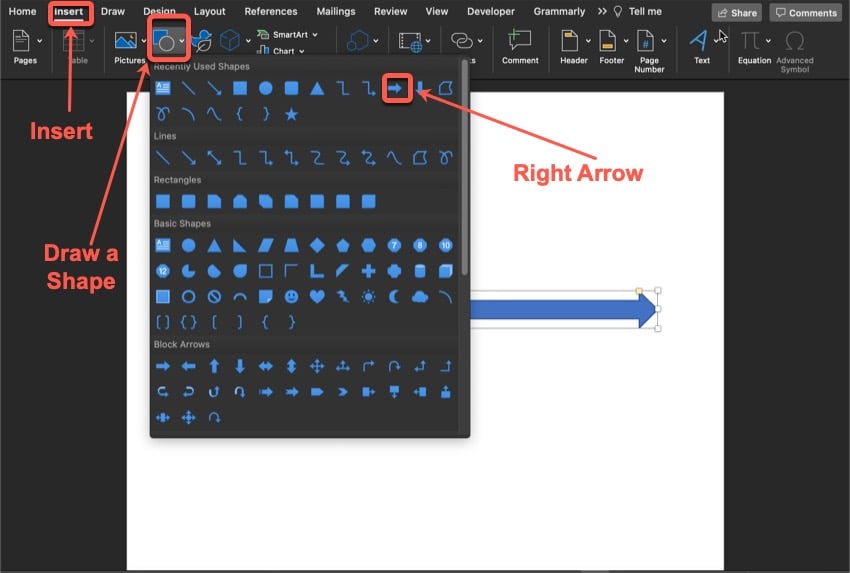


Start with a blank document open in Word. The base of a timeline will be the arrow. To create this base, click on the Insert tab.
In the toolbar, click the Draw a Shape button. When you click on this button, a menu drops down where you can choose what shape you want.
Click on the arrow option and draw a line where you want your timeline to be. Adjust the width and length of the arrow by dragging the handles.
2. Create a Text Box


Part of a timeline is to have points on your timeline that represent events. To create the points, you’ll need to create a text box.
To create a text box, click on the Insert tab. After you click on the Insert tab, click on the Draw a Text Box button in the toolbar.
Now, draw a diagonal line where you want your text box. Then start typing your text.
3. Connect Your Text to Your Timeline


In most timelines, your points are connected to the timeline. To do this, click on the Insert tab.
After clicking on the Insert tab, click on Draw a Shape button in the toolbar. When you click on this button, a menu full of shapes drops down. Click on the line option.


To make the connecting line thicker (or thinner), click on the Shape Format tab. In the toolbar, click on the Format Pane button.
When you click on this button, a sidebar will pop up. Click on the Fill & Line tab. Next, click on the line section of the sidebar. Next, click on the up arrow next to the Width option to make the line thicker.
Your finished timeline should look something like this one:


How to Create a Microsoft Word Timeline With SmartArt
The second method to make a timeline in Microsoft Word is to use a SmartArt timeline. SmartArt has several pre-designed timeline layouts.
Here’s how to make a timeline in Microsoft Word using SmartArt:
1. Insert a SmartArt Timeline


Begin by clicking on the Insert tab above the toolbar. In the toolbar under the Insert Tab, click on the SmartArt button.
When you click on the SmartArt button, a menu drops down. From that menu, click on the Process menu option.
2. Choose the Timeline SmartArt Timeline


After you click on the Process menu option another menu drop down, giving you many SmartArt options for timelines.
From the dropdown menu, select the Timeline icon for the Microsoft Word timeline you want to use. In this example, I’ll use the basic timeline.
3. Customize the SmartArt Timeline


As you can see, the SmartArt timeline design is already complete. There’s no need to draw the various shapes that make up the time.
All you need to do now is customize the timeline as needed by adding the information you need. Here are some various customizations you can make:
- Add text by clicking in the text placeholder and typing your text.
- Change the color of the timeline by clicking on the Change Colors icon in the menu.
- Resize the entire timeline by dragging the handles surrounding the entire timeline to make it smaller or larger.
- Resize a part of the timeline by dragging the handles surrounding that part.
6 Timeline Making Tips for Making Timelines in MS Word
When you’re making your timeline, keep these tips in mind:
- Have a plan. Before making your Microsoft Word timeline, plan what you want to include on your timeline and how you want it to look. Start by deciding whether you want your timeline to show future events or past events. Then, think about how detailed you want your timeline to be.
- Be consistent. When you’re designing your timeline, it looks better if the timelines in your document have a consistent design with your document. If your document is branded, you’ll want to use similar colors and shapes so that your timeline fits with your brand.
- Keep it simple. Also, it’s best not to use a lot of colors. A lot of colors can be distracting. A consistent color scheme for the timeline will look more professional.
- Check the size. When you’re making your Microsoft Word timeline, make sure your timeline fits on one page. If your timeline is on several pages, it can make the timeline hard to follow.
- Make your points clear. When you’re adding point to the timeline don’t abbreviate words. Don’t assume people know what point you’re trying to make. If you’re making a timeline of events, add actual dates to your timeline.
- Keep it traditional. In English-speaking countries people read from left to right. Therefore, it’s best to make your timeline from left to right. This will make it easy for people to read. (If your document is in a language that reads in a different direction, then follow the traditional direction for that language.)
Common Microsoft Word Questions Answered (FAQ)
Many people use only a fraction of the Word’s capabilities. If you’re one of those people, it’s okay to ask questions. Here are some common questions with answers:
These instructions may vary slightly depending on your version of Microsoft Word.
1. Can I Set the Page Size?
Yes. Setting the page is a way that you can customize a Word documents.
To set the page size, select Layout on the menu bar. Then click the Size icon to choose a page size. A menu drops down showing the various paper sizes. Choose the size you want for your document.
If you don’t see the size you need, click on More Paper Sizes at the bottom of the dropdown menu to create your own. This tutorial explains more about page layout:
2. How Do I Add Page Numbers to my Document?
Page numbers can help you keep your document organized. To insert page numbers, begin by click on Insert. Then click Page Number in the toolbar.
From the dropdown menu choose the option for the location of your page numbers. Learn more in this tutorial:
3. How Do I Set the Margins of Pages in Microsoft Word?
Setting the margins can help you customize your template or document. To set your own margins, begin by selecting the Layout option.
Under the Layout tab, click on the Margins icon. When you click on this button, a menu drops down. Choose a preset margin or select the option at the bottom of the menu to create custom margin settings.
4. Does Microsoft Word Have a Spelling and Grammar Checker?
Yes. Spelling and grammar mistakes can make your document look unprofessional. They can also be distracting for the reader.
To use the spelling and grammar spelling checker, click on the Review tab. Under the Review tab. Then click on the Editor icon in the toolbar. A panel appears on the right that’ll take you through your spelling and grammar mistakes and give you the chance to correct them.
For a complete look at how to check spelling and grammar in MS word, study this tutorial:
5. Can I Align Text in Microsoft Word?
Yes. Aligning text can make your document look neater and more professional.
To begin, highlight the text that you want to align and right-click on the highlighted text. A dropdown menu displays. From this menu, click on the Paragraph option. A popup menu appears. Choose a text alignment option in the Alignment field under General.
Find Microsoft Word Templates
Do you want to use Microsoft Word templates? Here are some articles that feature Word templates to make your documents look professional:
Learn More About Microsoft Word
Microsoft Word is a very useful tool. Whether you’re just starting out with Word or just need a Word refresher, we can help. Check out our guide on how to use MS Word, or study one of the tutorials below:
Create Your Own Microsoft Word Timeline
Now that you’ve read how to make a timeline in Microsoft Word, use that knowledge in your current project or in your next project.
For an easy and fast method of creating a Microsoft Word timeline, the SmartArt method is the best. But for complete customization, then the method where you create your own timeline from scratch may be the best. Either way, timelines are a really useful way to show the passage of time and highlight certain events.
If you want to use a premium template for other parts of your project, then Envato Elements is a great timesaver. Plus, the right template will help your project look more professional.
![]()
Download Article
![]()
Download Article
A timeline is a great way to show progress on a project or event over time. You can also use timelines to display historical milestones, document changes, and even to plan events in the future. Word makes it very easy for you to make a timeline using its SmartArt tools. This wikiHow article will teach you how to visually display a timeline of events in Microsoft Word.
-
1
Change the page layout to landscape mode (optional). Because timelines are displayed horizontally, you’ll have a better-looking timeline if your document is in landscape (horizontal) mode. Here’s how you can do this:
- Click the Layout tab at the top of Word.
- Click Orientation.
- Click Landscape.
-
2
Click the Insert tab at the top of Word. It’s in the upper-left area of Word.
Advertisement
-
3
Click SmartArt on the toolbar. Look for the icon of a green arrow with a white rectangle over it.
-
4
Click the Process menu. It’ll be in the left panel on Windows, or in the sub-menu on a Mac.
-
5
Click a timeline layout. The two timeline options are Circle Accent Timeline (the one with two large circles and two smaller circle) and Basic Timeline (the arrow with three circles inside). Hover your mouse cursor over a timeline preview to see its name, and then click to add it to your document.
- If you’re using a Mac, selecting a timeline layout will insert it into your document. If you’re using Windows, you’ll need to click ‘OK to insert it.[1]
- If you’re using a Mac, selecting a timeline layout will insert it into your document. If you’re using Windows, you’ll need to click ‘OK to insert it.[1]


Advertisement
-
1
Click any of the Text markers. Each dot (or other shape, depending on the Process layout you chose) represents an event in time. To get you started, Word adds some placeholder text to show you where to add your labels. When you click any of these placeholder text entries, you’ll be able to edit that text.
- Clicking the text will bring up the Text Pane on the left side of Word.
- If you don’t see the Text Pane, click Text Pane on the SmartArt Design tab to bring it up.
-
2
Enter the text for this event. This could be the event’s name, a particular date, or both.
- One idea for labeling your timeline is to enter the date as the primary event text, and then add smaller bullet points to summarize what happened on that date. To do this, just type the date (or any other time marker, like a season), press Enter or Return, and then click Add Bullet on the SmartArt Design tab to add your first bullet point.
-
3
Repeat for all other placeholder text. You can also change the name and look of the text the same as you would any other Word text—just highlight the text you want to customize, click the Home tab, and use the «Font» panel options.


Advertisement
-
1
Click one of the timeline markers. Word only inserts a few event markers to get you started. If you need to add more events, start by clicking the marker next to where you want to insert the new event.
- It doesn’t matter if you choose the marker to the left or right of the event.
-
2
Click the SmartArt Design tab. You’ll see this tab in the upper-right area of Word after you click one of the shapes.
-
3
Click Add Shape. It’s in the upper-left area of Word.
-
4
Select Add Shape After or Add Shape Before. Choose the option that represents where you want to add another event marker. This also opens the Text Pane on the left so you can add text to the event.
-
5
Open the Text Pane. If you don’t see the Text Pane on the left side of Word, click any of the event markers (or Text Pane in the toolbar) to open it now. You should now see an empty bullet in the Text Pane.
-
6
Enter the event’s text next to the empty bullet in the Text Pane. You’ll have to add your event’s text in the Text Pane, as adding a new shape doesn’t also add placeholder text.


Advertisement
-
1
Move an event. If an event marker is out of order, you can move it elsewhere on the timeline. Just right-click the event you want to move on the Text Pane and select Move Up or Move Down as needed.
-
2
Change the colors. To modify the colors of the SmartArt timeline:
- Click any element in the timeline.
- Click the SmartArt Design’ tab if it doesn’t open automatically.
- Click Change Colors in the toolbar at the top.
- Select a different color theme.
-
3
Apply a new style. You can add different stylistic and/or 3D effects to your graphics, too. Just click the SmartArt Design tab, click the menu on the «SmartArt Styles tab, and then choose an effect.
-
4
Switch to a different timeline layout. If you’ve decided the Process layout you selected isn’t working for your timeline, you can easily change the layout on the SmartArt Design tab—just scroll through the layouts on the «Layouts» panel and choose the one you want.


Advertisement
Add New Question
-
Question
How do I increase the size of my timeline?

Ravenwolf123
Community Answer
Add the same form you previously chose using SmartArt. Put it below the one you have already made. In the ‘Tell Me What You Want To Do’ search bar, type in ‘shape’, then click ‘Draw A Shape’ or ‘Draw Shapes’. Select the arrow and draw it from the last part of the top section of your timeline to the first part of the second section of your timeline.
-
Question
What do I do after I enter my text?
If you need another text box, just click «Draw Text Box» and draw it wherever you need it! If you are finished, save it and print/publish it.
Ask a Question
200 characters left
Include your email address to get a message when this question is answered.
Submit
Advertisement
Thanks for submitting a tip for review!
Related Articles
About This Article
Article SummaryX
1. Switch your document to landscape mode.
2. Click the Insert tab.
3. Click SmartArt.
4. Click Process.
5. Select a timeline layout.
6. Label the events.
Did this summary help you?
Thanks to all authors for creating a page that has been read 144,636 times.