Headers in your Microsoft Word document lets you add text to the top of each page of a business document. Although this text appears on each page, you have to enter it only once; the edits are propagated to all pages. This header is separated by a space, but for a more obvious segregation or to spice up the header a little, you can add a graphical line.
-
Double-click the Word header to enter Editing mode.
-
Click the end of a line and press «Enter» if you need a blank line on which to add your graphic.
-
Click the «Insert» tab and click «Shapes» from the Illustrations group.
-
Click a line format from the Line group. For a generic line, select the first option.
-
Click and drag the line wherever you want the line to appear. To draw a horizontal, vertical or 45-degree line, hold the «Shift» key while dragging. The line appears when you release the mouse button. If you make a mistake, press «Ctrl-Z» and try again.
-
Double-click body of the document to exit header Editing mode.
When you insert header or footer to your document, Word voluntarily adds a black horizontal line to the header or footer. This article will show you how to get rid of it.
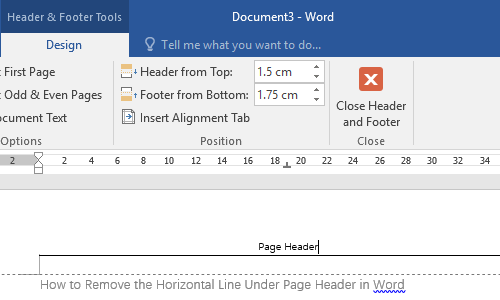
Sometimes, you may find an unwanted horizontal line after you insert header or footer to your Word, just like this:
However, Word does not allow you to highlight or select it, and therefore you cannot easily get rid of them. To remove these unwanted lines quickly, you can refer to the following instructions.
Method 1: Remove the Line Together with other Formattings
In this section, we will first present you with a simple way to remove these horizontal lines. However, using this way, you will also remove other formatting in the header or footer, such us text centering.
- Double click on the header to starting editing.
- On the “Home” tab, click on “More Options” button in the “Styles” group.
- Select “Clear Formatting” in the drop down list.
- After doing so, you will be able to remove the horizontal line in the header manually. Double click at the header again to stop editing.
Method 2: Remove the Line but Retain other Formattings
If you want to delete the blank horizontal line only, but in the meantime retain other formatting in the headers, you can refer to this method.
- Go to “Home” tab on the ribbon.
- Click on “Bottom Board” drop down list, and then select “Boards and Shading”.
- Word displays the “Boards” tab of the “Boards and Shading” dialog box, click on “None” under settings.
- Make sure you select “Paragraph” under apply to. And then click “OK”.
- In this way, you will be able to remove only the horizontal line in the header, while you can retain other formatting in your header. Double click at the header again to stop editing.
Word can Sometimes Corrupt Unexpectedly
Anyway, we can finally get rid of the unwanted horizontal lines in the header of our Word. As many of us know, Word offer a numerous of useful functionalities to help us in our studies and works. However, problems arise when our Word attacked by malware and virus . As our Word can be compromised unexpectedly, we therefore need to take hold of a powerful word recovery tool, so that we can be assured to recover our data when some accidents occur.
Author Introduction
Kelly Zhao is a data recovery expert in DataNumen, Inc., which is the world leader in data recovery technologies, including excel recovery and pdf repair software products. For more information visit www.datanumen.com
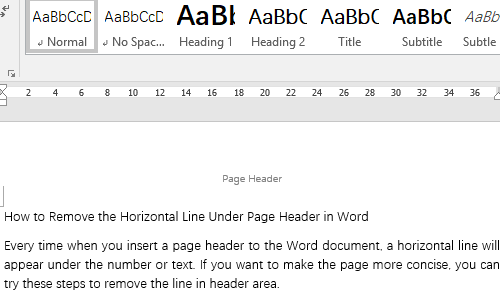
Every time when you insert a page header to the Word document, a horizontal line will appear under the number or text. If you want to make the page more concise, you can try these steps to remove the line in header area.
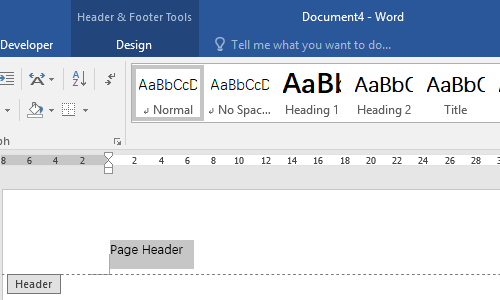
1. Double click the header area to activate the Hear & Footer Tools in Design tab.
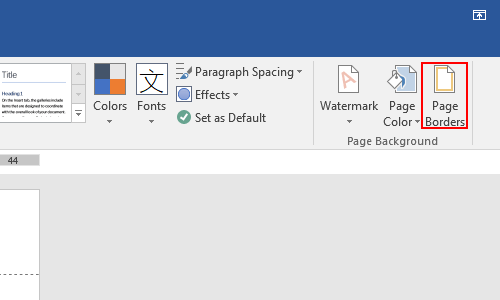
2. Go to Design tab, click Page Borders on the right.
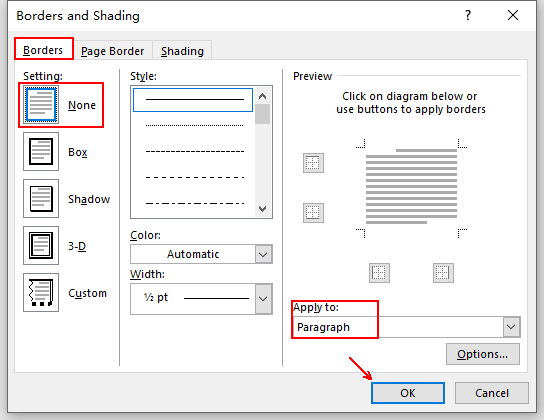
3. Switch to Borders tab, choose None in Setting, and Apply to Paragraph. Then hit OK to implement it.
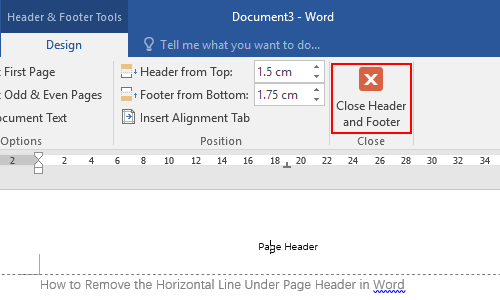
4. Go back to Header & Footer Tools and hit Close Header and Footer.
5. Now the horizontal line has gone.
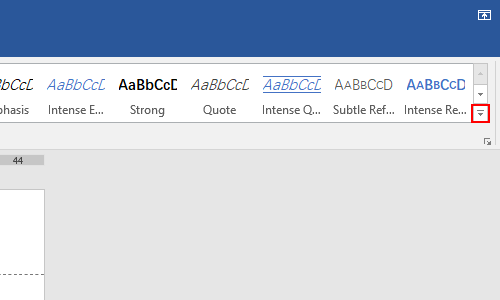
6. You can also double click the header and hit the small down arrow in Styles section of Home tab.
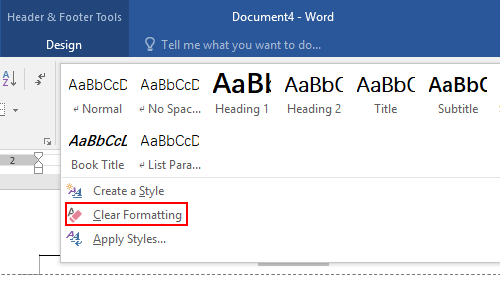
7. Then choose Clear Formatting in the expanded menu.
8. The horizontal line in header area will be removed as well. But other format settings of the header will be cleared at the same time. Please note that when performing this operation.
Copyright Statement: Regarding all of the posts by this website, any copy or use shall get the written permission or authorization from Myofficetricks.
Asked
9 years, 4 months ago
Viewed
251k times
I simply need header like this:
but with a black horizontal line instead of a blue one. How to do this in Word 2013?
Andrea
1,5064 gold badges17 silver badges19 bronze badges
asked Dec 1, 2013 at 17:37
1
On the Home tab under Paragraph click the Borders icon (the same one used to change the borders of tables) and from there select Horizontal line which inserts a line with black color by default.
To insert the title control go to the Insert tab and click Quick Parts, Document Property and then choose Title.
answered Dec 1, 2013 at 21:43
AdamAdam
7,3032 gold badges25 silver badges41 bronze badges
Answer:Select the Insert tab in the toolbar at the top of the screen. Then click on the Header button in the Header & Footer group. Select Remove Header from the popup menu.
Contents
- 1 How do I delete a line in word that won’t delete?
- 2 How do I get rid of the line above the footer?
- 3 How do I get rid of automatic horizontal lines in Word?
- 4 How do I get rid of the Footer line in Word?
- 5 How do I change the Header line in Word?
- 6 How do I remove headers and footers in pages?
- 7 How do I get rid of the vertical line between columns in Word?
- 8 How do I get rid of the vertical line on the left side of a Word document?
- 9 How do I get rid of the header line?
- 10 Why can’t I remove header and Footer in Word?
- 11 How do I remove the header and Footer space in Word?
- 12 Why can’t I change Header in Word?
- 13 How do you remove a header from just one page?
- 14 How do I remove a header from the second page in Word?
- 15 How do you delete column lines?
- 16 How do I get rid of the GREY line in Word?
- 17 Why is there a line on the side of my Word document?
How do I delete a line in word that won’t delete?
The easiest way to get rid of it is to use the Ctrl+Q combination on your keyboard. Simply move your cursor anywhere in the paragraph above the line that you want to delete, and then use Ctrl+Q.
1. Open the footers section, by clicking in that area in the document. 4. The borders and shading menu shows the line that miraculous appeared in my footer, by selecting the option None at the right side of the window it removes the horizontal bar from the footer.
How do I get rid of automatic horizontal lines in Word?
The first method is to press “Ctrl + Z” right after typing the characters and pressing “Enter” to undo the automatic creation of the horizontal line. The line is removed and your characters remain.
How to Get Rid of the Header & Footer Line in Microsoft Word
- Click the “Insert” tab at the top of Microsoft Word.
- Click “Header” in the “Header & Footer” group, and click “Remove header” at the bottom of the drop-down menu.
- Click “Footer” in the “Header & Footer” group, and click “Remove footer.”
Edit your existing headers and footers
- Double-click the header or footer you want to edit, or select Header or Footer, and then select Edit Header or Edit Footer.
- Add or change text for the header or footer or do any of the following:
- When you’re done, select Close Header and Footer or press Esc.
How do I remove headers and footers in pages?
Turning headers or footers off removes the content from all headers and footers in your document.
- In the Document sidebar, click the Document tab.
- Deselect the Header or Footer checkbox.
How do I get rid of the vertical line between columns in Word?
Select the table, Design contextual tab, Table styles group, Border button, click Inside Vertical border that should leave the table border and the horizontal lines. Note that the lines will not be deleted but just won’t print. Select it and press the delete button.
How do I get rid of the vertical line on the left side of a Word document?
Click the arrow under Accept on the ribbon and select “Accept All Changes” to remove the vertical lines.
Double click on the header to starting editing. On the “Home” tab, click on “More Options” button in the “Styles” group. Select “Clear Formatting” in the drop down list. After doing so, you will be able to remove the horizontal line in the header manually.
Why can’t I remove header and Footer in Word?
1. Click File > Info > Check for Issues > Inspect Document, see screenshot: 2. In the popped-out Document Inspector dialog box, only check the Header, Footers, and Watermarks option in the dialog box, make sure other options unchecked.
How do I remove the header and Footer space in Word?
Re: I NEED TO COMPLETELY GET RID OF THE SPACE ALLOCATED TO HEADERS AND FOOTERS. On the Page Layout tab of the ribbon, in the Page Setup group, click Margins > Custom Margins… Set Top, Header, Bottom and Footer to 0, then click OK.
Check the “Allow only this type of editing in the document” box and select “Filling in forms” option. Next click “Select sections” to invoke the “Section Protection” dialog box. In that box, check only “Section 1” box and click “OK”. Then click “Yes, Start Enforcing Protection”.
Double click the header or footer area to make it active. This also activates the Header & Footer Tools section on Word’s Ribbon. On the Design tab of that section, select the “Different First Page” check box. This action removes the header and footer from the first page.
Put the cursor in the header. The contextual “Header & Footer > Design tab will display. In the Option group, turn on (put a checkmark) in “Different first page”. The scroll down to the second page and change the header, ie delete it.
How do you delete column lines?
To do this, select the row or column and then press the Delete key.
- Right-click in a table cell, row, or column you want to delete.
- On the menu, click Delete Cells.
- To delete one cell, choose Shift cells left or Shift cells up. To delete the row, click Delete entire row. To delete the column, click Delete entire column.
How do I get rid of the GREY line in Word?
To get rid of them, select the paragraph(s) and press ctrl+Q (but beware you would loose all paragraph formatting in your case the indent at the beginning of the paragraph), or select the paragraph(s) and go to the border button and choose no border.
Why is there a line on the side of my Word document?
This red line is there because there are still changes in the document that need to be accepted (which can be minor changes like double spaces or a wrongly placed comma). Step 1: Go to the Review tab and click on ‘Accept’ (Word 2019). Step 2: Click on ‘Accept all changes and Stop Tracking’.


