
Worksheet and workbook specifications and limits
|
Feature |
Maximum limit |
|---|---|
|
Open workbooks |
Limited by available memory and system resources |
|
Total number of rows and columns on a worksheet |
1,048,576 rows by 16,384 columns |
|
Column width |
255 characters |
|
Row height |
409 points |
|
Page breaks |
1,026 horizontal and vertical |
|
Total number of characters that a cell can contain |
32,767 characters |
|
Characters in a header or footer |
255 |
|
Maximum number of line feeds per cell |
253 |
|
Sheets in a workbook |
Limited by available memory (default is 1 sheet) |
|
Colors in a workbook |
16 million colors (32 bit with full access to 24 bit color spectrum) |
|
Named views in a workbook |
Limited by available memory |
|
Unique cell formats/cell styles |
65,490 |
|
Fill styles |
256 |
|
Line weight and styles |
256 |
|
Unique font types |
1,024 global fonts available for use; 512 per workbook |
|
Number formats in a workbook |
Between 200 and 250, depending on the language version of Excel that you have installed |
|
Names in a workbook |
Limited by available memory |
|
Windows in a workbook |
Limited by available memory |
|
Hyperlinks in a worksheet |
65,530 |
|
Panes in a window |
4 |
|
Linked sheets |
Limited by available memory |
|
Scenarios |
Limited by available memory; a summary report shows only the first 251 scenarios |
|
Changing cells in a scenario |
32 |
|
Adjustable cells in Solver |
200 |
|
Custom functions |
Limited by available memory |
|
Zoom range |
10 percent to 400 percent |
|
Reports |
Limited by available memory |
|
Sort references |
64 in a single sort; unlimited when using sequential sorts |
|
Undo levels |
100 |
|
Fields in a data form |
32 |
|
Workbook parameters |
255 parameters per workbook |
|
Items displayed in filter drop-down lists |
10,000 |
|
Noncontiguous cells that can be selected |
2,147,483,648 cells |
|
Maximum limits of memory storage and file size for Data Model workbooks |
32-bit environment is subject to 2 gigabytes (GB) of virtual address space, shared by Excel, the workbook, and add-ins that run in the same process. A data model’s share of the address space might run up to 500 – 700 megabytes (MB), but could be less if other data models and add-ins are loaded. 64-bit environment imposes no hard limits on file size. Workbook size is limited only by available memory and system resources. Beginning with Excel 2016, Large Address Aware functionality lets 32-bit Excel consume twice the memory when users work on a 64-bit Windows operating system. For more information, see Large Address Aware capability change for Excel. Note: Adding tables to the Data Model increases the file size. If you don’t plan to create complex Data Model relationships using many data sources and data types in your workbook, uncheck the Add this data to the Data Model box when you import or create tables, pivot tables, or data connections. For more information, see Data Model specification and limits. |
|
Processor Cores |
64 |
|
File name length |
218 characters — This includes the file path. For example, C:UsernameDocumentsFileName.xlsx. |
Calculation specifications and limits
|
Feature |
Maximum limit |
|---|---|
|
Number precision |
15 digits |
|
Smallest allowed negative number |
-2.2251E-308 |
|
Smallest allowed positive number |
2.2251E-308 |
|
Largest allowed positive number |
9.99999999999999E+307 |
|
Largest allowed negative number |
-9.99999999999999E+307 |
|
Largest allowed positive number via formula |
1.7976931348623158e+308 |
|
Largest allowed negative number via formula |
-1.7976931348623158e+308 |
|
Length of formula contents |
8,192 characters |
|
Internal length of formula |
16,384 bytes |
|
Iterations |
32,767 |
|
Worksheet arrays |
Limited by available memory |
|
Selected ranges |
2,048 |
|
Arguments in a function |
255 |
|
Nested levels of functions |
64 |
|
User defined function categories |
255 |
|
Number of available worksheet functions |
341 |
|
Size of the operand stack |
1,024 |
|
Cross-worksheet dependency |
64,000 worksheets that can refer to other sheets |
|
Cross-worksheet array formula dependency |
Limited by available memory |
|
Area dependency |
Limited by available memory |
|
Area dependency per worksheet |
Limited by available memory |
|
Dependency on a single cell |
4 billion formulas that can depend on a single cell |
|
Linked cell content length from closed workbooks |
32,767 |
|
Earliest date allowed for calculation |
January 1, 1900 (January 1, 1904, if 1904 date system is used) |
|
Latest date allowed for calculation |
December 31, 9999 |
|
Largest amount of time that can be entered |
9999:59:59 |
Charting specifications and limits
|
Feature |
Maximum limit |
|---|---|
|
Charts linked to a worksheet |
Limited by available memory |
|
Worksheets referred to by a chart |
255 |
|
Data series in one chart |
255 |
|
Data points in a data series for 2-D charts |
Limited by available memory |
|
Data points in a data series for 3-D charts |
Limited by available memory |
|
Data points for all data series in one chart |
Limited by available memory |
PivotTable and PivotChart report specifications and limits
|
Feature |
Maximum limit |
|---|---|
|
PivotTable reports on a sheet |
Limited by available memory |
|
Unique items per field |
1,048,576 |
|
Row or column fields in a PivotTable report |
Limited by available memory |
|
Report filters in a PivotTable report |
256 (may be limited by available memory) |
|
Value fields in a PivotTable report |
256 |
|
Calculated item formulas in a PivotTable report |
Limited by available memory |
|
Report filters in a PivotChart report |
256 (may be limited by available memory) |
|
Value fields in a PivotChart report |
256 |
|
Calculated item formulas in a PivotChart report |
Limited by available memory |
|
Length of the MDX name for a PivotTable item |
32,767 |
|
Length for a relational PivotTable string |
32,767 |
|
Items displayed in filter drop-down lists |
10,000 |
Workbooks with the «Allow changes by more than one user…» setting enabled
If the Allow changes by more than one user… setting is on for a workbook, then the following information applies. This setting is accessible by clicking the Review tab > Share Workbook. Note that in newer versions of Excel, the Share Workbook button has been hidden. To unhide it, click File > Options > Quick Access Toolbar. Open the list under Choose commands from and select All Commands. Scroll down that list until you see Share Workbook (Legacy). Select that item and click Add. Click OK. The Share Workbook button is now at the top of the Excel window.
|
Feature |
Maximum limit |
|---|---|
|
Users who can open the file at the same time |
256 |
|
Personal views in the workbook |
Limited by available memory |
|
Days that change history is maintained |
32,767 (default is 30 days) |
|
Workbooks that can be merged at one time |
Limited by available memory |
|
Cells that can be highlighted |
32,767 |
|
Colors used to identify changes made by different users when change highlighting is turned on |
32 (each user is identified by a separate color; changes made by the current user are highlighted with navy blue) |
|
Excel tables in the workbook |
0 (zero) Note: A workbook that contains one or more Excel tables cannot have the Allow changes by more than one user… setting enabled. |
Worksheet and workbook specifications and limits
|
Feature |
Maximum limit |
|---|---|
|
Open workbooks |
Limited by available memory and system resources |
|
Total number of rows and columns on a worksheet |
1,048,576 rows by 16,384 columns |
|
Column width |
255 characters |
|
Row height |
409 points |
|
Page breaks |
1,026 horizontal and vertical |
|
Total number of characters that a cell can contain |
32,767 characters |
|
Characters in a header or footer |
255 |
|
Maximum number of line feeds per cell |
253 |
|
Sheets in a workbook |
Limited by available memory (default is 3 sheets) |
|
Colors in a workbook |
16 million colors (32 bit with full access to 24 bit color spectrum) |
|
Named views in a workbook |
Limited by available memory |
|
Unique cell formats/cell styles |
65,490 |
|
Fill styles |
256 |
|
Line weight and styles |
256 |
|
Unique font types |
1,024 global fonts available for use; 512 per workbook |
|
Number formats in a workbook |
Between 200 and 250, depending on the language version of Excel that you have installed |
|
Names in a workbook |
Limited by available memory |
|
Windows in a workbook |
Limited by available memory |
|
Hyperlinks in a worksheet |
65,530 hyperlinks |
|
Panes in a window |
4 |
|
Linked sheets |
Limited by available memory |
|
Scenarios |
Limited by available memory; a summary report shows only the first 251 scenarios |
|
Changing cells in a scenario |
32 |
|
Adjustable cells in Solver |
200 |
|
Custom functions |
Limited by available memory |
|
Zoom range |
10 percent to 400 percent |
|
Reports |
Limited by available memory |
|
Sort references |
64 in a single sort; unlimited when using sequential sorts |
|
Undo levels |
100 |
|
Fields in a data form |
32 |
|
Workbook parameters |
255 parameters per workbook |
|
Items displayed in filter drop-down lists |
10,000 |
|
Noncontiguous cells that can be selected |
2,147,483,648 cells |
|
Processor Cores |
64 |
Calculation specifications and limits
|
Feature |
Maximum limit |
|---|---|
|
Number precision |
15 digits |
|
Smallest allowed negative number |
-2.2251E-308 |
|
Smallest allowed positive number |
2.2251E-308 |
|
Largest allowed positive number |
9.99999999999999E+307 |
|
Largest allowed negative number |
-9.99999999999999E+307 |
|
Largest allowed positive number via formula |
1.7976931348623158e+308 |
|
Largest allowed negative number via formula |
-1.7976931348623158e+308 |
|
Length of formula contents |
8,192 characters |
|
Internal length of formula |
16,384 bytes |
|
Iterations |
32,767 |
|
Worksheet arrays |
Limited by available memory |
|
Selected ranges |
2,048 |
|
Arguments in a function |
255 |
|
Nested levels of functions |
64 |
|
User defined function categories |
255 |
|
Number of available worksheet functions |
341 |
|
Size of the operand stack |
1,024 |
|
Cross-worksheet dependency |
64,000 worksheets that can refer to other sheets |
|
Cross-worksheet array formula dependency |
Limited by available memory |
|
Area dependency |
Limited by available memory |
|
Area dependency per worksheet |
Limited by available memory |
|
Dependency on a single cell |
4 billion formulas that can depend on a single cell |
|
Linked cell content length from closed workbooks |
32,767 |
|
Earliest date allowed for calculation |
January 1, 1900 (January 1, 1904, if 1904 date system is used) |
|
Latest date allowed for calculation |
December 31, 9999 |
|
Largest amount of time that can be entered |
9999:59:59 |
Charting specifications and limits
|
Feature |
Maximum limit |
|---|---|
|
Charts linked to a worksheet |
Limited by available memory |
|
Worksheets referred to by a chart |
255 |
|
Data series in one chart |
255 |
|
Data points in a data series for 2-D charts |
Limited by available memory |
|
Data points in a data series for 3-D charts |
Limited by available memory |
|
Data points for all data series in one chart |
Limited by available memory |
PivotTable and PivotChart report specifications and limits
|
Feature |
Maximum limit |
|---|---|
|
PivotTable reports on a sheet |
Limited by available memory |
|
Unique items per field |
1,048,576 |
|
Row or column fields in a PivotTable report |
Limited by available memory |
|
Report filters in a PivotTable report |
256 (may be limited by available memory) |
|
Value fields in a PivotTable report |
256 |
|
Calculated item formulas in a PivotTable report |
Limited by available memory |
|
Report filters in a PivotChart report |
256 (may be limited by available memory) |
|
Value fields in a PivotChart report |
256 |
|
Calculated item formulas in a PivotChart report |
Limited by available memory |
|
Length of the MDX name for a PivotTable item |
32,767 |
|
Length for a relational PivotTable string |
32,767 |
|
Items displayed in filter drop-down lists |
10,000 |
Workbooks with the «Allow changes by more than one user…» setting enabled
If the Allow changes by more than one user… setting is on for a workbook, then the following information applies. This setting is accessible by clicking the Review tab > Share Workbook.
|
Feature |
Maximum limit |
|---|---|
|
Users who can open and share the file at the same time |
256 |
|
Personal views in the workbook |
Limited by available memory |
|
Days that change history is maintained |
32,767 (default is 30 days) |
|
Workbooks that can be merged at one time |
Limited by available memory |
|
Cells that can be highlighted in the workbook |
32,767 |
|
Colors used to identify changes made by different users when change highlighting is turned on |
32 (each user is identified by a separate color; changes made by the current user are highlighted with navy blue) |
|
Excel tables in the workbook |
0 (zero) Note: A workbook that contains one or more Excel tables cannot have the Allow changes by more than one user… setting enabled. |
Worksheet and workbook specifications and limits
|
Feature |
Maximum limit |
|---|---|
|
Open workbooks |
Limited by available memory and system resources |
|
Total number of rows and columns on a worksheet |
1,048,576 rows by 16,384 columns |
|
Column width |
255 characters |
|
Row height |
409 points |
|
Page breaks |
1,026 horizontal and vertical |
|
Total number of characters that a cell can contain |
32,767 characters |
|
Characters in a header or footer |
255 |
|
Maximum number of line feeds per cell |
253 |
|
Sheets in a workbook |
Limited by available memory (default is 3 sheets) |
|
Colors in a workbook |
16 million colors (32 bit with full access to 24 bit color spectrum) |
|
Named views in a workbook |
Limited by available memory |
|
Unique cell formats/cell styles |
65,490 |
|
Fill styles |
256 |
|
Line weight and styles |
256 |
|
Unique font types |
1,024 global fonts available for use; 512 per workbook |
|
Number formats in a workbook |
Between 200 and 250, depending on the language version of Excel that you have installed |
|
Names in a workbook |
Limited by available memory |
|
Windows in a workbook |
Limited by available memory |
|
Hyperlinks in a worksheet |
65,530 hyperlinks |
|
Panes in a window |
4 |
|
Linked sheets |
Limited by available memory |
|
Scenarios |
Limited by available memory; a summary report shows only the first 251 scenarios |
|
Changing cells in a scenario |
32 |
|
Adjustable cells in Solver |
200 |
|
Custom functions |
Limited by available memory |
|
Zoom range |
10 percent to 400 percent |
|
Reports |
Limited by available memory |
|
Sort references |
64 in a single sort; unlimited when using sequential sorts |
|
Undo levels |
100 |
|
Fields in a data form |
32 |
|
Workbook parameters |
255 parameters per workbook |
|
Filter drop-down lists |
10,000 |
Calculation specifications and limits
|
Feature |
Maximum limit |
|---|---|
|
Number precision |
15 digits |
|
Smallest allowed negative number |
-2.2251E-308 |
|
Smallest allowed positive number |
2.2251E-308 |
|
Largest allowed positive number |
9.99999999999999E+307 |
|
Largest allowed negative number |
-9.99999999999999E+307 |
|
Largest allowed positive number via formula |
1.7976931348623158e+308 |
|
Largest allowed negative number via formula |
-1.7976931348623158e+308 |
|
Length of formula contents |
8,192 characters |
|
Internal length of formula |
16,384 bytes |
|
Iterations |
32,767 |
|
Worksheet arrays |
Limited by available memory |
|
Selected ranges |
2,048 |
|
Arguments in a function |
255 |
|
Nested levels of functions |
64 |
|
User defined function categories |
255 |
|
Number of available worksheet functions |
341 |
|
Size of the operand stack |
1,024 |
|
Cross-worksheet dependency |
64,000 worksheets that can refer to other sheets |
|
Cross-worksheet array formula dependency |
Limited by available memory |
|
Area dependency |
Limited by available memory |
|
Area dependency per worksheet |
Limited by available memory |
|
Dependency on a single cell |
4 billion formulas that can depend on a single cell |
|
Linked cell content length from closed workbooks |
32,767 |
|
Earliest date allowed for calculation |
January 1, 1900 (January 1, 1904, if 1904 date system is used) |
|
Latest date allowed for calculation |
December 31, 9999 |
|
Largest amount of time that can be entered |
9999:59:59 |
Charting specifications and limits
|
Feature |
Maximum limit |
|---|---|
|
Charts linked to a worksheet |
Limited by available memory |
|
Worksheets referred to by a chart |
255 |
|
Data series in one chart |
255 |
|
Data points in a data series for 2-D charts |
32,000 |
|
Data points in a data series for 3-D charts |
4,000 |
|
Data points for all data series in one chart |
256,000 |
PivotTable and PivotChart report specifications and limits
|
Feature |
Maximum limit |
|---|---|
|
PivotTable reports on a sheet |
Limited by available memory |
|
Unique items per field |
1,048,576 |
|
Row or column fields in a PivotTable report |
Limited by available memory |
|
Report filters in a PivotTable report |
256 (may be limited by available memory) |
|
Value fields in a PivotTable report |
256 |
|
Calculated item formulas in a PivotTable report |
Limited by available memory |
|
Report filters in a PivotChart report |
256 (may be limited by available memory) |
|
Value fields in a PivotChart report |
256 |
|
Calculated item formulas in a PivotChart report |
Limited by available memory |
|
Length of the MDX name for a PivotTable item |
32,767 |
|
Length for a relational PivotTable string |
32,767 |
Workbooks with the «Allow changes by more than one user…» setting enabled
If the Allow changes by more than one user… setting is on for a workbook, then the following information applies. This setting is enabled when using Shared Workbooks.
|
Feature |
Maximum limit |
|---|---|
|
Users who can open and share the workbook at the same time |
256 |
|
Personal views in the workbook |
Limited by available memory |
|
Days that change history is maintained |
32,767 (default is 30 days) |
|
Workbooks that can be merged at one time |
Limited by available memory |
|
Cells that can be highlighted |
32,767 |
|
Colors used to identify changes made by different users when change highlighting is turned on |
32 (each user is identified by a separate color; changes made by the current user are highlighted with navy blue) |
|
Excel tables in the workbook |
0 (zero) Note: A workbook that contains one or more Excel tables cannot have the Allow changes by more than one user… setting enabled. |
Top of Page
Limit of Rows in Excel Worksheet
Limiting rows in Excel is a great tool to add more protection to the spreadsheet as this restricts the other users from changing or modifying the spreadsheet to a great limit. For example, while working on a shared spreadsheet, a user must limit the other user from changing the data that the primary user has inserted. The Excel row limit can do this.
Table of contents
- Limit of Rows in Excel Worksheet
- How to Limit Number of Rows in Excel? (with Examples)
- Example #1 – Limit of Rows by Using Excel Hide Function.
- Example #2 – Restrict Accessing Rows by Protecting the Worksheet
- Example #3 – Limit Worksheet Rows in Excel with VBA (Scroll Lock)
- Things to Remember
- Recommended Articles
- How to Limit Number of Rows in Excel? (with Examples)
How to Limit the Number of Rows in Excel? (with Examples)
We can limit rows in Excel in multiple ways, as below.
- Hiding the rows
- Protecting the rows
- Scrolling limits
Example #1 – Limit of Rows by Using Excel Hide Function.
It is the easiest function that we can use to limit the rows that are in Excel. Using this method, we physically make the unwanted rows disappear from the workspace.
Below are the steps for limiting rows using the Excel hide function:
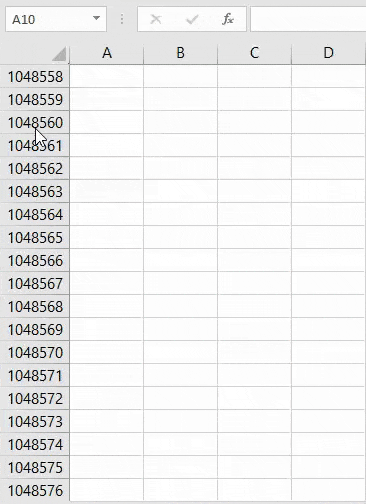
- First, select the rows that are not wanted and need to be restricted. In this case, we chose the rows from A10 to the last.

- Now, right-click on the mouse after the rows are selected and choose the option that will hide the rows.

- After the rows are selected to be hidden, the user will only see those not set as hidden. In this way, the rows are limited in Excel.


Example #2 – Restrict Accessing Rows by Protecting the Worksheet
Another simple way of restricting the rows in excel is by protecting the sheet and disabling the feature of allowing the user to select locked cells in excelIn Excel, cells are locked to protect them from unwanted editing, deleting, and overwriting. Locking cells is specifically beneficial in cases where an excel worksheet needs to be shared with several colleagues.read more. This way, we can restrict the user from accessing the restricted rows.
In this method, the user is only restricted from accessing the rows. However, all the rows are still visible to the users.
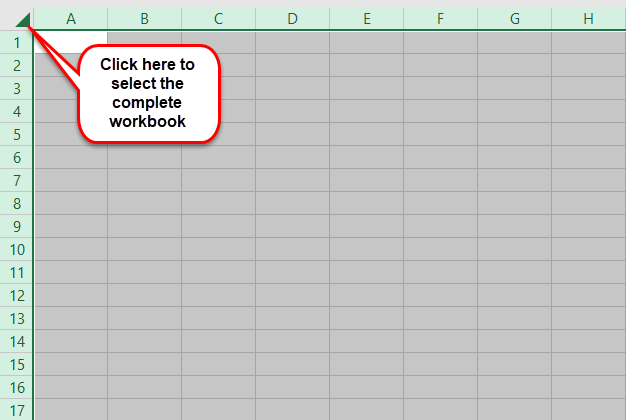
- Step 1: Select the complete workbook.
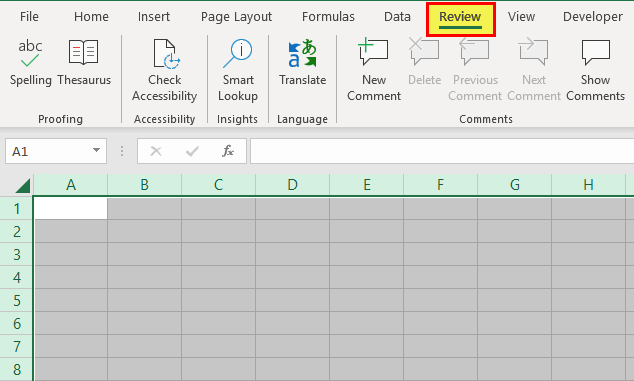
- Step 2: Now, go to the “Review” tab.
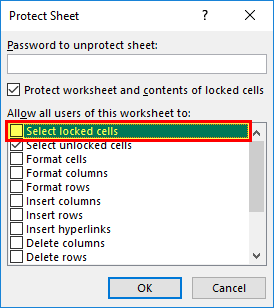
- Step 3: Now, select the option of “Protect Sheet.”

- Step 4: From the options of protecting the sheet, Untick the option “Select locked cells.” By not checking this option, Excel will now not allow the users to select the locked cells.
- Step 5: The complete worksheet is locked and cannot be accessed since we have protected the complete worksheet.
- Step 6: Now, we must unprotect the rows or fields that we want the users to have access to. Select the rows that are to be made available.
- Step 7: Now, right-click and choose the option of “Format Cells.”
- Step 8: Choose the option to unprotect the range from the “Format CellsFormatting cells is an important technique to master because it makes any data presentable, crisp, and in the user’s preferred format. The formatting of the cell depends upon the nature of the data present.read more” option.
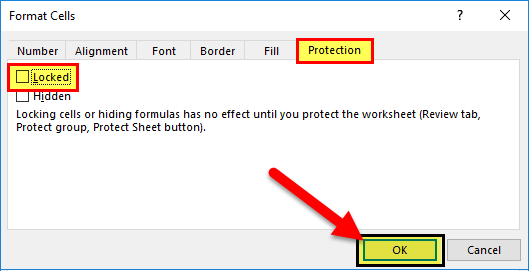
- Step 9: Now, the rows are limited, as only the selected rows are accessible by the user.
Example #3 – Limit Worksheet Rows in Excel with VBA (Scroll Lock)
In this method, the rows are blocked from accessing.
Step 1: Right-click on the sheet name and click “View Code.”
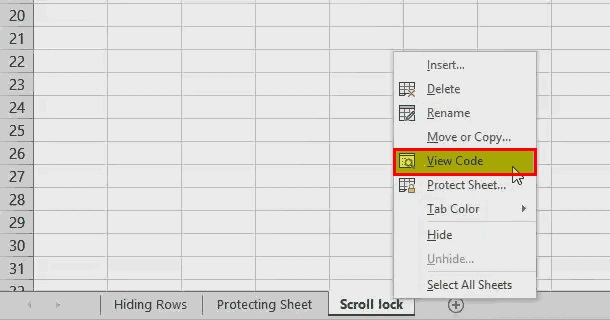
- Step 2: Go to the “View” tab and select the “Properties Window.” You can also use the shortcut key F4 to choose the properties window.

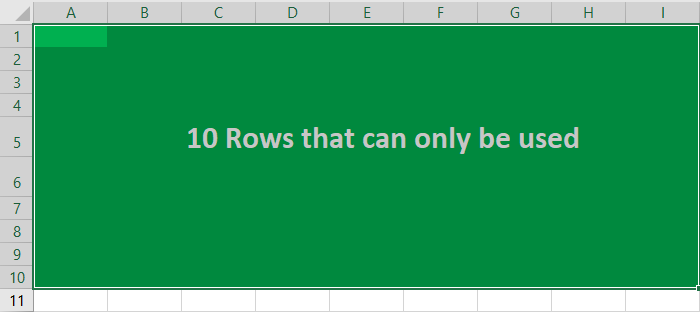
- Step 3: Now, go to the “ScrollArea” and insert the rows to be made available to the user.
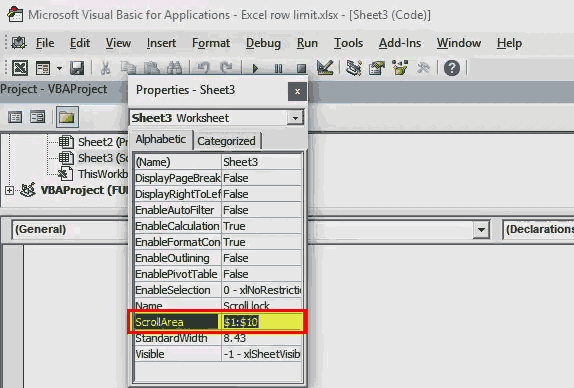
- Step 4: The user can only access the first 10 rows in Excel.
Things to Remember
- By doing the limit of rows in Excel, we only choose to hide the rows that are not yet required.
- When rows are inactive, they are only not available in the current worksheet and can be accessed in a new worksheet.
- Only the current worksheet will be affected if we use the scroll lock option to inactivate some of the rows. Other sheets will not get impacted as the property is only changed for that worksheet, whose code is viewed and then changed.
- The rows number will not get affected, and the rows will not get a reassigned number if any of the rows are hidden. If we have hidden the first 10 rows, this does not mean that the 11th row will get first. The 11th row will remain the 11th row since Excel wants the user to notify that some rows are hidden.
- If we are using the “ScrollArea” option to limit the rows, then this can be changed by the other user as this option to change the scroll option is available to all users as this option does not make the changes protected.
- If we do not want other users to change any of the rules we have created related to the available rows, then we must use the option of “Protect sheet in excelWhen we don’t want any other user to make changes to our worksheet, we can use the Protect worksheet feature in Excel. It can be found in Excel’s Review tab. read more” and then continue with a password.
Recommended Articles
This article is a guide to Excel Rows Limit. Here, we discuss how to limit the rows in Excel using the hide feature, protect the worksheet, and VBA scroll lock, along with practical examples and downloadable templates. You may learn more about Excel from the following articles: –
- Count Rows in ExcelThere are numerous ways to count rows in Excel using the appropriate formula, whether they are data rows, empty rows, or rows containing numerical/text values. Depending on the circumstance, you can use the COUNTA, COUNT, COUNTBLANK, or COUNTIF functions.read more
- VBA Last Row FunctionThe End(XLDown) method is the most commonly used method in VBA to find the last row, but there are other methods, such as finding the last value in VBA using the find function (XLDown).read more
- Remove Blank Rows in Excel
- Row Function Excel Example
Reader Interactions
Display only what you want to see
Updated on September 26, 2022
What to Know
- To hide certain rows: Select or highlight the rows you want to hide. Right-click a row heading and choose Hide. Repeat for columns.
- To unhide: Right-click the header for the last visible row or column and choose Unhide.
- To temporarily limit range of cells: Right-click sheet tab > View Code > Properties. For ScrollArea, type A1:Z30. Save, close, and reopen Excel.
To help control the size of an Excel worksheet, you can limit the number of columns and rows that a worksheet displays. In this guide, we show you how to hide (and unhide) rows and columns in Excel 2019, Excel 2016, Excel 2013, and Excel for Microsoft 365, as well as how to limit access to rows and columns using Microsoft Visual Basic for Applications (VBA).
Hide Rows and Columns in Excel
An alternative method for restricting the work area of a worksheet is to hide sections of unused rows and columns; they’ll stay hidden even after you close the document. Follow the steps below to hide the rows and columns outside the range A1:Z30.
-
Open your workbook and select the worksheet you want to hide rows and columns in. Click the header for row 31 to select the entire row.
-
Press and hold the Shift and Ctrl keys on the keyboard. At the same time, press the down arrow key on the keyboard to select all rows from row 31 to the bottom of the worksheet. Release all the keys.
-
Right-click one of the row headings to open the contextual menu. Select Hide.
-
The worksheet now shows only the data in rows 1 through 30.
-
Click the header for column AA and repeat steps 2 and 3 (using the right arrow key instead of the down arrow key) to hide all columns after column Z.
-
Save the workbook; the columns and rows outside the range A1 to Z30 will remain hidden until you unhide them.
You can use the same process to hide any rows or columns you want. Just select the header or headers for the row or column, right-click the header, and select Hide.
Unhide Rows and Columns in Excel
When you want to view the data you hid, you can unhide the rows and columns at any time. Follow these steps to unhide the rows and columns you hid in the previous example.
-
Open the worksheet you used to hide row 31 and higher and column AA and higher. Click the headers for row 30 (or the last visible row in the worksheet) and the row below it. Right-click the row headers and, from the menu, select Unhide.
-
The hidden rows are restored.
-
Now click the headers for column Z (or the last visible column) and the column to the right of it. Right-click the selected column headers and, from the menu, choose Unhide. The hidden columns are restored.
Limit Access to Rows and Columns With VBA
You can use Microsoft Visual Basic for Applications (VBA) to temporarily limit the range of usable rows and columns in a worksheet. In this example, you’ll change the properties of a worksheet to limit the number of available rows to 30 and the number of columns to 26.
Changing the scroll area is a temporary measure; it resets each time the workbook is closed and reopened.
-
Open a blank Excel file. At the bottom of the screen, right-click the Sheet1 sheet tab. From the menu, choose View Code.
-
The Visual Basic for Applications (VBA) editor window opens. In the left rail, locate the Properties section.
-
Under Properties,in the right column of the ScrollArea row, click the empty box and type A1:Z30.
-
Select File > Save and save your workbook as you normally would. Select File > Close and Return to Microsoft Excel.
-
To make sure your change is applied, perform this test. In your worksheet, try to scroll past row 30 or column Z. If the change has been applied, Excel bounces you back to the selected range and you’re unable to edit cells outside that range.
-
To remove the restrictions, access VBA again and delete the ScrollArea range.
FAQ
-
What is the maximum limit of rows in Excel?
Microsoft says that the maximum size of a single Excel spreadsheet is 1,048,576 rows by 16,384 columns. The maximum row height is 409 points, and the maximum column width is 255 characters.
-
How do I permanently set row and column limits in Excel?
If you want to set a hard limit to columns or rows in an Excel spreadsheet (i.e. set it up so no additional rows or columns can be added past that set limit), unfortunately you can’t. There’s currently no menu option to prevent yourself or other users from adding more rows or columns you may not want. However, you can manually delete unwanted rows and columns by right-clicking the selected row(s) or column(s) and selecting Delete.
Thanks for letting us know!
Get the Latest Tech News Delivered Every Day
Subscribe
Содержание
- Maximum Number of Rows in Excel
- How to Find the Maximum Number of Rows in Excel?
- Limit User Action to Specific Number of Rows in Excel
- Using Hide Method
- Things to Remember
- Recommended Articles
- XLS and XLSX: Maximum Number of Columns and Rows
- What is the maximum number of columns & rows in Excel Worksheet
- Maximum number of rows & columns in Excel
- How to Limit Rows and Columns in Excel
- What to Know
- Hide Rows and Columns in Excel
- Unhide Rows and Columns in Excel
- Limit Access to Rows and Columns With VBA
Maximum Number of Rows in Excel


How to Find the Maximum Number of Rows in Excel?
Table of contents
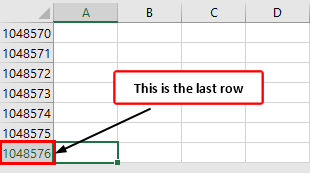
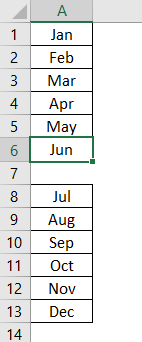
For example, look at the below worksheet preview.
The active cell is the A1 cell. To go to the last row of this column, we need to press the shortcut key “Ctrl + Down Arrow.” It will take us to the last row in the selected cell column.
![]()
But one thing we need to know about this shortcut is it will take us to the last used cell without a cell break.
For example, look at the below data preview.
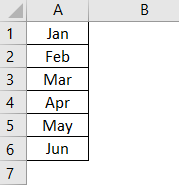
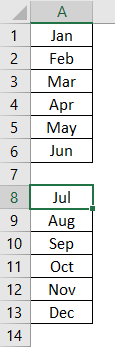
We have some data in the first 6 rows of column 1, and the active cell is the A1 cell. If we press “Ctrl + Down Arrow, “it will take you to the last used cell, not to the last row of the worksheet.
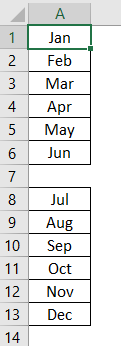
This shortcut key will go to the last used cell without cell breaks. For example, look at the below data preview.
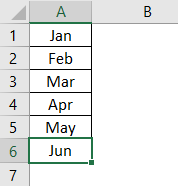
After the first 6 rows, we have a line break of one row, and after that cell break, we have data in another 6 rows. So first, we will press the shortcut key “Ctrl + Down Arrow.” It will take me to the last used row before the cell break, the 6th row.
Again, we will press the shortcut key “Ctrl + Down Arrow” and see where it will go.
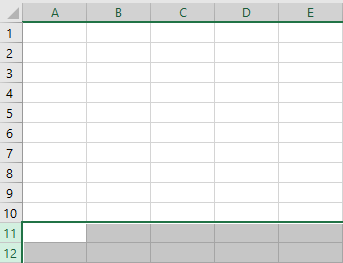
Upon pressing the shortcut key one more time, it has jumped to the next used cell, not to the end of the last used cell. So now, we must press the “Ctrl + Down Arrow” key. It will take us to another last used row, the 13th row.

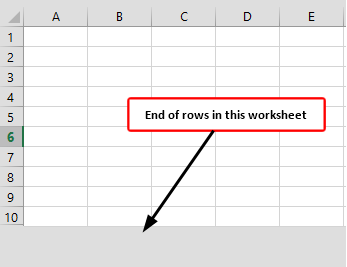
Now, if we press the “Ctrl + Down Arrow,” it will take us to the last row of the worksheet. Like this, going to the maximum number of rows with Excel works.
Limit User Action to Specific Number of Rows in Excel
Often, we do not want users to use all the rows. Rather, we want them to work with a specific range of cells or rows. We can do this by using multiple methods. Below are the ways to restrict user action to particular rows.
Using Hide Method
For example, if we want to allow a user to work with the first ten rows of the data, we can hide the remaining rows except for the first 10 rows.
- To hide from the 11th row onwards, we must select all the rows till the 10,48,576 rows.
- Now right-click on the row headerRow HeaderExcel Row Header is the grey column on the left side of column 1 in the worksheet that contains the numbers (1, 2, 3, etc.). To hide or reveal row and column headers, press ALT + W + V + H.read more and choose the option of “Hide.”

- It will hide all the selected rows, and the user can see only 10 rows.
After selecting several rows to be hidden, press the shortcut key “Ctrl + 9” (Number 9 should be from the keyboard number, not from the number pad of the keyboard). It will simply hide the rows.
Like this, we can limit the action of users with specific worksheets.
Things to Remember
- Excel 2003 version has only 65,536 rows only.
- From the Excel 2007 version onwards, we have more than 1 million rows.
- If we use all the rows, then the computer should be equipped with a well-versed processor, and RAM capacity should be not less than 8 GB.
Recommended Articles
This article is a guide to the Maximum Number of Rows in Excel. We discuss finding the last row and restricting user action to specific rows in Excel and a downloadable template. You may learn more about Excel from the following articles: –
Источник
XLS and XLSX: Maximum Number of Columns and Rows
Info by Stefan Trost | Last update on 2022-11-17 | Created on 2018-01-19
The maximum number of possible columns and rows in Microsoft Excel is not unlimited. Instead, the limit differs from program version to program version and is moreover depending on whether the file format is XLSX or XLS.
Here is a table of previous versions and formats of Excel as well as the maximum number of rows and columns allowed for the corresponding version and format.
| Version | Format | Max. Rows | Max. Columns |
| Excel 365 | XLSX | 1.048.576 | 16.384 (XFD) |
| Excel 2021 | XLSX | 1.048.576 | 16.384 (XFD) |
| Excel 2019 | XLSX | 1.048.576 | 16.384 (XFD) |
| Excel 2016 (16.0) | XLSX | 1.048.576 | 16.384 (XFD) |
| Excel 2013 (15.0) | XLSX | 1.048.576 | 16.384 (XFD) |
| Excel 2010 (14.0) | XLSX | 1.048.576 | 16.384 (XFD) |
| Excel 2007 (12.0) | XLSX | 1.048.576 | 16.384 (XFD) |
| Excel 2003 (11.0) | XLS | 65.536 | 256 (IV) |
| Excel 2002 (10.0) | XLS | 65.536 | 256 (IV) |
| Excel 2000 (9.0) | XLS | 65.536 | 256 (IV) |
| Excel 97 (8.0) | XLS | 65.536 | 256 (IV) |
| Excel 95 (7.0) | XLS | 16.384 | 256 (IV) |
| Excel 5.0 (1993) | XLS | 16.384 | 256 (IV) |
| Excel 4.0 (1992) | XLS | 16.384 | 256 (IV) |
| Excel 3.0 (1990) | XLS | 16.384 | 256 (IV) |
| Excel 2.0 (1987) | XLS | 16.384 | 256 (IV) |
| Excel 1.0 (1985) | XLS | 16.384 | 256 (IV) |
In the first versions of Excel from 1985 on, only 16,384 lines and 256 columns were allowed. This made it possible to use the columns from column A to column IV. The last usable field in the lower right corner was accordingly the field IV16384. With this, a maximum of 4,341,760 cells of the XLS sheet could be used in the Excel versions from 1.0 to 7.0.
Starting with Excel 97 (version 8.0), the maximum number of lines for the XLS format was increased to 65,536, the maximum number of columns remained unchanged. So, a maximum of 16,777,216 cells are usable in an XLS sheet.
First ten years later with Excel 2007 (version 12.0) and the introduction of the XLSX format, there was a further increase in the number of permitted fields. From this time on, 1,048,576 rows and 16,384 columns (that is from column A to the XFD column) were possible. Til today, this number has not been increased again. Overall, a current Excel spreadsheet can therefore comprise 17,179,869,184 cells. Incidentally, this increase only applies to the XLSX format. If you use a current version of Excel to store a sheet in the old XLS format, the limit of 65,536 lines and 256 columns introduced with Excel 97 is there still today. If you nevertheless try to save a spreadsheet that exceeds this range in XLS format, Excel will issue an error message and not save the corresponding field(s).
Since Excel 2016 up to the current Excel 365 offered in a subscription model, Microsoft has not only kept the same number of permitted rows and columns, but has also frozen the version number on 16, since instead of discrete versions, there should be continuously new features rolled out via the Windows update in future. It remains to be seen whether Microsoft someday will give us more columns or more rows via this update again.
Источник
What is the maximum number of columns & rows in Excel Worksheet
The theoretical limit of rows and columns in the Microsoft Office application, Excel is well defined. If you exceed this mark, you are prompted with a ‘File not loaded completely’ popup message. It bears the following description:
- The file contains more than 1,048,576 rows or 16,384 columns. To fix this problem, open the source file in a text editor such as Microsoft Office Word. Save the source file as several smaller files that conform to this row and column limit, and then open the smaller files in Microsoft Office Excel. If the source data cannot be opened in a text editor, try importing the data into Microsoft Office Access, and then exporting subsets of the data from Access to Excel.
- The area that you are trying to paste the tab-delineated data into is too small. To fix this problem, select an area in the worksheet large enough to accommodate every delimited item.
So, what’s the maximum number of rows and columns supported in an Excel worksheet? Let’s find out!
Maximum number of rows & columns in Excel
Excel supports three Worksheets in a Workbook file, and each Worksheet can support up to 1,048,576 rows and 16,384 columns of data. Workbooks, however, can have more than 3 Worksheets if the computer supports enough memory for the additional data.
A handful of Office users seem to believe that 64-bit Excel can support more rows or columns than the 32-bit version. Is it true? While it might seem possible theoretically or remotely, it’s certainly not true as the number of rows/columns is limited by the version of the product and not by a number of ‘BITS’ it supports.
Moreover, having larger worksheet sizes exclusively for 64-bit Excel would cause some sorts of unknown compatibility issues. Microsoft strongly desires to keep its Worksheet accessible to all copies of Excel and version, regardless of whether it is 32-bit and 64-bit. Only when data is inserted into a Worksheet, other factors like how much memory the computer has, play a role in defining the rows, columns, cells limits.
Having said that, there’s one way via which you can find the number of rows and columns in Excel Worksheet and answer the question yourself. Here’s how!
- For determining the maximum number of rows, place the cursor in an empty column and press Ctrl + Down Arrow. The action will take you to the last row.
- Similarly, to find the maximum number of columns, place the cursor in an empty row and press Ctrl + Right Arrow. This will take you to the last column.
For other additional information, you can visit this Office Support Page.
Источник
How to Limit Rows and Columns in Excel
Display only what you want to see
What to Know
- To hide certain rows: Select or highlight the rows you want to hide. Right-click a row heading and choose Hide. Repeat for columns.
- To unhide: Right-click the header for the last visible row or column and choose Unhide.
- To temporarily limit range of cells: Right-click sheet tab >View Code >Properties. For ScrollArea, type A1:Z30. Save, close, and reopen Excel.
To help control the size of an Excel worksheet, you can limit the number of columns and rows that a worksheet displays. In this guide, we show you how to hide (and unhide) rows and columns in Excel 2019, Excel 2016, Excel 2013, and Excel for Microsoft 365, as well as how to limit access to rows and columns using Microsoft Visual Basic for Applications (VBA).
Hide Rows and Columns in Excel
An alternative method for restricting the work area of a worksheet is to hide sections of unused rows and columns; they’ll stay hidden even after you close the document. Follow the steps below to hide the rows and columns outside the range A1:Z30.
Open your workbook and select the worksheet you want to hide rows and columns in. Click the header for row 31 to select the entire row.
:max_bytes(150000):strip_icc()/Sites-97f9f6afae9f455b8ca922903c3e054f.jpg)
Press and hold the Shift and Ctrl keys on the keyboard. At the same time, press the down arrow key on the keyboard to select all rows from row 31 to the bottom of the worksheet. Release all the keys.
:max_bytes(150000):strip_icc()/SelectRows-089aa3f6908547dc92c6d18d5cceb581.jpg)
Right-click one of the row headings to open the contextual menu. Select Hide.
:max_bytes(150000):strip_icc()/Hide-7f443bc6033e4d4b98b8702922e7c8db.jpg)
The worksheet now shows only the data in rows 1 through 30.
:max_bytes(150000):strip_icc()/LimitedRows-5d73916e26b9448081cfc254ebeaeaa9.jpg)
Click the header for column AA and repeat steps 2 and 3 (using the right arrow key instead of the down arrow key) to hide all columns after column Z.
:max_bytes(150000):strip_icc()/HideColumns-4bf2226c133e41a39b79a7784007b049.jpg)
Save the workbook; the columns and rows outside the range A1 to Z30 will remain hidden until you unhide them.
You can use the same process to hide any rows or columns you want. Just select the header or headers for the row or column, right-click the header, and select Hide.
Unhide Rows and Columns in Excel
When you want to view the data you hid, you can unhide the rows and columns at any time. Follow these steps to unhide the rows and columns you hid in the previous example.
Open the worksheet you used to hide row 31 and higher and column AA and higher. Click the headers for row 30 (or the last visible row in the worksheet) and the row below it. Right-click the row headers and, from the menu, select Unhide.
:max_bytes(150000):strip_icc()/Unhide-f3e3f2fbeaef478da59ddd8c5b920d8a.jpg)
The hidden rows are restored.
:max_bytes(150000):strip_icc()/Unhidden-c03c6e55715d4f0c9770a11f8ef34c65.jpg)
Now click the headers for column Z (or the last visible column) and the column to the right of it. Right-click the selected column headers and, from the menu, choose Unhide. The hidden columns are restored.
:max_bytes(150000):strip_icc()/ColumnsRestored-d06dd25083b44cf88afb91f689043806.jpg)
Limit Access to Rows and Columns With VBA
You can use Microsoft Visual Basic for Applications (VBA) to temporarily limit the range of usable rows and columns in a worksheet. In this example, you’ll change the properties of a worksheet to limit the number of available rows to 30 and the number of columns to 26.
Changing the scroll area is a temporary measure; it resets each time the workbook is closed and reopened.
Open a blank Excel file. At the bottom of the screen, right-click the Sheet1 sheet tab. From the menu, choose View Code.
:max_bytes(150000):strip_icc()/NewSheet-e1932e0f521b40a580f8f7a7fc7c562a.jpg)
The Visual Basic for Applications (VBA) editor window opens. In the left rail, locate the Properties section.
:max_bytes(150000):strip_icc()/VBA-0ae3957795f04c6181fbc39c20f2edb1.jpg)
Under Properties,in the right column of the ScrollArea row, click the empty box and type A1:Z30.
:max_bytes(150000):strip_icc()/A1Z30-fbba47ba3f2847ae94c6fae7a77b1193.jpg)
Select File > Save and save your workbook as you normally would. Select File > Close and Return to Microsoft Excel.
:max_bytes(150000):strip_icc()/Save-e853356887ce44f1b6a05f4e26e0c318.jpg)
To make sure your change is applied, perform this test. In your worksheet, try to scroll past row 30 or column Z. If the change has been applied, Excel bounces you back to the selected range and you’re unable to edit cells outside that range.
:max_bytes(150000):strip_icc()/TestRange-a77a1c94b58a42a2b257ec3e6248d800.jpg)
To remove the restrictions, access VBA again and delete the ScrollArea range.
Microsoft says that the maximum size of a single Excel spreadsheet is 1,048,576 rows by 16,384 columns. The maximum row height is 409 points, and the maximum column width is 255 characters.
Источник
This post will guide you how to limit rows and columns in an Excel Worksheet. How do I limit the number of rows and columns in an Excel Spreadsheet.
- Limit Rows and Columns with VBA
- Limit Rows and Columns with Hiding Rows and Columns
- Video: Limit Rows and Columns
Limit Rows and Columns with VBA
Assuming that you have a worksheet, and you want to allow other people to edit your worksheet only, but you do not want them to add more rows or columns. So you need to limit the number of rows and columns in your worksheet. You can temporarily prevent other people from scrolling below a certain row and column. And how to disable scrolling below a specific row and column, you can use the Scroll Area property of the worksheet to limit the range of usable rows and columns. Just do the following steps:
#1 right click on your worksheet tab at the bottom of your worksheet. And click View Code menu from the popup menu list. And the Visual Basic for Applications window will open.
#2 click View Menu in the Visual Basic for Applications window, and then click Properties Window menu from the drop down menu list. And the Properties window will be shown.
#3 Find the Scroll Area property in the list of worksheet properties.
#4 click in the empty box to the right of the Scroll Area label. And type the range of cells that you want to display.
#5 press Ctrl + S keys and save the worksheet. And then close the Visual Basic for Applications window and return the worksheet.
#6 you will be unable to scroll past the row number you typed into the scroll Area text box. And all other rows are also be locked.
You can also try to hide all other rows and columns to achieve the same result of limiting rows and columns in your worksheet. For example, If you need to hide the rows and columns outside the range A1:C4, just do the following steps:
#1 click the row 5 to select the entire row.
#2 press Shift + Ctrl + Down Arrow keys in your keyboard, to select all rows from row 5 to the bottom of the worksheet.
#3 right click on the selected rows and choose Hide from the popup menu list.
#4 click on the Column D to select the entire column. And press Shift + Ctrl + right Arrow keys in your keyboard, to select all rows from row 5 to the bottom of the worksheet. Then repeat step 3 to hide all columns after column C.
#5 You will see that all rows and columns outside the range A1:C4 will be hidden.
Video: Limit Rows and Columns