
- Download demo project — 54.37 KB
- Download source — 62.6 KB
Introduction
There has been the C++ project BasicExcel for quite some years now. It is very useful to read and write Excel sheets in .xls format. However, it contains only very basic functionality. There are missing features like text formatting using fonts, and display formats and formulas are not yet supported. This article covers this additional functionality. The new, derived project ExcelFormat is based on the old BasicExcel code, and just adds what I was missing for my own needs. If you want to see where I am using the new library, you can look at the Export functions of Service Manager and Uninstall Manager.
XLS Format
This library processes Excel files in the BIFF8 XLS file format. For a detailed documentation of the format and all its internals, there are two documents available:
- OpenOffice provides OpenOffice.org’s Documentation of the Microsoft Excel File Format.
- Microsoft published the Microsoft Office Binary File Formats a few years later.
Compatibility
You can use the code on MS Windows with the MSVC compilers of VC++ 6.0 SP3 or later. Using GCC on MacOSX or Linux is also supported, but with some limitations. May be it even works in other environments like Sun Solaris, but this is not yet tested.
Here you can see a table of environments with their respective status:
| small XLS files | larger XLS files | |
|---|---|---|
WIN32, using Windows API IStorage |
OK | OK |
WIN64, using Windows API IStorage |
OK | OK |
MacOS X / Linux 32 bit, using BasicExcel CompoundFile implementation |
OK | issues |
MacOS X / Linux 64 bit, using BasicExcel CompoundFile implementation |
OK | issues |
The issues listed above are because of the incomplete CompoundFile implementation of the underlying BasicExcel library.
I already fixed some part of the BasicExcel code regarding numbers in RKValue format and 64 bit compatibility,
but there are still issues that show up when reading or writing larger XLS files which use XBAT or SBAT entries.
Using the Code
To use the new formatting functionality, first create an XLSFormatManager object, like in the example1() function, and attach it to an existing BasicExcel object:
void example1(const char* path)
{
    BasicExcel xls;

        xls.New(1);
    BasicExcelWorksheet* sheet = xls.GetWorksheet(0);

    XLSFormatManager fmt_mgr(xls);
You can find all the examples of this article in the source code file Examples.cpp.
To define a custom font, create an ExcelFont object and set any needed properties, for example, the font weight for a bold font:
ExcelFont font_bold;
font_bold._weight = FW_BOLD;
The format of an Excel cell can be defined by a CellFormat object, which holds the chosen font and some more properties:
CellFormat fmt_bold(fmt_mgr);
fmt_bold.set_font(font_bold);
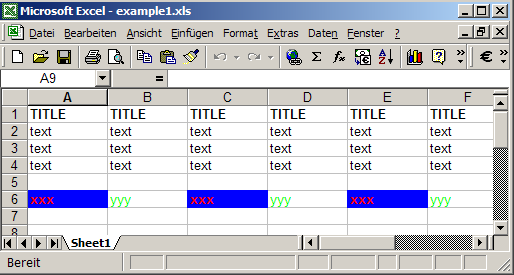
After you have prepared the CellFormat, you can choose the font and display settings of Excel cells by calling SetFormat():
int col, row = 0;

for(col=0; col<10; ++col) {
    BasicExcelCell* cell = sheet->Cell(row, col);

    cell->Set("TITLE");
    cell->SetFormat(fmt_bold);
}

while(++row < 4) {
    for(int col=0; col<10; ++col)
        sheet->Cell(row, col)->Set("text");
}

++row;
Text color is specified by setting color indices in ExcelFont, for example:
ExcelFont font_red_bold;
font_red_bold._weight = FW_BOLD;
font_red_bold._color_index = EGA_RED;

CellFormat fmt_red_bold(fmt_mgr, font_red_bold);
fmt_red_bold.set_color1(COLOR1_PAT_SOLID); 		fmt_red_bold.set_color2(MAKE_COLOR2(EGA_BLUE,0));

CellFormat fmt_green(fmt_mgr, ExcelFont().set_color_index(EGA_GREEN));

for(col=0; col<10; ++col) {
    BasicExcelCell* cell = sheet->Cell(row, col);

    cell->Set("xxx");
    cell->SetFormat(fmt_red_bold);

    cell = sheet->Cell(row, ++col);
    cell->Set("yyy");
    cell->SetFormat(fmt_green);
}
ExcelFormat.h contains constants to define basic palette colors in the enumeration EXCEL_COLORS, you can use in calls to ExcelFont()::set_color_index(). The macro MAKE_COLOR2 accepts two color indices to specify the pattern line and pattern background colors. As a shortcut to calling CellFormat::set_color1() and CellFormat::set_color2(), you can also use CellFormat::set_background() to define cells with solid background colors or colorize patterns.
After creating and formatting the Excel cells in memory, all you have to do is to save the new Excel sheet as a file:
    xls.SaveAs(path);
}
This should be enough for a quick overview on how to use the new ExcelFormat objects. In the source code file ExcelFormat.cpp, you can find some more examples.
ExcelFont
There are nine font properties available:
struct ExcelFont
{
    ExcelFont()

    ...

    wstring _name;
    short   _height;
    short   _weight;
    short   _options;
    short   _color_index;
    short   _escapement_type;
    char    _underline_type;
    char    _family;
    char    _character_set;

    ...

};
For detailed information, please look into the XLS file format documentation.
CellFormat
These CellFormat properties are available in addition to the chosen ExcelFont and the display format:
struct CellFormat
{
    CellFormat(XLSFormatManager& mgr)

    ...

    char    _alignment;
    char    _rotation;
    char    _text_props;
    int     _borderlines;
    int     _color1;
    short   _color2;

    ...

};
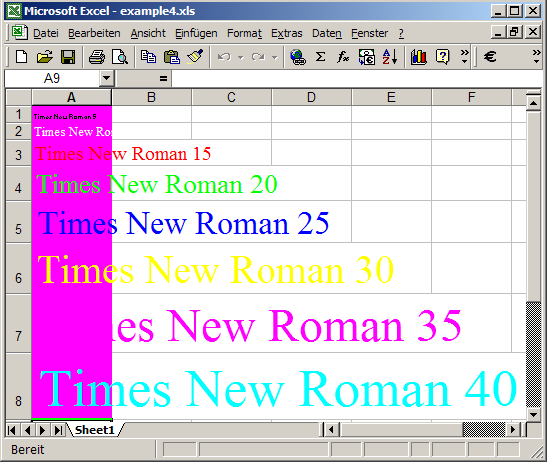
In example2(), you can see how to change the font face and the font size:
ExcelFont font_header;
font_header.set_weight(FW_BOLD);
font_header.set_underline_type(EXCEL_UNDERLINE_SINGLE);
font_header.set_font_name(L"Times New Roman");

font_header.set_color_index(EGA_BLUE);
font_header._options = EXCEL_FONT_STRUCK_OUT;

CellFormat fmt_header(fmt_mgr, font_header);
fmt_header.set_rotation(30);

int row = 0;

for(int col=0; col<10; ++col) {
    BasicExcelCell* cell = sheet->Cell(row, col);

    cell->Set("TITLE");
    cell->SetFormat(fmt_header);
}
The example3() function shows how to use CellFormat::set_format_string() and BasicExcelCell::SetFormat() to define text, number, and date format strings. There are some predefined constants for format strings:
#define XLS_FORMAT_GENERAL      L"General"
#define XLS_FORMAT_TEXT         L"@"
#define XLS_FORMAT_INTEGER      L"0"

#define XLS_FORMAT_DECIMAL      L"0.00"
#define XLS_FORMAT_PERCENT      L"0%"


#define XLS_FORMAT_DATE         L"M/D/YY"

#define XLS_FORMAT_TIME         L"h:mm:ss"
#define XLS_FORMAT_DATETIME     L"M/D/YY h:mm"
However, you can use any valid Excel format string to define custom display formats.
example4() shows how to use many different fonts and colors in one sheet:
Formulas
Formulas are now preserved when reading and writing an Excel sheet. You can even store a formula into an Excel cell by calling BasicExcelCell::SetFormula(). However, currently, you either have to copy a Worksheet::CellTable::RowBlock::CellBlock::Formula object from an already existing cell, or you have to define it yourself, which is quite tricky because Excel uses a pre-parsed formula containing RPN tokens.
Points of Interest
For those who are interested in a bit of background information, I want to provide a description of what has been changed since the predecessor library BasicExcel.
Conditional Compilation
There are two different BasicExcel implementations, one for VC++ version 6.0, and one for newer compilers. ExcelFormat now merges these two code bases by using conditional compilation to handle the differences.
Most of this is accomplished in the header file by this code snippet (and modifications using the newly defined macros):
#if _MSC_VER<=1200    // VC++ 6.0

#pragma warning(disable: 4786)

#define LONGINT __int64
#define LONGINT_CONST(x) x
#define COMPOUNDFILE

#else    // newer Microsoft compilers

#define LONGINT long long
#define LONGINT_CONST(x) x##LL
#define COMPOUNDFILE CompoundFile::

#ifdef _DEBUG
#define _ITERATOR_DEBUG_LEVEL 0	// speedup iterator operations while debugging
#endif

#endif
To distinguish between MS Windows environments using MSVC and others using GCC, the macro _MSC_VER is tested for existence. This switches between using the Windows API to access the compound binary file format and the BasicExcel implementation of CompoundFile.
The #pragma warning statement disables compiler warnings of VC++ 6.0 because of long compiler internal names in object files, which occur for non-trivial usage of STL classes.
Immediately after these defines, there are these preprocessor statements for VS 2005 and above:
#if _MSC_VER>=1400    		// VS 2005
#define _CRT_SECURE_NO_WARNINGS    	//MF
#define _SCL_SECURE_NO_WARNINGS    	//MF

#endif
They disable the VC++ security library warnings, because the BasicExcel code is not yet prepared for this new runtime library additions. By the way, the MF comments mark additions and fixes by me to the old BasicExcel code.
Additionally, I eliminated some compiler warnings by fixing data types. Typically, this was a change from integral types like int to the C runtime library type size_t.
To switch between 32 bit and 64 bit mode using GCC, use the compiler option -m32 respective -m64 like in the Makefile example in the source download.
In the VC++ environment you can choose the target environment in the project settings.
New Features
In addition to the new API described above, I had to add code in BasicExcel in order to implement these new features:
- Read and write the
Formulastructure from/to XLS files - Define, read, and write the
FORMATstructure from/to XLS files - Get/set the XF index value
BasicExcelCellobjects for all the various cell types
Formatting Storage Structures
The information about the format of an Excel cell in the BIFF8 file format is stored using a so called XF index. This refers to an XF (extended format
) record, which consists of the following members:
XF {
    short       fontRecordIndex         short       formatRecordIndex
    short       protectionType
    char        alignment
    char        rotation
    char        textProperties
    char        usedAttributes
    int         borderLines
    int         colour1
    short       colour2
}
Besides a few directly associated attributes specifying alignment, rotation, etc. of the Excel cell, there are two more index values: fontRecordIndex and formatRecordIndex. These are used to define font and display format descriptions. In the whole picture, this two-level index based formatting architecture enables cell formatting with small file sizes and low memory usage, because there are typically only a few different fonts and display formats used in an Excel worksheet. The font index refers to a FONT record with the following attributes:
FONT {
    short       height
    short       options
    short       colourIndex
    short       weight
    short       escapementType
    char        underlineType
    char        family
    char        characterSet
    char        unused
    SmallString name
}
The third index is a special one. This format index is associated with a record containing only the index itself and a text representation of the display format:
FORMAT {
    short       index
    LargeString fmtstring
}
XLSFormatManager manages these three formatting substructures to format Excel cells using the C++ structures CellFormat and ExcelFont:
struct CellFormat  ->  XF {FORMAT index, FONT index, XF attributes}

struct ExcelFont   ->  FONT {FONT attributes}
On calling CellFormat::set_font(const ExcelFont& font), the manager class searches for an already registered matching font description. If there is none yet, a new FONT record is created to be stored in the Excel sheet. On calling CellFormat::set_format_string(const wstring& fmt_str), the manager class searches for an already registered matching display format string. If there is none yet, a new FORMAT record stores the display format string. The same strategy is used when applying a CellFormat to a cell object by calling BasicExcelCell::SetFormat(const CellFormat& fmt): the manager class searches for an already registered matching XF description with identical font and format indices as well as matching XF attributes. If there is none yet, a new XF record is created to be stored in the Excel sheet. In the end, this results in a list of FORMAT, FONT, and XF records, which are stored in the header of the Excel workbook file. Each cell is formatted by storing a single related XF index, which determines all the cell formatting attributes, the font, and the display format.
For further implementation details, please have a look into ExcelFormat.h, ExcelFormat.cpp, BasicExcel.hpp and BasicExcel.cpp of the source code.
Memory Usage
To limit memory usage, a reference counting SmartPtr is used to manage the heap structures needed for formula storage. Every cell contains only an optionally filled pointer to the struct Formula. For text or number cells, formula information is not needed. So the smart pointer stays empty, and just contains the value NULL.
In the following section, you can see the implementation of the struct RefCnt as the base for struct Formula and the template struct SmartPtr to hold the reference counted heap objects:
struct RefCnt
{
            RefCnt()
     :    _ref_cnt(0)
    {
    }

    int    _ref_cnt;
};


template<typename T> struct SmartPtr
{
        SmartPtr()
     :  _ptr(NULL)
    {
    }


              SmartPtr(T* p)
     :  _ptr(p)
    {
        if (p)
            ++_ptr->_ref_cnt;
    }

        SmartPtr(const SmartPtr& other)
     :    _ptr(other._ptr)
    {
        if (_ptr)
            ++_ptr->_ref_cnt;
    }


        ~SmartPtr()
    {
        if (_ptr) {
            if (!--_ptr->_ref_cnt)
                delete _ptr;
        }
    }


    SmartPtr& operator=(T* p)
    {
        if (_ptr) {
            if (!--_ptr->_ref_cnt)
                delete _ptr;

            _ptr = NULL;
        }

        if (p) {
            _ptr = p;

            ++_ptr->_ref_cnt;
        }

        return *this;
    }


    operator bool() const {return _ptr != NULL;}

         bool operator!() const {return !_ptr;}


    T* operator->() {return _ptr;}
    const T* operator->() const {return _ptr;}


    T& operator*() {return *_ptr;}
    const T& operator*() const {return *_ptr;}


private:
    T* _ptr;
};
String Conversion
There are some new string conversion functions: stringFromSmallString(), stringFromLargeString(), wstringFromSmallString(), wstringFromLargeString() using narrow_string()/widen_string() are used to convert from internal Excel string structures to STL string classes and vice versa. You can use them to access the internal data storage of BasicExcel.
History
- 20.09.2009 — Version 1.0 of
ExcelFormat(BasicExcelVersion 2.0) - 28.09.2009 — Version 2.0
- Added new section Formatting storage structures
- 04.10.2009 — Version 2.1
- Updated source code with macros and constants for cell and font properties
- 07.11.2009 — Version 2.2
- Fixed VS2008 problem when reading sheets with formula fields
- Added
BasicExcel::Close(),CellFormat::get/set_text_props()andget/set_borderlines()
- 12.01.2010 — Version 2.3: (by Ami Castonguay and Martin Fuchs)
- Fixed reference counting of Formula data structs
- Support for shared formulas
- Support for merged cells
- Save formatting even if cell is empty
- Flush
fstreaminstead of closing it followed by open to prevent races in conjunction with virus scanners - Enable reading of XLS files exported by MacOS Numbers.app
- 15.11.2010 — Version 2.4
- Add second
set_borderlines()overload - Add
ExcelFont::set_italic(),CellFormat::set_wrapping() - Handle
COLINFO - Miscellaneous fixes
- Add second
- 01.01.2011 — Version 2.5
- Dynamically allocate memory for unexpected high row/column values while loading XLS files
- Unicode overloads for
Load()andSaveAs() - Adjust to
RKValueswritten by OpenOffice Calc
- 03.02.2011 — Version 3.0
- access compound document files using the Windows API
- reduced memory consumption and increased speed
- 64 bit portability
- return current value string from formula cells
This member has not yet provided a Biography. Assume it’s interesting and varied, and probably something to do with programming.
Last Updated on July 14, 2022 by
This is a guide on Excel number format using the Python openpyxl library. The Excel program provides dozens of different number formats to fit different needs, and we can use Python to set all of them.
We are going to continue to “beautify” our previous monthly budget Excel template.

Library
To install the required library, simply type the following inside a command prompt window:
pip install openpyxlAdjust Excel Number Format using Python
Since we are making a budget template, let’s add a dollar sign in front of all the numbers. For the net difference number, we are going to introduce a red color for negative numbers. Then for the exp/income ratio, we’ll format it as a percentage.
It’s simple to change the format, just set the cell.number_format attribute to whatever format we need. That’s it!
for r in range(8,20):
    ws[f'C{r}'].number_format ='"$"#,##0_);("$"#,##0)'

for r in range(7,13,2):
    ws[f'F{r}'].number_format= '"$"#,##0_);[Red]("$"#,##0)'

ws['F13'].number_format = '0.00%'
Common Excel Number Formats
The below is for your reference. You can get the same list from the Excel program’s Format Cells menu as well.

| Parameter | Number Example |
| ‘General’ | 1234.56 |
| ‘0’ | 1235 |
| ‘0.00’ | 1234.56 |
| ‘#,##0’ | 1,235 |
| ‘#,##0.00’ | 1,234.56 |
| ‘#,##0_);(#,##0)’ | 1,235 |
| ‘”$”#,##0_);(“$”#,##0)’ | $1,235 |
| ‘#,##0_);[Red](#,##0)’ | 1,235 or -1,235 |
| ‘”$”#,##0_);[Red](“$”#,##0)’ | $1,235 or -$1,235 |
| ‘”$”#,##0.00_);(“$”#,##0.00)’ | $1,234.56 |
| ‘#,##0.00_);[Red](#,##0.00)’ | 1,234.56 or -1,234.56 |
| ‘”$”#,##0.00_);[Red](“$”#,##0.00)’ | $1,234.56 or -$1,234.56 |
| ‘0%’ | 123456% |
| ‘0.00% | 123456.00% |
| ‘0.00E+00’ | 1.23E+03 |
Of course, there are also formats for dates. However, note this works only for the “number” data when converted into dates. In Excel, 0 means 1900-01-00, 1 means 1900-01-01, and so on. Today is 2022-03-17, the equivalent integer number is 44637.
| Parameter | Date Format |
| ‘General’ | 44637 |
| ‘mm-dd-yy’ | 03-17-22 |
| ‘d-mmm-yy’ | 17-Mar-22 |
| ‘d-mmm’ | 17-Mar |
| ‘mmm-yy’ | Mar-22 |
Additional Resources
How to Use Python to Read Excel Formula
How to Work with Excel Named Range in Python
Work with Excel Named Range in Python
Write Data to Excel using Python

Преобразование чисел, дат и строк в настраиваемый текстовый формат из кода VBA Excel с помощью функции Format. Синтаксис, параметры, символы, примеры.
Format – это функция, которая преобразует число, дату или строку в текст, отформатированный в соответствии с именованным выражением формата или инструкциями, составленными из специальных символов.
Синтаксис и параметры
Format(Expression, [FormatExpression], [FirstDayOfWeek], [FirstWeekOfYear])
- Expression – любое допустимое выражение (переменная), возвращающее числовое значение или строку (обязательный параметр).
- FormatExpression – выражение формата, именованное или содержащее инструкции из специальных символов (необязательный параметр).
- FirstDayOfWeek – константа, задающая первый день недели (необязательный параметр).
- FirstWeekOfYear – константа, задающая первую неделю года (необязательный параметр).
Именованные выражения форматов
Именные форматы даты и времени
| Имя формата | Описание |
|---|---|
| General Date | Стандартное отображение даты и времени в соответствии с параметрами системы. |
| Long Date | Длинный формат даты. |
| Medium Date | Средний формат даты. |
| Short Date | Краткий формат даты. |
| Long Time | Длинный формат времени. |
| Medium Time | Средний формат времени. |
| Short Time | Краткий формат времени. |
Проверьте отображение даты и времени с использованием именованных форматов на вашем компьютере при помощи следующего кода VBA Excel:
|
Sub FormatDateTime() MsgBox «General Date: « & Format(Now, «General Date») & vbNewLine _ & vbNewLine & «Long Date: « & Format(Now, «Long Date») & vbNewLine _ & vbNewLine & «Medium Date: « & Format(Now, «Medium Date») & vbNewLine _ & vbNewLine & «Short Date: « & Format(Now, «Short Date») & vbNewLine _ & vbNewLine & «Long Time: « & Format(Now, «Long Time») & vbNewLine _ & vbNewLine & «Medium Time: « & Format(Now, «Medium Time») & vbNewLine _ & vbNewLine & «Short Time: « & Format(Now, «Short Time») End Sub |
Скорее всего, результат будет таким:

Именованные форматы чисел
| Имя формата | Описание |
|---|---|
| General Number | Стандартное отображение числа без знака разделителя групп разрядов. |
| Currency | Денежный формат. |
| Fixed | Отображение числа без знака разделителя групп разрядов с двумя цифрами после разделителя целой и дробной части. |
| Standard | Отображение числа со знаком разделителя групп разрядов и с двумя цифрами после разделителя целой и дробной части. |
| Percent | Процентный формат: отображение числа, умноженного на 100, со знаком процента (%), добавленного справа. |
| Scientific | Отображение числа в экспоненциальном виде. |
| Yes/No | Возвращается «Нет», если число равно 0, иначе отображается «Да». |
| True/False | Возвращается «Ложь», если число равно 0, иначе отображается «Истина». |
| On/Off | Возвращается «Выкл», если число равно 0, иначе отображается «Вкл». |
Проверяем работу именованных форматов на числах 2641387.7381962 и 0 с помощью кода VBA Excel:
|
Sub FormatNumber() Dim n As Double n = 2641387.7381962 ‘n = 0 MsgBox «Форматируемое число = « & n & vbNewLine _ & vbNewLine & «General Number: « & Format(n, «General Number») & vbNewLine _ & vbNewLine & «Currency: « & Format(n, «Currency») & vbNewLine _ & vbNewLine & «Fixed: « & Format(n, «Fixed») & vbNewLine _ & vbNewLine & «Standard: « & Format(n, «Standard») & vbNewLine _ & vbNewLine & «Percent: « & Format(n, «Percent») & vbNewLine _ & vbNewLine & «Scientific: « & Format(n, «Scientific») & vbNewLine _ & vbNewLine & «Yes/No: « & Format(n, «Yes/No») & vbNewLine _ & vbNewLine & «True/False: « & Format(n, «True/False») & vbNewLine _ & vbNewLine & «On/Off: « & Format(n, «On/Off») End Sub |
Получаем следующий результат:


Вместо вопросительного знака в отображении числа в формате Currency, по идее, должен быть знак валюты (₽ или руб.).
Специальные символы для выражений форматов
Символы для форматов даты и времени
| Символ | Описание |
|---|---|
| Точка (.) | Разделитель компонентов даты (день, месяц, год). Используется при отображении месяца в виде числа. |
| Пробел | Разделитель компонентов даты (день, месяц, год). Используется при отображении месяца прописью. |
| Двоеточие (:) | Разделитель компонентов времени (часы, минуты, секунды). |
| d | День в виде числа без нуля в начале (1–31). |
| dd | День в виде числа с нулем в начале (01–31). |
| m | Месяц в виде числа без нуля в начале (1–12). Если (m) следует после (h) или (hh), отображаются минуты (0–59). |
| mm | Месяц в виде числа с нулем в начале (01–12). Если (mm) следует после (h) или (hh), отображаются минуты (00–59). |
| mmm | Месяц прописью в сокращенном виде (янв–дек). |
| mmmm | Полное название месяца (январь–декабрь). |
| y | День года в виде числа (1–366). |
| yy | Год в виде 2-значного числа (00–99). |
| yyyy | Год в виде 4-значного числа (1900–9999). |
| h | Часы в виде числа без нуля в начале (0–23). |
| hh | Часы в виде числа с нулем в начале (00–23). |
| n (m) | Минуты в виде числа без нуля в начале (0–59). |
| nn (mm) | Минуты в виде числа с нулем в начале (00–59). |
| s | Секунды в виде числа без нуля в начале (0–59). |
| ss | Секунды в виде числа с нулем в начале (00–59). |
В этой таблице перечислены далеко не все символы для выражений форматов даты и времени. Вы можете ознакомиться со всеми символами, в том числе и для форматирования чисел, на сайте разработчика.
Примеры отображения даты с помощью разных по количеству наборов символа d:
|
Sub DataIsD() MsgBox «d: « & Format(Now, «d») & vbNewLine _ & vbNewLine & «dd: « & Format(Now, «dd») & vbNewLine _ & vbNewLine & «ddd: « & Format(Now, «ddd») & vbNewLine _ & vbNewLine & «dddd: « & Format(Now, «dddd») & vbNewLine _ & vbNewLine & «ddddd: « & Format(Now, «ddddd») & vbNewLine _ & vbNewLine & «dddddd: « & Format(Now, «dddddd») End Sub |

Символы для числовых форматов
| Символ | Описание |
|---|---|
| Точка (.) | Десятичный разделитель. |
| Запятая (,) | Разделитель групп разрядов. В отображаемых числах заполняется пробелом. |
| (0) | Заполнитель, который отображает цифру или ноль. Используется, когда нужны ведущие нули или нули в конце числа. |
| (#) | Заполнитель, который отображает цифру или ничего не отображает. Используется, когда не нужны ведущие нули или нули в конце числа. |
| (%) | Заполнитель процента. Выражение умножается на 100, а знак процента (%) вставляется на той позиции, где он указан в строке формата. |
| (E- E+ e- e+) | Экспоненциальный формат. |
Примеры использования символов в выражениях числовых форматов VBA Excel:
|
Sub FormatNumber2() Dim n As Double n = 2641387.7381962 ‘n = 0.2397842 MsgBox «Форматируемое число = « & n & vbNewLine _ & vbNewLine & «0.##: « & Format(n, «0.##») & vbNewLine _ & vbNewLine & «000.###: « & Format(n, «000.###») & vbNewLine _ & vbNewLine & «#,###.###: « & Format(n, «#,###.###») & vbNewLine _ & vbNewLine & «0 %: « & Format(n, «0 %») & vbNewLine _ & vbNewLine & «0.### E-: « & Format(n, «0.### E-«) & vbNewLine _ & vbNewLine & «0.### E+: « & Format(n, «0.### E+») End Sub |


Символы для текстовых форматов
| Символ | Описание |
|---|---|
| At-символ (@) | Заполнитель для символов, отображающий знак или пробел. |
| Амперсанд (&) | Заполнитель для символов, отображающий знак или ничего (пустая строка). |
| Меньше (<) | Принудительный перевод всех буквенных символов в нижний регистр. |
| Больше (>) | Принудительный перевод всех буквенных символов в верхний регистр. |
Примеры использования символов в выражениях строковых форматов VBA Excel:
|
Sub FormatString() MsgBox «Номер телефона: « & Format(«1234567890», «+7 (@@@) @@@-@@-@@») & vbNewLine _ & vbNewLine & «Серия и номер паспорта: « & Format(«1234567890», «&& && &&&&») & vbNewLine _ & vbNewLine & «Нижний регистр: « & Format(«Нижний регистр», «<«) & vbNewLine _ & vbNewLine & «Верхний регистр: « & Format(«Верхний регистр», «>») End Sub |

Форматы для различных значений одного выражения
Различные форматы для разных числовых значений
В выражении формата для чисел предусмотрено от одного до четырех разделов, отделяемых друг от друга точкой с запятой. Отображаемая строка зависит от значения, возвращенного параметром Expression функции Format.
| Количество разделов | Результат форматирования |
|---|---|
| Один раздел | Выражение формата применяется ко всем значениям. |
| Два раздела | Первый раздел применяется к положительным значениям и нулям, второй – к отрицательным значениям. |
| Три раздела | Первый раздел применяется к положительным значениям, второй – к отрицательным значениям, третий – к нулям. |
| Четыре раздела | Первый раздел применяется к положительным значениям, второй – к отрицательным значениям, третий – к нулям, четвертый – к значениям Null. |
Пример использования четырех разделов в выражении формата числовых значений:
|
Sub FormatDifferentValues() MsgBox «Число 1234,5678: « & _ Format(1234.5678, «#,##0.00 руб.;Отрицательное число;Ноль рублей;Значение Null») _ & vbNewLine & vbNewLine & «Число -25: « & _ Format(—25, «#,##0.00 руб.;Отрицательное число;Ноль рублей;Значение Null») _ & vbNewLine & vbNewLine & «Число 0: « & _ Format(0, «#,##0.00 руб.;Отрицательное число;Ноль рублей;Значение Null») _ & vbNewLine & vbNewLine & «Null: « & _ Format(Null, «#,##0.00 руб.;Отрицательное число;Ноль рублей;Значение Null») End Sub |

Различные форматы для разных строковых значений
В выражении формата для строк предусмотрено до двух разделов, отделяемых друг от друга точкой с запятой. Отображаемая строка зависит от текста, возвращенного параметром Expression функции Format.
| Количество разделов | Результат форматирования |
|---|---|
| Один раздел | Выражение формата применяется ко всем строковым данным. |
| Два раздела | Первый раздел применяется к строковым данным, второй – к значениям Null и пустым строкам («»). |
Пример использования двух разделов в выражении формата строк:
|
Sub FormatString2() MsgBox «Строка «Белка»: « & _ Format(«Белка», «@;Пустая строка или Null») _ & vbNewLine & vbNewLine & «Пустая строка: « & _ Format(«», «@;Пустая строка или Null») _ & vbNewLine & vbNewLine & «Строка «Null»: « & _ Format(«Null», «@;Пустая строка или Null») _ & vbNewLine & vbNewLine & «Значение Null: « & _ Format(Null, «@;Пустая строка или Null») End Sub |

ExcelFormat
Original author: Martin Fuchs
Integration with CMake and bii: metamaker
ExcelFormat allows reading, writing, and editing of XLS (BIFF8 format) files using C++. For more details see http://www.codeproject.com/Articles/42504/ExcelFormat-Library.
For example application which uses ExcelFormat see https://github.com/metamaker/ExcelFormat-BiiExample.
How to build
You can use this library with bii (http://www.biicode.com). To do this follow next steps:
-
In some source file of your project include ExcelFormat by adding
#include <ExcelFormat/ExcelFormat.h>. -
Initialize bii block inside your project’s folder (if not yet then run
$ bii init -L). -
Run
$ bii findto download dependencies and createbiicode.conffile in the root of your project. -
Wire dependencies to
biicode.conf:[requirements] metamaker/ExcelFormat: 0 [includes] ExcelFormat/*: metamaker/ExcelFormat/include -
Run
$ bii cpp:configure. You can specify your CMake generator with-Gflag like$ bii cpp:configure -G "Visual Studio 12". -
Run
$ bii cpp:buildto build your project.
Another possible option is CMake (http://www.cmake.org/). The steps are next:
- Open command line and change current directory with
$ cdcommand to the directory where you unpacked the project’s source code. - Run
$ cmake -H. -Bbuild -G "Visual Studio 12"to create Makefile for Visual Studio 2013 (or use other generator if you use other IDE). Don’t forget to specify path to dependency libraries and headers with -D parameter. - Open
build/ExcelFormat.slnand build solution in Visual Studio. - Optionally, you can install library by building project which name is
INSTALLin Visual Studio. Remember that you must have enough rights on your system to let VS copy files to installation folder.
License agreement
This source code and files are licensed under The Code Project Open License (CPOL) (http://www.codeproject.com/info/cpol10.aspx). See CPOL.htm for details.
Release history
28.04.2015 — Version 3.1
- FindExcelFormat.cmake is fixed to correspond new dirs structure
- Prebuilt version of library for usage in CMake projects with VS2013
24.04.2015
- Integration with CMake buildsystem
03.02.2011 — Version 3.0
- access compound document files using the Windows API
- reduced memory consumption and increased speed
- 64 bit portability
- return current value string from formula cells
01.01.2011 — Version 2.5
- Dynamically allocate memory for unexpected high row/column values while loading XLS files
- Unicode overloads for Load() and SaveAs()
- Adjust to RKValues written by OpenOffice Calc
15.11.2010 — Version 2.4
- Add second set_borderlines() overload
- Add ExcelFont::set_italic(), CellFormat::set_wrapping()
- Handle COLINFO
- Miscellaneous fixes
12.01.2010 — Version 2.3: (by Ami Castonguay and Martin Fuchs)
- Fixed reference counting of Formula data structs
- Support for shared formulas
- Support for merged cells
- Save formatting even if cell is empty
- Flush fstream instead of closing it followed by open to prevent races in conjunction with virus scanners
- Enable reading of XLS files exported by MacOS Numbers.app
07.11.2009 — Version 2.2
- Fixed VS2008 problem when reading sheets with formula fields
- Added BasicExcel::Close(), CellFormat::get/set_text_props() and get/set_borderlines()
04.10.2009 — Version 2.1
- Updated source code with macros and constants for cell and font properties
28.09.2009 — Version 2.0
- Added new section Formatting storage structures
20.09.2009 — Version 1.0 of ExcelFormat (BasicExcel Version 2.0)
Libraries add pre-defined code structures (such as functions, subroutines among others) in a simple and easy way.
In the VBA context, a library usually allows access to new objects and functions.
Standard Libraries
Libraries that are enabled by default when opening Excel:
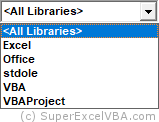
- Excel – This is a collection of classes available in Excel, allowing you to work with worksheets objects E.g. workbooks, spreadsheets, ranges, etc…
- Office – It is a generic class collection for all Office suite applications, allowing you to work with Office objects in general E.g. command bar, help, etc…
- stdole – It is the standard collection of the OLE class, it allows exchange of information between applications
- VBA – It is the class collection that allows functions to be used E.g. MsgBox, InputBox, string functions, etc…
- VBAProject – It is the local collection for the active workbook, (E.g. spreadsheets, users, etc…)
Class: is what defines the structure of a given object (E.g. for class Range we have objects like Range(«A1»), Range(«C2:B5»), and so on).
Enabling Libraries
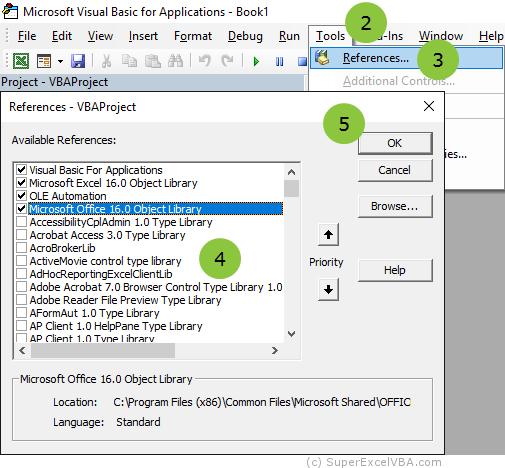
To access, enable and disable libraries in VBA:
- In Excel, open the VBE (
 +)
+) - On the Menu Bar, click Tools
- Select References… (the References – VBAProject dialog box will be displayed)
- Select the desired libraries
- Click OK
 +
+ )
)
To add a library that is not in the list, use the  button and select the file of the new library.
Enabling additional libraries allows you to develop codes that communicate with other applications and processes. E.g. Word, Outlook, DAO (Data Access Objects), ADOdb (Active Data Objects database), etc…
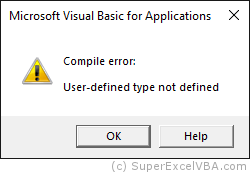
When we refer to a library in the code but forget to enable it, the following error message is displayed:
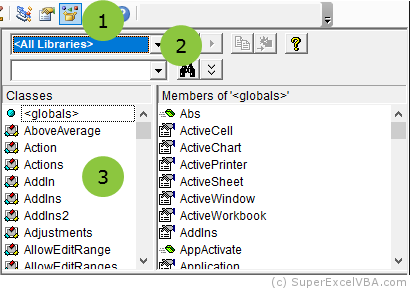
Object Browser
The Object Browser allows you to view the list of all the different objects, methods, and properties of the enabled libraries.
To search the libraries:
- Click on the Object Browser icon on the toolbar ()
- Select the library you want to view on the dropdown menu
- Navigate the library
 )
)
When in doubt, the Microsoft Help button ( ) can elucidate the utility of the selected element.
VBA Early Binding vs Late Binding
You can use structures from a library without enabling it. This procedure is called Late Binding.
Dim OutApp As Object
Set OutApp = CreateObject("Outlook.Application")
Usually for the Late Binding a variable is declared as an object and later associated with CreateObject.
When we enable a library to access its structures we are performing what is called Early Binding.
Dim OutApp As New Outlook.Application
In the example case the Outlook library was enabled ( ).
).
Early & Late Binding Differences
Early: From the point of view of code development and performance time, Early Binding is more suitable because it allows you to use Excel intellisense ( +
+  ) as well as the library object browser.
Late: Regarding compatibility errors, mainly due to the use of different versions of Excel (which changes the version of the libraries), Late Binding is more indicated.
Intellisense: is an aid, mainly to autocomplete the code, with useful information ( + ).
So, to gain practice with the libraries, try to write the code with Early Binding and later change it into Late Binding.
SuperExcelVBA.com is learning website. Examples might be simplified to improve reading and basic understanding. Tutorials, references, and examples are constantly reviewed to avoid errors, but we cannot warrant full correctness of all content. All Rights Reserved.
Excel ® is a registered trademark of the Microsoft Corporation.
© 2023 SuperExcelVBA | ABOUT
![]()