Multilevel numbering in Word is the #1 headache for many people working with large documents.
Believe it or not, it’s not complicated. It just takes somebody to lead the way and point out the pitfalls you need to avoid.
Today that pleasure falls to me!
Before I start, grab your free multilevel numbering troubleshooting guide that shows you the steps to get multilevel numbering working properly first time, every time, together with answers to over 20 FAQs and plenty of real client examples constructed step by step to help you fix what isn’t working with your numbering.

1. What Multi-level Numbering Looks Like
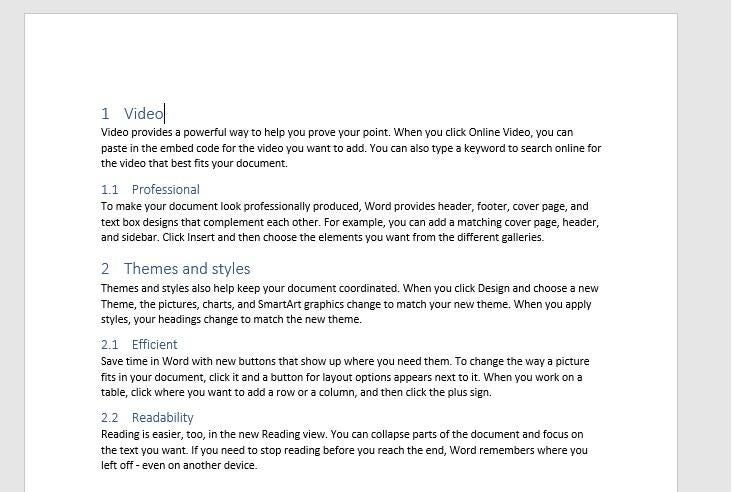
Often used in the legal profession or in large corporate documents, multilevel numbering creates a logical hierarchy and easy navigation within the document. The headings can also be summarised later on in a table of contents. Here is a simple example:

2. How to Set Up Multilevel Numbering
Here is the correct process:
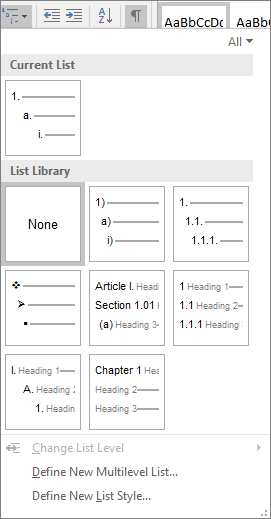
1. Select the text that you want to number (this can be a section of text or the whole document).

2. Select the Home tab.
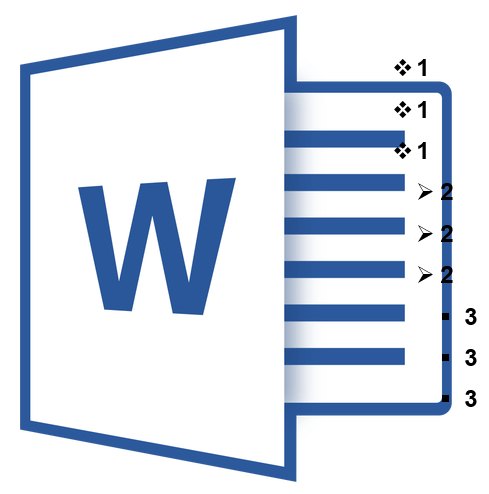
3. Click the multilevel numbering icon in the Paragraph group.
![]()
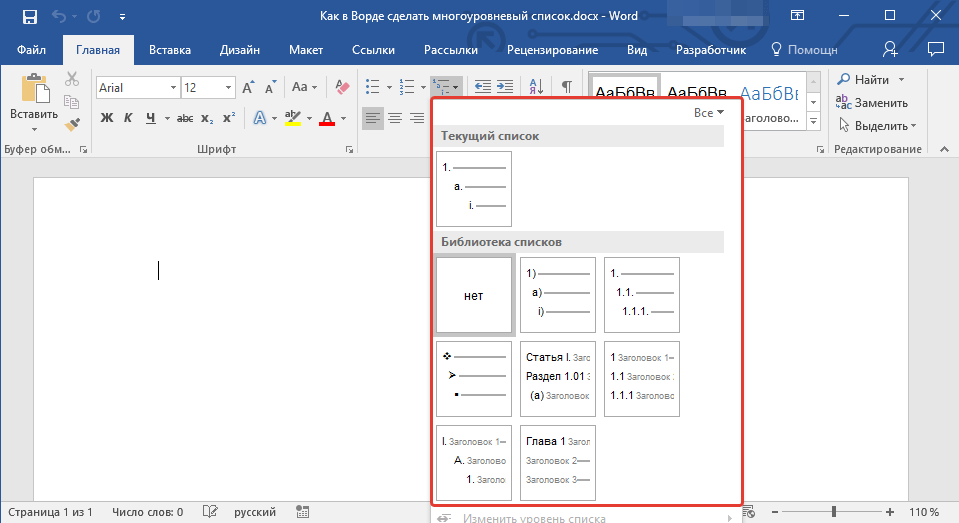
4. You can either select an existing layout from the list to use as a starting point, or you can create a new numbering system from scratch. As you hover over each thumbnail image, Word provides a larger image of the numbering system.
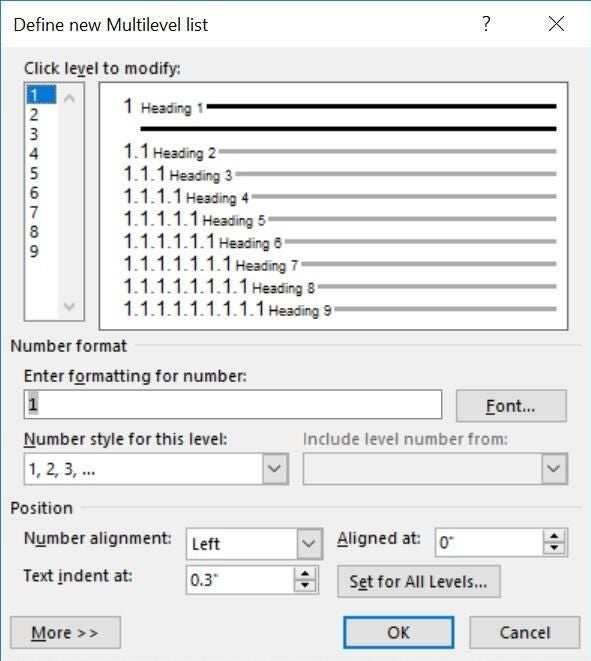
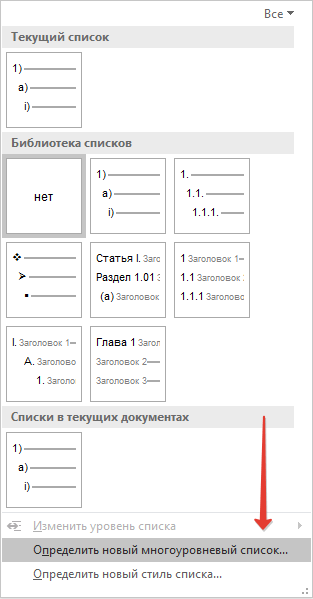
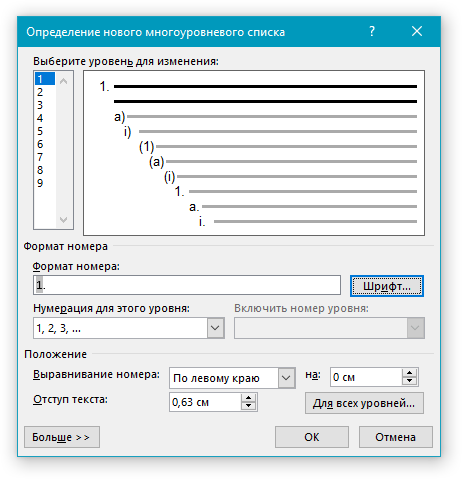
5. Choose Define New Multilevel List to display the control dialog.

The dialog box can be broken down as follows:
Step #1 Click level to modify
In the top left is a list of levels. As you select each level, the settings in the rest of the dialog box changes.
Level 1 is the highest level, i.e. the main headings such as chapter or section titles.
Level 2 is subordinate to level 1.
Level 3 is subordinate to level 2.

Step #2 Enter formatting for number
This is where the level number is constructed. If you include a previous level number, it will be displayed with a grey background, as will the number for the current level.
Type anything you wish to put in between the numbers such as dots, dashes, brackets etc.
Clear any text in the ‘Enter formatting for this number’ box.
Step #3 Include level number from
When creating a subordinate level (or child level), you can first specify the level number of the parent.
For example, for section 3.2
- ‘3’ is the parent level (level 1) and
- ‘2’ is the child level (level 2)

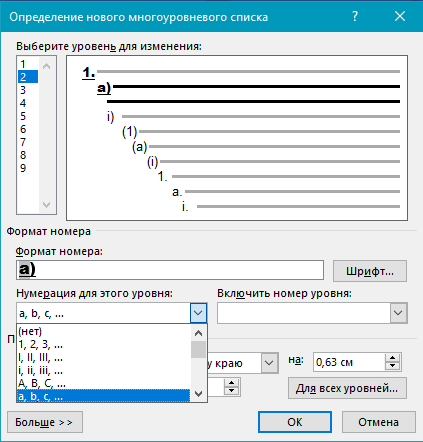
Step #4 Number style for this level
Each level can have its own number style. It may be a standalone style, e.g. 1, 2, 3 or a, b, c or continue on from a higher level, e.g. 1.1.1 or 1.a.i.
- When creating 1.1 numbering, this option is 1, 2, 3.
- When creating 1.a numbering, this option is a, b, c

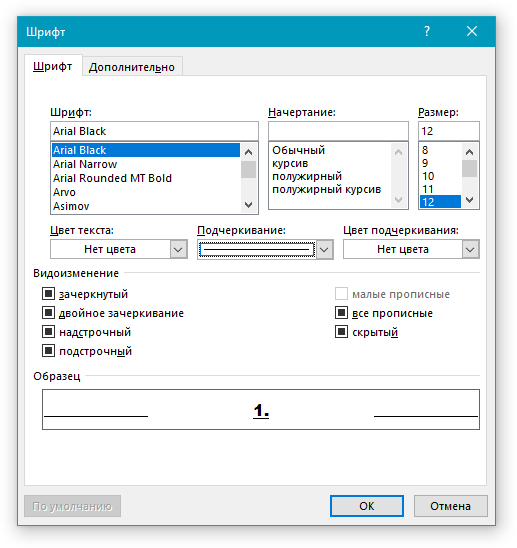
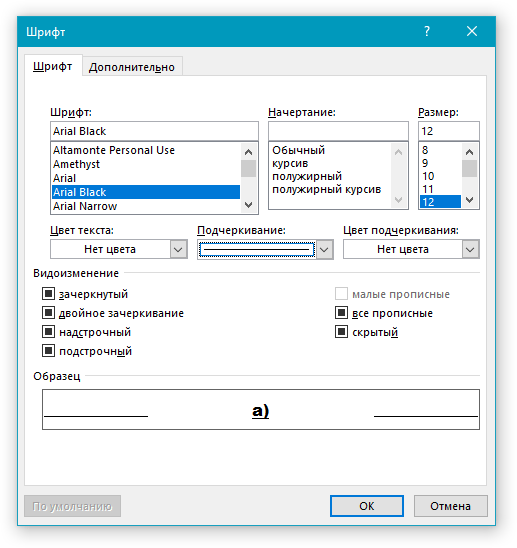
Step #5 Font
Set the font formatting for the selected level, if you want.

Step #6 Position
What position from the left margin do you want items for each level of numbering. For example, level 1 items may be 0cm from the left margin, level 2, 1cm from the left margin and level 3, 2cm from the left margin.
Here’s what they mean:
- The Aligned At determines how far from the left margin the number appears.
- The Text indent at figure determines how far from the left margin the text following the number is.

6. Click OK to save all the settings and close the dialog box.
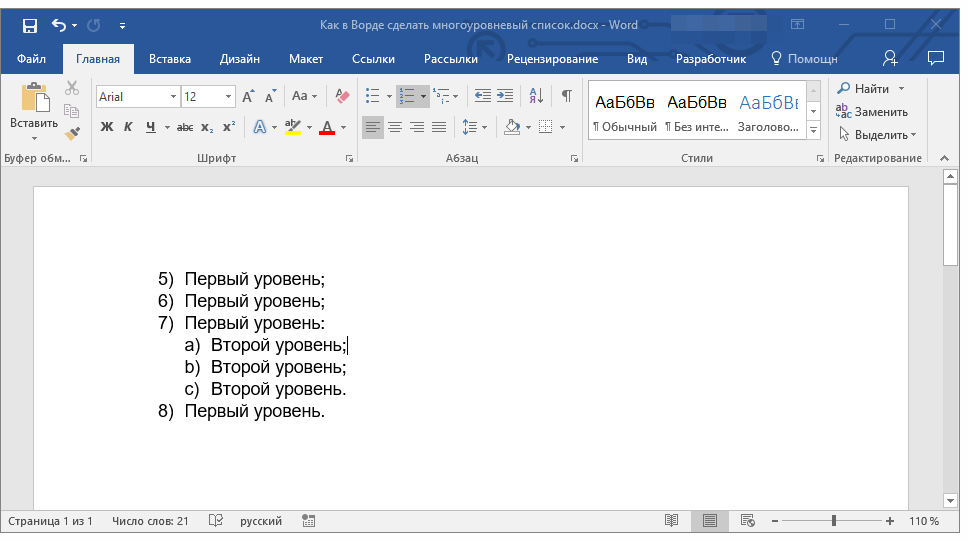
The text you selected in step 1 now looks like this.

The next part is where the magic happens …
3. How to Apply Multilevel Numbering
Once you have created your numbering system:
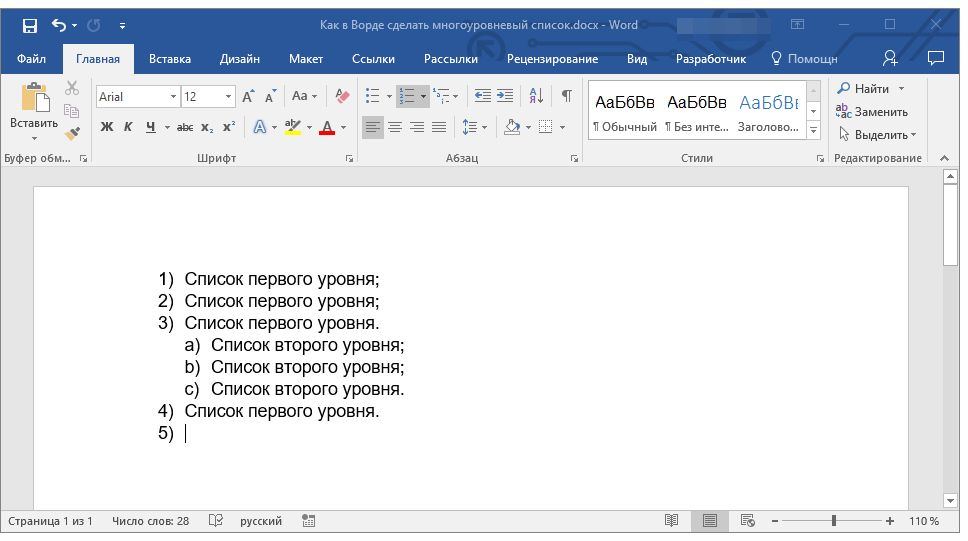
1. Position the cursor at the beginning of a line.

2. Press the TAB key to move the text down a level (demote).

3. Press the SHIFT and TAB keys together to move the text up a level (promote).

If you prefer, you can also click the indent icon to demote and the outdent icon to promote between levels.
![]()
4. How to Change Multilevel Settings
Once you have created your numbering system:
1. Reselect all text that is using the multilevel numbering.
2. Click the multilevel numbering icon and select Define New Multilevel List (yes, you choose this option even if you are modifying an existing multilevel list).

The original settings that you defined are redisplayed.
3. In the top-left box select the level that you wish to change, then change your settings.
4. Repeat for the other settings.
5. Click OK to save the settings. Your numbered list should now reflect your new settings.
5. Linking Multilevel Numbering to Styles
Each level of a multilevel numbering system can be linked to a style. This means that as you apply styles throughout the document, the numbering is applied appropriately and automatically. You can either use the built-in Heading 1, Heading 2, Heading 3 styles or use your own custom styles.
1. In the Numbering dialog box, click the MORE button in the bottom-left corner to expand the dialog box.
2. Select level to modify in the top-left box.
3. Open the Link level to style drop-down list and choose the style you wish to connect to the numbering level.

4. Click OK.
5. In the document, apply the Heading 1, Heading 2, Heading 3 styles where needed.
It’s a good idea to create a body text style and apply that where appropriate, so that the body text does not inadvertently get caught up in the multi-level numbering.
6. Select the whole document (or the portion of the document where you want to apply your numbered sections).
7. Click the icon in the Paragraph group (Home tab).
8. Select your custom numbering style from the gallery. The thumbnail image should show the linked styles.

6. How to Use Styles to Set Number Levels
1. Select all the text that you wish to apply the same number level to. Alternatively, if you wish to go line by line, you can place the cursor anywhere in a line of text.
2. In the Styles gallery, click the style that corresponds to the number level you wish to apply. For example, to apply the top level numbering click Heading 1 and for the third level numbering click Heading 3 (assuming those are the styles you assigned).
The numbering and all the numbering settings will be applied to the selected text or the paragraph in which the cursor was positioned.

And that, my friend, is how you do multilevel numbering in Word with no loose ends.
How to set up a dual-multilevel numbering system in Word
7. Two resources to help you
1. Grab your free multilevel numbering troubleshooting guide.

2. Watch over my shoulder as I set up multilevel numbering from scratch.

8. What next?
I hope you found plenty of value in this post. I’d love to hear your biggest takeaway in the comments below together with any questions you may have.
Have a fantastic day.


About the author
Jason Morrell
Jason loves to simplify the hard stuff, cut the fluff and share what actually works. Things that make a difference. Things that slash hours from your daily work tasks. He runs a software training business in Queensland, Australia, lives on the Gold Coast with his wife and 4 kids and often talks about himself in the third person!
SHARE
Word for Microsoft 365 Word 2021 Word 2019 Word 2016 Word 2013 Word 2010 Word 2007 More…Less
You can apply a numbering scheme to the headings in your document by using multilevel-list templates and built-in heading styles in Word (Heading 1, Heading 2, and so on).
Important: Make sure you’re using built-in heading styles in your document.
You can number headings so that top-level headings (Heading 1) are numbered 1, 2, 3, for example, and second-level headings (Heading 2) are numbered 1.1, 1.2, 1.3.
-
Open your document that uses built-in heading styles, and select the first Heading 1.
-
On the Home tab, in the Paragraph group, choose Multilevel List.

-
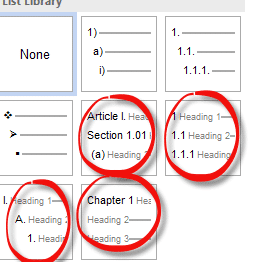
Under List Library, choose the numbering style you would like to use in your document.
Note: Depending on the type of documentation you’ve prepared, you might choose a template that includes the word «Heading» in the example.
Need more help?
Want more options?
Explore subscription benefits, browse training courses, learn how to secure your device, and more.
Communities help you ask and answer questions, give feedback, and hear from experts with rich knowledge.
You can customize an existing multilevel list (see
how to create a multilevel list)
or apply your specifications to the format using the Define new Multilevel list dialog box.
To create a custom multilevel format, do the following:
1. On the Home tab, in the Paragraph group,
choose the Multilevel List button:

2. In the Multilevel List, click
Define New Multilevel List… item to display the Define new Multilevel list dialog box:

3. In the Define new Multilevel list dialog box:
In the main part:
- In the Click level to modify list, select the list level you want to change. Word selects the
first level, 1, when you open the Define new Multilevel list dialog box. - In the Number format group:
- In the Enter formatting for number text box, Word displays the number formatting for
the selected list level. Type any changes for the text of the format into this text box.For example, you might edit the 1) format to Section 1. so that each
instance of the number included the word Section:
Do not type over this number in this box! If you do so, even replacing it
with another number, you will break the automatic numbering; each number in the list
will be the same (looks like
a standard bulleted list that
uses a number as a bullet symbol). - To specify font formatting, click the Font… button. Word displays the Font
dialog box. Choose the font, font style, size, and any extras (such as color or effects),
and then click the OK button. - In the Number style for this level drop-down list, select the number format you want
to use.For example:
- The multilevel list with bullets in the second level:

- The multilevel list with options in the third level:

- The multilevel list with bullets in the second level:
- To include the number from the previous level (or a higher level), choose the level from the
Include level number from drop-down list. This drop-down list is unavailable for the
first level because there’s no level above it.For example: If Level 1 uses 1, 2, 3 numbering and Level 2
uses a, b, c numbering, applying Level 1 in the Include level
number from drop-down list to Level 2 changes the Level 2
numbering to 1a, 1b, and so on:
- In the Enter formatting for number text box, Word displays the number formatting for
- Use the controls in the Position box to customize where the number appears:
- In the Number alignment drop-down list, choose the distance from the left, centered,
or right margin that Word places the number. - In the Aligned at text box, select the position at which to align the number.
- In the Text indent at text box, set the indent position for the text.
For example, the multilevel list whose first level is centered, while the text itself is
indented:
Use the Set for All Levels… button to customize alignment and indents for all levels in
the list:
- In the Number alignment drop-down list, choose the distance from the left, centered,


To open the additional options of the customization for the multilevel list, click the
More > > button in the lower-left corner. Word displays an extra panel at the
right of the dialog box, so you see the full dialog box:

Word also changes the More > > button to a < < Less button
that you can click to hide the extra section of the dialog box again.
Some useful additional options:
- If you need to link this numbered list level to a particular style, select the style in the Link
level to style drop-down list:
- To customize the numbering, use the Start at spinner to change the starting number:
For example, Level 3 starts on the fifth of the Roman numbering:

- If you want to restart numbering after a certain level, select the Restart list after
checkbox and choose that level in the drop-down list (the Restart list after controls aren’t
available for the first level in the list, because there’s no higher level).For example, Level 3 has end-to-end numbering from Level 2 and restarts numbering
only after changing Level 1:
- Select the Legal style numbering checkbox if you want to use legal-style numbering: changing
any roman numeral to an Arabic numeral.For example, Level 3 includes the numbering from both previous levels, but it should show
the Legal style numbering 1.1.1 instead of A.1.1:

- In the Follow number with drop-down list, select the character to include after the number:
Tab character, Space, or Nothing. If you choose a
Tab character, you can select the Add tab stop at checkbox and set the distance
at which to place a tab stop.


Note: More details are available in the
Multi-level lists section in the
Work with bulleted, numbered and multi-level lists lesson of the
Create basic documents free course.
See also this tip in French:
Comment personnaliser une liste à plusieurs niveaux.

on
June 11, 2018, 12:25 PM PDT
How to create multilevel numbered headings in Word 2016
Multilevel number headings don’t have to complicate your work. This technique takes a few clicks and you’re done.
We may be compensated by vendors who appear on this page through methods such as affiliate links or sponsored partnerships. This may influence how and where their products appear on our site, but vendors cannot pay to influence the content of our reviews. For more info, visit our Terms of Use page.

Over the last few months, we’ve reviewed Word’s numbered list features. Specifically, How to control spacing and alignment in a numbered list in Microsoft Word shows how to control spacing and alignment and How to number headings in a Word 2016 document shows a simple way to number headings. In this article, we’ll continue by reviewing Word’s Multilevel List feature. Fortunately, it’s easier to implement and modify than you might think.
I’m using Word 2016 on a Windows 10 64-bit system, but this feature is available in earlier versions. However, the multilevel list options discussed in this article aren’t available in the online 365 browser edition. For your convenience, you can download the demonstration .docx and .doc files, or you can work with your own content.
LEARN MORE: Office 365 Consumer pricing and features
What doesn’t work
You can’t use Word’s Numbering feature to generate a multilevel numbering system, even if you use built-in heading styles. Figure A shows a document with two styled heading levels: Heading 1 and Heading 2. You can apply the Numbering option (in the Paragraph group) and Word will number the headings consequently, but the feature ignores different levels; if you expected 1, 1.1, 2, 2.1, and 2.2, you might be surprised. If you select the entire document first, Numbering not only ignores the different levels, but it also numbers the paragraphs!
Figure A
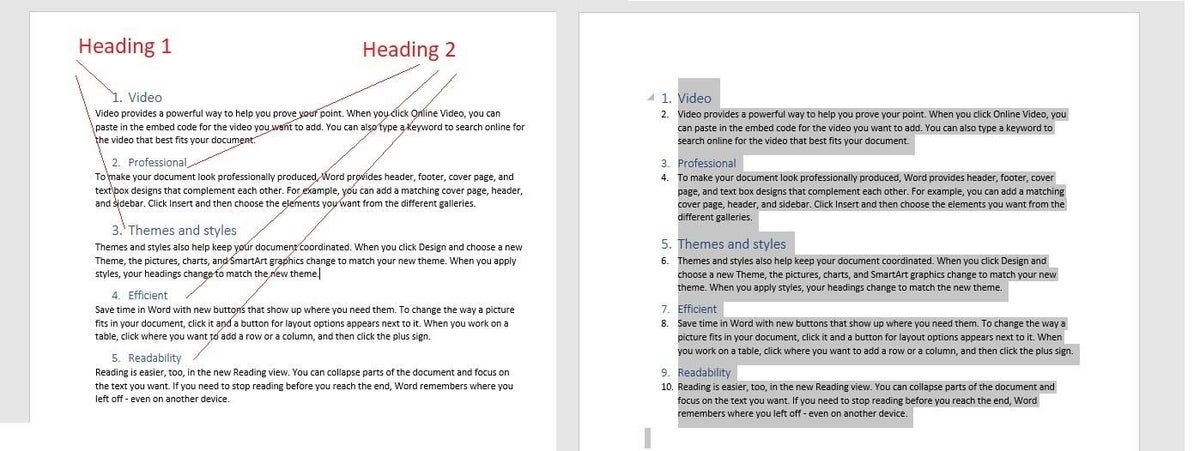
Word’s Numbering option can’t handle multilevel headings.
The easy way
If you use built-in heading styles, applying a multilevel list style is as simple as a few clicks. First, position the cursor anywhere in the document. Then, click the Multilevel List option and choose an option (Figure B). As you can see in Figure C, two quick clicks and you’re done!
Figure B
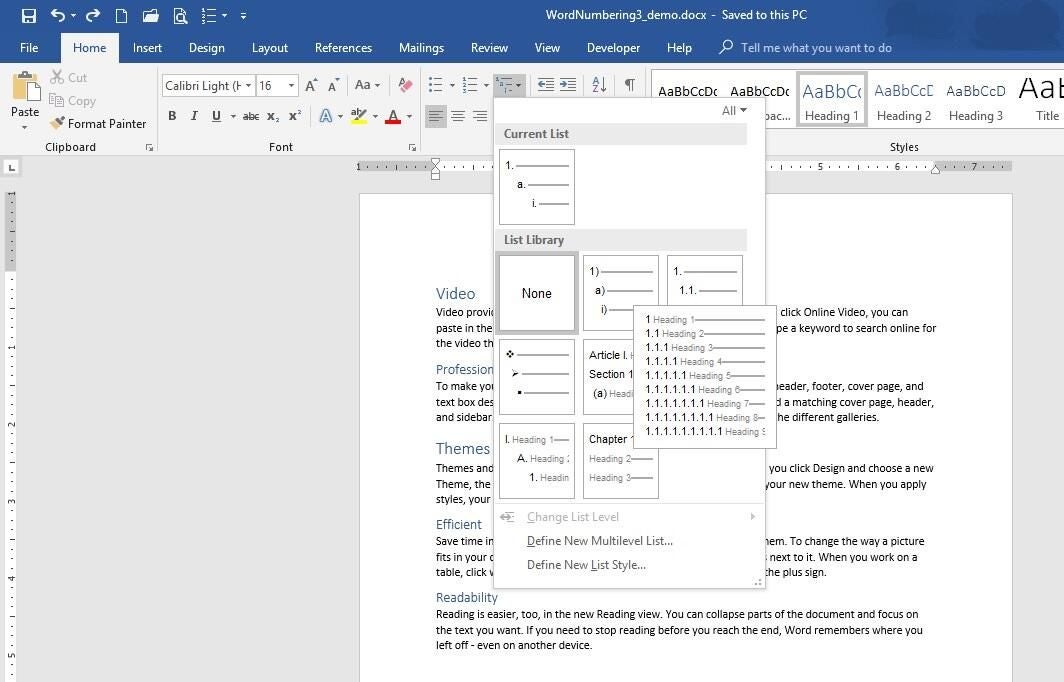
Choose one of the built-in multilevel options from the gallery.
What’s important to note is that the List Library collection displays styles linked to the built-in heading styles. If one of these works for you, you needn’t go any further.
Figure C
It took two clicks to apply this multilevel numbering scheme.
Tweak it
The default options are adequate most of the time, but you might want to customize the results a bit and that’s where things can get a bit confusing. The options are straightforward, but there are a lot of them; Word can handle up to nine levels!
To modify the options, click the Multilevel List option (in the Paragraph Group). Word selects all lists currently in use in the List Library. You’ll see two options below the gallery: Define New Multilevel List and Define New List Style. Use the first to create and save a stable custom list style. You’ll use the second to change list styles. You can also use the latter to create a new style. So, what’s the difference? The Define New List Style option lets you name a style, so you can share, modify, and delete it later. Most users will never need this option. Now, let’s move on: choose Define New Multilevel List. Figure D shows the resulting dialog.
Figure D
Open this dialog to create a new multilevel list.
Now you’re ready to choose settings that will reflect your numbered heading needs:
- Select the level you want to modify. You can change one, a few or all of the levels.
- Select a numbering format to apply to the chosen level, adjust the formatting; adjust the spacing and aligning, and so on.
- Repeat the above for each level you want to change.
- Click OK when you’re done.
To save the list style to a template so you can use it with other documents, select the list in the document. Access the Multilevel List dropdown and choose Define New List Style. Enter a descriptive new and select the New documents based on this template (at the bottom). Once you click OK, the multilevel list style will be available in all new documents.
SEE: 30 things you should never do in Microsoft Office (free PDF) (TechRepublic)
An example
Let’s use what we’ve learned to modify the built-in style applied earlier (Figure C). Specifically, we’ll change the numbering style for both levels and indent level 2. To begin, click anywhere inside the list area, and then do the following:
- Click Multilevel List in the Paragraph group, and then choose Define New Multilevel List.
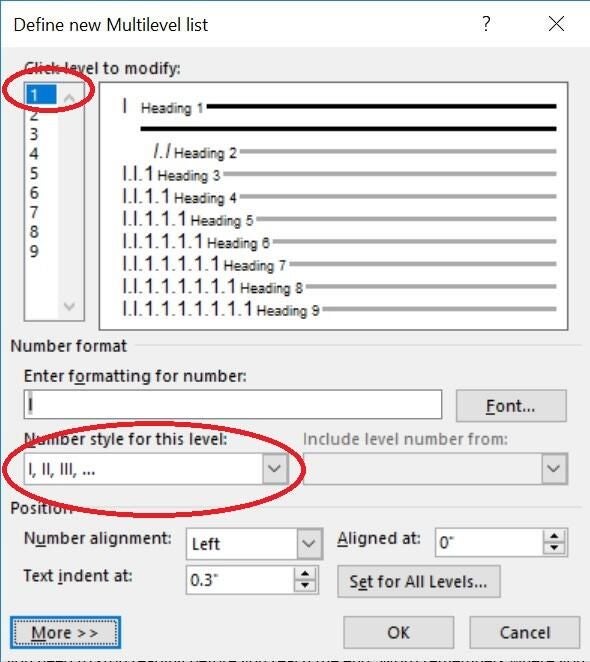
- Select 1 in the Click level to modify list to choose the first level.
- From the Number style for this level dropdown, choose I, II, III, (Figure E). We’re done with level 1.
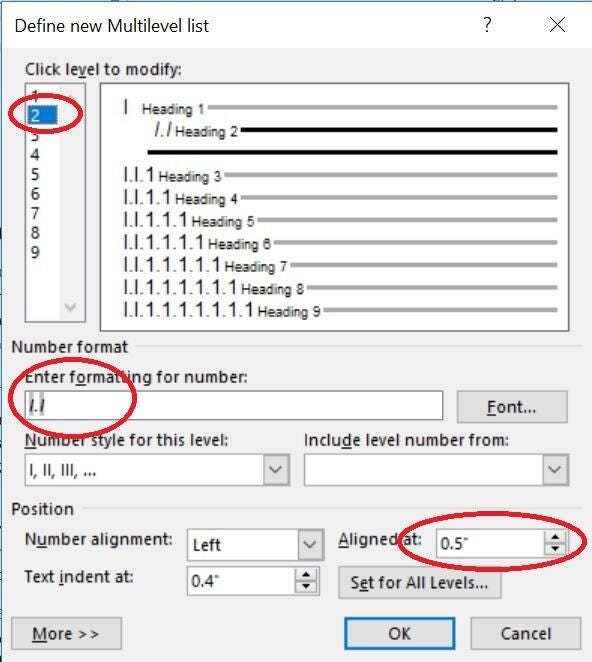
- Select level 2 and change the number style to l, ll, lll, as you did for level 1.
- Click the Font button, choose Italics, and click OK.
- In the Aligned at control, enter .50. (Figure F).
- Click OK to see the new list attributes in Figure G.
Figure E
Alter level 1.
Figure F
Alter level 2.
Figure G
We reset only a few options, but substantially changed the look of the headings.
Notice that the Font option (when you applied italics) changes only the number, not the heading text. To update the heading text, modify the heading style as you normally would. Word assumes you want all Heading 1 and Heading 2 styles included in the new numbering scheme. If you want to omit a heading level from the scheme, don’t use a built-in heading style to format those headings.
There are lots of options. For instance, you might reduce the amount of space between the number and the text by changing the Text indent at setting. Or, you might center the heading by choosing Center from the Number alignment dropdown. For even more options, click More to expose several more settings. You could use the Apply changes to option when setting level 1 to the I, II, III numbering style instead of changing it for each level.
To add new levels to the list, simply use a lower level built-in heading style. For a visual review of the document’s structure, display the Navigation pane: Click the view tab and check Navigation Pane in the Show group.
This feature is easiest to use when you combine it with Word’s built-in heading styles. However, you can map a custom heading style to the multilevel numbering feature–it just takes more work. Word handles nine levels, but any document with more than four levels should receive a serious developmental edit. More than four becomes confusing and perhaps worse, unreadable.
Stay tuned
Word’s Multilevel List feature works nicely with the built-in heading styles. However, you can get the same effect working with custom styles. Next month, I’ll show you how to do so.
Send me your question about Office
I answer readers’ questions when I can, but there’s no guarantee. Don’t send files unless requested; initial requests for help that arrive with attached files will be deleted unread. You can send screenshots of your data to help clarify your question. When contacting me, be as specific as possible. For example, “Please troubleshoot my workbook and fix what’s wrong” probably won’t get a response, but “Can you tell me why this formula isn’t returning the expected results?” might. Please mention the app and version that you’re using. I’m not reimbursed by TechRepublic for my time or expertise when helping readers, nor do I ask for a fee from readers I help. You can contact me at susansalesharkins@gmail.com.
Also see:
- How to add a drop-down list to an Excel cell (TechRepublic)
- How to become a cloud engineer: A cheat sheet (TechRepublic)
- 50 time-saving tips to speed your work in Microsoft Office (free PDF) (TechRepublic download)
- How to add a drop-down list to an Excel cell (TechRepublic)
- Cost comparison calculator: G Suite vs. Office 365 (Tech Pro Research)
- Microsoft Office has changed, how you use it should too (ZDNet)
- Best cloud services for small businesses (CNET)
- Best to-do list apps for managing tasks on any platform (Download.com)
- More must-read Microsoft-related coverage (TechRepublic on Flipboard)
-
Microsoft
-
Software
Содержание
- Выбор стиля для списка со встроенной коллекции
- Создание нового стиля
- Определение новых стилей
- Ручная нумерация элементов списка
- Вопросы и ответы
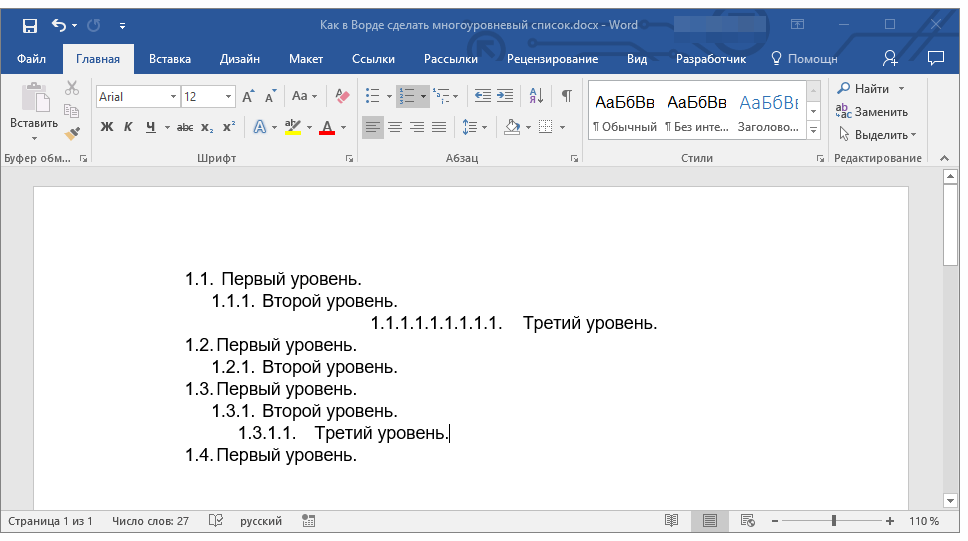
Многоуровневый список — это список, в котором содержатся элементы с отступами разных уровней. В программе Microsoft Word присутствует встроенная коллекция списков, в которой пользователь может выбрать подходящий стиль. Также, в Ворде можно создавать новые стили многоуровневых списков самостоятельно.
Урок: Как в Word упорядочить список в алфавитном порядке
Выбор стиля для списка со встроенной коллекции
1. Кликните в том месте документа, где должен начинаться многоуровневый список.
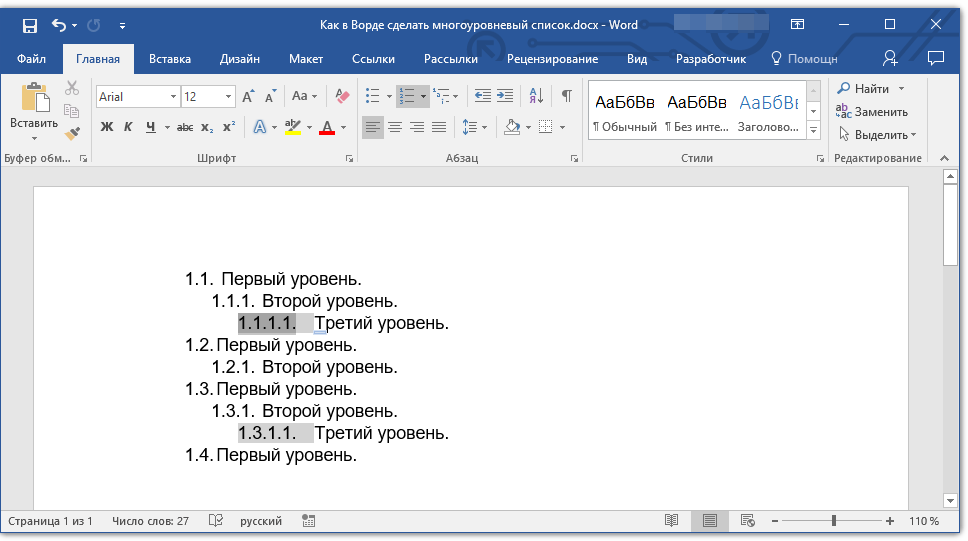
2. Кликните по кнопке “Многоуровневый список”, расположенной в группе “Абзац” (вкладка “Главная”).
3. Выберите понравившийся стиль многоуровневого списка из тех, что представлены в коллекции.
4. Введите элементы списка. Для изменения уровней иерархии элементов, представленных в списке, нажмите “TAB” (более глубокий уровень) или “SHIFT+TAB” (возвращение к предыдущему уровню.
Урок: Горячие клавиши в Ворде
Создание нового стиля
Вполне возможно, что в числе многоуровневых списков, представленных в коллекции Microsoft Word, вы не найдете того, который бы вас устроил. Именно для таких случаев в этой программе предусмотрена возможность создания и определения новых стилей многоуровневых списков.
Новый стиль многоуровневого списка может быть применен при создании каждого последующего списка в документе. Кроме того, новый стиль, созданный пользователем, автоматически добавляется в доступную в программе коллекцию стилей.
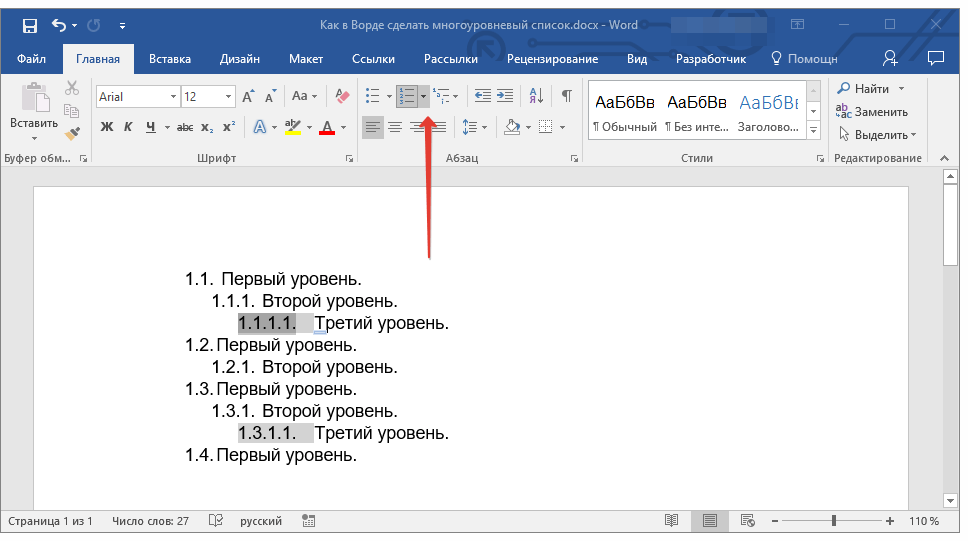
1. Кликните по кнопке “Многоуровневый список”, расположенной в группе “Абзац” (вкладка “Главная”).

2. Выберите “Определить новый многоуровневый список”.
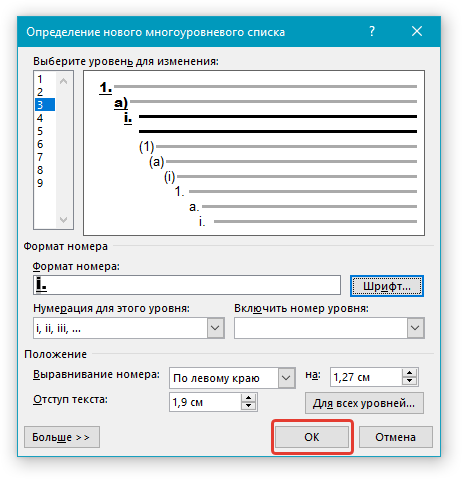
3. Начиная с уровня 1, введите желаемый формат номера, задайте шрифт, расположение элементов.
Урок: Форматирование в Ворде
4. Повторите аналогичные действия для следующих уровней многоуровневого списка, определив его иерархию и вид элементов.
Примечание: Определяя новый стиль многоуровневого списка, в этом же списке вы можете использовать и маркеры и номера. К примеру, в разделе “Нумерация для этого уровня” вы можете пролистать перечень стилей многоуровневого списка, выбрав подходящий стиль маркера, который и будет применен к конкретному уровню иерархии.
5. Нажмите “ОК” для принятия изменения и закрытия диалогового окна.
Примечание: Стиль многоуровневого списка, который был создан пользователем, будет автоматически установлен в качестве стиля, используемого по умолчанию.
Для перемещения элементов многоуровневого списка на другой уровень, воспользуйтесь нашей инструкцией:
1. Выберите элемент списка, который нужно переместить.
2. Кликните по стрелке, расположенной около кнопки “Маркеры” или “Нумерация” (группа “Абзац”).
3. В выпадающем меню выберите параметр “Изменить уровень списка”.
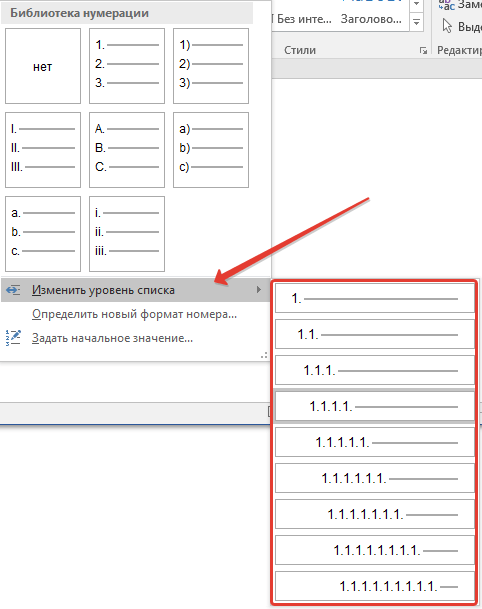
4. Кликните по тому уровню иерархии, на который нужно переместить выбранный вами элемент многоуровневого списка.
Определение новых стилей
На данном этапе необходимо пояснить, в чем заключается разница между пунктами “Определить новый стиль списка” и “Определить новый многоуровневый список”. Первую команду уместно использовать в ситуациях, когда необходимо изменить стиль, созданный пользователем. Новый стиль, созданный с помощью этой команды, обнулит все его вхождения в документе.
Параметр “Определить новый многоуровневый список” крайне удобно использовать в случаях, когда нужно создать и сохранить новый стиль списка, который в дальнейшем не будет изменяться или же будет использоваться только в одном документе.
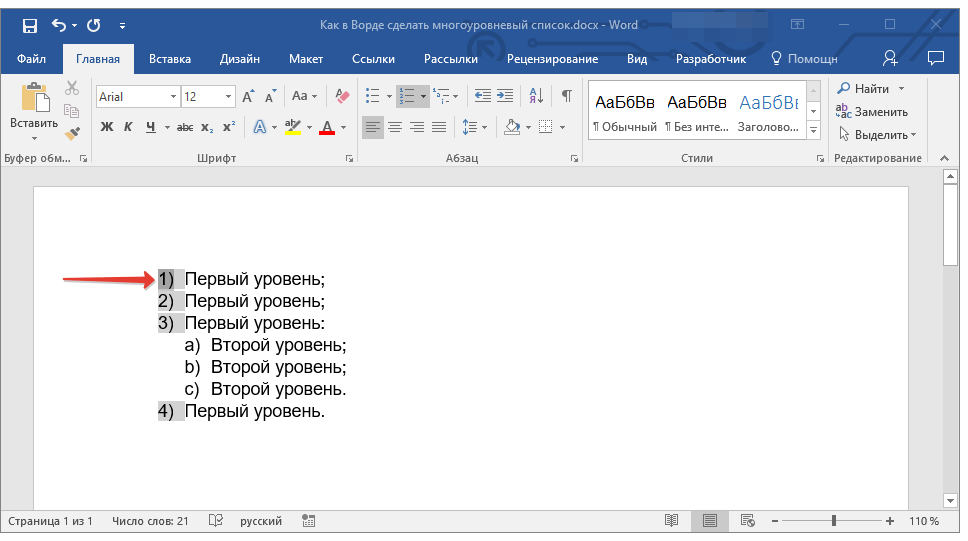
Ручная нумерация элементов списка
В некоторых документах, содержащих нумерованные списки, необходимо обеспечить возможность ручного изменения нумерации. При этом, необходимо, чтобы MS Word правильно изменял номера следующих элементов списка. Один из примеров документов такого типа — юридическая документация.
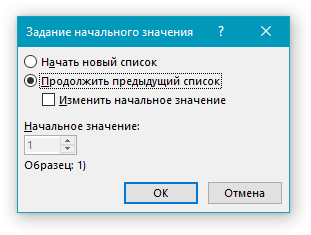
Для ручного изменения нумерации необходимо воспользоваться параметром “Задание начального значения” — это позволит программе корректно изменить нумерацию следующих элементов списка.
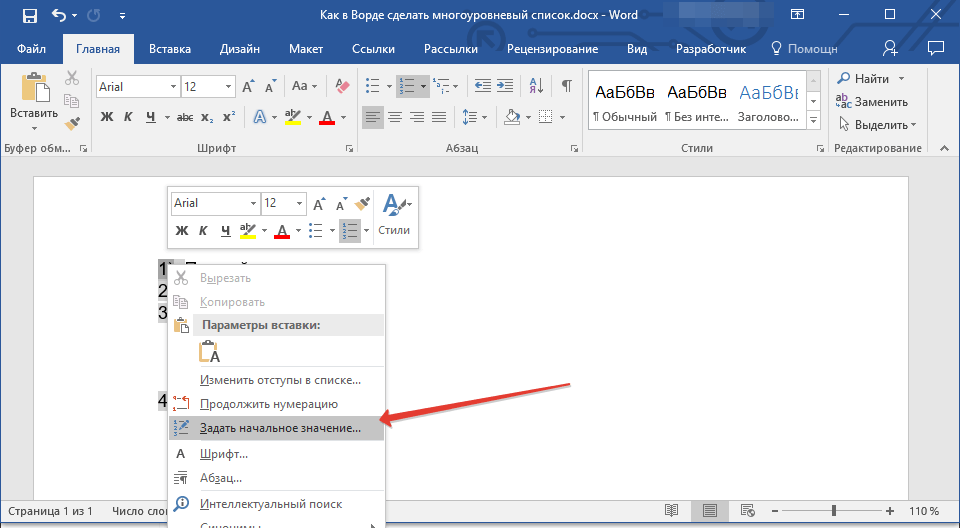
1. Кликните правой кнопкой мышки по тому номеру в списке, который нужно изменить.
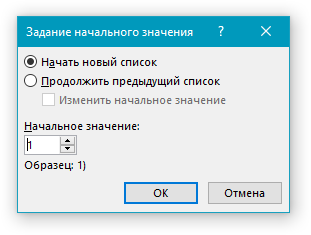
2. Выберите параметр “Задать начальное значение”, а затем выполните необходимое действие:
- Активируйте параметр “Начать новый список”, измените значение элемента в поле “Начальное значение”.
- Активируйте параметр “Продолжить предыдущий список”, а затем установите галочку “Изменить начальное значение”. В поле “Начальное значение” задайте необходимые значения для выбранного элемента списка, связанного с уровнем заданного номера.
3. Порядок нумерации списка будет изменен согласно заданным вами значениям.
Вот, собственно, и все, теперь вы знаете, как создавать многоуровневые списки в Ворде. Инструкция, описанная в данной статье, применима ко всем версиям программы, будь то Word 2007, 2010 или его более новые версии.
Word has an amazing range of options for automatically numbering your document heading and, if necessary, paragraphs.
Even more amazing is my visit to an office last week. I found staff going through a long document, laboriously numbering headings and sub-headings by hand! They been doing this for years and weren’t happy when shown this button on the ribbon, it does the job in seconds instead of an hour or more!

The above is from the Home tab of the Word 2007 ribbon. The same button with the same preset options are in Word 2010, Word 2013 and Word 2016 for Windows. It’s almost the same in Word 2016 for Mac (only the ‘Change List Level’ is missing).
Just with the one of the preset options you can autonumber a document like this:
There’s all manner of options, just two of them are shown above. They even extend to bullets.

The beauty of autonumbering is that you can set it up and let Word do all the drudge work.
You’ve probably used the bullets or numbering features already; they are on the buttons to the left of the multi-level one. As the name suggests ‘Multi-level lists’ lets you define staggered levels in your document with numbering styles for each level.
Aaaaargh!
There few things in Office more frustrating than the multi-level numbering feature. Not because it’s bad (it’s not) but because it seems to satisfy no-one.
Over the years, Microsoft has spent a lot money developing numbering in Office yet you’ll still find people discussing their annoyance about it. The numbering system, for all its options, doesn’t seem to be able to do exactly what you, your organization or school wants.
But don’t be scared, the multi-level list features are very good and worth trying out.
Numbered Headings
The most common form of multi-level numbering is numbering each heading. Text paragraphs aren’t numbering, only the headings.

This can be linked to the Heading styles so each heading has a number/bullet added automatically. These are noted in the list gallery with the word heading in the thumbnail.
Or go to the Heading Style and change the Format | Numbering options:

Notice in the style summary it says ‘Numbering Style:’ also ‘Start at’.
Continuous numbering
The alternative is where every paragraph is numbered. This is usually for accurate referencing in legal and engineering documents. Sometimes it’s used in collaborative drafts to identify the text being discussed with the numbering removed before final release.
One might imagine Abraham Lincoln and his advisers on Madison Avenue discussing a document like this;
 Source: in the spirit of Bob Newhart
This style is even easier to apply. Select the text and choose a multi-level style you want. Word will change the text to ‘List Paragraph’ style and give all the text 1st level numbering.
Then you can change the levels of paragraphs to get the multiple levels. Do that in various ways:
- Alt + Shift + left/right arrows is the fastest way to change levels.
- Use ‘Change List Level’ from the Numbering or Multi-Level list menu.


The indents for each level and standard but not compulsory. You can change the styles to make all numbers start from the left margin. This is a more efficient use of page space.

Right-click next to a number and choose Adjust List Indents.

Skipping numbering
The numbering doesn’t always go according to neat numbers and Word can cope with that.
Right-click at the autonumber and you’ll see some options:

Continue Numbering: if there’s been a break in the numbered text, this tells Word to continue using the last number format and numbering.
Set Numbering Value: this is the powerful option
Start new list: forget what’s happened earlier in the document and start a new list.

Continue from previous list: similar to ‘Continue Numbering’ but here you get more control over the details. Choose ‘Advance value’ to specify an exact restart level.

Questions? There are always questions about Word numbering – ask us and we’ll see what we can do. Please include as many details as possible.
This tutorial shows two ways to create numbered lists in Microsoft Word. We will also look at how to change list levels, start with a different list number, and change the font, size, and color of list numbers.
Do you want to create bulleted lists? Please see my previous tutorial “How to Create Bulleted Lists in Microsoft Word.”
What about Lists Ordered by Letters?
For simplicity, this tutorial refers to “numbered lists” because Word organizes all ordered (hierarchical) list options in the Numbering Library. However, all the steps shown here also apply to lists organized by letters.
If you would like to learn more about ordered and unordered lists, please see “How to Write Vertical Lists (Ordered and Unordered).”
Table of Contents
- How to Create a Numbered List — Basic Method 1
- How to Create a Numbered List — Basic Method 2
- How to Change Numbered List Levels
- How to Start a List with a Different Number
- How to Change the Font, Size, and Color of List Numbers
Watch all the steps shown here in real time!
Explore more than 200 other writing-related software tutorials on my YouTube channel.
The images below are from Word for Microsoft 365. These steps also apply to Word 2021, Word 2019, Word 2016, and Word 2013.
The basic steps are similar in Word for Mac. However, the more advanced steps, such as starting a list with a different number, are different on Mac. So, we will cover this topic for Word for Mac in a separate tutorial.
How to Create a Numbered List — Basic Method 1
This is the basic method to create a numbered list in Word. This method requires you to type each item as you create the list. If you have already typed your list items, see Method Two below.
- Place your cursor where you want to start your list.
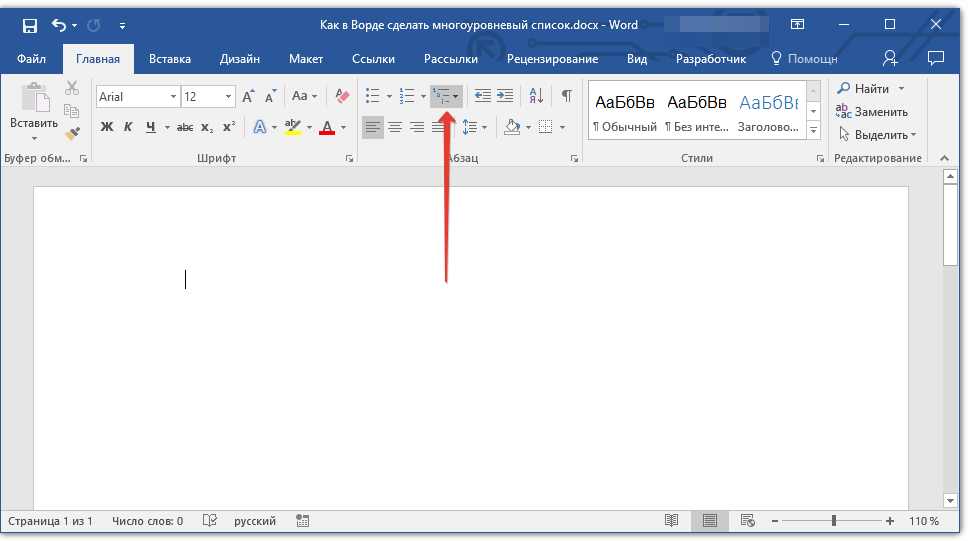
- Select the Home tab in the ribbon.

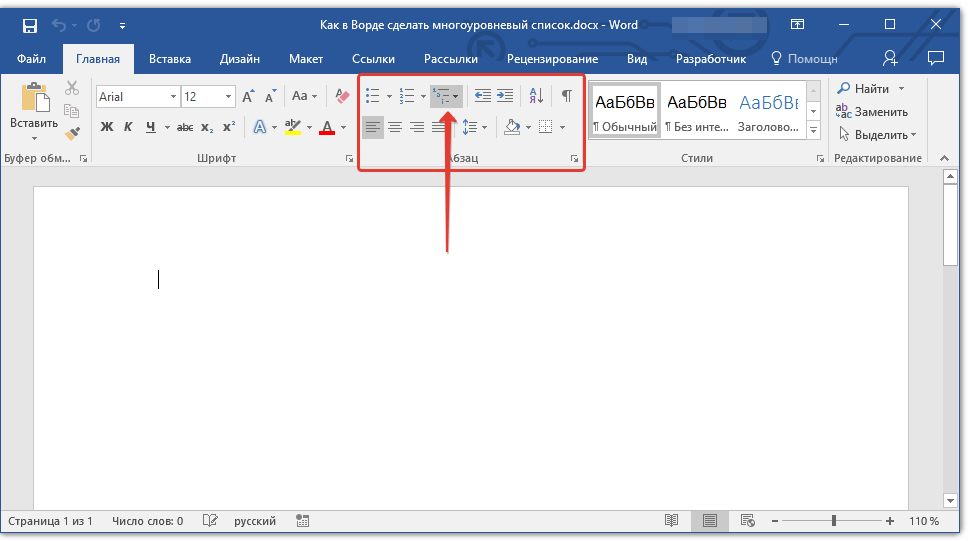
- Select the menu arrow next to the Numbering button.
![]()
- Choose a number style from the Numbering Library.

The number one will appear in your document.

- Type your first list item after the number, and then press the Enter key on your keyboard. The next number will appear.

Continue typing your list items and pressing the Enter key until your list is complete.
- After typing the final item, press the Enter key twice to remove your cursor from the list.
How to Create a Numbered List — Basic Method 2
This method is for existing text formatted vertically as a list.
- Select the text.

- Select the Home tab in the ribbon (see figure 1).
- Select the menu arrow next to the Numbering button (see figure 2).
- Choose a style from the Numbering Library (see figure 3).
Your selected items should become a numbered list.

How to Change Numbered List Levels
Word lets you create numbered lists with up to nine nested levels. Here are two ways to change the level of list items.
Change List Levels — Method 1
Important note: This method won’t work for the first item in your list.
- Select one or more list items (other than the first item).

- Select the Home tab in the ribbon (see figure 1).
- Select the Increase Indent button in the Paragraph group.

Each time you select the Increase Indent button, the item(s) will move one level and take on the appropriate format for that level (e.g., lowercase letters, roman numerals, etc.).

Pro Tip: To return the selected text to a previous level, select the Decrease Indent button to the left of the Increase Indent button.
Change List Levels — Method 2
- Select one or more list items (see figure 8).
- Select the Home tab in the ribbon (see figure 1).
- Select the menu arrow next to the Numbering button (see figure 2).
- Select Change List Level from the drop-down menu.

- Select a list level from the list-level menu.

Your list item(s) should move to the next level.
How to Start a List with a Different Number
You can start a list with a number other than one or continue the numbering from the previous list.
- Select the first list number or place your cursor within the first list item. If you select the list number, all numbers on that level should also be selected.

- Select the Home tab in the ribbon (see figure 1).
- Select the menu arrow next to the Numbering button (see figure 2).
- Select Set Numbering Value from the drop-down menu.

5.a. Enter the number you want to start with in the Set value to text box in the Set Numbering Value dialog box.

5.b. (Alternative Option) Select Continue from previous list if you want to continue the numbering from a previous list in your document.

- Select the OK button.

Your list should be renumbered according to your selections in the Set Numbering Value dialog box.
How to Change the Font, Size, and Color of List Numbers
By default, the font, size, and color of your list numbers will be the same as your normal text style. However, you can manually change the appearance of list numbers by selecting them separately from the text.
- Select one list number. All numbers on that level should also be selected.

- Select the Home tab in the ribbon (see figure 1).
- Select a new font, size, or color from the Font group.

Your list numbers should change to the new formatting. Repeat these steps for each level in your list, as necessary.

Related Resources
How to Write Run-In Lists
How to Create and Update a List of Tables or Figures in Microsoft Word
How to Create Numbered Lists in PowerPoint (PC & Mac)
Updated February 12, 2023

Microsoft Word lets you easily create and format multilevel lists in your documents. You can choose from a variety of formatting options, including bulleted, numbered, or alphabetized lists. Let’s take a look.
Creating a multilevel list in Word is dead simple. Start by typing out one or more lines of your list, with each item of your list on a different line. Then, select those lines.

On the “Home” tab of the Ribbon, click the “Multilevel Lists” button, and then click one of the built-in lists types shown on the dropdown menu.
Your list will now be formatted in the style you chose.
And yes, right now, it’s a single-level list. The truth is that technically, single- and multi-level lists are not much different in Word. It’s not until you start promoting and demoting list items that it turns into a multilevel list.
Demoting and Promoting Lines On Your Multilevel List
Demoting a line in your list indents the line and bumps it to a lower list level. Promoting a line does just the opposite.
Demote or Promote a List Item By Pressing Tab or Shift-Tab
Start by placing your cursor at the beginning of the line you want to demote or promote.
To demote that line to a lower list level, just hit your Tab key.
You can also demote a line more than once by just pressing Tab however many times you need. Here, we’ve demoted the third line in our list twice.
Repeat these steps if you would like to add four, five, or even more levels to your multilevel list.
You can also promote a line (move it back a level) by placing your cursor at the beginning of the line…
And then hitting Shift+Tab.
You can also demote or promote multiple lines at a time by selecting them…
and then hitting the Tab or Shift+Tab keys.
Pick a Specific List Level for a Line
While just using the Tab and Shift+Tab key combos is probably the easiest way to promote or demote lines on your list, Word does have a menu option for choosing a specific level.
Place your cursor anywhere in the line you want to change (or select multiple lines if you want to change more than one).
Click the “Multilevel List” button on the Home tab of the Ribbon, point to the “Change List Level” option on the dropdown, and then select the level you want.
And the line (or lines) you selected get changed to that level.
How to Quickly Change the Type of Your Multilevel List
Sometimes, you may decide that you want to change the basic type of multilevel list you’re using. Perhaps you originally went with numbers, but now want to use bullet points. Or maybe you just want a different numbering scheme. Whatever the case, you can easily make that change.
Place your cursor anywhere on any line of your list. It really doesn’t matter where, because this is going to change the whole list.
Open that “Multilevel Lists” dropdown menu again, and this time, just click any of the other default list types on the menu.
Your whole list changes to that new type.
How to Customize Your Multilevel List
So, what if you want to change something about your list like the way just one line level is numbered or how the levels are aligned. Well, you can do that, too. Multilevel lists in Word are pretty customizable, letting you make changes to just about every aspect.
Start by placing your cursor anywhere on any line of your list. Open the “Multilevel List” dropdown, and then choose the “Define New Multilevel List” command.
The Define New Multilevel List window pops up, showing you a number of basic options for customizing how the lines in your list appear. However, there’s more here than meets the eye, so go ahead and click that “More” button down in the bottom left corner.
Now, your window should look like this, with a bunch of extra options off to the right.
So, here’s the rundown. First, select the level of the list that you want to modify. You can click either in the simple numbered list to the left, or on a line in the center window that shows how the list actually looks.
Below that, you’ll find a bunch of options for changing the number format and positioning for the selected level appears.
Here’s what you can do there (and note that this list includes the extra stuff revealed by that “More” button):
- Enter formatting for number: You can type the text for the line number as you want it to appear in this box. Click the “Font” button to its right to change the font used for the level.
- Number style for this level: Use this dropdown to change the style of the selected number level. You can change it to pretty much any number or bullet style you want. You can even mix bullet points into a numbered list this way (or vice versa).
- Include level number from: Use this dropdown to include the number from a previous level. This lets you create line numbers like 1.1; 1.1.1; and so on.
- Start at: Choose the number or letter where you want to start the numbering.
- Restart list after: Have the list restart after it reaches a certain number or letter.
- Position: Use the controls in the “Position” section to change how the selected number level is aligned and indented. You can also click the “Set For All Levels” button to control alignment and indents for your whole list. You can also choose whether the line number is followed by a tab character (the default), a space, or no character at all.
And at the top right of the window, you’ll find a few extra options, including:
- Apply changes to: Choose whether you want to apply changes to the whole list, from the point where your cursor is placed in the list, or only levels you’ve selected.
- Link level to style: You can use this dropdown to link your selected level to a style, whether a built-in Word style or one you’ve created. This can be particularly handy for linking levels to heading styles.
- Level to show in gallery: This dropdown lets you choose the level of the list that’s shown in the gallery on Word’s Home tab. Honestly, its not a very useful option, and it’s usually best to leave it set to its default—Level 1.
- ListNum field list name: Use this field to associate the level with a name that you can then use along with Word’s LISTNUM function. This is useful if you’re creating functions to generate lists.
After making changes to a particular level, you’ll need to repeat the process for each additional level of the list you want to modify. So, select a level, make your changes, select the next level, make those changes, and so on.
When you have finished changing all the levels you want, click the “OK” button, and your multilevel list will now show your changes.
How to Turn Your Multilevel List into a New Style
After customizing you multilevel list just the way you want it, you may find yourself wanting to use that same formatting for other lists—even lists in other documents. You can do this by turning the list into a style.
Place your cursor anywhere on any line of your list, open the “Multilevel List” dropdown menu again, and this time, choose the “Define New List Style” option.
In the Define New List Style window, start by giving your new style a name.
Now, there are a number of formatting options available in this window. You can change the font, character formatting, type (number or bullet), and several other things that you were also able to change when customizing your list.
While these options can be useful if you want to create a quick new multilist style from scratch (i.e., when you have not already created and customized a list you want to turn into a style), we highly recommend that you don’t bother with them. Instead, it’s much more effective to create your list, customize using the more powerful tools we talked about in the previous section, and then creating your style. The new style will include all those customizations you’ve already made to the list.
One option you will want to pay attention to is whether you want the style to be available only in the current document, or in new documents based on the template attached to the document. You’ll want to choose the latter if you need to access the style when you create other documents.
Choose what you want, and then click “OK” to save your new style.
Now, you’ll be able to choose that style (or any other list styles you’ve created) from the “Multilevel List” dropdown menu any time you want to create another multilevel list.
And now you know more than you ever wanted to know about creating multilevel lists in Word.
READ NEXT
- › How to Edit, Restart, or Continue a Numbered List in Google Docs
- › How to Alphabetize Lists and Tables in Microsoft Word
- › How to Make a PowerPoint Presentation From an Outline
- › BLUETTI Slashed Hundreds off Its Best Power Stations for Easter Sale
- › This New Google TV Streaming Device Costs Just $20
- › The New NVIDIA GeForce RTX 4070 Is Like an RTX 3080 for $599
- › HoloLens Now Has Windows 11 and Incredible 3D Ink Features
- › How to Adjust and Change Discord Fonts
I think I’ve finally figured out how to get proper multilevel numbering happening in Word 2007!
A client called me in desperation — they had an employment contract with multilevel numbering, but somewhere along the way the numbering got screwed. Instead of 12 followed by 12.1, 12.2, 12.3 etc. they had 12 followed by 14.1, 14.2, 14.3 etc. I tried every trick I knew to get those second level numbers to reset, but I couldn’t figure it out. I sent an email to my client letting him know that Word had probably beaten me on this one, and asking him if he wanted me to persevere for a little while longer. He gave his OK, so back to Word I went, determined to master this multilevel list numbering. Ultimately, I had to set up new styles for him and reapply them to the document, but I finally got it working after about an hour or so.
Hopefully these instructions will help someone else (as well as remind me how to do it again next time I’m asked to troubleshoot multilevel lists!). (Printable PDF of these instructions)
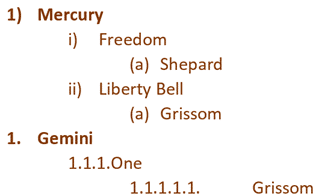
The example I work through below creates a multilevel numbered list that looks something like this (ignore the formatting — you can sort that out later):

Warning! This is a long series of steps as I’m going to take you through setting up three list levels. Please take your time and work through the instructions one step at a time — this is not something you can do while you’re focused on something else, so turn off Twitter, email notifications etc.
Step 1: Set up a new multilevel list style
Tip: When you define a new Multilevel List style, define ALL levels in it at once. Don’t set up a new list style for each level – it won’t work.
- Open a new Word 2007 document.
- On the Home tab, go to the Paragraph group.
- Click the small drop-down arrow next to the Multilevel List icon.
 Click Define New List Style.
- On the Define New List Style window, give the style for the entire list a name (in this example I’ve called it Numbered List).

- By default, you’re working on the 1st level. Set the font, font size and font weight for the 1st level numbers. NOTE: These font settings are for the numbers ONLY, not for the paragraph style. So if you want bold numbers, set that here. Ignore everything else on this window for now.
- Click Format at the bottom left of this window, then click Numbering to open the Modify Multilevel List window.
- Click the More button at the bottom left of the Modify Multilevel List window to display all available options.
- Level 1 (top left) is already set, and I’m happy with the Number style… of 1, 2, 3, but I want a period after my top level number, so I need to delete the ) after 1 in the Enter formatting… field and type in a period (don’t touch the gray shaded 1).
- Assign a style to this level — in this example, I’ve assigned the standard Word style of List Number in the Link level to style field. I’ll modify this style using the Styles pane later.

- Click OK to return to the Define New List Style window. DO NOT close this window — you now need to set up the 2nd and 3rd levels for your list.
- Select 2nd level from the Apply formatting to drop-down list.
- Set the font, font size and font weight for the 2nd level numbers.
- Click Format at the bottom left of this window, then click Numbering to open the Modify Multilevel List window.
- Select 2 in the Click level to modify list.
- The default Number style for this level is a, b, c. Using the drop-down list, change this to 1, 2, 3.
- Remove the ) from after 1 in the Enter formatting… field.
- Place your cursor in FRONT of the grayed 1 in the Enter formatting… field.
- Select Level 1 from the Include level number from drop-down list. You now have two grayed 1‘s. PLEASE NOTE: This ‘Level 1’ selection you just made does NOT display in the field. You know you’ve got it right if another grayed 1 is added to the Enter formatting… field.
- Type a period between the two grayed 1‘s in the Enter formatting… field.
- Select the List Number 2 style from the drop-down list in the Link level to style field.
- Click OK to return to the Define New List Style window. Do not close it. You’re nearly finished… you just have to set up the 3rd list level.
- Select 3rd level from the Apply formatting to drop-down list.
- Set the font, font size and font weight for the 3rd level numbers.
- Click Format at the bottom left of this window, then click Numbering to open the Modify Multilevel List window.
- Select 3 in the Click level to modify list.
- The default Number style for this level is i, ii, ii. Using the drop-down list, change this to 1, 2, 3.
- Remove the ) from after after 1 in the Enter formatting… field.
- Place your cursor in FRONT of the grayed 1 in the Enter formatting… field.
- Select Level 1 from the Include level number from drop-down list. You now have two grayed 1‘s in the Enter formatting… field.
- Select Level 2 from the Include level number from drop-down list. You now have three grayed 1‘s in the Enter formatting… field. The first is the Level 1 number, the second is the Level 2 number, and the third is the Level 3 number — unfortunately, as all are 1, it’s hard to see which is which!
- Type a period between each of the grayed 1‘s (i.e. your numbers should look like this: 1.1.1)
- Select the List Number 3 style from the drop-down list in the Link level to style field.
- Click OK to return to the previous window where you should see your three levels listed, with the numbering styles you set up.
- Click OK again to close the window and return to the document, where a first level numbered item is added to your document.
 Click Define New List Style.


Phew! You’ve finished the first (and most difficult) part of setting up your multilevel lists.
Step 2: Test your new multilevel list
- Open the Styles pane (click at the bottom right of the Styles group on the Home tab).
- Click the Manage Stylesbutton.
Manage Styles button
- Go to the Recommend tab.
- Scroll down and select List Number, List Number 2 and List Number 3 from the list.
- Click Show, then click OK. The List Number, List Number 2 and List Number 3 styles should show in your Styles pane.
- Enter several paragraphs of text.
- Apply List Number, List Number 2 and List Number 3 styles to various paragraphs.
 at the bottom right of the Styles group on the Home tab).


Bonus hint: Assign a different level to an existing numbered paragraph
There are several methods for assigning a different level to an existing numbered list — I’ll just describe two:
- Method 1: Use the Styles pane and reassign the relevant List Number style to the paragraph. If the text used the List Number 3 style and you apply the List Number 2 style, then the numbering will update accordingly.
- Method 2: Right-click anywhere in the list item, select Change List Level, then select the new level you want to apply to this item.
Changing the styles
- Changing the formatting for the numbered paragraphs: You may want to change the settings of the List Number, List Number 2 and List Number 3 styles — for example, their indents, above/below paragraph spacing, tab positions etc. You do this the normal way, using the Styles pane and modifying each style.
- Changing the master list style: To change any aspect of the Numbered List style (the master style with the three levels that you set up earlier): Click the Manage Styles button on the Styles pane, go to the Edit tab, select the Numbered List style, then click Modify.
- Changing the numbering format for a single multilevel list style: Put your cursor into a multilevel list numbered paragraph, click the small drop-down arrow next to the Multilevel List icon (Home tab > Paragraph group), select Define New Multilevel List, then change the Number style for this level setting.
I have no doubt there are many more fancy things you can do with multilevel list numbering (after all, there are a slew of settings on the Define New Multilevel List Style window I didn’t even touch), but sometimes you just want a simple, multilevel numbered list! Hopefully, these instructions have given you just that.
See also:
- Outline numbering (for headings): https://cybertext.wordpress.com/2008/09/23/word-2007-outline-numbering/
- Multilevel Appendix headings: https://cybertext.wordpress.com/2012/01/31/word-multilevel-appendix-headings/
[Links last checked January 2012]

This Word tutorial explains how to change the number of levels displayed in a table of contents in Word 2010 (with screenshots and step-by-step instructions).
Question: In Word 2010, how do I change the number of levels displayed in the table of contents?
Answer:Click somewhere on the table of contents. Then select the References tab in the toolbar at the top of the screen. Then click on the Table of Contents button in the Table of Contents group. Select Insert Table of Contents from the popup menu.
Next, select the formatting for the table of contents. Set the number of levels to display in the Show levels box. Click on the OK button.
When prompted whether to replace the existing table of contents, click on the OK button.
The table of contents should now display the number of levels that you just set.