
Word for Microsoft 365 Word 2021 Word 2019 Word 2016 Word 2013 More…Less
Change the look of your text or WordArt by changing its fill or outline, or by adding an effect, such as a shadow, reflection, or glow.
-
Select your text or WordArt.
-
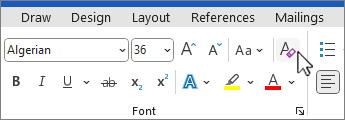
On the Home tab, select
 Text Effects.
-
Choose the effect you want.
For more choices, point to Outline, Shadow, Reflection, or Glow, and then select the effect to use.
 Text Effects.
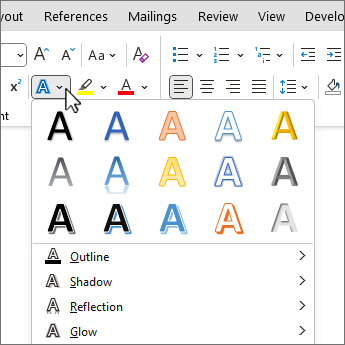
To remove the effect, select the text again, and then go to the Home tab and choose  Clear Formatting.
Need more help?
Добавление контура, тени, отражения или светящегося текста
Сделайте текст или объект WordArt привлекательнее, изменив его заливку, контуры или добавив эффекты, например тени, отражения и свечение.
Выберите текст или объект WordArt.
Нажмите Главная > Текстовые эффекты.

Выберите нужный эффект.
Чтобы просмотреть дополнительные варианты, наведите указатель на пункт Контур, Тень, Отражение или Свечение и выберите необходимый эффект.
Чтобы удалить эффект, еще раз вы выберите текст и нажмите кнопку Главная > удалить форматирование.
Как сделать в Ворде тень от шрифта?
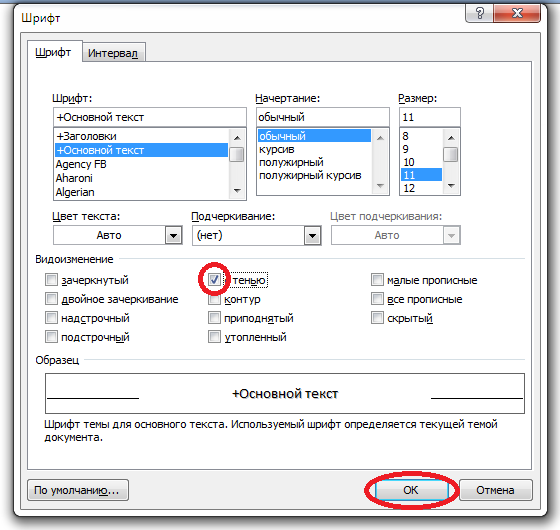
Штобы сымитировать тень от шрифта в программе Word, выделяем нужный кусок текста, затем на панели инструментов выбираем пункт меню «Шрифт».

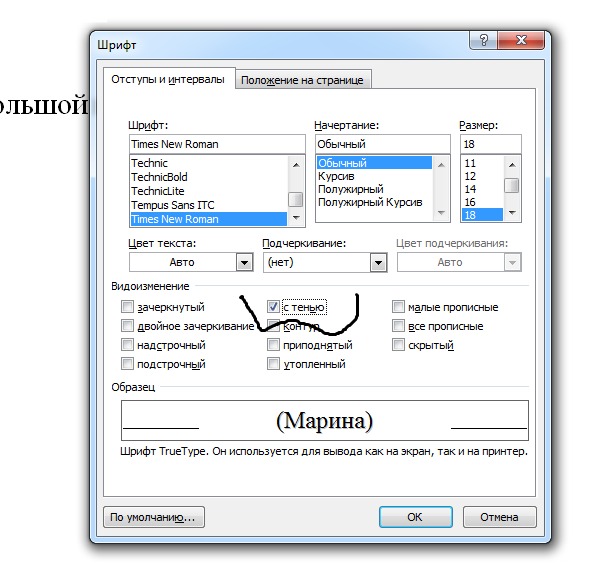
В открывшемся окне находим окошечко с обозначением «с тенью», ставим галочку, жмём «ОК».

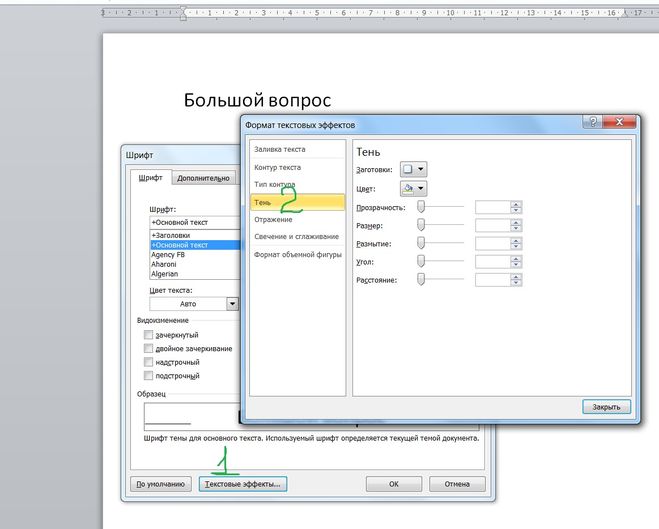
Для начала нужно найти в настройку шрифтов. Сделать это можно тремя способами:
- нажать одновременно на ctrl и D;
- выделить текст и нажать на правую кнопку мыши;
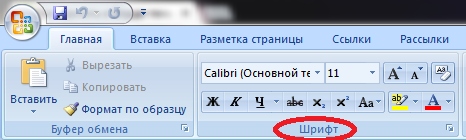
- перейти на вкладку «Главная», под настройкой размера, курсива и т.д. вы увидите слово «Шрифт», справа от него небольшой значок уголком, нужно нажать на него.
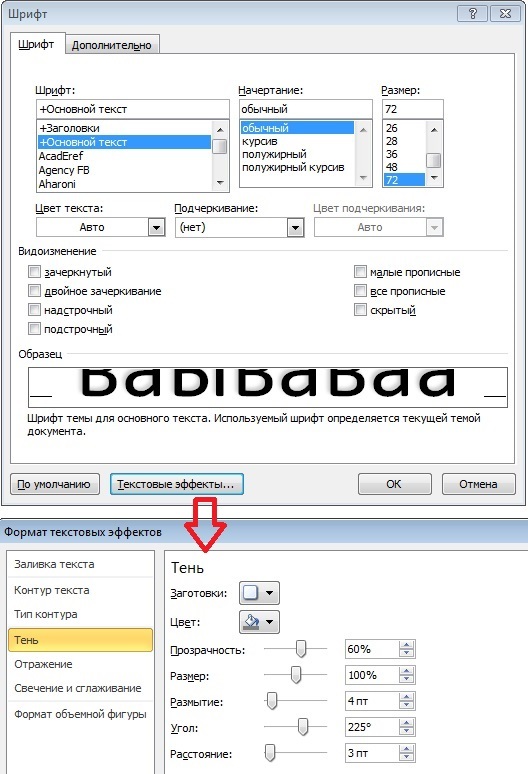
После того, как окно с настройкой шрифтов открыто, нужно нажать на «Теневые эффекты» (действие номер 1), а после перейти на «Тень» (действие номер два). Потом вас ожидает ручная настройка, в которой можно задать угол, степень размытия, расстояние и т.д. Можно задать тени определенный цвет.
Как сделать текст с тенью в ворде?
В программе ворд можно сделать текст с тенью двумя простыми способами, давайте их разберем подробнее.
Первый способ.
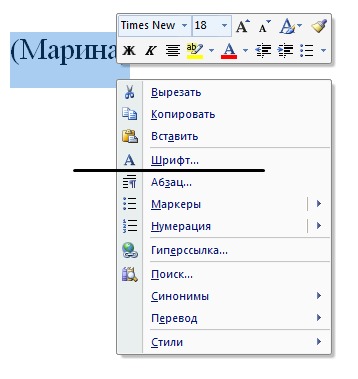
Откроем новый лист в программе ворд и напишем в нем словосочетание «Текст с тенью», после его выделим и нажмем на правую кнопку мыши. В появившемся меню, выберем строчку «Шрифт».

На экране появится меню «Шрифт», которое открыто в закладке «Шрифт», в нем есть раздел «Видоизменение», в котором поставим галочку напротив строки «с тенью», после закрываем меню через кнопку «ОК» или клавишу «Enter».

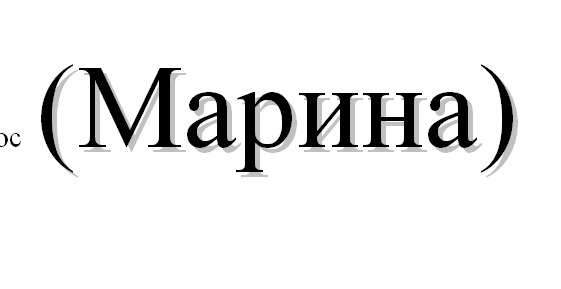
В результате получим в программе ворд текст с тенью.

Второй способ.
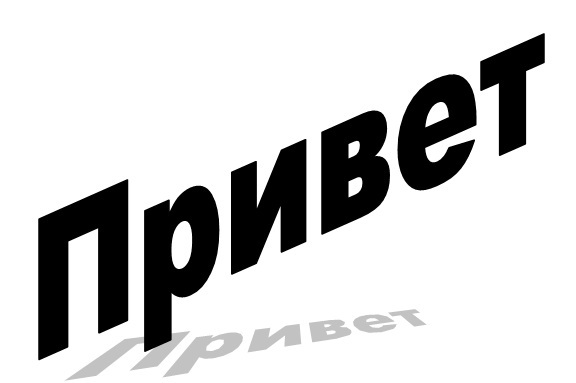
В этом способе используется специальные шрифты, в которых тоже есть данная функция. Сначала ставим курсор в место, где будем писать текст. Затем на верхней панели выбираем закладку «Вставка», в блоке «Текст», нажимаем на иконку «Wordart», выбираем любой понравившийся формат.

Пишем в специальном меню точно такой же текст, как в первом способе и нажимаем на кнопку «ОК».

Выделяем текст, на верхней панели настроек, во вкладке «Формат», находим иконку «Эффекты тени». Нажимаете на неё, на экране появится, различные варианты тени, выбирайте понравившийся.

В итоге получаем другой вариант текста с тенью в программе ворд.
![]()
3
Как сделать в Ворде тень от шрифта?
10 ответов:
![]()
1
0
Для начала нужно найти в настройку шрифтов. Сделать это можно тремя способами:
- нажать одновременно на ctrl и D;
- выделить текст и нажать на правую кнопку мыши;
- перейти на вкладку «Главная», под настройкой размера, курсива и т.д. вы увидите слово «Шрифт», справа от него небольшой значок уголком, нужно нажать на него.
После того, как окно с настройкой шрифтов открыто, нужно нажать на «Теневые эффекты» (действие номер 1), а после перейти на «Тень» (действие номер два). Потом вас ожидает ручная настройка, в которой можно задать угол, степень размытия, расстояние и т.д. Можно задать тени определенный цвет.
![]()
1
0
Создание тени к любому тексту в программе Ворд делается просто.
Сначала нужно выделить тот самый текст, слово, которому нужно добавить тень.
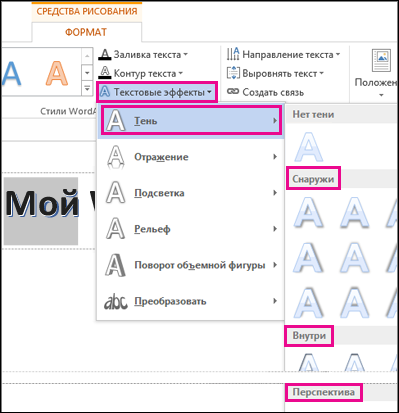
Выбираем на панели вкладок вкладку «Главная» -> «Шрифт» и выбираем «Текстовые эффекты».
В открывшемся меню выбираем тень и указываем именно на ту, которая является более подходящей.
![]()
1
0
Для того, чтобы написанное слово было с тенью (документ Ворд), необходимо выполнить следующие условия:
1) Выделяем текст, который Вы хотите, чтобы был с тенью и нажимаете правую кнопку мышки:
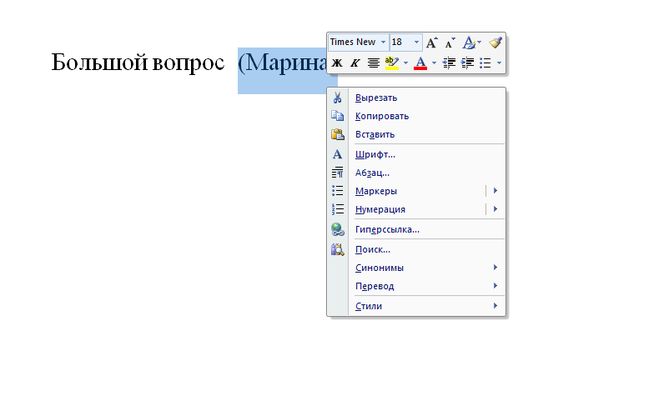
2) В появившемся окне выбираем «шрифт»:
3) В окне ставим галочку «с тенью» и нажимаем «ок»:
4) Получаем надпись с тенью:
![]()
0
0
Штобы сымитировать тень от шрифта в программе Word, выделяем нужный кусок текста, затем на панели инструментов выбираем пункт меню «Шрифт».
В открывшемся окне находим окошечко с обозначением «с тенью», ставим галочку, жмём «ОК».
![]()
0
0
Добавление тени к тексту и к картинке в Ворде отличается. Чтобы добавить «shadow» к каким-нибудь фигурам, нужно зайти в автофигуры и там найти пункт «Тени».
А для форматирования текста пройдите в раздел шрифт, и там в разделе «Видоизменение» найдете нужный эффект.
![]()
0
0
Создавать тень можно несколькими способами.
- Набираем нужный текст. Затем выделяем весь тест и нажимаем правой кнопкой мыши. В появившемся окне выбираем пункт Шрифт. В разделе Видоизменения выбираем пункт С тенью. И жмем ОК.
- Также можно создать текст с тенью, используя WordArt. Заходим в меню Вставка — Текст — WordArt. Набираем нужный текст. После этого появится меню Эффекты тени. И в предложенном перечне можно выбрать любую тень, какая придется по вкусу.

![]()
0
0
Для этого можна вставить объект WordArt (Вставка — WordArt).
Затем на вкладке:
Формат
выбрать пункт
Эффекты фигур
В эффектах нужно выбрать Тень — отобразяться всевозможные варианты, остается выбрать понравившейся.
Еще можно зайти в настройки шрифта и выбрать вариант написания с тенью.
![]()
0
0
Чтобы создать эффект тени для шрифта в текстовом редакторе Ворд, нужно напечатать текст и выделить его полностью. Затем нажимаем правой кнопкой мыши и в выпадающем меню выбираем пункт «Шрифт». Нажимаем на кнопку «Текстовые эффекты», после чего появляется набор текстовых эффектов, в котором настраиваем тень для выбранного текста.
![]()
0
0
Это очень простая процедура, алгоритм ее такой: набираем необходимый нам текст, который мы хотим украсить или выделить тенью, выделяем его, нажимает ПКМ, получаем меню, в котором надо выбрать опцию «Шрифт» — попадаем в меню, где в свою очередь выбираем опцию «Текстовые эффекты», а затем опцию «Тень», вот и все, выделенный текст у нас теперь с тенью.
![]()
0
0
Очень нестандартно и прикольно смотрится надпись, если ее сделать с тенью.
Чтобы получился такой текст с тенью в Ворде, нам нужно:
сначала пишем само слово (или предложение)
далее, выделяем слово
в разделе меню выбираем пункт «Шрифт»
находим раздел «Текстовые эффекты».
После этого смотрим и находим функцию «Тень».
Далее вручную подбираем цвет и угол тени.

Читайте также
![]()
При первом сохранении документа (нажатие сочетаний клавиш Shift+F12) комп выдаст окошко где можно выбрать в каком формате и с каким названием сохранить документ. Вообще «горячие» клавиши есть в справке (открывается на F1), притом полный перечень.
![]()
Не может быть. Работал со всеми вордами (2000 — 2010), у всех горячие клавиши действуют исправно.
Попробуйте кликнуть по значку ворда и внизу выбрать «параметры ворд», там есть настройки.
![]()
Во-первых, выделив фрагмент списка, можно изменить его уровень:
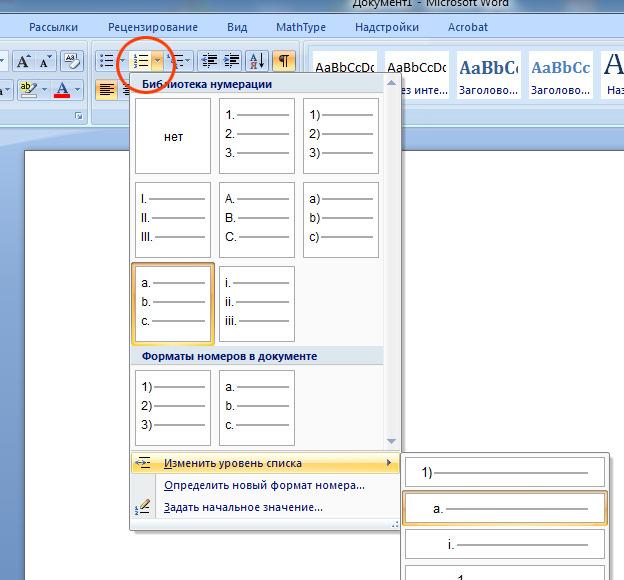
Во-вторых, обратить внимание на ползунки горизонтальной на линейке:
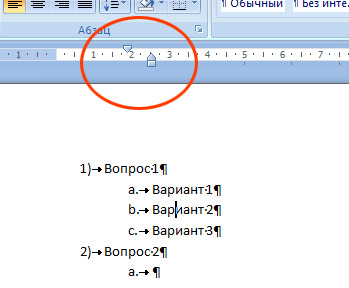
В-третьих, обратить внимание на параметры абзаца выделенного текста:
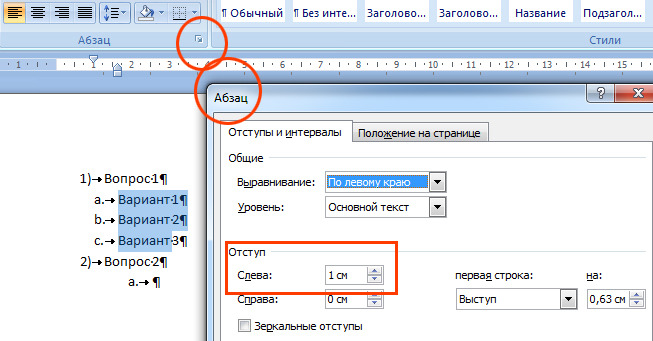
Кроме того, рядом с кнопкой библиотеки нумерации (рис.1) есть кнопки увеличения и уменьшения отступов списка.
![]()
Для того, чтобы в Word можно было вставить ссылку и потом по ней делать переход, нужно для начала эту самую ссылку правильно выделить — то есть выделить всю в строке браузера, затем нажать комбинацию клавиш CTRL+C,затем открыть Word, выполнить команду CTRL+v, чтобы вставить ссылку. Чтобы ссылка была активной, после внесения ее нажимаем кнопку ENTER, а для того, чтобы по ней перейти на нужную веб — страницу жмем кнопку CTRL+щелчок мышкой по ссылке. После этих действий откроется нужная страница.
![]()
Зайдите в колонтитлы (щелкните несколько раз по полю где видите номер страницы, либо найдите вкладку колонтитлы на панели инструментов) и удалите номер страницы, все в вашем документе больше нет номеров страниц. Успехов.
Learning how to shadow letters is a fun activity that can be utilized in all types of hand lettering Interests. Hand letter shading is one way to enhance the quality of a text that can transform it into artwork. Learning how to draw and place shadows on letters makes a text more dynamic as it provides the text with more dimensions. By doing this, we create a unique text with various shadowed letters. As you understand the process of letter shadowing you will find that once you understand the fundamental principles you can apply this technique and begin to shadow letters A to Z. Understanding how to shadow letters also provides you with an understanding of a three-dimensional concept. Shadows on letters are the result of light interacting with the text as an object. This is something we will find ourselves better understanding as we go through this tutorial on how to shadow letters.
Table of Contents
- 1 An Easy Guide to Applying Shadows to Letters
- 1.1 Necessary Materials
- 2 Step-by-Step Instructions on How to Shadow Letters
- 2.1 Understanding Light
- 2.2 Basic Shadow
- 2.2.1 Step 1: Write Out a Word
- 2.2.2 Step 2: Draw the Shadow Indicating Lines
- 2.2.3 Step 3: Apply Shadowing to Letters
- 2.3 Vivid Shadowing and Compound Shadowing
- 2.3.1 Step 1: Write Out a Word
- 2.3.2 Step 2: Draw the Shadow Indicating Lines
- 2.3.3 Step 3: Apply Shadowing to Letters
- 2.3.4 Step 4: Compound Shadows
- 2.4 Overlapping Shadows
- 2.4.1 Step 1: Write Out a Word
- 2.4.2 Step 2: Draw the Shadow Indicating Lines
- 2.4.3 Step 3: Apply Shadowing to Letters
- 2.5 Combination
- 2.5.1 Step 1: Write Out a Word
- 2.5.2 Step 2: Adding Darker Shadows
- 2.5.3 Step 3: Adding Lighter Shadows
- 2.5.4 Step 3: Adding Overlapping Shadows
- 3 Tips to Remember
- 4 Frequently Asked Questions
- 4.1 How Do You Shadow Letters With Markers?
- 4.2 Do Shadows in Letters Make Letters Three-Dimensional?
- 4.3 What Are the Different Ways to Shadow Letters?
An Easy Guide to Applying Shadows to Letters
In this tutorial on how to shadow letters, we will go through some simple techniques as well as some slightly more intricate techniques. What is great about letter shadowing is that it is not difficult at all, and with a few shadowed letters our text can be turned into a beautiful work of art.
As we learn how to shadow words, we are also learning how to give letters depth and how to understand the concept of the light source.
Once we understand the concept of the light source, we will see that the process of placing shadows within any text becomes much simpler. We will break down simple techniques such as drop shadow letters, that fall under the text, to more unique forms of letter shadowing such as overlapping shadows. However, as long as we have the right materials for this tutorial, we will find the process of how to shadow letters to be very simple.
Necessary Materials
In this tutorial, we will work with a few materials to make the process of drawing shadow words simple for us. We want to have a light 2H pencil, to draw lines for demarcating areas around the text that our shadows will be placed in. We want to have three Copic markers, one of them should be a specific grey marker.
Try to have another two markers, such as red and blue, so that you can explore how different color texts can be transformed through the process of making them shadowed letters.
We will also want a micron pen for darker letter shadowing, we want a pen anywhere between 6 mm and 12 mm in thickness. We will also be drawing shadows on letters, which we will be doing with a simple ballpoint pen. Lastly, we will want some paper, you can use whichever paper is available to you, however, thicker paper is often best when working with Copic markers. Since this tutorial is about you practicing, don’t worry too much about any special paper. However, the essential items can be found through the links below:
- N4 Neutral Gray Copic Marker
- Blue Copic Marker
- Red Copic Marker
- Ballpoint pen
- Micron 12mm pen
- Pencil
- Paper (Any paper will do)
Step-by-Step Instructions on How to Shadow Letters
In this tutorial, we will go through three processes of shadowing letters, all three are very simple and easy to follow through the steps. We will then create a fourth text; this will be a combination of all three techniques.
By making a text with a combination of all three techniques, we will see how it makes the text more vivid and beautiful.
However, before we get into the three different letter shadowing techniques, we need to first understand the concept of light. By understanding the light source, we will understand where to place the shadows on letters. Now that we know what to expect, let us see how the concept of light works within our various shadowed letters.
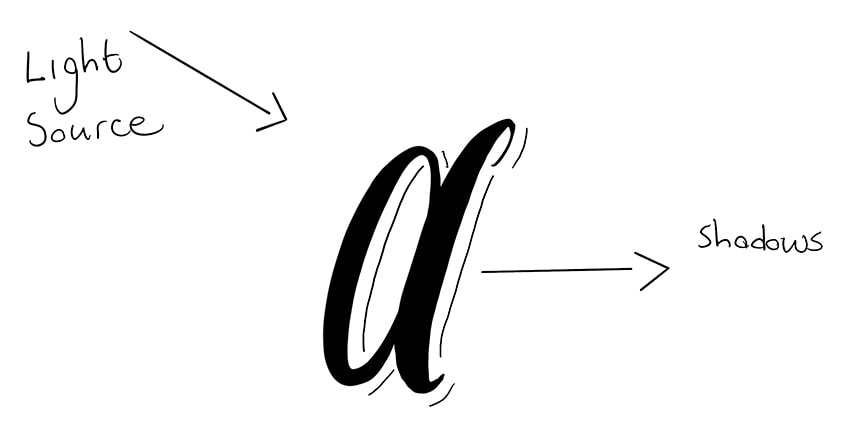
Understanding Light
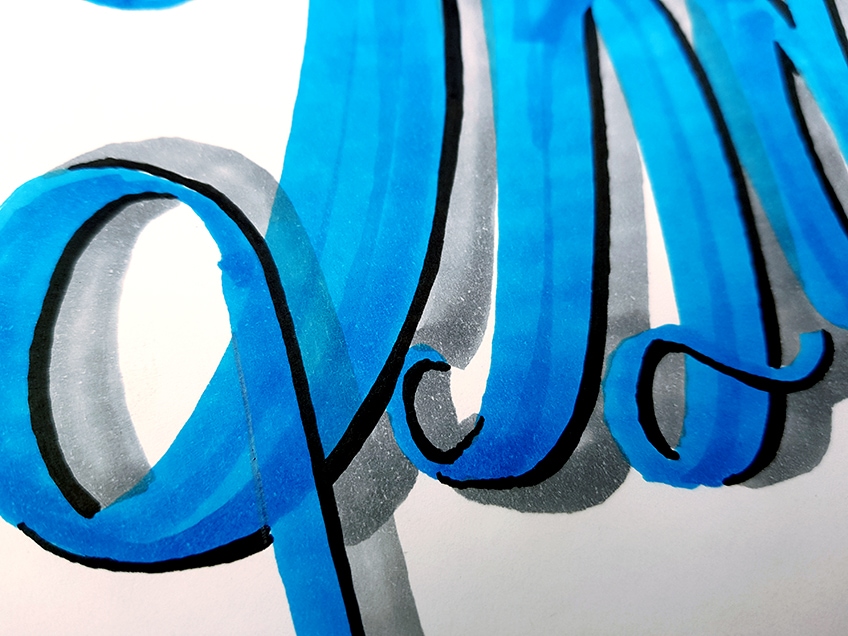
Before we go through the different steps, we first want to understand the concept of light. When we consider how light shines on an object, we fundamentally know that the light is on the opposite side of the shadow. If there is a shadow on one side of an object, we know that the light source is on the other side of that object. This is the same for shadowed letters, if we add shadows on the right side of a letter, this means that our light source is on the left side of the letter. We can see this concept within demarcated lines around the letter within the image below.
What we want to de is utilize the tools we have to give a more realistic rendition of the shadow. This is where we will utilize our tools, to better represent the shadowed letters. As long as we understand that the light source is on one side of a text, we know that the shadows will appear on the other side of that text. Below is another example to better illustrate this point.

Now that we are aware of this concept let us go through a few different techniques and see how we can achieve different shadows within our letters.
Basic Shadow
The basic shadow technique is very simple. This shadowing technique is a great way to give the text a lifting effect. Basic shadows also give the text a three-dimensional quality, which makes the text seem interesting and unique. Let us see how we achieve this basic shadow effect.
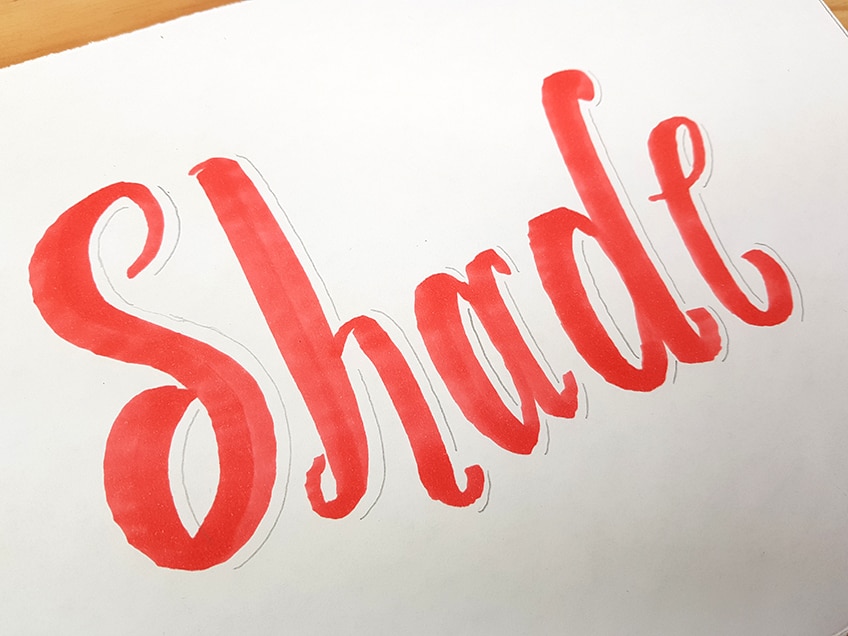
Step 1: Write Out a Word
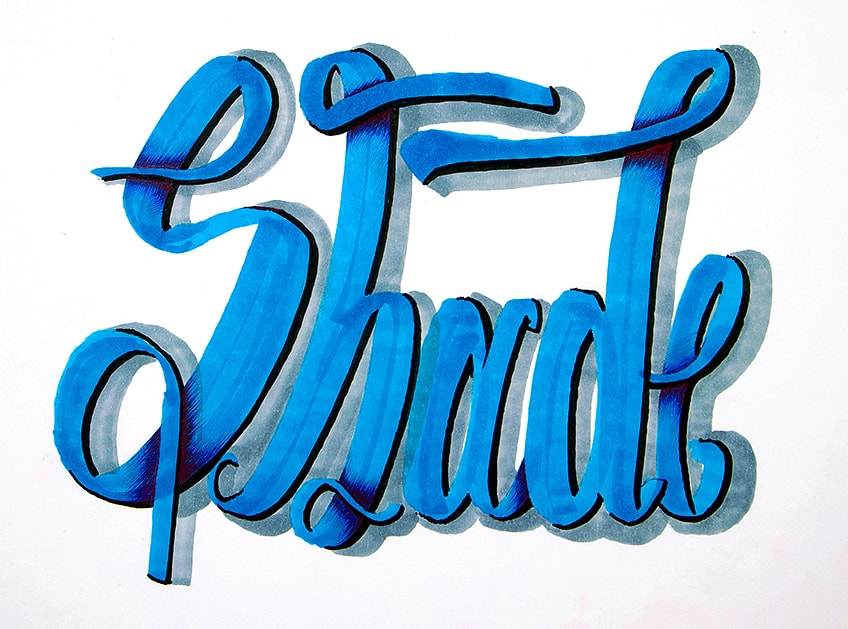
Let us begin by writing a word, for this exercise, let us write the word ‘shade’. You don’t have to write this word, but it might be helpful to write the same word as is shown in the tutorial. You can write this text in any kind of font or hand lettering style, however, try to keep it simple.

Step 2: Draw the Shadow Indicating Lines
Once we have our word written out, we want to now use the concept of the light source and proceed to draw shadow indicating lines on the side of our text that will have the shadows. We can use our pencils and proceed to draw indicative lines keeping them consistent on one side of the letters.
Remember, these lines would remain on the side of the letter opposite to the side that the light source would be present.
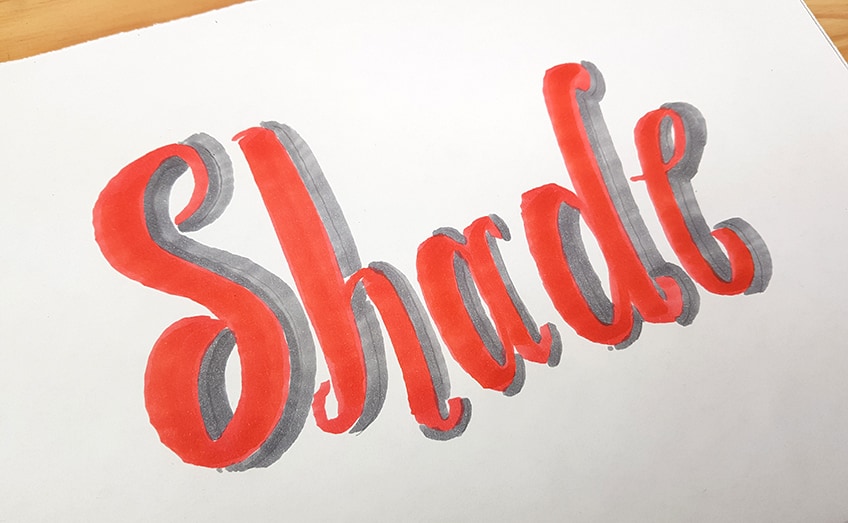
Step 3: Apply Shadowing to Letters
Once we have drawn the lines, indicating where we will place our shadows, we can proceed to do so with our neutral grey Copic markers. Remember, if your light source is at an angle slightly above your lettering on one side, this means that the shadowing will fade as it reaches the areas that are visible to the light.

Take your time applying these grey marks around the letters. Remember, you can use both ends of your Copic marker to gauge the width of your shadowing around each letter. As long as the shadow is present on the opposite side you have chosen your light source to be then your shadowed letters will look effective.
There you have it – basic shadowing!
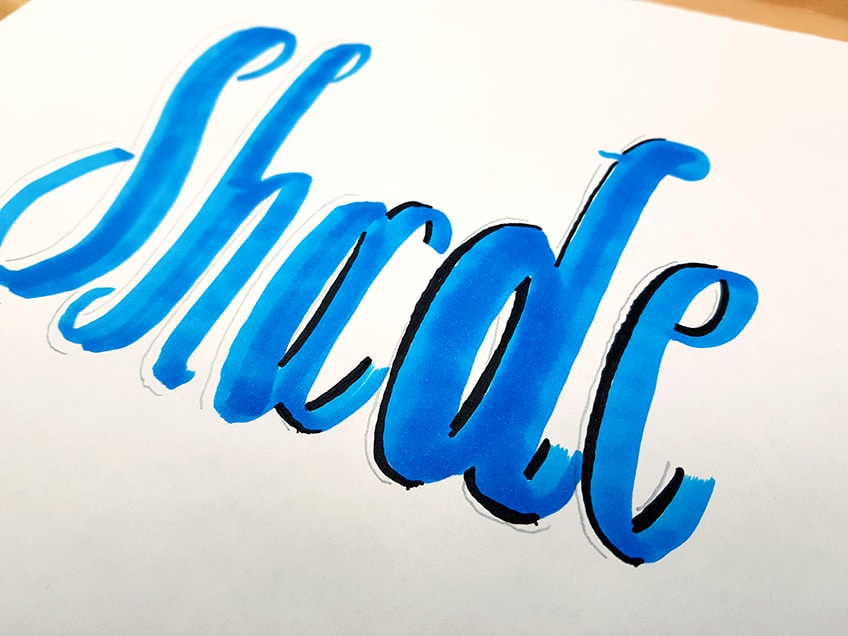
Vivid Shadowing and Compound Shadowing
This technique follows the same process as that of the basic shadow approach. However, this time we will use our micron pen to add a darker shadowing with the letters.
By doing this, we give more contrast to the text which gives both dimension and vivid quality that makes the letters pop.
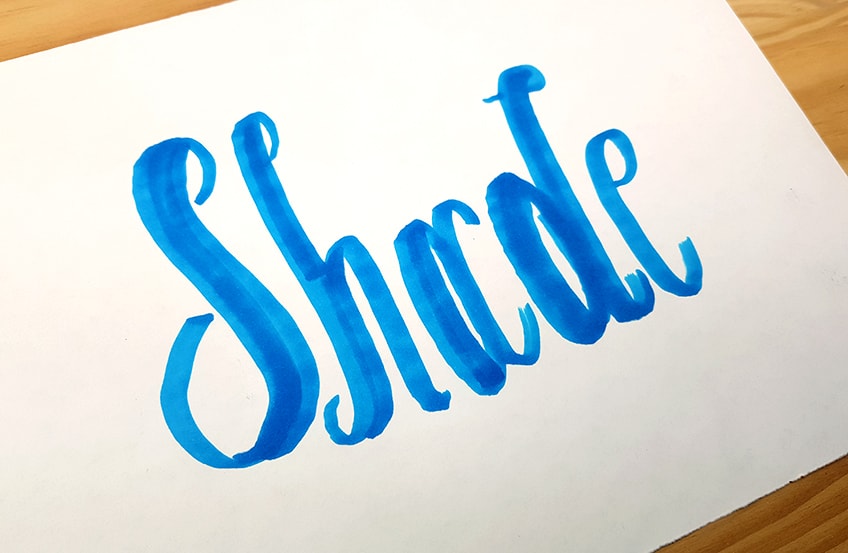
Step 1: Write Out a Word
This time take a different color marker and proceed to write out a word. Again, just to make it easier, let us use the same word for this exercise. Another good suggestion is to keep your letter style simple, as the aim is to get used to the letter shadowed letters techniques.
Step 2: Draw the Shadow Indicating Lines
Now that we understand how to place the pencil marks that indicate where our shadows will be we can proceed to draw them on the side of the letters that we choose. However, try drawing them on the other side of the letters, different from the side you drew them on in the first technique.
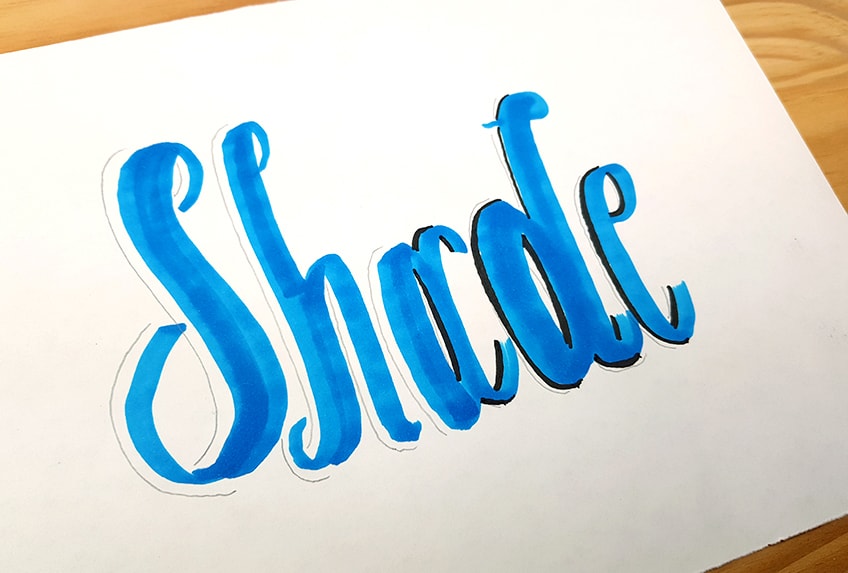
Step 3: Apply Shadowing to Letters
We can now proceed toad in the shadow lines using our micron pens. We want to try to stay along the ridge of each letter as we add in these dark pen marks.
Again, you can play around with how thick or thin you want your shadow lines to be, as long as they are on the same side of each letter.
Proceed to do this with each letter. Again, remember that, if your light source is slightly raised on one side of the text, there will be slight shadowing that falls under each letter. This means that letter shadowing can wrap around the letters a little bit.
As long as the shadows are opposite to the side of the light source then it will look accurate.

Step 4: Compound Shadows
This is where we apply the process of the first technique to the current shadow’s technique for these letters. By doing this, we are creating more depth within the lettering, giving it more dimension. This additional shadowing makes the text pop.
We do this by taking our neutral gray Copic marker and proceeding to add shadows on the same side of the current shadows.
Remember, that you want to keep the grey and black shadows on one side of the text. You also want to try and make them flow into each other in the areas where the shadows end. Make sure you utilize both ends of your Copic marker to achieve an effective shadowing around the letters.
That’s how you add vivid and compound shadows.
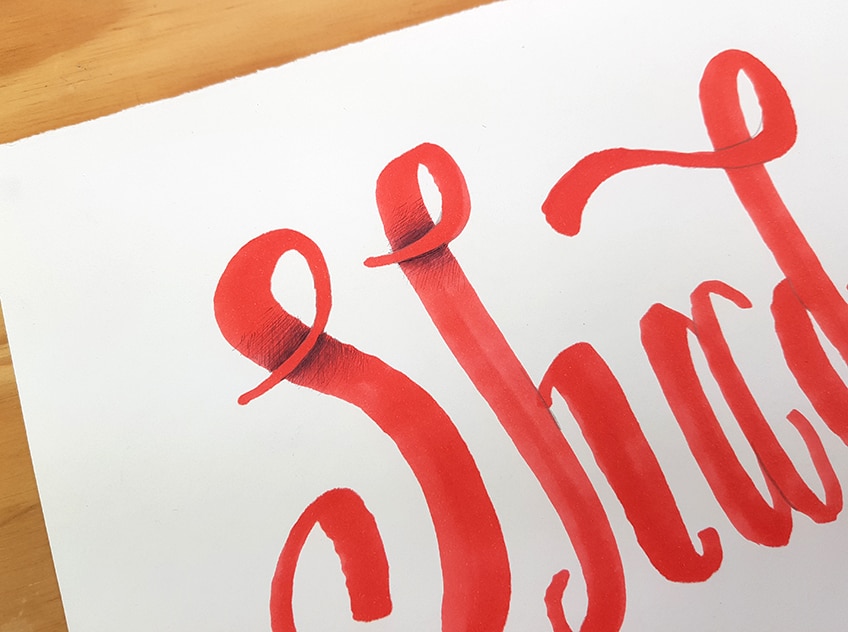
Overlapping Shadows
This technique is a little more intricate as it requires, firstly, a text with overlapping features. Secondly, it is a shading process done with a ballpoint pen as opposed to lines drawn with a marker. However, the process is simple once you understand the concept of the cross-hatching method used to achieve the shadowing effect. Let us go through the few steps that explain it in further detail.
Step 1: Write Out a Word
This time we want to write out our word with some twirls within our letters. Think of it as writing out a word in cursive with your Copic marker. You can play around with different thicknesses within the various lines of each letter and the overlapping features. Use both sides of the Copic marker to make an interesting overlapping letter arrangement.
However, let’s try to use the same letter “shade” as seen in the tutorial. This perhaps might make it easier to follow.

Step 2: Draw the Shadow Indicating Lines
This time the lines we draw are going to be placed on the letters. We don’t need to worry about the light concept for this letter shadowing technique. What we want to do is draw a line along with all the areas where your letters overlap. This means we are drawing a pencil line that completes the overlapping feature within each letter.

We can also do this for any areas within letters that seem as if they are connected by two parts. This means that we can create overlapping qualities within certain letters if they seem to have separate components that they are made of.
For example, the letter “H” is made up of a line and an arch that can be distinguished by a pencil line.
Step 3: Apply Shadowing to Letters
This time, how we will apply the shadowing to the letters is by shading from the pencil lines that define the overlapping features. We want to proceed to take our ballpoint pens and begin to shade in a gradient that flows outwardly from the pencil lines. We want the gradient to go from dark to light. We do this by paying attention to the pressures that we apply to the pen.
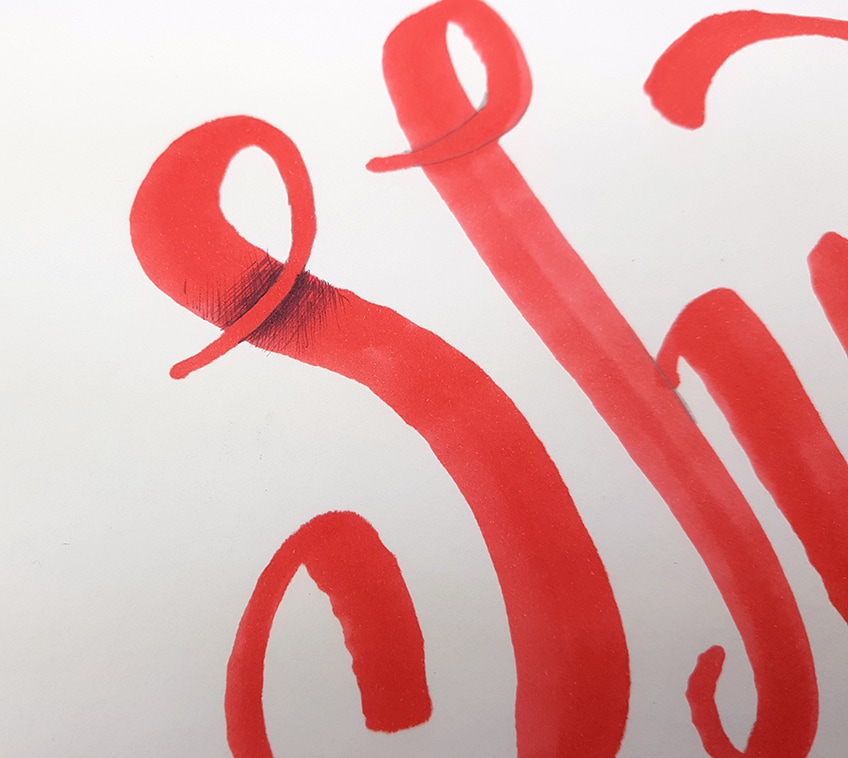
The aim is to create a gradient that goes from dark to light. The darkest parts are close to the pencil lines, giving the effect of a shadow underneath the overlapping feature within the letter. As we shade throughout the flow of the letter, we can lighten the gradient.
This will give the impression that the overlapping qualities within the letters are casting a shadow onto the letter itself.
You can do carry on this process throughout each letter of the word. Remember, as your shade make sure you are shading from the overlapping features that flow over the letter. You want to make sure that the shadowing falls underneath the overlapping feature.
Take your time with this shading process and pay attention to the pressure that you apply to the pen whilst shading.
Carry on this process until you have gone through each letter of the word. You can also extend the shadow throughout the form of each letter as long as you want. The shadowing can be elongated or short, both will have a different visual quality. Play around with this technique, just remember that the aim is to make a gradient that flows from the overlapping feature.
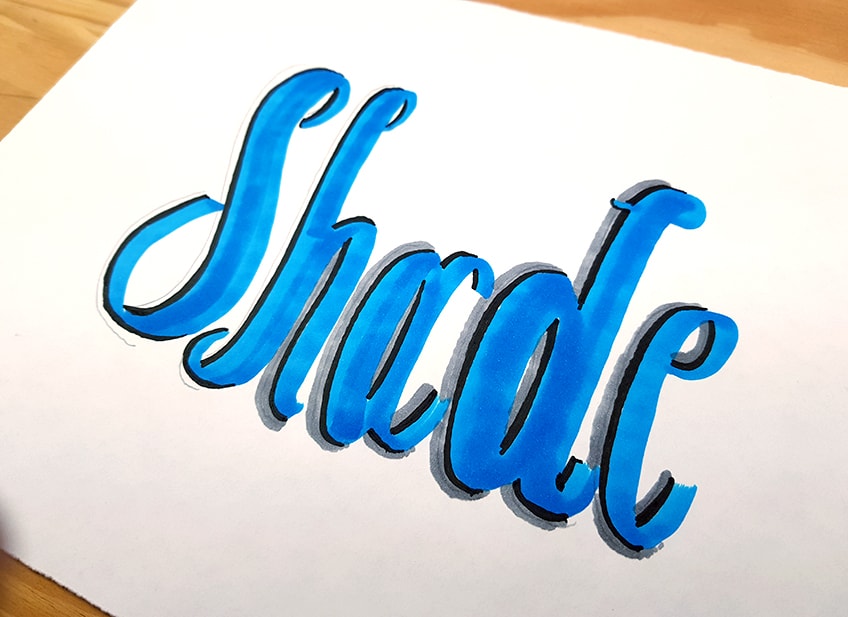
Combination
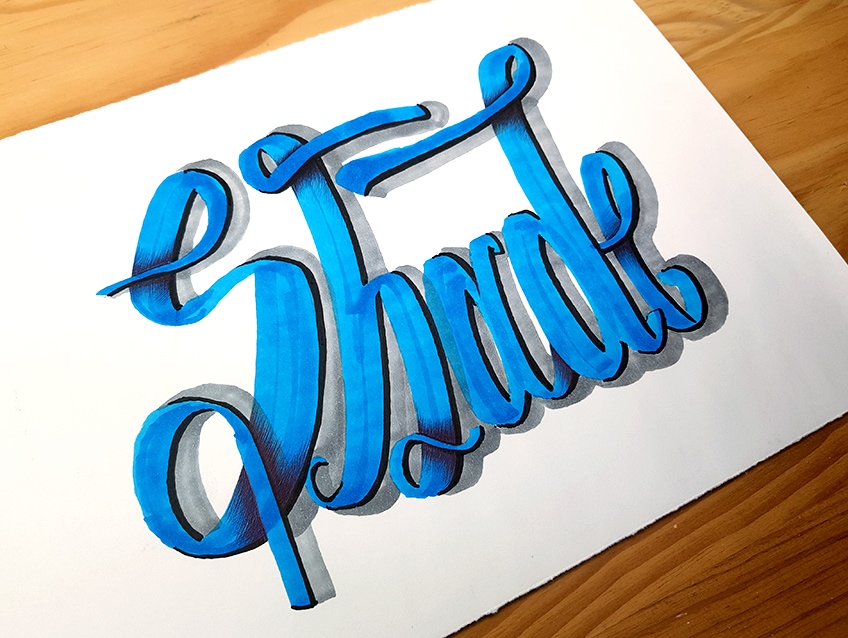
Now that we know how the different shadowed letters techniques work, we can play around with them all in a single image. We will now proceed to make a new word where we utilize all the different techniques we have learned. Creating a text with a combination of the different shadow techniques is a great way to develop an art-styled text that can make the letters more interesting and unique.
Let us go through each step and see how we can transform a text using a combination of the different techniques.
Step 1: Write Out a Word
Since we will be using all the shadowing techniques for this word, we want to make sure we have twirls within our text again for the overlapping shadows. Again, you want to think of the twirls like cursive, where there are overlapping features within some letters. Write out the same word ‘shade’ using your Copic marker.
Step 2: Adding Darker Shadows
Once we have our word written out, let us begin with the darkest shadowing first. This is where we take our micron pen and proceed to add dark lining along one side of each feature. Remember to keep the concept of a light source in your mind when adding the shadows.
At this point, it is not necessary to add pencil lines that demarcate the shadowed side, however, you can if you need to.
Step 3: Adding Lighter Shadows
Once we have added our darkest shadows along the side of each letter, we can proceed to add the lighter shadowing with our neutral grey marker. Remember, that these shadows will be placed on the same side of the darker shadows. If you find a letter overlapping onto another letter allow the shadowing to go over that letter as well.
Remember that if your light source is placed slightly above on one side, there will also be slight shadowing that forms under the letters. Take your time with adding the lighter shadowing. Use both ends of your Copic marker, using the thinner side for capturing shadows in the small gaps in between letters.
Step 3: Adding Overlapping Shadows
Once we have completed the light shadowing within the letters, we can proceed to add the overlapping shadows within the letters. We do this by adding some line work in all the overlapping features with our pencils.
Remember, we want to use our pencils to define the features that overlap in each letter.
Once we have defined all of the overlapping areas with our pencils, we can proceed to shade in these areas with our ballpoint pens.
Remember, we want to create a gradient that fades from dark to light.
We do this by darkly shading in the areas closest to the overlapping feature, which we then proceed to lighten as we move through the rest of the letter. Use the pencil marks to guide your shading process, helping you know when to start shading from. You want to shade in the letter starting from the pencil marks, this way the darkest part of the gradient is close to the overlapping feature of each letter. As you shade, you can also extend the shading throughout each letter as much as you would like.
There you have it! A simple and easy tutorial on how to shadow letters! Once you understand the principle of each technique and how to achieve them using the concept of light to guide you, you will find that the process is quite simple.
Most importantly, remember to have fun experimenting with different techniques and combinations of shadowed letters.
Tips to Remember
- Get your text right first. Once you have your text drawn nicely, then you can proceed with adding shadow to the text.
- Take your time. When working with markers, once you make a mistake there is no going back. So, take your time.
- Shadows are always placed on the opposite side of the light source. Remember to add shadows on the other side of the text, not the same side of the light source.
- The shadows should be consistent on one side of a set of letters. The shadows should be placed on the right side of all letters or the left side of all letters for an accurate shadow effect.
- Use your pencil to demarcate the sides for shadowing. Using the pencil can help you to prevent any unwanted mistakes.
- Have fun. Explore combinations of letter shadowing and different styles of hand lettering for your shadowed letters techniques.
Learning how to shadow letters is so much fun! This is because it is quite easy once you understand the process of different letter shadowing techniques. This is a great addition to hand lettering artworks and projects and provides you with a unique perspective into giving letters a three-dimensional quality. There are a few ways to create shadows within a text, whether it be shadows on letters or drop shadow letters, this tutorial gives you a good foundation for both. Now that you have an understanding of how to shadow letters, you can take these skills and add shadowing to all kinds of texts, using the same steps you can confidently shadow letters A to Z.
Frequently Asked Questions
How Do You Shadow Letters With Markers?
Firstly, you want to make sure that you have the right markers. Using a set of Copic markers will help you achieve the best results. This is because the ink is high quality and the Copic markers have two sides, which means you have the option to make your shadows either thick or thin. When it comes to the color of the text, that is completely up to you, however, it is important to have a neutral grey marker for the shadows. Once you have the right tools, then you would begin by writing out your text with a colored marker. From there you will identify which side of the text the light source would be. Once you know this, you can proceed to add shadowing with your neutral grey marker on the side of the text opposite to that of the light source. From there it is simply a matter of finessing the shape of the shadows to fall alongside the text as accurately as possible.
Do Shadows in Letters Make Letters Three-Dimensional?
Learning how to shadow letters is another way of learning how to make letters three-dimensional. This is because as we add shadows on letters or create drop shadow letters, it gives the letter the appearance of lifting off the page slightly. This is because the shadow indicates that there is a small gap between the surface of the letter and the shadow. Thus, learning how to shadow letters gives you a good intuition for the concept of three-dimensional as well. Learning letter shading within shadowed letter techniques like overlapping shadows gives another unique three-dimensional quality to the text. In this tutorial, you learn a few ways of letter shadowing which gives the text more depth and dimension.
What Are the Different Ways to Shadow Letters?
The basic shadow approach is when you add some light grey undertones along one side of each letter within a text. This creates drop shadow letters, which means that it gives the effect of the shadows placed directly under the text. Another method of letter shadowing is by using a micron pen or a black marker to create darker, more harsh shadows. This is when we follow the same process of a basic shadow approach, however, we use a darker tool to give the text a heightened contrast between the text and shadow. Another approach is when you add shadowing within the letters, whenever you create a text with overlapping features. We do this by shading with a ballpoint pen near the areas of a text that overlap. We achieve this by shading a gradient from dark to light. The aim is to create a gradient that moves away from the overlapping areas as the shading lightens as it moves through the form of the letter. These are a few ways to add shadows on letters, and you can always combine techniques.
This post and the photos within it may contain affiliate links. If you purchase something through the link, I may receive a commission at no extra charge to you.
Do you want to learn how to add shadows to your lettering?
You’ve come to the right place.
Hey, creative people!
I’m RK Sanchez, also known as Skribsinner on social media. I am a self-taught lettering and modern calligraphy artist from the Philippines.
I started my modern calligraphy journey in May 2016 and since then, I haven’t left a single day without creating anything with my pens, trying to be better than my “yesterday” self.
With the help of constant practice, along with all the bloody experiments and frustrations (lol), I am here to teach you the basics of shadowing and the techniques that I discovered (but not invented) over my two-year journey.
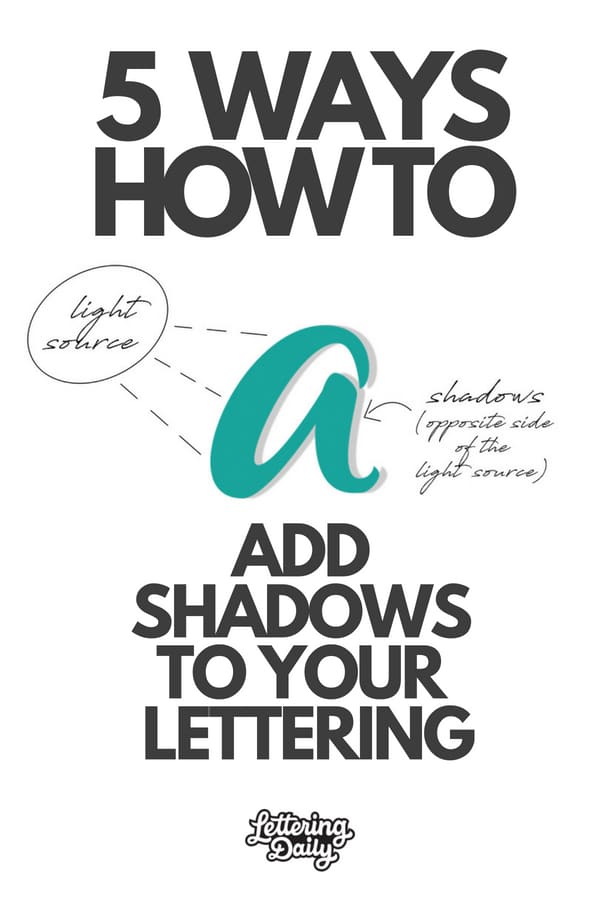
Here are the things that you will learn after reading this article:
- What are shadows and why do we put them on letters?
- The source of light
- The 5 types of shadowing
Also:
We are going to have some step-by-step instructions so it’s better to have your writing materials ready, such as brush pens/markers and paper, throughout this article.
Here are the usual materials that I use:
- Brush pens: Artline Stix, Sakura Koi, Tombow ABT, Faber Castell
- Fine Tip brush pen: Tombow Fudenosuke Soft Tip or Pilot Petit 3
- Light gray brush pen: Zig Clean Color Real Brush No. 091 (light gray) or Sakura Koi Coloring Brush Pen No. 153 (light cool gray)
- Drawing pen for outlines: UniPin, Sakura Micron
- Pencil: Pentel GraphGear 500 (PG515) 0.5mm
- Paper: 200-250gsm vellum board
But of course, you can use the materials that you are most comfortable with.
Let’s get started!
What are shadows and why do we put them on letters?
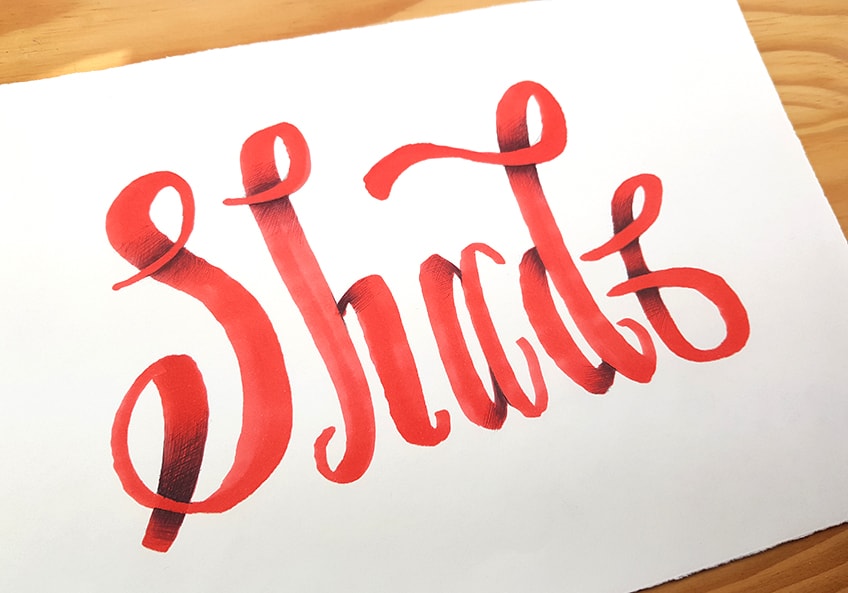
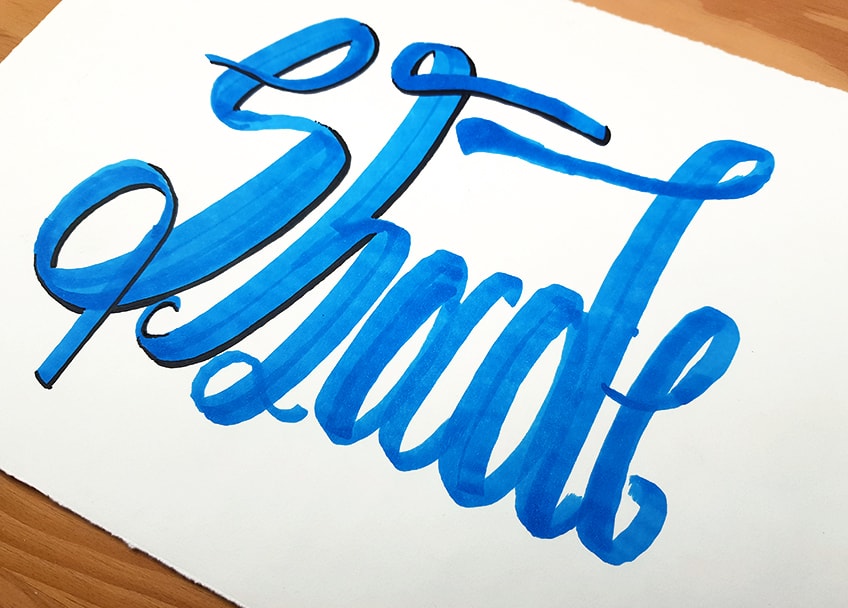
Before explaining anything, let’s check these two figures out:

They are the same word written by the same person, using the same strokes.
But there is a big difference between the two: The first figure looks good but plain and flat, whereas the second one seems to be more realistic with its 3D effect.
This funky 3D look of the second figure is made possible with the help of shadows.

Shadows are basically the area where the light can barely enter or cannot enter at all.
Try to look at all the stuff around you right now and imagine they only had one pigment just like the first figure. Isn’t it dull and unrealistic?
This is why we apply shadows to letters.
Shadows make our letters come to life. They make them more appealing and stay connected with the viewer, and this is because they look realistic, just as real as the things around you right now.
Disclaimer:
I don’t want you to think that shadows are all we need to make our lettering piece look good.
Of course, other aspects such as the letter forms, kerning, etc. are important. It also doesn’t make you a bad lettering artist if you don’t apply shadows to your letters.
Shadowing is just a technique that we do because we want to do it. It’s the artist’s choice and style.
The good news is we don’t need some mathematical formulas for us to understand shadowing in letters.
Unlike in other mediums and forms of visual art, the shadowing techniques that I’m going to teach you are easier to understand and apply.
The source of light
Shadows cannot exist without light. Where there is light, there are shadows.
This is why it is necessary for us to know where the source of light is when shadowing.
This is the first thing that you should decide before putting the shadows.
And yes, you saw it right. It’s you who decide where the light source should be.
The basic rule:
The shadows should appear on the opposite side of the light source.

- If your light source is on the left side, the shadows should appear on the right of the letters.
- If your light source is on the right side, the shadows should appear on the left of the letters.
The same thing when your light source is above the letters, your shadows should be beneath the letters.
If you’re familiar with my work, I mostly use the same light source which is on the upper left hand (around 10 o’clock) of my pieces. Hence, my shadows appear on the lower right (around 4 o’clock) of the letters.

Remember:
Consistency is the key to have a successful 3D illusion for your lettering piece.
You can decide to put the light source on the left for something you do today, and put it on the right side for another piece tomorrow.
But where you put the source of light doesn’t really matter, as long as you consistently put the shadows on the same side all throughout the piece you’re working on.
The 5 types of shadowing
Enough for all those technicalities! We finally arrived here and we’re all set for you to learn how to put the shadows. Here are the 5 shadowing techniques that I commonly use.

3.1 Basic Shadow
Just like what the name says, this is the most basic shadow you can put on your letters. This is great for those who have never tried shadowing before!
You can apply it either on the left or the right side, depending on where the light source is.
Let’s try this having the source of light on the left.
What you need:
- Brush pens and paper
- A light gray brush pen/marker
- A pencil
Step 1:
Draw/write a word like how you normally do. Any color would do.

Step 2:
Determine where to put the shadows. You can use a pencil to mark where the shadows should appear.
(It’s okay to disregard this step once you get used to where the light source and the shadows should be placed.)

Step 3:
Apply the shadows using the light gray brush pen/marker.

Optional:
Erase the pencil marks if they are too obvious. This will make the shadows look neater.
Reminder:
Don’t forget to apply shadows inside the letters and on thin strokes, too! This is something that most beginners tend to miss.

3.2 Dark Shadow + Basic Shadow
Now, let’s double the fun and add a darker shadow, which results to a stunning 3D effect.

What you need:
- Brush pens and paper
- A black fine tip brush pen/marker (I usually use Tombow Fudenosuke Soft Tip or Pilot Petit 3. These are brush pens so the width of the shadow will be consistent using a single stroke)
- A light gray brush pen/marker
- A pencil
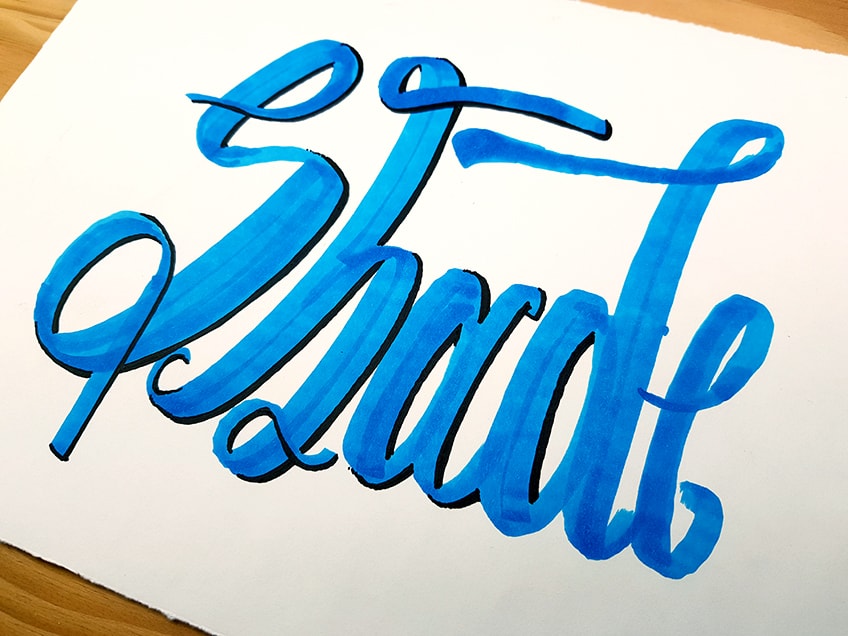
Step 1:
Draw/write a word like how you normally do.

Step 2:
Mark where to put the shadows using a pencil.

Step 3: Apply the shadows carefully using the black fine-tip brush pen/marker.

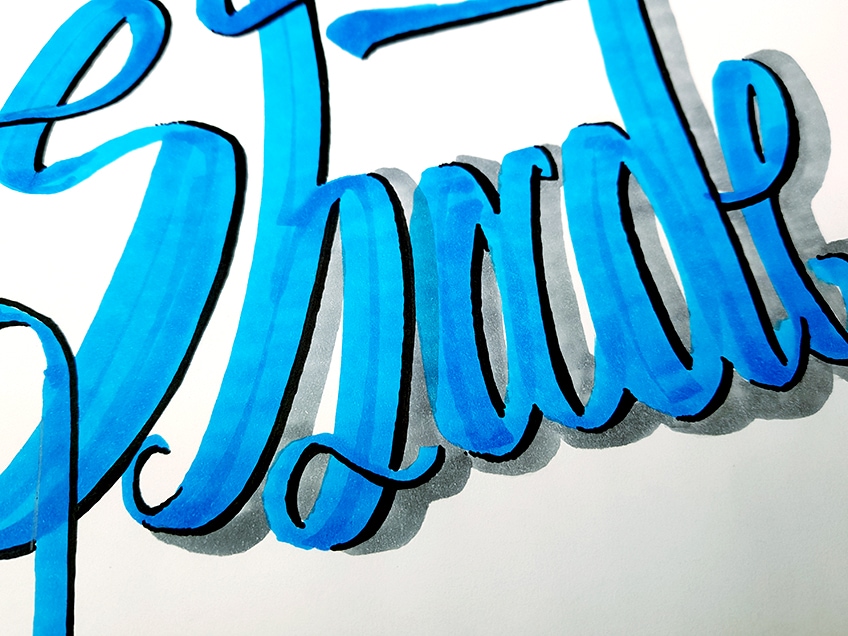
Tip:
Leave the black ink and let it totally dry for a couple of minutes. It could spare us from the nightmare of seeing it bleed or smudging it when applying the lighter shadows. (But it could be a good effect for Halloween, lol)
Optional: Erase the pencil marks if there are still any. Do this only when you’re sure that the black ink has totally dried.
Step 4: Add another layer of shadows right next to the dark shadows using the light gray brush pen/marker.

Looks fun, right? 😀
3.3 Overlapping Shadow
I use this in monochromatic (means using only one color) lettering pieces.
The shadows create an illusion that some parts are on top of the others.
You also need to imagine that the source of light comes from the viewer’s eyes.
So the shadows should appear on the parts that are NOT on top.

What you need:
- A set of brush pens (at least three) with the same color family (at least 1 light, 1 medium and 1 dark). For example: green, light green, dark green
You may also use colors in analogous harmony. For example: orange, vermilion, red
- A pencil
- At least 200gsm paper (we don’t want to ruin the work with a thin piece of paper because we’re going to apply layers of ink)
Colors that I’ll use:
- Base: Orange(Sakura Koi)
- Medium: Vermilion (Sakura Koi)
- Dark: Red (Sakura Koi)
Step 1:
Write a word using the base color.
The base color is the lightest shade of color you have among your set of pens.
So if you have red, orange, vermilion, you must use orange as your base color.

Step 2:
Decide which parts should be on top. Mark them using a pencil as a guide.

Step 3:
Apply the colors on the shadow area starting from the darkest.
We need to blend the colors carefully. The darkest should blend with the medium one and do it until you reach the base color.
In our example, apply red starting from the pencil guide.
Then gradually going farther from the pencil guide, next is vermilion, which should blend with red, and lastly orange, which should blend with vermilion.


Tip:
You can use a little of black or brown as the darkest shade, except when working with neon colors like yellow, apple green, etc.
I added a little brown (Sakura Koi) here:

Now, we can see that some parts overlap the others. 😀
3.4. Ribbon Style

This may be a little more difficult than the others at first, but when you finally get the knack of it, it will be super fun and addictive.
Here’s the thing:
You have to understand how real ribbons are spiraled and how the curves produce shadows.
When ribbons are spiraled, they look like this:

And there we can see that the “back” of the spiral ribbon produces shadows.

Now, we will combine this concept with the concept of thick and thin strokes of calligraphy to create the ribbon illusion.
To sum it up:
The thick/down strokes will be the “front” of the ribbon, and the thin/up strokes will be the “back”.
What you need:
- The same materials we use for Overlapping Shadows
Colors that I’ll use:
- Base: Fresh Green (Sakura Koi)
- Medium: Yellow Green (Sakura Koi) and Yellow Green (Artline Stix; this is a little darker than Sakura Koi)
- Dark: Green (Sakura Koi)
Step 1:
Write a word using the base color.

Tip:
The back and front of spiral ribbons have the same width. Hence, when doing the ribbon style, try writing the up and down strokes using similar or the same width. This will make the ribbon illusion more successful.
Step 2:
Using a pencil, mark all those twists and transition sections between letters.

Step 3:
Put the shadows on the up strokes. Apply the darkest color starting at the pencil guide. Blend the darkest with the medium shade and lastly, blend the medium with the base color (just like what we did in Overlapping Shadow).

Tip:
Notice the letter ‘C’. Don’t you think this ribbon looks thin?

Notice the letter ‘E’. Don’t you think this ribbon looks thick?

The farther the shadow area from the curve is, the thicker your ribbon will appear.
3.5. Cutting Shadow

I mostly use this technique in digitized lettering but this is also great in analogue ones!
Here, we “cut” some spaces from the letters, to form an illusion of shadows, instead of normally applying them.
This also creates an illusion that some parts are on top of others.

What you need:
- Your usual writing tools
- A pencil
- Any black drawing pen (fine liner) for outlines
- Any black marker/brush pen
Step 1:
Write a word like how you normally do.

Step 2:
Using a drawing pen, trace the outline of each letter.

Step 3:
Make another layer of outlines, but make them thicker this time.

Step 4:
Fill in the white spaces between and inside the letters with your black marker.

Step 5:
Using a pencil, determine where to put the cutting shadow.
Remember:
Put them on parts that you want to look on top. They are usually found in intersecting parts of letters.

Step 6:
Fill in the cutting shadow using a drawing pen.

BONUS: Drop Shadow
Basically speaking, when a light is blocked by a thing and that thing is a little far from a surface, a drop shadow can be formed on the surface.
Drop shadow is a common technique that is also great for beginners. So here’s the easy trick that I discovered in making drop shadows that have the exact same size as your letters.
What you need:
- A black brush pen/marker
- A colored brush pen/marker
- Thin sheets of paper (below 100gsm)
- A pencil
- Cotton balls or cotton swabs
Step 1: Write a word using a black marker.

Step 2:
Place the paper where you wrote the word under a new thin sheet of paper. Trace the word using a colored pen.

Step 3:
Move the paper with the colored word sideward and/or downward, depending where you want to put the drop shadow. Then trace the outline of the word using a pencil.

Step 4:
Shade the inside of the shadow using your pencil.

Step 5:
The shadow looks sloppy at the moment. So using a cotton ball or swab, smudge it until it’s smooth.

… and voila! You’ve got an awesome and neat drop shadow.
General Tip:
If you don’t have a light gray pen, you can always use a pencil! It’s a great alternative. Just like what we did in the drop shadow technique.
Final words
And there you have it friends!
5 different methods on how to apply shadows to your lettering.
The best way to learn how to apply shadows is to try out all of them.
Huge thanks to @skribsinner for taking the time to share her knowledge on this topic.
Now we want to hear from you, which shading method is your favorite?
Be sure to drop a comment below.
Until the next one,
Stay AWESOME!

Stay updated with my tutorials and get instant access to the Lettering Crate –
A growing library of free lettering & calligraphy resources that includes –
- Calligraphy practice sheets
- Procreate brushes
- The 30-day lettering planner
- Printables, and more!
Pin me!
About the author

RK is a self-taught visual artist from the Philippines. She started being interested in art at a young age of six.
Since then, she has explored different kinds of medium, such as oil and acrylic paints, oil pastels, colored pencils, charcoal pencils, watercolor, and hand lettering using ballpoint pens.
In 2016, she came across modern calligraphy and until now, her focus of improvement has been into letters. She has conducted several modern calligraphy and hand lettering demos for products and artist groups in the
Philippines. RK’s works have been featured in numerous art and lettering sharing communities, and also
used in covers of some books. She is now exploring her skills in digital designing and has created logos
and designs for companies and individuals.
Most of your Word documents are likely set in standard, drab Times New Roman or Calibri typography, perhaps with the occasional cheesy Word Art thrown in for variety. Yet Word actually includes a number of text effect tools that give you everything you need to make beautiful art from your words.
In this tutorial, I’ll show you how to create the cool text effects you want in every modern version of Microsoft Word, using its advanced type and typography formatting features. Once you’re done, you’ll know the tricks that I used to make Word templates that look great.
How to Make a Stylish Text Effect in MS Word (Quick Video)
In this quick screencast video, you’ll learn how to go beyond default Word Art options and make a cool text effect in Microsoft Word, using text formatting tools to create stylish typography:
For more detailed information on how to make beautiful Word text effects, review the step-by-step instructions below.
How to Make MS Word Text Effects (Step by Step)
Learn how to apply both standard text effects and more advanced options inside Microsoft Word’s Format pane, such as Drop Shadow and Reflection. Discover how to transform your text into cool typography art. Let’s get started:
1. Set Up a New Page in MS Word
Start by creating a new document by either clicking File > New or pressing the Control-N shortcut. To set properties like the page orientation and the page size, jump into the Layout tab.
.jpg)
.jpg)
.jpg)
If you plan to print your document and you already know the final paper size, it is important to set it as a first step. Why? Microsoft Word lets you easily scale any object, but
some properties, like the outline width, remain unchanged. Font size also
stays the same during the resizing, and has to be updated manually. Working in
the final paper size right from the beginning helps save time in the
future.
There are two things you need to know about the Layout tab before we set the final page size values. First, the Size drop-down menu contains only the paper sizes which are possible to print with the currently selected printer. In other words, you cannot set an A3 paper size when your printer can only print up to A4 documents. To fix that, you can jump to the File > Print menu and change the printer to a different one for a second, for example the Microsoft XPS Document Writer, which is a «virtual printer» that only saves files locally to your computer.
.jpg)
.jpg)
.jpg)
Don’t print anything, but once you’ve chosen a different printer, go back (using the left arrow in the top left corner), and open Layout > Size again. The list of available sizes should be much larger now.
.jpg)
.jpg)
.jpg)
Then, the other thing worth noting is that the drop-down menus for Margins, Orientation and Size may not be enabled all the time. If you have a Text Box placed and selected inside the document, some Layout options will be disabled. I’m specifically pointing this out because we will use Text Box objects all the time, and jumping to the Layout tab and seeing those options disabled can be quite frustrating.
.jpg)
.jpg)
.jpg)
Now you know how to always be able to set a page Size. Set the size to A4
and the Orientation to Landscape. Your page is now set up the way you’ll want for your custom Word text effect art, and you’ll know how to tweak it again next time.
.jpg)
.jpg)
.jpg)
2. Change the Font and the Font Size
Now, it’s time to add your text and start tweaking it. Type anything you want, select the text, and pick the font and size you want. Most of the text effects look best in large sizes, so don’t be afraid to
use either the Increase Font Size button
or the font size drop-down menu to make the text really big.
If the maximum
value of 72 pt is not enough, type in any number you want, for example
250 pt (only type the number). You can also use non-integer values, such as 198.5, if you want to get the largest possible text without wrapping.
.jpg)
.jpg)
.jpg)
3. What Is Kerning? (How to Set It in Word)
Let’s look at an important concept for setting typography in Word. When a type designer creates a font, every letter has its own width set to make sure the gaps between the letters are even. This works fine in most cases, except for the combination
of letters with less «rectangular» shapes, like «V» and «A».
Thus, type designers add “kerning” features, which specify that those two letters when placed next to each other will have the gap smaller (or bigger). In a perfect world, an application uses this kerning and everything looks fine. Well, not everything functions as expected in the real world.
.jpg)
.jpg)
.jpg)
If you only need to know one thing about kerning, remember this—it should always be enabled, but it is off by default in Microsoft Word. To turn it on, open the Font dialog (Control-D) Advanced tab, and check Kerning for fonts X points and above.
When you check this checkbox, a current font size is filled into the edit box, but you probably want to change it to 1 pt instead—just to make sure it will be really enabled all the time for
any text. Then click the Set as Default button. For more information about kerning, see Quick Tip: Typography Skills, Basic Kerning.
.jpg)
.jpg)
.jpg)
It is important to know that the kerning also has to be enabled this way for every text box in the document. If you accidentally or on purpose delete everything in your document
(Control-A > Delete), the kerning is again turned off.
4. Apply Standard Text Effects in Microsoft Word
Before we start adding our own text effect, let’s briefly take a look what Word offers us in the Text Effect and Typography drop-down menu on the Home tab on the ribbon. There are 15 pre-defined text effects with different outlines, fills, and shadow effects, and some of the presets also include 3D effects. The colors of those presets always reflect the selected color theme.
.jpg)
.jpg)
.jpg)
You can jump to the Design tab and select a different color scheme from the Colors drop-down menu. Jump back to the Home tab, open the Text Effects and Typography drop-down menu, and it should look a bit different.
.jpg)
.jpg)
.jpg)
This is nice, but unfortunately there’s no way to adjust those presets. The items in this list cannot be edited or deleted, and you cannot add new presets. Those 15 presets can be helpful
if you need a nice looking header and you only have two minutes of your time, but you will learn nothing new about the text
effects just by using them.
5. Body Text vs. a Text Box
The text can be placed in a document in two different ways. The usual way is to create a new document and start typing. We can call this type of text «body text«. While the text effects can be added to this body text quite easily, they are limited, and thus using body text is not a preferred option.
The second way is to use a Text Box object and write into this text box. To insert a new Text Box, select Insert > Shapes > Text Box, and draw a new text box the same way you draw for example a rectangle.
.jpg)
.jpg)
.jpg)
The text placed inside a text
box has several advantages. It can be moved around the document freely without
any restrictions (even off the document or over the margins), and it can be
rotated. Moreover, some additional text effects like the 3D rotate options are
available.
If you do not like the default appearance of the text box—especially the white fill and the black outline—both can be easily set to none on the Format tab. Use the Shape Fill and the Shape Outline drop-down menus.
.jpg)
.jpg)
.jpg)
To select a text box with no fill and no outline, click over the text, which will show the text box
borders as a dotted line. Clicking over this dotted line to select a text box should be easy now.
6. Change Your Page Background in Word
The standard white paper color may seem a little bit boring for our text effect, and it may be a good idea to set it to a different color. Go to the Design tab, and from the Page Color drop-down menu, select a dark gray color. As for any other color
drop-down, the first two columns with grays are still the same, but the eight columns on the right side change depending on the chosen color palette. After changing the background, the black text inside the text box is almost invisible now, but that’s fine—we’ll fix it in a minute.
.jpg)
.jpg)
.jpg)
7. Master the Almighty Format Pane
The Format tab in Word allows us to format the text box as well as the text itself. There are drop-down menus for the text fill, outline, and all the other possible effects, and there are submenus and submenus and submenus. It is definitively not an easy way to tweak the effects,
and we only have access to a limited number of presets and options. There is
a better place to adjust the setting—the Format Pane.
The Format Pane is an essential pane for setting all the advanced options, yet there is no standard way to display this pane. In short, every «More…» item on the Format tab (More Lines, More Gradients, More Textures) opens the Format Pane,
but since we have the Text Box inside our document, we might as well right click
the text box border and select Format Shape.
.jpg)
.jpg)
.jpg)
Before we move on, remember there is only one Format Pane,
but the content of this pane changes depending on the selected content. It’s
different for the text box, for body text, and for an image.
I say it to
prevent any confusion, because the name of this Format Pane also changes—it
can be Format Shape, Format Text Effects or Format Picture. Because this will
be our base station for setting all the effect, it is a good habit to keep this
pane open all the time.
8. Set the Text Fill and the Outline
With the background color set and a Format Pane still open,
select the text box and type in any word, for example “Effect”. Keep the font set to
Calibri and set the size to 72 pt. In the Format Pane, select Text Options,
open the Text Fill settings, and change the Text fill from the Solid Fill to the
Gradient Fill. From the Preset Gradients drop-down menu, select a yellow top
spotlight. This will create a subtle shading, as if there was a light source
shining from the top.
.jpg)
.jpg)
.jpg)
To make the text a little bit more interesting, we will also add an outline. Change the Text
Outline from No Line to Solid Line, raise the Width to a bigger number,
for example 3 pt, and change the Color to white.
.jpg)
.jpg)
.jpg)
The outline is nice, but too
strong. We can open the Compound Type drop-down menu and select Double, which
will split the outline into two: one visible over the text, and one outside the
text. To get rid of the ugly joins, change the Join type to Round instead of the default Bevel.
.jpg)
.jpg)
.jpg)
All we need to do now
is to increase the Transparency to make this outline less visible. A value
around 60% seems to be just fine.
.jpg)
.jpg)
.jpg)
9. Add More Cool Word Text Effects
With the text box
still selected and the Format Pane still open, switch to the Text Effects
tab. As a first effect, we will add a simple drop shadow below the text. Open
the Shadow effect properties, and from the presets drop-down menu, select Outer:
Offset Bottom. Because the page background color is quite dark, the effect is
quite subtle, which is fine, and probably does not need any additional tweaking.
.jpg)
.jpg)
.jpg)
If you want, you can
also try to add a Reflection effect. Select any preset, but increase the Blur
value to make the reflection less visible and not too distracting.
.jpg)
.jpg)
.jpg)
In just a few steps, we have a nice looking text effect, and we can call it done.
.jpg)
.jpg)
.jpg)
10. Share the Document (.docx vs .pdf)
When sharing your
document with your friends, you can choose between two main formats: the Word
native .docx, or Adobe Acrobat .pdf file. The document saved in .docx format
keeps the effects fully dynamic, but depending on the effects used, the other
person often needs to have the latest version of Microsoft Word installed.
Otherwise, the document can look different (and most likely ugly).
The biggest advantage
of the document saved in a .pdf format is that it will look exactly the same on
every device, in any application. However, you lose the ability to edit the
text effects, and probably also the ability to edit the text. Microsoft Word
can export as well as import the .pdf files, but the ability to edit the text with the applied effects is in most cases lost. For more information, please read this helpful tutorial:
To save the document
in the .docx format, simply hit the save button—it should be the default
format. To save the document as a .pdf file, select File > Export >
Create PDF/XPS, and then choose PDF in the file type drop-down when saving the file.
.jpg)
.jpg)
.jpg)
Key Takeaways: For Making Your Own MS Word Text Effects
We’ve only scratched
the surface of the text effects in Microsoft Word, but you should have a solid
knowledge of the Word basics needed for future effects. Here is a list of
the main takeaways:
- When possible, set
the paper size as a first step. Resizing the objects afterwards can bring
unexpected complications. - Most text effects look best in very large sizes.
- Always be sure to enable kerning and good typography practices when working with text in Word.
- There is a
difference between «body text» and text placed inside a
Text Box. For text effects, text placed inside a Text Box is preferred. - The Format Pane is the
best place to change any formatting—make sure to have this pane
visible all the time. - Share your creations
in Word .docx format to keep the ability to edit, or Adobe Acrobat .pdf format to
make sure everything will look the same at all times.
Enjoy creating your own text effects using these steps, and leave a comment below if you have any trouble making your own text effects in Word!
To learn more about Microsoft Word, study the
following tutorials:
Editorial Note: This post was originally published in 2014. It has been comprehensively revised by our staff to make it current, accurate, and up to date—with special assistance from Laura Spencer.
Did you find this post useful?
![]()
Hello, I’m Vaclav, graphics designer from Czech Republic, mainly focused on GUI design. Despite everything I’ve created in Photoshop, my most well-known creation is a viral video «Was iOS7 created in Microsoft Word?».
CSS3 combined with your imagination can result in an ocean of beautiful and unique effects. Creative experimentation with web typography is one of the favourites of web developers to make their websites visually impressive. By working on typography, you can now create stunning effects using only CSS.
In this post, 25 results of creative imagination combined with text shadows are shown which you can directly copy and paste. To learn how to create text shadows, go to this link — Tutorial on Text Shadows.
1. Smartly Embossed
See the Pen Text Shadow Example by Aakhya Singh (@aakhya) on CodePen.
Wanted to create one such shadow of your own? Don’t worry, CSS has got you covered.
This is an amazing style which uses a combination of white and black text shadows to give the text the look of being embossed. It uses Ubuntu as a font base with letter spacing of 5 px.
CSS
color: #121212;

text-shadow: 2px 7px 5px rgba(0,0,0,0.3),
    0px -4px 10px rgba(255,255,255,0.3);
2. Dropping It Elegantly
See the Pen Text Shadow Example by Aakhya Singh (@aakhya) on CodePen.
This is a really cool text shadow which makes it appear as if the text is dropping a shadow on a wall. This style requires a combination of many shadows having shades of grey.
CSS
color: #121212;

  text-shadow: 0 2px 1px #747474,
      -1px 3px 1px #767676,
      -2px 5px 1px #787878,
      -3px 7px 1px #7a7a7a,
      -4px 9px 1px #7f7f7f,
      -5px 11px 1px #838383,
      -6px 13px 1px #878787,
      -7px 15px 1px #8a8a8a,
      -8px 17px 1px #8e8e8e,
      -9px 19px 1px #949494,
      -10px 21px 1px #989898,
      -11px 23px 1px #9f9f9f,
      -12px 25px 1px #a2a2a2,
      -13px 27px 1px #a7a7a7,
      -14px 29px 1px #adadad,
      -15px 31px 1px #b3b3b3,
      -16px 33px 1px #b6b6b6,
      -17px 35px 1px #bcbcbc,
      -18px 37px 1px #c2c2c2,
      -19px 39px 1px #c8c8c8,
      -20px 41px 1px #cbcbcb,
      -21px 43px 1px #d2d2d2,
      -22px 45px 1px #d5d5d5,
      -23px 47px 1px #e2e2e2,
      -24px 49px 1px #e6e6e6,
      -25px 51px 1px #eaeaea,
      -26px 53px 1px #efefef;
3. Emerging Out
See the Pen Text Shadow Example by Aakhya Singh (@aakhya) on CodePen.
We have got you this cool typography effect using text shadows in which the text is stacked on top of multiple layers. Doesn’t the milky white text appear to be emerging out of the black?
CSS
color: #dfdfdf;

text-shadow: 0 2px 2px #dfdfdf,
      -2px 5px 1px #b8b8b8,
      -4px 8px 0px #979797,
      -6px 11px 0px #747474,
      -8px 14px 0px #565656,
      -10px 17px 0px #343434,
      -12px 20px 0px #171717,
      -14px 23px 0px #000;
4. Centered Text Shadow
See the Pen Text Shadow Example by Aakhya Singh (@aakhya) on CodePen.
You can use this style easily in your projects to make your text look elegant without drawing much attention to the shadow beneath it. Experiment with the values given to the text-shadow property to get more shadow variations.
CSS
color: #cfc547;

text-shadow: 3px 0px 7px rgba(81,67,21,0.8),
	  -3px 0px 7px rgba(81,67,21,0.8),
	  0px 4px 7px rgba(81,67,21,0.8);
5. Keeping It Short and Simple
See the Pen Text Shadow Example by Aakhya Singh (@aakhya) on CodePen.
This is another example created using a single shadow which is almost beneath the text.
CSS
color: #cfc547;

text-shadow: 3px 4px 7px rgba(81,67,21,0.8);
6. Letterpressed
See the Pen Text Shadow Example by Aakhya Singh (@aakhya) on CodePen.
Doesn’t the letters appear carved into that black surface? You can create this style using only two text shadows.
To achieve this effect, make your text a bit darker than the background. After that, give a shadow lighter than the text to its right and a darker shadow to its left.
CSS
color: #0f0f0f;

text-shadow: -1px -1px 3px #020202,
      2px 2px 4px #1b1b1b;
7. 3-D Text
See the Pen Text Shadow Example by Aakhya Singh (@aakhya) on CodePen.
Make your text look like a 3-D text by using just text shadows. Also notice the smoothness of the text. This is the magic of multiple text shadows.
For this effect, use a combination of text shadows having shades of the text color and set the blur radius to a very small value depending on the size of your text.
CSS
color: #dfdfdf;

text-shadow: 0 2px 2px #dfdfdf,
      -2px 5px 1px #cbcbcb,
      -4px 8px 1px #979797,
      -6px 11px 1px #a2a2a2,
      -8px 14px 1px #aeaeae,
      -10px 17px 1px #b5b5b5,
      -12px 20px 1px #bebebe,
      -14px 23px 1px #cecece,
      -16px 26px 1px #dbdbdb,
      -18px 29px 1px #dfdfdf
8. Green Glare
See the Pen Text Shadow Example by Aakhya Singh (@aakhya) on CodePen.
This style is making the colored text look very beautiful with text shadows of the shades of the text color. You can give this effect to any colored text by wisely choosing the color of the shadows. Have a look at its code below.
CSS
color: #67875d;

text-shadow: 0 2px 1px #79a06d,
      -1px 3px 1px #82ad75,
      -2px 5px 1px #8ebf80;
9. Double Shadowed
See the Pen Text Shadow Example by Aakhya Singh (@aakhya) on CodePen.
This cool double shadow effect is created using just two text shadows placed correctly — one white and the other red. You can make different color combinations for the shadows given.
The code used for giving this effect is given below.
CSS
color: #67875d;

text-shadow: 0 2px 1px #79a06d,
      -1px 3px 1px #82ad75,
      -2px 5px 1px #8ebf80;
10. Smoky Shadow
See the Pen Text Shadow Example by Aakhya Singh (@aakhya) on CodePen.
Smoky shadows are always eye-catching. And here we bring one for you.
To create your own smoky shadow, give a large blur radius to the text-shadow property.
CSS
color: #fff;

text-shadow: 3px 3px 20px #ff99cc,
    -2px 1px 30px #ff99cc;
11. Far Flung Shadow
See the Pen Text Shadow Example by Aakhya Singh (@aakhya) on CodePen.
Texts having blurred and distant shadows have been becoming quite popular lately. You can try placing shadows at different distances and orientations and giving them different colors.
CSS
color: #cfc547;

text-shadow: 16px 22px 11px rgba(168,158,32,0.8);
12. Perspective View of 3-D Text
See the Pen Text Shadow Example by Aakhya Singh (@aakhya) on CodePen.
We present you this arresting style which makes it appear as if the 3-D text having solid base is cemented on a white surface and you are viewing it from some angle. This typography will go well with a monochrome layout. So feel free to copy and paste the code shown below.
CSS
color: #000;

text-shadow: 0 2px 3px #747474,
      1px 3px 4px #222,
      0 8px 3px #474747,
      0 11px 4px #747474,
      0 14px 4px #565656,
      0 17px 4px #343434,
      0 20px 4px #171717;
13. Glass Shadow
See the Pen Text Shadow Example by Aakhya Singh (@aakhya) on CodePen.
If you were searching for a glass shadow effect, then your search ends here. This is created using the transform property by vertically inverting a copy of the text and rotating it about the X-axis. To make the shadow look real, the copy of the text is given some linear gradient.
HTML
<div id="para_div">
	<p>My Text</p>
	<p id="refl">My Text</p>
</div>
CSS
* {
  font-style: italic;
}

#refl {
  -moz-transform: scaleY(-1);
  -o-transform: scaleY(-1);
  -webkit-transform: scaleY(-1);
  transform: scaleY(-1);
  -moz-transform: rotateX(210deg);
  -o-transform: rotateX(210deg);
  -webkit-transform: rotateX(210deg);
  transform: rotateX(210deg);
  perspective: 200px;
  -webkit-mask-image: -webkit-gradient(linear, right top, right bottom, from(transparent), color-stop(20%, transparent), to(rgba(0, 0, 0, 0.4)));
}
14. Layered Shadow
See the Pen Text Shadow Example by Aakhya Singh (@aakhya) on CodePen.
It’s always fun to use multiple shadows. This super cool multi-layered text shadow effect created by correct placement of text shadows is a good example of how creative typography can be.
CSS
#shadow1 {      /* for first text */
  color: #dfdfdf;
  text-shadow: 0 0 2px #dfdfdf,
      -4px 5px 0 #b8b8b8,
      -7px 11px 0 #747474,
      -12px 17px 0 #343434,
      -17px 23px 0 #000;
}

#shadow2 {      /* for second text */
  color: #67875d;
  text-shadow: 0 0 2px #67875d,
      -4px 5px 0 #5d7755,
      -7px 11px 0 #4d6047,
      -12px 17px 0 #2e382b,
      -17px 23px 0 #000;
}
15. Rainbow Effect
See the Pen Text Shadow Example by Aakhya Singh (@aakhya) on CodePen.
Giving the colors of rainbow to the different text shadow layers of the previous example resulted in this vibrant colored shadow.
CSS
color: #ff0000;

text-shadow: 0 2px 2px #FF0000,
      -2px 5px 0 #ff7f00,
      -4px 10px 0 #ffff00,
      -8px 15px 0 #00ff00,
      -12px 20px 0 #0000ff,
      -16px 25px 0 #4b0082,
      -20px 30px 0 #9400d3;
16. Glowing Text
See the Pen Text Shadow Example by Aakhya Singh (@aakhya) on CodePen.
Here’s some yellow text radiating light on a black background. To make the text gleam, give large blur radii to all the shadows declared for this text so that they loose their shape.
The same concept applies for box shadows as well. So, now you can make anything glow using just CSS.
CSS
color: #cfc547;

text-shadow: 10px 10px 25px rgb(81,67,21),
    -10px 10px 25px rgb(81,67,21),
    -10px -10px 25px rgb(81,67,21),
    10px -10px 25px rgb(81,67,21);
17. Blurred Text
See the Pen Text Shadow Example by Aakhya Singh (@aakhya) on CodePen.
You can create blurred text by making your text transparent and dropping its shadow with some blur radius. Interesting, isn’t it?
Visit How to Create Blurred Text with CSS to learn different ways to create blurred text.
CSS
color: transparent;

text-shadow: 0 0 8px #316472;
18. Descending Shadow
See the Pen Text Shadow Example by Aakhya Singh (@aakhya) on CodePen.
In this demo, the shadow is given a large blur radius and is placed lower than the text which gives a floating look to the text.
CSS
color: #cfc547;

text-shadow: 0px 11px 10px rgba(81,67,21,0.8);
19. Beautifully Outlined
See the Pen Text Shadow Example by Aakhya Singh (@aakhya) on CodePen.
The bold and colorful outline of this text is created using text shadows. You can use this effect in your designs to make them more attractive and lively.
This outline is created by placing four text shadows of different colors and no blur radius at different positions near to the text.
CSS
color: #cfc547;

text-shadow: -1px 1px 0 #41ba45,
	1px 1px 0 #c63d2b,
	1px -1px 0 #42afac,
	-1px -1px 0 #c6c23f;
20. Outlined Text
See the Pen Text Shadow Example by Aakhya Singh (@aakhya) on CodePen.
Unlike in the previous demo, the outlines of the text in this demo are created by using a combination of text-shadow and -webkit-text-strokeproperties.
CSS
#shadow1 {
  color: white;
  -webkit-text-stroke: 1px #F8F8F8;
  text-shadow: 0px 1px 4px #23430C;
}

#shadow2 {
  color: white;
  -webkit-text-stroke: 1px #F8F8F8;
  text-shadow: 0px 2px 4px blue;
}

#shadow3 {
  color: #333;
  -webkit-text-stroke: 1px #282828;
  text-shadow: 0px 4px 4px #282828;
}
21. Funky Double Shadow
See the Pen Text Shadow Example by Aakhya Singh (@aakhya) on CodePen.
To create this effect, the text is given two hard shadows with no blur radius. The first shadow is given the background color and is placed near the text, and the second shadow is given the text color and is placed at a distance greater than the first shadow from the text.
CSS
color: #dfdfdf;

text-shadow: 4px 4px 0px #000,
    -4px 0 0px #000,
    7px 4px 0 #fff;
22. Colored Shadows
See the Pen Text Shadow Example by Aakhya Singh (@aakhya) on CodePen.
In this demo, each letter is given a shadow of different color gradient making it look quite impressive.
HTML
<p>
  <span id="y">Y</span>
  <span id="o">O</span>
  <span id="u">U</span
</p>
CSS
color: #dfdfdf;

#y {
  text-shadow: 0 1px 2px #75b663,
      1px 3px 1px #5ea04b,
      2px 5px 1px #5b9c49,
      4px 7px 1px #518b41,
      6px 9px 1px #477939,
      8px 11px 1px #3d6831,
      10px 13px 1px #335729,
      12px 15px 1px #294521,
      14px 17px 1px #1e3418;
}

#o {
  text-shadow: 0 1px 2px #9d64c4,
      1px 3px 1px #9759c0,
      2px 5px 1px #8b46b9,
      4px 7px 1px #7d3fa6,
      6px 9px 1px #6f3894,
      8px 11px 1px #613181,
      10px 13px 1px #532a6f,
      12px 15px 1px #45235c,
      14px 17px 1px #381c4a;
}

#u {
  text-shadow: 0 1px 2px #c48564,
      1px 3px 1px #c07d59,
      2px 5px 1px #b96e46,
      4px 7px 1px #a6633f,
      6px 9px 1px #945838,
      8px 11px 1px #814d31,
      10px 13px 1px #6f422a,
      12px 15px 1px #5c3723,
      14px 17px 1px #4a2c1c;
}
23. The Fallen Text
See the Pen Text Shadow Example by Aakhya Singh (@aakhya) on CodePen.
You can actually make your text look fallen using CSS, as done in this demo. Its orientation and position is changed using the transform property and is given different sets of shadows to make it look more natural.
HTML
<p data-text='FALLEN'>FALLEN</p>
CSS
p {
  transform: skew(40deg)rotate(-10deg)rotateX(50deg)translate3d(0, 0, 0);
  -webkit-perspective: 100px;
  perspective: 100px;
}

p::before {
  text-shadow: 0 2px 3px #747474,
      -3px 3px 1px #222,
      -6px 5px 1px #474747,
      -9px 7px 1px #747474,
      -12px 9px 1px #565656,
      -15px 11px 1px #343434,
      -22px 15px 1px #171717;
}

p:before,
p:after {
  position: absolute;
  left: 0;
  right: 0;
  top: 0;
  content: attr(data-text)
}

p:after {
  color: #edc;
}
24. Multiple Colored Shadows
See the Pen Text Shadow Example by Aakhya Singh (@aakhya) on CodePen.
This is another impressive example of multiple text shadow effect created by using two distant shadows of blue and pink color.
CSS
color: #474747;

text-shadow: 20px 10px 0px #ff99cc,
    -15px -6px 0px #64a5b7;
25. Knockout Text
See the Pen Knockout Text Example by Aakhya Singh (@aakhya) on CodePen.
This is an example of knockout text which allows its background to be visible through it. This effect is created using the text-shadow and mix-blend-modeproperties.
Eager to know more about knockout text? Visit the link How to Create Knockout Text with CSS and learn to create different types of knockout text effects.
HTML
<div id="parent">
  <p>Hey there!</p>
</div>
CSS
div {
  background: url('https://www.dl.dropboxusercontent.com/s/rv0tbpx6fmtr4vi/texture.jpg') repeat;
  padding: 10px;
}

p {
  padding: 30px;
  mix-blend-mode: multiply;
  text-shadow: 5px 4px 11px rgb(0,0,0), 0 2px 5px rgb(0,0,0);
  text-align: center;
}
Conclusion
Text shadows are used extensively in websites and are quite easy to implement. You can directly pick any of the text shadows given in this post and enhance your designs. You can also create your own by giving different colors and other variations taking idea from these shadows. We’ll soon be coming up with a post that would discuss the tips and tricks to create the text effects given here.
Letters with shadows. To find different sources for Instagram, open the tool, write or paste your phrase, view it in different styles, copy the extract with the desired font and paste the text in Instagram, Facebook, Twitter, Youtube, Whatsapp, Twitch, TikTok or any social network. There are other pages that also offer the service.
As much as Instagram Stories offers certain possibilities, when we write descriptions, comments or messages, there is no possibility beyond the default font.
However, there are third party apps that offer options for users to post other sources. Continue with us to learn more about this alternative and learn how to use fonts that make your publications more attractive, in this case Letters with shadows.
Followers Online has a very simple page, you just need put your text to see what it’s like with custom fonts. Later, just copy and paste on his Instagram.
Letters with shadows. If you want more options for the decorated text, just click “load more fonts”. The alternatives that appear here are more random, deviating a bit from the standard and mixing resources that have little in common, emojis and symbols.
A differential of the site is that it has the functionality to make the font itself. Clicking «Design your own font», you can choose the symbols that will correspond to each letter of the alphabet.
Table of Contents
- 1 [Letters with shadows] ➡️ How to use custom fonts?
- 2 How to change the font in social networks?
- 2.1 Effortless fonts for your posts
- 2.2 Be concise and say what you want
- 2.3 FAQ
- 2.4 How much does creativity cost to generate fonts?
- 2.5 Do you have to install something?
- 3 ❤️ Letters with shadows
- 4 🚀 Letters with shadows, fonts & fonts
- 5 🎯 Letters with shadows to copy and paste
- 6 ✍ Lyrics converter with shadows
- 6.1 → Unicode code: What is it?
- 7 Generator 🔥 Letters with shadows
[Letters with shadows] ➡️ How to use custom fonts?
Instagram and other social networks implement the typeface that best adapts to the general design of the system. This is part of the consistency necessary for the visual comfort of users browsing these tools.
— Letters with shadows. Turns out there is a way to add stylized letters that are actually special characters, as well as emojis and other symbols. In practice, they appear as custom fonts, but are technically called Unicode characters.
How this advice is still recent for many, it is a great opportunity to get noticed on the social network and who knows, win followers On Instagram. Not to mention that people will have Curious to see how you managed to modify the font that way.
Therefore, some cool tools for these fonts on Instagram can be to customize the profile bio or highlight parts of the captions in photos and videos you post. They are creative ways to increase your digital marketing strategy.
Remembering that these sources should be used sparingly, mainly to highlight important parts such as your company name, special offers on publications to take advantage of sales, title of the text or a section, etc.
Letters with shadows. As fun as they are, overusing them can give the impression that your account is too casual.
But use fonts custom balanced standard fonts are fine, as long as they are legible and aesthetically consistent with your brand. By the way, this is very important for those who use Instagram in companies or influencers.
Letters with shadows. We will show you step by step, all the places of this theme follow a similar operation. Therefore, it is possible to choose any of them, and the differences in relation to the stages will be minimal.
1. Open the tool
To facilitate the process, we advise you to use the fonts on the same device that you access Instagram.
2. Write or paste your text
The second step is to write or paste, in the box a text in which you want to apply the custom font.
As you type, or as soon as you paste the words, a list will appear with your stylized fragment in different fonts. If you want more alternatives, simply click “load more fonts”.
3. Copy the extract with the desired font.
Remember that Instagram does not have the functionality to edit the source. What we will do is save a sequence of characters and then transfer them to the desired field.
Therefore, choose the extract with the source you want to use and use the copy command on your device.
4. Instagram, Facebook, Twitter, Youtube, WhatsApp, Twitch, TikTok or any social network.
Now that your text is saved in the clipboard of your PC or phone and use the command paste in bio, description, comment or message.
Letters with shadows. Remember that there may be some Unicode character incompatibility. Therefore, make sure the snippet appears as intended And if so, adjust it so as not to surprise your followers.
Finally, we recommend that you choose one or two of these fonts to use frequently, so that they are a particular feature of your posts.
So try to use fonts to enrich the appearance of the subtitles you write for the images. Remember that the visual appeal on the web is very great, and using it in the verbatim part of the content will draw more attention to your message.
And don’t forget use stylized letters in the profile bio, if you find it appropriate. Use this function to attract to those who are not yet followers and also to encourage those who already follow them to carry out a certain action.
Did you like our tips on social media fonts?
Effortless fonts for your posts
After quick processing, it publishes hassle-free original fonts that become digital masterpieces and they get thousands of likes.
However, if you are not an experienced graphic artist and special software is not your strong suit, try our tool. This is a modern builder with which you will increase the reach in social networks.
Be concise and say what you want
There is no limit to perfection! Even the most successful pause moments can be transformed indefinitely, gaining new styles for Instagram.
Are you going to publish an announcement or an invitation? An important message, a beautiful statement, a catchy slogan, or a call to action? Maybe there is attractive fonts that you could use in your idea. The designers at Followers Online have already come up with an elegant font combination for all occasions, so just click on the option you like and type in the information.
FAQ
There is a aplicación móvil for any phone and tablet in Android or iOS. In it, you can not only put text on the photo, but also implement everything that is in the PC version.
Letters with shadows. Have you ever wondered how users incorporate Featured sources on their social networks? If you have inquired in Instagram, Twitter, Fb, WhatsApp or Tik Tok among others, you know that you do not have many options when it comes to customizing letters since the text of the biography, the comments, the captions, etc. have a default font.
There are no options to customize and modify them making them more aesthetically interesting, according to your interests, just relax! You can still use Letters with shadows in a pleasant and attractive way through this generator.
🚀 Letters with shadows, fonts & fonts
Use Letters with shadows. You can create fonts, typefaces, letters, characters and symbols originals for your social media headlines.
Now it’s time to create something different, don’t you think? Customize the profile bio or enhance parts of the captions of the images and videos you post.
The different social networks determine the typeface that best fits the general design of the system. This is part of the essential uniformity for the visual well-being of the users who browse these tools.
Turns out there is a way to include lyrics adapted to copy and paste which really are unique characters, as well as emojis and other symbols. Technically they are designated as Unicode characters.
🎯 Letters with shadows to copy and paste
Letters with shadows to copy and paste. We can conclude that with a letter generator you don’t really get fonts themselves, as long as they are Unicode characters.
𝔖𝔢𝔤𝔲𝔦𝔡𝔬𝔯𝔢𝔰 𝔒𝔫𝔩𝔦𝔫𝔢
𝓢𝓮𝓰𝓾𝓲𝓭𝓸𝓻𝓮𝓼 𝓞𝓷𝓵𝓲𝓷𝓮
𝕊𝕖𝕘𝕦𝕚𝕕𝕠𝕣𝕖𝕤 𝕆𝕟𝕝𝕚𝕟𝕖
🅂🄴🄶🅄🄸🄳🄾🅁🄴🅂 🄾🄽🄻🄸🄽🄴
🆂🅴🅶🆄🅸🅳🅾🆁🅴🆂 🅾🅽🅻🅸🅽🅴
â “ˆâ“ ”â“ –â “¤â“ ˜â ““ â “žâ“ ¡â “” â “¢ â“ „â“ â “› â “˜â“ â “”
🍦 ⋆ 🍌 🎀 𝓃𝓁𝒾𝓃𝑒 🎀 🍌 ⋆ 🍦
🐧 ♩ ѕ𝓔𝔤uί𝔡𝓸г𝓔𝓼 𝓞 ภ ˡ𝐢ℕє 😈♚
(-_-) ᔕ 乇 ᵍ𝓊 เ 𝓓Ⓞг𝓔𝐬 𝐎𝓷ℓⒾŇ𝐞 (-_-)
. • ♫ • ♬ • S𝔼G𝓾𝓲ᵈ𝓸𝐫Ⓔs 𝕠𝓝𝔩ι ภ € • ♬ • ♫ •.
✍ Lyrics converter with shadows
→ Unicode code: What is it?
What is Unicode? It’s a international standard that allows computers (and other devices) to represent and handle text characters from any writing system.
Unicode was developed for address the inconvenience caused by the huge existence of code sets. From the beginning of programming, developers used their languages, so transferring text from one computer to another often resulted in the loss of information.
Unicode made a huge effort in the XNUMXs, to make a set of singular characters spanning the entire writing system. Provide a singular number for each character, regardless of the platform, the program and the language.
El Unicode standard is capable of representing fonts and symbols used in any language.
So with this generator of Letters with shadows do not create fonts, use Unicode symbols that you can use in Instagram, Twitter, Pinterest, Facebook, Tumblr, Whatsapp, TikTok…
Generator 🔥 Letters with shadows
Our application works on any social network. It is very easy and you can use it as many times as you want.
Write any text in the box and the generator will transform the fonts to copy and paste in your bio, caption, stories, etc. And include an original and particular touch to your profile.