Download Article
Download Article
Want to create an outline around certain letters in your Word document? There are two easy ways you can surround words and phrases with colored outlines in Word—using Text Effects, and using Word Art. We’ll show you how to make any font in your Microsoft Word document stand out by outlining it in color.
-
1
Type the word or phrase you want to outline. The lines around your text will look better on larger characters, so make your font a bit larger than the rest of your text.
- You can make the letters any color you want before creating an outline around them. Just highlight the word or phrase, and then select a color from the «Font» panel at the top of Word.
-
2
Highlight the text you want to outline. Just click and drag the mouse around the text to select it.
Advertisement
-
3
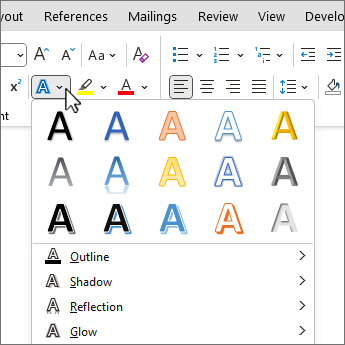
Click the Text Effects and Typography tool. This is the «A» surrounded by a blue glowing outline in the «Font» panel at the top of Word.
- If you don’t see this icon, click the Home tab at the top of Word.
-
4
Select the Outline menu. Now you’ll see all of the options you can use to create an outline around the selected letters.
-
5
Select an outline color. To choose the color of the line that surrounds your text, choose one of the colors displayed on the menu, or select More Outline Colors… to select a custom color.
-
6
Use the Weight menu to select the thickness of the outline. The larger the number, the thicker the outline around the letters.
- If you go too thick, you might make the text unreadable. You can always undo the last action in word by pressing Control + Z (PC) or Command + Z (Mac).
-
7
Use the Dashes menu to stylize the outline. If you’d rather have a dotted, dashed, or otherwise stylized line around your word or phrase instead of a solid line, you can select any of the options in this menu.
Advertisement
-
1
Click the Insert tab at the top of Word. WordArt is a tool that can help you create all types of vibrant text designs, including color outlines. You’ll find it on the Insert tab.
-
2
Click the WordArt menu. It’s the icon of a tiled blue «A» on the Insert tab in Word. A menu with several text styles will appear.[1]
-
3
Select an outline style. Not all WordArt styles have outlines, but several do. Don’t worry about the colors you see in the sample—you’ll be able to change those if you don’t like them. Once you click a style, you’ll see some sample text appear on the page.
-
4
Replace the sample text with your own. The text you type will appear in the selected outline style.
-
5
Select the Shape Format tab. It’ll appear at the top of the screen while you’re editing WordArt. This tab should already be active, but if it’s not, click it now.
-
6
Click the small arrow at the bottom-right corner of the WordArt Styles panel. It’s at the top of Word. This expands the «Format Shape» panel on the right side of Word.
-
7
Click the Text Fill and Outline icon. It’s the «A» with a line under it in the right panel.
-
8
Click Text Fill to select a color. When you choose this option, you’ll be able to choose the color of the actual text—you can choose an outline color separately.
-
9
Click Text Outline to design your outline. On this menu option, you can select a color, width, and even pattern (such as dotted or dashed) for the lines that surround your letters.
Advertisement
Add New Question
-
Question
How do I outline text in Windows 10?
Under WordArt Tools, on the Format tab, in the WordArt Styles group, click Shape Outline, and then do one of the following: To add or change an outline color, click the color that you want. To choose no color, click No Outline.
Ask a Question
200 characters left
Include your email address to get a message when this question is answered.
Submit
Advertisement
Thanks for submitting a tip for review!
About This Article
Article SummaryX
1. Create or Open a Word document.
2. Type the text you want in outline.
3. Highlight the text.
4. Click on the «Text Effects» tool.
5. Click on Outline.
6. Customize the Outline effect.
Did this summary help you?
Thanks to all authors for creating a page that has been read 498,291 times.
Is this article up to date?
Word for Microsoft 365 Word 2021 Word 2019 Word 2016 Word 2013 More…Less
Change the look of your text or WordArt by changing its fill or outline, or by adding an effect, such as a shadow, reflection, or glow.
-
Select your text or WordArt.
-
On the Home tab, select
Text Effects.
-
Choose the effect you want.
For more choices, point to Outline, Shadow, Reflection, or Glow, and then select the effect to use.
To remove the effect, select the text again, and then go to the Home tab and choose 
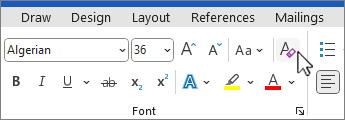
Need more help?
Select your text or WordArt. Click Home > Text Effects. Click the effect you want. For more choices, point to Outline, Shadow, Reflection, or Glow, and then click the effect you want.
Contents
- 1 How do I outline text in Word?
- 2 How do you outline text?
- 3 What is the outline text effect in Word?
- 4 Does Word have an outline template?
- 5 Is there an outline font?
- 6 What is outline format?
- 7 How do you create an outline on Microsoft Word?
- 8 How do I create an outline in Word 2013?
- 9 Why is my outline not working in Word?
- 10 How do you outline a document?
- 11 How do you outline text in Canva?
- 12 What is an inline font?
- 13 What are the 3 types of outlines?
- 14 What is an example of an outline?
- 15 How do you write a 5 paragraph essay outline?
- 16 What is a good outline look like?
- 17 What is the first step in making an outline?
- 18 How do you add 6 spaces in Word?
- 19 Where is the Design tab in Word?
- 20 How do you make a double lined border in Word?
How do I outline text in Word?
Add a border to some text
- Select a word, line, or paragraph.
- Go to Home > Borders, and then open the menu of border choices.
- Choose the type of border you want:
How do you outline text?
To create an outline:
- Place your thesis statement at the beginning.
- List the major points that support your thesis. Label them in Roman Numerals (I, II, III, etc.).
- List supporting ideas or arguments for each major point.
- If applicable, continue to sub-divide each supporting idea until your outline is fully developed.
What is the outline text effect in Word?
Outline. Outline applies a border around the letters of the text. Hover over each color to preview what the outline will look like. Click on the color to apply it.
Does Word have an outline template?
Beginning on the next page is an outline template (in Microsoft Word format), which is filled in with a sample to show you what a final outline looks like. Here is how to fill in your own outline: Triple click on a sentence to highlight it.
Is there an outline font?
Exco Sans Minimalist Typeface
Exco Sans is an ultra-modern and minimalist outline font that can give even the simplest designs a touch of style. In this pack from Envato Elements, you can make use of the Exco Sans outline font as italic, shadow, and regular version of the font.
What is outline format?
An outline presents a picture of the main ideas and the subsidiary ideas of a subject. Some typical uses of outlining might be an essay, a term paper, a book review, or a speech. For any of these, an outline will show a basic overview and important details.
How do you create an outline on Microsoft Word?
Add a border to a page
- Go to Design > Page Borders.
- Make selections for how you want the border to look.
- To adjust the distance between the border and the edge of the page, select Options. Make your changes and select OK.
- Select OK.
How do I create an outline in Word 2013?
How to Make Outline Text in Word 2013
- Step 3: Click the Home tab at the top of the window.
- Step 4: Click the Text Effects and Typography button.
- Step 5: Select the Outline option, then choose the desired color for the text outline.
Why is my outline not working in Word?
If the Outlining tab is missing from the ribbon, see if resetting the ribbon fixes the problem. Go to File | Options | Customize Ribbon. Once you have switched to Outline view, the options on the Outlining tab should be available.
How do you outline a document?
The outline detects and lists headings from your text to help organize your document.
Open a document outline
- Open a document in Google Docs.
- Select text for an outline heading.
- At the top, click Normal text.
- Click a heading style. The heading will be added to the outline.
How do you outline text in Canva?
Click the “Effects” feature in your Canva toolbar. You will see an option that says “Splice” (it should be the 5th option in the Effects panel). Click this and your text will now have an outlined style using Canva’s default adjustment settings (more on this below).
What is an inline font?
inline. Describes a typeface with white lines appearing inside the character strokes, sometimes intended to imitate carving or chiseling, as if the characters were carved in stone or wood, or to imitate engraving in metal. Inline typefaces are generally reserved for display work (examples: Delphian, Colonna, Castellar)
What are the 3 types of outlines?
12.2 Types of Outlines
Define three types of outlines: working outline, full-sentence outline, and speaking outline.
What is an example of an outline?
To outline is to summarize the main points or to draw the outer edge of something. An example of to outline is to write the important details of a planned novel before you write it.An example of an outline is the list of topics to be covered in the report. An example of an outline is the notes on cards for a speech.
How do you write a 5 paragraph essay outline?
5-Paragraph Essay Outline
- Opening hook: Your first sentence needs to hook readers. Make it fun and interesting.
- Topic introduction: Offer a brief introduction to what your essay will be about.
- Thesis statement: This sentence provides the point for your essay and what your body paragraphs will discuss.
What is a good outline look like?
Outlines arrange major topics, subtopics, and supporting details. Writers use outlines when writing their papers in order to know which topic to cover in what order. Outlines for papers can be very general or very detailed. Check with your instructor to know which is expected of you.
What is the first step in making an outline?
Here are five steps to a strong outline:
- Choose Your Topic and Establish Your Purpose. A lot of writers struggle to define the initial focus for their paper.
- Create A List Of Main Ideas. This is the brainstorming part of the writing process.
- Organize Your Main Ideas.
- Flush Out Your Main Points.
- Review and Adjust.
How do you add 6 spaces in Word?
Select the paragraphs you want to change. Go to Home > Line and Paragraph Spacing. Choose the number of line spaces you want or select Line Spacing Options, and then select the options you want under Spacing.
Where is the Design tab in Word?
Design and edit in Word
- Select Design > Themes.
- Point to a theme to preview how it will look.
- Select the theme you want.
How do you make a double lined border in Word?
You apply a double border to a paragraph in a Microsoft Word document.
- Select the paragraph for which you want to change the border width.
- On the Page Layout tab, click Page Border in the Page Background group.
- Click the Borders tab.
- On the Borders tab, select the border width that you want in the Width list.
- Click OK.
Last updated Apr 13, 2022

Want to create an outline around certain letters in your Word document? There are two easy ways you can surround words and phrases with colored outlines in Word—using Text Effects, and using Word Art. We’ll show you how to make any font in your Microsoft Word document stand out by outlining it in color.
Steps
Using an Outline Text Effect
- Type the word or phrase you want to outline. The lines around your text will look better on larger characters, so make your font a bit larger than the rest of your text.
- You can make the letters any color you want before creating an outline around them. Just highlight the word or phrase, and then select a color from the “Font” panel at the top of Word.
- Highlight the text you want to outline. Just click and drag the mouse around the text to select it.
- Click the Text Effects and Typography tool. This is the “A” surrounded by a blue glowing outline in the “Font” panel at the top of Word.
- If you don’t see this icon, click the Home tab at the top of Word.
- Select the menu. Now you’ll see all of the options you can use to create an outline around the selected letters.
- Select an outline color. To choose the color of the line that surrounds your text, choose one of the colors displayed on the menu, or select More Outline Colors… to select a custom color.
- Use the menu to select the thickness of the outline. The larger the number, the thicker the outline around the letters.
- If you go too thick, you might make the text unreadable. You can always undo the last action in word by pressing Control + Z (PC) or Command + Z (Mac).
- Use the menu to stylize the outline. If you’d rather have a dotted, dashed, or otherwise stylized line around your word or phrase instead of a solid line, you can select any of the options in this menu.
Using Word Art
- Click the tab at the top of Word. WordArt is a tool that can help you create all types of vibrant text designs, including color outlines. You’ll find it on the Insert tab.
- Click the menu. It’s the icon of a tiled blue “A” on the Insert tab in Word. A menu with several text styles will appear.[1]
- Select an outline style. Not all WordArt styles have outlines, but several do. Don’t worry about the colors you see in the sample—you’ll be able to change those if you don’t like them. Once you click a style, you’ll see some sample text appear on the page.
- Replace the sample text with your own. The text you type will appear in the selected outline style.
- Select the tab. It’ll appear at the top of the screen while you’re editing WordArt. This tab should already be active, but if it’s not, click it now.
- Click the small arrow at the bottom-right corner of the WordArt Styles panel. It’s at the top of Word. This expands the “Format Shape” panel on the right side of Word.
- Click the icon. It’s the “A” with a line under it in the right panel.
- Click to select a color. When you choose this option, you’ll be able to choose the color of the actual text—you can choose an outline color separately.
- Click to design your outline. On this menu option, you can select a color, width, and even pattern (such as dotted or dashed) for the lines that surround your letters.
Related wikiHows
- Convert Text to Outline in Photoshop
- Insert Symbols in an MS Word Document
References
Quick Summary
- ↑ https://support.microsoft.com/en-us/office/insert-wordart-c5070583-1ebe-4dc4-a41f-5e3729adce54
Source: Wiki How
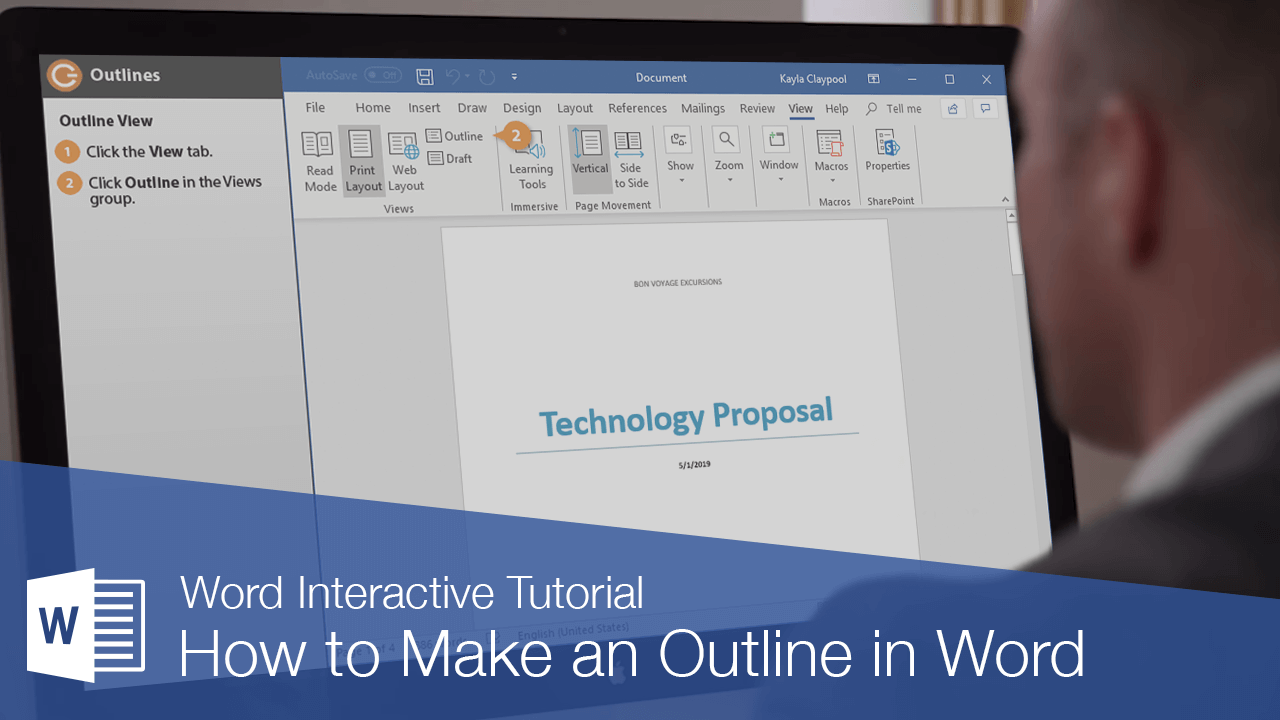
When you’re working with a long document, the Outline view helps you arrange your text. It creates an outline based on the styles you use, so it’s easy to see and organize all your headings and subheadings.
Outline View
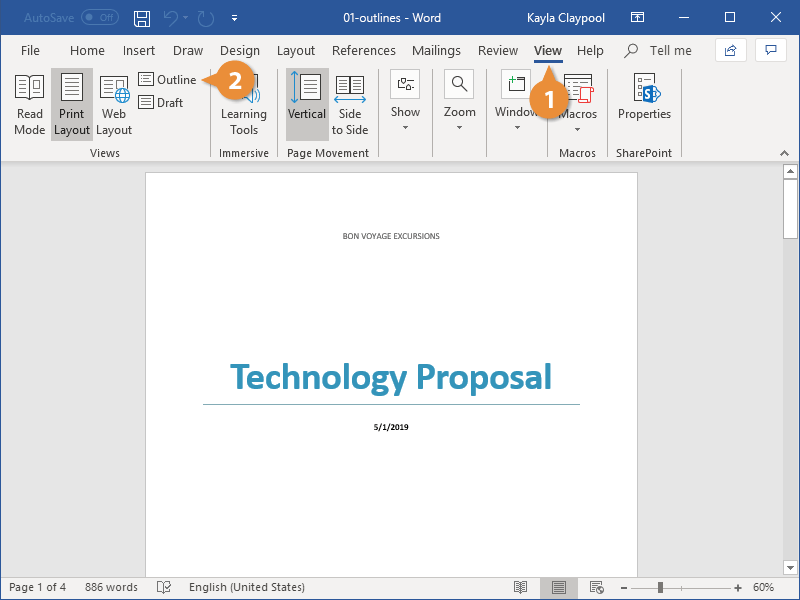
- Click the View tab.
- Click the Outline button in the Views group.
The Outline view breaks the document down so that each heading and paragraph is represented by a single line.
Any text formatted with a Heading style will automatically be set at the specified outline level, but you can adjust a line’s outline level manually using the tools on the Outlining tab that appears in Outline view.
Demote or Promote Items
Outline view makes it very easy to adjust the outline level of a heading.
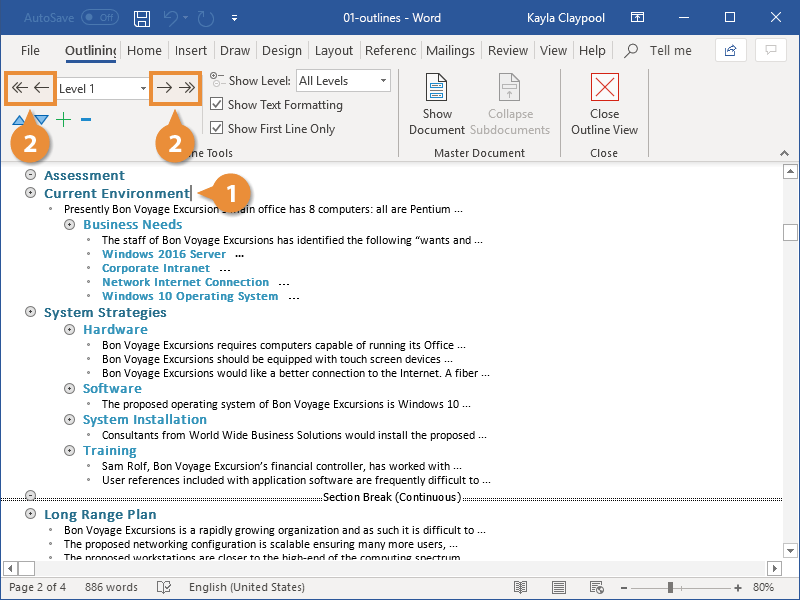
- Click the item in your document that you want to promote or demote.
- Click a Promote or Demote option from the Outline Tools group.
Promoting a topic moves it to a higher outline level, moving it one spot to the left, while demoting a topic moves it to a lower outline level, one spot to the right.
You can also use the double arrow buttons to promote a topic directly to Level 1, the highest outline level, or demote it all the way to body text.
Collapse and Expand Headings
You can collapse the contents of a heading in Outline view to make it easier to see the rest of a document.
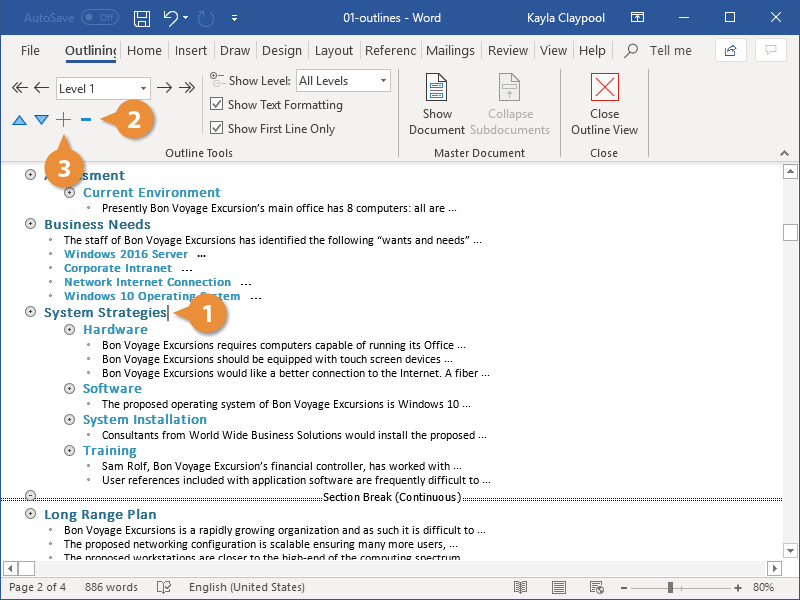
- Click the item in your document that you want to minimize.
- To collapse a section, click the Collapse button in the Outline Tools group.
- To expand a section, click the Expand button in the Outline Tools group.
That heading, along with all its subheadings and body text, is collapsed down to a single line.
That section is expanded once again, displaying all the subheadings and body text.
You can choose which outline levels are displayed by clicking the Show Level list arrow and selecting a level. Only sections of that outline level and higher will be displayed.
FREE Quick Reference
Click to Download
Free to distribute with our compliments; we hope you will consider our paid training.


 Text Effects.