
Headings make text stand out and help people scan your document.
The simplest way to add headings is with heading styles. Using heading styles means you can also quickly build a table of contents, reorganize your document, and reformat its design without having to manually change each heading’s text.
-
Select the text you want to use as a heading.
-
On the Home tab, move the pointer over different headings in the Styles gallery. Notice as you pause over each style, your text will change so you can see how it will look in your document. Click the heading style you want to use.

If you don’t see the style that you want, click the More button
to expand the gallery.
 to expand the gallery.
Tip: You can change the font and formatting of a heading style. Just select the heading text you want to customize, modify its styles the way you want, and then on the Home tab, in the Styles group, right-click the heading style that you customized and click Update Heading to Match Selection. Every time you apply that heading style in your document, the heading style will include your customizations.
Styles can do a lot more, including a table of contents. Here’s a short video on why to write first and format later using Styles.

Headings can make text stand out and help people scan your document. The simplest way to add headings is to use heading styles.
-
Select the text you want to use as a heading.
-
On the Home tab, click the heading style you want to use.
If you don’t see the style you want, click a left, right, or down arrow to see more available styles.
Have you ever wanted to make a custom letterhead to impress clients? Or, maybe you’ve decided to set up a home business? Either way, you don’t need to order from a printer or graphic designer. This easy tutorial will show you how to create a letterhead in Word without needing design skills.
I’ll use Microsoft Word for this step-by-step tutorial, which is included in Microsoft 365 (Formerly Office 365). I’ve also done a Google Docs letterhead as well. In addition, you can use a letterhead when doing a mail merge.
Informational & Design Elements
The key to letterhead design is deciding what you want to display first. Although creating the template is simple, you should do some planning. It helps to take a blank sheet of paper and sketch your design. Nothing fancy, as this is a mockup. This will help you choose the starting page header. The good news is once you grasp the power of templates, you can make changes or use different versions.
While creating your templates, you might consider using Quick Parts to add reusable assets to the Building Block Organizer. Then, you can easily find and insert those parts into other document areas.
The list of elements can vary based on whether you’re an individual, organization, or company. For example, if you’re doing a company letterhead, you might not have a slogan, or if you’re a law firm, you may not have social media addresses. To get you started, here are some visual elements to consider:
- Brand Logo
- Slogan or tagline
- Name
- Address
- Phone numbers (office and mobile)
- Web address
- Email address
- Professional license numbers
- Memberships and awards
- Established date
- Social media addresses
- color scheme
Once you’ve identified the items to include, you should determine their placement. For example, I split my elements between Microsoft’s Word header and footer.
Template Graphics Considerations
Images or logos can improve the design and be impactful. But images can pose design problems. For example, you may find a great graphic, but your office printer doesn’t do it justice. This is because your printer’s capabilities aren’t good enough to display the image. And we all know how pictures differ when you’re running low on printer ink.
The flip side is when you have a superb printer, but the image file isn’t as good as it should be. This could result from reducing the image file size too much, so it appears pixelated.
Another issue is that the image you pull in has too much white space, so you need to crop or adjust the image. But, again, an image capture program like SnagIt can do crops and adjustments.
If you work for a company or organization, you should check if they have an identity or “style guide.” They often have approved graphics they can give you in the appropriate image size and file format. Just like templates, style guides can range from simple to complex. For example, HubSpot has a lengthy article that includes examples.
In this tutorial, I’ll create a simple template starting from a blank document. It shares some of the steps we used for our Cornell Notes template. The page header will have my site logo, and the page footer will have my postal address. And yes, Microsoft Word could handle my new logo, which is an SVG file.
- Start with a blank Word document.
- Click the View menu and select Print Layout.

- From the Insert menu, select Header. It’s in the Header & Footer group. Microsoft Word will display a list with numerous starting Header styles.

- Click the style you prefer. I will use the top Blank style. You’re now in “Design” mode and you should see a Header marker tab to the left and placeholder text above.

- While on the Design menu, click Pictures from the Insert section. If your image is too large, it will scale down to fit the width.
- The Insert File dialog box will open. Find your graphic file and click Insert.
- Review your image to see if it’s balanced. In the example below, I think my logo is twice the size I prefer.
![]()
- Right-click your image and select Size and Position…
- A dialog appears with various resizing options. My initial logo was 20% and I reduced it down to 10%.
![]()
- Click OK to accept the new image size. The image will left-align.
![]()
- Click the image.
- Click Home.
- Click the Center Alignment button in the Paragraph section.
![]()
- Optional: Add any other text you might like in this area.
I include my address with a smaller font and a vertical line or pipe sign in the footer area. I also centered the text.
- From the Insert menu, select Footer. Word will display a series of Footer styles.

- Click the style you prefer. A placeholder footer appears.

- Add in your text such as your address.
- If you wish to change the font, highlight your text and right-click. This will open the mini format bar.

- Optional: If you wish to center your text, click the Home menu and then the Center text button.

- Double-click the small Footer marker at the top left to get out of footer design mode.
This is also a good time to print your custom letterhead to check any artwork’s color and clarity. Your online version may show colors that are muted but print fine. You may also need to adjust your printer settings if they are in draft or economical print mode.
If you need to edit the header or footer to get into design mode, double-click anywhere in the header or footer area. The small tab markers will show to the far left.
Save the Letterhead Template – (*.dotx)
Aside from tweaking your header and footer, you may want to adjust other properties before saving the file. For example, you might change the margins, fonts, or style.
- From the File menu, select Save As…
- In the Save As dialog, change the Save as type: to Document Template (*.dotx).

- Provide a descriptive name for your template such as “letterhead”.
- Click Save.
Using Your Letterhead Template
When you saved the template, Microsoft Word stored it in a templates folder. However, you can create a custom location if you prefer.
To use the letterhead template,
- Open Microsoft Word and select New either from the File menu or Backstage view.
- Click Personal.

- Double-click the template you wish to use. A new document will open based on your selection.
Finding Your Templates Folder
Microsoft stores your templates in a designated folder. You can find the location using these steps.
- Click the File menu from the ribbon.
- From the left navigation pane, click Options.
- From the Word Options dialog box, click Advanced.
- Scroll to the General section. It’s towards the bottom.
- Click the File Locations… button.
- In the File Locations dialog box, double-click User templates.
- Windows File Explorer will open the folder.
- Click the Cancel button.
If you need to find the full file path, you can shift + right-click on the file name.
Show Me How Video
This 4-minute video was recorded using Microsoft Office 365. Click the image below to see the video page.

Key Takeaways
Making a letterhead template won’t take care of your correspondence. You’ll still have to write your letters. But you won’t have to type in your contact details each time. And you can also use this template to bulk-print your letterhead. Many commercial printers can use a Word or PDF file for a print run.
To add a heading style
- Type the text you want into a Word document.
- Select a sentence that you want to add a header to.
- Select Home > Styles (or press Alt+H, then L), and then select the heading you want, such as the Heading 1 button.
Contents
- 1 How do you organize headings in Word?
- 2 How do you write headings and subheadings?
- 3 How do you put a heading 3 in Word?
- 4 How do you apply title style?
- 5 How can create the headings in MS text document?
- 6 How do I add a heading 4 style in Word?
- 7 Should headings be indented?
- 8 What are APA headings?
- 9 What are types of headings?
- 10 How do I add more headings?
- 11 How do I put text under a header in Word?
- 12 How do I make a heading 5 in Word?
- 13 How do I add more headings to a Table of Contents?
- 14 How do I create a heading and Table of Contents in Word?
- 15 Do you need subheadings in apa?
- 16 Do you bold APA headings?
- 17 What does APA stand for?
- 18 Are headings centered in APA?
- 19 What is APA Format example?
- 20 What are the 4 major sections of an APA paper?
How do you organize headings in Word?
Sort a list alphabetically in Word
- Select the list you want to sort.
- Go to Home > Sort.
- Set Sort by to Paragraphs and Text.
- Choose Ascending (A to Z) or Descending (Z to A).
- Select OK.
How do you write headings and subheadings?
A heading or subheading appears at the beginning of a page or section and briefly describes the content that follows.
Accessibility #
- Make sure headings and subheadings always follow a consecutive hierarchy.
- Do not skip a header level for styling reasons.
- Do not use all caps.
- Do not bold or italicize a heading.
How do you put a heading 3 in Word?
When you have the selection where you want to insert a Heading 3 style paragraph, press CTRL+SHIFT+s to display the Apply Styles dialog and in the Style Name control type Heading 3 and then click on Apply.
How do you apply title style?
To apply a style:
- Select the text you want to format, or place your cursor at the beginning of the line.
- In the Styles group on the Home tab, click the More drop-down arrow.
- Select the desired style from the drop-down menu.
- The text will appear in the selected style.
How can create the headings in MS text document?
Add a heading
- Select the text you want to use as a heading.
- On the Home tab, move the pointer over different headings in the Styles gallery. Notice as you pause over each style, your text will change so you can see how it will look in your document. Click the heading style you want to use.
How do I add a heading 4 style in Word?
Word 2010 — How can you make heading 4, 5, etc.. visible in the table of contents?
- select the text.
- right-click the selected text.
- select Styles… from the dropdown list.
- select Apply Styles… from the dropdown list.
- type Heading 4 into the textbox, and hit enter.
Should headings be indented?
headings: Level 1 headings should be centered (and in bold), and Level 2 and 3 headings should be left-aligned (and in bold or bold italic, respectively). Level 4 and 5 headings are indented like regular paragraphs.
What are APA headings?
APA Style uses a unique headings system to separate and classify paper sections. Headings are used to help guide the reader through a document. The levels are organized by levels of subordination, and each section of the paper should start with the highest level of heading. There are 5 heading levels in APA.
What are types of headings?
3 Types of Headings
- Question Headings. A question heading, as you might have guessed, is a heading in the interrogative case.
- Statement Headings. Statement headings are those that include a noun and a verb, forming a complete thought.
- Topic Heading.
How do I add more headings?
To add a heading style
- Type the text you want into a Word document.
- Select a sentence that you want to add a header to.
- Select Home > Styles (or press Alt+H, then L), and then select the heading you want, such as the Heading 1 button.
In This Article
- In Page Layout view, double-click the top or bottom margin area of the page.
- On the Insert tab, click the Header button or the Footer button and then choose Edit Header or Edit Footer from the menu that appears.
- Position the insertion point where you want the header or footer text to appear.
How do I make a heading 5 in Word?
Change the heading levels reported in the TOC
- Click anywhere inside the TOC.
- Go to the References tab > Table of Contents > Insert Table of Contents.
- On the Table of Contents window, change the Show levels setting from 3 to 4 or 5, depending on how deep you want to go.
- Click OK.
- Say Yes to replace the existing TOC.
How do I add more headings to a Table of Contents?
Go to References > Table of Contents. Select Custom table of contents. Use the settings to show, hide, and align page numbers, add or change the tab leader, set formats, and specify how many levels of headings to show.
How do I create a heading and Table of Contents in Word?
Click where you want to insert the table of contents – usually near the beginning of a document. Click References > Table of Contents and then choose an Automatic Table of Contents style from the list.
Do you need subheadings in apa?
If you are including a subheading to a section, APA formatted papers require you to have two subheadings on the same level. Some other general tips for you to consider are, donΓÇÖt overdo the use of headings and subheadings. Not every paragraph needs them.
Do you bold APA headings?
Note: Headings for Title, Abstract, and References are not in bold but otherwise follow Level 1 format. Your paragraph text begins a double-spaced line below the heading, with a ½-inch indentation at the start of each paragraph. Indented, bold, lowercase, and ending with a period.
What does APA stand for?
American Psychological Association
Summary: APA (American Psychological Association) style is most commonly used to cite sources within the social sciences.
Are headings centered in APA?
The first level of heading is bolded and centered, and the first letter of each word in the heading is capitalized. The paragraph text should be typed on the following line and indented five spaces from the left.
What is APA Format example?
APA in-text citation style uses the author’s last name and the year of publication, for example: (Field, 2005). For direct quotations, include the page number as well, for example: (Field, 2005, p. 14).
What are the 4 major sections of an APA paper?
In most cases, your paper should include four main sections: the title page, abstract, main section, and references list.
These themes give outstanding examples of the best ways to structure such a letter, and include example web content to serve as an overview of format. A cover letter needs the following seven parts (we’ve listed them from top to bottom):

Sample Of Business Letterhead Format Tunu.redmini.co
Use this accessible personal letterhead template to create personal stationery for a letter with a fresh look when an email won’t do.

Letter heading format in word. At the top of your cover letter, include the following information: Just like how the name suggest a heading is the head of any letter. The styles define the font family, size, color, and more.
In the corporate environment, it is a textbook rule that all kinds of official communication must. Variety of professional letter heading template that will perfectly match your needs. Open a blank document in either microsoft word or google docs.
Left justify your letter, so that your contact information, the date, the letter, and your signature are all aligned to the left. For the finishing, it is cool that you proofread your bank statement template doc format request letter word document sial heading. You can also share this document digitally if needed.
While you can create your own styles and use those as headings, or adjust the formatting of headings look on the fly, you can also change the default styles if you want. Set margins to be 1” on all sides of your document (usually the default). Your full name should be the focal point of your cover letter header (use a large font size and bold text)
When you saved the template, microsoft word stored it in a templates folder. Download the recommendation letter template (compatible with google docs or word) or read the example below. It is good that you apologize it and convey the addressee that you try your best in serving them.
These letterhead templates are available in microsoft word (.doc) format. Section, set the font to times new roman. 9 free letter heading template examples.
These themes supply excellent examples of how to structure such a letter, and include example material to work. That includes all details that should appear right below the cover letter header: Dont panic , printable and downloadable free free.
What is a heading in a formal letter? This letter template shows the format of a typical letter of reference for employment or educational purposes. Professional letter heading template collection.
To use the letterhead template, open microsoft word and select new either from the file menu or backstage view. It is a matter of your sincere manner. These layouts offer superb instances of how you can structure such a letter, as well as.
This personal letterhead template for word is sleek, modern, and ready to customize. There are many instances where we have to use this heading. The header is what your recipient will see at first when reading a letter from you.
It is located at the upper top of your letter sheet. When sending typed letters, leave two spaces before and after your written signature. The business letter heading format, like the format of a business letter itself, is specific and must get across certain if you don’t have letterhead, it’s still easy to create the proper letter heading format.
Recommendation letter for students of employee. Once things are all placed in their respective places on the document, you can save it in the file format you wish to use it for and print it. When it comes to the casual letterhead format, you are free to design it according to your company’s writing style since this letterhead is mostly featured on internal letters.
Whether your tool of choice is microsoft word or google docs, here’s how to create a cover letter heading: Set the text color to black. Single space your letter and leave a space between each paragraph.
In the modify style dialog box (see picture above), in the formatting: I am currently working on a template and i deleted (by right clicking and choosing remove) most of the default style boxes from word styles menu (i’m running word 2010 on. Set the font size to 12 point.
You can write the full date (june 26, 2019. How to format a cover letter. Just download a template, open it in microsoft word (or any other program that can read doc documents), edit the template, and print it.
Check the format of letterhead templates for more. When writing a formal or service letter, discussion design and also layout is key to earning a good impression. When creating a formal or service letter, discussion design and also format is key to making a great initial impression.
The format is appropriate for an employment reference, as well as a reference for college or. This heading is used when we don’t know who the recipient is or we don’t know the person for whom we’re writing. Variety of free letter heading template that will completely match your demands.

Business Letterhead Template Business letter template

Formal Business Letter In Word Templates At regarding
Formal Business Letter Templates 35 Formal / Business

Business Letter Modified Block Style Format Best Regarding

Cover Letter Sample For Job Application Doc Letter

Image result for trainee engineer experience certificate

Sample Of Quotation for Supply Best Of Quotation Letter

Simple Dots Resume Template Resume cover letter template

Business Letter Format Template PDF, Word, Excel

Business Letterhead Template Word in 2020 Company

You Can See This New Cover Letter format Multiple

Incentive Plan Template New Free Customer Incentive

40 Free Letterhead Template Word Letterhead template

Business Letter Format In MsWord FormalBusinessLetterMs

Professional Reference Letter Template Word Best Of 5

Business Letter Format On Microsoft Word 2010 ] Business

company letterhead examplepany example icoxcbmg

10+ Free Business Letter Template in PDF, Word [Doc

40 Business Letter format Template in 2020 Business
Apply and Customize Headings in Word Documents
by Avantix Learning Team | Updated April 19, 2022
Applies to: Microsoft® Word® 2010, 2013, 2016, 2019, 2021 or 365 (Windows)
You can create headings in Microsoft Word documents by applying Word’s built-in heading styles (such as Heading 1 or Heading 2). After you have applied styles, you can modify them and change the font, size, color, and other formatting attributes so the entire document will update. Once you have applied heading styles, you’ll be able to navigate to the headings using the Navigation Pane and create a table of contents.
Recommended article: How to Hide Comments in Word (or Display Them)
Do you want to learn more about Microsoft Word? Check out our virtual classroom or in-person classroom Word courses >
Heading styles are very important because they create structure in your documents and are readable by screen readers or assistive technology programs used by people with vision impairments. They can also save you a lot of time formatting and reformatting documents.
In addition to creating structure, heading styles are also used to:
- Generate a table of contents
- Reformat a document using Style Sets
- Navigate using the Navigation Pane (select Navigation Pane on the View tab in the Ribbon)
- Rearrange a document using the Outline View
- Create a structured PDF (portable document format) file with heading tags
Note: Screenshots in this article are from Word 365 but are very similar in previous versions of Word.
Creating headings by applying Word heading styles
To create or designate headings, you will need to apply the built-in heading styles in order (Heading 1, Heading 2, Heading 3, and so) to paragraphs. There are 9 levels of headings available in Word.
Heading styles are technically available as paragraph and character styles, but it’s important to apply them as paragraph styles to entire paragraphs. A paragraph in Word is anything with a hard return after it (you have pressed Return or Enter).
Heading styles are affected by your theme choices (overall theme, color theme, and font theme). You can change theme options using the Design tab in the Ribbon.
To create headings by applying heading styles:
- Click in the paragraph (title or subheading) you want to designate or format as a heading.
- Click the Home tab in the Ribbon.
- Click the heading style you want in the Styles Gallery (such as Heading 1) in the Style group. You may need to click the More arrow on the bottom right of the Styles Gallery to view more styles and then click the style you want to use.
All available heading styles do not appear initially in the Styles Gallery. When you apply a heading level (such as Heading 3), an additional heading level should appear in the Gallery (such as Heading 4).
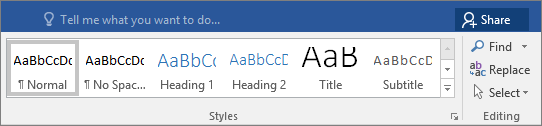
The Styles Gallery appears on the Home tab in the Ribbon and typically displays top level headings:

If you click the More arrow on the bottom right of the Styles Gallery, an expanded gallery appears:

Modifying or customizing heading styles using the Styles task pane
If you modify heading styles, every instance of the modified style will change in your document. Not only will this save time, but it will also ensure consistency. There are many ways to customize heading styles in Word. In this article, we will modify heading styles using the Styles task pane.
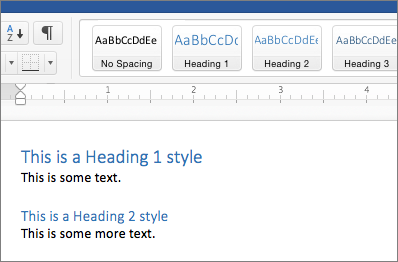
The Styles task pane appears with styles in the document (you can change this display by clicking Options at the bottom of the task pane):

To modify or customize a heading style:
- Click the Home tab in the Ribbon.
- Click the dialog box launcher (diagonal arrow) on the bottom right in the Styles group. You can also press Ctrl + Alt + Shift + S. The Styles task pane will appear. If the task pane is floating, double-click the title bar.
- Click in a paragraph using the style you want to modify.
- Click the arrow to the right of the heading you want to modify in the Styles task pane and then select Modify from the drop-down menu. You can also right-click the heading style in the task pane and select Modify. A dialog box appears.
- In the Modify Style dialog box, select the desired options such as font, font size, font color, alignment, and line spacing. Buttons in this dialog box are comparable to those in the Ribbon.
- If you want to change some other formatting options (such as paragraph formats), select Format at the bottom of the dialog box and select other options from the drop-down menu.
- Select Only in this document so that the style is modified in the current document only.
- Do not select Automatically Update unless you want the document styles to update when a user changes heading formatting in the document. It’s typically best to leave this option unchecked.
- Click OK or press Enter. The entire document will change unless a heading has been manually formatted (which overrides the style). You can simply reapply the style if this occurs.
The Modify Styles dialog box displays the style name, the type of style and options for modifying the style:

When you save the document, the modified styles are also saved.
Styles are the most important formatting feature in Word to automate formatting in longer documents. Heading styles also have the added benefit of creating structured documents and are integrated with several other Word features such as generated tables of contents.
This article was first published on May 15, 2021 and has been updated for clarity and content.
Subscribe to get more articles like this one
Did you find this article helpful? If you would like to receive new articles, join our email list.
More resources
How to Create a Table of Contents in Word
14+ Word Selection Shortcuts to Quickly Select Text
How to Copy Styles Between Microsoft Word Documents Using the Organizer
How to Insert Reusable Text Snippets in Word with Quick Parts (Great Timesaver)
How to Convert a PDF to Word in Microsoft Word (for Free – No Third Party Programs Needed)
Related courses
Microsoft Word: Intermediate / Advanced
Microsoft Excel: Intermediate / Advanced
Microsoft PowerPoint: Intermediate / Advanced
Microsoft Word: Long Documents Master Class
Microsoft Word: Styles, Templates and Tables of Contents
Microsoft Word: Designing Dynamic Word Documents Using Fields
VIEW MORE COURSES >
To request this page in an alternate format, contact us.
Our instructor-led courses are delivered in virtual classroom format or at our downtown Toronto location at 18 King Street East, Suite 1400, Toronto, Ontario, Canada (some in-person classroom courses may also be delivered at an alternate downtown Toronto location). Contact us at info@avantixlearning.ca if you’d like to arrange custom instructor-led virtual classroom or onsite training on a date that’s convenient for you.
Copyright 2023 Avantix® Learning
Microsoft, the Microsoft logo, Microsoft Office and related Microsoft applications and logos are registered trademarks of Microsoft Corporation in Canada, US and other countries. All other trademarks are the property of the registered owners.
Avantix Learning |18 King Street East, Suite 1400, Toronto, Ontario, Canada M5C 1C4 | Contact us at info@avantixlearning.ca