
One of the advantages to using Microsoft Exchange or Microsoft Outlook is the ability to use information from the Address Book in Microsoft Word documents. Exactly how to do it, though, isn’t obvious. The key is an AutoText entry called AddressLayout in English (see Non-English Word for the correct name in other languages). This article shows you how to change this entry and how to add an Insert Address button to the Word toolbar. See More Information at the end of this article for alternative methods of putting addresses into Word documents.
Adding an Insert Address button | Changing the Address Layout
Non-English Word | Notes | More Information
Adding an Insert Address button
Word 7.0 includes an Insert Address button on its Standard toolbar, but newer versions of Word don’t add the button to the Toolbar or ribbon. If you’re going to add address information to documents frequently, having a button available will make it easier. Here’s how to add it to a toolbar:
- In Word, choose View | Toolbars | Customize, then switch to the Commands tab..
- Under Categories, choose Insert.
- Near the bottom of the Commands list, you’ll find Address Book. Drag that command to any toolbar currently displayed in Word.
The Insert Address button makes it easy to add an address to any document.
Changing the Address Layout
Word includes a default AddressLayout entry that you can’t see or edit directly. Test it by using the Insert Address button to insert an address from your Address Book.
To add, remove or rearrange fields, create a new layout in a Word document, then save it as a new AutoText entry named AddressLayout. (If you have a non-English version of Word, see Non-English Word below.)
The following table lists each field you can use, indicates whether it applies to addresses from the Personal Address Book (PAB) or Outlook Contacts (OAB) and lists the corresponding field name in the OAB and PAB.
Fields marked with an asterisk (*) may work only in Word 2000.
| AddressLayout Field | Contacts (OAB) or Personal Address Book (PAB) Field Name |
OAB | PAB |
|---|---|---|---|
| Name Fields | |||
| <PR_DISPLAY_NAME> | Subject (by default, First Last Middle Suffix) (OAB) First Last or Last, First (PAB, depending on setting) |
X | X |
| <PR_GIVEN_NAME> | First | X | X |
| <PR_SURNAME> | Last | X | X |
| <PR_TITLE> | Job Title (OAB) Title (PAB) |
X | X |
| <PR_DISPLAY_NAME_PREFIX>* | Title (OAB) | X | ? |
| Company Fields | |||
| <PR_COMPANY_NAME> | Company | X | X |
| <PR_DEPARTMENT_NAME> | Department | X | X |
| <PR_OFFICE_LOCATION> | Office Location (OAB) Office (PAB) |
X | X |
| <PR_ASSISTANT> | Assistant | X | X |
| Address Fields | |||
| <PR_STREET_ADDRESS> | Street | X | X |
| <PR_LOCALITY> | City | X | X |
| <PR_STATE_OR_PROVINCE> | State/Province | X | X |
| <PR_POSTAL_CODE> | ZIP/Postal code | X | X |
| <PR_COUNTRY> | Country | X | X |
| <PR_POSTAL_ADDRESS> | Full address, including country only if it’s not your own | ||
| Phone Fields | |||
| <PR_OFFICE_TELEPHONE_NUMBER> | Business | X | X |
| <PR_OFFICE2_TELEPHONE_NUMBER> | Business 2 | X | X |
| <PR_PRIMARY_TELEPHONE_NUMBER> | Phone number (on Business tab) | X | |
| <PR_BUSINESS_FAX_NUMBER> | Business Fax | X | |
| <PR_PRIMARY_FAX_NUMBER> | Fax | X | |
| <PR_ASSISTANT_TELEPHONE_NUMBER> | Assistant (on Phone pick list) (OAB) Assistant (on Phone Numbers tab) (PAB) |
X | X |
| <PR_BEEPER_TELEPHONE_NUMBER> | Pager | X | X |
| <PR_CAR_TELEPHONE_NUMBER> | Car | X | |
| <PR_CELLULAR_TELEPHONE_NUMBER> | Mobile | X | X |
| <PR_RADIO_TELEPHONE_NUMBER> | Radio | X | |
| <PR_HOME_TELEPHONE_NUMBER> | Home | X | X |
| <PR_HOME2_TELEPHONE_NUMBER> | Home 2 | X | X |
| <PR_HOME_FAX_NUMBER> | Home Fax | X | |
| <PR_OTHER_TELEPHONE_NUMBER> | Other | X | |
| Other Fields | |||
| <PR_EMAIL_ADDRESS> | E-mail Address | X | X |
| <PR_ADDRTYPE> | E-mail Type | X | X |
| <PR_COMMENT> | Notes | X |
An example is the easiest way to show how to create a new layout. If you want to add the job title and company name to the layout and remove the country name, type (or copy and paste) this into Word, with a carriage return after each line:
<PR_GIVEN_NAME> <PR_SURNAME> <PR_TITLE> <PR_COMPANY_NAME> <PR_STREET_ADDRESS> <PR_LOCALITY>, <PR_STATE_OR_PROVINCE> <PR_POSTAL_CODE>
Make sure you include spaces and punctuation where you want them to appear in the address. Now, select the entire layout, and save it as an AutoText entry with the name «AddressLayout,» taking care to use exactly that spelling and capitalization.
To save an AutoText entry in Word 7.0, choose Edit | AutoText, enter the Name as «AddressLayout,» then click Add.
To save an AutoText entry in Word 97 or Word 2000/2002/2003, choose Insert | AutoText | New, enter «AddressLayout» as the name, then click OK.
You can now use the Insert Address button to test your new AddressLayout. The above example should give you an address that looks like this:
Bill GatesCEOMicrosoft CorporationOne Microsoft WayRedmond, WA 98052
You might notice, though, that if a person has no title, you get a blank line. To suppress blank lines and make use of different fields that display the same data, depending on whether the source is a PAB or OAB entry, try this variation from the Office 97 Resource Kit, omitting the carriage returns:
{{<PR_GIVEN_NAME> <PR_SURNAME> | <PR_DISPLAY_NAME>}r} {{<PR_STREET_ADDRESS>r}{{<PR_LOCALITY>} {, <PR_STATE_OR_PROVINCE> <PR_POSTAL_CODE>}r} {<PR_COUNTRY>r}| <PR_POSTAL_ADDRESS>r}
The curly braces ( {} ) are used to ensure that a particular line does not print if it is empty, for example, if the person does not have a title. The vertical bar ( | ) means OR. And the r switch substitutes for the carriage return. (Omit the r in Word 2000 and just put a carriage return or soft return after each line; the r switch doesn’t work in Word 2000.) You are limited to a total of 12 fields, according to WD2000: How to Modify the Layout of an Address Book Entry.
For Office XP, this turns out to be a pretty good AddressLayout entry to include both company and country. I suspect it might also work well in Office 2000. You should put a carriage return or soft return at the end of each line shown here:
{{<PR_GIVEN_NAME> <PR_SURNAME> | <PR_DISPLAY_NAME>} }{<PR_COMPANY_NAME>} {{<PR_STREET_ADDRESS> }{{<PR_LOCALITY>}{, <PR_STATE_OR_PROVINCE> <PR_POSTAL_CODE>}} {<PR_COUNTRY> }| <PR_POSTAL_ADDRESS>}
If the address doesn’t work the way you think it should, check the field names for spelling mistakes and make sure that you actually have information entered in the corresponding Contacts or PAB fields. Also, if the addresses were imported, you may need to follow the instructions in MSKB article Address Displays Incorrectly on Imported Contacts.
Another approach is to simply make sure that the Address field contains whatever you want printed after the name, repeating the company name or other information as needed.
Non-English Word
If you are using a non-English version of Word, AddressLayout may not be the correct name for the AutoText entry that you need to modify. If you discover what the correct name is for a particular language, please let us know and we’ll add it to this list:
- Dutch — AdresIndeling
- French — MiseEnPageAdresse
- German — Adreßlayout or Adresslayout
- Italian — IndirizzoLayout
- Nordic languages — AdresseLayout
- Spanish — AddressLayout
- Turkish – AdresD’zeni
Notes
If you want to write a Word macro to insert addresses, use the GetAddress method. This also gives you the option of specifying an address layout, rather than using the AddressLayout entry from AutoText. There’s a good example in the VBA help file in Word.
Additional notes on the fields:
- In an Outlook contact, if you edit the Subject field, subsequent changes to any name field will cause the Subject field also to change. If you are using the Reorder Contacts form to change the way addresses are displayed in the Outlook Address Book, you should use the <PR_GIVEN_NAME> and <PR_SURNAME> fields in the AddressLayout entry, rather than <PR_DISPLAY_NAME>. Also, <PR_DISPLAY_NAME> may show the (E-mail) suffix for contacts from the Outlook Address Book.
- For Outlook Contacts, the <PR_EMAIL_ADDRESS> and <PR_ADDRTYPE> fields work with the E-mail field only. There are no corresponding fields for the E-mail 2 and E-mail 3 addresses.
- In Outlook, the Country field is often filled in by default with a value determined by your regional settings (Control Panel | Regional Settings). Click Address on the Contacts record to check the value placed in Country field.

В эпоху интернета необходимость написать адрес на английском языке возникает нечасто, но у многих вызывает трудности. Как правило, это нужно для отправки официальной корреспонденции, посылки, для указания адреса доставки в интернет-магазине или для учебного задания. Ничего сложного в этом нет, задача несложная даже для начинающих. Главный принцип: почтовые работники должны понять, куда им доставить письмо.
Содержание:
- Пишем адрес получателя на английском языке.
- Как писать обратный адрес на письме за границу?
- Как написать российский адрес на английском?
- Как написать российский адрес доставки на английском языке для интернет-магазина (на примере AliExpress).
- Приложение: сокращения, используемые в адресах в США.
Читайте также: Как вести деловую переписку на английском по электронной почте.
Пишем адрес получателя на английском языке
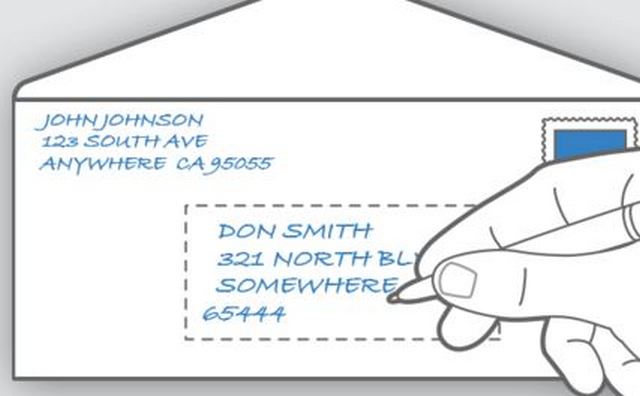
Мы привыкли писать адрес от большего к меньшему: индекс, область или край, город, улица, дом, квартира (если многоквартирный дом), фамилия и имя адресата. Если вы отправляете письмо в США или Великобританию, то адрес на английском языке пишется наоборот. Вот примеры адресов в США:
Joyce Price (имя получателя)
44 Cedar Avenue (номер дома, название улицы)
Arcadia Bay (город)
Oregon 97141 (штат, индекс)
USA
Также в США часто сокращают названия штатов, в адресе ниже DE значит Delaware:
Tyler Durden (имя получателя)
420 Paper St (номер дома, название улицы)
Wilmington (город)
DE 19886 (штат, индекс)
USA
«St» — это сокращенно от «Street». Список сокращений в американских адресах, включая штаты, можно посмотреть в приложении в конце этой статьи.
Не все живут в домах («houses»), многие живут в квартирах («apartment» в США, «flat» в Великобритании).
Sheldon Cooper & Leonard Hofstadter
Apt 4B 2311 North Los Robles Avenue (4B — номер квартиры, 2311 — номер дома)
Pasadena
California 91108
USA
Обычно сначала пишут номер квартиры, потом номер дома, потом улицу, как в примере выше. Иногда номер квартиры пишут после улицы и дома, выделяя его значком #
2311 North Los Robles Avenue, #Apt 4B
Бывает даже, что квартиру пишут отдельной строкой, если есть место:
Apt 4B
2311 North Los Robles Avenue
В примерах выше я написал все адреса строчными и прописными буквами (как в обычном тексте) — обычно так и пишут.

Однако конверты, открытки, посылки желательно подписывать прописными буквами, не используя точки и запятые. Такие рекомендации дает, в частности, почтовая служба USPS.
Примеры выше касаются адресов в США. В Великобритании система практически такая же, только не забывайте, что квартира в британском варианте — это «flat», а не «apartment».
Mr. Bean
Flat 2
12 Arbour Road
Highbury
North London
5089
Важное примечание: «Почта России» рекомендует в международных письмах дублировать название страны на русском. Видимо, для того, чтобы сортировщик почты наверняка понял, в какую страну отправляется письмо:
Tyler Durden
420 Paper St
Wilmington
DE 19886
USA, США (название страны продублировано по-русски)
Как писать обратный адрес на письме за границу?
Начнем с того, зачем на конверте нужен обратный адрес. Причины две:
- Обратный адрес нужен получателю, чтобы он знал, куда отправить ответ.
- Обратный адрес нужен почтальонам на случай, если письмо придется вернуть.
«Почта России» рекомендует писать обратный адрес по-русски, дублируя на английском названия страны и города.
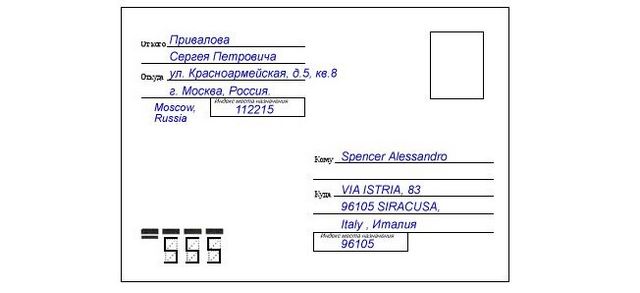
Логика, видимо, такая. Предположим вы написали из Москвы в Нью-Йорк, указав «Moscow, Russia» вдобавок к обратному адресу на русском. Американский адрес, разумеется, на английском (с пометкой «США» для наших почтовых работников). Далее происходит следующее:
- Письмо благополучно уходит в США, попадает в нужное почтовое отделение в Нью-Йорке.
- Нью-йоркский почтальон, придя по указанному адресу, обнаруживает пустырь/котлован/кратер — в общем, там никто не живет.
- Письмо на американской почте решают отправить назад. По-русски никто читать не умеет, но их спасает надпись «Moscow, Russia».
- Письмо уходит в Москву, там его смотрят русские почтальоны (напоминаю, обратный адрес написан по-русски) и без проблем отправляют вам с пометкой «адресат не найден».
Недостаток этого подхода в том, что адресату трудно будет написать вам ответ, переписав адрес из «Откуда». Для англичанина или американца кириллица — это примерно как иероглифы, особенно если вы напишете адрес не печатными буквами. В таком случае можно либо написать ваш адрес на латинице в самом письме, либо заполнить «Откуда» на латинице.
Как написать российский адрес на английском языке
Российский адрес пишется в обычной для нашей почты последовательности: страна, индекс, область, город, улица, дом, квартира, фамилия и имя получателя. Вообще, в почтовых службах мира, насколько я знаю, принято, что обратный адрес пишется в традициях страны-отправителя, а «Куда» — в традициях страны-получателя.
Адрес нужно писать транслитом (транслитерация — передача знаков одного языка знаками другого), то есть вы не переводите слова «край», «область» и даже «город», «улица», а пишете эти слова английскими буквами: krai, oblast, gorod, ulitsa. Это делается для того, чтобы наши почтальоны поняли куда доставить письмо.
Не нужно пытаться переводить «область» как «region» или «district», «переулок» как «lane» или «drive», а «шоссе» как «highway». Пощадите почтальона, который будет искать «хайвэй Энтузиастов».
Единственное, что нужно писать обязательно в переводе — название страны: Russia, также можно перевести названия некоторых городов, у которых есть устоявшийся общеизвестный перевод на английский (Moscow, St. Petersburg).
Приведем пример:
Russia
123456
Moscow
ul. Lesnaya, d. 5, kv. 176
Pupkin Ivan
Как написать российский адрес доставки на английском языке для интернет-магазина (на примере AliExpress)
Расскажу также о еще одной частой проблеме с адресом. Сейчас многие заказывают товары в иностранных интернет-магазинах и, делая это в первый раз, испытывают трудности с заполнением анкеты с адресом доставки. Тут все просто: все данные пишутся латиницей, слова вроде «край», «область» транслитерируются. Все в точности как в пункте выше про написание российского адреса латиницей на конверте.
Возьмем для примера магазин AliExpress, в последние пару лет ставший очень популярным в России. В «Алиэкспресс» типичная анкета с адресом доставки, в нее входят поля:
Рекомендуемая статья: Как узнать свой словарный запас?
- Имя получателя — заполняется транслитом, например: Pupkin Igor Ivanovich.
- Странарегион — выбирается из выпадающего списка.
- Улицадомквартира — транслитом, например: ulitsa Lenina, dom 12, kvartira 7 (или ul. Lenina, d. 12, kv. 7)
- Крайобластьрегион — выбирается из выпадающего списка.
- Город — транслитом, например: Voronezh, Murmansk, Vladivostok.
- Почтовый индекс.
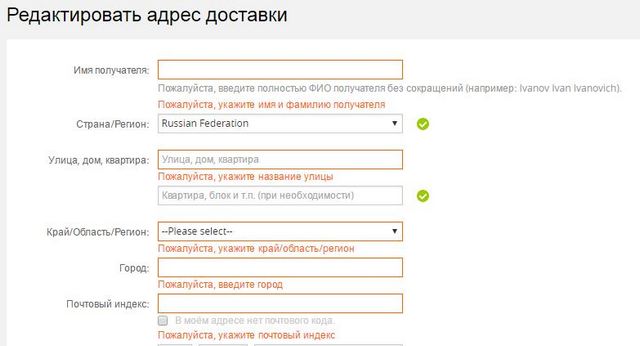
Если нажать на строку, где указывается край, область или регион, вы увидите, что они тоже написаны транслитом, например: Magadan Oblast, Altai Krai. По сути все поля, кроме названия страны, нужны не иностранным почтальонам, а российским, поэтому транслит — лучший вариант.
Приложение: сокращения, используемые в адресах в США
Читайте также: Тест: Штаты США и их столицы
| Сокращения, используемые в адресах в США | |||||
|---|---|---|---|---|---|
| ALY | ALLEY | FRG | FORGE | PNES | PINES |
| ANX | ANNEX | FRK | FORK | PL | PLACE |
| APT | APARTMENT | FRKS | FORKS | PLN | PLAIN |
| ARC | ARCADE | FT | FORT | PLNS | PLAINS |
| AVE | AVENUE | FWY | FREEWAY | PLZ | PLAZA |
| BSMT | BASEMENT | FRNT | FRONT | PT | POINT |
| BYU | BAYOU | GDNS | GARDEN | PRT | PORT |
| BCH | BEACH | GDNS | GARDENS | PR | PRAIRIE |
| BND | BEND | GTWY | GATEWAY | RADL | RADIAL |
| BLF | BLUFF | GLN | GLEN | RNCH | RANCH |
| BTM | BOTTOM | GRN | GREEN | RPDS | RAPID |
| BLVD | BOULEVARD | GRV | GROVE | RPDS | RAPIDS |
| BR | BRANCH | HNGR | HANGER | RST | REST |
| BRG | BRIDGE | HBR | HARBOR | RDG | RIDGE |
| BRK | BROOK | HVN | HAVEN | RIV | RIVER |
| BLDG | BUILDING | HTS | HEIGHTS | RD | ROAD |
| BG | BURG | HWY | HIGHWAY | RM | ROOM |
| BYP | BYPASS | HL | HILL | SHL | SHOAL |
| CP | CAMP | HLS | HILLS | SHLS | SHOALS |
| CYN | CANYON | HOLW | HOLLOW | SHR | SHORE |
| CPE | CAPE | INLT | INLET | SHRS | SHORES |
| CSWY | CAUSEWAY | IS | ISLAND | SPC | SPACE |
| CTR | CENTER | ISS | ISLANDS | SPG | SPRING |
| CIR | CIRCLE | JCT | JUNCTION | SPGS | SPRINGS |
| CLFS | CLIFF | KY | KEY | SQ | SQUARE |
| CLFS | CLIFFS | KNLS | KNOLL | STA | STATION |
| CLB | CLUB | KNLS | KNOLLS | STRA | STRAVENUE |
| COR | CORNER | LK | LAKE | STRM | STREAM |
| CORS | CORNERS | LKS | LAKES | ST | STREET |
| CRSE | COURSE | LNDG | LANDING | STE | SUITE |
| CT | COURT | LN | LANE | SMT | SUMMIT |
| CTS | COURTS | LGT | LIGHT | TER | TERRACE |
| CV | COVE | LF | LOAF | TRCE | TRACE |
| CRK | CREEK | LBBY | LOBBY | TRAK | TRACK |
| CRES | CRESCENT | LCKS | LOCK | TRFY | TRAFFICWAY |
| CROSSING | LCKS | LOCKS | TRL | TRAIL | |
| DL | DALE | LDG | LODGE | TRLR | TRAILER |
| DM | DAM | LOWR | LOWER | TUNL | TUNNEL |
| DEPT | DEPARTMENT | MNR | MANOR | TPKE | TURNPIKE |
| DV | DIVIDE | MDWS | MEADOW | UN | UNION |
| DR | DRIVE | MDWS | MEADOWS | UPPR | UPPER |
| EST | ESTATE | ML | MILL | VLY | VALLEY |
| EXPY | EXPRESSWAY | MLS | MILLS | VIA | VIADUCT |
| EXT | EXTENSION | MSN | MISSION | VW | VIEW |
| FLS | FALLS | MT | MOUNT | VLG | VILLAGE |
| FRY | FERRY | MTN | MOUNTAIN | VL | VILLE |
| FLD | FIELD | NCK | NECK | VIS | VISTA |
| FLDS | FIELDS | OFC | OFFICE | WAY | WAY |
| FLT | FLAT | ORCH | ORCHARD | WLS | WELL |
| FL | FLOOR | PKWY | PARKWAY | WLS | WELLS |
| FRD | FORD | PH | PENTHOUSE | ||
| FRST | FOREST | PNES | PINE |
| Сокращенные названия штатов и территорий в США | |||||
|---|---|---|---|---|---|
| AA | Armed Forces Americas | IN | Indiana | NY | New York |
| AE | Armed Forces Europe | KS | Kansas | OH | Ohio |
| AK | Alaska | KY | Kentucky | OK | Oklahoma |
| AL | Alabama | LA | Louisiana | OR | Oregon |
| AP | Armed Forces Pacific | MA | Massachusetts | PA | Pennsylvania |
| AR | Arkansas | MD | Maryland | PR | Puerto Rico |
| AS | American Somoa | ME | Maine | PW | Palau |
| AZ | Arizona | MH | Marshall Islands | RI | Rhode Island |
| CA | California | MI | Michigan | SC | South Carolina |
| CO | Colorado | MN | Minnesota | SD | South Dakota |
| CT | Connecticut | MO | Missouri | TN | Tennessee |
| DC | District of Columbia | MP | Northern Mariana Islands | TX | Texas |
| DE | Delaware | MS | Mississippi | UT | Utah |
| FL | Florida | MT | Montana | VA | Virginia |
| FM | Federated States of Micronesia | NC | North Carolina | VI | Virgin Islands |
| GA | Georgia | ND | North Dakota | VT | Vermont |
| GU | Guam | NE | Nebraska | WA | Washington |
| HI | Hawaii | NH | New Hampshire | WI | Wisconsin |
| IA | Iowa | NJ | New Jersey | WV | West Virginia |
| ID | Idaho | NM | New Mexico | WY | Wyoming |
| IL | Illinois | NV | Nevada |

Здравствуйте! Меня зовут Сергей Ним, я автор этого сайта, а также книг, курсов, видеоуроков по английскому языку.
Подпишитесь на мой Телеграм-канал, чтобы узнавать о новых видео, материалах по английскому языку.
У меня также есть канал на YouTube, где я регулярно публикую свои видео.
Userforms are a great way to solicit input. For instance, you can map a few bookmarks via a bit of VBA code, and a quick click can generate the address elements for a letter. By following these 10 steps, you can create a userform template that solicits address elements from a user.
There’s a lot going on, but the important part of this technique is mapping the userform controls to the bookmarks in the template. I used this method to generate address elements in a simple letter document (to simplify the example); you can use the same process for more complicated data-capturing tasks.
Note: You can download the sample template for this technique.
1: Begin with a basic design
Your initial design should include the appropriate control type for each address element and a name for each control. Table A identifies the control type, the control name, and the bookmark name for each address element. The command button will copy the input values from the userform to the letter. The bmAddress2 bookmark is listed multiple times because we’ll combine the city, state, and ZIP code into one line. It’s okay if things change as you progress. This is just something to get you started.
Table A
We’ll use these address elements for the form.
2: Create the userform
Using Figure A as a guide, you’ll add the controls listed in Table A to a userform. First, open the VB Editor by pressing [Alt]+[F11]. Then, choose UserForm from the Insert menu to display a blank userform and the Toolbox. If you don’t see the Toolbox, choose Toolbox from the View menu. If it disappears at any time, just click the userform.
Figure A
Add these controls to the blank userform.
After adding the controls, name them via the Properties Window. If you don’t see that window, press [F4]. Set the Address text box’s MultiLine property to True. (To arrange the controls, select them and choose the appropriate options from the Format menu.)
3: Populate the controls
We’ll use VBA to populate the date and state controls when you run the form. To open the form’s module, double-click the userform. Then, enter the following code:
Private Sub UserForm_Initialize()
'Populate cboState in ufAddressLetter.
Me.cboState.List = Split("AL AK AZ AR CA CO CT DE DC FL GA" _
& "HI ID IL IN IA KS KY LA ME MD MA MI MN MS MO MT NE NV NH" _
& "NJ NM NY NC ND OH OK OR PA RI SC SD TN TX UT VT VA WA" _
& "WV WI WY")
'Populate txtDate in ufAddressLetter. You can overwrite this value.
Me.txtDate.Value = Format(Now, "mmmm dd, yyyy")
End Sub
Double-click ufAddressLetter in the Project Window to return to the form. To see the code at work, press [F5] to run the userform. Doing so will populate the two controls, as shown in Figure B.
Figure B
The userform’s Initialize event populates two controls.
4: Automate the salutation
Return to the module and add the following code, which will automatically fill in the salutation control using the first name entered in txtName:
Private Sub txtName_Exit(ByVal Cancel As MSForms.ReturnBoolean)
'Automatic fill-in for salutation control.
On Error Resume Next
Me.txtSalutation = "Dear " & Left(txtName, InStr(Me.txtName, " ") - 1) & ":"
On Error GoTo 0
End Sub
Use the VBE’s Object and Procedure controls to enter the procedure’s stub (the Sub and End Sub lines) to make sure the referenced arguments are correct.
5: Add the code that generates the letter
Using Table A, you’re ready to map the userform controls to the code that will transfer input values from the userform to the letter. (The bookmarks don’t exist yet, but that’s okay.) Double-click the userform to return to its module and then enter the following code:
Private Sub cmdAddLetter_Click()
'Copy letter elements to letter template from userform
Dim bmks As Bookmarks
Dim bmRange As Range
'Pass the userform values to the document's bookmarks.
Set bmks = ActiveDocument.Bookmarks
Set bmRange = ActiveDocument.Bookmarks("bmDate").Range
bmRange.Text = Me.txtDate.Value
Set bmRange = ActiveDocument.Bookmarks("bmName").Range
bmRange.Text = Me.txtName.Value
Set bmRange = ActiveDocument.Bookmarks("bmAddress").Range
bmRange.Text = Me.txtAddress.Value
Set bmRange = ActiveDocument.Bookmarks("bmAddress2").Range
bmRange.Text = Me.txtCity.Value & ", " _
& Me.cboState.Value & " " _
& Me.txtZip.Value
Set bmRange = ActiveDocument.Bookmarks("bmSalutation").Range
bmRange.Text = Me.txtSalutation.Value
Me.Hide
End Sub
6: Add the code that runs the userform
You’ll need a macro to display the userform. Open the ThisDocument module (from the Project Explorer) and enter this short procedure:
Sub RunUserForm()
'Run sfAddressLabel
Dim frm As New ufAddressLetter
frm.Show
End Sub
7: Automate the userform
There’s one last bit of code to add. While still in the ThisDocument module, enter the following code:
Sub AutoNew()
'Run ufAddressLetter when file opens.
Call RunUserForm
End Sub
Word will run this code to display the userform each time you open the file.
8: Insert the bookmarks
Now that the userform and its code are in place, return to the blank Word document so you can insert the bookmarks. Displaying bookmarks will make this step easier:
- Click the File tab and then click Options (under Help). In Word 2007, click the Office button and then choose Word Options. In Word 2003, choose Options from the Tools menu, click View, and skip to step 3.
- Click Advanced in the left pane.
- Check Show Bookmarks in the Show Document Content section. (In Word 2003, it’s the Show section.)
Click OK.
Figure C
Check the Show Bookmarks option.
Refer to Table A for the bookmark names and use Figure D as a placement guide to insert each bookmark as follows:
- Click the Insert tab. In Word 2003, choose Bookmark from the Insert menu and skip to step 3.
- Click Bookmark in the Links group.
- Enter the name of your bookmark. For instance, your first bookmark will be bmDate.
- Click Add.
Now, insert the remaining bookmarks.
Figure D
Displaying the bookmark symbols makes it easier to insert multiple bookmarks.
9: Save as a template
Most likely, you’re not going to all this trouble for a single document, so you’ll want to save your work as a template. Do so as follows:
- Click the File tab (Office button in 2007) and click Save As. In Word 2003, choose Save As from the File menu and skip to step 3.
- Click Trusted Templates in the Places bar. (You must store your template in a trusted location for the AutoNew() macro to work. Otherwise, you’ll have to reset your macro security settings.)
- Enter a name for the file. (In Word 2003, alter the folder location, as necessary.)
- From the Save As Type drop-down, choose Word Macro-Enabled Template (.dotm). In Word 2003, choose Document Template (.dot).
- Click Save.
10: Open the template
To use ufAddressLetter to generate the address for a letter, create a new document based on the template as follows:
- Click the File tab (Office tab in 2007) and choose New. In Word 2003, choose New from the File menu.
- In the Available Templates section, click My Templates. In Word 2003, choose a template from the New Document pane (to the right).
- Choose the template and click OK.
Put the userform to work
When first open, the userform defaults to the current date. When you press [Tab] or [Enter] after entering a name, the form will fill in the salutation. You can change both if you like. When using the multiline feature to enter an address with more than one line, press [Ctrl]+[Enter] to force the cursor to the next line in the control. Figure E shows the form filled in. Click the Address Letter command button to generate the letter, shown in Figure F, using the input values.
Figure E
Fill in the userform.
Figure F
Click the command button to generate the address elements of your new letter.
Extra considerations
The code has no data validation or error handling. There’s also no code for clearing the bookmarks. To create a new letter, in this case, you’d just open a new template document. You can re-execute RunUserForm by using the Macros option in the Code group on the Developer tab. When applying this technique to more complex forms and custom documents, you can handle these things differently.
Несмотря на современные возможности общения через короткие сообщения в мессенджерах и социальных сетях, почтовые отправления остаются одним из самых востребованных способов общения. Официальные письма от работодателя или уведомления от государственных структур и банков все еще отправляются через почту. Кроме того, особую популярность приобретают интернет-магазины, которые предлагают отправить свои товары в любую точку мира. Все это требует от обывателя умение указывать правильный адрес для получения и отправки писем, посылок, бандеролей и т.п.
Для детей во все времена было интересно иметь друзей по переписке. Особенно, если этот друг живет в другой стране и может рассказать много интересного, а также помочь в практике общения на иностранном языке.
Однако нужно понимать, что в каждой стране есть свои определенные правила для написания адреса: что указать в начале, в каком месте расположить адрес, нужно ли указывать дополнительные подробности. Давайте разберемся сегодня с тем, как писать адрес при отправке в англоязычные страны.
Адрес на английском языке: правила написания

При написании адреса нужно придерживаться определенных правил, чтобы работникам почты было понятно, куда письмо или посылка должны быть доставлены.
Чаще всего в левом верхнем углу размещается имя и адрес отправителя, а в правом нижнем углу — имя и адрес получателя.
В англоязычных странах адрес обычно составляются в следующем порядке:
- Имя человека, которому предназначено письмо (addressee)
- Организация (если письмо имеет целью деловое общение) (Company’s name)
- Номер дома, номер квартиры, название улицы (apartment / flat, building, street)
- Название города (и штат – для США) (city, State)
- Почтовый индекс (postal/zip code)
- Название страны (country)
При написании деловых писем следует использовать уважительные формы обращения:
- Mr. – любому мужчине
- Mrs. – женщине, состоящей в браке
- Miss – женщине, не состоящей в браке
- Ms. – при отсутствии информации о семейном положении женщины
При составлении официального письма после имени необходимо указать название отдела и название компании. Если в таком письме конкретный получатель не известен, можно указать только отдел или название организации-адресата.
Например:

Ms E Watson
Marketing Agency
Top Star Corp
25 Carnaby Street, off 78
LIVERPOOL
NR32 4WY
UK
Или:
Office of Admissions and Financial Aid
Harvard College
4 James Street, off 65
Cambridge, MA 02138
Особенности написания адреса для Великобритании
В британском английском точка после Mr, Mrs, Ms и инициалов не ставится, а номер дома ставится перед названием улицы.
Также, согласно требованиям Королевской почтовой службы Великобритании (Royal Mail), название города пишется прописными буквами.
Итак, пример британского почтового адреса будет выглядеть следующим образом:
Miss S Pollard 2 Chapel Hill
Heswall
BOURNEMOUTH
BH1 1AA
UK
Порядок индексирования городов и районов Великобритании очень путанный и не всегда связан с географической локацией, поэтому рекомендуется узнавать точное написание индекса непосредственно у получателя.
Как написать адрес для отправки в США?
Основной особенностью в написании адреса для писем и посылок в США является сокращенное название штатов, которое указывается рядом с почтовым индексом.
Например:
JOHN GREEN
455 DARK SPURT
CALIFORNIA SPRINGS
CA 92928
USA
или:
Tyler Durden (имя получателя)
420 Paper St (номер дома, название улицы)
Wilmington (город)
DE 19886 (штат, индекс)
USA
Краткое обозначение штатов вы можете найти здесь.
Как писать обратный адрес на письме за границу?
Уметь писать обратный русский адрес столь же важно, как и адрес получателя. Это нужно по двум основным причинам:
- Обратный адрес нужен получателю, чтобы он знал, куда отправить ответ.
- Обратный адрес нужен почтальонам на случай, если письмо придется вернуть.
Желательно, чтобы российский адрес был написан на двух языках. Иначе могут возникнуть сложности как у иностранных, так и у отечественных почтальонов.
При написании адреса на английском языке нужно использовать принцип транслитерации, при котором некоторые слова не нужно переводить, а лишь написать их иностранными буквами так, как мы это слышим:
- «край»- krai
- «область»- oblast
- «город»- gorod
- «улица»- ulitsa
- «проспект»- prospect
Единственное, что нужно писать обязательно в переводе – название страны: Russia, также можно перевести названия некоторых городов и регионов, у которых есть устоявшийся общеизвестный перевод на английский (Moscow, St. Petersburg, Crimea).
Например:
Smirnov A. N.
ul. Kosmonavtov 35-11
Vyborg
Leningradskaya oblast
112233
RUSSIA
Или:
Sobolev A. V.
ul. Petrushina 34-19
Yekaterinburg
Sverdlovskaya oblast
142263
RUSSIA
Для удобства существуют специальные сайты по электронному переводу адреса на английский язык онлайн для правильного заполнения. Например, https://www.adressinfo.ru. Там пользователь вводит название улицы или другого объекта в поле и нажимает на клавишу «Перевод». На экране появляется транслитерация каждого слова латиницей.
Лексика и сокращения по теме «Почта»
- Post office — почтовое отделение, почта
- Main / head post office — главный почтамт
- Mailbox — почтовый ящик
- Letter — письмо
- Postcard — почтовая открытка
- Postage — почтовые расходы
- Package — бандероль
- Parcel – посылка
- Delivery — доставка
- First class mail — почтовое отправление первого класса
- Express mail — срочное письмо
- Air mail — авиапочта
- Sea mail — морская почта
- Receipt — квитанция, чек
- Notice — уведомление
- Stamp / postage stamp — почтовая марка
- Envelope — конверт
- Address — адрес
- Zip code / Postal code — почтовый индекс
- Return address — обратный адрес
- Postman — почтальон
- Courier — курьер
- To send — посылать
- To send back — посылать обратно
- To receive — получать
Слово «улица» на английском языке при написании адреса в США может быть сокращено:
- STR – street
- AVE – avenue
- LN – lane
- RD – road
- TPKE – turnpike
- PL – place
- DR – drive
- BLVD – boulevard
Итак, если вы заказали товар на AliExpress, Amazon, eBay или в любом другом магазине, написали письмо родственникам или друзьям в США или Великобританию и последовали всем нашим советам, как написать русский адрес по-английски, то будьте уверены на 100%, все будет доставлено.
И помните, почтальоны всего мира просят писать адрес разборчиво! 🙂

Sometimes you can forget that some parts of the text in different languages have their own formatting rules. This includes direct and indirect speech, dialogues and business correspondence. In the latter, it is very important to follow all the rules, because this is what can make a good impression on the interlocutor and help get a multi-million contract.
Business letters in English are a separate genre, you need to practice writing them, stock up on a fair amount of special vocabulary, take into account all grammatical and stylistic requirements. Every comma is literally important here, so you can’t lose face.
So, the very first thing in a business letter in English is the address. The rules for writing an address may vary depending on the addressee of your letter, so we will analyze several cases at once and see the differences.
General rules for writing an address
There is one most important rule for writing an address. You can even call it a scheme, or a sequence. So, in the English-speaking sphere, it is customary to indicate the address in the upper right corner of the letter, no matter whether it is a letter or an e-mail.
|
Address procedure |
Example |
|
|
It should be noted that words such as street or the name of a company department should be capitalized. The house number is written before the street name without extra commas; after the street name, the office or apartment number should already be specified.
This scheme can be applied to any type of correspondence, both business and informal, friendly.
Features of British addresses
Separately, we should talk about English addresses, because there may come across their own nuances that surprise an unknowing person.
So, always write a polite address before the address. It is always assigned the first line.
Polite address: (Mr, Mrs, Ms) + First letter of first name (without dot) + last name
Further standard city address.
City. It must be written in capital letters, according to the rules of the country.
The index is what you should pay attention to. The numeric postal code is not used in all countries. In Europe, numbers are often used interspersed with letters.
The index in the United Kingdom defines a part of the country, a district, and even a building. Therefore, it is very important to specify the exact index when sending a letter.
The country is indicated on the last line. Remember that the United Kingdom consists of England, Scotland, Wales and Northern Ireland.
American address
The address in the states is written almost the same as in Foggy Albion. Perhaps the main difference is the presence of the state in the address bar.
So, a US address would look something like this:
Mrs V Smith
Company Name (if needed)
23 Lane Road, F4
Brooklyn, NY 11202
It is also worth paying attention to the fact that the floor and apartment number in America can often be expressed by a letter, hence the code — F4, where F is the floor, and 4 is the apartment number on this floor.
Address not for business correspondence
In fact, business correspondence is far from the only direction where you need and can write an address. Things can be much more prosaic if it occurred to you to send a postcard or a handwritten letter to a friend from another country, as before. Or maybe you have your own online store and the order must be delivered to the other end of the mainland.
Each country may have its own address filling standards, but there is also a universally accepted rule. The main thing is to indicate all the necessary data, such as the name of the recipient, city address, city and postal code. In this case, you can use a universal template, using which it is impossible to make a mistake. Just exclude the company line from there, and you get a scheme for filling in the postal address for letters and parcels.
Required vocabulary
In the United States, for example, there are many varieties of streets that are abbreviated when writing an address:
- STR – street
- AVE – avenue
- LN – lane
- RD – road
- TPKE – turnpike – toll road (in the USA)
- PL – place
- DR – drive – a long winding road, laid out taking into account the terrain. For example, drive can go around a mountain or a lake
- BLVD – boulevard
- WAY – a small narrow path away from the main road or highway
- TER – terrace – the road leading up to the top of the slope
If the letter is business, then the office can also be shortened:
- Ofc / off – office
- Ste / STE – suite — room / office
In addition, you need to know the following words and abbreviations:
- Name/First Name
- Surname / Last name
- City / Town
- Apt – Apartment
- Postal code/ ZIP code – Index
In general, we can say that writing an address is not as difficult as it might seem at first glance. Especially considering that our country now also uses the international format, indicating the street, city, and only then the country and index.