
Word for Microsoft 365 Word 2021 Word 2019 Word 2016 Word 2013 Word 2010 Word 2007 More…Less
Alignment determines the appearance and orientation of the edges of the paragraph: left-aligned text, right-aligned text, centered text, or justified text, which is aligned evenly along the left and right margins. For example, in a paragraph that is left-aligned (the most common alignment), the left edge of the paragraph is flush with the left margin.
Vertical alignment determines the position of the text within a section of a document relative to the top and bottom margins, and is often used to create a cover page.
-
Select the text that you want to align.
-
On the Home tab, in the Paragraph group, click Align Left
 or Align Right .
 or Align Right
  .
.-
Select the text that you want to center.
-
On the Home tab, in the Paragraph group, click Center
.
 .
.-
Select the text that you want to center.
-
On the Layout or Page Layout tab, click the Dialog Box Launcher
in the Page Setup group, and then click the Layout tab. -
In the Vertical alignment box, click Center.
-
In the Apply to box, click Selected text, and then click OK.
 in the Page Setup group, and then click the Layout tab.
When you justify text in Word, you give your text straight edges on both sides of the paragraph. Justifying extends each line of your text to the left and right margins. Justifying text might make the last line of text in a paragraph considerably shorter than the other lines.
-
Select the text you want to justify.
-
On the Home tab, in the Paragraph group, click Justify
.
 .
.Tips:
-
In the Paragraph group, click the Dialog Box Launcher
, and select the Alignment drop-down menu to set your justified text. -
You can also use the keyboard shortcut, Ctrl + J to justify your text.
In Office Word 2007, you can choose from a selection of predesigned cover pages to create a professional-looking document quickly and easily.
-
On the Insert tab, in the Pages group, click Cover Page.
-
Click the cover page that you want.
A cover page is always added to the beginning of the open document.

See also
Adjust indents and spacing
Need more help?
Several languages such as Arabic, Persian, Urdu or Hebrew are usually written from right to left. Today we will learn how to shift the writing direction in Office 2016/2019/365 from the default Left To Right (LTR) into Right To Left direction (RTL). For convenience, we are providing detailed instructions for Word and Outlook; however process is similar for other Office apps such as Excel and PowerPoint.
Set Word paragraph defaults to right to left
To ensure that your Word document default writing direction is RTL, proceed as following:
- Open a new Microsoft Word document.
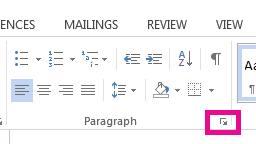
- In the Home tab, locate the Paragraph section in the Ribbon.
- Hit the small arrow at the bottom right side of the section as shown below:

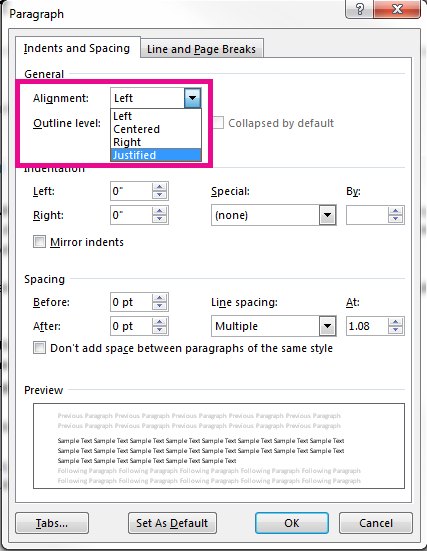
- The Paragraph Settings dialog will open up.
- In the General section, you’ll notice the Alignment combo box.
- Set the Alignment value to be Right.
- Select Right-to-left check box below.
- At the bottom of the dialog hit the Set as Default button.
- In the next dialog, select to apply this setting to all documents based on the normal.dotm template.
Word right to left writing
If you are not able to locate the RTL direction buttons in Word, proceed as following:
- Open your Word document, click on File and select Options.
- In the customize ribbon, click on the drop down box and select All commands.
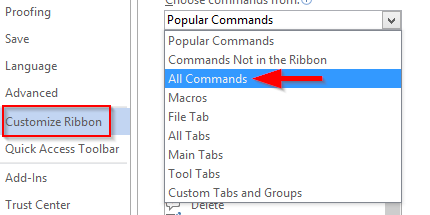
- Then search for the Left to Right and Right to Left in the options.
- Press on New Group at the bottom and rename it as you need.
- Add both LTR and RTL in the created group and select OK to add it in the Ribbon.

In Quick Access Toolbar:
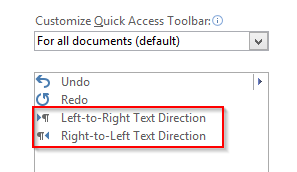
- Open your word document, click on File and select Options.
- In the Quick Access Toolbar, click on the drop down box and select All commands.

- Then search for Left to Right and Right to Left in the options.
- Click Add and select OK to add those options in Quick access toolbar.
Right to left switching with Macros
Readers asked me whether there is a way to programmatically set Right to Left for specific pages / ranges and paragraphs in a Word document.
The VBA method .RtlPara allows you to set the paragraph direction for a specific selection using Macros.
Default RTL in Outlook emails
To set right-to-left as your default Outlook email text direction, proceed as following:
- In the Outlook ribbon , hit the New Email button to open a new email item.
- Navigate to the Format Text tab.
- In the Paragraph Ribbon header, hit the small arrow at the bottom right side.
- The Paragraph settings dialog opens up.
- In the Alignment combo box, select Right.
- Then pick right-to-left as the email document Direction.
- Hit the Set as default button and apply all changes to all email items created off the normalemail.dotm template.
Note: While writing this tutorial, i have noticed that the Format Text Ribbon (including the Paragraph section) buttons are disabled by default. If so, just click your email item body and the Ribbon will be enabled.
Enable RTL buttons in Outlook
- Open your Outlook 365 and Click on New mail in the Home ribbon.
- Now in the opened compose mail dialog box, click on File and select Options.
- In the Customize Ribbon, click on the drop down box and select All commands.
- Search for Left to Right and Right to Left options.
- Press on New Group at the bottom and rename it as you need.
- Add both LTR and RTL in the created group and select OK to add it to the ribbon.

In Quick Access Toolbar:
- In your Outlook then hit New mail in the Home ribbon.
- In the dialog box of compose mail, click on File and select Options.
- In the Quick Access Toolbar, click on the drop down box and select All commands.

- Search for Left to Right and Right to Left options.
- Click Add and select OK to add it in Quick Access Toolbar.

- Hit either LTR to write from Left to Right and RTL to write from Right to Left in both Quick Access Toolbar and Customize ribbon.

99.9% of the time in English language writing, sentences start on the left hand side of the page. This is simply how we do things. But not every language uses this convention.
In Hebrew and Arabic, for instance, sentences begin at the right hand side of the page. Versions of Microsoft Word designed for these languages therefore default to right-to-left.
Whichever version of Word you’re using, though, you can adjust the text direction to suit your particular needs.
Writing in a Right-to-Left Language
If you need to write in a language that reads from right to left and your version of Word doesn’t support this, you will have to install the necessary language and keyboard settings.
If both left-to-right and right-to-left languages are enabled in a document, the ‘LTR’ and ‘RTL’ buttons should appear in the ‘Paragraph’ section of the ‘Home’ tab.
Changing the Text Direction
Even if you’re not writing in a right-to-left language, you may need to change the text direction if you’re using a version of Word where right-to-left is the default or if you’re editing a document written using this format.
In these cases, with Word 2010 or later on a Windows computer, your simplest option is to add buttons to the Quick Access Toolbar. To do this:
You can now use these buttons to set the text direction for all (or part) of a document.
Find this useful?
Subscribe to our newsletter and get writing tips from our editors straight to your inbox.
Alternatively, you can also add these buttons to the main ribbon on Microsoft Word by right clicking on the ribbon and selecting ‘Customize the Ribbon’.
This opens a menu similar to the one used to customize the Quick Access Toolbar. The main difference is that you need to create a new ‘Group’ under one of the main tabs so that the commands have somewhere to appear.
Microsoft Hates Mac Computers
It’s a melodramatic subtitle, we’ll grant you, but it’s the only explanation for why Microsoft Word on the Mac has only recently added support for right-to-left languages.
If you want to change the text direction from right-to-left to left-to-right in older versions of Word on an Apple computer, you’ll need to cheat using this workaround:
- Copy and paste your text into Pages, where it will default to left-to-right
- Copy and paste your reformatted text back into Word
You can also change the text direction from left-to-right to right-to-left using this method if you have an appropriate right-to-left script installed on Pages.
The text direction should then match the settings you chose in Pages (or other compatible program). If not, it might be time to get a PC instead.
![]()
- Remove From My Forums
-
Question
-
How can you view a Booklet layout in Word 2010 so it looks like the printed book will look?
So the first left-hand page is on the left
And the first right-hand page is on the right
What we now have in 2-page view:
Left-Screen Right-Screen
| cover | | 1st left-hand page aka inside-cover|
| 1st right-hand page | | 2nd left-hand page |
What we want:
Left-Screen Right-Screen
| cover |
| 1st left-hand page aka inside-cover | | 1st right-hand page |
Thanks for any help.
Answers
-
Hi,
Do you want to read a Word document like a real paper book? If it is correct, I recommend we try to use «Full Screen Reading» mode in Word 2010.
More reference:
http://office.microsoft.com/en-us/word-help/read-documents-in-word-HA010368861.aspx
If I misunderstand something, please let us know and give us a sample or screenshots.
Regards,
George Zhao
TechNet Community Support
It’s recommended to download and install
Configuration Analyzer Tool (OffCAT), which is developed by Microsoft Support teams. Once the tool is installed, you can run it at any time to scan for hundreds of known issues in Office
programs.-
Marked as answer by
Friday, September 19, 2014 6:36 AM
-
Marked as answer by
-
To see the document as it will print, display it in Print Preview (for example by clicking File | Print).
For Word to correctly add «filler» pages, for example following an Odd Page section break, you should also enable «Different odd and even» or «Mirror margins» in Page Setup.
Stefan Blom, Microsoft Word MVP
-
Marked as answer by
George123345
Friday, September 19, 2014 6:36 AM
-
Marked as answer by
Two ways to put left and right aligned text on the same line in Microsoft Word. There’s the commonly used option and the less well-known choice. BONUS: putting left, center and right aligned text on one line.
We’ll show how to make Left and Right aligned text looking like this.

You’ll often see it in Header or Footer.
As a bonus (because we can’t help ourselves) we’ll also have examples of Left, Right and Center positioning on the same line.
- Table with left and right positioning
- Table with left, center and right positioning
- Tabs with Left and Right text positions
- Tabs with Left, Right and Center positions
- Downside of tabs for right and center margin alignments
Table with left and right positioning
The easiest and most commonly used option is a table. Office Watch readers know we’ve written many times about how tables with no borders or gridlines can solve many Word formatting conundrums.
Here’s how we created the above example, this time with the table gridlines showing.

Each line is a single row table with two cells. The cells can have their own paragraph formatting (left, center, right or justified).
Make this by:
- Insert a 2×1 table with one row and two columns.

- The first cell has Paragraph Left setting. Type in the text or field codes you want.
- The second cell has Paragraph Right formatting. Add text to the cell.

- Select the table (use the handle at top left of the table) and remove all borders with Paragraph | Borders | No Border.

The Table Gridlines are visible in Word but won’t appear in any printed or PDF version.
Table with left, center and right positioning
Clever readers will have guessed the same trick can be used to have left, center and right text on the same line. Use a 3×1 table. The center cell has Center text positioning.

Word in-depth book Formatting Magic with Word has a whole chapter devoted to Tables including using them for formatting text in unusual ways.
Tabs with Left and Right text positions
The alternative is using Tabs. Tabs are a hidden formatting marks that position text along a line.
If you’re old enough to remember a manual typewriter, there was a bar with tabs that you slid along the bar. Pressing the Tab key moved the paper along to the next tab stopper.
Word also has Tab stops but they have more power than the old typewriter stops.
Modern Word has Tab stops which can have different alignment settings. The old typewriter tabs could only be Left tabs – meaning text comes to the right of the tab.

As you can see in the Tab dialog, Word has FIVE different types of tab. We’ll use three of them for single line positioning; Left, Center and Right.
Here’s some left and right text positioning using a Right align tab.

The left text is already left aligned against the left margin. Nothing needed there.
Make the right tab by clicking on the ruler to make a tab.
Double click on that tab to open the Tabs dialog.

- Click on the tab stop position you just created.
- Change Alignment to Right.
- Click Set
Now enter the text you need:
- Type the text for the left side
- Press Tab – the cursor should jump to the right side of the page.
- Type the text for the right side.
If the formatting doesn’t end up the way you want, choose Home | Paragraph | Show All – that will show the tab markers (right pointing arrows) across the page. There should only be one.

Tabs with Left, Right and Center positions
A single line with Left, Center and Right alignments is also possible with Tab stops.
Add a Tab stop in the middle of the line and change it to a Center alignment.

A Center tab alignment means the text is centered either side of the tab stop.

The great book Formatting Magic with Word has a whole chapter devoted to Tabs, all the uses and options.
Downside of tabs for right and center margin alignments
Tabs look like a great solution to positioning, but they have a major disadvantage. All Tab stops are absolute measurements in inches, centimetres etc. There’s no way to drop a tab into a relative position like Center or Right as you can with Word objects.
If the page size or left/right margins are changed, the center and right tabs will be out of position. They’ll have to be reset manually.
That’s not a problem with a table because the whole table (single row in this case) is set to 100% of the page width by default.
Four Word fixes for stretched out last line
Free sign to keep in touch with customers while in lockdown
Merge or Split cells in Word tables
Make a Table or list of Tables in a Word document
You’ve probably seen a document or two with a header or footer that has left and right-aligned text. It might also have centered text. These alignment configurations are easy to accomplish in the header because those sections have special attributes, and you can learn more about those particular attributes by reading How to align header or footer content to the left and right margins in Microsoft Word.
SEE: Google Workspace vs. Microsoft 365: A side-by-side analysis w/checklist (TechRepublic Premium)
Unfortunately, if you’ve tried to apply separate right and left alignments to the same line of text in the body of a document, you’ll quickly learn the task is impossible.
Somewhere along the line, you might have learned how to force the issue by inserting a table, but that’s not the only way to align text in the same line to both the left and right margins. In this tutorial, I’ll show you how to do so by using alignment tabs.
For this tutorial, I’ll be using Microsoft 365 on a Windows 10 64-bit system, but you can also use earlier versions of Word. It’s important to note this technique isn’t appropriate for the browser edition: It won’t let you set a tab, and it won’t display pre-existing tabs correctly within the context of this technique.
For an additional visual to follow along with, you can download our demonstration file here.
Jump to:
- About Word alignment options
- About aligned tabs
- How to set a right-aligned tab
- How to use a right-aligned tab
- Additional Word formatting tools
About Word alignment options
Learning how to use more than one kind of alignment in the body of a document isn’t all too difficult, but first, you’ll need to understand Word’s different alignment options:
- Left.
- Center.
- Right.
- Justified.
You’ll find them in the Paragraph group on the Home tab. Figure A shows an example of all four.
Figure A

The red lines on either side indicate the left and right margins.
About aligned tabs
An aligned tab is exactly what it sounds like — it lets you determine the alignment of content with a tab. With tabs, you have five alignment options:
- Left: Aligns text with the tab.
- Center: Aligns text within the tab’s left and right positions.
- Right: Aligns text to the right side, or the tab position’s border.
- Decimal: Aligns decimal with the tab position.
- Bar: Draws a vertical line.
Now that you know what types of alignment tabs Word supports, let’s create one. Specifically, we’ll create a right-align tab at the right margin. That way, we can enter content at the left margin and then use the tab to align content to the right margin.
How to set a right-aligned tab
Before setting the tab, check the document’s margins. If you’re using the out-of-the-box Normal template, right and left margins are both one inch, as shown earlier in Figure A. However, if you look at the right margin on the ruler, you’ll find that it’s set at 6.5 rather than 7.5. This is because your printer determines the right position. You’ll need to set the right-aligned tab to the same position as the document’s right margin, whatever that might be.
Now, let’s create the right-aligned tab as follows:
- Click the Home tab.
- Click the Paragraph group’s dialog launcher to open the dialog.
- Click Tabs in the bottom-left corner.
- Enter 6.5 in the Tab stop position.
- Click Right in the Alignment section (Figure B).
Figure B
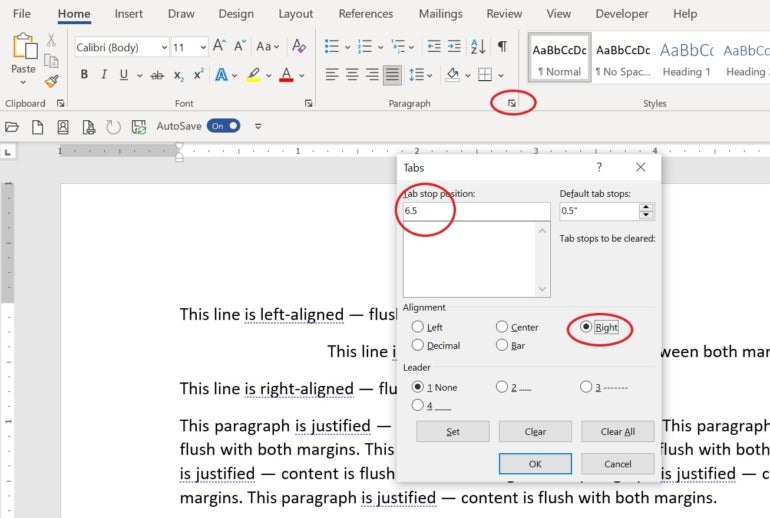
- Click Set.
- Click OK.
How to use a right-aligned tab
It’s impossible to apply more than one alignment property to the same line of content in Word. For instance, if you enter text and apply center alignment, and then you enter more text and apply right alignment, Excel will right-align the entire line. In this case, you would lose the center alignment.
SEE: Premium Microsoft Office Training Certification Bundle (TechRepublic Academy)
Usually when you need that kind of arrangement, you would insert a table with two or more cells and apply alignments to the cells. It works and it’s easy, but you have to insert a table every time you encounter one of these lines. There’s another way that doesn’t require a table at all: Alignment tabs.
How to split a sentence with the right-alignment tab
In the last section, you added a right-aligned tab. In this section, we’ll enter a sentence and then split it using the right-alignment tab as follows:
- Enter some text, such as: “This line is both left and right aligned.” By default, Word aligns this text with the left margin.
- Click to the left of “and” in your sentence and press Tab.
As you can see in Figure C, everything after the word “and” is now aligned to the right margin. When you pressed Tab, Word used the right-aligned tab you created in the last section. As a result, the text to the right of the cursor was pushed to the right margin.
Figure C

If you don’t get similar results, check your right margin again and make sure you entered the current measurement when creating the right-aligned tab.
All in all, an alignment tab is a better choice than a table if you have several instances of text throughout the document that need two different alignments.
Additional Word formatting tools
Changing text alignment in Word documents is a common way Microsoft Office users format their documents, but Word comes with a variety of other formatting tools and options that are readily available in the Home ribbon menu. Keep in mind that many formatting options are also accessible when you select text in the body of a document or right-click anywhere in the document.
If you’re looking to change formatting in your document, here are some other stylistic changes you can make beyond text alignment:
- Font: Font formatting options are available to adjust font size, font style, text highlight, text effects and typography, case changes, subscript and superscript, and strikethrough.
- Paragraph: Paragraph formatting options include bullets, numbering, multilevel lists, indent increases and decreases, sort, and line and paragraph spacing.
- Style: If you’re interested in updating the overall design of your document, Word has several preset headers and list formats you can choose from. You can also set up your own style in this section of the Home ribbon.
- Other formatting options: The format painter and the option to clear all formatting are great ways to make mass formatting changes to a Word document.
Whether you’re new to Word or you’ve been using it for years, these formatting tools are great to have ready in your back pocket. More advanced users have the option to granularly customize the settings for many of these formatting tools.
Read next: The 8 best alternatives to Microsoft Project (Free & Paid) (TechRepublic)
Learn how the side to side page movement in Word makes reading documents easier.

Microsoft Word defaults to the vertical layout when you open a document. What if you wanted to read pages side-to-side instead? Word offers this layout too and it makes flipping through a multi-page document much easier on widescreens and touch screens. Let’s see how to use the Side to Side page movement in Word.
This feature is only available in Microsoft 365 right now.
Read Pages Side by Side in Word
The Side to Side command is another way to view your documents in Word. Follow these steps to set up the view.
- Open the multi-page document in Word.
- Go to View. Select the Print Layout option if you are in another view like the Web Layout.
- Select Side to Side from the Page Movement group on the Ribbon. The Print Layout option activates this option.
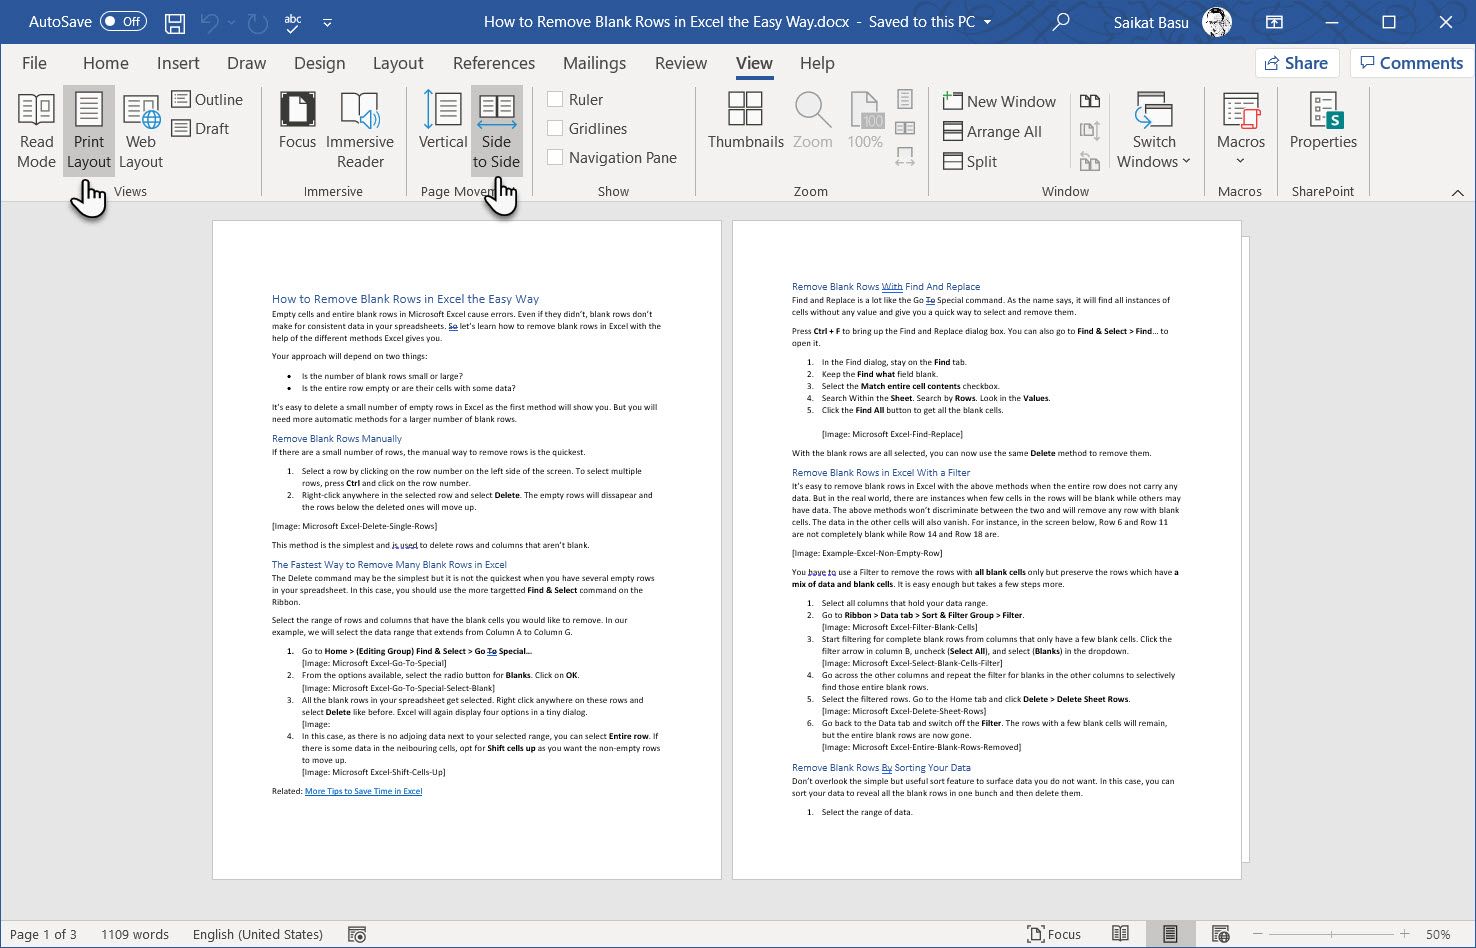
With Side to Side, you can now see whole pages by sliding each page from right to left or left to right. On touch screens, you can use your fingers to flip through the pages like a book. On other devices, you can use the horizontal scrollbar or the mouse wheel to move the pages into view.
You can revert to the Vertical layout option from the Page Movement group on the Ribbon.
Jump to the Right Page With Zoom
The Side to Side option also activates another feature called Thumbnails in the Zoom group. You will see all other commands greyed out.
Select Thumbnails to display all the pages like tiles. Use the arrow keys to select any tile (or thumbnail) and then press Enter to jump to that page in an instant. Strangely, selecting with the mouse doesn’t work when Word displays the pages as thumbnails.
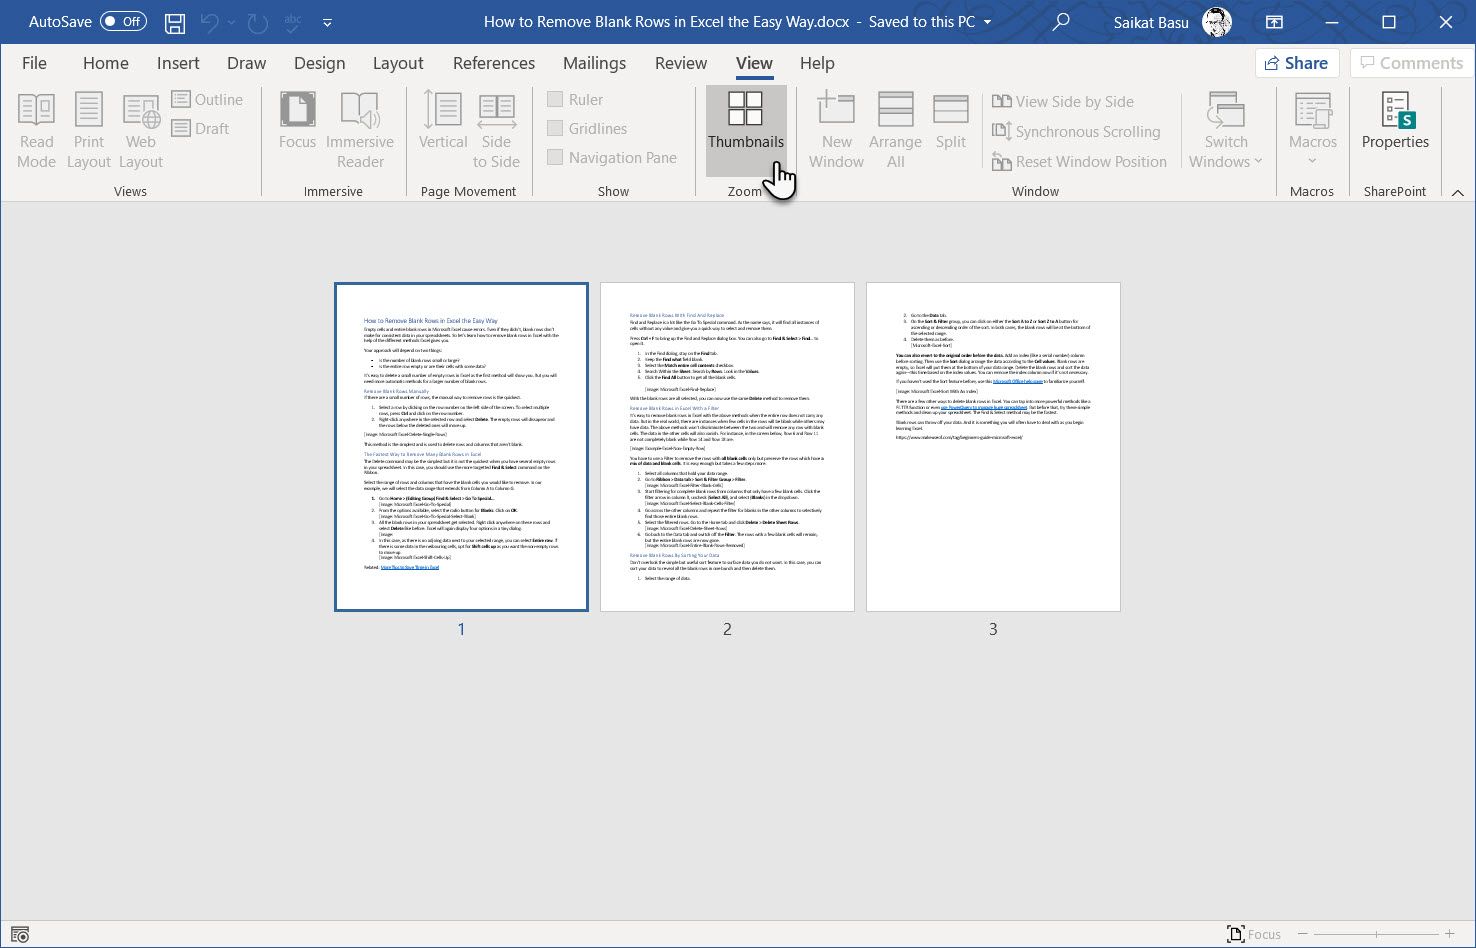
Toggle the Thumbnail button to quickly move from the tiled pages to the Side to Side layout. You can also use press Ctrl and use your mouse wheel to go back and forth between the views. On a touch screen, just pinch to zoom out from the thumbnails.
The Side to Side feature combined with thumbnails can make reading a long document easier on a touchscreen and the larger real estate of widescreen monitors.
Release Date: November 7, 2018
Category: Writing Tools
Author: Amanda W., Ph.D.
Many versions of Word allow users to enter text in right-to-left format to accommodate other languages.
Most of these change the formatting to left-to-right text direction when users select English for the text language.
However, a few versions have bugs in this process and the formatting remains right to left, such as the Arabic versions of Word.
If you receive a document originally written in one of these versions, the cursor, text direction, and/or punctuation will behave abnormally.

Here, we describe 1) how to fix this problem in a selected segment of text and 2) how to set all new comments to run in the correct direction.
The information in this guide was compiled from instructions for the 2010, 2013, and 2016 versions of Word, so these instructions should be accurate for those versions, but might not work with older versions.
Changing right-to-left to left-to-right formatting
To do this, we will add two buttons to our Quick Toolbar.
These will stay in Word as long as it is installed on your computer, so you can use them whenever you encounter this problem.
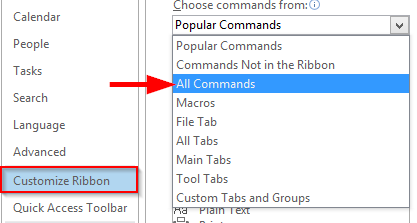
- In the Quick Access Toolbar at the top left of the screen (where the save and undo buttons are), click the arrow at the right side and select “More Commands”.
- Under «Choose commands from:» select «All Commands.»
- Find «Left-to-Right Text Direction» in the alphabetical list and click «Add>>».
- Find «Ltr Run» and click «Add>>».
- Click «OK» to close the window.
- You should now have two new buttons in the Quick Access toolbar at the top left of your screen: the Left-to-Right Text Direction button, which looks like an arrow and a paragraph symbol, and the Ltr Run button, which looks like an open, gray, or green circle depending on your version of Word.
- Select the text that needs to be fixed, or select all text in the document by pressing Ctrl-A.
- Click both the Left-to-Right Text Direction and Ltr Run buttons (it doesn’t matter which you click first).


Text should now run left to right as we expect in English writing.
If the text is suddenly right justified, meaning that it all lines up along the right margin, don’t worry – that means the author of the original document was trying to get around the bug and make the text look normal.
Just select the text and click “Left Align” in the “Paragraph” section under the “Home” tab.

Setting comments to default to left-to-right text
If you are providing feedback on this document, you will likely need to add comments to the document.
Although the directions above are effective in comments, it can get very annoying to click your two Quick Access buttons every time you need to write a new comment.
Luckily, we can set Word to use the correct formatting for all future comments.
- If there are no comments, write one and fix it using the directions above.
- In a properly formatted comment, click somewhere in the comment text that doesn’t have any special formatting (no italic, bold, superscript, etc.).
- Go to «Home» tab and click the tiny arrow in the bottom right corner of the “Styles” section.
- Click “Options…”
- Change “Select how list is sorted:” to “Alphabetical”.
- Change «Select styles to show:» to «All styles.»
-
Find «Comment Text» in the list and click it if it’s not already selected.
- If there are no styles in the list and it’s just a blank white box, click the «Style Inspector» button at the bottom (the one in the middle with a magnifying glass), and the first item in the smaller box that pops up should be “Comment Text.” You’ll follow the next steps within that box.
- If clicking “Comment Text” changes the comment back to right-to-left formatting, select all the text in that comment and click your two new Quick Access buttons again.
- Hover your mouse over «Comment Text» and click the drop-down arrow that appears.
- Click «Update Comment Text to Match Selection.»
- Close all open style boxes.
Try adding new comments; the text should run left to right.
This will save a bit of time and a lot of frustration.
It will need to be done for each document in which you encounter this issue, but once you’ve done it, that style information should stay with the document even if you send it to someone else.
Keywords: Microsoft Word, Microsoft Office, Text Direction, Editing, Comments
Scientific Writing Workshops
If you like our articles, try our workshops!
Our articles are based on the material from our scientific writing workshops, which cover these and many other topics more thoroughly, with more examples and discussion.
We offer on-site workshops for your event or organization, and also host workshops that individual participants can attend.
Our on-site scientific writing workshops can range from 1-2 hours to several days in length.
We can tailor the length to suit your needs, and we can deliver a writing workshop as a stand-alone activity or as part of scheduled meetings.
Our scientific writing workshops consistently receive high praise from participants including graduate students, post-docs, and faculty in diverse fields.
Please see our scientific writing workshop page for details.
If you found this article helpful or if there is a topic you want us to address in a future article, please
use our
online comment submission form,
or
contact us directly. Your comments and suggestions are valuable!
Click here to return to our scientific editing article library.