
Align text horizontally
-
In the text box, select the text that you want to change the horizontal alignment for.
-
On the Home tab, click the alignment option that you want
 .
.
 .
.Align text vertically
You can align all the text in a text box with the top, middle, or bottom of the text box.
-
Click the outer edge of the text box to select it.
-
On the Shape Format tab, click Format Pane.
-
Click the Shape Options tab if it isn’t already selected.
-
Click the text box icon
, and then click Text Box. -
Choose Top, Middle, or Bottom from the Vertical alignment drop-down list.
 , and then click Text Box.
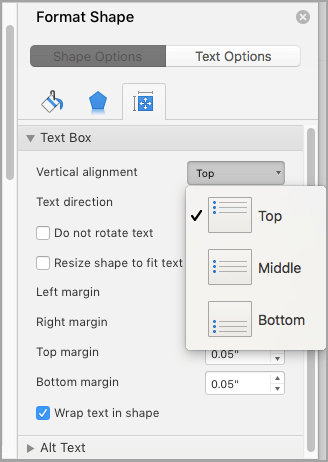
Adjust the text box margins
-
Click the outer edge of the text box to select it.
-
On the Shape Format tab, click Format Pane.
-
Click the Shape Options tab if it isn’t already selected.
-
Click the text box icon
, and then click Text Box. -
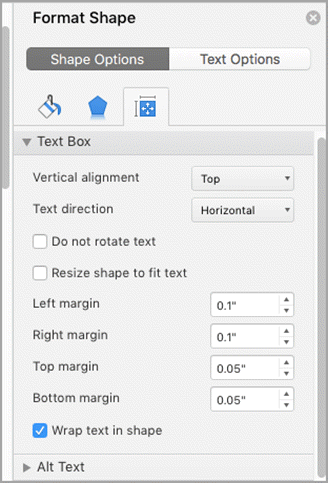
You can adjust the left, right, top, and bottom margins.
Important:
Office for Mac 2011 is no longer supported. Upgrade to Microsoft 365 to work anywhere from any device and continue to receive support.
Upgrade now
Align text horizontally
-
In the text box, select the text that you want to change the horizontal alignment for.
-
On the Home tab, under Paragraph, click the alignment option that you want
.
Align text vertically
You can align all the text in a text box with the top, middle, or bottom of the text box.
-
Click the outer edge of the text box to select it.
-
Click the Format tab (the purple contextual tab that appears next to the Home tab), and then under Text Box, click Change text alignment within the text box
. -
Click the alignment option that you want.
 .
.Adjust the text box margins
-
Click the outer edge of the text box to select it.
-
On the Format menu, click Shape.
-
In the left pane of the Format Shape dialog box, click Text Box.
-
Under Internal Margin, adjust the measurements to increase or decrease the distance between the text and the outer border of the text box.
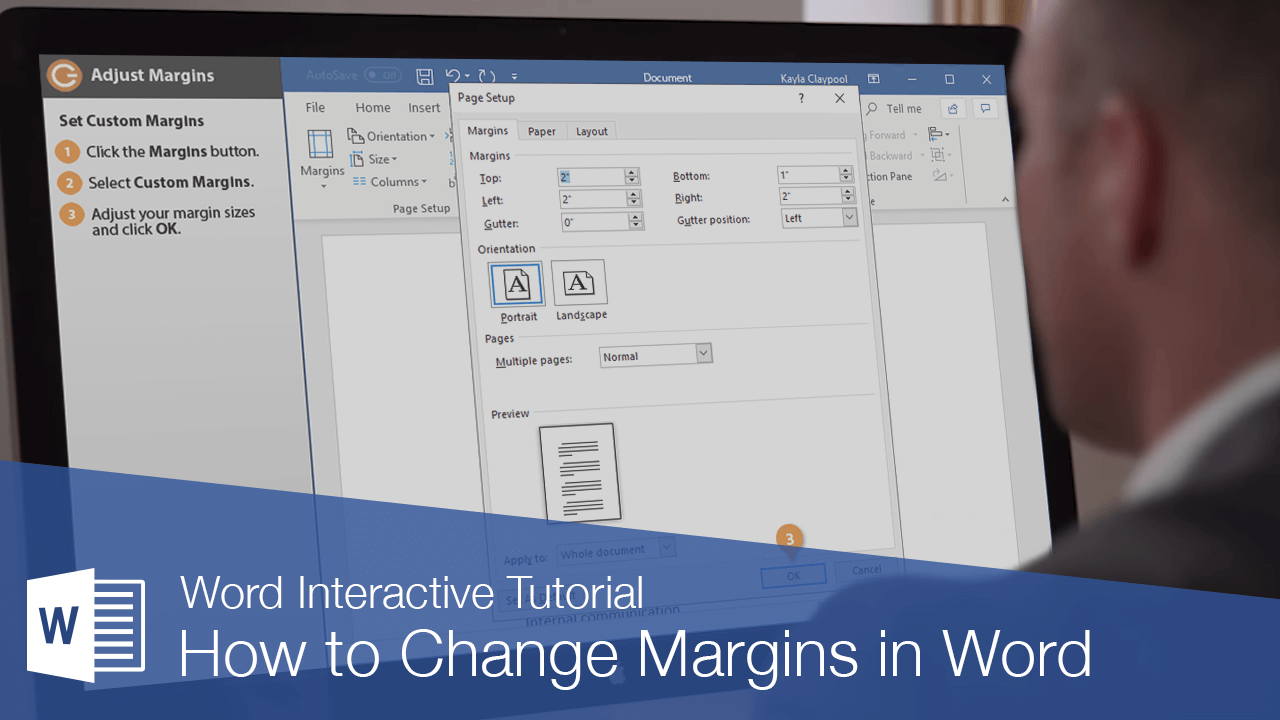
Margins are the blank spaces that line the top, bottom, and left and right sides of a document.To change margins, click on the Margins button, found on the Page Layout tab.
Contents
- 1 How do I use margins in Word?
- 2 What is a margin in text?
- 3 What does no margin mean?
- 4 How many margins are on a page?
- 5 What is 1 margins mean?
- 6 What do you mean by margin explain with example?
- 7 Why is there a margin on paper?
- 8 What are a company’s margins?
- 9 What is margin in business?
- 10 What is a margin requirement?
- 11 How do I remove a margin line in Word?
- 12 How do you margin a paper?
- 13 Where is the margin on Microsoft Word?
- 14 Is margin same as profit?
- 15 Why do books have a margin?
- 16 What are margins for in a notebook?
- 17 What is a margin on sales?
- 18 What is margin in balance sheet?
- 19 What are margins in docs?
- 20 Is a margin account a good idea?
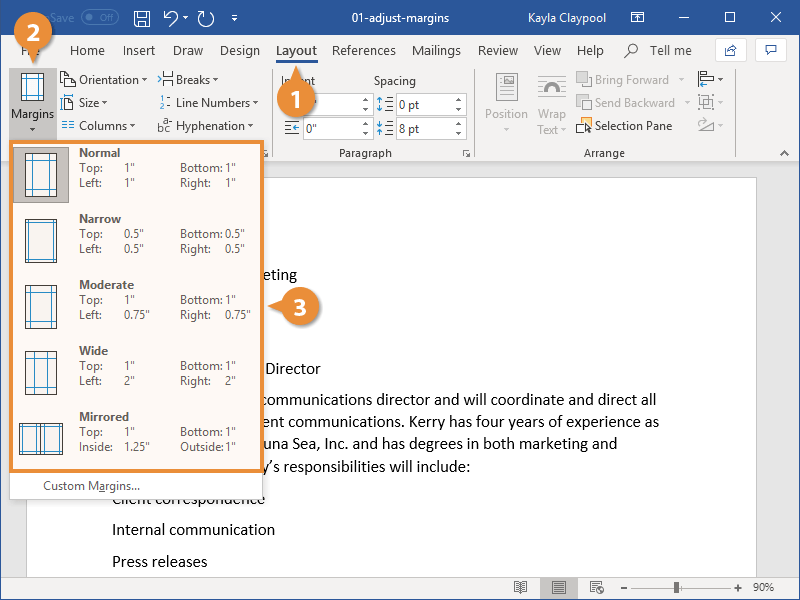
How do I use margins in Word?
Select Layout > Margins. Select Custom Margins. In Margins, use the Up and Down arrows to enter the values you want. Select OK when done.
Change default margins
- Select Layout > Margins > Custom Margins.
- Set your margins.
- Select Set As Default.
- Confirm your selection.
In typography, a margin is the area between the main content of a page and the page edges. The margin helps to define where a line of text begins and ends. When a page is justified the text is spread out to be flush with the left and right margins.(Any space between columns of text is a gutter.)
What does no margin mean?
Key Takeaways. Non-marginable securities are not allowed to be purchased on margin at a particular brokerage, or financial institution, and must be fully funded by the investor’s cash. Non-marginable securities are put in place to mitigate risks and control costs on stocks that are volatile.
How many margins are on a page?
Page margins should be consistent throughout the text. Required Margins: The top, bottom, and right margins are required to be 1 inch, but the left margin can either be 1 inch or 1.25 inches.
What is 1 margins mean?
The unit of measurement in those boxes is an inch so if you type 1″ in a text box, Word sets that margin to 1 inch. The Margins tab in the Page Setup window also has a “Set as Default” button. Click that when you want your margin settings to apply to all documents.
What do you mean by margin explain with example?
Margin can be defined in two main ways: It is the ratio of profit divided by revenue. This financial ratio is used to determine a company’s profitability. Money borrowed from a brokerage firm in order to leverage an investment.
Why is there a margin on paper?
Margins come in handy for notes, but at one time they had a more unique purpose. Mice and rats may not be able to read, but they love the taste of paper.So, paper manufacturers added margins as a safeguard to satisfy the rodents’ journalistic appetites while also helping to protect the written works.
What are a company’s margins?
A company’s operating margin, sometimes referred to as return on sales (ROS), is a good indicator of how well it is being managed and how efficient it is at generating profits from sales.In its essence, the operating margin is how much profit a company makes from its core business in relation to its total revenues.
What is margin in business?
Margin, or profit margin, is a percentage that’s used to measure the profitability of your business after expenses have been deducted from revenues. While revenue provides a good preliminary indicator of how well your business is performing, to determine actual business profit, you must consider your expenses as well.
What is a margin requirement?
A Margin Requirement is the percentage of marginable securities that an investor must pay for with his/her own cash.An Initial Margin Requirement refers to the percentage of equity required when an investor opens a position.
How do I remove a margin line in Word?
Go to Design > Page Borders. In the Borders and Shading box, on the Page Border tab, select the arrow next to Apply to and choose the page (or pages) you want to remove the border from. Under Setting, select None, and then select OK.
How do you margin a paper?
On the Page Layout tab, in the Page Setup group, click Margins. Click the margin type that you want. For the most common margin width, click Normal. Note: When you click the margin type that you want, your entire document automatically changes to the margin type that you have selected.
Where is the margin on Microsoft Word?
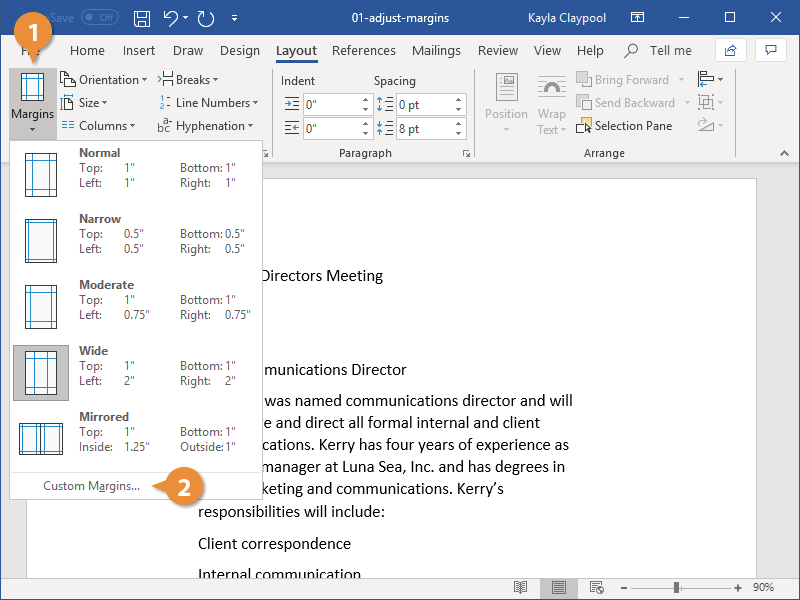
To change margins, click on the Margins button, found on the Page Layout tab. Word lists a number of pre-formatted options, but you can also make your own margins by selecting “Custom Margins,” found at the bottom of the Margins list. You can change each of the four margins in the dialog box that appears.
Is margin same as profit?
Profit Margin Measures a Company’s Profitability
Unlike profit, which gets measured in dollars and cents, profit margin gets measured as a percentage. To measure profit margin, use the company’s net income divided by the total sales generated.
Why do books have a margin?
Also known as “white space”, the margins of a book serve several important functions: 1) Enhances Aesthetics – margins help center the content on the page and make it more visually appealing.2) Improves Readability – the blank margins provide contrast to the printed words and images on the page.
What are margins for in a notebook?
Margins are around 2-inch lines presented on the top, bottom, left, and right sides of the notebook to make the writing look neat and mainly help teachers add notes and remarks for the students.
What is a margin on sales?
Sales margin is the amount of profit generated from the sale of a product or service. It is used to analyze profits at the level of an individual sale transaction, rather than for an entire business.
What is margin in balance sheet?
A margin is the difference between sales and expenses. There are a number of margins that can be calculated from the information located in the income statement, which give the user information about different aspects of an organization’s operations.
What are margins in docs?
Margins are the blank and unused spaces between the document’s content and edges. Margins don’t contain any text or image, and their prime purpose is to prevent text from colliding with document boundaries.
Is a margin account a good idea?
A margin account increases purchasing power and allows investors to use someone else’s money to increase financial leverage. Margin trading offers greater profit potential than traditional trading, but also greater risks. Purchasing stocks on margin amplifies the effects of losses.
TheTechieSenior.com is reader supported. We may earn a commission if you buy through links on this site. As an Amazon Associate, we earn from qualifying purchases. Learn more here.
In this article we’ll give you some easy to follow hints how to set line spacing and margins in Microsoft Word. We’ll also give you some easy tips for changing your first line indent and page margins. (Note: The following instructions apply specifically to Microsoft 365 Word, but should also work in the several preceding versions of Word.)
Table of Contents
Set line spacing and margins in Microsoft Word
Microsoft Word offers its users hundreds of customization possibilities. Some of them are behind the scenes and rarely seen or adjusted by the average user. But others, such as the ability to adjust spacing and margins, stand out front in their impact on your document’s appearance. It is important to know how to set spacing and margins in Microsoft Word, whether you are a casual user or you use Word every day.
How to increase line spacing.
With normal font usage, the distance between lines of text will be set automatically, usually at “1”. There are going to be times when you will want to change the line spacing. For example, if you are typing a book manuscript and are expecting to provide a printed or emailed version to an editor, you may be asked to provide a manuscript in Courier font with double spacing. Or it may be that you want to increase the line spacing slightly for aesthetic reasons, so that your text better fills the page.
Another circumstance when larger line spacing will be necessary is when you have a line of text and somewhere along that line, you insert one or more characters in a much larger font size. As a hypothetical example, you might want a date presented in a much larger font size than the other text on the line. The larger font size that you used for the date will force that entire line’s spacing to be increased to accommodate the larger date font.
Fortunately, changing line spacing in Microsoft Word is an easy task.
Set Line Spacing via the Ribbon
Select the text you want to increase the line spacing for. If you need to change all of the text in a document, you can select all text in the document by using the key command, Control + A in Windows or Command + A on a Mac. That handy little shortcut will select all of the text in the entire document.
- Be sure you are displaying the Home ribbon at the top of MS Word.
- Look in the third section of icons from the left which deals with line spacing, ordered and unordered lists, paragraph indents, etc..
- Look for an icon with four thin horizontal lines. On the left side of it is a blue up and down arrow. That icon is the one that allows you to set your line spacing.
- Tap it and you can choose 1.0 (normal single spaced line), 1.15, 1.5, 2.0, 2.5, and 3.0.

There is also a line labeled “Line Spacing Options.” From there you can play with the settings in greater detail.
You may also open the Line Spacing Options box by selecting the text you wish to set line spacing for.
- Right-click the selection and choose “Paragraph….”
- The same Line Spacing Options box mentioned in the previous paragraph will open.
For more detailed information about line spacing, see our article Double Spacing in Microsoft Word – How to Start and Stop It.
How to set space between paragraphs.
There are several reasons you might wish to adjust the spacing between paragraphs in your documents. Whatever the reason is, the process is simple when you know where to look.
To change paragraph spacing:
- Open the same Line Spacing Box you used in the previous instruction.
- Select your text, then right click and select “Paragraph…” from the menu. The same box you saw before will open.
- Be sure “Indents and Spacing” is chosen at the top of the box.
- Look for the Spacing section.
- In the Spacing section, the first controls you’ll see are the “Before” and “After” controls. Those controls set the spacing before or after each paragraph, accordingly.
If you select the entire document, any settings you make here will be used throughout your document.
If you select only a portion of the document, the setting you make here will apply only to the portion you selected.
How to set first line paragraph indents.
Formatting a paragraph so the first line is indented is easy in Microsoft Word, but not necessarily obvious.
For this task, you’ll need to be sure the ruler is turned on. Go to View in the top menu, then be sure there is a check next to Ruler. The check mark indicates the ruler is active. If it is not, just click on the word Ruler.
The Ruler option causes a ruler to be displayed horizontally at the top of the document and vertically on the far left.
If you want to indent the first line of all paragraphs in your document by, you can do so using Command + A on a Mac or Control + A in Windows to select the entire document.
- Near the left end of the top ruler, you will see two icons, one above the other. The top icon looks like an upside down triangle.
- With your chosen text selected, grab just that icon with your mouse or trackpad and slide it to the right. You should see the first line of your paragraphs become indented.
You may not want the first paragraph to be indented. In that case, select all of your paragraphs except the first before you slide the icon in the ruler. That should leave your first paragraph fully aligned left and your others with their first lines indented.
How to set margins in MS Word – easy method one.
If you followed the instructions above for indenting the first line of a paragraph, you’re halfway to knowing how to set margins. This method applies to the paragraph where your cursor is located if you have not selected a box of text. If you select a large block of text or your entire document, the changes will apply to the selected areas.
- In the ruler, look just below the upside down triangle icon that you used to indent the first line. You’ll see what looks like a triangle sitting on a box.
- Click and hold your mouse or trackpad on just the triangle. When you slide it, the margin will be adjusted, but leaving the first line indent wherever you set it. Slide it too far to the right and your indented first line will be negatively indented, hanging out to the left of your paragraph.
- There is a single triangle icon on the right end of the ruler. It works the same way as the left one, but adjusts only the right side margin. It does not affect the first line indent.
- Clicking and sliding the tiny box under the triangle on the left end of the ruler indents the entire paragraph or larger selection, taking with it the first line indent.
Because of their small sizes, it can be a little tricky to select just the triangle or the box.
How to set margins in MS Word – easy method two.
This method will change the margins for your entire document without the need to select any specific text.
- Click on the Layout tab to open the layout ribbon.
- The first icon in the layout ribbon is labeled “Margins.” When you click on the Margins icon you’ll be presented with a few preset options – normal, narrow, wide, and a couple others. Selecting any of these options will affect your entire document without having to select text.
- At the bottom of the list is “Custom margins…” Click that option, then be sure Margins is selected at the top of the box that opens.
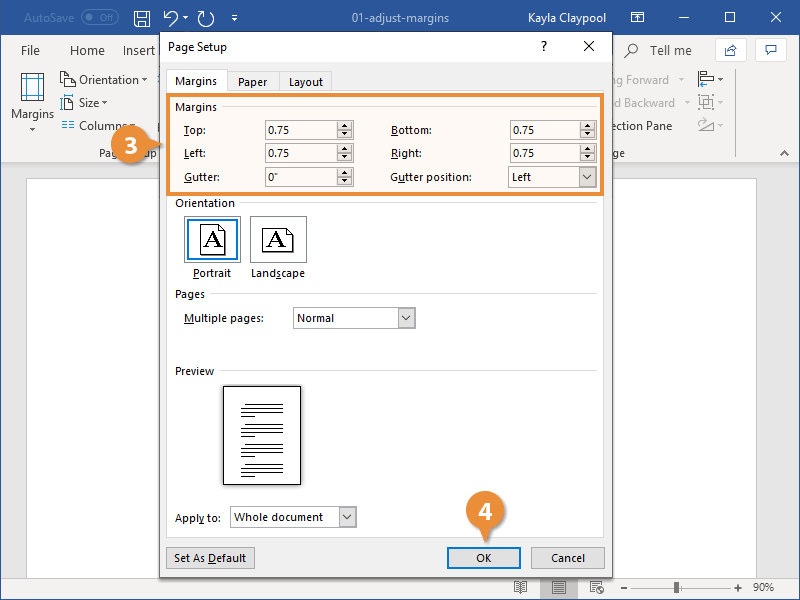
- You’re given options to set top, bottom, left, right, and gutter. You’ll also see a box with drop-down options to apply the margins to the entire document or from that point forward.
Set new default margins
You can easily set new default margins which will affect all future documents that use the normal.dotm styles.
Use the same instructions as instructed in How to set margins in MS Word – easy method two, above.
In the Custom margins… box, make the adjustments you wish to use, then, at the bottom, click the Default… button (Mac) or “Set as Default…” (Windows). That will set your margins for all future documents according to the settings you made.
You’ll find more helpful hints on using Microsoft Word here.
You can also set line spacing in the Web version of Microsoft Word.
 Please Note:
This article is written for users of the following Microsoft Word versions: 2007, 2010, 2013, and 2016. If you are using an earlier version (Word 2003 or earlier), this tip may not work for you. For a version of this tip written specifically for earlier versions of Word, click here: Extending a Paragraph into the Left Margin.
![]()
Written by Allen Wyatt (last updated December 14, 2021)
This tip applies to Word 2007, 2010, 2013, and 2016
You probably already know that Word allows you to specify an indent from the left margin on a paragraph-by-paragraph basis, if desired. The indent value you set is added to the left margin value for the page, thereby deriving how far the left side of the paragraph should appear in relation to the left edge of the paper.
For some layout tasks, you may want to set a negative indent for a paragraph. Word allows you to do this, effectively moving the left side of the paragraph into the margin area you defined for your page. To set a negative indent, follow these steps:
- Select the paragraph or paragraphs you want affected by the formatting change. (If you want the change to a single paragraph only, you can simply make sure the insertion point is within that paragraph.)
- Display the Home tab of the ribbon.
- Click the small icon at the bottom-right of Paragraph group. Word displays the Paragraph dialog box. (See Figure 1.)
- Using the Left control, specify a negative value. For instance, if you wanted the paragraph to extend a quarter-inch into the left margin area, you would enter -.25 as the Left value.
- Click on OK.
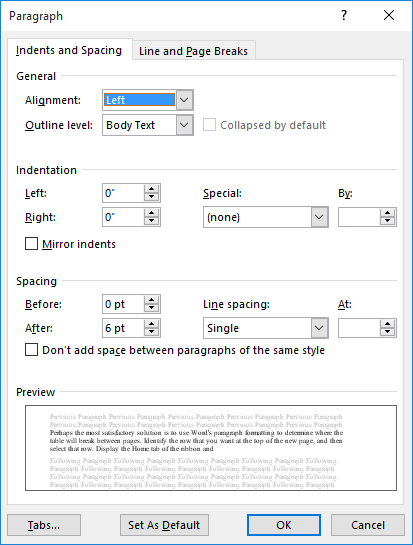
Figure 1. The Paragraph dialog box.
WordTips is your source for cost-effective Microsoft Word training.
(Microsoft Word is the most popular word processing software in the world.)
This tip (6831) applies to Microsoft Word 2007, 2010, 2013, and 2016. You can find a version of this tip for the older menu interface of Word here: Extending a Paragraph into the Left Margin.
Author Bio
With more than 50 non-fiction books and numerous magazine articles to his credit, Allen Wyatt is an internationally recognized author. He is president of Sharon Parq Associates, a computer and publishing services company. Learn more about Allen…
MORE FROM ALLEN
PRIVATE Fields in WordPerfect Documents
Did you ever convert a document from WordPerfect and see PRIVATE fields in it? Here’s what those fields mean.
Discover More
Printing Only Selected Pages
I often need to print only select pages of a document, rather than the whole thing. Word makes it easy to be judicious in …
Discover More
Copying Fill Color in a Table
You may spend some time getting the color in a portion of a table just right, only to be faced with the task of copying …
Discover More
More WordTips (ribbon)
Compound List Formatting
Word can help you do quite a bit of complex formatting to your lists, both bulleted and numbered. Using the steps …
Discover More
Searching for Paragraph Formatting
You can use the Find and Replace capabilities of Word to search for a wide variety of information. One thing you can look …
Discover More
Typing Beyond the Right Margin
In the days of typewriters, you could type beyond the right margin by using the MarRel lever or key. This tip discusses …
Discover More
![]()
Download Article
A user-friendly guide to changing a Word document’s margins to wide, narrow, and more
![]()
Download Article
- Applying Preset Margins (Desktop)
- Creating Custom Margins (Desktop)
- Using the Mobile App
- Q&A
- Warnings
|
|
|
|
Are you trying to adjust your margins in Microsoft Word? The margins are the empty space between the edge of the page and the contents of the document. Depending on your needs, you can change the margins to become wider, narrower, or a mix of both. You’ll be able to select from a few preset options or customize your own. This wikiHow will show you how to fix and change the default 1-inch margins in Microsoft Word using your iPhone, Android, or Windows or Mac computer.
Things You Should Know
- On desktop, click «Layout» → «Margins» → select a margin preset.
- For custom margins, click «Custom Margins…» and enter the values for Top, Left, Bottom, and Right.
- On mobile, tap «•••» → «Home» → «Layout» → «Margins» → select a preset or «Custom Margins». Enter a new value and tap «Done».
-
1
-
2
Click Layout. This will be in the top toolbar, between Design and References.
Advertisement
-
3
Click Margins. You can find this in the upper-left corner of the Layout tab. This looks like a rectangle with blue lining the margins.
- A pop-up menu will open.
-
4
Select a margin type. You’ll see a list of preset margins: Normal, Narrow, Moderate, Wide, Mirrored, and Office 2003 Default. Click a preset margin to apply it to your document. It should be applied immediately.
- If you don’t like how it looks, you can select Normal again, or press CTRL + Z (Windows) or CMD + Z (Mac) to undo the change.
Advertisement
-
1
Click Layout. This will be in the top toolbar, between Design and References.
-
2
Click Margins. You can find this in the upper-left corner of the Layout tab. This looks like a rectangle with blue lining the margins.
- A menu will open.
-
3
Click Custom Margins…. This will be at the bottom of the drop-down menu.
- A new window will open.
-
4
Set your new margins. On the desktop application, you’ll be able to edit the margin sizes for: Top, Left, Bottom, Right, Gutter, and Gutter Positions. On the web version, you’ll only be able to edit the margin sizes for: Top, Left, Bottom, and Right. You’ll see a preview of the document layout at the bottom of the window.
- Click the field and enter your new margin size, or use the up/down arrow to adjust the current margins.
- For Gutter Positions, select Left or Top.
- Only adjust the Gutter margin if you intend to use the document in a bound format, like a book or report, and you need space for the binding. In this case, type a number in Gutter that will allow enough room for the binding and use the drop-down to indicate whether the binding will be on the top or on the left.
- Make sure Apply to is set to Whole document, unless you only want to change the margins from This point forward.
-
5
Set new default margins (optional). If you want to use this margin for all new documents in Microsoft Word, click Set as default in the bottom-left corner. Click Yes to confirm.
- When you create a new document, the margins will reflect the change.
-
6
Click OK when finished. The changes will be applied immediately.
Advertisement
-
1
Open the Microsoft Word app. Microsoft Word is available for iOS in the App Store and for Android in the Google Play Store.
- If you aren’t already logged in to your Microsoft account, enter your email address and password to do so now.
-
2
Open a new or existing project. Tap a recent project on your homepage, or tap the + tab to create a new one.
-
3
Tap ••• . This is the «•••» located at the top of your on-screen keyboard. If you don’t see your keyboard, tap the document to open it.
- A new menu will open at the bottom.
-
4
Tap Home. This is located at the top of the new menu.
- A pop-up menu will open.
-
5
Tap Layout. You can find this between Draw and Review.
-
6
Tap Margins. This is the first listing in the Layout tab.
-
7
Select a margin type. You’ll see a list of preset margins: Normal, Narrow, Moderate, Wide, and Mirrored. Tap a preset margin to apply it to your document. It should be applied immediately.
- If you don’t like how it looks, you can select Normal again, or pick a new preset.
- Be sure to save your document when you’re finished.
-
8
Create a custom margin (optional). Tap Custom Margins at the bottom of the Margins menu. You’ll be able to edit the margin sizes for: Top, Left, Bottom, and Right.
- Tap a margin to edit it.
- Tap the backspace button to erase the existing margin.
- Enter a new margin value.
- Tap Done in the top-right corner.
- Tap Margins → Custom Margins to edit another margin.
- The changes will be applied immediately.
Advertisement
Add New Question
-
Question
I want the page ruler. What can I do?

To get the ruler, go into the View tab (Word 2010 and newer) and select the Ruler checkbox.
-
Question
Can I ever allow one more letter on a line to finish a long word rather than wrap to the next line?
No. The only thing you could possibly do would be to make all the margins wider. Making only one word go to the next line is impossible unless you do the same for all words.
Ask a Question
200 characters left
Include your email address to get a message when this question is answered.
Submit
Advertisement
Thanks for submitting a tip for review!
-
Leaving the margin under .25″ may lead to text being cut off when printed.
Advertisement
About This Article
Article SummaryX
1. Open a Microsoft Word document.
2. Click the Layout tab.
3. Click Margins.
4. Click Custom Margins….
5. Set the margins.
6. Click the Apply to drop-down.
7. Select how to apply the margins.
8. Click OK.
Did this summary help you?
Thanks to all authors for creating a page that has been read 493,209 times.
Is this article up to date?
Not all documents fit inside Word’s default one-inch margin between the text and the edge of the page. To change the margins in your Word documents, use one of several choices, from predefined margins that make it easy to apply a different size margin, to the customized margins adjustable to fit your needs.
These directions work with all currently supported desktop versions of Word and Word for Mac, while Word Online offers limited margin capabilities.
Quickly Change Margins in Word
To make the margins in your document smaller or larger, use Word’s Narrow, Moderate, or Wide margins. To print your document on both sides of the paper and put it in a three-ring binder, use the Mirror margin setting.
Mirror margins cannot be set in Word Online. However, if you view a document with mirror margins in Word Online, the mirror margins are preserved.
To apply a predefined margin, select Layout > Margins and choose the predefined margin you want to use.
In Word Online, Word 2010 and Word 2007, the Layout tab is labeled as Page Layout. The steps to change margins remain the same.
Use the Ruler to Adjust Margins in Word
The horizontal ruler displayed below the Word menu provides another way to change the margins in your document.
Before you begin, display the ruler. If the ruler is not displayed above your document, select View and place a checkmark next to Ruler to display the ruler. You’ll also need to work in Print view. Select View > Print Layout to display the document in print view.
The ruler is not available in Word Online.
Here’s how to change the margins using the ruler:
- Change the left margin: Place the cursor over the left indents until it changes to a double-headed arrow. Drag the margin to the right to make it wider or to the left to make it narrower.
- Change the right margin: Place the cursor over the right indent until it changes to a double-headed arrow. Drag the margin to the left to make it wider or to the right to make it narrower.
Create Custom Margins
When you need a certain size margin for a document, use the custom settings.
Here’s how to set a custom margin size:
- Select Layout > Margins > Custom Margins.
- Change the size for the Top, Bottom, Left, and Right margins.
- Select Set As Default to set the new margin settings as the default for the current template. This margin setting will be used in each new document you create based on that template. This feature is not available in Word Online.
- Select OK when you’re finished.
Create Gutter Margins
Documents that will be bound need extra margin space for the binding. This gutter margin ensures the binding doesn’t interfere with the white space around the text.
To add a gutter margin, select Layout > Margins > Custom Margins and type a width in the Gutter box.
You cannot create gutter margins in Word Online. Switch to the desktop version of Word to set gutter margins.
Create Mirror Margins
Documents printed on both sides of the page and bound, such as books and magazines, use a special margin setting. These mirror margins ensure the right and left pages are mirror images of each other.
To create mirror margins, select Layout > Margins and select Mirrored. To change the size of the mirror margins, select Layout > Margins > Custom Margins and change the size of the Inside or Outside margins.
Set Margins for a Section of Your Document
When your document is divided into sections, you can apply different margin sizes to different sections. This feature is not available in Word Online.
To change the margins for a single section:
- Select the section in the document where you want a different margin size.
- Select Layout > Margins > Custom Margins.
- Type new values for the Top, Bottom, Right, and Left margins.
- From the Apply to list, select This Section.
- Select OK when you’re done.
View Page Margins
Word can display boundary lines that show you where the margins are in your document. These boundary lines appear as dotted lines. The margin boundaries cannot be viewed in Word Online.
To view the page margins:
- Select File > Options. In Word 2007, select the Microsoft Office button and select Word Options.
- Select Advanced.
- Scroll down to the Show document content section and select Show text boundaries.
- Select OK.
Thanks for letting us know!
Get the Latest Tech News Delivered Every Day
Subscribe

on
April 2, 2012, 4:38 AM PDT
How to pull a paragraph in Word into the left margin
It’s easier than you might think to pull text into the left margin. Doing so is as simple as setting a format option, but in an unusual way.
Most text is flush with the left margin or indented to the right a bit. You can indent just the first line of a paragraph or indent all but the first line (that’s called a hanging indent). What you might not realize is that a paragraph’s left indent can extend into a document’s left margin-that’s not a common request, but it’s easy to do.
Normally, a paragraph’s left indention setting is 0 or a positive number. The value 0 aligns the paragraph with the left margin, and a positive setting moves the text to the right of the left margin. It stands to reason that a negative value would move the text to the left of the left margin-and that’s exactly how you accomplish this unusual layout request. For example, a left indentation of -.40 creates an interesting visual effect for this timeline of events.
To assign this paragraph setting, do the following (you can use any paragraph of text):
- Click inside the paragraph you want to format. If working with a list of items or several paragraphs, select the entire list or all of the paragraphs.
- On the Home tab, click the Paragraph group’s dialog launcher (the small arrow in the bottom-right corner). In Word 2003, choose Paragraph from the Format menu.
- In the Left option in the Indention section, enter -.40. Negative values are valid settings.
- Click OK.
Dragging text into the left margin helps set it off a bit, but it’s a technique that will have limited uses and appeal, so save it for those documents that will truly benefit from it. You can do the same thing with the right margin, although your opportunities for doing so will be even more limited.
-
Software
A margin is the empty space between a document’s contents and the edges of the page. Word’s default margins are 1 inch on each side of the page, but you can change the margins to accommodate the needs of your document.
Choose a Margin Size
Word includes several built-in margin settings that you can choose from.
- Click the Layout tab.
- Click Margins button.
- Select a new margin setting.

Word adjusts the size of the margins and automatically redistributes your content to fit.
Set Custom Margins
If the common margin settings don’t meet your needs, you can create custom ones.
- Click Margins button on the Layout tab.
- Select Custom Margins.
- Adjust your margin settings in the dialog box.
- Click OK.
Another way to adjust margins is to click and drag the Left Margin, Right Margin, Top Margin, or Bottom Margin line on the Ruler.
If you intend to bind a document and require extra space for the bindings, use the Gutter setting on the Margins tab in the Page Setup dialog box.

FREE Quick Reference
Click to Download
Free to distribute with our compliments; we hope you will consider our paid training.
|
02-28-2016, 05:40 PM |
|||
|
|||
|
How remove short vertical line in left margin of text?from
In several places of my manuscript a «|» appears immediately to the left of some paragraphs. How can this be removed? Thanks for your help. NightWriter
|


|
02-28-2016, 07:56 PM |
|
The line is probably a ‘Track Changes’ marker, indicating that the text was edited while ‘Track Changes’ was ‘on’. Accepting or rejecting the changes will delete the marker.
__________________
|
|
02-28-2016, 11:21 PM |
|||
|
|||
|
Thanks, macropod. Dear macropod, Thanks a million for so speedily solving my problem with Tracking Markers. (I joined the Forum less than an hour before you responded!) I’ve worked with Word for about twenty-five years, but never had occasion to use «Review.» Gratefully, NightWriter
|
|
02-29-2016, 05:21 AM |
|
A stray mouse-click in the Status Bar’s Track Changes marker can do it.
|
|
02-29-2016, 05:20 PM |
|||
|
|||
|
Thanks loads, Charles. I’m really glad to learn how I created those «|’s» NightWriter
|