
Word for Microsoft 365 Word 2021 Word 2019 Word 2016 Word 2013 Word 2010 Word 2007 More…Less
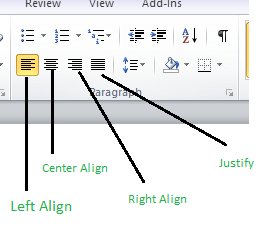
Alignment determines the appearance and orientation of the edges of the paragraph: left-aligned text, right-aligned text, centered text, or justified text, which is aligned evenly along the left and right margins. For example, in a paragraph that is left-aligned (the most common alignment), the left edge of the paragraph is flush with the left margin.
Vertical alignment determines the position of the text within a section of a document relative to the top and bottom margins, and is often used to create a cover page.
-
Select the text that you want to align.
-
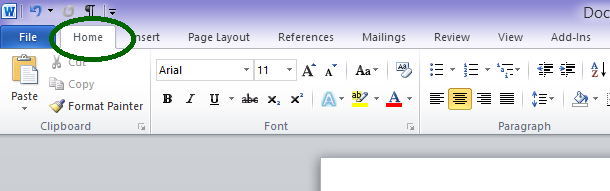
On the Home tab, in the Paragraph group, click Align Left
 or Align Right .
 or Align Right
  .
.-
Select the text that you want to center.
-
On the Home tab, in the Paragraph group, click Center
.
 .
.-
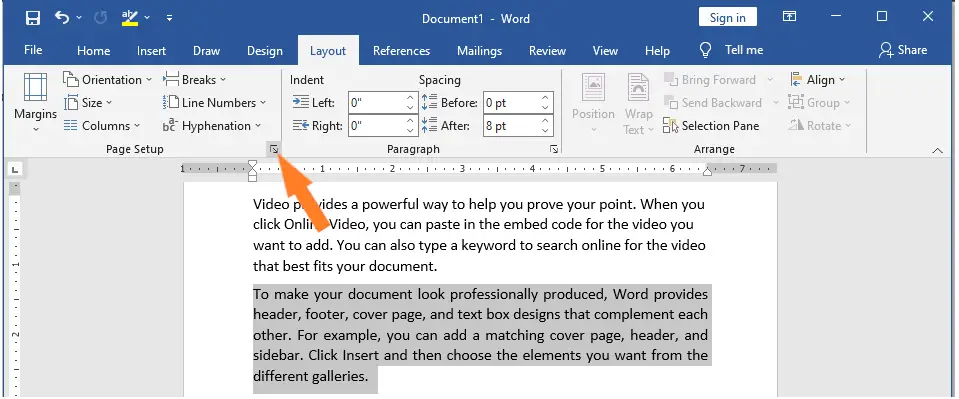
Select the text that you want to center.
-
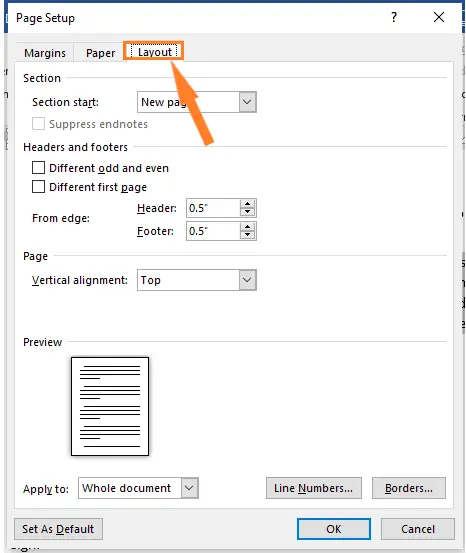
On the Layout or Page Layout tab, click the Dialog Box Launcher
in the Page Setup group, and then click the Layout tab. -
In the Vertical alignment box, click Center.
-
In the Apply to box, click Selected text, and then click OK.
 in the Page Setup group, and then click the Layout tab.
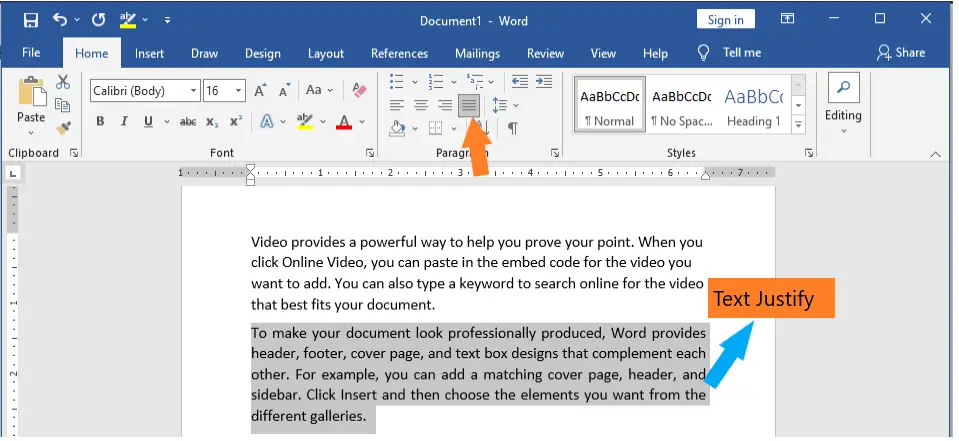
When you justify text in Word, you give your text straight edges on both sides of the paragraph. Justifying extends each line of your text to the left and right margins. Justifying text might make the last line of text in a paragraph considerably shorter than the other lines.
-
Select the text you want to justify.
-
On the Home tab, in the Paragraph group, click Justify
.
 .
.Tips:
-
In the Paragraph group, click the Dialog Box Launcher
, and select the Alignment drop-down menu to set your justified text. -
You can also use the keyboard shortcut, Ctrl + J to justify your text.
In Office Word 2007, you can choose from a selection of predesigned cover pages to create a professional-looking document quickly and easily.
-
On the Insert tab, in the Pages group, click Cover Page.
-
Click the cover page that you want.
A cover page is always added to the beginning of the open document.

See also
Adjust indents and spacing
Need more help?
Want more options?
Explore subscription benefits, browse training courses, learn how to secure your device, and more.
Communities help you ask and answer questions, give feedback, and hear from experts with rich knowledge.
To align left, press Ctrl + L. To align right, press Ctrl + R. To align center, press Ctrl + C. To justify, Ctrl + J.
Contents
- 1 How do I align left margin in Word?
- 2 What is the shortcut key for Align text Left?
- 3 How do you type left to right in Word?
- 4 How do you align left and right text in Word?
- 5 What does left justified look like?
- 6 What is flush left in Word?
- 7 How do I turn on alignment guides in Word?
- 8 How do you write left to right?
- 9 How do you move a column to the left and right in Word?
- 10 How do you type left to right in Word on a Mac?
- 11 What are the 4 alignment options?
- 12 What is left aligned text?
- 13 What is left adjust?
- 14 Should be left justified?
- 15 How do you flush left?
- 16 How do you align both left and right?
- 17 Is APA justified or left aligned?
- 18 How do I show alignment lines in Word?
- 19 How do you use the word alignment?
- 20 What are alignment guides in Word?
How do I align left margin in Word?
For example, in a paragraph that is left-aligned (the most common alignment), text is aligned with the left margin. In a paragraph that is justified, text is aligned with both margins.
Align text left, center, or right.
| To | Click |
|---|---|
| Align text left | Align Text Left |
| Center text | Center Text |
| Align text right | Align Text Right |
What is the shortcut key for Align text Left?
Ctrl+L
Frequently used shortcuts
| To do this | Press |
|---|---|
| Center the text. | Ctrl+E |
| Align the text to the left. | Ctrl+L |
| Align the text to the right. | Ctrl+R |
| Cancel a command. | Esc |
How do you type left to right in Word?
You can change the text direction from within a Microsoft Office program by choosing the Right-to-left paragraph button in the Paragraph group on the Home tab (this only appears if you have a right-to-left language enabled).
How do you align left and right text in Word?
Align the text left or right
- Select the text that you want to align.
- On the Home tab, in the Paragraph group, click Align Left or Align Right .
What does left justified look like?
If printed text is left-justified, each line begins at the same distance from the left-hand edge of the page or column.
What is flush left in Word?
In English and most European languages where words are read left-to-right, text is usually aligned ‘flush left’, meaning that the text of a paragraph is aligned on the left-hand side while the right-hand side is ragged.
How do I turn on alignment guides in Word?
Turn on the snap-to options
- Select a chart, picture, or object in the document.
- On the right end of the ribbon, select Format > Align > Grid Settings. The Grid and Guides dialog box appears.
- Turn on one or both of these options: Option. Description. Snap objects to grid when the gridlines are not displayed.
How do you write left to right?
In a right-to-left, top-to-bottom script (commonly shortened to right to left or abbreviated RTL), writing starts from the right of the page and continues to the left, proceeding from top to bottom for new lines.
How do you move a column to the left and right in Word?
To move a row or column using the mouse, follow these steps:
- Select the entire row or column that you want to move.
- Click on the highlighted row or column and hold down the mouse button.
- Drag the row or column to the place where you want it to be.
- Release the mouse button.
How do you type left to right in Word on a Mac?
Use bidirectional keyboard shortcuts
- Change selected text to left to right: Press Command-Option-Control-Right Arrow.
- Change selected text to right to left: Press Command-Option-Control-Left Arrow.
- Change selected text to the default direction: Press Command-Option-Control-Down Arrow.
What are the 4 alignment options?
There are four main alignments: left, right, center, and justified. Left-aligned text is text that is aligned with a left edge. Right-aligned text is text that is aligned with a right edge.
What is left aligned text?
Left-aligned text is text that is aligned with a left edge. Right-aligned text is text that is aligned with a right edge. Centered text is text that is centered between two edges.
What is left adjust?
Updated: 08/02/2020 by Computer Hope. Left align, left alignment, or left justify is text, pictures, graphics, or page formatting that aligns text along the left side of a page or containing element. This text has a ragged right edge because it is left-aligned instead of being right aligned.
Should be left justified?
Margins: All page margins (top, bottom, left, and right) should be 1 inch. All text should be left-justified. Indentation: The first line of every paragraph should be indented 0.5 inches.
How do you flush left?
Flush Left (FL) – Text Alignment
Your entire document should be aligned with the left margin (flush left). Your text should appear with a straight and even edge on the left side and ill be uneven on the right side.
How do you align both left and right?
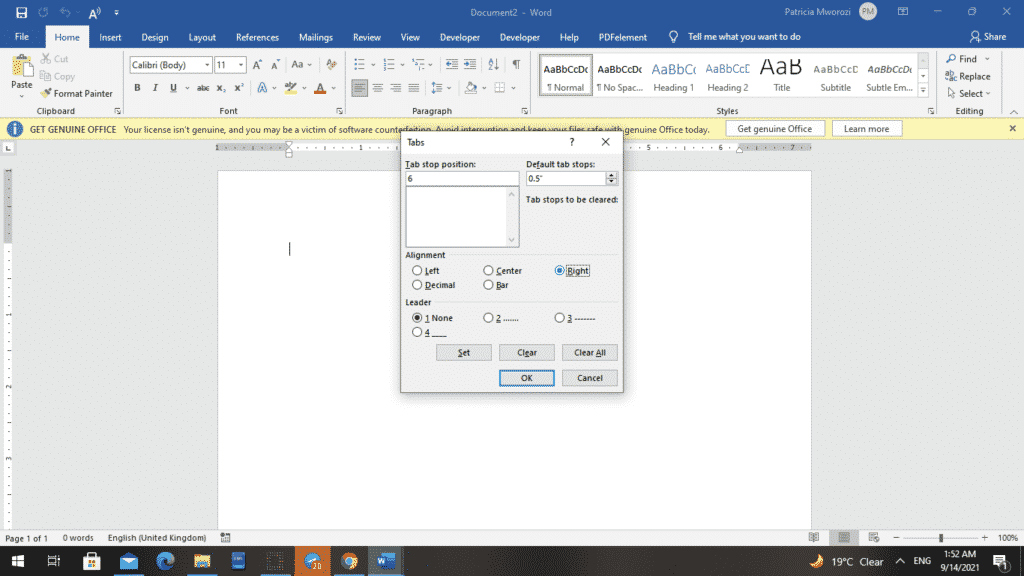
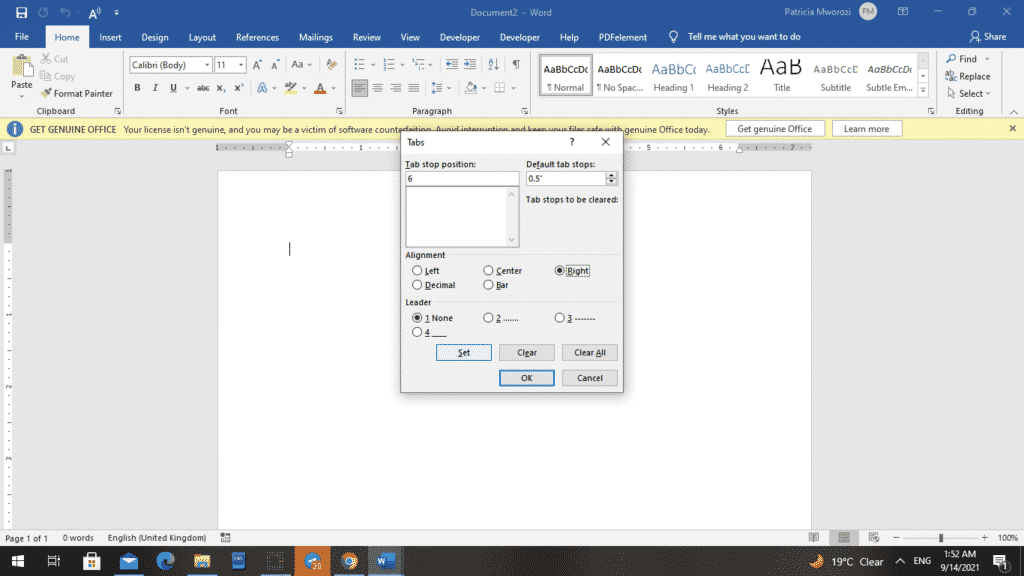
Figure B
- On the Home tab, click the Paragraph group’s dialog launcher and then click Tabs in the bottom-left corner.
- Enter 6.5 in the Tab stop position.
- Click Right in the Alignment section (Figure C).
- Click Set.
- Click OK.
Is APA justified or left aligned?
Align the text of an APA Style paper to the left margin. Leave the right margin uneven, or “ragged.” Do not use full justification for student papers or manuscripts being submitted for publication.
How do I show alignment lines in Word?
Click the shape or object in the document. Under Drawing Tools on the Format tab, in the Arrange group, click Align, and then click View Gridlines.
How do you use the word alignment?
Examples of alignment in a Sentence
The school has to bring its programs into alignment with state requirements. New alignments have been created within the political party. These example sentences are selected automatically from various online news sources to reflect current usage of the word ‘alignment.
What are alignment guides in Word?
Microsoft Word is equipped with live layout and alignment guides to help you align, resize, and move objects. The example below draws a shape and lines it up using the alignment tool. 1. In the “Insert” tab, click “Shape” and select a shape to draw.
Apply Left, Center, Right or Justify Alignment to Text in Microsoft Word
by Avantix Learning Team | Updated April 13, 2022
Applies to: Microsoft® Word® 2010, 2013, 2016, 2019, 2021 and 365 (Windows)
You can align or justify text or other content in Word in several ways including using keyboard shortcuts, selecting commands in the Ribbon, using the Paragraph dialog box or modifying a style. It’s important to note that alignment or justification is paragraph formatting so applies to entire paragraphs. You can align text or inline graphics in paragraphs that are followed by a hard return (you pressed Enter or Return).
To see where paragraphs have been created in a Word document, it’s helpful to turn on Show/Hide ¶ on the Home tab in the Ribbon.
In this article, we’ll review 4 different ways to change horizontal alignment or justification in Word documents.
Recommended article: How to Insert a Line in Word (3+ Ways)
Do you want to learn more about Microsoft Word? Check out our virtual classroom or in-person Word courses >
There are 4 types of alignment that can be applied to paragraphs:
- Align left – aligns text or inline graphics with the left margin or indent
- Center – centers text or inline graphics between the left and right margins or indents
- Align right – aligns text or inline graphics with the right margin or indent
- Justify – distributes text evenly between the left and right margins or indents
A paragraph aligns within the indents (indent markers appear on the Ruler). The indents may be different from the margins. Paragraphs are also entered in cells in tables and each paragraph in a cell may have different indents and alignment settings.
1. Align or justify using keyboard shortcuts
To align or justify paragraphs using keyboard shortcuts:
- Align left – select the paragraph(s) and press Ctrl + L to align to the left.
- Align right – select the paragraph(s) and press Ctrl + R to align to the right.
- Align center – select the paragraph(s) and press Ctrl + E to align center.
- Justify – select the paragraph(s) and press Ctrl + J to justify.
2. Align or justify using the Ribbon
To align or justify paragraphs using the Word Ribbon
- Select the paragraph(s) to which you want to apply alignment or justification. If you would like to select all paragraphs, press Ctrl + A.
- Click the Home tab in the Ribbon and then click Align Left, Center, Align Right or Justify in the Paragraph group.
Align and Justify commands appear on the Home tab in the Ribbon in the Paragraph group:
![]()
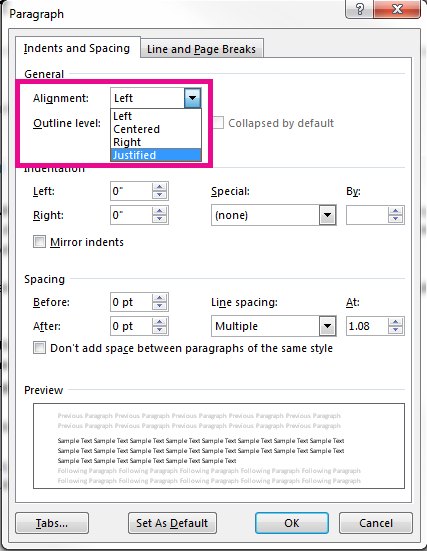
3. Align or justify using the Paragraph dialog box
To align or justify paragraphs using the Paragraph dialog box:
- Select the paragraph(s) to which you want to apply alignment or justification. If you would like to select all paragraphs, press Ctrl + A.
- Right-click and select Paragraph. The Paragraph dialog box appears.
- From the Alignment drop-down menu, select Left, Center, Right or Justify.
- Click OK.
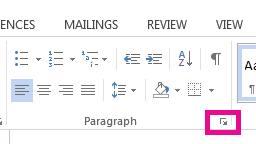
You can also display the Paragraph dialog box by clicking the Home tab in the Ribbon and then clicking the dialog box launcher on the bottom right of the Paragraph group.
The Paragraph dialog box includes a drop-down menu to select Alignment:
4. Align or justify by modifying a style
When you create a new blank document, it starts out using the Normal style which contains default paragraph and character formatting.
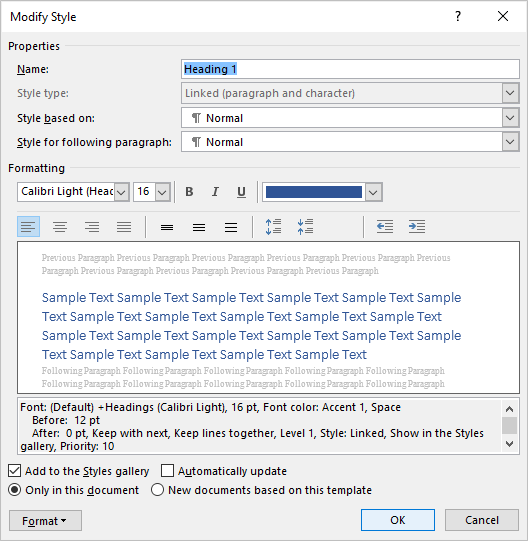
If you want to apply alignment or justification to multiple paragraphs throughout a document (such as a heading), you can modify a style (such as Heading 1).
To change the alignment for a heading style (such as Heading 1):
- Click in a paragraph using the heading style (typically applied through the Home tab in the Ribbon).
- Click the Home tab in the Ribbon.
- In the Styles group, right-click the heading style. A dialog box appears.
- Click Format. A drop-down menu appears.
- Click Paragraph. The Paragraph dialog box appears.
- From the Alignment drop-down menu, select Center or your preferred alignment.
- Click OK twice.
Below is the Modify Style dialog box with align and justify commands:
There may be issues if you modify alignment or justification in the Normal style since other styles are based on this style by default. Cells in tables would likely be affected and so would other styles that are based on the Normal style (such as Header, Footer and Heading styles). Paragraphs using these styles would then inherit the alignment or justification (unless alignment or justification has been specifically modified in these styles). If you are comfortable using styles, you could create your own style or modify a different Word style to avoid this issue.
Subscribe to get more articles like this one
Did you find this article helpful? If you would like to receive new articles, join our email list.
More resources
How to Double Space in Word (4 Ways + Shortcut)
How to Hide Comments in Word (or Display Them)
How to Find and Replace in Word (and Use Wildcards)
How to Create a Hanging or First Line Indent in Word (3 Ways)
How to Superscript or Subscript in Microsoft Word (with Shortcuts)
Related courses
Microsoft Word: Intermediate / Advanced
Microsoft Excel: Intermediate / Advanced
Microsoft PowerPoint: Intermediate / Advanced
Microsoft Word: Long Documents Master Class
Microsoft Word: Styles, Templates and Tables of Contents
Microsoft Word: Designing Dynamic Word Documents Using Fields
VIEW MORE COURSES >
Our instructor-led courses are delivered in virtual classroom format or at our downtown Toronto location at 18 King Street East, Suite 1400, Toronto, Ontario, Canada (some in-person classroom courses may also be delivered at an alternate downtown Toronto location). Contact us at info@avantixlearning.ca if you’d like to arrange custom instructor-led virtual classroom or onsite training on a date that’s convenient for you.
Copyright 2023 Avantix® Learning
Microsoft, the Microsoft logo, Microsoft Office and related Microsoft applications and logos are registered trademarks of Microsoft Corporation in Canada, US and other countries. All other trademarks are the property of the registered owners.
Avantix Learning |18 King Street East, Suite 1400, Toronto, Ontario, Canada M5C 1C4 | Contact us at info@avantixlearning.ca
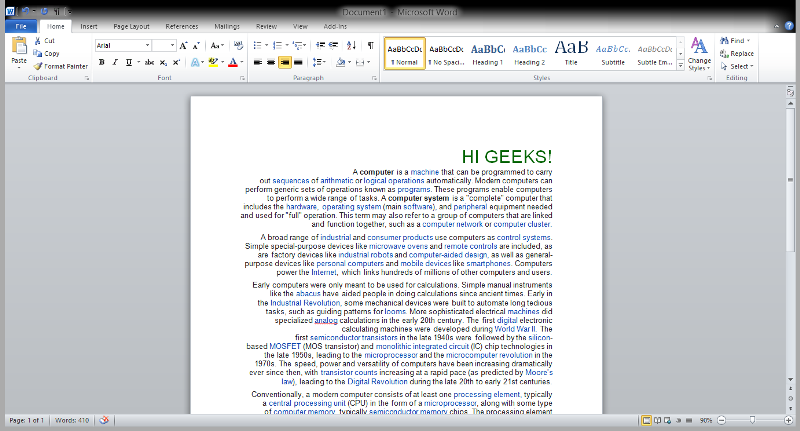
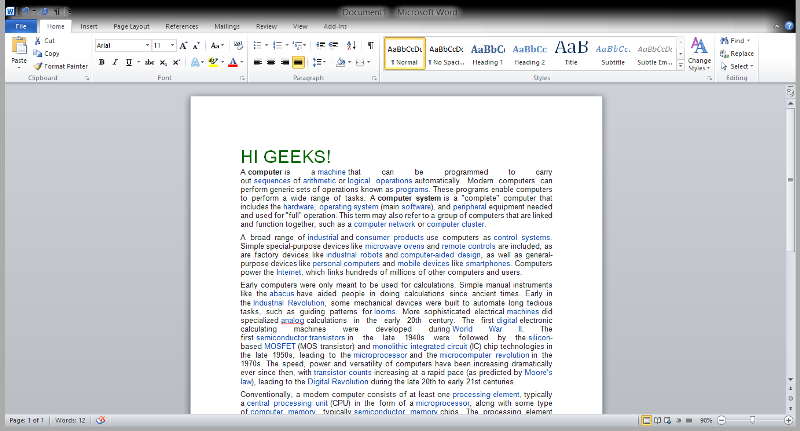
In this course, we will talk about how to align text in Microsoft Word. Meanwhile, this is the continuation of the previous tutorial on how to change font style, size and font case in Microsoft Word which still part of formatting text in your documents.
Furthermore, we’ll learn how to change text so that it looks like what we want it to look like.
Table of contents
- Text Alignment
- What is text alignment in MS Word?
- Default text alignment in MS Word
- How Many Alignment in MS Word
- Left Aligned Text
- Right Align Text
- Center Aligned Text
- Justified Text
- How to Align Text in Microsoft Word
- Which shortcut key to align the text?
- Summary
What is text alignment in MS Word?
Text alignment is a way to change the look of all the text in a paragraph. It is an attribute of paragraph formatting. For instance, when a paragraph is align to the left, which is the most common way to align it. The text lines up with the left margin. On the other hand, when a paragraph is justified, the text lines up with both sides of the page.
Default text alignment in MS Word
The default alignment for text or paragraphs is left-align with straight margins on the left and uneven ones on the right. However, there are many other ways to format a document’s alignment.
Also, the alignment buttons in the Paragraph group on the Home tab let us justify or align not just text but also other objects.
How Many Alignment in MS Word
There are four types of text alignment available in Microsoft Word — left-align, center-align, right-align, and justify.
Left Aligned Text
A paragraph or a text is left-align when that paragraph or text is aligned evenly along the left margin of the page in MS-Word. It is also known as “left-justified,”.
Right Align Text
Right-alignment means that the text of a paragraph is line up evenly along the right edge of the page in MS-Word. Moreover, right alignment works well for columns with numbers, tables, and other types of ordered lists.
Center Aligned Text
Center aligned means that the text of a paragraph is in the middle of the left and right margins.
Justified Text
Justified Text in MS-Word is a paragraph’s text when it lines up evenly along both the left and right edges of the page.
How to Align Text in Microsoft Word
Here are the ways How to Align Text in Microsoft Word.
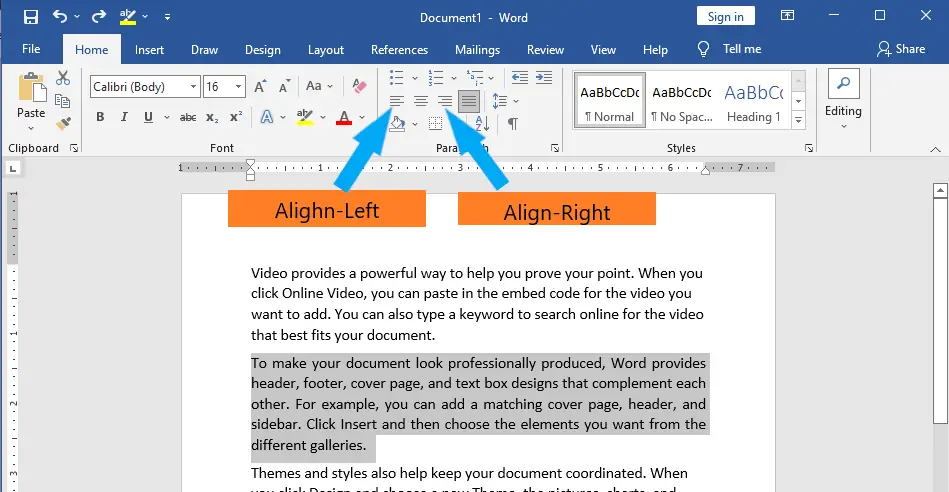
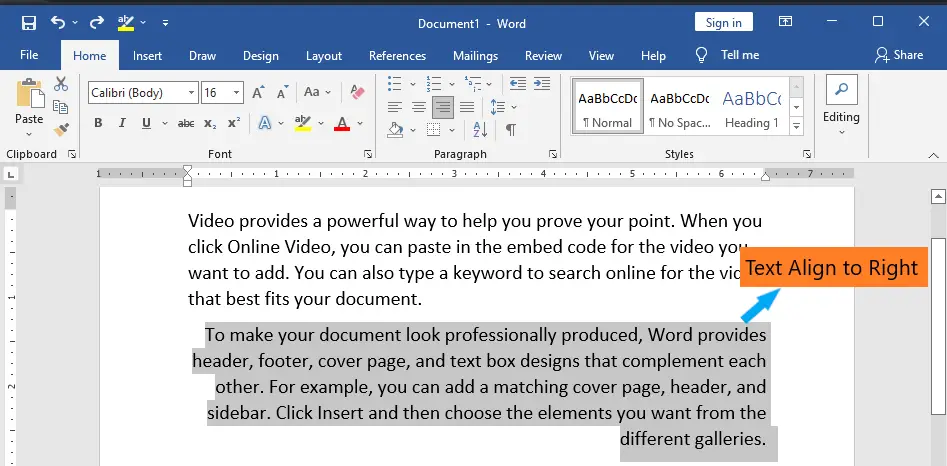
- Align text left or right in Microsoft Word
First select text in Word you want to align. Then, at the top of the window, click or tap on the Home tab.

Click or tap Align Left or Align Right in the Paragraph section, depending on what you want to do.

Here’s what right-aligned text looks like:
TIP: You can also align text to the left or right quickly by selecting the text and then pressing the CTRL + L or CTRL + R keys on your keyboard.
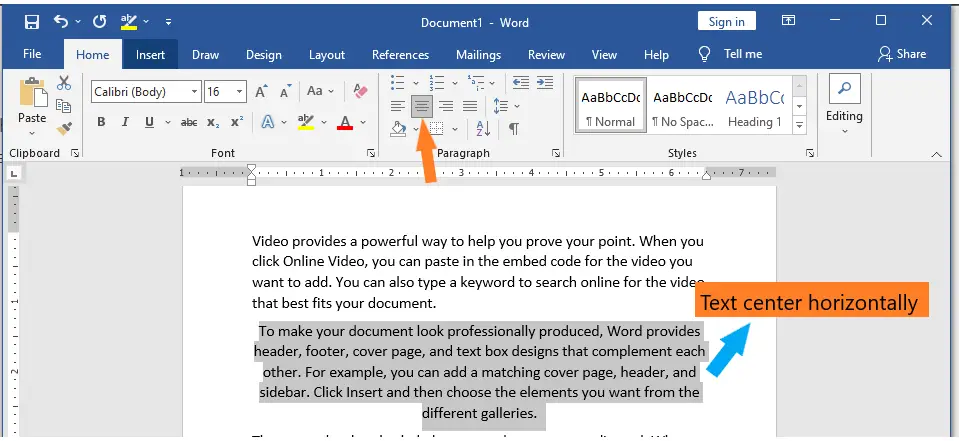
- Center text horizontally in Microsoft Word
First, choose the text you want to center horizontally. Then, at the top of the window, click or tap on the same Home tab.
When you click or tap on Center in the Paragraph section, the text you chose is moved right away to the middle of the page’s side margins.
TIP: You can also center text by selecting it and then pressing the CTRL + E keys on your keyboard. - Justify text in Microsoft Word
When text is justified, the edges on both sides of the page are straight. Word can add more or less space between words so that each line is filled from beginning to end. But if the last line of text has too few words, it can be cut down.
To justify text in Word, you must first select the text and then click or tap on the Home tab at the top of the window.
Justify is a button you can click or tap in the Paragraph section. This is how your text should look:
TIP: If you select the text and then press the CTRL and J keys on your keyboard, you can quickly align text. - Align text vertically (top, center, justify, bottom) on the pages of a Microsoft Word document
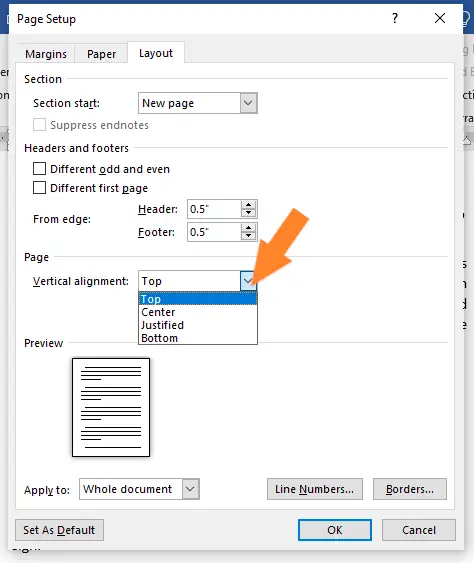
First, select the text, just like you would for any other text-alignment task. Then, at the top of the window, click or tap on the Layout tab.
Then, in the Page Setup area, click or tap on the Dialog Box Launcher button. It is a small button in the bottom-right corner of the Page Setup section that looks like an arrow.

Now, the window for setting up pages opens. Choose the Layout tab at the top of the window.

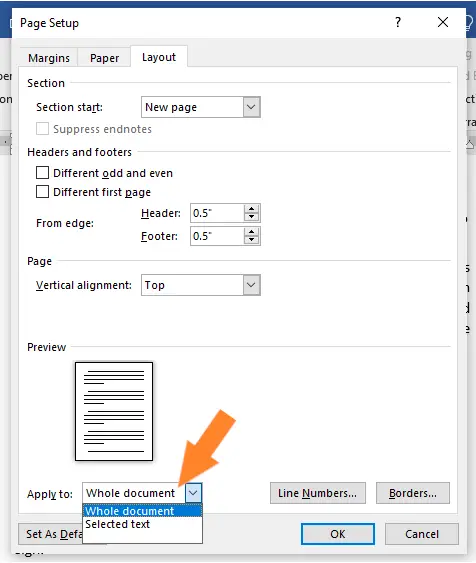
In the Page section, look for a setting called Vertical alignment. It should be set to “top” by default, which means that the text is aligned vertically to the top of the page. But you can set the text to be aligned in the middle, at the bottom, or even to justify. Click or tap on Vertical alignment, and then choose the option you like best.

Then, make sure that Selected text is chosen in the box that says “Apply to” at the bottom of the window. This only changes the alignment of the text you chose. But if you’d rather, you can apply the vertical alignment to all the text in the whole document by leaving the Apply to setting on Whole document.

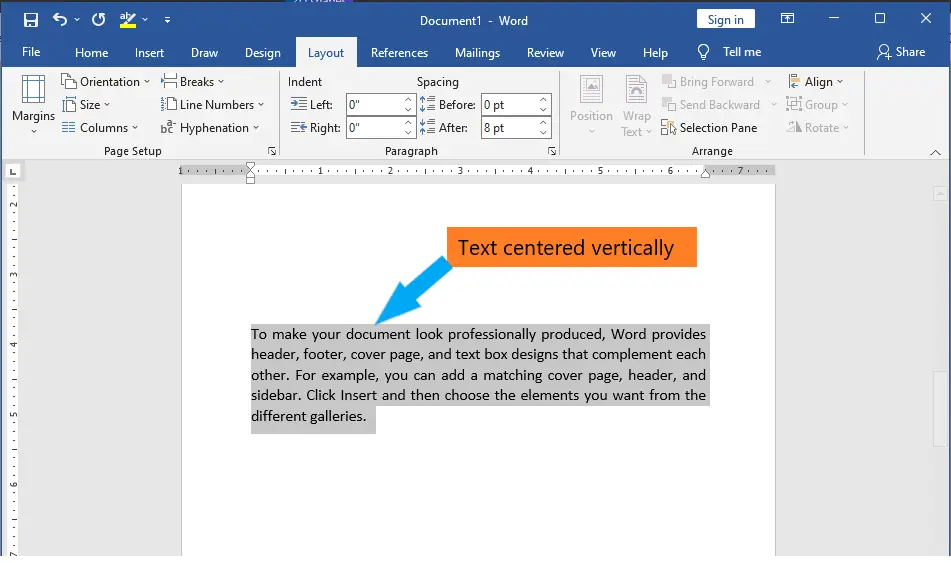
Here’s what a vertically centered piece of text looks like:

Simple, right? Now, all you have to do is try out the different alignment options until your text looks exactly how you want it to. You may also want to change the color of the font or just some of the cases in your Word document. Just visit our previous tutorial.
Which shortcut key to align the text?
Here are frequently used shortcuts to align the text in MS Word.
| Text alignment | Short Cuts |
|---|---|
| Increase the font size by 1 point. | Ctrl+Right bracket (]) |
| Center the text. | Ctrl+E |
| Align the text to the left. | Ctrl+L |
| Align the text to the right. | Ctrl+R |
Summary
In summary, we’ve talked about how to change text alignment in Microsoft Word, as well as how to apply those alignments in a document and what those terms mean. In addition, we know the available alignment in Microsoft Word. We also know how to use shortcuts that will make our formatting documents easy.
We hope this tutorial helps you as you format your documents in MS Word.
PREVIOUS
NEXT
MS-Word is a word processing application that provides many powerful tools, these tools provide a great advantage to the user. It is used to create documents like letters, articles, etc. MS-Word is an interactive and very user-friendly application. It has been developed by Microsoft Corporation Ltd.
Text Alignments
This is one of the features provided by MS-Word to its user. This feature is used by the user to align text or paragraphs so that it gives a good look or a kind of systematic look. There are 4 types of text alignments which are left-aligned, center-aligned, right-aligned, and justified. (All 4 are shown in the below image.
Left-Aligned Text
A paragraph or a text is left-aligned when that paragraph or text is aligned evenly along the left margin of the page in MS-Word. Now, we will learn step by step with the help of a diagram to make a paragraph text left-aligned.
Step 1: First open MS-Word on your PC.
Step 2: Now, Open the document or create a new one in which you want to perform this operation.

Step 3: Now, select the paragraph text which you want to make Left-aligned.
Step 4: Now, go to the “Home” tab and click on that. (As shown in the below image)
Step 5: Now, go to the “Paragraph” section in the “Home” tab and click on the Left-Align text button.

Step 6: The paragraph text is aligned to left successfully.

Alternate way or using shortcut key:
The shortcut key for Left-Aligned Text is “Ctrl + L”.
Now, we can use a shortcut key for the same. Let us see this also step by step:
Step 1: First open MS-Word on your PC.
Step 2: Now, Open the document or create a new one in which you want to perform this operation.
Step 3: Now, select the paragraph text which you want to make Left-aligned.
Step 4: Now, use the Shortcut key which is “Ctrl +L “.
Step 5: The paragraph text is aligned to left successfully.
Center Aligned Text
A paragraph’s text or a text will be center-aligned if the paragraph or text is in the center of the left and right margins of the page in MS-Word. Now, we will learn step by step with the help of a diagram to make a paragraph text center-aligned.
Step 1: First open MS-Word on your PC.
Step 2: Now, Open the document or create a new one in which you want to perform this operation.
Step 3: Now, select the paragraph text which you want to make Center-aligned.
Step 4: Now, go to “Home” tab and click on that. (As shown in the below image)
Step 5: Now, go to the “Paragraph” section in the “Home” tab and click on the Center-Align text button.

Step 6: The paragraph text is aligned to the center successfully.
Alternate way or using shortcut key:
The shortcut key for Center-Aligned Text is “Ctrl + E”.
Now, we can use a shortcut key for the same. Let us see this also step by step:
Step 1: First open MS-Word on your PC.
Step 2: Now, Open the document or create a new one in which you want to perform this operation.
Step 3: Now, select the paragraph text which you want to make Center-aligned.
Step 4: Now, use the Shortcut key which is “Ctrl +E“.
Step 5: The paragraph text is aligned to the Center successfully.
Right-Aligned Text
A paragraph’s text is said to be right-aligned when it is aligned evenly along the right margin of the page in MS-Word. Now, we will learn step by step with the help of a diagram to make a paragraph text right-aligned.
Step 1: First open MS-Word on your PC.
Step 2: Now, Open the document or create a new one in which you want to perform this operation.
Step 3: Now, select the paragraph text which you want to make Center-aligned.
Step 4: Now, go to the “Home” tab and click on that. (As shown in the below image)
Step 5: Now, go to the “Paragraph” section in the “Home” tab and click on the Right-Align text button.

Step 6: The paragraph text is aligned to the center successfully.
Alternate way or using shortcut key:
The shortcut key for Right-Aligned Text is “Ctrl + R”.
Now, we can use a shortcut key for the same. Let us see this also step by step:
Step 1: First open MS-Word on your PC.
Step 2: Now, Open the document or create a new one in which you want to perform this operation.
Step 3: Now, select the paragraph text which you want to make Right-aligned.
Step 4: Now, use the Shortcut key which is “Ctrl +R“.
Step 5: The paragraph text is aligned to the Right successfully.
Justified Text
A paragraph’s text is said to be justified when it is aligned evenly along both the left side and the right side margins of the page in MS-Word. Now, we will learn step by step with the help of a diagram to make a paragraph text justified.
Step 1: First open MS-Word on your PC.
Step 2: Now, Open the document or create a new one in which you want to perform this operation.
Step 3: Now, select the paragraph text which you want to make justified text.
Step 4: Now, go to the “Home” tab and click on that. (As shown in the below image)
Step 5: Now, go to the “Paragraph” section in the “Home” tab and click on Justify text button.

Step 6: The paragraph text is aligned to the Justified text successfully.
Alternate way or using shortcut key:
The shortcut key for Justified Text is “Ctrl + J”.
Now, we can use a shortcut key for the same. Let us see this also step by step:
Step 1: First open MS-Word on your PC.
Step 2: Now, Open the document or create a new one in which you want to perform this operation.
Step 3: Now, select the paragraph text which you want to make Justified Text.
Step 4: Now, use the Shortcut key which is “Ctrl +j“.
Step 5: The paragraph text is aligned to the Justified text successfully.
- Free Courses
- Microsoft Word
- How to Align Text in Word

How to Adjust Paragraph Alignment in Word
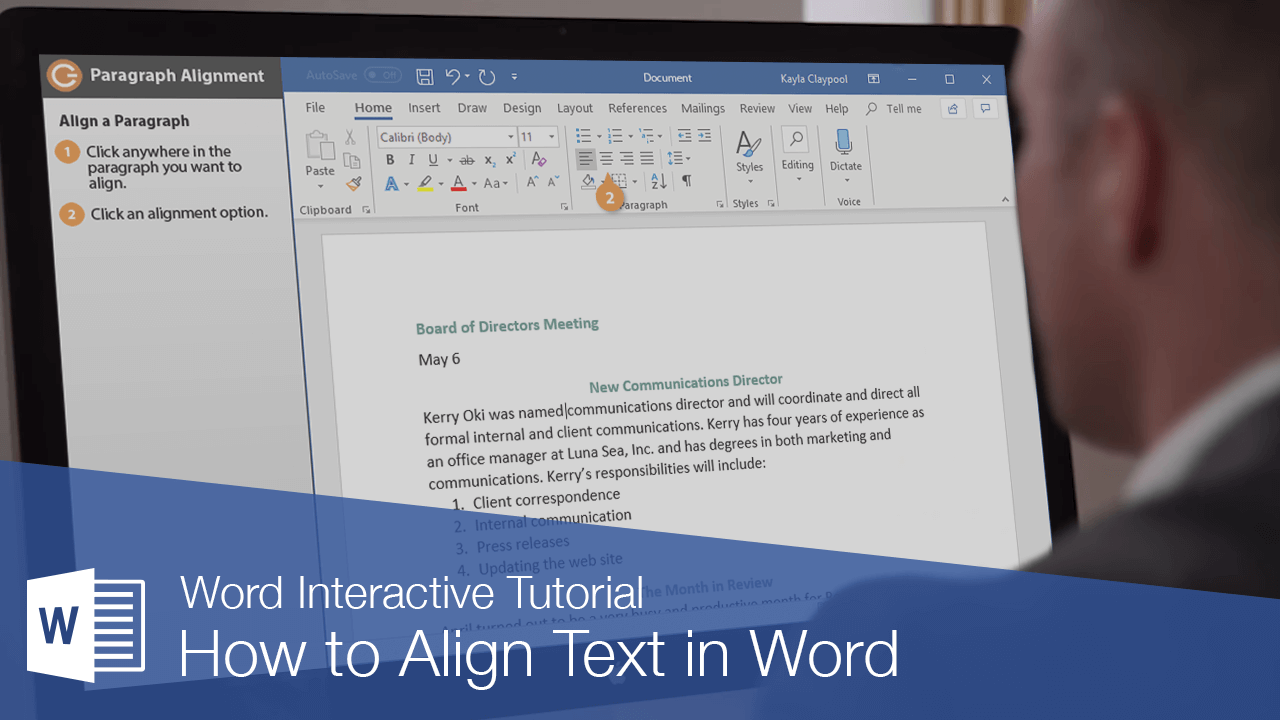
The text in your paragraphs is aligned to the left margin by default, but you can easily align it to the right margin, center it between the margins, or justify it to spread evenly between the margins on a page.
Align a Paragraph
- Click anywhere in a paragraph you want to align, or select multiple paragraphs.
- Click an alignment option in the Paragraph group.
Shortcuts:
- To align left, press Ctrl + L.
- To align right, press Ctrl + R.
- To align center, press Ctrl + C.
- To justify, Ctrl + J.

Examples:
Left Aligned

Right Aligned

Center Aligned

Justified


FREE Quick Reference
Click to Download
Free to distribute with our compliments; we hope you will consider our paid training.
- How to Double Space in Word
- How to Create a Hanging Indent in Word
- How to Set Tabs in Word
Related Training
Free Download
Work Email*
Job Title*
100% spam free
We will never share your email with anyone
Free Courseware sample
Work Email*
Job Title*
100% spam free
We will never share your email with anyone
There are times when you want to align text both to the left and right of your document. Usually, to do this, you might have to use tables for this kind of alignment to look neat.
However, there is a simple way to do this without going through the trouble of adding and then removing tables, as you will see below.
- Open the document where you want to align text to the left and right.
- Go to the ‘Home’ tab on the ribbon.

- Under the ‘Paragraph’ group, click the downward-facing arrow in the right bottom corner.
- A ‘Paragraph’ dialog box will appear.
- Go to the ‘Indents and Spacing’ section.
- From the ‘Alignment section, select ‘Left.’
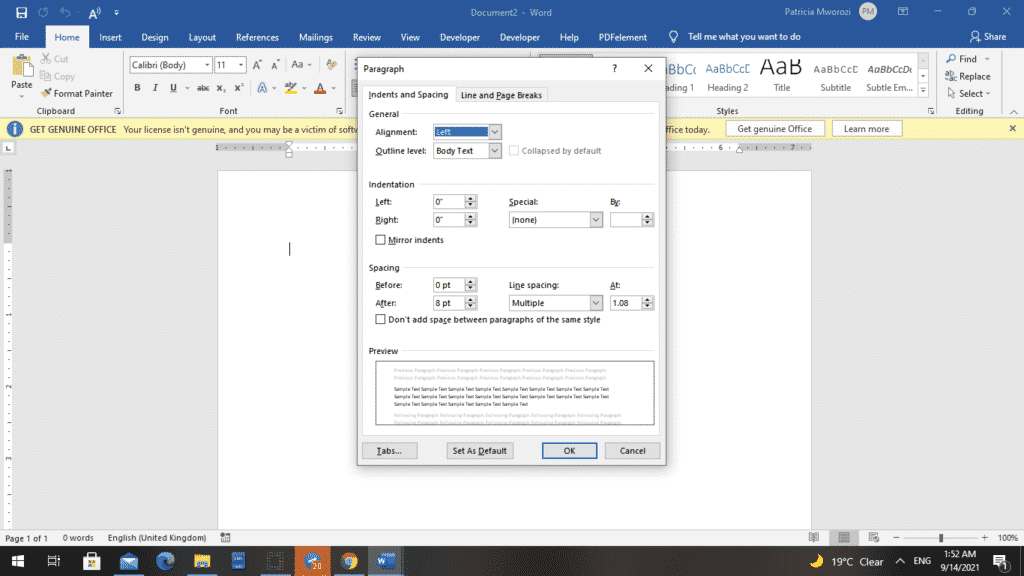
- At the bottom of the dialog box, select ‘Tabs.’

- A ‘Tabs’ dialog box will appear.
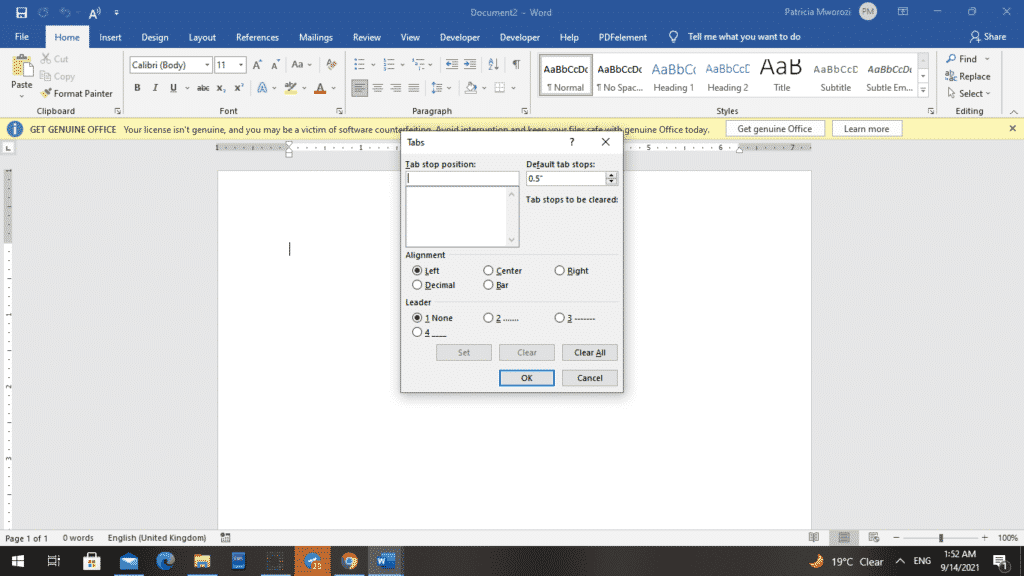
- First, enter a digit into the ‘Tab stop position.’ This digit is where you want the right-hand text to end or stop.
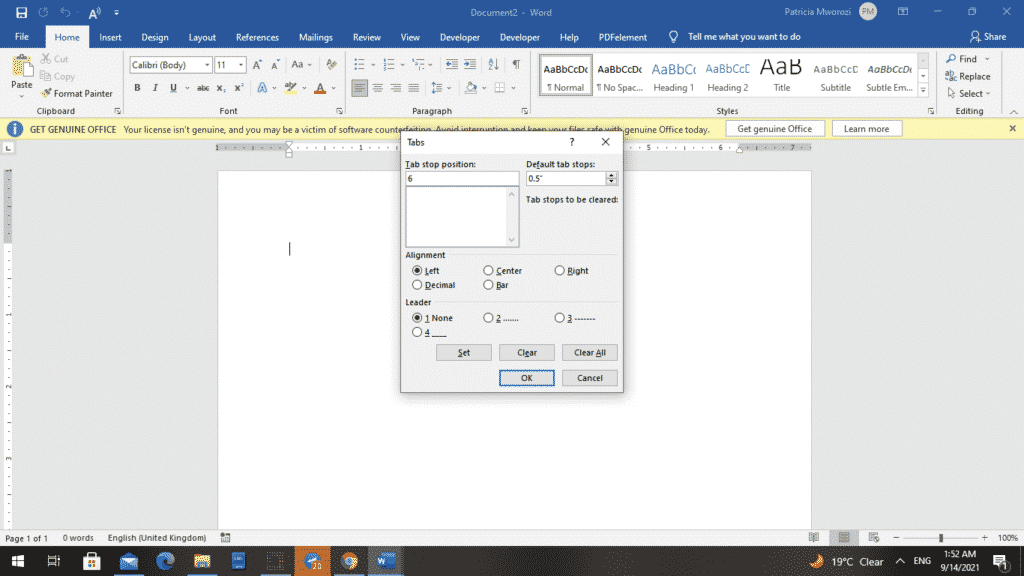
- Go down to the alignment section and check ‘Right’ from the list of options.
- Click ‘Set’ and then OK.
Now you can start typing.
- Before you type any text, press the ‘Tab’ button on your keyboard.
- When starting a new line, press ‘Enter’ and then the ‘Tab’ key.
- Now, place the cursor at the left location where you want to insert text.
- Type your text as you usually would.
- Instead of pressing the ‘Enter’ button on the keyboard to enter a new line, press the downward-facing arrow.
- Now, your text is right and left-aligned.
With the COVID-19 pandemic showing no signs of slowing down, schools and other higher institutions of learning have been forced to continue with virtual learning. As a teacher, this poses a difficulty when it comes to assigning group projects. It is very difficult for students to collaborate on written assignments.
Simul Docs is here to solve all the challenges that might come with group projects. For one, all the writing and editing is centralized under one location.
The first step is downloading Simul Docs.
After writing your first draft in Microsoft Word, upload it to Simul Docs. This will automatically make it the first version. Now, another colleague can open it and make their edits. This will create another version different from the first.
Whenever another person opens a version and makes edits, a new version is created with the latest changes.
Sometimes, you might be in a rush and forget to turn on tracked changes so your modifications can be updated. You have nothing to worry about. Simul Docs automatically records these edits regardless of your online or offline status.
Since it is a collaboration, a bonus feature is the ability to add comments to the document. If you want a colleague to review the changes by a specific time, or any other instructions, you can let them know in the comment section. Later on, these comments can be removed after your groupmates have seen and executed the instructions.
Additionally, you and your groupmates can work on the document at the same time. There’s no need to sit around waiting for someone else to make edits. You might do your part in time, and the last person ends up costing the group credit because they work slowly. You can save time by working on a document at once, and Simul Docs keeps each version separately.
Let us say another co-worker is supposed to include their input, but they do not have Simul Docs. Maybe they are not tech-savvy. All you have to do is download the document or forward it by email. Alternatively, you can upload it to any storage software like one drive, and once their changes have been made, they can forward it to you once again, and you can open it in Simul Docs.
Once all the necessary edits have been made, you can save the final version containing all the modifications with one click.
As you can see, with Simul Docs, you do not need many documents open to work on a single assignment or have to be in the exact location as your groupmates.
You and your groupmates can work on the same document from the comfort of your homes or workplaces.
Simul is the most convenient collaborative tool yet. Centralising your written project avoids mishaps like losing your work or losing its original format.
Visit simuldocs.com and simplify group edits today.
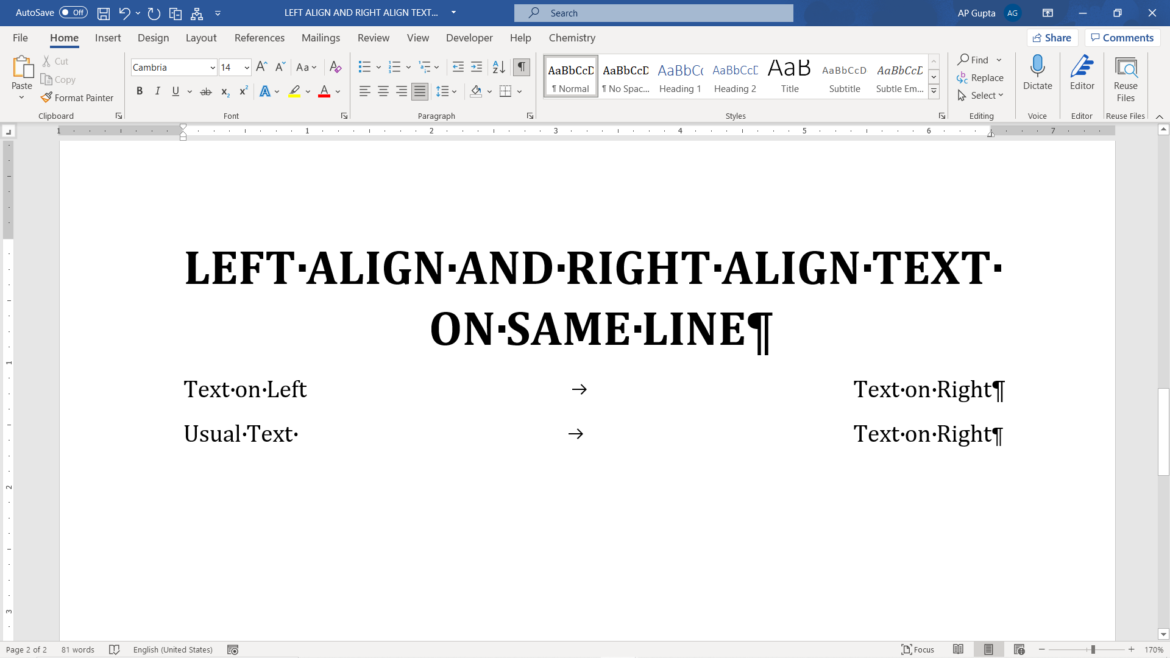
Ever wondered how to align text left and right on same line in Ms Word. The trick is to use tab spacing and is explained in following steps.
Setting up tab space to align text left and right align on same line in Word
1: Make sure the “Ruler” is visible. Navigate to View Tab and check the box against “Ruler” to display ruler.
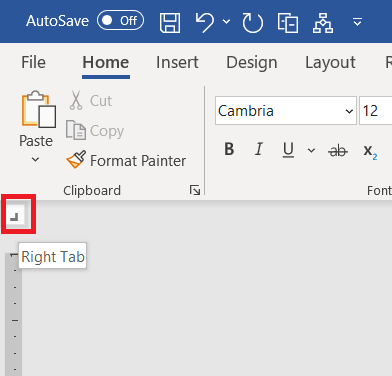
2: Change “Left Tab” to “Right Tab” by clicking in icon shown below.
3: Right click anywhere on the top ruler to get tab marker shown below.
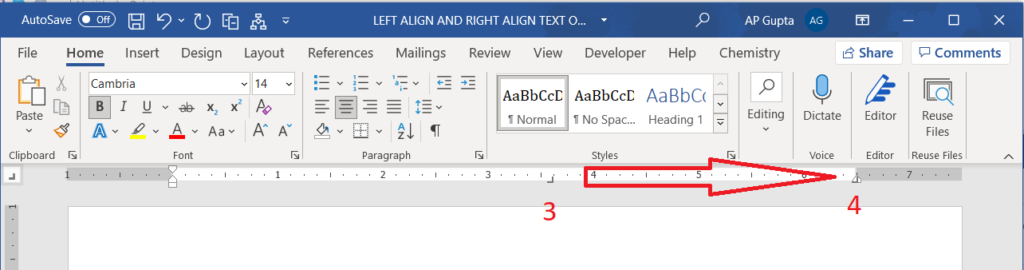
4: Drag the tab marker to the right margin.
Now you are ready. Text typed on any line will be aligned left. Press tab to move to the right margin and text typed thereafter will be right aligned.