
Free download leave borders for word documents vectors 119,754 files in editable .ai .eps .svg .cdr format, borders, borders for, borders word, documents, for, for word
Sort by: Default Trending now Newest Recommend Relevant Popular Unpopular Request a design
frame border vintage frames leaves leaf curves swirled text word frame and corner design element lettering element calligraphy classic ornament

 [ Vectors ] tropical summer banner template flamingo leaves border decor ( ai, eps 4.82MB )
![]()
![]() All-free-download.com
All-free-download.com

[ Vectors ] golden border design elements collection luxury elegant shiny symmetric shapes ( .svg .ai .eps 3.26MB )
![]()
![]() Anggi Bayoga
Anggi Bayoga
[ Vectors ] border ornament template elegant black white repeating symmetric decor ( .ai .eps .svg 1.86MB )
![]()
![]() All-free-download.com
All-free-download.com
[ Vectors ] document cover template elegant vintage frames ( .ai .svg .eps 1.38MB )
![]()
![]() All-free-download.com
All-free-download.com
[ Vectors ] border ornament template elegant black white symmetric decor ( .ai .eps .svg 1.35MB )
![]()
![]() All-free-download.com
All-free-download.com

[ Vectors ] wedding quotes for any speech design elements circle layout elegant texts leaves hearts decor ( .ai .eps .svg 1.79MB )
![]()
![]() All-free-download.com
All-free-download.com

[ Vectors ] international day for the elimination of violence against women poster template arm ribbon leaves female symbol sketch ( .ai .eps .svg 1.29MB )
![]()
![]() All-free-download.com
All-free-download.com

[ Vectors ] Autumn Leaves Border ( ai, eps 4.68MB )
![]()
![]() All-free-download.com
All-free-download.com
[ Vectors ] document border template classical curves decoration symmetric style ( ai, eps 5.55MB )
![]()
![]() All-free-download.com
All-free-download.com
[ Vectors ] christian border ornament template elegant symmetric decor black white sketch ( .ai .eps .svg 881.71KB )
![]()
![]() All-free-download.com
All-free-download.com
[ Vectors ] perpendicular borders frame collection elegant classical symmetric black white sketch ( .svg .ai .eps 2.08MB )
![]()
![]() Anggi Bayoga
Anggi Bayoga

[ Vectors ] wedding quotes for any speech design elements hearts texts leaf curves decor ( .ai .eps .svg 1.89MB )
![]()
![]() All-free-download.com
All-free-download.com

[ Vectors ] quotes for mom banner template flat elegant symmetric texts leaves decor ( .ai .eps .svg 1.27MB )
![]()
![]() All-free-download.com
All-free-download.com

[ Vectors ] wedding quotes for any speech design elements ( .ai .eps .svg 1.78MB )
![]()
![]() All-free-download.com
All-free-download.com

[ Vectors ] autumn sale banner template bright leaves decor ( ai, eps 2.53MB )
![]()
![]() All-free-download.com
All-free-download.com
nature calligraphic lines ornament christian banner background letters template poster natural icon premium quality season handdrawn repeating circle cover template cover border backdrop vintage design ribbon holy cross round bright document cover vintage jhs plant seasonal autumn

[ Vectors ] painting for school cartoon farm elements ( .ai .eps 3.58MB )
![]()
![]() All-free-download.com
All-free-download.com
[ Vectors ] document cover templates elegant vintage frames symmetry ( .ai .eps .svg 2.37MB )
![]()
![]() All-free-download.com
All-free-download.com
[ Vectors ] border decorative template black white elegant classical symmetric decor ( .ai .eps .svg 1.52MB )
![]()
![]() All-free-download.com
All-free-download.com

[ Vectors ] eco flyer design white text green leaves decoration ( ai, eps 3.34MB )
![]()
![]() All-free-download.com
All-free-download.com
[ Vectors ] border ornament template elegant luxury black white symmetric decor ( .ai .eps .svg 847.33KB )
![]()
![]() All-free-download.com
All-free-download.com
[ Vectors ] document cover template vintage swirled frame decor ( .eps .ai .svg 1.55MB )
![]()
![]() All-free-download.com
All-free-download.com

[ Vectors ] wedding quotes for any speech design elements handdrawn texts ribbon leaves decor ( .ai .eps .svg 1.75MB )
![]()
![]() All-free-download.com
All-free-download.com
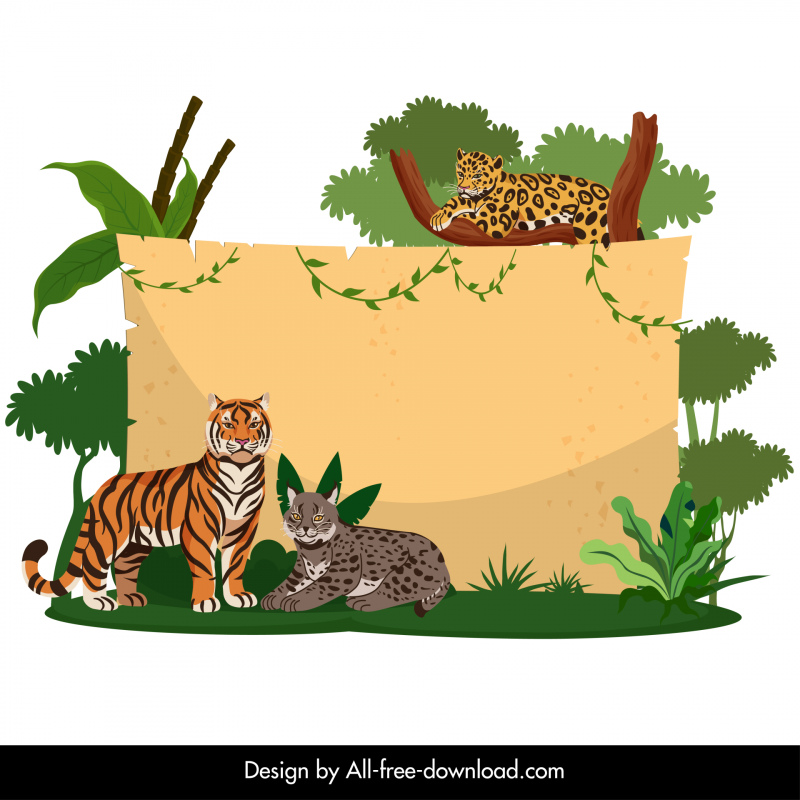
[ Vectors ] wildlife border template feline species jungle scene outline ( .ai .eps .svg 4.28MB )
![]()
![]() All-free-download.com
All-free-download.com
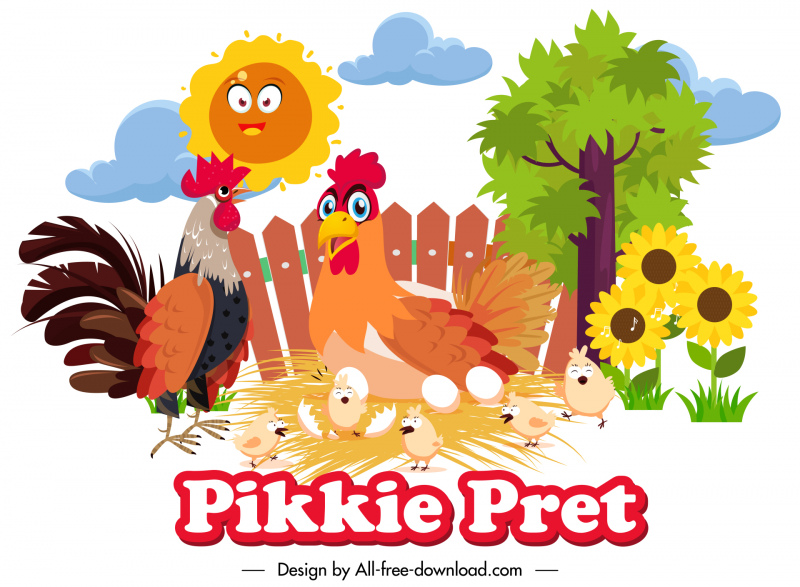
[ Vectors ] pikkie pret painting for school agriculture farming elements ( .ai .eps 2.88MB )
![]()
![]() All-free-download.com
All-free-download.com

[ Vectors ] Follow your dreams quotation leaves background typography template ( .ai .eps 1.33MB )
![]()
![]() All-free-download.com
All-free-download.com

[ Vectors ] document cover template symmetric vintage frame ( .svg .ai .eps 1.89MB )
![]()
![]() All-free-download.com
All-free-download.com
[ Vectors ] border decorative template elegant symmetric swirled shapes decor ( .ai .eps .svg 929.95KB )
![]()
![]() All-free-download.com
All-free-download.com

[ Vectors ] autumn banner dark design fruit leaves decoration ( ai, eps 12.56MB )
![]()
![]() All-free-download.com
All-free-download.com

[ Vectors ] document cover template gray symmetric vintage frames decor ( .svg .ai .eps 2.61MB )
![]()
![]() All-free-download.com
All-free-download.com
![]()
[ Vectors ] friends concept banner raising arms leaves icons decor ( ai, eps 3.63MB )
![]()
![]() All-free-download.com
All-free-download.com
borders borders for borders word documents for for word leave leave borders word love border ornate border flourish border round border poster borders free sunflower border free school border designs free art deco border vector free camouflage borders
[ Vectors ] document cover templates elegant symmetric vintage frames sketch ( .ai .svg .eps 1.57MB )
![]()
![]() All-free-download.com
All-free-download.com

[ Vectors ] document cover template dark elegant symmetric vintage frames ( .ai .svg .eps 1.49MB )
![]()
![]() All-free-download.com
All-free-download.com
[ Vectors ] christian border ornament template elegant symmetrical decor ( .ai .eps .svg 868.44KB )
![]()
![]() All-free-download.com
All-free-download.com

[ Vectors ] flowers border corner frame tages templates ( .ai .eps 48.67MB )
![]()
![]() All-free-download.com
All-free-download.com

[ Vectors ] document cover template purple vintage frames decor ( .eps .svg .ai 6.56MB )
![]()
![]() All-free-download.com
All-free-download.com
[ Vectors ] document cover template symmetric vintage frames ( .svg .eps .ai 4.52MB )
![]()
![]() All-free-download.com
All-free-download.com

[ Vectors ] winter banner blue white design calligraphic leaves ornament ( ai, eps 5.14MB )
![]()
![]() All-free-download.com
All-free-download.com
[ Vectors ] document decorative elements classical symmetric repeating curves decor ( ai, eps 3.10MB )
![]()
![]() All-free-download.com
All-free-download.com
Loading more items please wait…
Loading more items please wait…
Advanced search
Search term:
Search type:
Search in:
Licence:
Sort result:
- Home
- Licences
- Term
- Privacy
- About
- Contact
Page:
Word for Microsoft 365 Word for Microsoft 365 for Mac Word 2021 Word 2021 for Mac Word 2019 Word 2019 for Mac Word 2016 Word 2016 for Mac Word 2013 Word 2010 Word 2013 Developer Word Starter 2010 More…Less
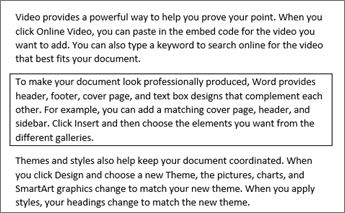
Sometimes, putting a border around text will work better in your document than inserting a text box or a one-cell table, to achieve a similar look.
-
Select a word, line, or paragraph.
-
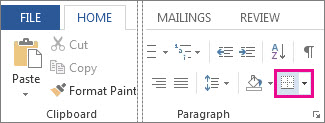
Go to Home > Borders, and then open the menu of border choices.

-
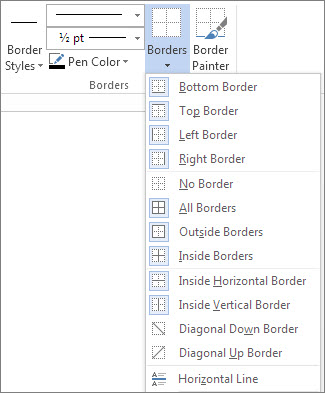
Choose the type of border you want:
Customize the border
-
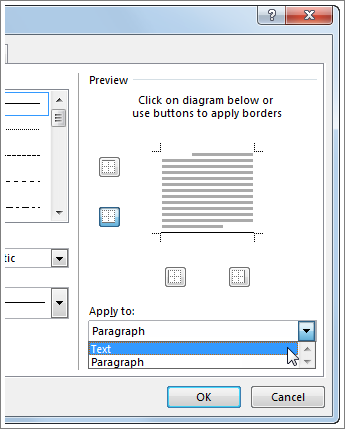
After you’ve selected your text and found the basic type of border you’d like, open the Borders menu again, and choose Borders and Shading.
-
Make your choices for style, color, and width, and then apply the choice with the buttons in the Preview section of the dialog box. When the preview is the way you want it, click OK.
Note: Make sure that the Apply to box has the correct setting: Text or Paragraph.
See Also
Add, change, or delete borders from documents or pictures
You can add a border to an individual word, a line of text, or an entire paragraph. You can make borders as plain or fancy as you want.
You can also add a border to a picture, put a border around a table, add a border to an individual page.
Add a border to selected text
-
Select a word, line, or paragraph.
-
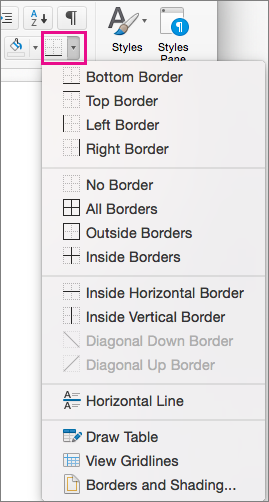
On the Home tab, click the arrow next to the Borders button.
-
In the Borders gallery, click the border style that you want to apply.
Customize the text border
-
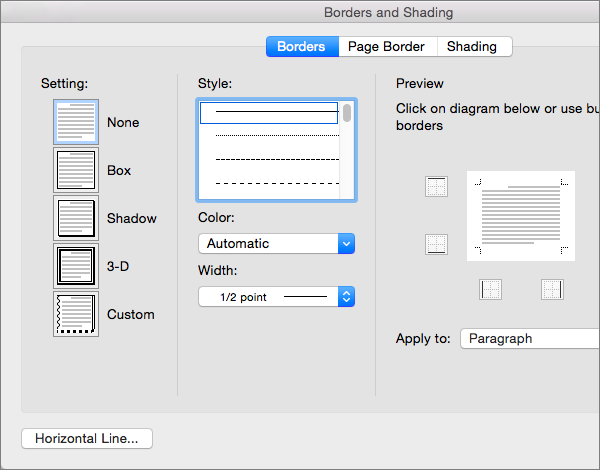
After you’ve selected your text and found the basic type of border you’d like, click the arrow next to the Borders button again, and then click Borders and Shading.
-
In the Borders and Shading dialog box, change Setting, Style, Color, and Width to create the border style that you want.
Note: To make sure the border style is correctly applied, set Apply to to Text or Paragraph. If you haven’t selected any text, you can only set Apply to to Paragraph.
-
Click OK to apply your selected border styles.
Tip: You can also fill the area of your selected text with color. In the Borders and Shading dialog box, click Shading to select a color and patterns. The color you pick in the Fill list fills the rectangular area; the color you select from the Color menu is applied to the rectangular area in a pattern you select from the Style list.
See Also
Add, change, or delete borders from documents or pictures
Add a border to a table
Need more help?
![]()
Download Article
Learn how to insert a lined or art border in Microsoft Word documents on desktop
![]()
Download Article
- Adding a Page Border (Windows)
- Adding a Page Border (Mac)
- Adding a Text Border
- Q&A
|
|
|
Do you want to make an outside border in your Microsoft Word documents? You can easily add a solid or dotted border to an entire page or selected content. You can also use Microsoft Word’s included designs to create an artistic border for themed event flyers. This wikiHow will show you how to create a border around text, images, or pages in Microsoft Word using your Windows or Mac computer.
Things You Should Know
- To add a page border, click «Design» → «Page Borders». Select a border setting, style, and page application. Click «OK».
- To add a border around text or images, select the content. Click the «Home» tab and click the arrow next to the border icon. Click «Borders and Shading…»
- Select a border setting, style, and page application. Click «OK».
-
1
Open a project in Microsoft Word. This looks like a W on top of a blue square. Microsoft Word is available to install for Windows.[1]
- You must have a subscription to use Office 365.
- Use this method to add a lined border around a Microsoft Word document. This is different from changing the margins.
-
2
Click Design. This will be in the top toolbar, between Draw and Layout.
Advertisement
-
3
Click Page Borders. You can find this at the left side of the Design section, next to Page Color. It will have an icon of a page with a yellow border.
- A new window will open.
-
4
Click Page Border. This is the middle tab on the Borders and Shading window. You may already be on this tab.
-
5
Select a border setting. In the left-most column, click the border option that you want to use. Select from: None, Box, Shadow, 3-D, and Custom.
- If you want a simple border to go all the way around your page, select Box.
- To add a border with fun images, click the Art drop-down menu and select from Word’s art gallery. This border can be used for themed flyers for holidays and events.
-
6
Select a border style. In the «Style» column, scroll down until you find the border style you want to use, then click the style. Select from the various solid and dotted line styles.
- If needed, you can also change the border’s color and width from the Color and Width drop-down menus, respectively.
-
7
Select pages to use. If you created a new section earlier in this method, click the «Apply to» drop-down box, then click the section to which you want to apply the border in the resulting drop-down menu.
- To apply the border to the first page of your section, click This section — first page only in the drop-down menu.
-
8
Click OK. It’s at the bottom of the page. This will apply the border to your document’s specified page(s).

Advertisement
-
1
Open a project in Microsoft Word. This looks like a W on top of a blue square. Microsoft Word is available to install for Mac.[2]
- You must have a subscription to use Office 365.
-
2
Click Design. This will be in the top toolbar, between Draw and Layout.
-
3
Click Page Borders. You can find this at the left side of the Design section, next to Page Color. It will have an icon of a page with a yellow border.
- The Borders and Shading window will open, set to the Page Border tab. If it isn’t already on the Page Border tab, click it now.
-
4
Select a border setting. In the left-most column, click the border option that you want to use. Select from: None, Box, Shadow, 3-D, and Custom.
- If you want a simple border to go all the way around your page, select Box.
- To add a border with fun images, click the Art drop-down menu and select from Word’s art gallery. This border can be used for themed flyers for holidays and events.
-
5
Select a border style. In the «Style» column, scroll down until you find the border style you want to use, then click the style. Select from the various solid and dotted line styles.
- If needed, you can also change the border’s color and width from the Color and Width drop-down menus, respectively.
-
6
Select pages to use. If you created a new section earlier in this method, click the «Apply to» drop-down box, then click the section to which you want to apply the border in the resulting drop-down menu.
- To apply the border to the first page of your section, click This section — first page only in the drop-down menu.
-
7
Click OK. This is the blue button. This will apply the border to your document’s specified page(s).
Advertisement
-
1
Open a project in Microsoft Word. This looks like a W on top of a blue square.
-
2
Click Home. This is in the top toolbar, between File and Insert.
-
3
Select content. Click and drag your mouse across the text or image(s) around which you want to place a border.
- This method will place a border around an entire selection of images and text together.
- If you want to place a border around a single image, double-click the image. Select a preset style from the Picture Styles section, or click Picture Border to set the color, weight, and design of the border.[3]
-
4
Click
next to the «Borders» button. The Borders button resembles a square divided into four smaller squares; you’ll find it in the «Paragraph» section of options in the toolbar, just right of the paint bucket icon. A drop-down menu will open.
- On a Mac, click the Format menu item at the top of the screen instead.
-
5
Click Borders and Shading…. It’s at the bottom of the drop-down menu. A new window will open.
- On a Mac, you’ll find this option in the middle of the Format drop-down menu.
-
6
Select a border setting. In the left-most column, click the border option that you want to use. Select from: None, Box, Shadow, 3-D, and Custom.
- If you want a simple border to go all the way around your text, select Box.
-
7
Select a border style. In the «Style» column, scroll down until you find the border style you want to use, then click the style. Select from the various solid and dotted line styles.
- If needed, you can also change the border’s color and width from the Color and Width drop-down menus, respectively.
- To add a border with images, click the Art drop-down menu and select a design.
-
8
Select pages to use. If you created a new section earlier in this method, click the «Apply to» drop-down box, then click the section to which you want to apply the border in the resulting drop-down menu.
- To apply the border to the first page of your section, click This section — first page only in the drop-down menu.
-
9
Click OK. This will apply the border to your document’s specified page(s).
- Be sure to save your document when you’re finished.
- You can also use Microsoft Word to create a booklet or another handout flyer.


Advertisement
Add New Question
-
Question
How can I place a border around a picture I’ve inserted into a document?

You do what is shown above, but instead, you click on the picture before you go through the steps.
-
Question
How do I put a border around a table in Microsoft Word?
Go into Format —> Borders and Shading. There you’ll find options for borders you can apply to the table.
-
Question
What three options can I set regarding a picture border?
The three option you can set are: small, medium and large.
Ask a Question
200 characters left
Include your email address to get a message when this question is answered.
Submit
Advertisement
Thanks for submitting a tip for review!
About This Article
Thanks to all authors for creating a page that has been read 971,313 times.
Is this article up to date?

 Fall Leaves Border Coloring Pages Printable
What is A Page Border?
A page border is a border that appears around the margins of a page. There is some art border that consists of repeating small images creating a border. A page border serves the purpose of decoration on a page. You can use the page border to make your documents prettier.
How to Add a Microsoft Word Page Border?
You can add a page border in Microsoft Word by following a few steps. In Microsoft Word, go to the Page Layout tab and then choose Page Borders. You will be able to choose the style and adjust it to your needs.
How to Make Custom Page Borders?
Sometimes, the borders available in Microsoft Word do not meet our needs. For example, if you want to print a card with fall borders in it. You can still do it by downloading a template and inserting it to Microsoft Word using Clip Arts. You can make a custom page border that way.
There are a lot of ways to add custom page borders. It is better to use another program such as Corel Draw instead of Microsoft Word. In Microsoft Word, the option is very limited.
You can create documents with borders in Microsoft Word only if it’s a formal document. But if you want to get creative with custom page borders, it is better for you to just use another program.
You can find any page borders template on the internet. The options are almost unlimited. You can choose whatever theme you want. And use it however you want.
By using a design program, you will be able to make not only documents but also other things such as cards and even invitations.

Printable Fall Paper Borders

Fall Leaves Border Paper Printable

Vintage Fall Borders

Fall Page Borders Microsoft Word

Printable Fall Borders For Word Documents

Printable Fall Leaves Border

Fall Leaf Border Clip Art

Fall Leaves Clip Art Border

Printable Fall Page Borders
How to Make a Cutout Page Border?
You can make a cutout page border and use it as a frame. Either it’s for a card or to frame a picture. To create this cutout page border, you will need a thick paper like cardstock or cartons. You can make the design yourself or print a design from the internet. Print it in a regular paper.
Once it’s ready, glue it to the thicker paper and cut it out. Once you have done, you can attach the border to the card or picture. You can also layer them to create a more three-dimensional looking border. You can even layer different designs into a page border.
More printable images tagged with:
Коллекция Borders и объекты Border показывают, как создать рамку в Word для заданного раздела, абзаца или текста в целом. В отличии от других объектов. Объекты Border предоставляют не общее количество рамок в документе, а только границы рамки, поясню…
Мы можем создать рамку в Word для заданного абзаца, тем самым получим доступ к коллекции Borders. Далее, нам нужно каждую границу рамки оформить в индивидуальный цвет, для этого, через метод Item(index) мы можем получить доступ к нужной границе данной рамки (верх, низ, правая или левая сторона), и уже потом, обработать ее в индивидуальном порядке.
Borders – как создать рамку в Word
Коллекция объектов Border, представляющих границы объекта Border. Мы можем как создать рамку в Word для заданного раздела, так и для абзаца или текста. Отсюда следует, что доступ к коллекции можно получить через свойство Borders, которое есть у следующих объектов:
Word Section – Создание рамки Word для заданного раздела.
Word Paragraph – Создание рамки Word для заданного абзаца.
Word Font, Range, Selection – В большинстве случает актуально использовать объект Font, так как он прямо говорит, что нужно применить рамку к тексту.
Свойства
Count — Возвращает количество объектов Border в коллекции Borders.
Enable – Свойство возвращает или устанавливает границы рамки в Word для заданного объекта. Может принимать логические значения true (установить рамку, заданную приложением по умолчанию), false (удалить рамку) или значения константы WdLineStyle.
DistanceFrom – Свойство возвращает или задает отступы для рамки. Применимо только для страниц! Значение константы WdBorderDistanceFrom:
- wdBorderDistanceFromPageEdge — 1 — С края страницы.
- wdBorderDistanceFromText — 0 — Начиная с текста.
DistanceFromBottom — Возвращает или задает отступ в пунктах между текстом и нижней границей рамки.
DistanceFromLeft — Возвращает или задает отступ в пунктах между текстом и левой границей рамки.
DistanceFromRight — Возвращает или задает отступ в пунктах между текстом и правой границей рамки Word.
DistanceFromTop — Возвращает или задает отступ в пунктах между текстом и верхней границей рамки.
Свойства EnableFirstPageInSection и EnableOtherPagesInSection всегда используются вместе, и, если одно свойство содержит значение true(false), то другое должно содержать противоположное значение, иначе, эффекта не будет.
EnableFirstPageInSection – Применить рамку только для первой страницы раздела. Возвращает или задает логические значения true или false. Только для страниц!
EnableOtherPagesInSection — Применить рамку для всех страниц раздела, кроме первой страницы. Возвращает или задает логические значения true или false. Только для страниц!
InsideColor и OutsideColor – Свойства возвращают или устанавливают 24 — битный цвет внутренних или внешних границ. Цвет можно задавать как с помощью функции RGB языка Visual Basic, так и с помощью значений константы wdColor. Как создать рамку в Word.
InsideColorIndex и OutsideColorIndex — Свойства возвращают или устанавливают цвет внутренних или внешних границ рамки в Word. Цвет можно задавать как с помощью функции RGB языка Visual Basic, так и с помощью значений константы WdColorIndex .
Свойства InsideLineStyle и OutsideLineStyle в большинстве случае должны использоваться вместе. Применять только свойство InsideLineStyle актуально тогда, если у нас выбрано несколько абзацев. Если мы применим данное свойство к одному абзацу, то возникнет ошибка.
InsideLineStyle и OutsideLineStyle – Свойства возвращают или устанавливают стиль внутренних или внешних границ для указанного объекта. Свойство может быть установлено в True, False или значение константы WdLineStyle. Как создать рамку в Word.
InsideLineWidth и OutsideLineWidth — Свойства возвращают или устанавливают ширину линии в пунктах для внутренней или внешней границы рамки. Свойство может быть установлено в True, False или значение константы WdLineWidth.
- wdLineWidth025pt — 2 — 0.25
- wdLineWidth050pt — 4 — 0.50
- wdLineWidth075pt — 6 — 0.75
- wdLineWidth100pt — 8 — 1.00
- wdLineWidth150pt — 12 — 1.50
- wdLineWidth225pt — 18 — 2.25
- wdLineWidth300pt — 24 — 3.00
- wdLineWidth450pt — 36 — 4.50
- wdLineWidth600pt — 48 — 6.00
Shadow – Возвращает или задает логическое значение, которое включает (true) или отключает (false) тени для рамки.
Методы
ApplyPageBordersToAllSections() — Применяет определенное ранее форматирование рамки в Word ко всем разделам документа.
Item(index) — Возвращает границу рамки для заданного диапазона или выделения. Параметр index содержит значение константы WdBorderType:
- wdBorderBottom — 3 — нижняя граница.
- wdBorderDiagonalDown — 7 — диагональная граница, начиная с верхнего — левого угла.
- wdBorderDiagonalUp — 8 — диагональная граница, начиная с нижнего — левого угла.
- wdBorderHorizontal — 5 — горизонтальные границы.
- wdBorderLeft — 2 – левая граница.
- wdBorderRight — 4 — правая граница.
- wdBorderTop — 1 — верхняя граница.
- wdBorderVertical — 6 — вертикальные границы
Border – как создать рамку в Word
Объект содержит только свойства
Свойства
Значения приведенных ниже константы смотрите в начале стать, в описании коллекции Borders.
ArtStyle — Возвращает или устанавливает графическое оформление рамки. Значение константы WdPageBorderArt. Только для страницы!
ArtWidth — Возвращает или задает ширину в пунктах для указанного графического оформления рамки в Word.
Color — Возвращает или устанавливает 24 — битный цвет рамки. Значение константы WdColor
ColorIndex — Возвращает или устанавливает цвет для указанной границы рамки. Значение константы WdColorIndex. Как создать рамку в Word.
Inside – Возвращает True, если внутренние границы могут быть применены к указанному объекту.
LineStyle — Возвращает или задает стиль линии границы. Значение константы WdLineStyle.
LineWidth — Возвращает или устанавливает ширину линии границы рамки в Word. Значение константы WdLineWidth.
Visible – Позволяет показать (true) или скрыть (false) рамку. Чтение и запись
Хорошо, теперь я приведу два примера кода на языке VBScript и JScript:
' ----------------------------------------------------------------------------
 ' Коллекция Borders и объект Border
 ' Создание рамки в Word для текста, абзаца и раздела
 ' Borders.vbs
 ' ----------------------------------------------------------------------------
 Option Explicit
dim oWord, oDoc, oSel, i, oPars, MyText, oRange
 dim oParsRange, oParsRangeFont
Set oWord = CreateObject("Word.Application")
 Set oDoc = oWord.Documents
 oDoc.Add()
 oWord.Visible = True
 Set oRange = oDoc(1).Range()
 Set oSel = oWord.Selection
MyText = "Как создать рамку в Word. "
For i=0 to 40
 oSel.TypeText MyText & MyText & MyText & MyText & MyText & MyText & MyText
 oSel.TypeParagraph
 Next
Set oPars = oRange.Paragraphs
'---------------------------------------------------------------------------------------
 ' Создаем рамку для первого абзаца и определяем отступы
 '---------------------------------------------------------------------------------------
 oPars(1).Borders.Enable = true
 oPars(1).Borders.DistanceFromBottom = 15
 oPars(1).Borders.DistanceFromLeft = 15
 oPars(1).Borders.DistanceFromRight = 15
 oPars(1).Borders.DistanceFromTop = 15
 '---------------------------------------------------------------------------------------
'---------------------------------------------------------------------------------------
 ' Создаем рамку для третьего абзаца
 ' определяем толщину и цвет границ
 '---------------------------------------------------------------------------------------
 oPars(3).Borders.Enable = true
 oPars(3).Borders(1).LineWidth = 18
 oPars(3).Borders(1).ColorIndex = 9
 oPars(3).Borders(2).LineWidth = 18
 oPars(3).Borders(2).ColorIndex = 10
 oPars(3).Borders(3).LineWidth = 18
 oPars(3).Borders(3).ColorIndex = 11
 oPars(3).Borders(4).LineWidth = 18
 oPars(3).Borders(4).ColorIndex = 12
 '---------------------------------------------------------------------------------------
'---------------------------------------------------------------------------------------
 ' Формируем ссылку на заданный диапазон
 ' Диапазон содержит выбор - от 5 по 10 абзацы
 ' Применяем форматирование к заданному выбору
 '---------------------------------------------------------------------------------------
 Set oParsRange = oDoc(1).Range(oDoc(1).Paragraphs(5).Range.Start, oDoc(1).Paragraphs(10).Range.End)
 oParsRange.Borders.InsideLineStyle = 22
 oParsRange.Borders.InsideLineWidth = 12
 oParsRange.Borders.OutsideLineStyle = 23
 oParsRange.Borders.OutsideLineWidth = 18
 '---------------------------------------------------------------------------------------
'---------------------------------------------------------------------------------------
 ' Применяем рамки к выбранному тексту
 '---------------------------------------------------------------------------------------
 Set oParsRangeFont = oDoc(1).Range(oDoc(1).Paragraphs(13).Range.Start, oDoc(1).Paragraphs(15).Range.End)                                                                                                                             ' как создать рамку в Word
 oParsRangeFont.Font.Borders.Enable = 20
'---------------------------------------------------------------------------------------
 ' Создаем рамку для всего раздела документа
 '---------------------------------------------------------------------------------------
 For i = 1 to oDoc(1).Sections(1).Borders.Count
 oDoc(1).Sections(1).Borders(i).LineStyle =19
 Next
 oDoc(1).Sections(1).Borders.ApplyPageBordersToAllSections
 '---------------------------------------------------------------------------------------
'---------------------------------------------------------------------------------------
 ' Определяем новый стиль границ рамки и их ширину
 '---------------------------------------------------------------------------------------
 oDoc(1).Sections(1).Borders(1).ArtStyle = 22
 oDoc(1).Sections(1).Borders(1).ArtWidth = 10
 '---------------------------------------------------------------------------------------
'---------------------------------------------------------------------------------------
 ' Применяем рамку только для певой страницы раздела
 '---------------------------------------------------------------------------------------
 oDoc(1).Sections(1).Borders.EnableFirstPageInSection = true
 oDoc(1).Sections(1).Borders.EnableOtherPagesInSection = false
 '---------------------------------------------------------------------------------------
// ----------------------------------------------------------------------------
 // Коллекция Borders и объект Border
 // Создание рамки в Word для текста, абзаца и раздела
 // Borders.js
 // ----------------------------------------------------------------------------
 var oWord, oDoc, oSel, i, oPars, MyText, j, oRange;
 var oParsRange, borderLoop, oParsRangeFont;
oWord = WScript.CreateObject("Word.Application");
 oDoc = oWord.Documents;
 oDoc.Add();
 oWord.Visible = true;
 oRange = oDoc(1).Range();
 oSel = oWord.Selection;
MyText = "Как создать рамку в Word. ";
for(i=0; i<=40; i++){
 oSel.TypeText(MyText + MyText + MyText + MyText);// + MyText + MyText + MyText);
 oSel.TypeParagraph();
 }
oPars = oRange.Paragraphs;

 //---------------------------------------------------------------------------------------
 // Создаем рамку для первого абзаца и определяем отступы
 //---------------------------------------------------------------------------------------
 oPars(1).Borders.Enable = true;
 oPars(1).Borders.DistanceFromBottom = 15;
 oPars(1).Borders.DistanceFromLeft = 15;
 oPars(1).Borders.DistanceFromRight = 15;
 oPars(1).Borders.DistanceFromTop = 15;
 //---------------------------------------------------------------------------------------
//---------------------------------------------------------------------------------------
 // Создаем рамку для третьего абзаца
 // определяем толщину и цвет границ
 //---------------------------------------------------------------------------------------
 oPars(3).Borders.Enable = true;
 oPars(3).Borders(1).LineWidth = 18;
 oPars(3).Borders(1).ColorIndex = 9;
 oPars(3).Borders(2).LineWidth = 18;
 oPars(3).Borders(2).ColorIndex = 10;
 oPars(3).Borders(3).LineWidth = 18;
 oPars(3).Borders(3).ColorIndex = 11;
 oPars(3).Borders(4).LineWidth = 18;
 oPars(3).Borders(4).ColorIndex = 12;
 //---------------------------------------------------------------------------------------
//---------------------------------------------------------------------------------------
 // Формируем ссылку на заданный диапазон
 // Диапазон содержит выбор - от 5 по 10 абзацы
 // Применяем форматирование к заданному выбору
 //---------------------------------------------------------------------------------------
 oParsRange = oDoc(1).Range(oDoc(1).Paragraphs(5).Range.Start, oDoc(1).Paragraphs(10).Range.End);
 oParsRange.Borders.InsideLineStyle = 22;
 oParsRange.Borders.InsideLineWidth = 12;
 oParsRange.Borders.OutsideLineStyle = 23;
 oParsRange.Borders.OutsideLineWidth = 18;
 //---------------------------------------------------------------------------------------
//---------------------------------------------------------------------------------------
 // Применяем рамки к выбранному тексту
 //---------------------------------------------------------------------------------------
 oParsRangeFont = oDoc(1).Range(oDoc(1).Paragraphs(13).Range.Start, oDoc(1).Paragraphs(15).Range.End);                                                                                                                             // как создать рамку в Word
 oParsRangeFont.Font.Borders.Enable = 20;
//---------------------------------------------------------------------------------------
 // Создаем рамку для всего раздела документа
 //---------------------------------------------------------------------------------------
 for(i = 1; i<=oDoc(1).Sections(1).Borders.Count; i++){
     oDoc(1).Sections(1).Borders(i).LineStyle =19;
 }
 oDoc(1).Sections(1).Borders.ApplyPageBordersToAllSections();
 //---------------------------------------------------------------------------------------
//---------------------------------------------------------------------------------------
 // Определяем новый стиль границ рамки и их ширину
 //---------------------------------------------------------------------------------------
 oDoc(1).Sections(1).Borders(1).ArtStyle = 22;
 oDoc(1).Sections(1).Borders(1).ArtWidth = 10;
 //---------------------------------------------------------------------------------------
//---------------------------------------------------------------------------------------
 // Применяем рамку только для певой страницы раздела
 //---------------------------------------------------------------------------------------
 oDoc(1).Sections(1).Borders.EnableFirstPageInSection = true;
 oDoc(1).Sections(1).Borders.EnableOtherPagesInSection = false;
 //---------------------------------------------------------------------------------------

Видим, что программный код получался довольно объемным, да и сама статья тоже не маленькая. Не буду вникать в описание сценариев, так как описание я дал в самих комментариях. Скажу лишь, что после запуска сценария будет создан документ с заданным текстом, некоторые абзацы и первая страница будут отформатированы — в виде различных рамок.