

Try it!
Change your document’s layout to get it just the way you want.
Margins
-
Select Layout > Margins.
-
Choose the margins you want or select Custom Margins to define your own.
Page Orientation
-
To change orientation, select Layout > Orientation.
-
Select Portrait or Landscape.
Line Spacing
-
Select Home > More Paragraph Options > Line Spacing.
-
Choose the spacing you want.
Want more?
Word for the web Quick Start
Change margins
Change page orientation to landscape or portrait
Change the line spacing in Word
Need more help?
Want more options?
Explore subscription benefits, browse training courses, learn how to secure your device, and more.
Communities help you ask and answer questions, give feedback, and hear from experts with rich knowledge.
Lesson 12: Page Layout
/en/word/links/content/
Introduction
Word offers a variety of page layout and formatting options that affect how content appears on the page. You can customize the page orientation, paper size, and page margins depending on how you want your document to appear.
Optional: Download our practice document.
Watch the video below to learn more about page layout in Word.
Page orientation
Word offers two page orientation options: landscape and portrait. Compare our example below to see how orientation can affect the appearance and spacing of text and images.
- Landscape means the page is oriented horizontally.

- Portrait means the page is oriented vertically.
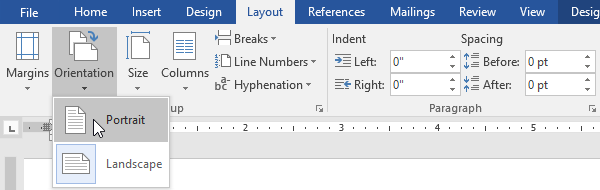
To change page orientation:
- Select the Layout tab.
- Click the Orientation command in the Page Setup group.
- A drop-down menu will appear. Click either Portrait or Landscape to change the page orientation.
- The page orientation of the document will be changed.

Page size
By default, the page size of a new document is 8.5 inches by 11 inches. Depending on your project, you may need to adjust your document’s page size. It’s important to note that before modifying the default page size, you should check to see which page sizes your printer can accommodate.
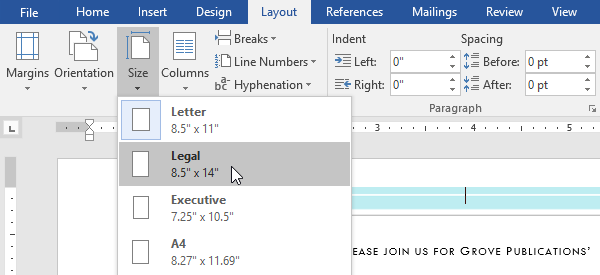
To change the page size:
Word has a variety of predefined page sizes to choose from.
- Select the Layout tab, then click the Size command.
- A drop-down menu will appear. The current page size is highlighted. Click the desired predefined page size.
- The page size of the document will be changed.

To use a custom page size:
Word also allows you to customize the page size in the Page Setup dialog box.
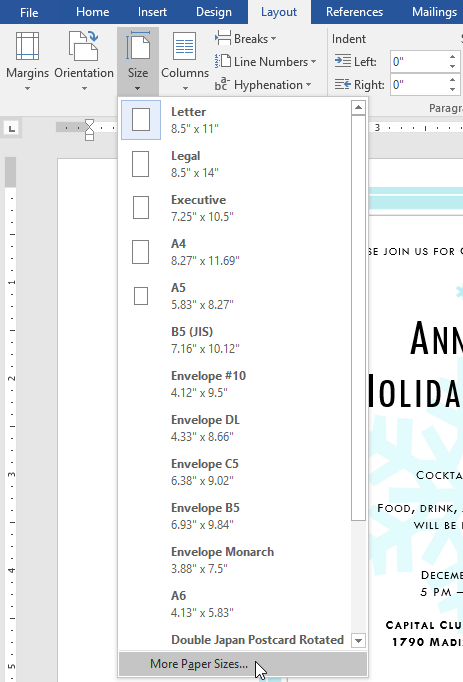
- From the Layout tab, click Size. Select More Paper Sizes from the drop-down menu.
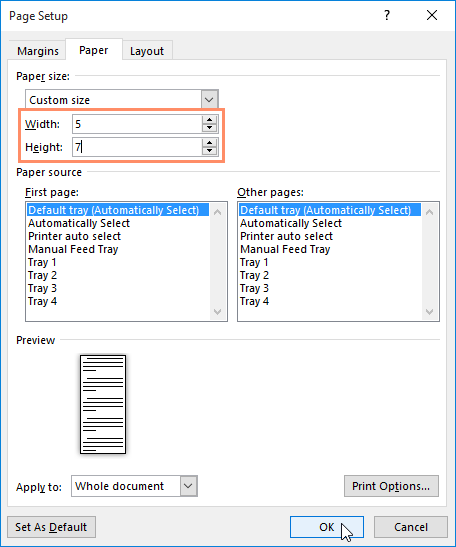
- The Page Setup dialog box will appear.
- Adjust the values for Width and Height, then click OK.
- The page size of the document will be changed.
Page margins
A margin is the space between the text and the edge of your document. By default, a new document’s margins are set to Normal, which means it has a one-inch space between the text and each edge. Depending on your needs, Word allows you to change your document’s margin size.
To format page margins:
Word has a variety of predefined margin sizes to choose from.
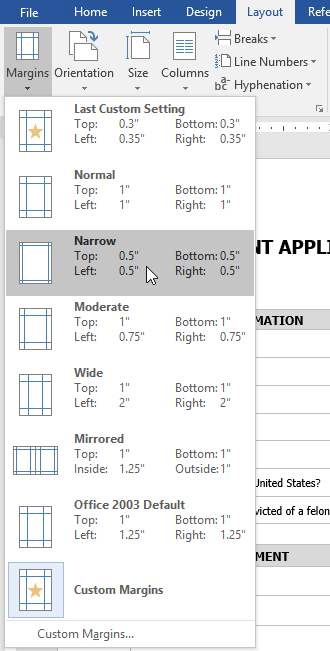
- Select the Layout tab, then click the Margins command.
- A drop-down menu will appear. Click the predefined margin size you want.
- The margins of the document will be changed.

To use custom margins:
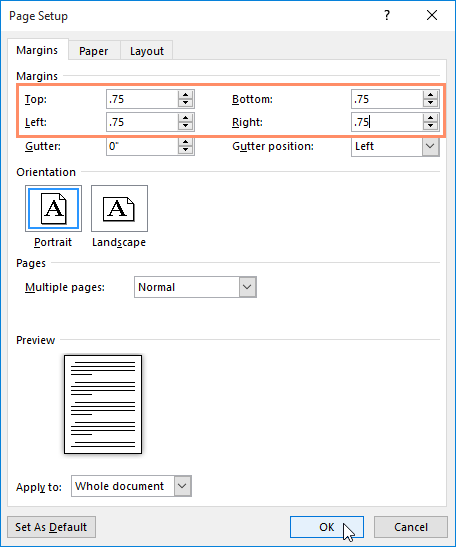
Word also allows you to customize the size of your margins in the Page Setup dialog box.
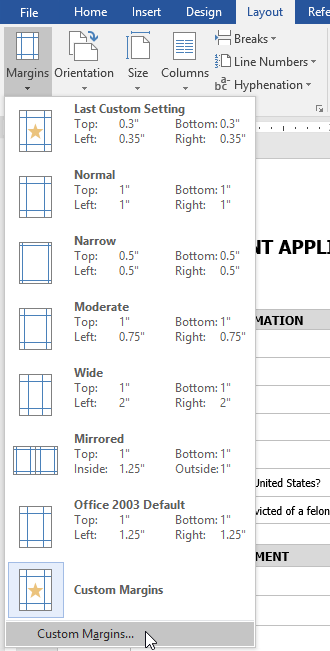
- From the Layout tab, click Margins. Select Custom Margins from the drop-down menu.
- The Page Setup dialog box will appear.
- Adjust the values for each margin, then click OK.
- The margins of the document will be changed.
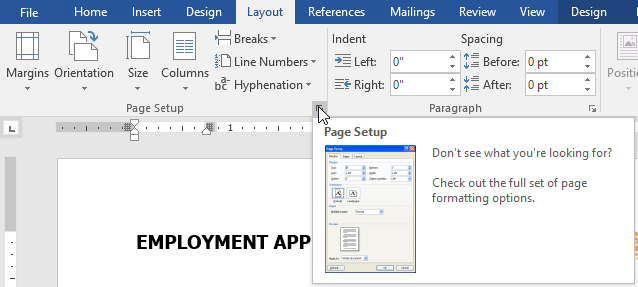
You can also open the Page Setup dialog box by navigating to the Layout tab and clicking the small arrow in the bottom-right corner of the Page Setup group.
You can use Word’s convenient Set as Default feature to save all of the formatting changes you’ve made and automatically apply them to new documents. To learn how to do this, read our lesson on Changing Your Default Settings in Word.
Challenge!
- Open our practice document.
- Change the page orientation to Portrait.
- Change the page size to Legal. If Legal size is not available, you can choose another size such as A5.
- Change the margins to the Narrow setting.
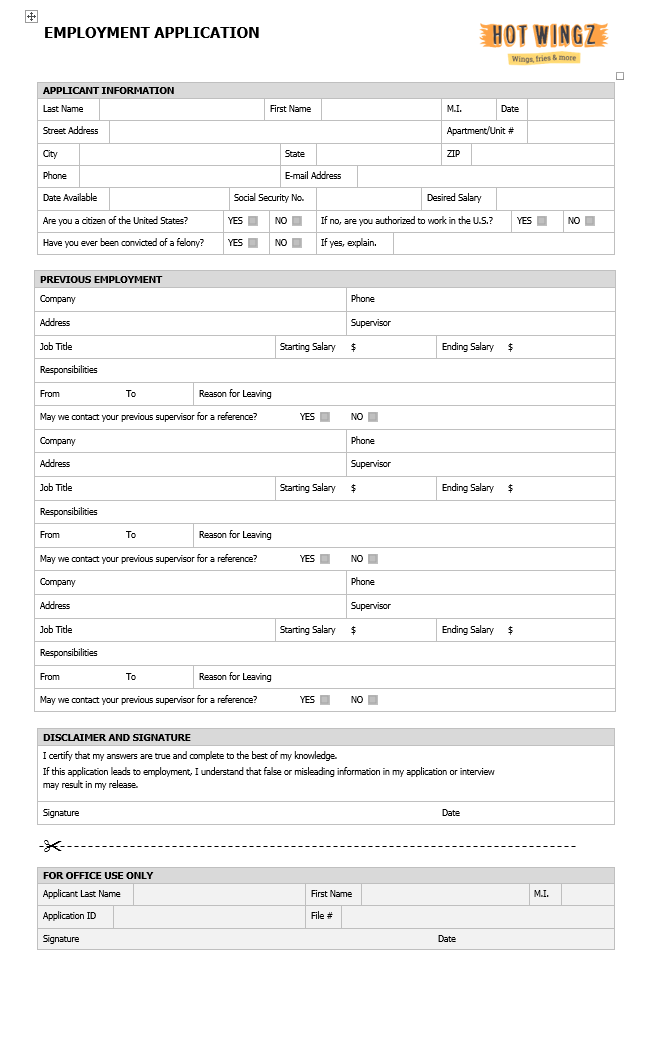
- When you’re finished, your document should be one page if using Legal size. It should look something like this:
/en/word/printing-documents/content/
When you create a new document in Microsoft Word, it looks decent right off the bat. But sometimes you want to make your page look much better than the default.
Use Microsoft Word’s page layout design tools to make easy-to-read documents that reflect positively on you and your business—even if you’re new to Word.


You can make page layout designs in Microsoft Word from scratch. Or, skip the grunt work by using Microsoft Word templates.
Envato Elements and GraphicRiver are both great sources of print templates for Word. Each template is made by professional designers. Elements makes a compelling offer. Download unlimited templates, fonts, photos, and other creative assets for one fixed subscription price.
But, if you only need the occasional template for MS Word and prefer to pay for each single use, then look to GraphicRiver.
How to Make Awesome Page Layout Designs in Microsoft Word (Video)
If you create or modify documents in Word, you may want to change the standard Microsoft Word layout. There are a number of changes you can make.
Watch this quick screencast to find out what you need to know about Word page layout options:
To learn more about changing page layouts in Microsoft Word, study the complete written tutorial below:
Why Learn About Page Layouts In Word?
Page layout settings in Word determine how your document looks when you print it out. It includes the page orientation, margins, and columns, for example.
It’s important to pay attention to the page layout of your document for several reasons:
- It ensures consistency. This gives your readers a good experience while consuming your document.
- A good page layout makes your document more readable. When your document is aesthetically pleasing and has a consistent look, your audience is more likely to read, comprehend, and remember your content.
- A well-designed document reflects well on you. It reinforces your credibility and authority in your field.
Microsoft Word has robust page settings that allow you to control your page layout design. Everything is designed to be as simple and intuitive as possible. Yet, doing page layout in Word can be daunting if you’re new to the software.
This article breaks things down for you. So, you can follow along, step-by-step, and take control of how your document looks.
Types of Documents You Can Create in MS Word
You can create all kinds of printed documents in Microsoft Word.
Make business documents like:
- resumes
- cover letters
- business letters
- reports
- proposals
- invoices
- certificates
- forms
MS Word is also very handy for creating marketing documents. Create everything from:
- flyers
- brochures
- advertising inserts
- and more
For education or training use Word to prepare:
- handouts
- workbooks
- manuals
- certificates
You can also produce postcards, invitations, newsletters, and signs. If you can print it, then you can whip it up in Word.
In this tutorial, you’ll learn how to use Microsoft Word’s page layout tools to produce the print materials you need.
How to Work With Templates to Quickly Change Your Design
The quickest way to change or apply a page layout is by using a print template for Word. For the examples below, we’ll be using the SEO Proposal template from Envato Elements.


When looking for a print template for Word, it’s a good idea to choose one that uses paragraph and character styles. The styles feature will allow you to quickly format text even in a long document.
Below are some roundups of Microsoft Word templates you can choose from:
Now that you’ve chosen a template with a good page layout in Word, it’s time to learn how to use it.
1. Download the Template
Download the template of your choice to your computer’s hard drive. Unzip the file, then copy the template. This way, you’ve got the original template file intact, if you want to revert to it.


2. Customize the Template With Your Own Content
Replace the text with your own information.


If you want to change the text formatting, change the settings for fonts and paragraphs.
To add your own image, click on an image placeholder. The Format Picture dialog box opens. Under Fill, select Picture or texture fill. Under Picture source, click Insert….


Find and select the image you want to use. Click Insert.


Now, the image is inserted.


To replace an existing logo on the template, click on the logo, then click on the Picture Format tab.


Click the Change Picture button on the ribbon. Find and select the logo file, then click Insert.
![]()
![]()
![]()
If necessary, click-and-drag one of the handles of the logo to resize it.
Next, I’d like to change the color of the rectangle on the cover page. To do that, select the shape, then click the Shape Format tab.


The Shape Format ribbon is displayed. Click on the drop-down arrow beside the Shape Fill button. Select from the color options shown or click More Fill Colors… to specify the color you want to apply.


This is what the customized proposal cover looks like now:


Repeat these steps to customize the other pages of the template.
As you can see, when you start with a template for Word most of the design and page formatting decisions are already made for you by the template creator.
But, if you prefer to start your document from scratch, follow the steps below to change the default page format settings.
Type or paste your text into the document. Apply text and paragraph formatting to modify settings for fonts, spacing, alignment, and more. Then, you can move on to the page layout.
3. How to Set the Microsoft Word Page Orientation as Portrait or Landscape
To set the Microsoft Word page orientation of your document, go to File > Page Setup….


The Page Setup dialog opens. Click on the button for either Word portrait or landscape layout orientation.


4. How to Set the Print Size of the Paper
From the Microsoft Word Page Setup dialog, you can also change the paper size when you print the document. Click on the Paper Size field to show the different paper size choices available.


Select the size you wish to use. You can also click Manage Custom Sizes… to specify your own size.


5. How to Split Your Text into Multiple Columns
Sometimes you may want to divide your text into columns. This can make the document more readable and adds variety to an otherwise monotonous layout. Columns are popular in magazines, newsletters, and similar types of materials.
Arrange the Entire Document into Columns
To change the MS Word layout to columns, follow these steps:
1. Go to Layout > Columns.


The Columns dialog box opens.


2. Select one of the Presets or manually set the:
- number of columns
- width and spacing
- apply to the whole document or from that point forward
3. When you’re happy with the settings, click OK.
Apply Columns to a Part of the Document
You can also apply columns to only a specific part of the document.
1. Select the text you wish to display in columns.


2. Go to Layout > Columns.
3. In the Columns dialog box, choose the settings you want to apply.
Notice that you now have the option to apply the column settings to Selected text. Click OK.


Now, only the selected text has been broken into two columns. The rest remains in one column.


6. How to Add Page and Section Breaks
Sections in Microsoft Word enable you to apply different layouts to different parts of your document. This is useful for making creative layouts, especially to long documents.
Insert a Page Break in Word
A page break separates text, so that anything after the break is moved to a succeeding page. It’s useful for dividing up a document into chapters and sections.
To insert a page break, place the cursor at the point where you want the break to be, then go to Insert > Break > Page Break.


In our sample document, the title page is now on a separate page from the rest of the text.


Insert a Section Break in Word
If you wish to apply varying formatting on different parts of the document, then you’ll want to break it into sections. This includes varying the columns, headers and footers, pagination, borders, and other settings.
To create a section break, place the cursor where you would like the section break to be. Go to Insert > Break > Section Break.


Select the type of section break you want to insert:
- Section Break (Next Page) creates a section break and moves the next section into a new page.
- Section Break (Continuous) keeps the two sections on the same page while allowing you to apply different formatting settings for each.
- Section Break (Odd Page) starts a new section on the next odd-numbered page.
- Section Break (Even Page) starts a new section on the next even-numbered page.
Take Control of Your Page Layouts with Microsoft Word
Use Microsoft Word’s page layout tools to give your documents a consistent, readable, and professional look. You don’t have to be an expert in Word to take better control of your document’s page layouts. With Microsoft Word’s page layout tools, you can make any document look the way you want it to.
You don’t have to start from scratch, either. You can have professional designers make most of the design and layout decisions for you by using print templates for MS Word. If you want unlimited downloads of templates as well as photos, fonts, icons, and other creative assets—all for one small, fixed fee—then Envato Elements is the best source for you.
For one-off Word templates and other desktop publishing tools, look to GraphicRiver. Here, you can access everything you need to create impressive print materials on a pay-per-use basis.
And when you use a template, the skills you learned in this post will help you customize and adapt it to your needs.
Editorial Note: Video added by Alexis (Lexi) Rodrigo.

If you’re creating a Word document with multiple page layouts, you may wish to make a single page landscape. Here’s how.
Photo Credit — iStockPhoto
When you’re creating Word documents, you have two-page layout options available—landscape or portrait. Portrait mode is the default option, but you can switch to landscape mode instead if you want your text sideways.
If you want to use both types of layouts in Word, you’ll need to use a few workarounds using section breaks and Word’s own page formatting options to do so. Here’s how.
If you want to quickly make one page landscape in Word, here’s what you’ll need to do:
- Open your Word document and place the blinking cursor at the start of the page you wish to change to landscape mode.
- Click on the Layout menu in the ribbon bar.
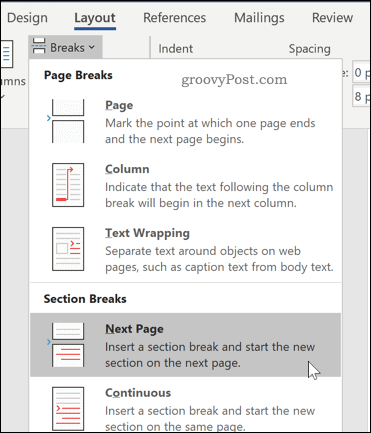
- Select Breaks > Next Page in the Section Breaks section. This will insert a section break and push your text onto a new page.

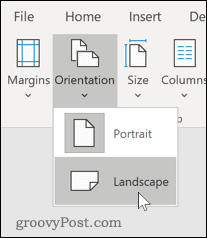
- In the Layout menu, press Orientation > Landscape. This will switch the current page and all the following pages to landscape mode.

- You’ll now need to turn the remaining pages back to portrait mode. Scroll down to the next page, then place the blinking cursor at the start of the page.
- Press Layout > Breaks > Next Page to insert a new section break.
- Click on Orientation > Portrait to switch the pages to portrait mode.


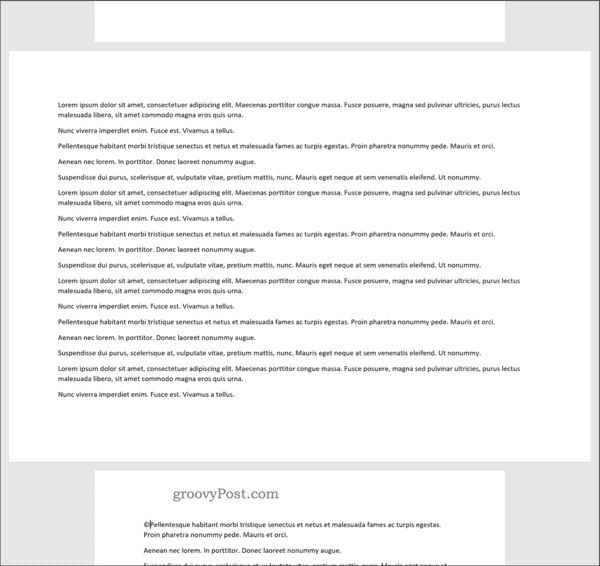
If you followed the steps correctly, you should now have one single landscape page, with all other pages remaining in portrait mode.
How to Make Specific Text Landscape in Word
If you don’t want all of the text on your page to appear on the landscape page, you can choose to make a landscape page that only contains specific text.
- To do this, start by highlighting the text that you want to appear on the landscape page.

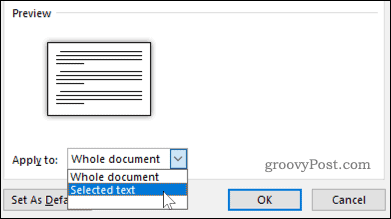
- In the Layout menu, click on Margins, then select the Custom Margins… option at the bottom of the drop-down menu.

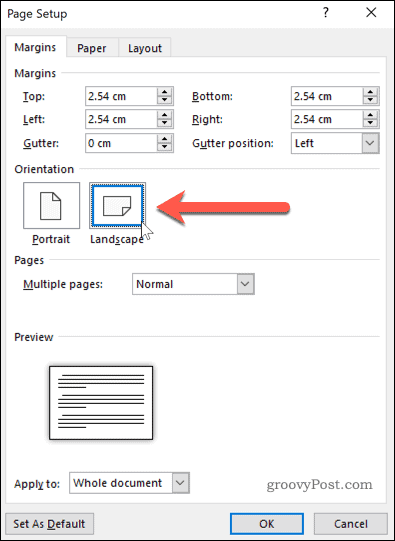
- In the Page Setup window, click on the Landscape option in the Margins tab, under the Orientation section.

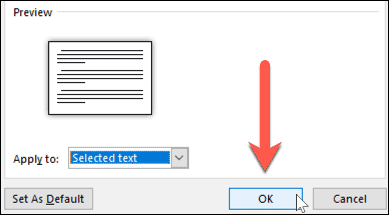
- In the Apply to box, choose Selected Text.

- Click OK to confirm the settings you’ve selected.


You should now have a landscape page that contains the text you previously highlighted, creating a section break that uses a different page layout to the rest of your Word document.
You can use this method to turn an entire page landscape—to do this, select all of the text on the page before you start and repeat the steps above to complete the change.
Formatting Microsoft Word Documents
Now that you know how to make a single page landscape in Word, you can start creating documents with as many combinations of landscape and portrait pages as you want. This is where learning how to rearrange pages in Word might just come in handy.
If you’re looking for other ways to take your Word documents further, why not learn how to insert an Excel table into Word. For academic documents, you may wish to create a table of contents in Word to keep your document organized.
![]()
1
Add space for underlines
This option adds extra space for underlines.
2
Adjust line height to grid height in the table
When this option is turned on, the table row height snaps to the document grid. Used in East Asian text.
3
Align table rows independently
When this option is not selected, center-aligned or right-aligned non-wrapped tables are aligned as a whole without changing the relative positions of the rows.
When this option is selected, the rows of a center-aligned or right-aligned non-wrapped table are center-aligned or right-aligned independently. For example, the right edges of the rows of a right-aligned non-wrapped table line up evenly if the right edges do not line up when the table is left-aligned.
4
Allow hyphenation between pages or columns
5
Allow space between paragraphs of the same style in a table
6
Allow table rows to lay out apart
This option determines the behavior of a non-wrapped table that is laid out on the right side of a wrapped object and extends below the wrapped object.
When this option is not selected, the remainder of the table is positioned out to the right with the first part of the table.
When the option is selected, the remainder of the table is allowed to slide back to the left.
7
Allow tables to extend into margins
This option was new in Word 2003.
This option will retain the settings of a table that is extended past the margins of a document instead of using autofit to make the table fit within the margins.
This was enabled automatically under Tools > Options > Compatibility for Word 2000 and Word 2002. In Word 2003 and newer versions, the option is built in.
8
Auto space the way Word 95 does
(Word 2003: Auto space like Word 95)
This option determines how lines of text break (word wrap) in an East Asian Word 95 document.
9
Balance SBCS characters and DBCS characters
Not used in U.S. English Word.
10
Combine table borders the way Word 5.x for the Macintosh does
If a table contains two contiguous cells whose border is formatted differently, the left-most cell is displayed with the border width of the right-most cell.
11
Convert backslash characters into yen signs
Not used in U.S. English Word.
12
Disable OpenType Font Formatting Features
13
Do full justification the way WordPerfect 6.x for Windows does
To achieve full justification, WordPerfect compresses the spaces between words while Word expands them. This often results in different line breaks and leads to different page breaks.
Turn on this option to implement the WordPerfect justification method.
14
Don’t add automatic tab stop for hanging indent
This option ignores the automatic tab stop that Word 6.0 uses when creating a hanging indent.
15
Don’t add extra space for raised/lowered characters
This option prevents Word from inserting additional space between lines to accommodate raised or lowered characters.
16
Don’t add leading (extra space) between rows of text
This option displays text without leading between the lines. This is the same functionality that exists in Word versions 5.x for the Macintosh.
17
Don’t allow hanging punctuation with character grid
This option prevents the use of punctuation marks in East Asian text when the character grid is enabled. This option was new in Word 2002.
18
Don’t autofit tables next to wrapped objects
19
Don’t balance columns at the start of Continuous sections
This option prevents Word from balancing columns at the end of a section or document.
20
Don’t blank the area behind metafile pictures
This option prevents Word from obscuring any text or graphics surrounding an inserted metafile. Selecting this option decreases editing speed.
21
Don’t break constrained tables forced onto the page
22
Don’t break wrapped tables across pages
This option was new in Word 2002. This option prevents a wrapped table from breaking across a page break.
Note: The Allow row to break across pages option has no effect in a wrapped table.
23
Don’t center «exact line height» lines
This option changes the vertical position of text between the top of the line space and the bottom of the line space.
With this option turned off, any extra space is split between the ascender and descender. With the option turned on, all the extra space goes to the descender.
24
Don’t expand character spaces on a line that ends with SHIFT+RETURN
When a «justified» line of text ends with SHIFT+ENTER, Word prevents extra spacing between words and makes the line appear as «Align Left».
25
Don’t snap text to grid inside table with inline objects
This option was new in Word 2002. This option prevents Word from allowing East Asian text in a table cell to snap to the character grid when an «inline with text» object is inserted in the table cell.
26
Don’t use Asian rules for line breaks with character grid
This option was new in Word 2002. This option allows East Asian text to line-break the same as in earlier versions of Word when the character grid is turned on.
27
Don’t use hanging indent as tab stop for bullets and numbering
28
Don’t use HTML paragraph auto spacing
This option has two functions:
- If you have Auto set for Paragraph Spacing Before/After, and you turn this option on, Word adjusts Paragraph Spacing Before/After to 5 pt.
- With this option turned off (default setting), Word sets the spacing between paragraphs to the larger of Paragraph Spacing Before/After.
With this option turned on, Word uses both values of Paragraph Spacing Before/After between paragraphs. This is the same functionality as in earlier versions of Word.
29
Don’t use proportional width for Korean characters
30
Don’t vertically align inside of textboxes
31
Don’t vertically align table cells containing shapes
32
Draw underline on trailing spaces
Not used in U.S. English Word.
33
Expand/condense by whole number of points
This option rounds the measurement of the spacing for characters with condensed or expanded spacing to the nearest whole number.
34
Forget last tab alignment
This option forces tab settings at the end of lines to behave the same as in Word 97.
35
Lay out AutoShapes the way Word 97 does
When an AutoShape with Top & Bottom wrapping style applied appears at the bottom of a page, Word forces the AutoShape behind the text.
36
Lay out footnotes the way Word 6.x/95/97 does
This option positions footnotes as they were in earlier versions of Word.
37
Lay out tables with raw width
This option allows Word to determine the width of a table (table width + table indent) and prevents a table from being laid out in an area that is too small.
This option prevents the table from being clipped (cut off on the sides) or pushed off the page when it is aligned next to a floating object.
38
Print body text before header/footer
This option prints the main text layer before the Header/Footer layer, which allows for the process of PostScript codes in the text layer, the same way that Word 5.x for the Macintosh does. (This functionality is the reverse of the default order.)
39
Print colors as black on noncolor printers
This option prints all colors as black, instead of using grayscale (different shades of gray) when you use a printer that does not print color.
40
Select entire field with first or last character
This option was new in Word 2002. This option allows you to select the entire field when you select either the first or last character of the field result. This option does not work when the field code is displayed.
41
Set the width of a space like WordPerfect 5.x
WordPerfect calculates the width of a space in a proportional font differently from Word. In the WordPerfect interface, this default word spacing is named WordPerfect Optimal. The Word 97 text converters can use the WordPerfect formula for spacing.
42
Show hard page or column breaks in frames
If a frame contains a manual, or hard, page break or column break, Word displays it.
43
Split apart page break and paragraph mark
44
Substitute fonts based on font size
This option is used by the WordPerfect 6.x converter to make a font request based on font size first and, if a match is not found, to actually map the font.
45
Suppress extra line spacing at bottom of page
WordPerfect suppresses any extra line spacing from the last line on a page. For example, if line spacing is set to double, the final line on the page does not display white space below it.
Turn on this option to implement the line-spacing feature.
46
Suppress extra line spacing at top of page
This option prevents Word from adding extra line spacing at the top of a page. If the line spacing for the line at the top of a page is set for more than single spacing, Word ignores the extra spacing, so that the top margin does not increase.
47
Suppress extra line spacing at top of page the way Word 5.x for the Macintosh does
(Word 2003: Suppress extra line spacing at top of page like Word 5.x for the Mac)
This option prevents Word from adding extra line spacing at the top of a page. If the line spacing for the line at the top of a page is set for more than single line spacing, Word ignores the extra spacing, so that the top margin does not increase.
48
Suppress extra line spacing the way WordPerfect 5.x does
(Word 2003: Suppress extra line spacing like WordPerfect 5.x)
This option ensures that the layout of a converted WordPerfect document that is formatted with Automatic line height closely matches that of the original document.
49
Suppress Space Before after a hard page or column break
This option suppresses the space in a paragraph formatted with the Space Before option that follows a hard page break or column break.
50
Swap inside and outside mirror indents and relative positioning
51
Swap left and right borders on odd facing pages
If a paragraph has a left border (not a box) and the Different Odd/Even Headers check box or Mirror Margins check box is selected, Word prints the border on the right, on odd numbered pages.
52
Treat * as ** in mail merge data sources
In a data source, this option converts a delimiter composed of a backslash and quotation mark («) to two quotation marks (» «), so that Word can recognize quotation marks.
53
Truncate font height
This option rounds the font size up or down, as in WordPerfect 6.x for Windows.
54
Underline tab character in numbered lists
55
Use cached paragraph information for column balancing
56
Use larger small caps the way Word 5.x for the Macintosh does
This option applies small caps formatting in Word version 6.0 for the Macintosh the same way as in Word version 5.x for the Macintosh, which produces slightly larger small capital letters.
57
Use line-breaking rules
This option was new in Word 2002. This option controls line breaks in a Thai language document.
58
Use Normal style for bulleted and numbered lists
59
Use printer metrics to lay out document
If this option is selected, Word uses the information from the printer driver that is installed, as in some earlier versions of Word.
If this option is turned off (default), Word use built-in metrics to lay out the document. This means your document looks the same, no matter what printer driver is installed.
60
Use Word 2002 table style rules
This option was new in Word 2003. This option will preserve layout compatibility of tables styles used in Word 2002.
61
Use Word 2002-2007 style evaluation rules for font size and paragraph justification in tables
62
Use Word 2003 hanging-punctuation rules
63
Use Word 2003 indent rules for text next to wrapped objects
64
Use Word 2003 kerning pair rules
65
Use Word 2013 rules for hyphenation between pages and columns
66
Use Word 2003 table autofit rules
67
Use Word 6.x/95 border rules
This option suppresses paragraph borders when a paragraph is intersected by frames or wrapped drawing objects.
68
Use Word 97 line-breaking rules for Asian text
This option uses Word 97 line-breaking rules for Asian text.
69
Wrap lines the way Word 6.0 does
(Word 2003: Lines wrap like Word 6.0)
Not used in U.S. English Word.
70
Wrap trailing spaces to next line
This option automatically moves any spaces that trail into the margin after a word at the end of a line to the beginning of the next line.