
Word for Microsoft 365 Word for Microsoft 365 for Mac Word 2021 Word 2021 for Mac Word 2019 Word 2019 for Mac Word 2016 Word 2016 for Mac Word 2013 Word 2010 Word for Mac 2011 More…Less
A text box is an object you can add to your document that lets you put and type text anywhere in your file. Text boxes can be useful for drawing attention to specific text and can also be helpful when you need to move text around in your document.
Add a text box
-
Place cursor where you want the text box to appear.
-
Go to Insert and in Illustrations select Drawing.
-
Select Text Box and use your cursor to create the text box.
-
Insert text in box and apply any styling needed.
-
Select Save andClose.
If you aren’t using a mouse
-
Press Alt + Period (.) and then press N.
-
Then press D to select drawings.
-
Press Alt + Period (.) and then press N.
-
Type the text that you want.
-
Press the Esc key 3 times.
-
Press Enter to save textbox.
Notes:
-
To format the text in the text box, select the text, and then use the formatting options in the Font group on the Home tab.
-
To format the text box itself, use the commands on the Shape Format contextual tab that appears when you select a text box.
-
To position the text box, select it, and then when the pointer becomes a
 four-headed arrow, drag the text box to a new location.
 -
You can also change or remove a border from a text box or shape.
-
If you have multiple text boxes, you can link them together so that text will flow from one box to another. Select one of the text boxes and on the Shape Format tab, select Create Link.
-
 four-headed arrow, drag the text box to a new location.
Editing in a text box
-
Double click the textbox.
-
In Drawing (Preview), select the textbox to place your cursor and edit text.
-
When finished select Save and Close to view updated text box.
Copy a text box
-
Select the border of the text box that you want to copy.
-
Press Ctrl+C.
Note: Make sure the pointer is on the border of the text box, not inside it. If the pointer is inside, pressing Ctrl+C will copy the text, not the text box.
-
Select a location and press Ctrl+V to paste the text box.
Delete a text box
-
Select the border of the text box that you want to delete, and then press Delete.
Note: Make sure the pointer is on the border of the text box and not inside it. If the pointer is inside the box, pressing Delete will delete the text inside the text box, not the box.
Add a text box
-
Go to Insert > Text Box, and then select Draw Text Box.
-
Click or tap in the document, and drag to draw the text box the size that you want.
-
To add text to a text box, select inside the text box, and then type or paste text.
Notes:
-
To format the text in the text box, select the text, and then use the formatting options in the Font group on the Home tab.
-
To format the text box itself, use the commands on the Format contextual tab, which appears under Drawing Tools when you select a text box.
-
To position the text box, select it, and then when the pointer becomes a
, drag the text box to a new location. -
You can also change or remove a border from a text box or shape.
-
If you have multiple text boxes, you can link them together so that text will flow from one box to another. Select one of the text boxes and on the Format tab, under Drawing Tools, and then select Create Link.
-
Copy a text box
-
Select the border of the text box that you want to copy.
-
Go to Home > Copy
.Make sure that the pointer is not inside the text box, but rather on the border of the text box. If the pointer is not on the border, pressing Copy will copy the text inside the text box and not the text box.
-
Go to Home and select Paste.
 .
.
Delete a text box
-
Select the border of the text box and then press DELETE.
Make sure that the pointer is not inside the text box, but rather on the border of the text box. If the pointer is not on the border, pressing DELETE will delete the text inside the text box instead.
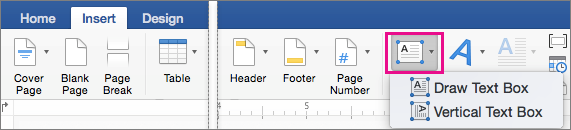
Add a text box
-
Go to Insert > Text Box and then select either Draw Text Box (where the text aligns horizontally on the page) or Vertical Text Box (where the text aligns vertically on the page).
-
Select in the document, and then drag to draw the text box the size that you want.
-
To add text to a text box, click or tap inside the text box, and then type or paste text.
-
To format the text in the text box, select it, and then Control + Click the text and select Font.
-
To add different effects to the text box, select the text box, and use the options on the Shape Format tab (such as changing the text direction or aligning the text at the top, middle or bottom of the text box).
-
To position the text box, select and hold it, and then when the pointer becomes a
, drag the text box to a new location.
-
Note: If you have drawn multiple text boxes, you can link them together so that text will flow from one box to another. You can only link an empty text box to the one that you’ve selected. To do this, select the text box that you want to link to another text box, and then go to Shape Format > Create Link.
Copy a text box
-
Select the text box you want to copy.
Make sure that the pointer is on the border of the text box and not inside the text box. If the pointer is not on the border, the text inside the text box is copied.
-
Press Control + Click, and then select Copy. Or, press
+ C. -
Select the location in your document where you want to paste the text box, press Control + Click, and then select Paste. Or, press
+ V.
 + C.
+ C.Remove a text box
-
Select the border of the text box that you want to delete, and then press DELETE.
Make sure that the pointer is on the border of the text box and not inside the text box. If the pointer is not on the border, pressing DELETE will delete the text inside the text box.
Add a text box
-
Go to Insert > Text Box.
-
Click in your file where you’d like to insert the text box, hold your mouse button down, then drag to draw the text box the size that you want.
-
After you’ve drawn the text box click inside it to add text.
Copy a text box
-
Select the text box you want to copy.
Make sure that the pointer is on the border of the text box and not inside the text box. If the pointer is not on the border, the text inside the text box is copied.
-
Press Control + Click, and then select Copy. Or, press
+ C. -
Select the location in your document where you want to paste the text box, press Control + Click, and then select Paste. Or, press
+ V.
Remove a text box
-
Select the border of the text box that you want to delete, and then press DELETE.
Make sure that the pointer is on the border of the text box and not inside the text box. If the pointer is not on the border, pressing DELETE will delete the text inside the text box.
Need more help?
Want more options?
Explore subscription benefits, browse training courses, learn how to secure your device, and more.
Communities help you ask and answer questions, give feedback, and hear from experts with rich knowledge.
Stack text vertically by using WordArt
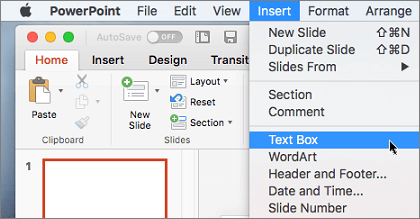
- On the Insert tab, click WordArt.
- Select a style from the gallery, and then click OK.
- In the Edit WordArt Text dialog box, type the text that you want, stacked the way you want it (press Enter after each word or letter), and then click OK.
Contents
- 1 Can you layer text in Word?
- 2 How do you overlay text boxes in Word?
- 3 How do you write on top of words in Word?
- 4 How do you overlap text?
- 5 How do I use layers in Word?
- 6 How do you write down a page in Word?
- 7 How do I group all text boxes in Word?
- 8 What is a floating text box?
- 9 How do you put a above a letter?
- 10 How do you type over on a Mac?
- 11 What is allow overlap in Word?
- 12 How do I fix overlapping text in Word?
- 13 How do you stack shapes in Word?
- 14 How do you overlay objects in Word?
- 15 How do I stack pictures in Word?
- 16 How do I put page numbers on certain pages in Word?
- 17 How do you number your pages on Microsoft Word?
- 18 How do I move text up and down in Word?
- 19 How do I make a multi level list in Word?
- 20 How do you group multiple things in Word?
Can you layer text in Word?
To layer items in any Word document, including label templates, you need to use the “Arrange” tools. The key tools that you need are “Bring Forward”, “Send Backward”, and (if you are using pictures or shapes) “Wrap Text”. To find the Arrange tools, left click on an image to select it.
How do you overlay text boxes in Word?
To have text appear “on top” of other text or objects in Word, set it within a text box (Insert > Text Box), then right-click it and choose Format Text Box to change the wrapping style Layout to “In Front of text”.
How do you write on top of words in Word?
Click the Insert tab, then click the “Shapes” button. Choose the “Scribble” tool, which looks like a squiggly line. When the cursor changes to a plus sign, click inside the text box above the line, press and hold down the left mouse button and draw what you want to write.
How do you overlap text?
How To Overlap Text With An Image
- Step 1: Add Your Text.
- Step 2: Select The Background Layer.
- Step 3: Select The Area That Will Overlap The Text.
- Step 4: Copy The Selected Area To A New Layer.
- Step 5: Turn The Text Layer Back On.
- Step 6: Drag Layer 1 Above The Text Layer.
How do I use layers in Word?
How to Layer Objects in Word
- Select the object.
- Click the Format tab.
- If necessary, expand the Arrange group.
- Click the Bring Forward or Send Backward list arrow.
- Select a layering option.
How do you write down a page in Word?
How to Make the Writing Go Downward in Microsoft Word
- Open a Word document.
- Click “Draw Vertical Text Box” and note that your cursor changes into a crosshair.
- Click the location within the document where you want to insert vertical text, hold down your left mouse button and draw a vertical rectangle.
How do I group all text boxes in Word?
Grouping objects
- Hold the Shift (or Ctrl) key and click the objects you want to group.
- Click the Group command on the Format tab, then select Group.
- The selected objects will now be grouped.
What is a floating text box?
Text boxes in Microsoft Word are graphic elements that contain editable text.If you specify a text box object to sit in front of the text on the page instead of in line, the box appears to float over the words.
How do you put a above a letter?
Holding the “Ctrl” key plus a punctuation key and the letter will insert the marked letter on your document. Diacritics include the acute, grave and circumflex accents. These keyboard shortcuts will help you display text more accurately in your business documents.
How do you type over on a Mac?
On the Word menu, click Preferences. Under Authoring and Proofing Tools, click Edit, and then in the Edit dialog box, select Replace existing text as you type (Overtype mode). Note: To turn off overtype mode, clear the check box next to Replace existing text as you type (Overtype mode).
What is allow overlap in Word?
Like all positioning options, “Allow overlap” only applies to images which aren’t using the “In line with text” wrapping style. Once you’ve turned it on you can drag your images around to overlap how you want.
How do I fix overlapping text in Word?
To fix this problem, move the object so that it does not overlap the text. You can move an object or a group of objects by dragging it, nudging it, or using measurements to position it on the page.
How do you stack shapes in Word?
Hold down the Shift key and click each of the three shapes, selecting them all; then choose Drawing Tools Format→Group Objects→Group. The shapes are grouped into one object. Save the changes to the document and close it.
How do you overlay objects in Word?
Allow pictures to overlap
- Select a picture.
- Select the Layout Options icon.
- Select See more.
- On the Position tab, in the Options group at the bottom, select the Allow overlap check box.
- Repeat for each picture for which you want to enable overlapping.
How do I stack pictures in Word?
How to Layer Images in Microsoft Word
- Once you open Microsoft Word, click Insert–Pictures from the menu at the top of your.
- Once your images are inserted, you will notice that instead of layering on top of one.
- Now, you can click and drag your images wherever you want on the page to create your.
How do I put page numbers on certain pages in Word?
At the top of the page, before the first line/word, click on the document to place your curser. Then choose Page Layout from the top menu. Next select Breaks – Next Page. Now choose Insert from the top menu and then select Page Numbers and then choose how you want them to appear in the document.
How do you number your pages on Microsoft Word?
On the Insert tab, click the Page Number icon, and then click Page Number. Select a location, and then pick an alignment style. Word automatically numbers every page, except designated title pages. To change the numbering style, select Format and then choose the formatting you want to use.
How do I move text up and down in Word?
The keyboard shortcut is Shift+Alt + Up/Down, and it’s used to move items up or down. Use the Shift+Alt+Up key, and the row where the cursor is will immediately move up: This also works for other elements, such as paragraphs…
How do I make a multi level list in Word?
To create a multilevel list:
- Select the text you want to format as a multilevel list.
- Click the Multilevel List command on the Home tab. The Multilevel List command.
- Click the bullet or numbering style you want to use.
- Position your cursor at the end of a list item, then press the Enter key to add an item to the list.
How do you group multiple things in Word?
Group shapes, pictures, or other objects
- Press and hold CTRL while you click the shapes, pictures, or other objects to group. You will need to select more than one shape, picture or object in order to enable the Group button.
- Select the Arrange button and choose Group.
Achieve more control and flexibility with your documents
Updated on September 11, 2022
What to Know
- Select Insert > Text Box > choose a text box template. Select and drag box to the position you want.
- To resize text, select and drag circles around the edge. To rotate text, select and drag the circular arrow.
- Place the cursor inside the text box and type the information you want to appear.
This article explains how to use text boxes in Microsoft Word. Instructions apply to Word for Microsoft 365, Word 2019, Word 2016, and Word 2013.
How to Insert a Text Box in Word
Start by opening the document you want to add a text box to. Then follow the steps below.
-
On the ribbon, select Insert.
-
In the Text group, select Text Box, then choose a text box template.
-
The new text box appears in the middle of the text, and the Shape Format tab is automatically selected.
-
Select and drag the box to the position you want. To resize the text box, select and drag the circles around the edge. To rotate the text box, select and drag the circular arrow at the top of the box.
-
Place the cursor inside the text box and type the information you want to appear there.
Why Use Text Boxes?
When you type text in Microsoft Word, you have options for making it look a particular way on the page (such as changing the page margins), but those options are limited. Text boxes expand your formatting repertoire by offering additional control and flexibility for how your text appears. You can place a text box anywhere within a document and format it with different colors and fonts. This feature is especially helpful for creating a blockquote or a sidebar.
Customize a Text Box
After you create a text box, you can customize it in a number of ways.
-
To bring up options, place the cursor inside the text box and right-click. Choose an option and follow the screen prompts to add a border, change the style, or adjust the way the text box interacts with the other text on the page.
Alternatively, use the controls on the Shape Format tab.
-
To go directly to the Layout Options menu, select the text box, then select the Layout Options icon (it looks like a horseshoe and is located to the right of the text box).
-
Change the text, make more adjustments, or move the box to another location at any time. To delete a text box, select its border, then press Delete on the keyboard.
Thanks for letting us know!
Get the Latest Tech News Delivered Every Day
Subscribe
In Microsoft Word, the user can create the text boxes in several built-in styles, predefined Textboxes offered in Word. If any of the built-in styles do not meet the user’s, interest there is a feature in Word that allows the user to draw the text box. There is an option where you can get more textboxes from Office.com and can save the selection to the text box gallery.
In this tutorial, we will explain:
- How to insert a Built-in Styles Text Box.
- How to insert text into Text Box.
- How to copy the Text Box to a new location.
- How to change the direction of text in the selected Text Box.
- How to Format the Text Box.
- How to change the default formatting for a Text Box.
- How to save a selected Text Box as a Building Block.
What is Text Box in Microsoft Word
A Text Box is a feature in Word that focuses on its content and displays essential text such as headings and quotes.
1] How to insert a Built-in Styles Text Box
![]()
Click the Insert tab on the menu bar.
On the Insert tab in the Text group, click the drop-down arrow of the Text Box button.
You will see a list of text box built-in styles you can choose from; select the one you desire.
The text box you selected will appear in the document.
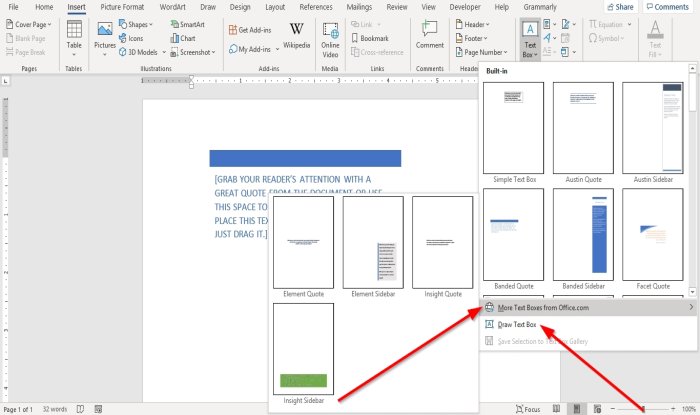
You can use More Text Boxes from Office.com to insert text boxes in the document.
In the Text Box drop-down list, you can also select Draw Text Box and draw a text box into the document.
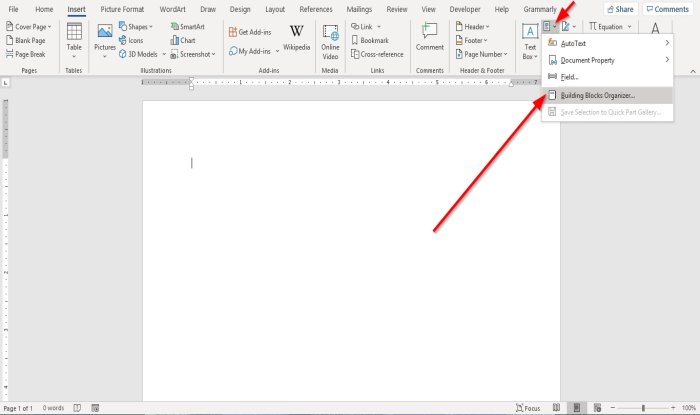
The other option to insert a Built-in Style text box is to your document is to click on the Explore Quick Parts button.
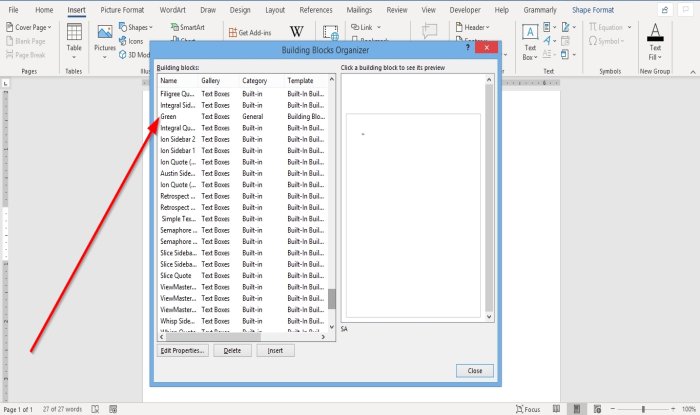
In the drop-down list, select Building Blocks Organizer.
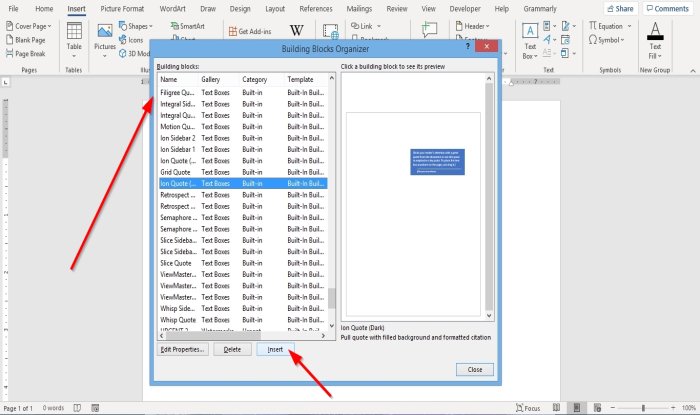
A Building Blocks Organizer dialog box will appear.
In the dialog box, scroll down until you see the text box gallery.
Click any text box of your choice and click Insert.
The text box is inserted into the document.
2] How to insert text into Text Box
For a built-in style text box, click into the text box and press the Delete Key to delete the default text inside it and type your text.
For the text box you draw, click inside the text box and enter your text.
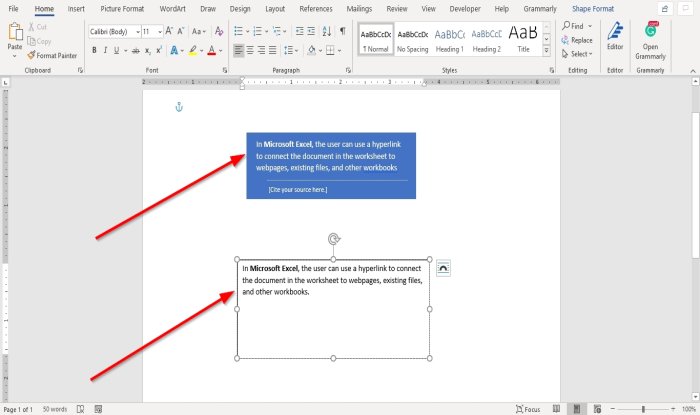
3] How to copy the Text Box to a new location
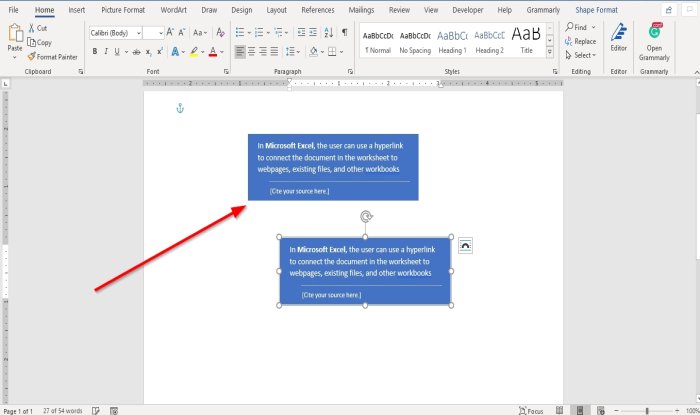
Place the cursor near the text box’s frame, hold the CTRL-key down, and drag the textbox.
You will notice that the text box is copied.
4] How to change the direction of text in the selected Text Box
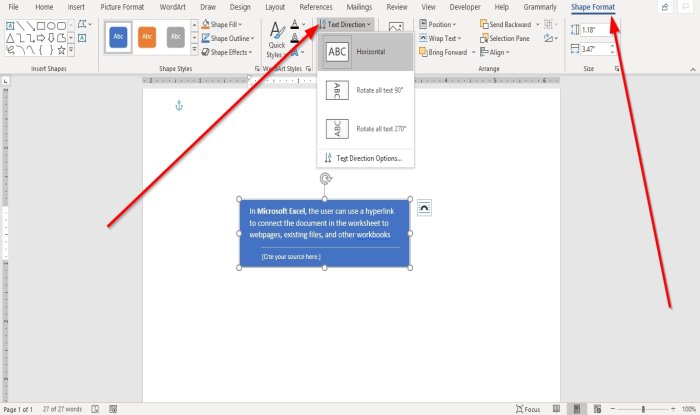
Go to the Shape Format tab.
On the Shape Format tab in the Text group, click Text Direction.
In the drop-down list, choose the direction you want the text to be in the text box.
5] How to Format the Text Box
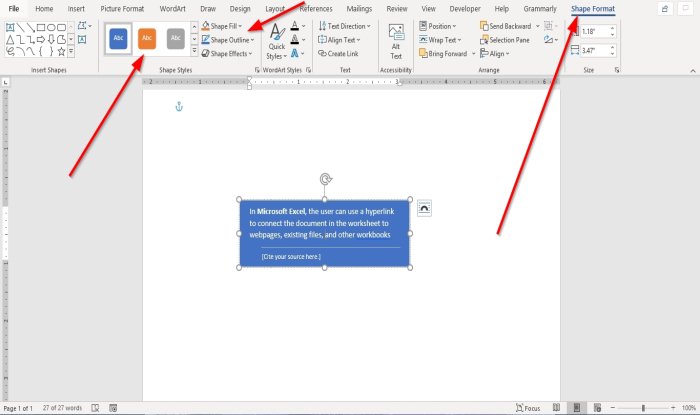
Click on the text box on the Shape Format tab in the Shape Styles group. You can choose the built-in styles you like.
You can format the text box by selecting Shape Fill, Shape Outline, and Shape Effects.
6] How to change the default formatting for a Text Box
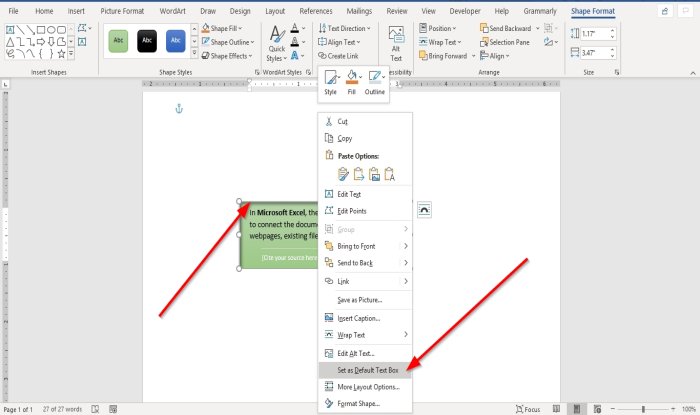
Right-click a formatted text box border and select Set as Default Text Box.
7] How to save a selected Text Box as a Building Block
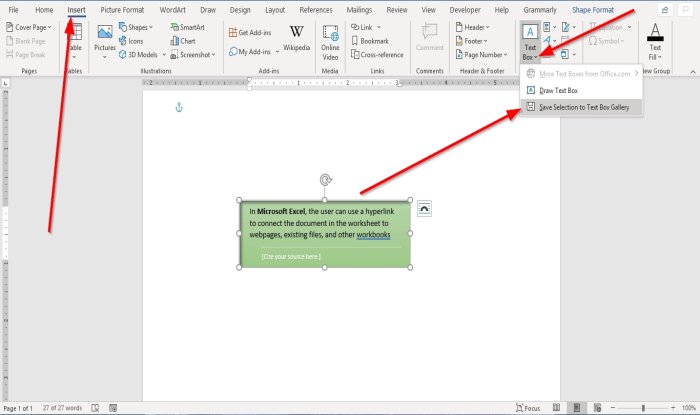
Go on the Insert tab in the Text group and select the Text Box button.
In the drop-down list, select Save Selection to Text Box Gallery.
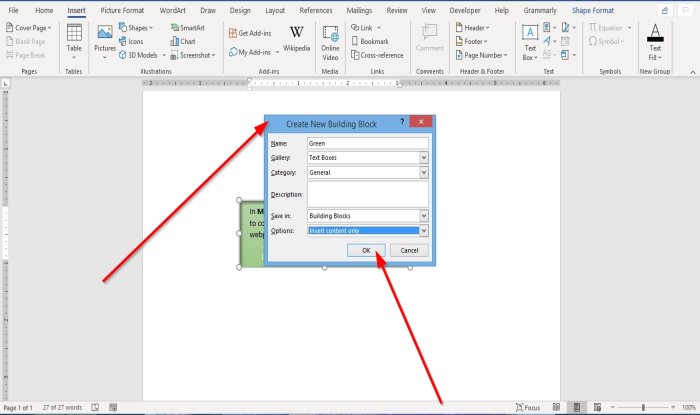
A Create New Building Block dialog box will appear, enter a name, select a category, or any changes you wish to make in the dialog box.
Click Ok.
If you want to see if the textbox you save is in the Building Block, click the Explore Quick Parts button in the Text group.
In the drop-down list, select Building Block Organizer.
A Building Blocks Organizer dialog box will appear; Scroll down until you see the name of the text box you name.
I hope this helps; if you have questions, please comment below.
Read next: How to print hidden text in Word on Windows and Mac.

If you want to get creative with your text or simply have more flexibility, consider adding a customizing a text box in Word.
If you want more flexibility with certain text in your Word document, why not use a text box? Since a text box is considered an object, you can move it wherever you like in your document. This is handy for placing text in areas you normally wouldn’t.
You can use a text box to call attention to something in your document, rotate snippets of text, or create a unique appearance. Microsoft Word also provides formatting options for text boxes that give them their own nifty style or useful function.
Here, we’ll show you how to add or draw a text box and then format it to your liking in Microsoft Word.
With Word on Windows, you can either insert a preformatted text box or draw one of your own. Either way, you can customize it afterward, so choose the best option for you.
Go to the spot in your document where you want the text box and select the Insert tab. Click the Text Box drop-down arrow and pick a Built-In style or Draw a Text Box.

If you’re using Word on Mac, go to the Insert tab, click the Text drop-down arrow, and then the Text Box arrow. You can then choose to draw a simple text box or one where the text inside is vertical.

To draw your text box on either platform, drag the crosshairs to create the size you want. You can resize the text box any time after you draw it too.

When your text box appears, click inside to add your own words.
Format and Customize a Text Box in Word
Once you insert or draw your text box, select it and go to the Shape Format tab to view all of your formatting options. You’ll find the following features in Word on Windows, which may differ slightly in Word on Mac.

Shape Styles
Choose a theme or preset style for your text box. These options include filling colors and various effects.

Or you can use the Shape Fill, Outline, and Effects options to create your own distinctive style. From gradients and patterns to dashed lines and scribbles, you have many terrific options for customizing the appearance of your text box.

Note: Some options in the Shape Styles section may not be available if you select a preset text box.
WordArt Styles
Along with making the text box itself look snazzy, you can do the same with the text inside of it. Check out the Quick Styles in the WordArt Styles for premade options.

Or use the Text Fill, Outline, and Effects to make the text really pop. You can do things like add a shadow and glow or warp the text, so it’s curvy and cool.

Text, Accessibility, Arrange, and Size
The remaining sections of the ribbon allow you to change the direction of the text inside the box, use text wrapping with other elements in your document, rotate the text box, and adjust its exact size. You can also use the Alt Text Accessibility option to describe the text box.

Edit Your Text Box
After you customize your text box, you can still edit it anytime. Just note that when you select the text box to make changes, it may appear without some of the elements or effects you’ve applied. This is to make text editing simpler.
Once you complete your edits and deselect the text box, it will return to normal with your customizations.

Add Text Anywhere, Any Way in Word
Text boxes in Microsoft Word let you place text anywhere in your document without worries of margins or other normal text limitations. And because you can completely format the text box almost any way you want, it can be both a fun and useful addition to your document.
If you use Google Docs and Microsoft Word, take a look at how to work with text boxes in Docs too!
![]()