
Latitude and Longitude in Excel: Calculate Distance, Convert Degrees, and Geocode Addresses
If you have a long list of geographic coordinates to work with, a Microsoft Excel spreadsheet is sure to be useful. There are three basic Excel tools that can work for you, no matter how you want to manipulate your geographic coordinates. You’ll need to know how to calculate the distance between two latitude and longitude points, how to convert latitude and longitude data to decimal degrees, and finally, how to geocode latitudes and longitudes.
How to Calculate the Distance Between Two Coordinates in Excel
In an example of how to calculate the distance between two coordinates in Excel, we’ll seek to measure the great circle distance. We’ll note that latitude and longitude are denoted in degrees, minutes and seconds.

Convert Latitude and Longitude to Decimal Degrees in Excel
Everything, including something as complicated as degrees, minutes, and seconds, can be converted into decimals. The degrees part remains the same, but minutes and seconds need to be converted into their percentage of a degree and combined. There are 60 minutes in a degree and 60 seconds in a minute (which means 3,600 seconds in a degree). Therefore, divide minutes by 60 and seconds by 3,600.
The overall formula:
Total Degrees (in the decimal form) = Deg + [Mins / 60] + [Seconds / 3600]

…So About That Distance
Now that you have the latitude and longitude values in decimals, you just face the equation for the nautical miles between Timbuktu and Casablanca, noted underneath.
Nautical Miles= ACOS [(sin(Lat_place_1*PI()/180)*sin(Lat_place_2*PI()/180)+
cos(Lat_place_1*PI()/180)*cos(Lat_place_2*PI()/180)*
cos(Lon_place_2*PI()/180-Lon_place_1*PI()/180))
] *3443.8985
That three thousand number, in the end, is the radius of Earth, in, Nautical Miles. Even if you were to substitute it with the radius of a sphere, assuming the Earth is spherical, at 3437.7468 NM, you will not be near the real, accurate distance.


Geocode Latitude and Longitude in Excel
Geocoding is the conversion of street addresses to latitude and longitude data that can be mapped. Now, there are two ways to geocode latitude and longitude from an Excel spreadsheet: the hard way and the easy way.
We’ll cover the hard way first, which is what you’ll need if you require the coordinates to live in your Excel document. You’ll need to write the Visual Basic (VBA) script to make a call to an external geocoder, or find the code elsewhere, such as this GitHub repo. There are a number of geocoder APIs and some geocoders are faster than others.
The Google Maps Geocoding API is a common choice and this is the API we’ll call in the easy option. However, it also can work directly within Excel. Armed with the code you’ve written or discovered, here are the steps to deploy geocoding within Excel.
Step 1: Find the Developer tab in your version of Excel.
Step 2: Look for the “Visual Basic” tab. This opens the development window.
Step 3: Insert —> Module. The new module will hold your function.
Step 4: Here is where you copy and paste your code.
Step 5: We need to add references now. So, Tools —> References. Make sure to check the Microsoft XML v6.0. CLICK OK.
Step 6: Press CTRL / CMD + S. Save as type —> Excel Add-In. Now you get to name your function. The extension has to be .xlam. Time to close all Excel files.
Step 7: Open a new file. File —> Options —> Add-Inns. In the Manage box, choose Excel-Add Ins.
Step 8: Press Go. Choose your function in the window that appears by ticking in the box. Press OK.
Step 9: VOILA. Now you could just use the new function you created, like any other function.
After you are done retrieving the values, copy and paste them elsewhere, off of the sheet with the calculations. Then delete the function calls because otherwise when you reopen this file, the Google API will start to be pinged again. That will eat up several minutes before the file is open. To optimize Google resource usage, take a 10-second break between addresses.
That’s a lot of steps, and assumes you’ve found some code to try out. Next, we’ll see the easier way to geocode your Excel data. It’s fast and reliable, but it won’t import the coordinates into your Excel file. On the other hand, the excel geocoding tool is copy-paste simple and gets you an interactive map.
Create a Map with Excel
There are a number of ways to create maps with Excel data. Perhaps the easiest is to just copy and paste your spreadsheet data into our map-making tool. Doing so turns your Excel document into a beautiful, interactive map like the one below.
View Example Latitude/Longitude Map in a full screen map
To make your own map based on latitude and longitude coordinates, separate the coordinates into their own columns within your spreadsheet.


Then, select and copy the rows and columns of your spreadsheet (Ctrl+C command or Cmd+C on Mac) and navigate to batchgeo.com. Paste (Ctrl+V or Cmd+V on Mac) in your data, and you’re done!
Whether you want to make a latitude and longitude map or create your own virtual wedding guide for your guests, BatchGeo provides a free and easy way to make beautiful web maps that are ready to be saved and shared.
November 09, 2018 — by Bill Jelen

Say that you have a list of cities in Excel and need to know the latitude and longitude for each city. A new Geography Data Type feature coming to Office 365 will make this easy. Check the Data tab in the Excel ribbon. Do you have a new Data Type category with Stocks and Geography?
If you have the new features, read on. If you don’t do a search for how to join the Office Insiders program.
First, make a copy of your city data. The Data Type operation is a bit destructive and will change the text in the city cells. Make a copy first so your original cities can be used later.
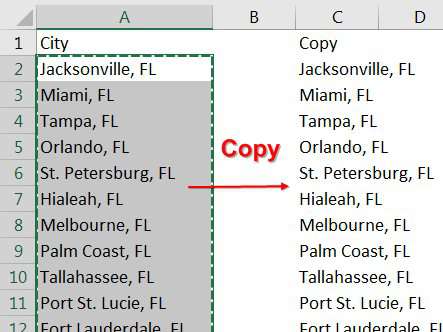
Select the range of cells containing cities. From the Data tab of the Ribbon, click on Geography (shown below in Portuguese…your computer will show your default language).

Each cell should gain a Map icon. If any cells have a circled question mark instead, you might have mis-spelled the city. Select that cell and use the pane on the right side of the screen to do a search. Note: This can also happen if there are two cities with the same name, such as Uniontown Ohio or Sutter Illinois. In the selection pane, they will show you the county for the two Sutters and you can choose.
Say that your first city data type is in C2. Add a formula in D2 of =C2.Latitude.
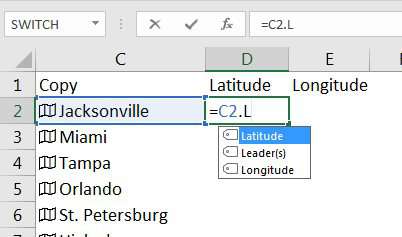
In E2, use =C2.Longitude. Copy the D2 and E2 formulas down for all cities.

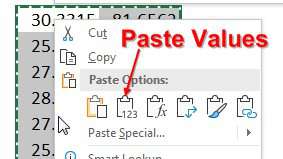
You might think you are done, but those formulas in columns D & E need the data type cells to remain in order to keep working. Follow these extra steps:
- Select D2:E999
- Press Ctrl + C to Copy
- Right-click and choose the Paste Values icon to convert the latitude and longitude to values.
- You can now delete the extra columns B & C.
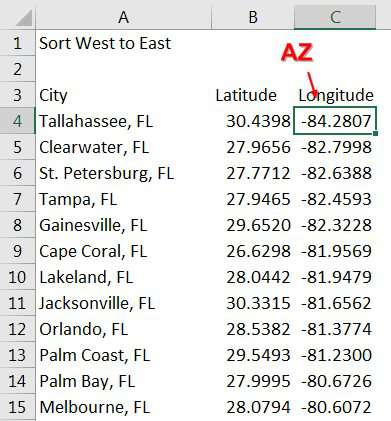
You can now sort your data in a North-to-South order. Sort by Latitude descending
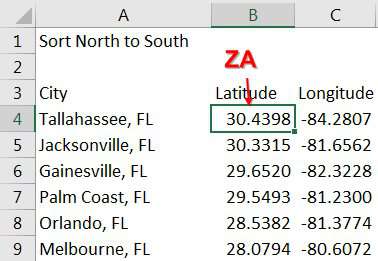
Or — to sort west to east, sort by Longitude ascending
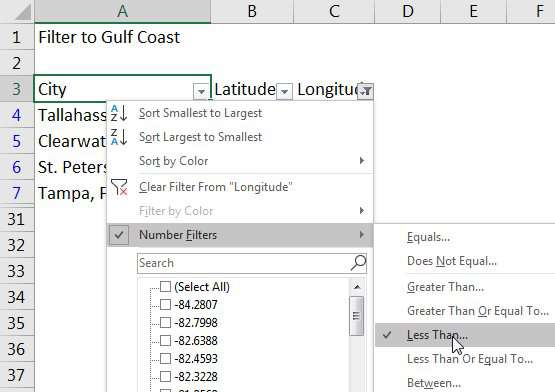
You can also filter the data. To find all cities along the Gulf of Mexico, filter by Longitude, looking for everything less than -82.43.
The new Geography data types in Excel allow you to add meta-data about each city.
Excel Thought Of the Day
I’ve asked my Excel Master friends for their advice about Excel. Today’s thought to ponder:
«Rules for lists: no blank rows, no blank columns, one cell headers, like with like»
Title Photo: Cody Black on Unsplash
 Please Note:
This article is written for users of the following Microsoft Excel versions: 97, 2000, 2002, and 2003. If you are using a later version (Excel 2007 or later), this tip may not work for you. For a version of this tip written specifically for later versions of Excel, click here: Displaying Latitude and Longitude.
![]()
Written by Allen Wyatt (last updated December 10, 2022)
This tip applies to Excel 97, 2000, 2002, and 2003
If you do much geographic work, you may wonder if you can use Excel to display longitude and latitude in a cell in terms of degrees, minutes, and seconds. There are three ways that a solution can be approached.
First, if you just want to affect the display, you can follow these steps:
- Select the cell you want to format for latitude or longitude.
- Choose Cells from the Format menu. Excel displays the Format Cells dialog box.
- Make sure the Number tab is selected. (See Figure 1.)
- In the categories list, choose Custom.
- Place the insertion point in the Type box and erase whatever is there.
- Type three # signs.
- Hold down the Alt key and type 0176 on the numeric keypad. (This inserts the degree symbol—and you must use the numeric keypad.)
- Type a space, two zeros, an apostrophe (the single quote), and another space.
- Type two more zeros followed by two more apostrophes. (A quote mark won’t work; it must be two apostrophes.)
- Click on OK.
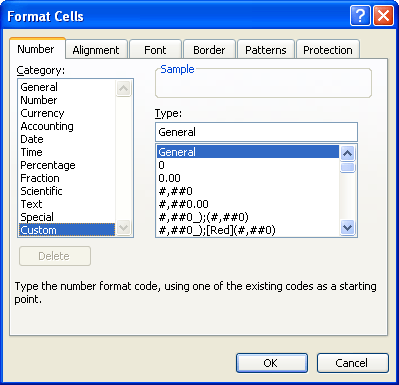
Figure 1. The Number tab of the Format Cells dialog box.
Now, if you type a number such as 1234543 into the cell, it is displayed as 123 degrees, 45 minutes, and 43 seconds.
Sometimes, however, you may want to take a decimal value that represents latitude and longitude and display it in degrees, minutes, and seconds. For instance, you may want 122.44 (which is a decimal representation of degrees) to be displayed as 122 degrees, 26 minutes, and 24 seconds. This cannot be accomplished with formatting the cell in which the number is contained. Instead, you must use a formula to achieve the proper display. For instance, if 122.44 is in cell A7, then you can put the following in cell B7:
=TEXT(TRUNC(A7), "0" & CHAR(176) & " ") & TEXT(INT((ABS(A7)
- INT(ABS(A7)))*60), "0' ") & TEXT(((((ABS(A7)-INT(ABS(A7)))*60)
- INT((ABS(A7) - INT(ABS(A7)))*60))*60), " 0''")
This is a long formula, but it provides the desired formatting of the latitude or longitude value. The result is text, and cannot be used in any calculations. If you want to use a display instead, you can simply divide the decimal value of the latitude or longitude by 24, which converts it into the same value ranges used by Excel to represent times. Then you can format the display of the formula as follows:
- Select the cell containing the formula.
- Choose Cells from the Format menu. Excel displays the Format Cells dialog box.
- Make sure the Number tab is selected.
- In the categories list, choose Custom.
- Place the insertion point in the Type box and erase whatever is there.
- Type [h] followed by a degree sign (remember; you hold down the Alt key and type 0176 on the numeric keypad).
- Type a space, mm, an apostrophe, another space, ss, and two more apostrophes.
- Click on OK.
ExcelTips is your source for cost-effective Microsoft Excel training.
This tip (3016) applies to Microsoft Excel 97, 2000, 2002, and 2003. You can find a version of this tip for the ribbon interface of Excel (Excel 2007 and later) here: Displaying Latitude and Longitude.
Author Bio
With more than 50 non-fiction books and numerous magazine articles to his credit, Allen Wyatt is an internationally recognized author. He is president of Sharon Parq Associates, a computer and publishing services company. Learn more about Allen…
MORE FROM ALLEN
Removing Filters and Unhiding Rows and Columns on Multiple Worksheets
Need to remove filters and display all rows and columns in all your worksheets? It is not easy to do manually, but with a …
Discover More
Automatically Setting Right Leader Tabs
If you have a constant need to define tabs at the edge of the right margin, you’ll love the macro-based technique …
Discover More
Opening a Text File and Template from the Command Line
Word includes a command-line syntax that you can use to open files and do other operations. If you want to load a text …
Discover More
When analyzing real estate investments in Excel, it’s often necessary to include the latitude and longitude coordinates of the properties we’re modeling. To do this, most of us open up Google Maps, or some other mapping tool, and find the coordinates that way. Others use a latitude/longitude lookup tool such as latlong.net to find what they need.
However, these tools require leaving Excel, manually grabbing the coordinates, and then copying them back into Excel. While not overly time consuming, there is a more effective and accurate way to quickly grab a property’s coordinates without leaving Excel. In this post, I share some VBA code that you can add to your Excel file (together with a Google Geocoding API key) to automate the process of auto-populating latitude and longitude in Excel. Note that we have confirmed as of July 2021 that this function still works.
Note: Is working in VBA too daunting? Consider using our A.CRE Geocoding Excel Add-in to further simplify the process. Are you an Accelerator member? Download the Add-in free instantly.
Leaving Excel to Grab Lat/Long. Coordinates Takes Time and Increases Transcription Errors
Google Geocoding in Excel
Google has developed a service for converting addresses (like “555 Main St., Anywhere USA, CA”) into geographic coordinates (like latitude 36.411022 and longitude -120255489). The service, made possible by the Google Maps Geocoding API, is commonly used online to quickly convert physical addresses to coordinates.
What is less common, but just as easily done, is to use the geocoding API with a custom Excel function or via an Excel Add-In to convert a physical address to latitude and longitude coordinates instantly and without having to leave Excel. In this tutorial, I show you how to use VBA code to create a custom Excel function. If you’d rather use an Excel add-in, checkout our A.CRE Geocoding Excel Add-in.
Note: This function requires you to insert a Google Geocoding API key (which you can get for free – instructions below). The API sets a limit on the number of requests you can make each second (50). When you exceed the limit, you get a message that reads something like: “Requestor has exceeded the server limit.” Google offers the ability to increase the limit via a premium plan. Google also now requires you to have a credit card on file and charges you for API use above a certain threshold. Learn more about Google’s Usage Limits Here.
Manually Add a Google Geocoding Custom Function via VBA
The first option for incorporating Google Geocoding into Excel, is to write a custom function that will take an address and instantly convert it to latitude and/or longitude coordinates using Google’s geocoding service.
Now if you’re unfamiliar with the concept of custom functions in Excel, a custom function acts like any other function in Excel (e.g. SUM, EDATE, VLOOKUP) only that it is specific to the workbook you create it in, and requires you to save the workbook as a macro-enabled file. This may be exactly what you want since, if you share the workbook, other users of the workbook will have access to the custom function.
However, if you’d like this function to be available every time you open up Excel, you might consider installing the A.CRE Geocoding Excel Add-in.
Adding the Google Geocoding custom function only takes a few minutes and the process is quite painless. I learned how to do this after reading a post on the subject, written by Christos Samaras, on his engineering blog (of all places!). I’ve recorded a video (see below) that walks you through the simple process of creating the function using Mr. Samaras’ VBA code. The video also explains how to get and insert your Google Geocoding API key.
To get the VBA Code used in this tutorial: Click Here
Once the custom function is in your model, using the function is simple:
- In the cell of your choosing (e.g. cell B2), write a physical address in this order: STREET ADDRESS, CITY, STATE, ZIP CODE (example: 555 Main St, Anywhere USA, CA, 90229).
- To get the latitude of the address in cell B2, use the formula = GetLatitude(B2)
- To get the longitude of the address in cell B2, use the formula = GetLongitude(B2)
- To get both the latitude and longitude of the address in cell B2, use the formula = GetCoordinates(B2)
Troubleshooting Issues
Here are the most commons issues that arise when manually using the Geocoding custom function:
- Failure to Enable XML v3.0 library. In order to use this function you must enable the XML, v3.0 library from VBA editor. To do this, ‘Go to Tools -> References -> check the Microsoft XML, v3.0.
- You haven’t inserted a proper API Key into the code. As of 2018, the code requires you to insert your own Google Maps Geocoding API key. And as of 2019, it’s necessary to attach billing information to your Google account and link that to your Google project. To get a free API key from Google, use this quick start guide provided by Google.
- Getting a #VALUE, #NAME, or ‘Server denied the request’ errors. There are a handful of reasons for these errors but generally these errors are because either the function wasn’t setup correctly or the Google API key wasn’t setup correctly. My best advice if you’re struggling with one of these error is to:
- Follow the instructions to the T. I know that’s easier said than done, but if you’re not saving the file as a Macro-Enabled file, not turning on Microsoft XML 3.0, entering the API key in the wrong place, inadvertently deleting something from the VBA code, or not entering the address correctly, etc, than you will get an error.
- Make sure you’re running the most recent version of Excel. This code may work with older version of Excel, but I have not tested it on versions earlier than 2016.
- Make sure you have billing details on file with Google in order for your API key to work. While Google gives you a certain number of API requests for free, Google requires users have a credit card on file to avoid abuse of the API.
- Also here’s a quick tip. If you use the GETCOORDINATES() function, the VBA code has a few built-in custom error messages that will help you troubleshoot what you’re doing wrong. For instance, if you haven’t setup your API key correctly, the cell will output: “Invalid API Key”.
Alternative: Use the A.CRE Geocoding Excel Add-in
While writing a custom function is a viable solution for converting addresses to latitude and longitude coordinates, it has two disadvantages. First, it requires going into the VBA editor and manipulating code. That can be an intimidating task for some. The second issue with writing a custom function, is that it only exists in that one Excel workbook, which means if you want the function available beyond that Workbook you’ll need to create a custom Excel Add-in.
Unfortunately, creating a custom Excel add-in is not as simple as writing a custom function. So we’ve gone ahead and created a downloaded custom Excel add-in for this particular task. That add-in is called the A.CRE Geocoding Excel Add-in. You can learn more about the add-in and how to install and use it by clicking here.

A custom Excel add-in to make address to latitude and longitude conversion easy
Nowadays, GPS localization is common. Some apps use decimal format (48.85833) while others return the coordinates in degrees, minutes and seconds (48°51’29.99»).
In this article I will show you how to convert from one format to the other and vice-versa.
Add GPS coordinates to address
If you are looking to add GPS coordinates to your address, please go to this page.

How to write a GPS coordinates in Excel
GPS coordinates are generally written using the symbols ° (degrees), ‘ (minutes), and » (seconds).

But if you keep your coordinate as a string, no calculation is possible. So it will be impossible to convert the GPS coordinates ⛔⛔⛔
What is the best way to write a GPS coordinate?
Use the following format for your GPS coordinates — hours:minutes:seconds. Each part of the coordinate should be delimited with a colon «:«
48:51:29.99
The default cell display could be different depending on the version of Excel that you are using. It can display the GPS coordinates as either a date or a time.

Don’t worry, we will correct this formatting soon 😉😎😃
Insert a negative time
The standard GPS coordinate is:
- positive for East and North
- negative for West and South
Unfortunately, Excel doesn’t accept a negative time, so you need to wrap it in double quotes as though it were text. Then put a minus sign before the opening quote.
=-«74:02:40.29»
But the cell content is displayed as a string of #

Excel doesn’t like negative time. But you can correct this by checking one option in Excel.
- Go to the menu File>Options
- Select Advanced
- At the bottom of the list of options, check the option «Use 1904 date system«

Customize the time format
Now, let’s customize the format of our cell:
- Open the Format cell dialog box (Ctrl + 1)
- Select the option Custom
- In the Type box, enter this format code exactly as it is displayed below
[hh]°mm’ss.00»

The hour between square brackets is compulsory to display a value over 23 hours.
Convert coordinates from Degree, Minute, Second (DMS) to decimal
Because we have written the coordinate as a number, we just have to multiply the cell by 24 (24 hours in a day). The number format is General.

And the the conversion is finished 😍😍😍
=B3*24
Then just change the format of the cell range D3:E7 to General.
Convert coordinates from decimal to Degree, Minute, Second
And the other way round, to convert a decimal value to degrees, minutes and seconds, simply divide the value by 24.
= B3/24
