
Track changes in Word
Note: If a document has been shared with you for review, you may not be able to turn off Track Changes. If you want to edit the document without tracking changes, you’ll need to either save a copy or ask the person who sent it to you to share it again with review mode turned off.

Turn Track Changes on and off
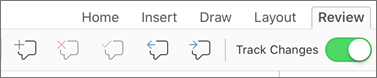
On the Review tab, select Track Changes.
-
When Track Changes is on, the section is highlighted. Deletions are marked with a strikethrough, and additions are marked with an underline. Different authors’ changes are indicated with different colors.
-
When Track Changes is off, the section is not highlighted. Word stops marking changes, but the colored underlines and strikethroughs are still in the document.
Tip: You also can add a Track Changes indicator to the status bar. Right-click the status bar and select Track Changes.
View tracked changes
Note: When a document is in Editing or Reviewing mode, you can select a tracked change to view a collaborator’s full, suggested change in a card that displays. Hover over the Accept or Reject button to see a preview of what that action would do to your final document.
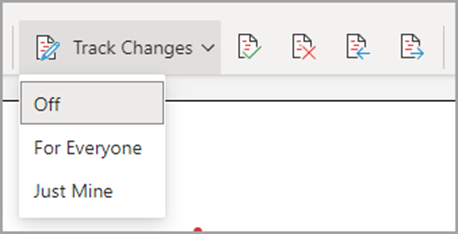
Choose whose changes to track
You can choose to track only your own changes or everyone’s changes.
-
To track only your own changes — On the Review tab, select Track Changes > Just Mine.
-
To track everyone’s changes — On the Review tab, select Track Changes > For Everyone.
Tip: to use a password to keep others from turning off Track Changes — On the Review tab, select Track Changes > Lock Tracking.
Choose how you would like to see the changes in the document
You can choose the type of markup you want to see.
-
On the Review tab, select Tracking.
-
Select All Markup for the drop-down list to display.
-
Select one of the following options.
-
Simple Markup displays tracked changes with a red line in the margin.
-
All Markup displays tracked changes with different colors of text and lines for each reviewer
-
No Markup hides the markup to show the document with changes incorporated
-
Original displays the original document without tracked changes and comments showing. However, any tracked changes or comments in the document that have not been accepted, rejected, or deleted remain in the document.
Choose the way track changes display
You can choose the types of revisions that display and the way they display. If you choose to show revisions as balloons, they display in the margins of the document. If you choose to display them directly within the document in line. In line revisions display all deletions with strikethroughs instead of inside balloons.
-
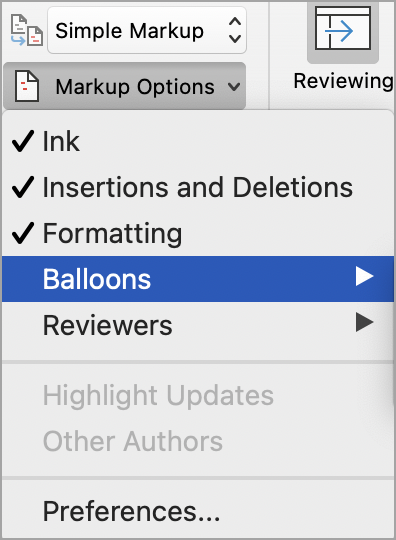
On the Review tab, select Track > Show Markup.
-
Select Balloons and then select the type of display you want.
-
Show Revisions in Balloons
-
Show All Revisions Inline
-
Show Only Formatting in Balloons
Note: If you want to see tracked changes in balloons, you must be in Print Layout view or Web Layout view.
Display changes by type of edit
-
On the Review tab, select Track Changes > Show Markup.
-
Select the type of edit.
-
Insertions and Deletions
-
Formatting
The check mark next to the item indicates that it’s selected.
Note: Even if you hide a type of markup by clearing it on the Show Markup menu, the markup automatically displays each time the document is opened by you or a reviewer.
Display changes by reviewer(s)
-
In Review > Tracking, select Show Markup.
-
Select Specific People.
-
Select to clear all check boxes except the ones next to the names of the reviewers whose changes you want to show.
Note: To select or clear all check boxes for all reviewers in the list, select All Reviewers.
Navigate tracked changes in Changes menu section
You can navigate from one tracked change to another.
-
In Review > Changes, select Next to view the next tracked change.
-
In Review > Changes, select Previous to view the previous tracked change.
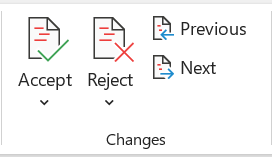
Accept or Reject tracked changes
There are multiple ways to address tracked changes. The most proficient method is to identify the commentor and respond to the tracked change is through the card display when you click the marked change. The card displays the commentor name and the option to accept or reject the suggestion.

Accept or reject tracked changes in sequence using the main menu
You can resolve teach tracked change from the beginning of the document to the end of the document in sequence.
-
Select Review > Changes > Next.
-
Select Accept or Reject. The next sequential tracked change is highlighted for your review and action.
Note: You can also accept or reject individual tracked changes using the main menus’ drop-down menus. This method is often used as a methodical approach to reviewing tracked changes.
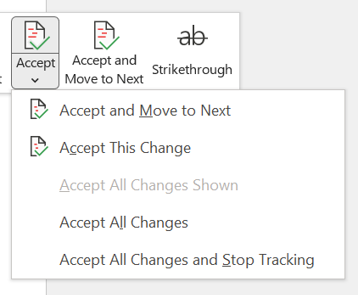
Accept changes using the main menu
-
In Review > Changes, select Accept.
-
Select one of the options.
-
Accept and Move to Next
-
Accept This Change
-
Accept All Changes
-
Accept All Changes and Stop Tracking
Reject changes using the main menu
-
In Review > Changes, select > Reject.
-
Select one of the options.
-
Reject and Move to Next
-
Reject This Change
-
Reject All Changes
-
Reject All Changes and Stop Tracking
Accept or reject changes within a document with a right click
Working within a document, you can right-click on a tracked change to accept or reject the change. Using the right-click method displays a banner menu option and a drop-down menu option.
Accept changes in-line with the right-click banner option
-
Right-click a tracked change in the document to review a single suggestion.
-
On the banner, select one of the following.
-
Accept > Accept and Move to Next
-
Accept > Accept This Change
-
Accept > Accept All Changes
-
Accept > Accept All Changes and Stop Tracking
-
Accept and Move to Next
Accept changes in-line with the right-click drop-down menu option
-
Right-click a tracked change in the document to review a single suggestion.
-
In the drop-down menu, select one of the following.
-
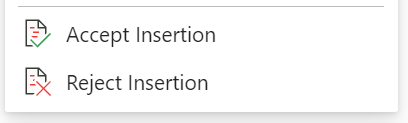
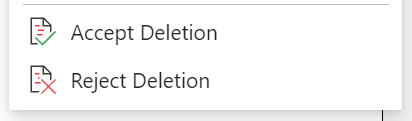
Accept Insertion (or Accept Deletion)
-
Reject Insertion (or Reject Deletion)
Accept or reject all tracked changes at once on the main menu
Accept all tracked changes
-
In Review > Changes, select Accept.
-
Select one of the options.
-
Accept All Changes Shown
-
Accept All Changes
-
Accept All Changes and Stop Tracking
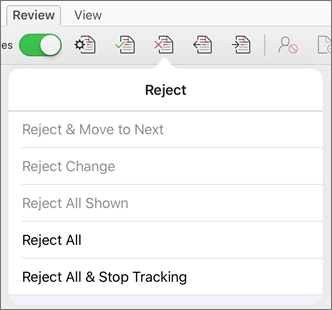
Reject all tracked changes
-
In Review > Changes, select Reject.
-
Select one of the options.
-
Reject All Changes Shown
-
Reject All Changes
-
Reject All Changes and Stop Tracking
Note: When Review>Tracking>Show Markup>Specific People>All Reviewers is selected, the Accept All Changes Shown and Reject All Changes Shown options do not display.
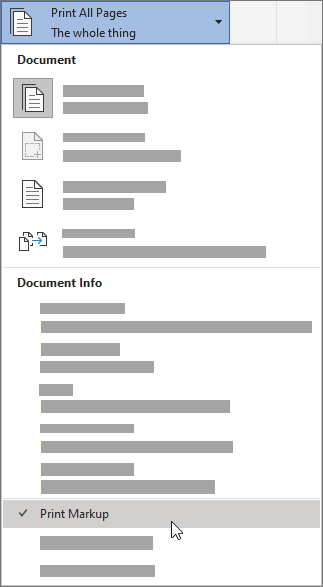
Hide tracked changes and comments when printing
Hiding changes doesn’t remove them from the document. You must use the Accept and Reject commands in the Changes group to remove markup from your document.
-
Go to File > Print > Settings > Print All Pages.
-
Under Document Info, select Print Markup to clear the check mark.

View all your changes in a summary list on the Reviewing Pane
-
In Review > Tracking, select Reviewing Pane.
-
Choose if you want to see the Reviewing Pane next to or below your document.
-
Select Reviewing Pane Vertical to see a list of all changes next to your document.
-
Select Reviewing Pane Horizontal to see a list of all changes below your document.
You can use the Reviewing Pane as a handy tool for to check that all tracked changes have been removed from your document so that they show up to others who might view your document. The summary section at the top of the Reviewing Pane displays the exact number of visible tracked changes and comments that remain in your document.
The Reviewing Pane also allows you to review long comments that don’t fit within a comment bubble.
Note: The Reviewing Pane, unlike the document or the comment balloons, is not the best tool for making changes to your document. Instead of deleting text or comments or making other changes in the Reviewing Pane, make all editorial changes in the document. The changes will then be visible in the Reviewing Pane.
Important: Comments are no longer part of the Track Changes function.
Turn on Track Changes
You can set Word for the Web to track changes for all users who are collaborating on the document or to track only your changes.
-
On the Review tab, select Track Changes.
-
In the Track Changes drop-down list, select one of the following:
-
To track only the changes that you make to the document, select Just Mine.
-
To track changes to the document made by all users, select For Everyone.
-
Turn off Track Changes
-
On the Review tab, select Track Changes.
-
In the Track Changes drop-down list, select Off.
Select the Markup view
-
On the Review tab, select Markup view.
-
Select one of the markup options.
-
Markup in margin (Simple Markup) — See suggestions in the margin
-
Markup on page (All Markup) — See suggestions on the page
Review, accept, or reject changes
Accept or reject tracked changes in sequence
You can review each tracked change in sequence and decide whether to accept or reject the change.
-
Click or tap at the beginning of the document.
-
On the Review tab, select Track Changes.
-
Select Accept or Reject. As you accept or reject changes, Word will move to the next change.
Tip: To move through changes in the document without accepting or rejecting them, select Next or Previous.
-
Repeat until you’ve reviewed all of the changes in your document.
Accept or reject a single change
Rather than move through changes in sequence, you can accept or reject a single change. When you accept or reject the change, Word will not move to the next change in the document.
-
Click the change.
-
Select the option to accept or reject it.
When tracked changes are turned on, Word marks any changes made by any authors of the document. This is useful when you’re collaborating with other authors because you can see which authors made a particular change.
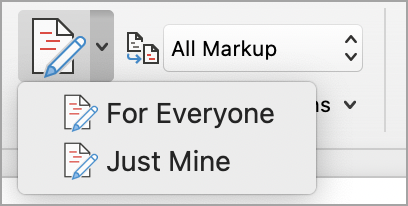
Turn Track Changes on
-
On the Review tab, select Track Changes.
-
Select to track only your own changes or everyone’s change.
-
To track only your own changes — On the Review tab, select Track Changes > Just Mine.
-
To track everyone’s changes — On the Review tab, select Track Changes > For Everyone.
Note: To turn Track Changes off, select Track Changes again.
Accept or reject all tracked changes at once on the main menu
Accept all tracked changes
-
Select Reviewing > Accept.
-
Select one of the options.
-
Accept All Changes Shown
-
Accept All Changes
-
Accept All Changes and Stop Tracking
Reject all tracked changes
-
Select Reviewing > Reject.
-
Select one of the options.
-
Reject All Changes Shown
-
Reject All Changes
-
Reject All Changes and Stop Tracking
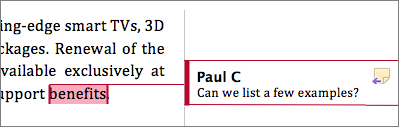
Word shows changes in the document by displaying a line in the margin. If you switch to All Markup view, you’ll see changes inline and in balloons.
Anytime someone adds a comment, it’ll show up in a balloon.
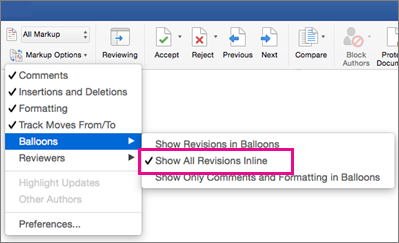
Review changes inline
To see changes inline instead of in balloons, do the following:
-
On the Review Tab, select Markup Options
-
Point to Balloons and select Show All Revisions Inline.
Keep Track Changes on
To prevent others from turning off Track Changes, lock Track Changes on with a password.
Important: Be sure to remember the password so you can turn Track Changes off when you’re ready to accept or reject the changes.
Lock Track Changes with a password
-
On the Review tab, select Protect > Protect Document.
-
In the Password box, enter a password.
-
Re-enter your password and select OK.
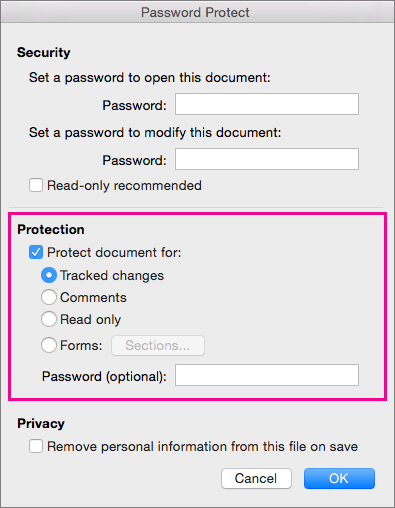
While tracked changes are locked, you can’t turn off change tracking, and you can’t accept or reject changes.
Unlock Track Changes
-
On the Review tab, select Protect > Protect Document.
-
Under Protection, uncheck Protect document for.
-
Enter your password and select OK.
For more info, see
remove the tracked changes and comments.
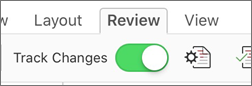
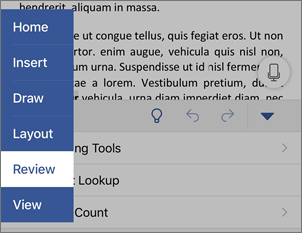
Turn Track Changes on or off (Word for iPad)
-
Tap the Review tab.
-
Tap the control next to Track Changes to turn Track Changes on or off.
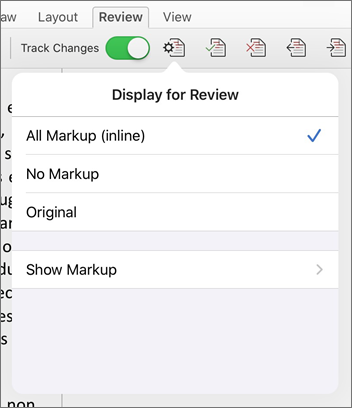
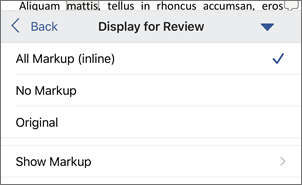
Show or hide markup (Word for iPad)
-
On the Review tab, tap the Display for Review icon.
-
In the Display for Review list, tap the option you want:
-
All Markup (inline) shows the final document with tracked changes visible inline
-
No markup shows the final document without tracked changed
-
Original shows the original document with no tracked changes
-
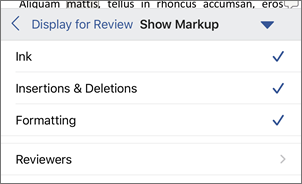
Show tracked changes by type (Word for iPad)
-
On the Review tab, tap the Display for Review icon.
-
In the Display for Review list, tap Show Markup.
-
In the Show Markup list, tap the option you want:
-
Ink shows or hides any marks made by digital inking in the document.
-
Insertions & Deletions shows or hides inserted or deleted text.
-
Formatting shows or hides formatting changes.
-
Show Revisions in Balloons shows changes in balloons in the right margin.
-
Show Only Formatting in Balloons shows only formatting changes in balloons and keeps the other changes as inline tracking.
-
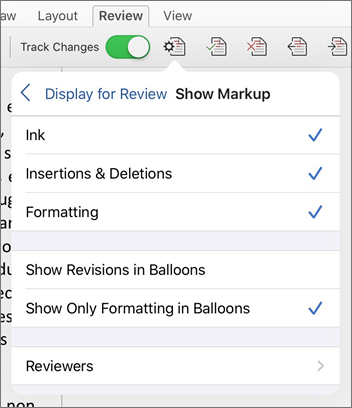
Show tracked changes by reviewer (Word for iPad)
If there are multiple reviewers for the document, Word will show all changes by default. However, you can choose to show only changes made by specific viewers.
-
On the Review tab, tap the Display for Review icon.
-
In the Display for Review list, tap Show Markup.
-
In the Show Markup list, tap Reviewers.
-
In the Other Authors list, tap the names of the reviewers whose changes you want to see or tap All Reviewers.
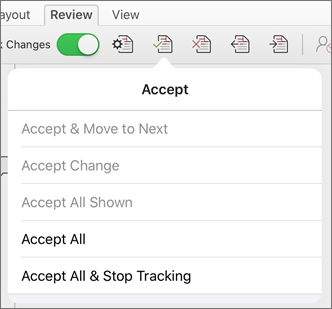
Accept changes (Word for iPad)
-
Tap twice on a change in the document to select it.
-
On the Review tab, tap the Accept icon.
-
Do one of the following:
-
Tap Accept & Move to Next to accept the change and move to the next change in the document.
-
Tap Accept Deletion, Accept Insertion, or Accept Change to accept the selected change, identified contextually by type, and not move to the next change in the document.
-
Tap Accept All Shown to accept all changes that are visible, but not changes that are hidden. For example, if you’re viewing only changes made by a specific reviewer, tapping Accept All Shown accepts only the changes made by that reviewer.
-
Tap Accept All to accept all changes in the document.
-
Tap Accept All & Stop Tracking to accept all changes in the document and turn off Track Changes.
-
-
To move to another change without accepting or rejecting it, tap the Previous or Next icon.
Reject changes (Word for iPad)
-
Tap twice on a change in the document to select it.
-
On the Review tab, tap the Reject icon.
-
Do one of the following:
-
Tap Reject & Move to Next to reject the change and move to the next change in the document.
-
Tap Reject Deletion, Reject Insertion, or Reject Change to reject the selected change, identified contextually by type, and not move to the next change in the document.
-
Tap Reject All Shown to reject all changes that are visible, but not changes that are hidden. For example, if you’re viewing only changes made by a specific reviewer, tapping Reject All Shown rejects only the changes made by that reviewer.
-
Tap Reject All to reject all changes in the document.
-
Tap Rejects All & Stop Tracking to reject all changes in the document and turn off Track Changes.
-
-
To move to another change without accepting or rejecting it, tap the Previous or Next icon.
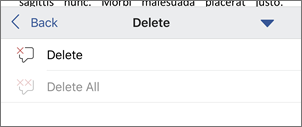
Delete comments (Word for iPad)
-
Tap twice on a comment in the document to select it.
-
Tap the Review tab.
-
Tap the Delete icon to delete the comment or press and hold the Delete icon until the Delete list appears, and then do one of the following:
-
Tap Delete to delete only the selected comment.
-
Tap Delete All to delete all comments in the document.
-
-
To move to another comment without deleting it, tap the Previous or Next icon.
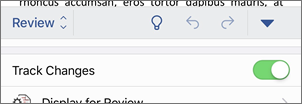
Turn Track Changes on or off (Word for iPhone)
-
Tap the pen icon at the top to open the ribbon.
-
Tap the Review tab.
-
Tap the control next to Track Changes to turn Track Changes on or off.
Show or hide markup (Word for iPhone)
-
On the Review tab, tap Display for Review.
-
Tap the option you want:
-
All Markup (inline) shows the final document with tracked changes visible inline
-
No markup shows the final document without tracked changed
-
Original shows the original document with no tracked changes
-
Show tracked changes by type (Word for iPhone)
-
On the Review tab, tap Display for Review.
-
Tap Show Markup.
-
In the Show Markup list, tap the option you want:
-
Ink shows or hides any marks made by digital inking in the document.
-
Insertions & Deletions shows or hides inserted or deleted text.
-
Formatting shows or hides formatting changes.
-
Show tracked changes by reviewer (Word for iPhone)
If there are multiple reviewers for the document, Word will show all changes by default. However, you can choose to show only changes made by specific viewers.
-
On the Review tab, tap Display for Review.
-
Tap Show Markup.
-
Tap Reviewers.
-
In the Other Authors list, tap the names of the reviewers whose changes you want to see or tap All Reviewers.
Accept changes (Word for iPhone)
-
Tap twice on a change in the document to select it.
-
On the Review tab, tap Accept.
-
Do one of the following:
-
Tap Accept & Move to Next to accept the change and move to the next change in the document.
-
Tap Accept Deletion, Accept Insertion, or Accept Change to accept the selected change, identified contextually by type, and not move to the next change in the document.
-
Tap Accept All Shown to accept all changes that are visible, but not changes that are hidden. For example, if you’re viewing only changes made by a specific reviewer, tapping Accept All Shown accepts only the changes made by that reviewer.
-
Tap Accept All to accept all changes in the document.
-
Tap Accept All & Stop Tracking to accept all changes in the document and turn off Track Changes.
-
Reject changes (Word for iPhone)
-
Tap twice on a change in the document to select it.
-
On the Review tab, tap Reject.
-
Do one of the following:
-
Tap Reject & Move to Next to reject the change and move to the next change in the document.
-
Tap Reject Deletion, Reject Insertion, or Reject Change to reject the selected change, identified contextually by type, and not move to the next change in the document.
-
Tap Reject All Shown to reject all changes that are visible, but not changes that are hidden. For example, if you’re viewing only changes made by a specific reviewer, tapping Reject All Shown rejects only the changes made by that reviewer.
-
Tap Reject All to reject all changes in the document.
-
Tap Reject All & Stop Tracking to reject all changes in the document and turn off Track Changes.
-

Delete comments (Word for iPhone)
-
Tap twice on a comment in the document to select it.
-
One the Review tab, tap Delete, and then do one of the following:
-
Tap Delete to delete only the selected comment.
-
Tap Delete All to delete all comments in the document.
-
-
To move to another comment without deleting it, tap the Previous or Next icon
Need more help?
На основании Вашего запроса эти примеры могут содержать грубую лексику.
На основании Вашего запроса эти примеры могут содержать разговорную лексику.
последнее обновление
обновлено в
This privacy statement was last updated on 17th February 2015.
This page was last updated on — 01.
This trackmail.co.uk review report was last updated on 12-02-2020.
This page was last updated on: 24.
This page was last updated on 5/14/08.
These recommendations were last updated on December 4, 2009, and will be updated periodically as new information becomes available.
Данные рекомендации в последний раз обновлялись 4 декабря 2009 года и будут периодически обновляться по мере поступления новой информации.
These conditions were last updated on [14th March 2001].
This statement was last updated on 02 June 2015.
The list was last updated on 3 June 2002.
This version was last updated on 21st May 2018 and historic versions are archived and can be obtained by contacting us.
Эта версия была последней обновленной 12 Сентябрь 2018 и исторические версии архивируются здесь можно получить, связавшись с нами.
List of known Equities, and the date they were last updated on.
The Panel notes that the travel ban and assets freeze lists were last updated on 16 December 2009.
Группа отмечает, что перечни, касающиеся запрета на поездки и замораживания активов, в последний раз обновлялись 16 декабря 2009 года.
Cookie Policy last updated on 15 August 2014.
Настоящая Политика использования файлов cookie была обновлена 15 октября 2014 года.
The 1844 Sanctions list was last updated on 8 March 2018, and supersedes all previous versions.
This page was last updated on November 4, 2009.
The list was last updated on 31 December 2013.
This privacy policy is subject to change without notice and was last updated on 31 May, 2015.
Эта политика конфиденциальности могут быть изменены без предварительного уведомления и был последний обновленный 31 September 2015.
The site was last updated on June 262018, and it currently has 1 registered member(s).
Последний раз сайт обновлялся 19 июн 2012, на данный момент на нем зарегистрировано 1 участника(-ов).
This policy was last updated on June 26, 2012.
This document was last updated on Sept 28, 2014
Результатов: 103. Точных совпадений: 103. Затраченное время: 361 мс
Documents
Корпоративные решения
Спряжение
Синонимы
Корректор
Справка и о нас
Индекс слова: 1-300, 301-600, 601-900
Индекс выражения: 1-400, 401-800, 801-1200
Индекс фразы: 1-400, 401-800, 801-1200
-
#1
Is «last update on Jan 15» correct anyway?

-
#2
Please give us the complete sentence in which you would use this phrase, gainni21, and explain the situation in which you would say it.
-
#3
Please give us the complete sentence in which you would use this phrase, gainni21, and explain the situation in which you would say it.
I’d use it by referring to a document which needs to be updated periodically, setting this note on its front page.
-
#4
If you use it as you have written, it is not a complete sentence. So either will work to convey the meaning “it was last updated on XYZ” or “the last update was performed on XYZ”
-
#5
If you use it as you have written, it is not a complete sentence. So either will work to convey the meaning “it was last updated on XYZ” or “the last update was performed on XYZ”
While is «Last updated on Jan 15» widely accepted?
-
#6
While is «Last updated on Jan 15» widely accepted?
I have seen both quite often, especially on web pages. What is your concern?
So either will work to convey the meaning
-
#7
I have seen both quite often, especially on web pages. What is your concern?
No concerns, thanks for your hint
In this post, we will pay attention to show you 3 quick ways to insert the created or last modified date into your Word document.
Every time we create a document, it contains a lot of information, such as the created date and last modified date. These details keep us a good track of how we have been editing on the document. So today, we will show you methods to enable you to insert the created or last modified date into document.
Note:
Before all, once you finishing drafting document, save it first. So you can have the most updated version. Then you can insert relevant dates into document with following instructions.
Method 1: Insert Date Manually
In Word, you can see the created and last modified dates if you switch to the background. However, you can’t copy that information directly. Instead you shall follow these steps.
- Firstly, in Word, click “File” tab.
- Next click “Info” option and on the rightest column, click “Properties”.
- Then on drop-down menu, select “Advanced Properties”.

- And in the window open, click “General” tab.
- Now you can copy and paste relevant information into document.


Method 2: Insert Field
- First off, place insertion pointer properly and click “Insert” tab.
- Then click “Quick Parts” and choose “Field”.

- In “Field” box, choose “Date and Time” for category.
- Next, to insert created date, select “CreateDate” field name. And to insert last modified date, select “SaveDate” instead.
- Then choose a date format if necessary.
- Lastly, click “OK”. You will have the date inserted in the selection.


Method 3: Run VBA Codes to Insert both Created and Last Modified Date
- First and foremost, place cursor at the position where dates go.
- Then press “Alt+ F11” to open VBA editor.
- In “Project” panel, click “Normal”.
- Next click “Insert” tab.
- Choose “Module”.

- Double click to open the module.
- Paste following codes there:

Function GetDocDates(strDocPath) As String
  Dim objFileSystem As Object
  Dim objFile As Object
  Dim strDates As String

  Set objFileSystem = CreateObject("Scripting.FileSystemObject")
  Set objFile = objFileSystem.GetFile(strDocPath)

  strDates = "Created Date: " & objFile.DateCreated & vbNewLine & _
             "Last Modified Date: " & objFile.DateLastModified
  GetDocDates = strDates

  Set objFile = Nothing
  Set objFileSystem = Nothing
End Function

' Call Function GetDocDates
Sub InsertDocDates()
  ' Insert dates at selection point.
  Selection.InsertAfter GetDocDates(ActiveDocument.FullName)
End Sub
- Put cursor inside “InsertDocDates” macro and click “Run” button to run it.


You will get dates inserted into document like this:
Deal with Data Loss Issue
Data loss has become quite a topic today. All kinds of information now goes digital. This means we have to be fully prepared for data disaster in advance. And Word document corruption is a problem we can easily run into. Thus, we suggest you getting a Word repair tool in hand.
Author Introduction:
Vera Chen is a data recovery expert in DataNumen, Inc., which is the world leader in data recovery technologies, including repair xls and pdf repair software products. For more information visit www.datanumen.com
 If you ever need to edit a document of any sort including a contract or agreement and want your changes and comments to standout, the Track Changes feature in Word 2010 has no equal… Really. It’s that good. If you’re an attorney or contract specialist, you probably already know this from previous versions of Word but if not, pay close attention and let me introduce you to the Track Changes feature of Word 2010 found on the Review Tab of the Ribbon.
Step 1 – Starting Content
To start out, you need some initial content. This can be something that you’ve written or perhaps you’re a teacher so grab one of your students papers you need to edit. Track changes will look at ALL changes done to a document so you can be as creative as you like with your content.

Step 2 – Enable Track Changes
Select the Review tab and then Click Track Changes.

Step 3 – Edit
Start your engines! Now you can edit the document as much as you like and the edits will be shown with a colored markup. These edits aren’t considered permanent at this point, but they will be saved with the document until they are “Accepted” or “Rejected.”

Step 4 – Comments & Additional Editing Tools
Adding comments is an easy way to communicate points that need clarification or just a general comment. Comments will appear on the side of the document but won’t appear in the final draft. To Add a comment, Select a portion of the document and then Click New Comment.* A box will appear on the right-side that you can type in to convey a particular message to concerning the editing.
*Note that format changes such as adding bold, italic, underline, etc… will result in an automatically created Comment labeled Formatted. 
You can also add Balloons, which are system generated comments that will display editing actions taken on each part of the document. Showing revisions in balloons is my is actually my preferred method for editing and reviewing documents. These balloons will change depending upon whether you are viewing the “Final: Show Markup” or the “Original: Show Markup”. To do this Click Show Markup > Balloons > Show Revisions in Balloons.

Step 5 – Edit As A Different Author
The color that markups will appear will depend on which author (editor) number you are of the document. The first editor will have red markup, the second will have blue, and so on. The identity of the editor is determined by the User Name associated with the Office 2010 install. You can change this if you Click Track Changes > Change User Name…

If you edit a document and then change your own user name, Word will consider you an entirely different author and you can then edit the document using multiple colored markups. If you do this you need to remember the exact user name you used for each color because using anything different will just create a new author (and color).

Step 6 – Accept Or Reject Changes
With the document fully edited you are ready to start accepting or rejecting changes. There are two different places to do this; the Review ribbon Accept button, or the Right-Click context menu option.
Additionally, from the ribbon you can skip ahead and Accept All Changes in Document to completely to instantly change the document according to all of the markup.

Step 7 – Compare Or Combine Documents
You can use the Compare tool to view documents side-by-side and see what differences there are between them. This will work with ANY two documents, but it is only really useful for documents that are similar or have been modified. Below I loaded both the original version and the finished revised version for comparison.

The comparison window is huge, but it will display every difference and will automatically open the Reviewing Pane to help you track changes easier.

Conclusion
The Review ribbon in Office 2010 is a useful tool for collaboration, writing and editing. In Word 2010, the Track Changes tool is especially useful and a must have for anyone who needs to edit a document and track changes / revisions. Its change tracking is concise, easy to see, understand and apply.
![]()