
Tutorial last revisioned on August 11, 2022 with Laravel 9
Default Laravel Export
Let’s create a dummy project with Users table and default Laravel Auth. Then we create 10 random users. Actually, Laravel comes with pre-built Factory class for User model, so all we need to do is to create a UsersTableSeeder.php
class UsersTableSeeder extends Seeder
{
    public function run()
    {
        User::factory(10)->create();
    }
}
Then, we require Laravel Excel package:
composer require maatwebsite/excel
Now, we export all users to Excel. To do that, we create a separate class app/Exports/UsersExport.php:
namespace AppExports;

use AppModelsUser;
use MaatwebsiteExcelConcernsFromCollection;
use MaatwebsiteExcelConcernsWithHeadings;

class UsersExport implements FromCollection, WithHeadings
{
    public function collection()
    {
        return User::all();
    }

    public function headings(): array
    {
        return [
            '#',
            'Name',
            'Email',
            'Created at',
            'Updated at'
        ];
    }

}
Finally, let’s use it from Controller:
namespace AppHttpControllers;

use AppExportsUsersExport;
use MaatwebsiteExcelFacadesExcel;

class ExportController extends Controller
{

    function export()
    {
        return Excel::download(new UsersExport, 'users.xlsx');
    }

}
Here’s the visual result:
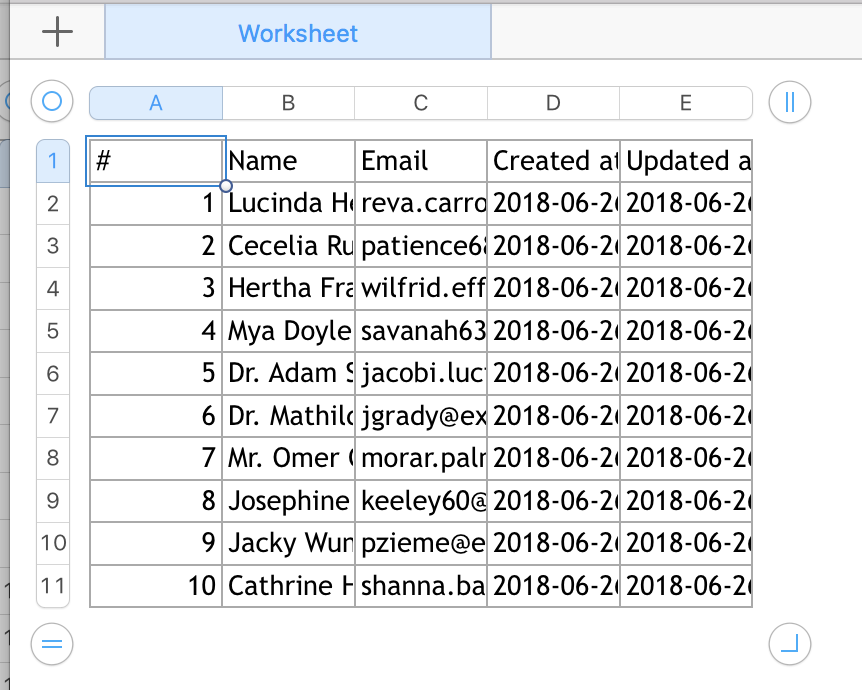
It does the job, exports the data. But does it look good and readable? Far from it. So let’s tweak it a little.
Step 1. Auto-formatting column widths
Somewhere deep in the official documentation I’ve found a really easy way to adjust the column sizes automatically. All you need is to implement one interface ShouldAutoSize:
// ...
use MaatwebsiteExcelConcernsShouldAutoSize;

class UsersExport implements FromCollection, WithHeadings, ShouldAutoSize
{
// ...
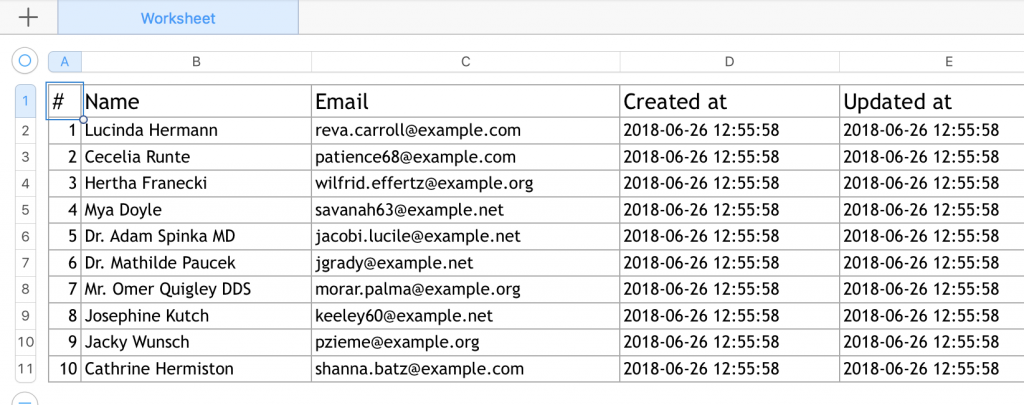
And here’s the new Excel:

Better, huh? Let’s move on.
Step 2. Formatting the fonts and sizes
You can adjust any cell styles using method called registerEvents() and AfterSheet event:
// ...
use MaatwebsiteExcelConcernsWithEvents;
use MaatwebsiteExcelEventsAfterSheet;

class UsersExport implements FromCollection, WithHeadings, ShouldAutoSize, WithEvents
{

    // ...

    /**
     * @return array
     */
    public function registerEvents(): array
    {
        return [
            AfterSheet::class    => function(AfterSheet $event) {
                $cellRange = 'A1:W1'; // All headers
                $event->sheet->getDelegate()->getStyle($cellRange)->getFont()->setSize(14);
            },
        ];
    }

}
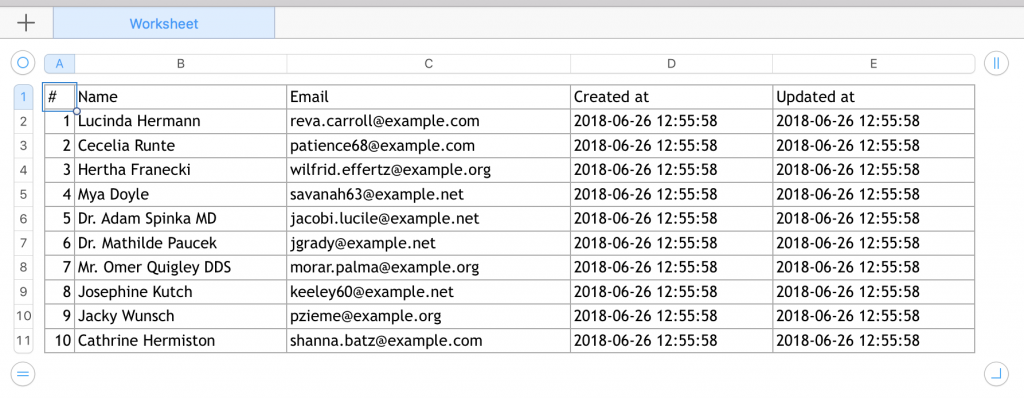
Here’s how the header row looks now:
The main logic here is this line:
$event->sheet->getDelegate()->getStyle($cellRange)->getFont()->setSize(14);
It just takes whatever cell range we pass, and changes the styles.
Here’s where we need to dig deeper and look at the package which is the base of Laravel Excel. It’s actually based on PHPSpreadsheet package. So let’s take a look at its documentation, and specifically section Recipes.
Some examples from there:
Wrap text:
$spreadsheet->getActiveSheet()->getStyle('A1:D4')
    ->getAlignment()->setWrapText(true);
Default style of a worksheet:
$spreadsheet->getDefaultStyle()->getFont()->setName('Arial');
$spreadsheet->getDefaultStyle()->getFont()->setSize(8);
Styling borders and applying styles from array:
$styleArray = [
    'borders' => [
        'outline' => [
            'borderStyle' => PhpOfficePhpSpreadsheetStyleBorder::BORDER_THICK,
            'color' => ['argb' => 'FFFF0000'],
        ],
    ],
];

$worksheet->getStyle('B2:G8')->applyFromArray($styleArray);
You can find more examples in that recipes section, just apply it to your individual needs.
That’s it, that’s how you format exported excel with Laravel and PHP.
Related articles:
- Laravel-Excel 3.0: Export Custom Array into Excel
- How to import CSV in Laravel and Choose Matching Fields
How set style for each cells or particular cell in Laravel excel export ??
my code is like this
Excel::create('Output', function($excel) use ($records) {
  $excel->sheet('Records', function($sheet) use ($records) {
    $i = 0;
    foreach ($records as $key => $record) {
       $sheet->row($i, $record);
       $sheet->row($i, function ($row) {
         $row->setFontWeight('bold');
         $row->setBackground('#FF5300');
       });
       $i++;
    }
  });
})->export('xls');
By this i can set style for rows. But i want to set style for each cell.
asked Dec 9, 2016 at 5:26
![]()
need to set style for each cell
   Excel::create('Output', function($excel) use ($records) {
      $excel->sheet('Records', function($sheet) use ($records) {
        $i = 1;
        foreach ($records as $record) {
            $j = 'A';
            foreach($record as $value) {
                $sheet->cell($j.$i, function($cell) use ($value) {
                    $cell->setValue($value);
                    $cell->setBackground('#FF5300');
                });
                $j++;
            }
            $i++;
        }
      });
    })->export('xls');
answered Dec 9, 2016 at 11:33
![]()
0
Please try this work for me
$sheet->cell('A1', function($cell)
{

  $cells->setFontWeight('bold');

});
![]()
answered Dec 9, 2016 at 5:46
![]()
You can do styling in the export file
use MaatwebsiteExcelConcernsWithEvents;
use MaatwebsiteExcelEventsAfterSheet;
public function registerEvents(): array
    {
        return [
                AfterSheet::class    => function(AfterSheet $event) {
                    $cellRange = 'A1:W1';
                    $sheet = $event->sheet;
                    $sheetDelegate = $sheet->getDelegate();
                    $sheet->getStyle('B9')->getFont()->getColor()->setARGB('767171');
                    $sheet->getStyle('B10')->getFont()->setBold(true);

                  }
            },
        ];
    }
answered Sep 25, 2020 at 17:58
![]()
Styling sheets
General styling
If you want to change the general styling of your sheet (not cell or range specific), you can use the ->setStyle() method or any of the other setters which can be found inside the export documentation.
// Font family
$sheet->setFontFamily('Comic Sans MS');

// Set font with ->setStyle()`
$sheet->setStyle(array(
    'font' => array(
        'name'      =>  'Calibri',
        'size'      =>  12,
        'bold'      =>  true
    )
));
Styling with PHPExcel methods
It’s possible to style the sheets and specific cells with help of PHPExcel methods. This package includes a lot of shortcuts (see export documentation), but also always the use of the native methods.
// Set background color for a specific cell
$sheet->getStyle('A1')->applyFromArray(array(
    'fill' => array(
        'type'  => PHPExcel_Style_Fill::FILL_SOLID,
        'color' => array('rgb' => 'FF0000')
    )
));
Using HTML tags
Most of the HTML tags are supported.
<html>

    <!-- Headings -->
    <td><h1>Big title</h1></td>

    <!--  Bold -->
    <td><b>Bold cell</b></td>
    <td><strong>Bold cell</strong></td>

    <!-- Italic -->
    <td><i>Italic cell</i></td>

    <!-- Images -->
    <td><img src="img.jpg" /></td>

</html>
Inside the
view.phpconfig you can change how these tags will be interpreted by Excel by default.
Using HTML attributes
Some of the basic styling can be done with HTML attributes.
<html>

    <!-- Horizontal alignment -->
    <td align="right">Big title</td>

    <!--  Vertical alignment -->
    <td valign="middle">Bold cell</td>

    <!-- Rowspan -->
    <td rowspan="3">Bold cell</td>

    <!-- Colspan -->
    <td colspan="6">Italic cell</td>

    <!-- Width -->
    <td width="100">Cell with width of 100</td>

    <!-- Height -->
    <td height="100">Cell with height of 100</td>

</html>
Styling through inline-styles
It’s possible to use inline styles inside your view files. Most of the general styles are supported.
<html>

    <!-- Cell with black background -->
    <td style="background-color: #000000;">Cell</td>

</html>
Inside the reference guide you can find a list of supported styles.
Styling through external CSS file
Styling can be done through an external CSS file.
External css file:
#cell {
    background-color: #000000;
    color: #ffffff;
}

.cell {
    background-color: #000000;
    color: #ffffff;
}

tr td {
    background-color: #ffffff;
}

tr > td {
    border-bottom: 1px solid #000000;
}
Table:
<html>
    {{ HTML::style('css/table.css') }}

    <!-- Cell styled with class -->
    <td class="cell">Cell</td>

    <!-- Cell styled with ID -->
    <td id="cell">Cell</td>
</html>
Inside the reference guide you can find a list of supported styles.
It’s advised to include
<meta http-equiv="Content-Type" content="text/html; charset=utf-8" />into the view to fix problems with UTF-8 encoding.
Содержание
- # Customizing columns
- # Formatting columns
- # Dates
- # Value binders
- # Available DataTypes
- # Disable intelligent formatting
- # Default Value Binder
- # Auto size
- # Column widths
- # Styling
- # Default styles
- # Workbook background color
- Name already in use
- laravel-excel-docs / 3.1 / exports / column-formatting.md
- Name already in use
- laravel-excel-docs / 2.1 / blade / styling.md
- Big title
- # Columns
- # What are columns?
- # Defining columns
- # Column definition
- # Using different data sources
- # Column Types
- # Custom type
- # Custom number format
- Laravel Excel Export: Formatting and Styling Cells
- Default Laravel Export
- Step 1. Auto-formatting column widths
- Step 2. Formatting the fonts and sizes
# Customizing columns
# Formatting columns
You can easily format an entire column, by using WithColumnFormatting . In case you want something more custom, it’s suggested to use the AfterSheet event to directly interact with the underlying Worksheet class.
# Dates
When working with dates, it’s recommended to use PhpOfficePhpSpreadsheetSharedDate::dateTimeToExcel() in your mapping to ensure correct parsing of dates.
# Value binders
By default Laravel Excel uses PhpSpreadsheet’s default value binder to intelligently format a cell’s value when reading it. You may override this behavior by implementing the WithCustomValueBinder concern and the bindValue method. Your export class may also extend DefaultValueBinder to return the default behavior.
# Available DataTypes
- PhpOfficePhpSpreadsheetCellDataType::TYPE_STRING
- PhpOfficePhpSpreadsheetCellDataType::TYPE_FORMULA
- PhpOfficePhpSpreadsheetCellDataType::TYPE_NUMERIC
- PhpOfficePhpSpreadsheetCellDataType::TYPE_BOOL
- PhpOfficePhpSpreadsheetCellDataType::TYPE_NULL
- PhpOfficePhpSpreadsheetCellDataType::TYPE_INLINE
- PhpOfficePhpSpreadsheetCellDataType::TYPE_ERROR
# Disable intelligent formatting
If you want to disable the intelligent formatting of values, you can extend your export class with PhpOfficePhpSpreadsheetCellStringValueBinder . In this case all values are passed on as strings.
# Default Value Binder
If you want to use one value binder for all your exports, you can configure the default value binder in the config.
# Auto size
If you want Laravel Excel to perform an automatic width calculation, use the following code.
# Column widths
In some cases you might want more control over the actual column width instead of relying on autosizing. You can do so with the WithColumnWidths concerns. It accepts an array of columns (alphabetic representation: A, B, C) and a numeric width.
Can be used together with ShouldAutoSize . Only the columns with explicit widths won’t be autosized.
# Styling
The WithStyles (available after v3.1.21 ) concerns allows styling columns, cells and rows. This might be useful when you want to make the heading row bold.
For the contents of the styles array, please refer to the PhpSpreadsheet docs
If you prefer the fluent syntax for styling cells, you can do it as follows:
# Default styles
The WithDefaultStyles (available after v3.1.40 ) concerns allows styling the entire workbook.
# Workbook background color
The WithBackgroundColor (available after v3.1.40 ) concerns adds support to configure the background color of the entire workbook
Источник
Name already in use
laravel-excel-docs / 3.1 / exports / column-formatting.md
- Go to file T
- Go to line L
- Copy path
- Copy permalink
Copy raw contents
Copy raw contents
You can easily format an entire column, by using WithColumnFormatting . In case you want something more custom, it’s suggested to use the AfterSheet event to directly interact with the underlying Worksheet class.
When working with dates, it’s recommended to use PhpOfficePhpSpreadsheetSharedDate::dateTimeToExcel() in your mapping to ensure correct parsing of dates.
By default Laravel Excel uses PhpSpreadsheet’s default value binder to intelligently format a cell’s value when reading it. You may override this behavior by implementing the WithCustomValueBinder concern and the bindValue method. Your export class may also extend DefaultValueBinder to return the default behavior.
- PhpOfficePhpSpreadsheetCellDataType::TYPE_STRING
- PhpOfficePhpSpreadsheetCellDataType::TYPE_FORMULA
- PhpOfficePhpSpreadsheetCellDataType::TYPE_NUMERIC
- PhpOfficePhpSpreadsheetCellDataType::TYPE_BOOL
- PhpOfficePhpSpreadsheetCellDataType::TYPE_NULL
- PhpOfficePhpSpreadsheetCellDataType::TYPE_INLINE
- PhpOfficePhpSpreadsheetCellDataType::TYPE_ERROR
Disable intelligent formatting
If you want to disable the intelligent formatting of values, you can extend your export class with PhpOfficePhpSpreadsheetCellStringValueBinder . In this case all values are passed on as strings.
Default Value Binder
If you want to use one value binder for all your exports, you can configure the default value binder in the config.
If you want Laravel Excel to perform an automatic width calculation, use the following code.
In some cases you might want more control over the actual column width instead of relying on autosizing. You can do so with the WithColumnWidths concerns. It accepts an array of columns (alphabetic representation: A, B, C) and a numeric width.
Can be used together with ShouldAutoSize . Only the columns with explicit widths won’t be autosized.
The WithStyles (available after v3.1.21 ) concerns allows styling columns, cells and rows. This might be useful when you want to make the heading row bold.
For the contents of the styles array, please refer to the PhpSpreadsheet docs
If you prefer the fluent syntax for styling cells, you can do it as follows:
The WithDefaultStyles (available after v3.1.40 ) concerns allows styling the entire workbook.
Workbook background color
The WithBackgroundColor (available after v3.1.40 ) concerns adds support to configure the background color of the entire workbook
Источник
Name already in use
laravel-excel-docs / 2.1 / blade / styling.md
- Go to file T
- Go to line L
- Copy path
- Copy permalink
Copy raw contents
Copy raw contents
If you want to change the general styling of your sheet (not cell or range specific), you can use the ->setStyle() method or any of the other setters which can be found inside the export documentation.
Styling with PHPExcel methods
It’s possible to style the sheets and specific cells with help of PHPExcel methods. This package includes a lot of shortcuts (see export documentation), but also always the use of the native methods.
Using HTML tags
Most of the HTML tags are supported.
Big title
Bold cell Bold cell Italic cell 
«>
Inside the view.php config you can change how these tags will be interpreted by Excel by default.
Using HTML attributes
Some of the basic styling can be done with HTML attributes.
Big title Bold cell Bold cell Italic cell Cell with width of 100 Cell with height of 100
«>
Styling through inline-styles
It’s possible to use inline styles inside your view files. Most of the general styles are supported.
Inside the reference guide you can find a list of supported styles.
Styling through external CSS file
Styling can be done through an external CSS file.
External css file:
Inside the reference guide you can find a list of supported styles.
It’s advised to include into the view to fix problems with UTF-8 encoding.
Источник
# Columns
In the previous chapter, we defined the source of data. Laravel Excel tries to export this data as good as possible. By using Columns you’ll get more fine-grained control on how the data will be presented.
1 What is a column?
A column is a vertical series of cells in a spreadsheet. In the Export they will be defined by with Column class, like Text::make(‘Name’)
2 Defining columns
Columns can be configured using the WithColumns concern within the export class. An array of Column instances are expected.
3 Data types
Per column a data type can be configured. This is very useful when dealing with data likes numbers, dates and prices.
# What are columns?
A column in a spreadsheet is a vertical series of cells in a spreadsheet. In the example underneath A and B are columns.
| A | B | |
|---|---|---|
| 1 | A1 | B1 |
| 2 | A2 | B2 |
Each of these columns will be represented by an instance of Column .
Purposes of a Column within Laravel Excel are:
1 Defining which data should be inserted in which column
A column can pick any attribute of a model.
2 Setting data types and Excel number formatting
Indicate columns are text, number, prices, dates, etc.
2 Customizing column presentation
Changing styling, width, etc. (See next chapter)
# Defining columns
To start using columns, you’ll have to add the WithColumns concern to the export class.
This concern will enforce a columns() method which should return an array of Column instance. When not passing any array keys, the columns will be inserted from left to right in A, B, etc.
The above example will give the following spreadsheet output:
| Name | Date of Birth |
|---|---|
| Spock | 06-01-2230 |
| Captain Kirk | 22-03-2233 |
If you want more control in which columns the data should end, you can configure the column letter as array key. Column coordinates without a column definition will be left empty.
# Column definition
A column consist of a required title which will be used as column header. The second parameter refers to the name of the attribute of the model.
If no attribute is passed, the title will be converted to a snake case attribute.
When working with relationships (e.g. HasOne and BelongsTo), you can use a dot notation as attribute:
A callback can also be passed as second argument. The closure will get the row or Model. Whatever is returned within the closure, will be inserted in the cell.
By using a specific data type, that data type will automatically configure the right internal data type and number formatting for Excel.
# Using different data sources
The above examples all expect the input source to be an Eloquent model. However, the data source is not only limited to Eloquent. You can use any other data source (except a View) in combination with columns.
The attribute expects the array key of the row. When using a callback as attribute, you’ll get an array of the entire row.
# Column Types
# Custom type
By using the type() setter, you can set any PhpSpreadsheet DataType to the specific column cells.
# Custom number format
By using the format() setter, you can set any PhpSpreadsheet NumberFormat to the specific column cells.
Источник
Laravel Excel Export: Formatting and Styling Cells

Laravel-Excel package is great for exporting data. But not a lot of info there about formatting Excel cells – widths, word wraps, fonts etc. So when I encountered this in a client’s project, I decided to write this article with a few tips on this topic.
Default Laravel Export
Let’s create a dummy project with Users table and default Laravel Auth. Then we create 10 random users. Actually, Laravel comes with pre-built Factory class for User model, so all we need to do is to create a UsersTableSeeder.php
Then, we require Laravel Excel package:
Now, we export all users to Excel. To do that, we create a separate class app/Exports/UsersExport.php:
Finally, let’s use it from Controller:
Here’s the visual result:
It does the job, exports the data. But does it look good and readable? Far from it. So let’s tweak it a little.
Step 1. Auto-formatting column widths
Somewhere deep in the official documentation I’ve found a really easy way to adjust the column sizes automatically. All you need is to use one Trait ShouldAutoSize:
And here’s the new Excel:
Better, huh? Let’s move on.
Step 2. Formatting the fonts and sizes
You can adjust any cell styles using method called registerEvents() and AfterSheet event:
Here’s how the header row looks now:

The main logic here is this line:
It just takes whatever cell range we pass, and changes the styles.
Here’s where we need to dig deeper and look at the package which is the base of Laravel Excel. It’s actually based on PHPSpreadsheet package. So let’s take a look at its documentation, and specifically section Recipes.
Some examples from there:
Default style of a worksheet:
Styling borders and applying styles from array:
You can find more examples in that recipes section, just apply it to your individual needs.
That’s it, that’s how you format exported excel with Laravel and PHP.
Источник
February 18, 2023
Category : Laravel
Here, i will show you laravel maatwebsite excel set background color. if you have question about laravel excel sheet set background color then i will give simple example with solution. This article goes in detailed on how to set background color in excel cell heading laravel php. step by step explain phpexcel set background color laravel. Let’s get started with laravel maatwebsite background color.
We will use WithEvents and AfterSheet for set background color of column in laravel maatwesite composer package. you can use this example with laravel 6, laravel 7, laravel 8, laravel 9 and laravel 10 version.
You can follow bellow url for checking full example of Import and Export Excel File with laravel. Here i will give you solution with export class:
Laravel Import Export Excel and CSV File Tutorial
Solution:
app/Exports/UsersExport.php
<?php
namespace AppExports;
use AppModelsUser;
use MaatwebsiteExcelConcernsFromCollection;
use MaatwebsiteExcelConcernsWithHeadings;
use MaatwebsiteExcelConcernsWithEvents;
use MaatwebsiteExcelEventsAfterSheet;
class UsersExport implements FromCollection, WithHeadings, WithEvents
{
/**
* Write code on Method
*
* @return response()
*/
public function collection()
{
return User::select("id", "name", "email")->get();
}
/**
* Write code on Method
*
* @return response()
*/
public function headings() :array
{
return [
'ID',
'Name',
'Email',
];
}
/**
* Write code on Method
*
* @return response()
*/
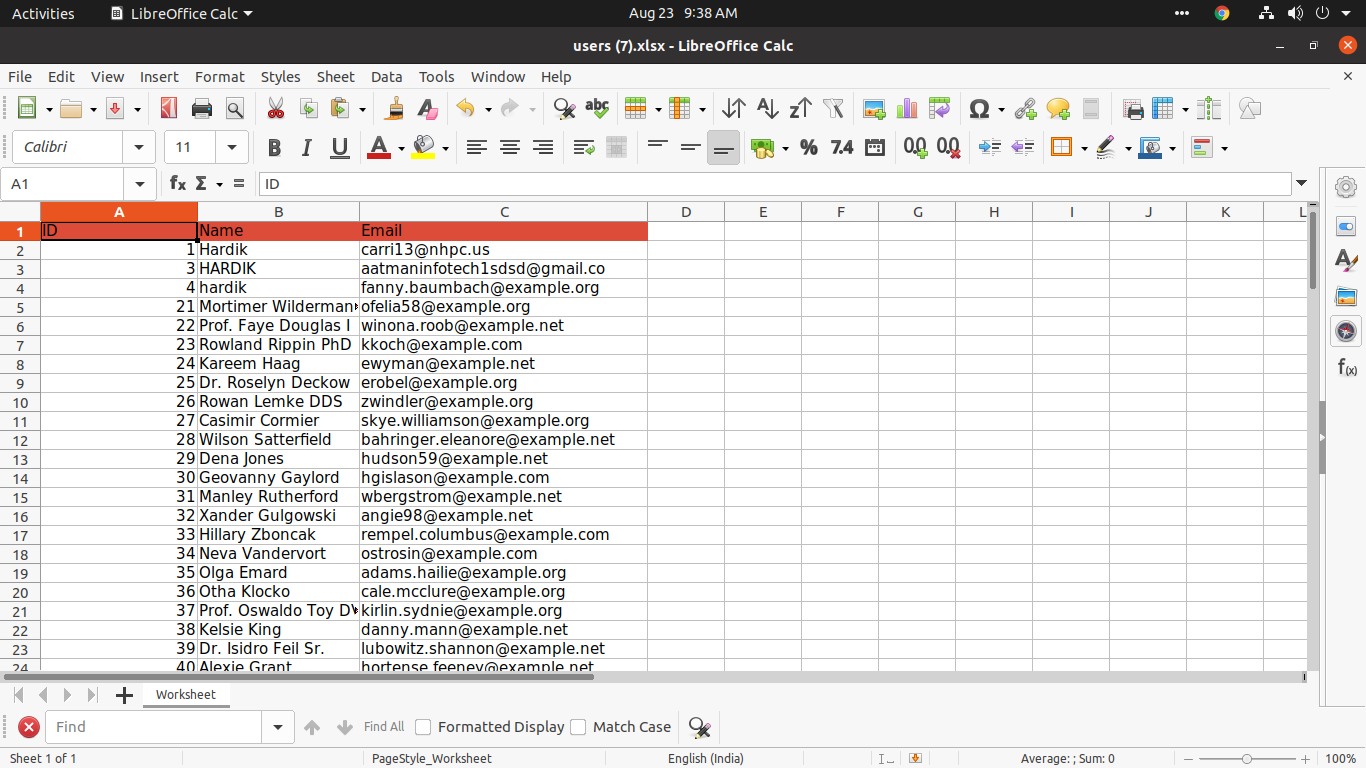
public function registerEvents(): array
{
return [
AfterSheet::class => function(AfterSheet $event) {
$event->sheet->getDelegate()->getStyle('A1:C1')
->getFill()
->setFillType(PhpOfficePhpSpreadsheetStyleFill::FILL_SOLID)
->getStartColor()
->setARGB('DD4B39');
},
];
}
}
Output:
I hope it can help you…

Hardik Savani
I’m a full-stack developer, entrepreneur and owner of Aatman Infotech. I
live in India and I love to
write tutorials and tips that can help to other artisan. I am a big fan of PHP, Laravel, Angular, Vue, Node, Javascript, JQuery,
Codeigniter and Bootstrap from the early stage. I believe in Hardworking and Consistency.
Follow Me:
We are Recommending you
- How to Validate Excel Sheet Data in Laravel?
- Laravel 8 Stripe Payment Gateway Integration Example
- Laravel 8 Get Current Logged in User Data Example
- Laravel 8 Inertia JS CRUD with Jetstream & Tailwind CSS
- Laravel 8 Yajra Datatables Example Tutorial
- Laravel 8 Import Export Excel and CSV File Tutorial
- Laravel 8 Authentication using Jetstream Example
- Laravel Yajra Datatables Export to Excel CSV Button Example
- How to add header row in export excel file with maatwebsite in Laravel 5.8?
- PHP — import excel file into mysql database tutorial
- Laravel Export to PDF using Maatwebsite Example

Popular Posts
- Laravel 9 Model Observers Example Tutorial
- Laravel Blade Foreach Loop Example
- Laravel Carbon Subtract Year Example
- Laravel 6 Multiple Image Upload Tutorial
- Laravel 9 Custom Email Verification Tutorial
- Laravel Collection isEmpty() and isNotEmpty() Method Example
- Laravel — Class «Input» not found — Solved
- How to Override Auth Login Method in Laravel 8?
- Laravel Select with Count Query with Group by Example
- Laravel 8 Create Custom Helper Functions Tutorial
- Laravel 6 Form class not found — Solution
Categories
- Laravel
- Angular
- PHP
- jQuery
- Python
- Bootstrap
- Javascript
- MySql
- Ubuntu
- Ajax
- Node JS
- HTML
- Codeigniter
- Guest Post
- Vue.JS
- React JS
- Git
- Server
- Installation
- JSON
- CSS
- .htaccess
- Google Map
- SQL
- JQuery UI
- Google API
- Typeahead JS
- Axios
- Socket.io
- Highcharts
Latest Posts
- Laravel 10 Custom Validation Rule Example
- Laravel 10 CKeditor Image Upload Example
- Laravel 10 Livewire Wizard Multi Step Form Tutorial
- Laravel 10 Restrict User Access From IP Address Example
- Laravel 10 Custom Validation Error Message Example
Как установить стиль для каждой ячейки или конкретной ячейки в Laravel excel export??
мой код похож на этот
Excel::create('Output', function($excel) use ($records) {
  $excel->sheet('Records', function($sheet) use ($records) {
    $i = 0;
    foreach ($records as $key => $record) {
       $sheet->row($i, $record);
       $sheet->row($i, function ($row) {
         $row->setFontWeight('bold');
         $row->setBackground('#FF5300');
       });
       $i++;
    }
  });
})->export('xls');
Этим я могу установить стиль для строк. Но я хочу установить стиль для каждой ячейки.
09 дек. 2016, в 06:34
Поделиться
Источник
2 ответа
необходимо установить стиль для каждой ячейки
   Excel::create('Output', function($excel) use ($records) {
      $excel->sheet('Records', function($sheet) use ($records) {
        $i = 1;
        foreach ($records as $record) {
            $j = 'A';
            foreach($record as $value) {
                $sheet->cell($j.$i, function($cell) use ($value) {
                    $cell->setValue($value);
                    $cell->setBackground('#FF5300');
                });
                $j++;
            }
            $i++;
        }
      });
    })->export('xls');
Bizzon
09 дек. 2016, в 08:42
Поделиться
Пожалуйста, попробуйте эту работу для меня
$sheet->cell('A1', function($cell)
{

  $cells->setFontWeight('bold');

});
Brajesh Kanungo
09 дек. 2016, в 03:40
Поделиться
Ещё вопросы
- 0Как применить Location.url (), который я изменил
- 1Сборка трассировки для Android
- 0Плагин полосы прокрутки работает в jsfiddle, но не работает в реальном приложении
- 0Sphinx searchhd windows error
- 0Active Direcory «когдаСоздано» в MySQL datetime
- 1Параметры для использования логического
- 1Версия прошивки модема: Android
- 1Android L — Снимайте флеш-изображение с автофокусом, используя Camera2 api
- 0Как игнорировать файл конфигурации, пока база данных не будет создана
- 1Лучший способ уведомить пользовательский интерфейс, что происходит в другом потоке в wpf?
- 0JavaScript Regex возвращает ноль
- 0Как использовать STL max из include <алгоритма> для определенного пользователем типа данных
- 0Как добавить класс с анимацией css3?
- 1анализ журнала разговоров в WhatsApp
- 0не могу заставить CORS работать в Chrome и Firefox
- 0Как воспроизвести аудио файл на веб-странице HTML
- 1Некоторое время музыка не останавливает андроид
- 0Чтение и отображение данных из варианта VT_ARRAY | VT_BSTR?
- 0Поймать URL и перенаправить в другое место
- 1Javascript Object имеет свойство с двумя значениями
- 1iText делает весь рулон в цвете стола
- 0получить индекс div с тем же именем класса в angularjs
- 0Когда я устанавливаю сайт phpfox, он показывает мне надоедливую ошибку кодирования языка
- 1Uncaught ReferenceError: Невозможно обработать привязку «text: function () {return username}»
- 0CSS фоновое изображение не отображается при размещении
- 1JavaScript: возвращение свойства объекта
- 1Могу ли я встроить статический вызов метода в запрос EF
- 0как игнорировать, где условие результатов и выбрать оставшиеся результаты в SQL Server
- 1CodePrimitiveExpression и логические значения
- 1Почему, когда я загружаю gridview в PDF-файл, он показывает ошибку
- 1Сбой скрипта Python при работе на веб-сервере
- 0Symfony 2.3 handleRequest ($ request) не устанавливает сущность
- 1Обработка изображений в реальном времени в Android с использованием NDK
- 1Я хочу завершить все приложение, когда пользователь нажимает кнопку назад в Android
- 0Почему это создание таблицы не работает в MySQL
- 0Не удается заставить работать производный класс WebDuino — скомпилируйте ошибки с помощью Web_HelloWorld.ino
- 1Windows зависает во время (или после) выполнения кода Java, генерирующего много изображений
- 1Как заставить каждую кнопку реагировать только на эту строку
- 0возьмите класс элемента и поместите его в другой элемент в качестве атрибута
- 1Использование данных из асинхронных функций
- 0Как заказать строки DATETIME с [] в MySQL
- 0Как обрабатывать подмассивы в каждой подпрограмме OpenMP
- 1Приложение Java, установите тайм-аут соединения на 0
- 1что именно происходит в getView
- 1Сбой происходит при запуске приложения в ICE CREAM SANDWICH
- 1Как проверить версию pymodbus для декодирования значения float_32?
- 0Форма ввода, показывающая позади изображения
- 1График не отображается должным образом
- 1Как отключить все видео Youtube в контейнере
- 0Как вывести курсор из поля ввода?

install
Execute the following command to import the package
composer require maatwebsite/excel
Maatnesite excel excelserviceprovider is automatically discovered and registered by default.
Please enter config / APP PHP add the following code at the following location
'providers' => [
    MaatwebsiteExcelExcelServiceProvider::class,
]
In config / APP PHP add facade code as follows
'aliases' => [
    'Excel' => MaatwebsiteExcelFacadesExcel::class,
]
Execute the following command
php artisan vendor:publish --provider="MaatwebsiteExcelExcelServiceProvider"
This will create a new configuration file named config / excel php.
Use (I take export order as an example)

1. Create a route
2. Access and obtain data (I am in the form of array)
3. Customize an export order class

4. Get the order list data and call the export class
<?php
/**
 * admin service file Created by PhpStorm.
 * Date: 2020/09/27
 */

namespace ModulesAdminService;

use CommonRepositoryMallOrderRepository;
use AppExportsOrderExport;
use MaatwebsiteExcelFacadesExcel;

class MallOrderService
{
    /**
     * Export order
     * @param array $get_data
     * @return SymfonyComponentHttpFoundationBinaryFileResponse
     */
    public function getAll($get_data = [])
    {
        $arr_option = self::option($get_data);
        $arr_option['with'] = ['order_goods', 'get_address', 'order_logistics'];
        $result = MallOrderRepository::getAll($arr_option);

        $orderList = [];
        foreach ($result as &$item) {
            $item['order_status'] = MallOrderRepository::orderStatus($item['status']);
            $orderList[$item['order_status']][] = $item;
        }

        return Excel::download(new OrderExport($orderList), 'Order list' . date('Y:m:d').'.xls');
    }
}
OrderExport export export order class code
<?php

namespace AppExports;

use MaatwebsiteExcelConcernsFromCollection;
use MaatwebsiteExcelConcernsExportable;
use MaatwebsiteExcelConcernsWithTitle; //sheet name
use MaatwebsiteExcelConcernsWithMultipleSheets;//sheet
use MaatwebsiteExcelConcernsWithStyles;//modelling
use MaatwebsiteExcelConcernsWithColumnWidths; //Column width
use PhpOfficePhpSpreadsheetWorksheetWorksheet;
use PhpOfficePhpSpreadsheetStyleNumberFormat;
use MaatwebsiteExcelConcernsWithColumnFormatting;

class OrderExport implements FromCollection, WithMultipleSheets, WithTitle, WithColumnWidths, WithStyles, WithColumnFormatting
{
    use Exportable;

    private $data;//Order data
    private $status; //sheet name (order status)
    private $column; //Total number of rows
    private $goodsNum = []; //Quantity of goods in an order

    public function __construct($data, $status = '')
    {
        $this->data = $data;
        $this->status = $status;
    }

    public function collection()
    {
        $data = $this->data;

        //Header
        $header = [
            'order_no'        => 'Order No',
            'consignee'       => 'consignee',
            'user_phone'      => 'contact information',
            'address'         => 'Receiving address',
            'goods_name'      => 'Commodity name [Specification]',
            'goods_num'       => 'quantity',
            'specs_price'     => 'Price',
            'order_amount'    => 'Order amount',
            'freight_amount'  => 'freight',
            'discount_amount' => 'Preferential amount',
            'pay_amount'      => 'Payment amount',
            'pay_type'        => 'Payment method',
            'pay_time'        => 'Payment time',
            'created_at'      => 'Order time ',
            'express_name'    => 'Courier Services Company',
            'express_no'      => 'courier number',
            'delivery_time'   => 'Delivery time',
            'receiving_time'  => 'Receiving time',
            'remark'          => 'Buyer message',
            'seller_notes'    => 'Buyer remarks'
        ];

        $list = [];
        foreach ($data as $key => $value) {
            $list[0] = $header;
            $this->goodsNum[] = count($value['order_goods']);
            foreach ($value['order_goods'] as $k => $item) {
                $list[] = [
                    'order_no'        => $value['order_no'],
                    'consignee'       => $value['get_address']['name'],
                    'user_phone'      => $value['get_address']['phone'],
                    'address'         => $value['get_address']['get_city']['mername'] . $value['get_address']['address'],
                    'goods_name'      => $item['goods_name'] . ' [' . $item['specs_title'] . ']',
                    'goods_num'       => $item['goods_num'],
                    'specs_price'     => $item['specs_price'],
                    'order_amount'    => $value['order_amount'],
                    'freight_amount'  => $value['freight_amount'],
                    'discount_amount' => $value['discount_amount'],
                    'pay_amount'      => $value['pay_amount'],
                    'pay_type'        => $value['pay_type'] == 1 ? 'WeChat' : 'Alipay',
                    'pay_time'        => $value['pay_time'],
                    'created_at'      => $value['created_at'],
                    'express_name'    => $value['order_logistics']['get_express']['name'],
                    'express_no'      => $value['order_logistics']['express_no'],
                    'delivery_time'   => $value['order_logistics']['created_at'],
                    'receiving_time'  => $value['order_logistics']['receiving_time'],
                    'remark'          => $value['remark'],
                    'seller_notes'    => $value['seller_notes']
                ];
            }
        }

        $this->column = count($list);

        return collect($list);
    }

    /**
     * Create sheet
     * @return array
     */
    public function sheets(): array
    {
        $list = $this->data;
        $sheets = [];
        foreach ($list as $key => $value) {
            $sheets[] = new OrderExport($list[$key], $key);
        }

        return $sheets;
    }

    /**
     * sheet name
     * @return string
     */
    public function title(): string
    {
        return $this->status;
    }

    /**
     * Set column width
     * @return array
     */
    public function columnWidths(): array
    {
        return [
            'A' => 16, 'B' => 13, 'C' => 13, 'D' => 20, 'E' => 50, 'F' => 8, 'G' => 10, 'H' => 13,
            'I' => 8, 'J' => 12, 'K' => 12, 'L' => 12, 'M' => 20, 'N' => 20, 'O' => 15, 'P' => 20,
            'Q' => 20, 'R' => 20, 'S' => 30, 'T' => 30, 'U' => 20, 'V' => 20, 'W' => 20, 'X' => 20,
        ];
    }

    /**
     * Format column
     * @return array
     */
    public function columnFormats(): array
    {
        $format = NumberFormat::FORMAT_NUMBER_00;//The amount shall be kept to two decimal places
        return ['G' => $format, 'H' => $format, 'I' => $format, 'J' => $format, 'K' => $format];
    }

    /**
     * Style settings
     * @param Worksheet $sheet
     * @throws PhpOfficePhpSpreadsheetException
     */
    public function styles(Worksheet $sheet)
    {
        $sheet->getDefaultRowDimension()->setRowHeight(22);//Set row height
        $sheet->getStyle('A1:Z' . $this->column)->getAlignment()->setVertical('center');//Vertical center
        $sheet->getStyle('F1:K' . $this->column)->applyFromArray(['alignment' => ['horizontal' => 'center']]);//Set horizontal center
        $sheet->getStyle('A1:Z1')->applyFromArray(['font' => ['bold' => true, 'color' => ['rgb' => '0072ff']]]);//Font settings
        $cell = ['A', 'B', 'C', 'D', 'H', 'I', 'J', 'K', 'L', 'M', 'N', 'O', 'P', 'Q', 'R', 'S', 'T'];//Cells to be merged
        //$sheet->mergeCells('A18:A22'); // merge cell
        foreach ($cell as $item) {
            $start = 2;
            foreach ($this->goodsNum as $key => $value) {
                $end = $start + $value - 1;
                $sheet->mergeCells($item . $start . ':' . $item . $end); //merge cell
                $start = $end + 1;
            }
        }
    }
}
Look at the export results

Official website of Laravel Excel:
https://docs.laravel-excel.com/3.1/getting-started/installation.html
PHP spreadsheet document:
https://phpspreadsheet.readthedocs.io/en/latest/topics/recipes/#mergeunmerge-cells