Excel for Microsoft 365 Word for Microsoft 365 PowerPoint for Microsoft 365 OneNote for Microsoft 365 Publisher for Microsoft 365 Visio Plan 2 Excel for Microsoft 365 for Mac Word for Microsoft 365 for Mac PowerPoint for Microsoft 365 for Mac Word for the web Excel 2021 Word 2021 PowerPoint 2021 Publisher 2021 Visio Professional 2021 Visio Standard 2021 OneNote 2021 Excel 2021 for Mac Word 2021 for Mac PowerPoint 2021 for Mac Excel 2019 Word 2019 PowerPoint 2019 Publisher 2019 Visio Professional 2019 Visio Standard 2019 Excel 2019 for Mac Word 2019 for Mac PowerPoint 2019 for Mac Excel 2016 Word 2016 Outlook 2016 PowerPoint 2016 OneNote 2016 Publisher 2016 Visio Professional 2016 Visio Standard 2016 Excel 2013 Word 2013 Outlook 2013 PowerPoint 2013 OneNote 2013 Publisher 2013 Visio Professional 2013 Visio 2013 Outlook.com Excel 2010 Word 2010 Outlook 2010 PowerPoint 2010 OneNote 2010 Publisher 2010 Visio 2010 Visio Standard 2010 New Outlook for Windows More…Less
The Translate feature is currently available for Word, Excel, OneNote, Outlook, and PowerPoint.
Note: The procedures for Outlook for the web are the same as the procedures for the new Outlook for Windows. Select the Web tab above for those instructions.
Translate an email in Outlook
In Outlook, you can translate words, phrases, and full messages when you need them. You can also set Outlook to automatically translate messages you receive in other languages.
When you receive an email in another language, you’ll see a prompt at the top of the message asking if you’d like Outlook to translate it into your preferred language.
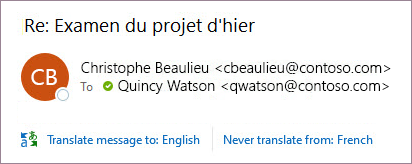
When you receive an email in another language, you can respond in two different ways:
-
In the message, select Translate message. Outlook replaces the message text with translated text.
After you’ve translated the message, you can select Show original to see the message in the original language or Turn on automatic translation to always translate messages to your preferred language.
-
In the message, select Never translate. Outlook won’t ask you if you’d like to translate messages in the future.
If, for some reason, Outlook doesn’t offer these options, select the Translate button from the ribbon, or right-click on the message and select Translate, then Translate Message.
-
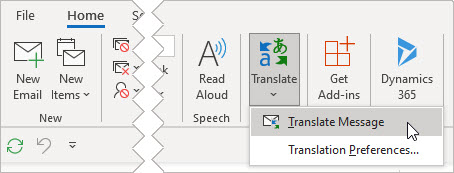
On the Home tab, select Translate > Translate Message.
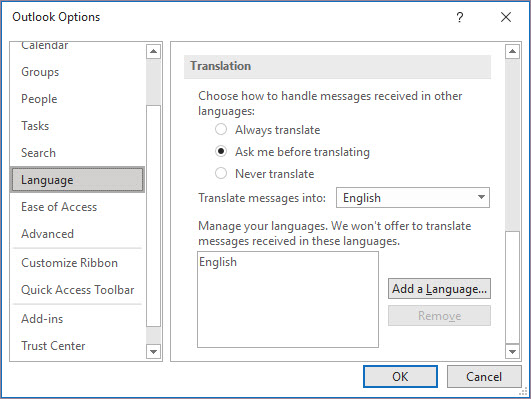
To change your translation preferences, go to Home > Translate > Translation Preferences.
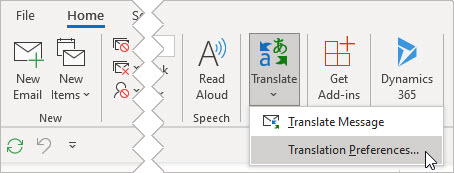
Here you can set your preferred language.
Translate part of an email
To translate just a bit of text from a message, select that text and right-click. Outlook will show you the translation right there in the context menu that appears.
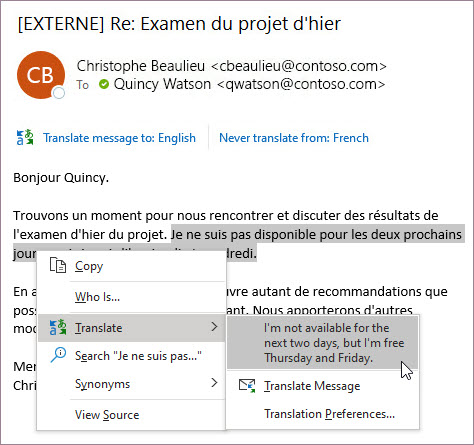
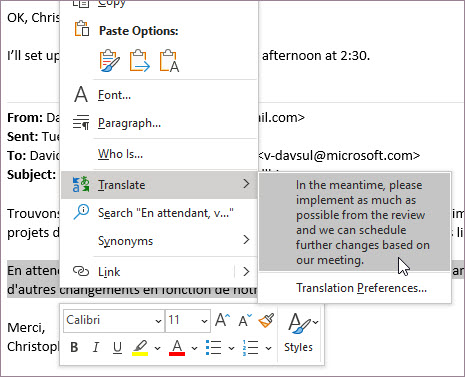
You can also select text and right-click to translate to your preferred language when you’re composing an email. When you click the translated text, you can insert it into the message you’re writing.
To learn more see Announcing new translation features in Outlook.
Note: Automatic translation and intelligent translation suggestions are only available for Exchange Online mailboxes.
Word for Microsoft 365 makes it easy
In Word for Microsoft 365 when you open a document in a language other than a language you have installed in Word, Word will intelligently offer to translate the document for you. Click the Translate button and a new, machine-translated, copy of the document will be created for you.

Translate words or phrases in Word, Excel, or PowerPoint
-
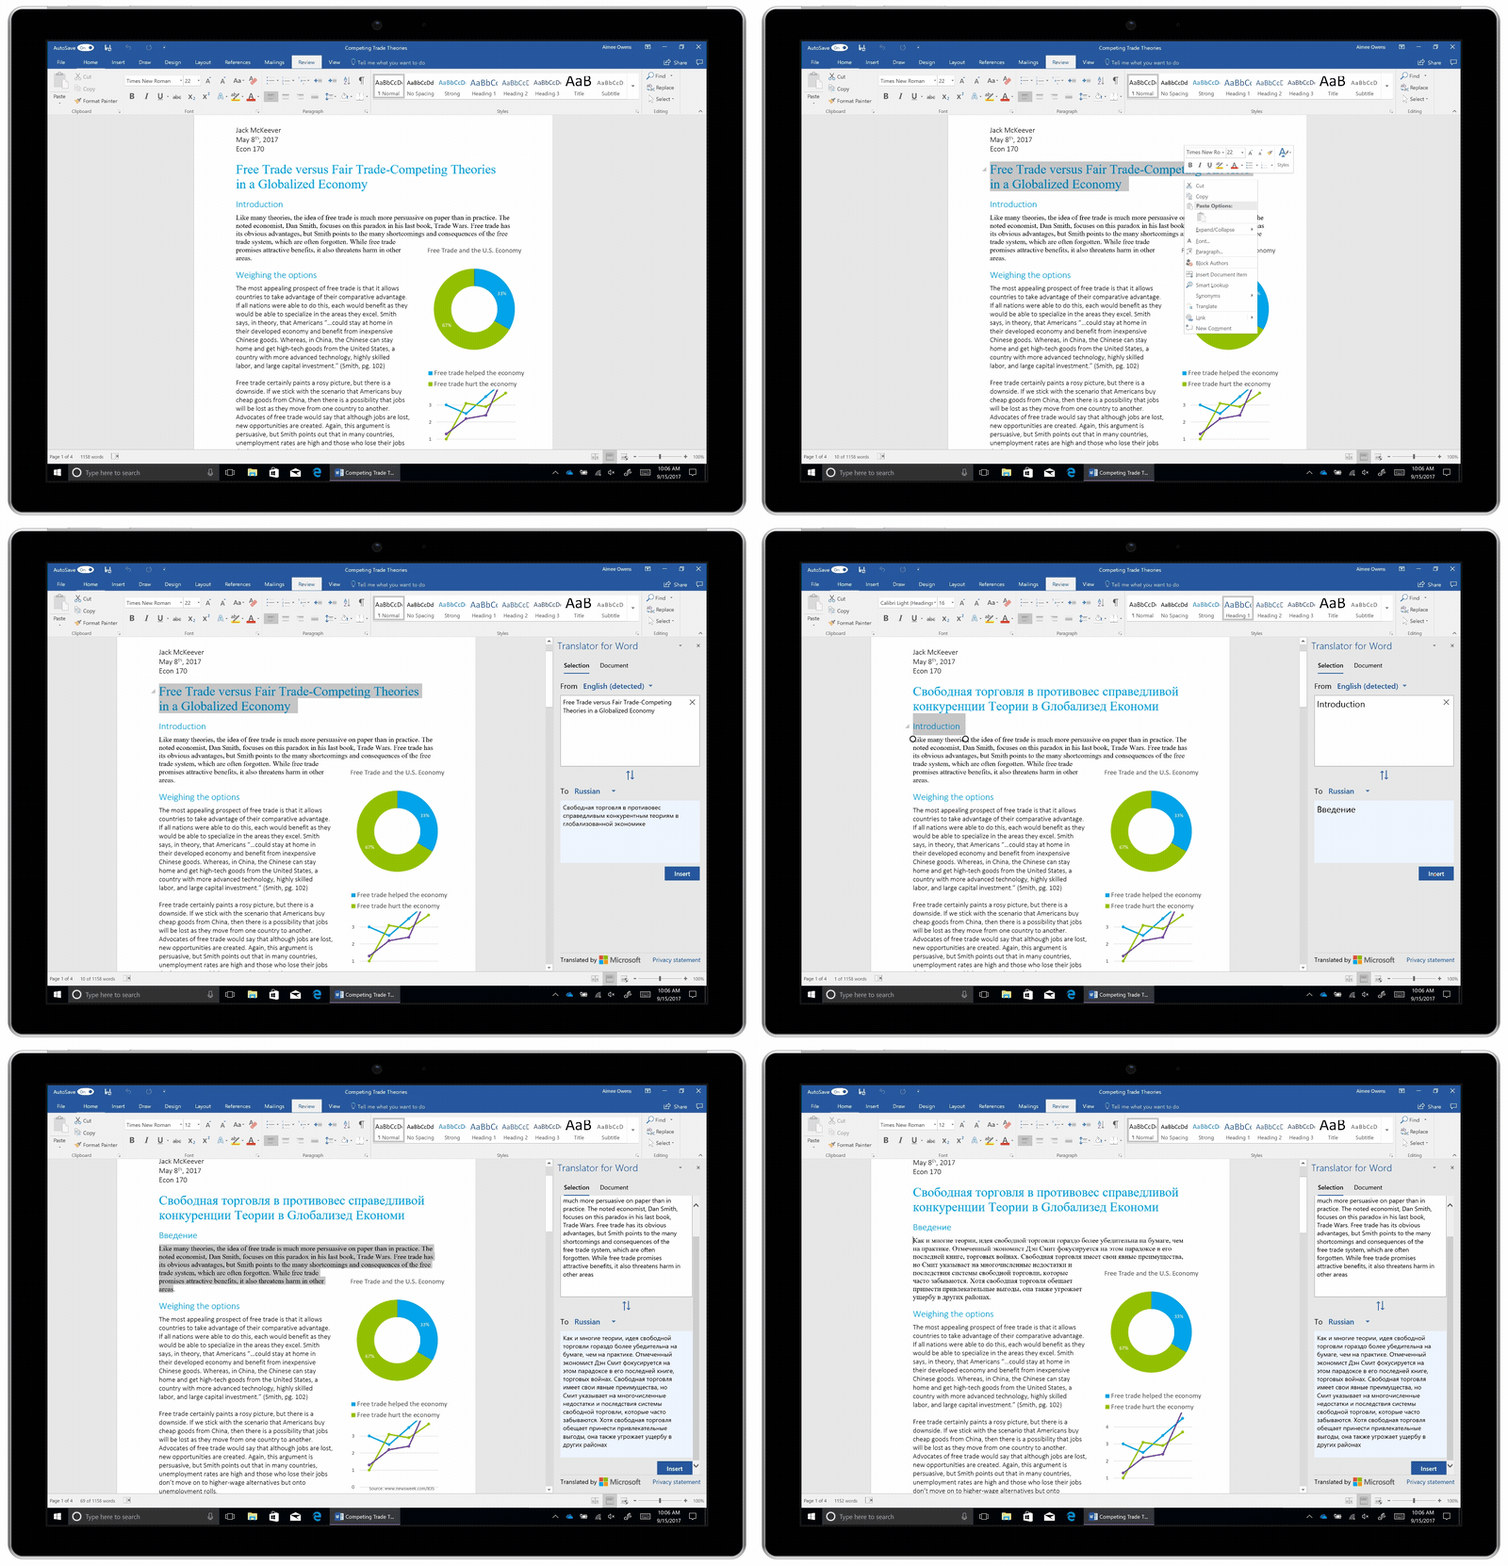
In your document, spreadsheet or presentation, highlight the cell or text you want to translate.
-
Select Review > Translate.
-
Select your language to see the translation.
-
Select Insert. The translated text will replace the text you highlighted in step 1.
Note: In Excel, there is no Insert button, you’ll have to copy/paste the text you highlighted in step1.
You might see a list of several translations. Expand the translated item to show a usage example in both languages. Choose the one you want and click Copy.
Available in: 

This feature is available to Microsoft 365 subscribers and Office 2019 customers using Version 1710 or higher of Word; or Version 1803 or higher of PowerPoint or Excel. You must also be connected to the internet, and have Office connected experiences enabled to use Translator.
Subscribers get new features and improvements monthly.
Buy or try Microsoft 365
Not sure what version of Office you’re running? See What version of Office am I using?
This feature is not currently available to customers using Microsoft 365 operated by 21Vianet.
Translate a whole file in Word
-
Select Review > Translate > Translate Document.
-
Select your language to see the translation.
-
Select Translate. A copy of the translated document will be opened in a separate window.
-
Select OK in the original window to close translator.
Available in:
This feature is available to Microsoft 365 subscribers and Office 2019 customers using Version 1710 or higher of Word. You must also be connected to the internet, and have Office connected experiences enabled to use Translator.
Users with Office 2016, but without a subscription, will have the same translation features that are available in Office 2013 and earlier.
Subscribers get new features and improvements monthly.
Not sure what version of Office you’re running? See What version of Office am I using?

Translate words or phrases in OneNote for Windows 10
-
In your notes highlight the text you want to translate.
-
Select View > Translate > Selection.
-
Select your language to see the translation.
-
Select Insert. The translated text will replace the text you highlighted in step 1.
Translate a whole page in OneNote for Windows 10
-
Select View > Translate > Page.
-
Select your language to see the translation.
-
Select Translate. The translated page will be added as a sub-page of the existing page.
-
Select OK in the original window to close translator.
If you later want to change the To language for document translation, or if you need to translate a document to more than one language, you can do so, by selecting Set Document Translation Language…from the Translate menu.

See also
-
Admin considerations for modern translator feature in Office
-
Languages supported by Microsoft Translator
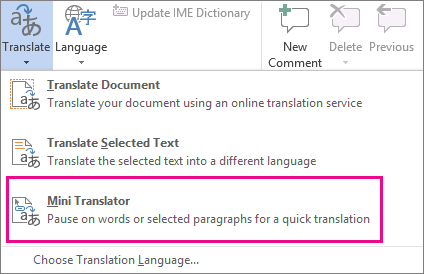
The translation tools available depend on which Office program you’re using:
-
Translate Document/Translate Item: Word, Outlook.
-
Translate Selected Text: Word, Outlook, OneNote, PowerPoint, Publisher, Excel, Visio.
-
Mini Translator: Word, Outlook, PowerPoint, OneNote
You can have an entire Word document or Outlook message translated by a computer («machine translation») and displayed in a web browser. When you choose this kind of translation, the content in your file is sent over the Internet to a service provider.
Note: Machine translation is helpful for conveying the basic subject matter of the content and for confirming whether the content is relevant to you. For high accuracy or sensitive files, human translation is recommended, because machine translation might not preserve the full meaning and tone of the text.
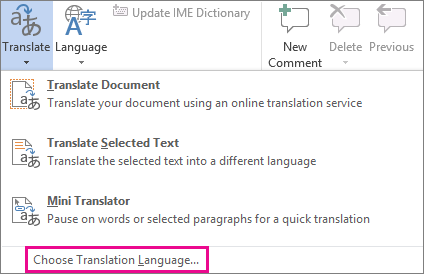
Choose your translation language
-
On the Review tab, in the Language group, click Translate > Choose Translation Language.
-
Under Choose document translation languages click the Translate from and Translate to languages that you want, and then click OK.
Translate the document or message
-
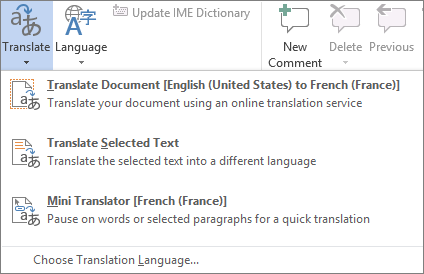
On the Review tab, in the Language group, click Translate.
-
Click Translate Document (Translate Item in Outlook). The From and To languages that you selected are listed.
A browser tab opens with your file in both the original language and the language that you selected for translation.
Note: If this is the first time you have used translation services, you may need to click OK to install the bilingual dictionaries and enable the translation service through the Research pane. You can also see which bilingual dictionaries and machine translation services you have enabled by clicking the Translation options link in the Research pane. See the next section (Translate selected text) to learn how to access the Research pane.
You can use the Research pane to translate a phrase, sentence, or paragraph into several selected language pairs in the following Microsoft Office programs: Excel, OneNote, Outlook, PowerPoint, Publisher, Visio, and Word.
Note: In PowerPoint, only one slide’s text box can be translated at a time.
-
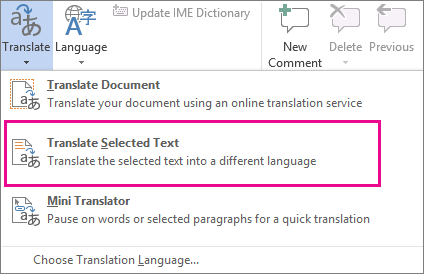
On the Review tab, in the Language group, click Translate > Translate Selected Text to open the Research pane.
Note: In Word, you can right-click anywhere in the document, and then click Translate.
-
In the Research pane, in the All Reference Books list, click Translation.
-
Do one of the following to translate a word or short phrase:
-
Select the words, press ALT, and then click the selection. The results appear in the Research pane under Translation.
-
Type the word or phrase in the Search for box, and then press Enter.
Notes:
-
If this is the first time you have used translation services, click OK to install the bilingual dictionaries and enable the translation service through the Research pane.
-
You can also see which bilingual dictionaries and machine translation services you have enabled by clicking the Translation options link in the Research pane.
-
To change the languages that are used for translation, in the Research pane, under Translation, select the languages that you want to translate from and to. For example, to translate English to French, click English in the From list and French in the To list.
-
To customize which resources are used for translation, click Translation options, and then select the options that you want.
-
-
In Word, Outlook, PowerPoint, and OneNote, the Mini Translator displays the translation of one word as you point at it with your cursor. You can also copy the translated text to the Clipboard, paste it into another document, or play a pronunciation of the translated word.
-
On the Review tab, in the Language group, click Translate > Mini Translator.
-
Point to a word or phrase that you want translated with your mouse. When a faint dialog box appears overlayed in your document, move your mouse over it to see any translations available.
Note: The Mini Translator will continue to appear whenever you move over words. To turn it off, repeat step 1 above.
For more information, see See translations with the Mini Translator.
This feature is only available if you have an Office 365 subscription, or Office 2019 for Mac, and only for Word, Excel, and PowerPoint. For Translator in Outlook see Translator for Outlook for more information.
Translate a whole document
-
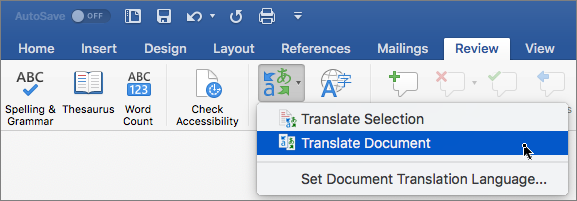
Select Review > Translate > Translate Document.
-
Select your language to see the translation.
-
Select Translate. A copy of the translated document will be opened in a separate window.
Available in:
Translate selected text
-
In your document, highlight the text you want to translate.
-
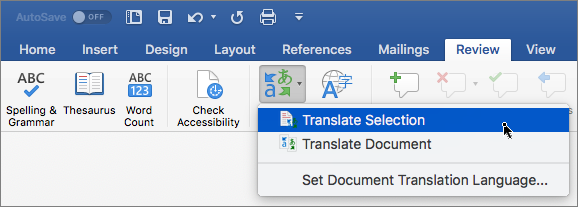
Select Review > Translate > Translate Selection.
-
Select your language to see the translation.
-
Select Insert. The translated text will replace the text you highlighted in step 1.
Note: In Excel, there is no Insert button, you’ll have to copy/paste the text you highlighted in step1.
Available in:
Translate a whole document
Word for the web makes it easy to translate an entire document. When you open a document that is in a language other than your default language, Word for the web will automatically offer to create a machine-translated copy for you.
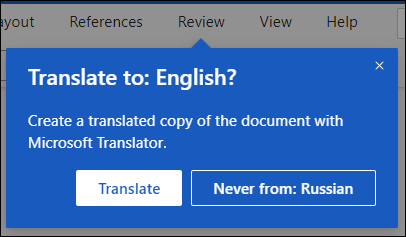
If you’d prefer to initiate the translation manually, you can still do that with these steps:
-
Select Review > Translate > Translate Document.
-
Select your language to see the translation.
-
Select Translate. A copy of the translated document will be opened in a separate window.
Available in:
Translate selected text
-
In your document, highlight the text you want to translate.
-
Select Review > Translate > Translate Selection.
-
Select your language to see the translation.
-
Select Insert. The translated text will replace the text you highlighted in step 1.
Available in:
Translate an email
-
When you receive an email in another language, a prompt will appear at the top of the message asking if you’d like Outlook to translate it into your default language.
-
If you select Translate message, Outlook will replace the message text with translated text.
You can then select Show original message to see the message in the original language or Turn on automatic translation to always translate messages in another language.
-
If you select Never translate, Outlook won’t ask you if you’d like to translate messages in that language in the future.
-
You can change your translation preferences and choose your translation language by going to Settings
> View all Outlook settings > Mail > Message handling.
Available in:
More information
-
Microsoft Translator languages
-
Right-to-left languages
-
Language Accessory Pack for Office
-
Change the language Office uses in its menus and proofing tools
-
Enable or change the keyboard layout language
-
Check spelling and grammar in a different language
Need more help?
Want more options?
Explore subscription benefits, browse training courses, learn how to secure your device, and more.
Communities help you ask and answer questions, give feedback, and hear from experts with rich knowledge.
В данной статье показаны действия, с помощью которых можно перевести документ Word с различных языков на нужный вам язык встроенными средствами программы Microsoft Word.
Если вы работаете с разными языками, но ваши языковые навыки не слишком сильны, то можно использовать быстрый инструмент перевода. В программе Microsoft Word встроен мощный переводчик, поддерживающий множество языков, но для работы этой функции нужно постоянное интернет соединение, так как перевод содержимого документа на другой язык происходит с помощью веб-службы «Переводчик Майкрософт»
Эта инструкция написана с учетом последней версии Word. Для более старых версий Word инструкции и шаги могут незначительно отличаться, но при этом у вас также есть возможность переводить разделы текста, а также целые документы Word аналогичным образом.
Содержание
- Как выбрать язык для перевода
- Как перевести документ
- Как перевести выделенный текст
- Как использовать мини-переводчик
Как выбрать язык для перевода
Чтобы выбрать с какого языка и на какой сделать перевод, откройте документ Word и перейдите на вкладку Рецензирование, в группе «Язык» нажмите кнопку Перевод и в открывшемся выпадающем списке выберите Выбрать язык для перевода…
Затем в окне «Параметры языка перевода», в выпадающих списках выберите необходимые языки для перевода документа (например с английского на русский). При необходимости выберите язык для мини-переводчика. После того как сделаете выбор, нажмите кнопку OK.
Как перевести документ
Чтобы перевести весь документ, откройте документ Word который необходимо перевести и перейдите на вкладку Рецензирование, в группе «Язык» нажмите кнопку Перевод и в открывшемся выпадающем списке выберите Перевести документ.
После этого откроется окно в котором запрашивается разрешение на отправку вашего документа на сторонний сервер, согласитесь с этим нажав кнопку Да.
Каждый раз, когда вы будете делать перевод, Word будет запрашивать разрешение на отправку вашего документа на сторонний сервер, но чтобы это сообщение больше не отображалось, установите флажок опции Больше не показывать
После этого будет переведён весь документ и перевод текста будет открыт на отдельной странице вашего браузера который используется как браузер по умолчанию.
Как перевести выделенный текст
Чтобы перевести выделенный текст, предварительно выделите часть текста, затем на вкладке Рецензирование, в группе «Язык» нажмите кнопку Перевод и в открывшемся выпадающем списке выберите Перевести выделенный текст
После этого в правой части окна появится боковая панель с переводом текста.
Вы можете использовать боковую панель для работы с переводчиком непосредственно из документа Word. Но с большими объёмами текста (больше одного абзаца), работать с ней не совсем удобно.
Как использовать мини-переводчик
Чтобы использовать мини-переводчик, откройте документ Word и перейдите на вкладку Рецензирование, в группе «Язык» нажмите кнопку Перевод и в открывшемся выпадающем списке выберите Мини-переводчик
Если включена функция мини-переводчика, то при наведении курсора на любое слово, будет появляться прозрачная панель с переводом (прозрачной она сделана для того, чтобы не отвлекать от работы, когда перевод не требуется), при наведении указателя мыши на панель, она перестанет быть прозрачной.
Используя рассмотренные выше действия, можно перевести документ Word с различных языков на нужный вам язык с помощью встроенного переводчика.
В процессе работы с документами Word, пользователю может понадобится переводчик Ворд для перевода отдельных слов, фраз или предложений, а также всего файла на другой язык. Согласитесь, что это полезная функция, о которой не все знают.
При использовании в тексте документа иностранных слов, или при наличии документа на иностранном языке возникает необходимость в переводе содержимого на язык пользователя программы. В других случаях, наоборот, требуется перевести весь текст или фрагмент текста на иностранный язык.
Содержание:
- Перевод текста Word: особенности использования встроенного средства
- Переводчик Word с английского на русский язык — перевод отдельных слов и предложений
- Перевод текста документа Ворд — перевод содержимого всего документа
- Настройки Переводчика Майкрософт в Word
- Переводчик Майкрософт в Word онлайн
- Выводы статьи
Не секрет, что далеко не все в совершенстве владеют иностранными языками, поэтому пользователи используют для получения перевода программное обеспечение в приложениях или на онлайн сервисах в интернете. Решить проблему поможет переводчик Word, использующий в своей работе облачную службу Microsoft Translator.
В программе Word, а также в других приложениях из состава офисного пакета Microsoft Office, имеется встроенная функция переводчика текста.
Перевод текста Word: особенности использования встроенного средства
Переводчик текста Ворд использует облачную службу Word Translator, работающую на основе Microsoft Translator.
Переводчик Майкрософт поддерживает функцию перевода с более 60 языков. С помощью искусственного интеллекта (ИИ) и технологии нейронных сетей обеспечивается более высокое качество перевода, чем при обычном машинном переводе на основе статистических данных.
В настоящее время, в Microsoft Translator нейросети, использующие нейро-машинный перевод (NMT), доступны для 21 языка: английского, арабского, китайского, японского, французского, испанского, немецкого, итальянского, португальского, русского, хинди, турецкого, корейского, польского, болгарского, датского, норвежского, румынского, чешского, нидерландского и шведского. Список поддерживаемых языков постоянно увеличивается.
Нейро-машинный перевод позволяет увеличить качество и повысить скорость перевода, по сравнению с обычным статистическим машинным переводом (SMT).
Встроенный переводчик в Word использует облачную службу перевода Microsoft Translator, поэтому для его работы необходимо постоянное интернет-соединение.
Переводчик Майкрософт можно использовать в двух вариантах:
- Встроенное средство в программе MS Word.
- Онлайн переводчик Word из браузера.
В первом случае, на компьютере должен быть установлен текстовый редактор — программа Microsoft Word. Во втором случае, можно обойтись без установки платного приложения на ПК, используя бесплатный вариант — Word Online, доступный пользователям из веб-интерфейса некоторых облачных хранилищ в браузере.
В программе Word из состава офисного пакета Microsoft Office, имеется встроенная функция переводчика текста.
В основном, пользователями используются два типа функций перевода:
- Перевод отдельных слов, фраз, словосочетаний, предложений и абзацев в тексте документа Word.
- Перевод всего документа Word.
В этой статье вы найдете инструкции о том, как перевести в Word отдельные слова, фразы или предложения с помощью встроенного средства, а также использование переводчика документа Ворд для перевода всего содержимого данного файла.
Отдельно в этом руководстве рассмотрим пример работы функции перевода текста документа в бесплатном онлайн сервисе Word Online.
В этом обзоре использован интерфейс последней версии Word, в предыдущих версиях приложения выполняются похожие действия с незначительными отличиями, касающимися внешнего вида.
Переводчик Word с английского на русский язык — перевод отдельных слов и предложений
Довольно часто пользователям нужно выполнить перевод теста Word с английского на русский или для других языковых пар. Сначала рассмотрим способ перевода отдельной части документа.
Чтобы использовать переводчик с английского Ворд (или на другие языки), воспользуйтесь одним из удобных способов.
1 способ:
- Откройте документ Word.
- Войдите в меню «Рецензирование».
- Выделите текст, который необходимо перевести: отдельное слово, фразу, предложение или абзац.
- В группе «Язык» нажмите на кнопку «Перевод».
- В выпадающем меню нужно выбрать «Перевод выделенного фрагмента».
- В правой части окна документа Word откроется область «Переводчик».
- Во вкладке «Выделенный фрагмент», в поле «Исходный язык» вставлен текст на языке оригинала. По умолчанию язык автоматически определен, в данном случае, это английский язык.
- В поле «Язык перевода», в нашем случае, русский, вставлен перевод фрагмента текста. Если это одно слово, то ниже отображены возможные варианты перевода.
- Нажмите на кнопку «Вставить», чтобы заменить в документе оригинальный фрагмент текста на переведенный.
2 способ:
- Выделите нужный фрагмент текста в документе Word.
- Щелкните правой кнопкой мыши.
- В контекстном меню выберите пункт «Перевести».
- На правой боковой панели появятся поля с переводом выделенного текста.
Перевод текста документа Ворд — перевод содержимого всего документа
Переводчик с английского Word поможет перевести содержимое всего документа, а не только отдельных фрагментов текста.
1 способ:
- Откройте документ в программе Microsoft Word.
- В открытом документе появится окно с предложением «Перевести этот документ?».
Этим способом создается переведенная копия документа с помощью Переводчика Майкрософт.
- Нажмите на кнопку «Перевести».
- На боковой панели «Переводчик», во вкладке «Документ» нажмите на кнопку «Перевести».
- На компьютере откроется отдельное окно программы с переводом документа Word.
В нашем случае, переводчик с английского на русский Ворд справился с поставленной задачей.
В открывшемся окне с копией перевода можно исправить неточности перевода, если что-то переведено не совсем корректно. В любом случае, есть и другие способы решить проблему с текстами на иностранном языке, о которых можно прочитать на этом сайте.
2 способ:
- В окне открытого документа Word войдите в меню «Рецензирование».
- Нажмите на кнопку «Перевод», которая находится в группе «Язык».
- В открывшемся контекстном меню выберите пункт «Перевести документ».
- В области «Переводчик», во вкладке «Документ» нажмите на кнопку «Перевести».
- На ПК откроется переведенная копия файла Word.
3 способ:
- В открытом окне документа Word щелкните по тексту правой кнопкой мыши.
- В контекстном меню нажмите на пункт «Перевести».
- В боковом меню «Переводчик» нажмите на кнопку «Перевести».
- Переведенный документ откроется в отдельном окне приложения.
Настройки Переводчика Майкрософт в Word
Пользователь может изменить некоторые параметры перевода. Для этого ему потребуется выполнить следующее:
- В боковой области «Переводчик» нажмите на кнопку с изображением шестеренки.
- В окне «Настройки» доступно два пункта:
- Предлагать для перевода содержимое на языках, которые я не понимаю.
- Никогда не предлагать для перевода документы и содержимое на этих языках.
Здесь можно добавить другие языки, чтобы исключить предложения о переводе с содержимым на этих языках.
Переводчик Майкрософт в Word онлайн
Чтобы перевести фрагмент текста документ Word, пользователь может воспользоваться помощью онлайн сервиса. Бесплатный сервис Word онлайн встроен в некоторые облачные хранилища, поэтому пользователи могут работать с документами, сохраненными в форматах DOC или DOCX, без использования программ, входящих в Microsoft Office.
Данный способ удобен тем, что доступ к документу можно получить на любом устройстве с любого места, понадобится лишь Интернет.
Выполните следующие действия:
- Используя браузер войдите в облачное хранилище OneDrive, Яндекс Диск или Mail.Ru.
- Загрузите нужный документ Word в облачное хранилище.
- Откройте документ в окне онлайн сервиса.
- Во вкладке «Рецензирование» нажмите на кнопку «Перевод» или на стрелку около этой кнопки, чтобы выбрать параметры перевода:
- Перевод выделенного фрагмента.
- Перевод документа.
- Выделите участок текста, чтобы получить его перевод.
- В боковом меню отобразится перевод выделенного фрагмента.
Выводы статьи
При работе в офисном редакторе, в тексте документа встречаются иностранные слова или выражения, поэтому пользователю необходим переводчик на русский Ворд. С помощью переводчика можно перевести непонятные слова, написанные на другом языке.
В программу Word встроен переводчик, использующий сервис Microsoft Translator. Благодаря этому, пользователи смогут переводить фрагменты текста или полностью весь документ Word в окне приложения. В других случаях используйте похожий метод перевода с помощью сервиса Word онлайн.
Похожие публикации:
- Как убрать пустую страницу в Ворде — 6 способов
- Как выделить текст в Word: разные способы
- Как убрать выделение текста в Word — 6 способов
- Редактирование PDF онлайн — 5 сервисов
- Как перевернуть страницу в Ворде
Переводчик в ворде, что это такое и как им пользоваться
Какой программой вы пользуетесь для перевода текста с иностранных языков? Уверена, что многие из вас назовут специализированные программы-переводчики или на крайний случай онлайн-переводчик Яндекс или Гугл. И так же я уверена в том, что вы даже не подозревали, что в текстовом редакторе Microsoft Word есть свой переводчик, и очень даже не плохой. Во всяком случае, при работе с текстами в этой программе, гораздо удобнее переводить текст, не отрываясь от дела. Не верите? Тогда посмотрите, как это делается и решайте, что для вас удобнее.И так, переводчик в ворде.
Переводчик в ворде, что это такое и как им пользоваться
Показывать я буду на примере Microsoft Word версии 2010, но в версии 2007 и 2013 это так же можно применить.
- Запустите текстовый редактор Word.
- Скопируйте или введите с клавиатуры любой текст на английском языке.
- Выделите этот текст;
- В главном меню перейдите на вкладку Рецензирование;
- Найдите на ленте блок Язык и нажмите на кнопку-иконку Перевод.
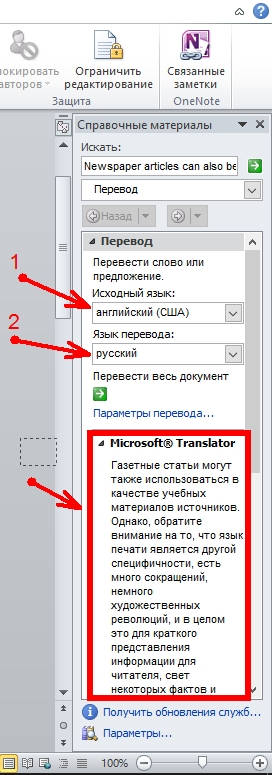
Справа у вас появится окошко Справочные материалы, в котором необходимо выбрать исходный язык и язык, на который необходимо этот текст перевести.
Как только вы это сделаете, так сразу же ниже, в этом же окошке появится перевод нашего выделенного текста.
Ниже я привожу тексты на английском языке, потом текст перевода ворда, и еще ниже этот же текст в грамотном литературном переводе.
Как видно из сравнения, текст переведенный вордом почти не отличается от текста грамотного переводчика. Так что стоит взять эту функцию себе на вооружение и пользоваться ей при случае.
К тому же здесь же предусмотрен перевод текста и с выводом в окне браузера, и перевод отдельного слова.
У меня почему-то третий вариант не сработал. Может у вас получится.
Таким образом, можно легко перевести на многие языки целые фразы или даже книги, и не искать специальную программу или человека со знанием языка.
Я даже попробовала этот же русский текст перевести на китайский.
Не знаю, поймут ли китайцы, но одно то, что этот текст отобразился в иероглифах, говорит само за себя.
На украинский язык, на мой взгляд, перевод оказался тоже не плохим.
А вот если выделить текс и в выпадающем меню выбрать иконку Перевод, то перевод уже немножко другой получается, но тоже не плохим.
Попробуйте сами и выберите тот вариант перевода, который вам больше нравится.
Как сделать сноски в ворде 2010 + Видео
Как в Ворде сделать разные ориентации страницы
Как сделать цветную страницу в ворде
Удачи!
There can be a language barrier while sharing documents and other media with people from around the world. One may have written in their native language, whilst you have no gist of what is written in it.
However, Microsoft Office suites allow you to automatically translate a number of languages into the one which you understand. You can translate documents in Microsoft Word, Excel, and PowerPoint.
Although this article focuses on Microsoft Office 2021, the steps below are valid for all Office suites.
Microsoft Translator
Microsoft Translator is a plugin that is installed in your copy of Office, which is used to translate text from one language to another.
The translator plugin of MS Office now provides you easiness in translating any selected text within a file or document, or entire documents, into any language of your preference. You can also revert the translated text with the original text if required later.
If you have Microsoft Office 2016 or above installed, chances are that you already have this plugin installed. You can check whether you have Microsoft Translator installed by selecting some text and then right-click on it. If you see the “Translate” option in the context menu, then Translator is already installed.
If you do not find the option, you can download and install it from the given link:
Download Translator
Once on the page, click Get it now and then proceed with the given instructions to install the plugin in your copy of the Office suite.
After the plugin is installed, proceed with the given steps to translate a portion of a document:
- Select the text you want to translate and right-click on it. Now click “Translate” from the context menu.
- You will now see the selected text in a window on the right of the document, which has been automatically translated into your system’s default language. Check whether the translation is correct and understandable, and then click Insert to replace the selected text.
You can also change the To and From languages if you think that Office didn’t detect the correct language to translate, or you want the translated text in another language.
The same can be applied to PowerPoint and Excel to translate any text.
If you want to translate an entire document, click on Review from the top, click Translate, and then click Translate Document.
This will create a translated duplicate document that you can edit and save while maintaining the original copy.
Final Thoughts
Previously, you could also translate an entire Office document using TransTools – a small add-in for Microsoft Word. However, the support for dual-language documents has since been removed.
That said, we believe that Microsoft Translator has progressed over the years to make accurate translations from a variety of languages all across the world.
Related posts:
В MS Word встроен мощный переводчик, поддерживающий множество языков.
Оговорюсь сразу — для работы этой функции нужно постоянное интернет-соединение и браузер.
В ленте нужно выбрать вкладку «Рецензирование». А в ней вкладку «Перевод».
Для начала нужно настроить, с какого языка на какой нужно сделать перевод. Предположим, что с русского на английский. Выбираем пункт «Выбрать язык для перевода…». Откроется диалоговое окно «Параметры языка перевода». Для перевода документа выставляем перевести с русского на английский, для мини-переводчика — перевести на английский. Далее нажимаем «Ок».
Теперь разберём три варианта перевода, которые предлагает Word:
1. Перевести документ.
Будет переведён весь документ и перевод будет открыт на отдельной странице вашего браузера. Каждый раз, когда вы будете делать перевод, Word будет запрашивать разрешение на отправку вашего документа на сторонний сервер. Нужно с этим согласиться, так как переводчик фактически не встроен в Word, а даёт возможность воспользоваться онлайн версией. Чтобы это сообщение больше не выскакивало, можно поставить галочку напротив пункта «Больше не показывать».
2. Перевод выделенного текста.
Как следует из названия, необходимо предварительно выделить часть текста, а уже затем выбрать этот вариант перевода. Слева появиться панель для работы с переводчиком непосредственно из документа Word. Но с большими объёмами текста (больше одного абзаца), работать с ней не удобно.
3. Мини-переводчик.
Если включена эта функция, при наведении курсора на любое слово, будет появляться прозрачная панель с переводом (прозрачной она сделана для того, чтобы не отвлекать от работы, когда перевод не требуется), при наведении на неё курсора, она перестанет быть прозрачной.
Have a Word document in a language you don’t understand? Here’s how to translate it easily.
Can’t read a Word document because it’s in a foreign language? Fortunately, there’s an option to translate your documents (or selected text) without even leaving the Word app.
We’ll cover some of the ways to translate your Word documents into various languages. A couple of these methods use the Word app, while others use online services to translate your document.
1. How to Translate Selected Text in Word
If you’re only looking to translate certain text or parts of your Word document, you can take advantage of a Word feature that translates only the selected word or text block. This won’t touch any other parts of the document.
You can access this selective translation feature by doing the following:
- Launch your document in Microsoft Word.
- Find the text you want to translate in your document and highlight it using your cursor.
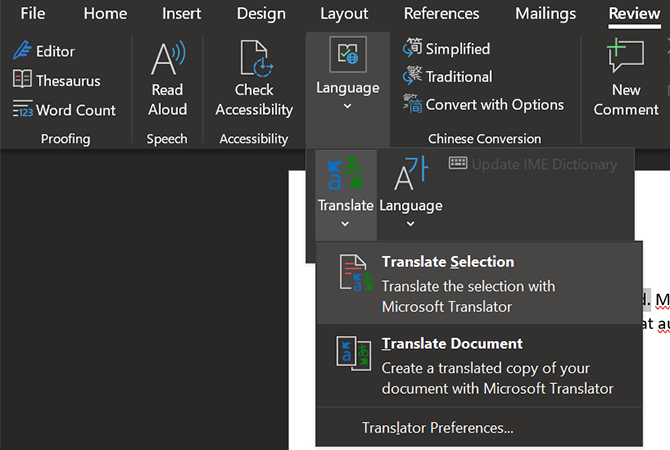
- Switch to the Review tab at the top of your screen. Here, select Language then click Translate, followed by Translate Selection.
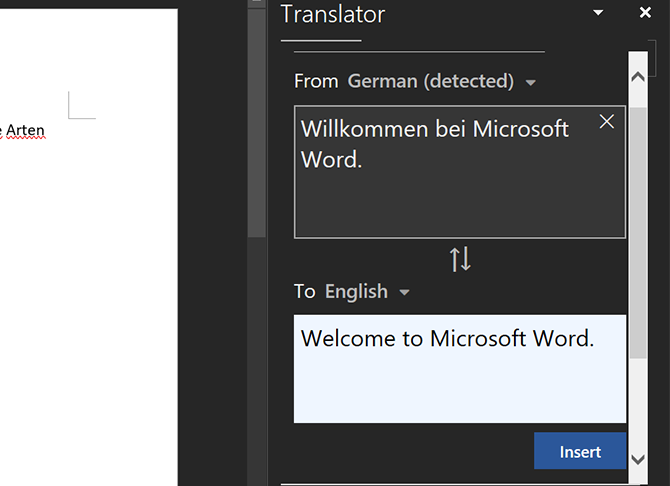
- A new pane with your translations will open on the right side of the screen. In most cases, Word can detect your source language, so all you need to do is select the target language.
- Once your text is translated and you’re happy with it, click Insert to add the translated text into your document.
At the bottom of the translation pane, you can view more details about your selected text and words. This includes the definition of the word means and its part of speech.
When you’ve finished translating your text, click X in the translation pane to close it and get back to your document.
2. How to Translate a Whole Document in Word
If you’re looking to translate your entire Word document to another language, there’s a feature for that as well. This doesn’t require you to select any anything in your document; it takes the contents and translates them to your chosen language.
A great aspect of this Word feature is that it won’t overwrite your original document. It stays as-is, while Word creates a new document for your translated version. This makes sure you preserve the original file.
You can utilize the full document translation feature in Word as follows:
- Open your document with Word.
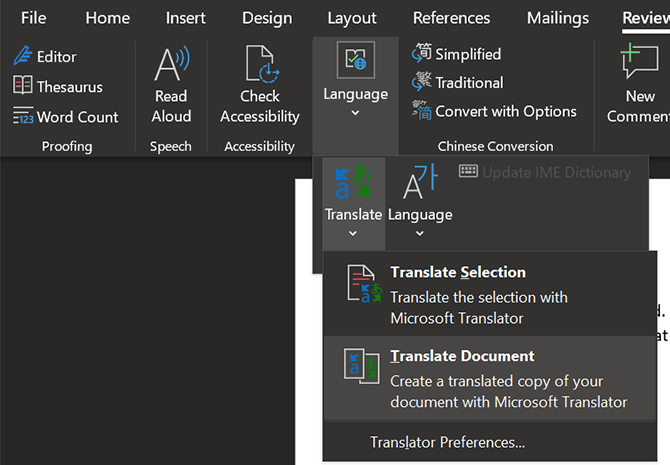
- Click the Review tab at the top, choose Language, select Translate, and click Translate Document.
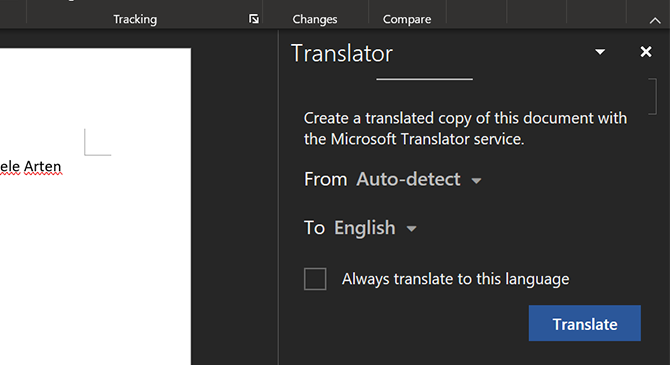
- On the right-side pane, select the source and target language for your document. Then click on Translate to start translating your document.
- Word will create and open a new document with your translated text in it. You can save this document by clicking the save icon as normal.
3. How to Use Google Docs to Translate a Word Document
While Google Docs is a separate office suite, you can use it to open and work with your Word documents too. Google Docs has a translation feature that you can use with uploaded Word files.
This basically uploads your Word document to Google Docs, translates the text, and lets you save the translated version to your computer. You can do this as follows:
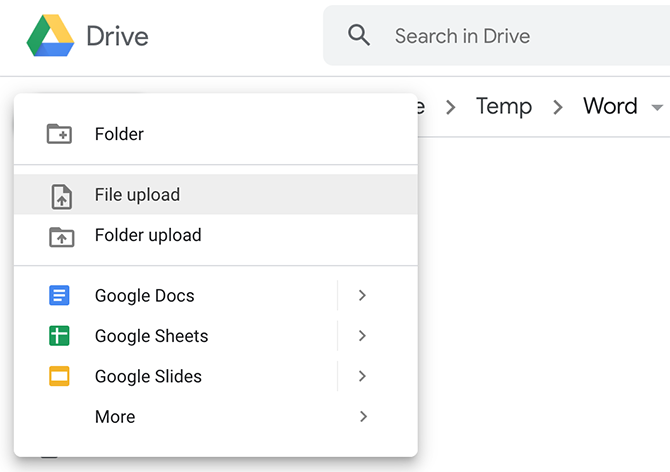
- Open a new tab in your browser and head over toGoogle Drive. This is where you upload documents to edit them in Google Docs.
- Click New followed by File upload and select your Word document.
- Right-click on your document in Google Drive and select Open with, followed by Google Docs.
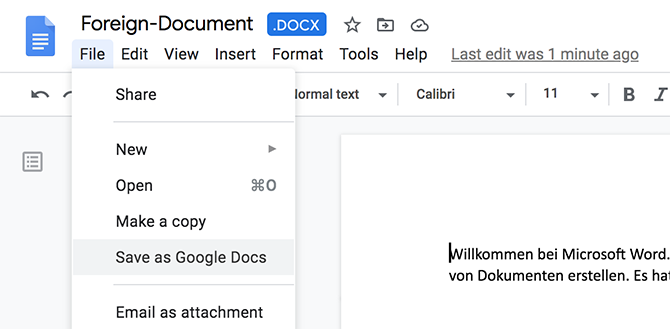
- When the document opens in the editor, click the File menu and choose Save as Google Docs. You need to do this because Google Docs can’t directly translate Word documents.
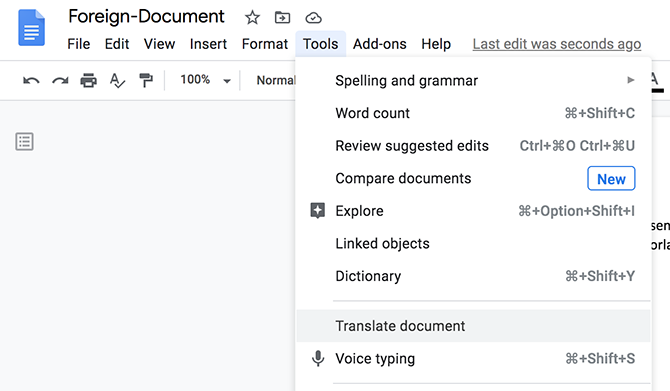
- A new Google Docs file will open with your Word document’s content in it. To translate this, click the Tools menu at the top and choose Translate document.
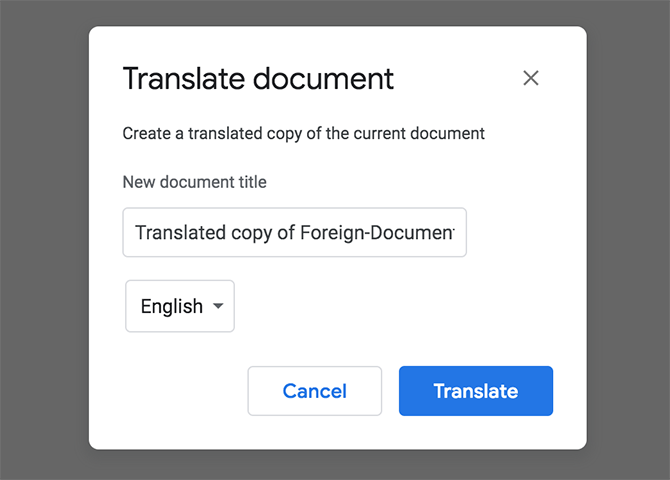
- Enter a name for your new translated document, choose the target language from the dropdown menu, and click Translate.
- Your translated document will open in a new tab. To save it as a Word document, click the File menu and select Download, followed by Microsoft Word.
4. Use Online Translators to Translate a Word Document
If you aren’t happy with Word’s translation feature or want a second opinion, you have several online tools to translate your Word document from one language to another.
Before you use these services, keep in mind that not all of them will preserve your document’s formatting. If that doesn’t bother you, here are two online translation services you can use for your Word document:
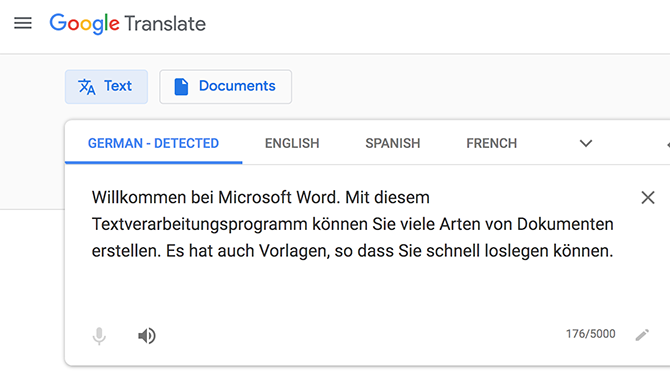
1. Google Translate
Google Translate is arguably the best free translator available, and offers many languages to choose from. Unlike other Google services, you don’t need a Google account to use this translation feature.
Here’s how you use it for your Word documents:
- Copy the text that you want to translate from your Word document.
- Head to the Google Translate website in your browser.
- Paste the text in the box on the left and select the source language. If you aren’t sure, click Detect Language and Google Translate will detect it for you.
- Choose the target language on the right box and your translation will instantly appear in the box.
- Copy the content from the box on the right and paste it into your Word document.
Your Word document is now translated.
2. Online Doc Translator
Unlike Google Translate, Online Doc Translator doesn’t require you to manually copy text from your document for translation. You can upload your entire Word document to translate it to your chosen language.
The service uses Google Translate to do the task, so you know that you’ll get a high-quality translation for your document. It works as follows:
- Open the Online Doc Translator site in your browser.
- Click Upload file and upload your Word document.
- Select the source and target languages. Then click Translate.
- Click Download your translated document to download your Word document.
Translating a Word Document in a Few Clicks
Sometimes, you may come across Word documents that aren’t in a language you know. For those scenarios, you have both built-in and external ways to translate your Word documents. Try the best one for your needs, and you’ll have a version of your document that’s readable to you.
На чтение 5 мин. Просмотров 357 Опубликовано 14.06.2021
Не можете прочитать документ Word, потому что он на иностранном языке? К счастью, есть возможность переводить документы (или выделенный текст), даже не выходя из приложения Word.
Мы рассмотрим некоторые из способы перевода документов Word на разные языки. Некоторые из этих методов используют приложение Word, а другие используют онлайн-сервисы для перевода документа.
Содержание
- 1. Как перевести выделенный текст в Word
- 2. Как перевести весь документ в Word
- 3. Как использовать Документы Google для перевода Документ Word
- 4. Используйте онлайн-переводчики для перевода документа Word
- 1. Google Translate
- 2. Онлайн-переводчик документов
- Перевод документа Word за несколько кликов
1. Как перевести выделенный текст в Word
Если вы только ищете для перевода определенного текста или частей документа Word вы можете воспользоваться функцией Word, которая переводит только выбранное слово или текстовый блок. Это не коснется других частей документа.
Вы можете получить доступ к этой функции выборочного перевода, выполнив следующие действия:
- Запустите свой документ в Microsoft Word.
- Найдите в документе текст, который вы хотите перевести, и выделите его с помощью курсора.
- Перейдите на вкладку Обзор в верхней части экрана. Здесь выберите Язык , затем нажмите Перевести , а затем – Перевести выделенный фрагмент .
- Справа откроется новая панель с вашими переводами. сторона экрана. В большинстве случаев Word может определить ваш исходный язык, поэтому все, что вам нужно сделать, это выбрать целевой язык.
- После того, как ваш текст переведен и вас устраивает, нажмите Вставить , чтобы добавить переведенный текст в свой документ.
В нижней части панели перевода вы можете просмотреть дополнительные сведения о выбранном тексте и словах. Это включает определение слова означает и его часть речи.
Когда вы закончите перевод текста, нажмите X на панели перевода, чтобы закрыть ее и вернуться к своему документу.
2. Как перевести весь документ в Word
Если вы хотите перевести весь документ Word на другой язык, для этого также есть функция. Это не требует от вас выбора чего-либо в вашем документе; он берет содержимое и переводит его на выбранный вами язык.
Отличным аспектом этой функции Word является то, что она не перезаписывает исходный документ.. Он остается как есть, а Word создает новый документ для вашей переведенной версии. Это гарантирует, что вы сохраните исходный файл.
Вы можете использовать полную функцию перевода документов в Word следующим образом:
- Откройте документ в Word.
- Щелкните вкладку Обзор вверху, выберите Язык , выберите Перевести , и нажмите Перевести документ .
- На правой панели выберите источник и целевой язык для вашего документа. Затем нажмите Перевести , чтобы начать перевод документа.
- Word создаст и откроет новый документ с вашим переведенным текст в нем. Вы можете сохранить этот документ, щелкнув значок сохранения как обычно.
3. Как использовать Документы Google для перевода Документ Word
Хотя Документы Google – это отдельный офисный пакет, вы также можете использовать его для открытия документов Word и работы с ними. В Документах Google есть функция перевода, которую можно использовать с загруженными файлами Word.
Это в основном загружает ваш документ Word в Google Docs, переводит текст и позволяет вам сохранить переведенную версию на свой компьютер. Вы можете сделать это следующим образом:
- Откройте новую вкладку в своем браузере и перейдите в Google Привод. Здесь вы загружаете документы, чтобы редактировать их в Google Docs.
- Нажмите Создать , затем Загрузка файла и выберите свой документ Word.
- Щелкните правой кнопкой мыши документ на Google Диске и выберите Открыть с помощью , а затем Google Docs .
- Когда документ откроется в редакторе, щелкните меню Файл и выберите Сохранить как Документы Google . Вам нужно сделать это, потому что Google Docs не может напрямую переводить документы Word.
- Откроется новый файл Google Docs с вашим документом Word. содержание в нем. Чтобы перевести это, нажмите меню Инструменты вверху и выберите Перевести документ .
- Введите имя для вашего нового переведенного документа, выберите целевой язык в раскрывающемся меню и нажмите Перевести .
- Ваш переведенный документ откроется в новой вкладке. Чтобы сохранить его как документ Word, щелкните меню Файл и выберите Загрузить , а затем – Microsoft Word .
4. Используйте онлайн-переводчики для перевода документа Word
Если вам не нравится функция перевода Word или вы хотите получить второе мнение, у вас есть несколько онлайн-инструментов для перевода. ваш документ Word с одного языка на другой.
Прежде чем использовать эти службы, имейте в виду, что не все из них сохранят форматирование вашего документа. Если вас это не беспокоит, вот две службы онлайн-перевода, которые вы можете использовать для своего документа Word:
1. Google Translate
Google Translate, пожалуй, лучший бесплатный переводчик из доступных, предлагающий множество языков на выбор. В отличие от других сервисов Google, вам не нужна учетная запись Google, чтобы использовать эту функцию перевода.
Вот как вы используете его для документов Word:
- Скопируйте текст, который вы хотите перевести, из документа Word.
- Перейдите на сайт Google Translate в браузере.
- Вставьте текст в поле слева и выберите исходный язык. Если вы не уверены, нажмите Определить язык , и Google Translate определит его за вас.
- Выберите целевой язык в правом поле и свой перевод. мгновенно появится в коробке.
- Скопируйте содержимое из поля справа и вставьте в ваш документ Word.
Ваш документ Word переведен.
2. Онлайн-переводчик документов
В отличие от Google Translate, онлайн-переводчик документов не требует, чтобы вы вручную копировали текст из документа для перевода. Вы можете загрузить весь документ Word, чтобы перевести его на выбранный язык.
Служба использует Google Translate для выполнения этой задачи, поэтому вы знаете, что получите качественный перевод своего документа. Это работает следующим образом:
- Откройте сайт онлайн-переводчика документов в своем браузере.
- Нажмите Загрузить файл и загрузите документ Word.
- Выберите исходный и целевой языки. Затем нажмите Перевести .
- Нажмите Загрузить переведенный документ , чтобы загрузить документ Word.
Перевод документа Word за несколько кликов
Иногда вы можете встретить документы Word на языке, который вы не знаете.. Для этих сценариев у вас есть как встроенные, так и внешние способы перевода документов Word. Попробуйте лучший вариант для ваших нужд, и вы получите версию документа, удобную для чтения.
Do you want to write a letter or an article in a foreign language? Microsoft Office offers a Translate feature available in Microsoft Word, Microsoft Excel, PowerPoint, and One Note. The Translate feature converts content into a different language using the Microsoft Translator online service; in Microsoft Word, it includes two options Translate Selection and Translate Document.
Although the Translate feature is offered in Microsoft Office programs such as Microsoft Word, Microsoft Excel, PowerPoint, and One Note, Translate Selection and Translate Document are only found in Microsoft Word. The Translate Selection’s purpose is to translate the selection with Microsoft Translator, and the Translate Document’s purpose is to create a translated copy of your Document with Microsoft Translator.
In this tutorial, we will explain:
- How to use the option Translate Selection.
- How to use the option Translate Document.
Let us discuss this in more detail.
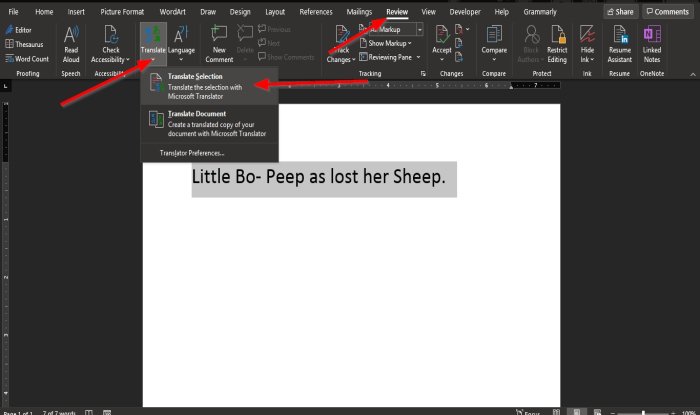
1] How to use Translate Selection option in Office
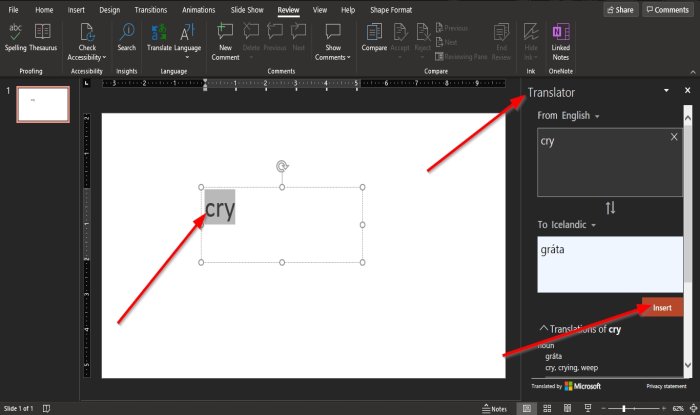
Highlight the text.
On the Review tab of any Office programs, click the Translate button in the language group.
In Microsoft Word or OneNote, when the Translate button is clicked, you will see a drop-down list.
In the drop-down, click Translate Selection.
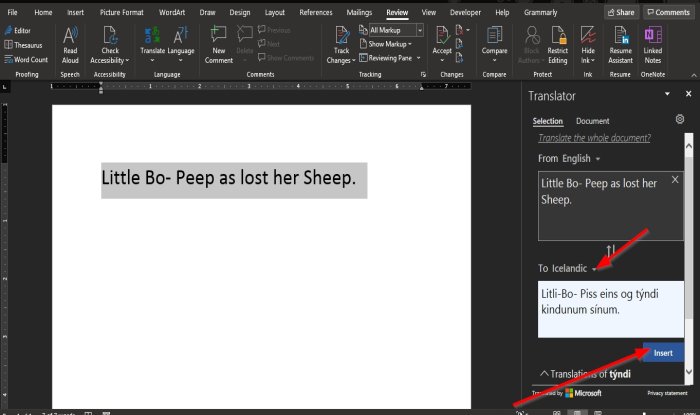
A Translator Pane will pop up on the right of the window.
In the Translator Pane, there are two options From and To
From is the language you want to translate.
To is the language you want the selected text to be translated to.
Choose a language from the To section by clicking the drop-down arrow and selecting a language.
Then click Insert.
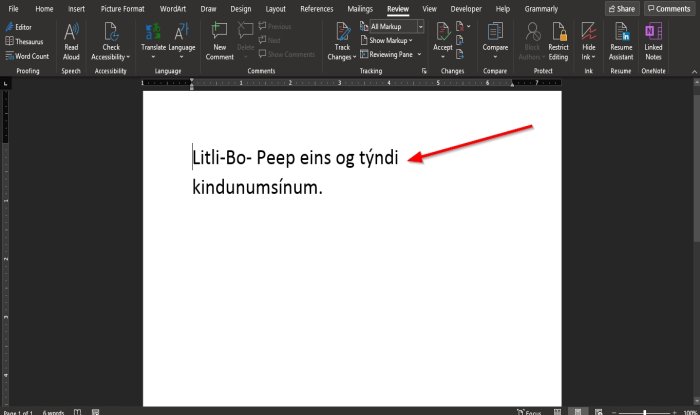
The text is translated.
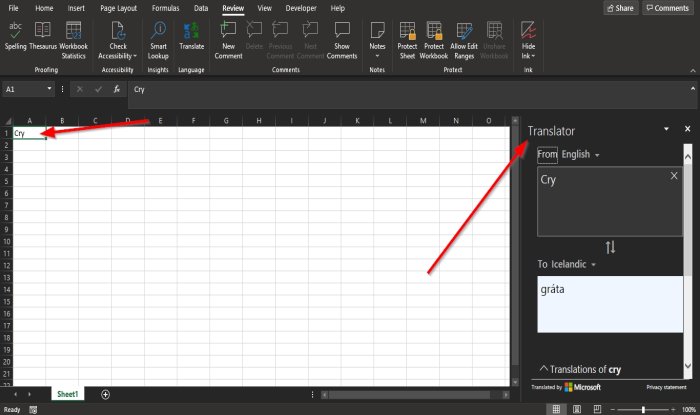
In the Microsoft Excel and PowerPoint programs, when the Translate button is selected.
A Translator Pane will pop up on the right of the window.
For PowerPoint, like Word, you have to highlight the text first before selecting a language and clicking Insert.
In Excel, you don’t have to highlight the text.
2] How to use Translate Document option in Office
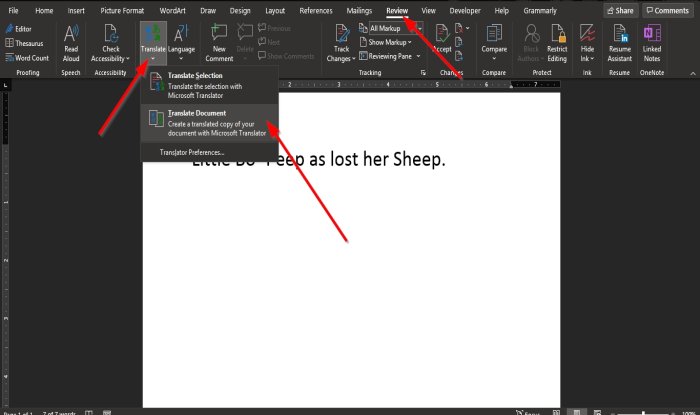
On the Review tab of any Office programs, click the Translate button in the language group.
In Microsoft Word or OneNote, when the Translate button is clicked, you will see a drop-down list.
In the drop-down, click Translate Document.
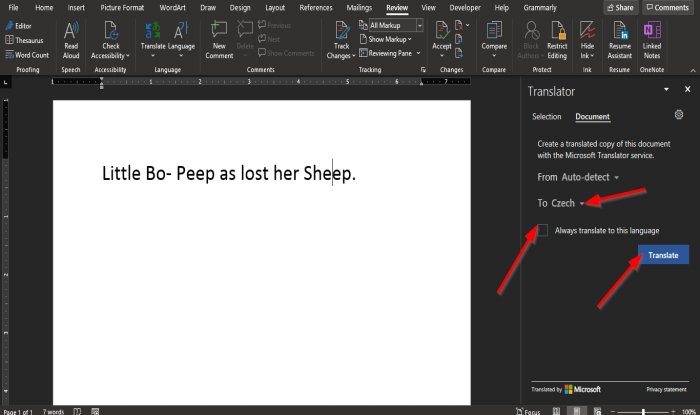
A Translator Pane will pop up on the right of the window.
Inside the Translator Pane in the To section, click the drop-down arrow and choose a language.
If you want to keep that particular language, check the checkbox for Always translate to this language.
Then click Translate.
A copy of the document is open with the translated text.
In OneNote, PowerPoint, and Excel, this option is not available.
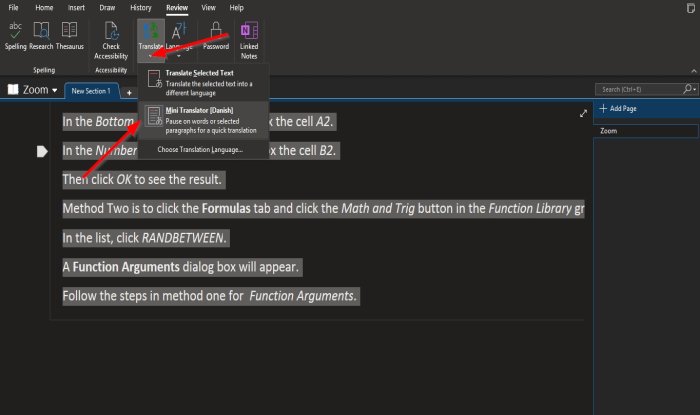
In OneNote, instead of a Translate Document option, there is a Mini Translator option.
Highlight the text in the notebook.
Click the Translate button.
In the drop-down list select the Mini Translator option.
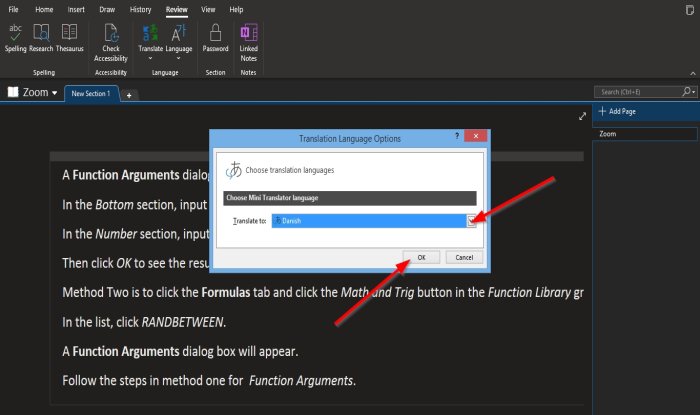
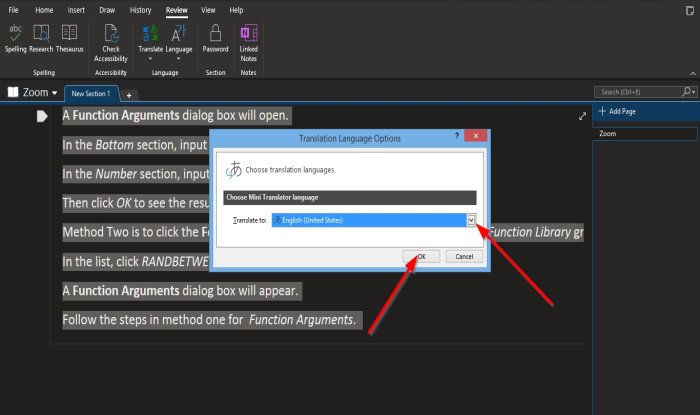
Once the Mini Translator option is selected, a Translation Language Options dialog box will open.
Inside the dialog box, choose a language from the Translate to list box.
Then click OK.
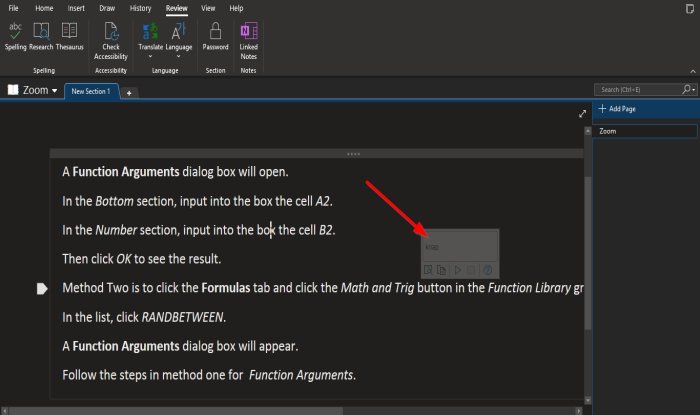
Hover the cursor over the text, and you see a small window containing the foreign language.
Once the language is chosen, it will remain as the language selected in the Mini Translator.
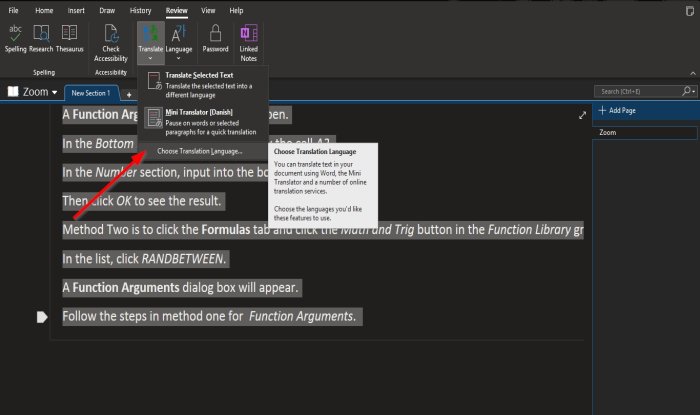
To set it back to English, highlight the text.
Click the Translate button and select Choose Translation Language.
A Translation Language Options dialog box will open.
Inside the dialog box, choose a language from the Translate to list box.
Then click OK.
We hope this tutorial helps you understand how to translate text into a different language in Microsoft Office.






 > View all Outlook settings > Mail > Message handling.




![Translate Microsoft Office Documents In Any Language [Word, Excel, PowerPoint] 1 Context](https://www.itechtics.com/wp-content/uploads/2022/01/Context.jpg)
![Translate Microsoft Office Documents In Any Language [Word, Excel, PowerPoint] 3 insert](https://www.itechtics.com/wp-content/uploads/2017/01/insert.jpg)
![Translate Microsoft Office Documents In Any Language [Word, Excel, PowerPoint] 4 translate document](https://www.itechtics.com/wp-content/uploads/2022/01/translate-document-700x366.jpg)


