
Microsoft Word is used in different countries and many languages. For some documents such as international Agreements, you need to write the documents or just parts of the document in a different language.
To change the text language, select the text for which you want to change language and do one of the following:
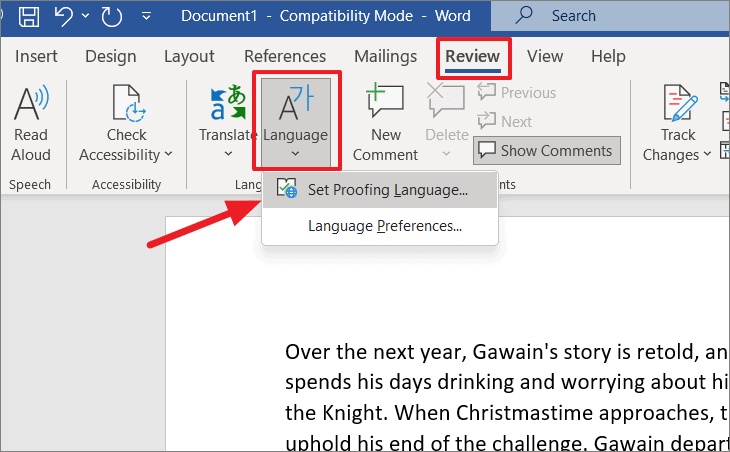
- On the Review tab, in the Language group, click the Language button, then choose Set Proofing Language…:

- On the status bar, click the Language icon:

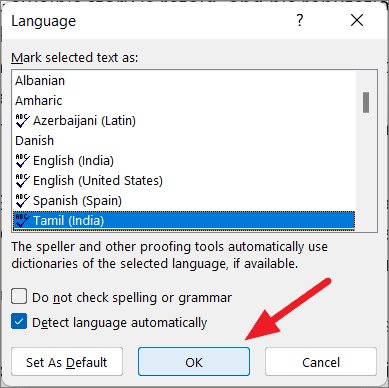
In the Language dialog box, choose the language you want to use for the selected text and click OK:

Notes:
- You can set different languages to different words, sentences, paragraphs, pages, or sections in the document.
- You can
skip some words or sentences from spelling and grammar checking or add them to the custom dictionary for some language.
Please, disable AdBlock and reload the page to continue
Today, 30% of our visitors use Ad-Block to block ads.We understand your pain with ads, but without ads, we won’t be able to provide you with free content soon. If you need our content for work or study, please support our efforts and disable AdBlock for our site. As you will see, we have a lot of helpful information to share.
Excel for Microsoft 365 Word for Microsoft 365 Outlook for Microsoft 365 PowerPoint for Microsoft 365 Access for Microsoft 365 OneNote for Microsoft 365 Project Online Desktop Client Publisher for Microsoft 365 Visio Plan 2 Excel 2021 Word 2021 Outlook 2021 PowerPoint 2021 Access 2021 Project Professional 2021 Project Standard 2021 Publisher 2021 Visio Professional 2021 Visio Standard 2021 OneNote 2021 Excel 2019 Word 2019 Outlook 2019 PowerPoint 2019 Access 2019 Project Professional 2019 Project Standard 2019 Publisher 2019 Visio Professional 2019 Visio Standard 2019 Excel 2016 Word 2016 Outlook 2016 PowerPoint 2016 Access 2016 OneNote 2016 Project Professional 2016 Project Standard 2016 Publisher 2016 Visio Professional 2016 Visio Standard 2016 Excel 2013 Word 2013 Outlook 2013 PowerPoint 2013 Access 2013 OneNote 2013 Project Professional 2013 Project Standard 2013 Publisher 2013 Visio Professional 2013 Visio 2013 Excel 2010 Word 2010 Outlook 2010 PowerPoint 2010 Access 2010 OneNote 2010 Project 2010 Project Standard 2010 Publisher 2010 Visio Premium 2010 Visio 2010 Visio Standard 2010 Excel Starter 2010 Language Preferences Language Preferences 2010 Language Preferences 2013 Language Preferences 2016 More…Less
You can use the Office language options to add a language, to choose the UI display language, and to set the authoring and proofing language.
The language options are in the Set the Office Language Preferences section of the Office Options dialog box, which you can access by going to File > Options > Language. The display and authoring languages can be set independently. For example, you could have everything match the language of your operating system, or you could use a combination of languages for your operating system, authoring, and Office UI display.
The available languages depend on the language version of Office and any additional language pack, language interface pack, or ScreenTip languages that are installed on your computer.
Add a language
You can add a display language or an authoring language. A display language determines the language Office uses in the UI — ribbon, buttons, dialog boxes, etc. An authoring language influences text direction and layout for vertical, right-to-left, and mixed text. Authoring languages also include proofing tools such as dictionaries for spelling and grammar checking. (The preferred authoring language appears at the top of the list in bold. You can change this by choosing the language you want and selecting Set as Preferred.)
To add a display language:
-
Open an Office program, such as Word.
-
Select File > Options > Language.
-
Under Office display language, on the Set the Office Language Preferences, select Install additional display languages from Office.com.
-
Choose the desired language in the Add an authoring language dialog and then select Add. A browser page opens where you can download the installation file.
-
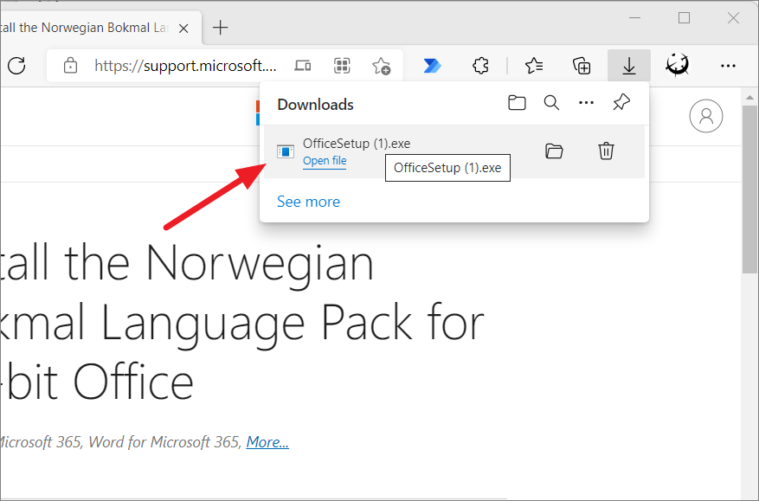
On the browser page, select Download and run the downloaded pack to complete installation.
-
The added language appears in the list of Office display languages.
To add an authoring language:
-
Open an Office program, such as Word.
-
Select File >Options >Language.
-
On the Set the Office Language Preferences, under Office authoring languages and proofing, select Add a Language….
-
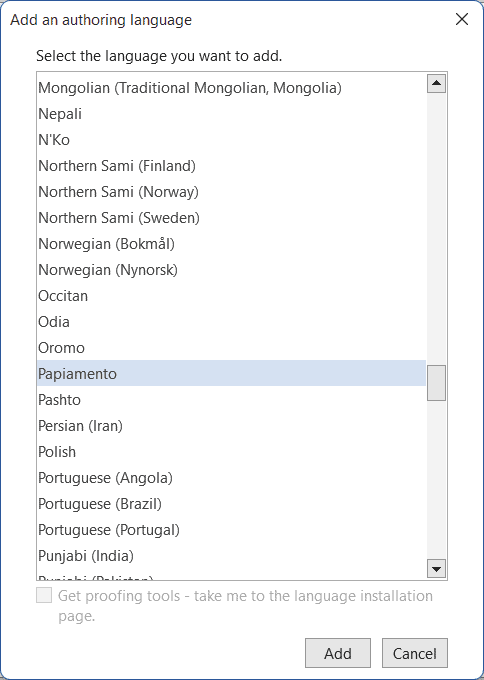
Choose the desired language in the Add an authoring language dialog and then select Add. A browser page opens where you can download the installation file.
-
On the browser page, select Download and run the downloaded pack to complete installation.
-
The added language appears in the list of Office authoring languages.
If Proofing available appears next to the language name, you can obtain a language pack with proofing tools for your language. If Proofing not available is next to the language name, then proofing tools are not available for that language. If Proofing installed appears next to the language name, you’re all set.
-
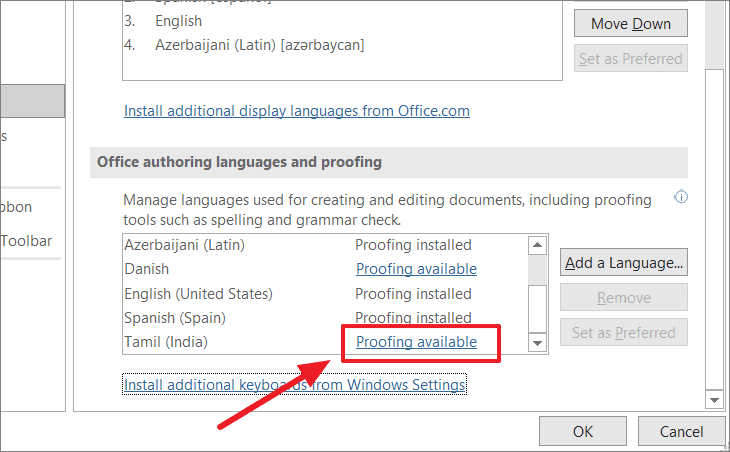
To go online and get the language pack you need, select the Proofing available link.
Both kinds of Office languages (display and authoring) have a preferred language that you can set independently.
The preferred language appears in bold at the top of each language list. The order of the languages in the list is the order in which languages are used by Office. For example, if your display language order is Spanish <preferred>, German, and Japanese, and the Spanish language resources are removed from your computer, German becomes your preferred display language.
To set the preferred language:
-
Open an Office program, such as Word.
-
Select File > Options > Language.
-
Under Set the Office Language Preferences, do one or both of the following:
-
Under Office display language, choose the language you want from the list and then select Set as Preferred.
-
Under Office authoring languages and proofing, choose the language you want from the list and then select Set as Preferred.
-
You can use the Office language options to add a language or to choose the language in which the Help and ScreenTips display.
The language options are in the Set the Office Language Preferences dialog box, which you can access by going to File > Options > Language. The display and help languages can be set independently. For example, you could have everything match the language of your operating system, or you could use a combination of languages for your operating system, editing, display, and Help.
The available languages depend on the language version of Office and any additional language pack, language interface pack, or ScreenTip languages that are installed on your computer.
Add a language
You can add a language to Office programs by adding an editing language. An editing language consists of the type direction and proofing tools for that language. The proofing tools include language-specific features, such as dictionaries for spelling and grammar checking. (The default editing language appears at the top of the list in bold. You can change this by choosing the language you want and selecting Set as Default.)
-
Open an Office program, such as Word.
-
Select File > Options > Language.
-
In the Set the Office Language Preferences dialog box, under Choose Editing Languages, choose the editing language that you want to add from the Add additional editing languages list, and then select Add.
The added language appears in the list of editing languages.
If Not enabled appears in the Keyboard Layout column, do the following:
-
Select the Not enabled link.
-
Windows settings will open to the Language page. In the Add Languages dialog box of Windows settings, select Add a language, choose your language in the list, and then select Add.
-
Close the Add Languages dialog box in Windows settings. In the Office dialog box, your language should display as Enabled under Keyboard Layout in the Choose Editing Languages section.
If Not Installed appears in the Proofing column, you might need to obtain a language pack or language interface pack to obtain the proofing tools for your language.
-
To go online and get the language pack you need, select the Not installed link.
The display and Help languages are the languages used in Office for display elements, such as menu items, commands, and tabs, in addition to the Help file display language.
The default language appears in bold at the top of the list. The order of the languages in the display and Help lists is the order in which languages are used by Office. For example, if your display language order is Spanish <default>, German, and Japanese, and the Spanish language tools are removed from your computer, German becomes your default display language.
To set the default language:
-
Open an Office program, such as Word.
-
Click File > Options > Language.
-
In the Set the Office Language Preferences dialog box, under Choose Display and Help Languages, choose the language that you want to use, and then select Set as Default.
Which display language is being used for which Office program?
If you use multiple languages and have customized Office so that it fits the way that you want to work, you can review all of the Office programs to see which language is the default display language for each.
-
In the Set the Office Language Preferences dialog box, under Choose Display and Help languages, select View display languages installed for each Microsoft Office program.
Note: This feature is available only for the following Office programs: Excel, OneNote, Outlook, PowerPoint, Publisher, Visio, and Word. It is not available for Office 2016 programs.
ScreenTips are small pop-up windows that provide brief, context-sensitive help when you rest the pointer on a display element, such as a button, tab, dialog box control, or menu. Setting the ScreenTip language in one Office program sets it for all of the Office programs that you have installed.
-
Open an Office program, such as Word.
-
Select File > Options > Language.
-
In the Set the Office Language Preferences dialog box, under Choose ScreenTip Language, choose your ScreenTip language.
Notes:
-
This feature is not available in Office 2016.
-
If the language that you want is not listed, you might need to add more language services. Select How do I get more ScreenTip languages from Office.com, and then follow the download and installation instructions.
-
After you install a new ScreenTip language, it becomes your default ScreenTip language.
-
For more information about ScreenTips, see Show or hide ScreenTips.
See also
Enable or change the keyboard layout language
Check spelling and grammar in a different language
Turn on automatic language detection
Need more help?
![]()
Written by Allen Wyatt (last updated November 26, 2022)
This tip applies to Word 97, 2000, 2002, and 2003
Word includes many tools to make your writing better. A few of the tools make use of specialized dictionaries; for instance the grammar and spelling checker. You can pick a language to be used on either a single paragraph, or on all instances of a particular paragraph style. To change which language is used for a particular paragraph, follow these steps:
- Select the paragraphs or defined style for which you want to change the language.
- Choose Tools | Language | Set Language. Word displays the Language dialog box. (See Figure 1.)
- Select a language from those in the language list.
- Click on OK.
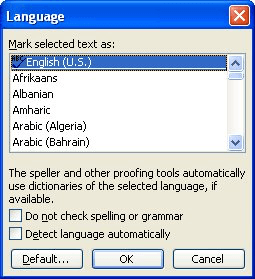
Figure 1. The Language dialog box.
If you want to specify that all paragraphs formatted with a particular style use a certain language, then follow these steps if you are using Word 2002 or Word 2003:
- Choose Styles and Formatting from the Formatting menu. Word displays the Styles and Formatting pane.
- In the Pick Formatting To Apply area of the pane, make sure the style you want to change is visible.
- Hover the mouse pointer over the name of the style you want to change. Notice that a downward-pointing arrow appears at the right side of the style name.
- Click on the downward-pointing arrow and choose the Modify option from the resulting menu. Word displays the Modify Style dialog box. (See Figure 2.)
- Click on the Format button, then choose the Language option. Word displays the Language dialog box.
- Select a language from those in the language list.
- Click on OK, then on OK again.
- Close the Styles and Formatting pane.
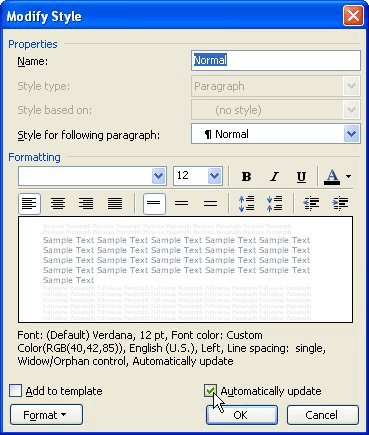
Figure 2. The Modify Style dialog box.
If you are using an older version of Word (97 or 2000), then you should follow these steps, instead:
- Choose the Style option from the Format menu. This displays the Style dialog box.
- Make sure the List option, at the bottom of the dialog box, is set to Styles in Use.
- From the list of available styles, select the one that you want to change to a different language.
- Click on the Modify button. This displays the Modify Style dialog box.
- Click on the Format button, then choose the Language option. This displays the Language dialog box.
- Select a language from those in the language list.
- Click on OK, then on OK again.
- Click Apply to close the style dialog box.
Any paragraphs formatted with the defined style will now use the appropriate dictionaries for the language you specified. The other paragraphs in your document will continue to use the default language.
WordTips is your source for cost-effective Microsoft Word training.
(Microsoft Word is the most popular word processing software in the world.)
This tip (1206) applies to Microsoft Word 97, 2000, 2002, and 2003.
Author Bio
With more than 50 non-fiction books and numerous magazine articles to his credit, Allen Wyatt is an internationally recognized author. He is president of Sharon Parq Associates, a computer and publishing services company. Learn more about Allen…
MORE FROM ALLEN
Quickly Dumping Array Contents
If you store information within a variable array, at some point in your macro you may want to get rid of that …
Discover More
Understanding the While…Wend Structure
Logical structures are important in programming, as they allow you to control how the programming statements are …
Discover More
Getting Rid of «Comment» in Comments
When you add a comment to a document, Word presents that comment in a very specific way. If you want to change the way in …
Discover More
Ribbon: Access keys
To use Backstage view, open the File page
Alt + F
Ribbon: Access keys
To use themes, colors, and effects, such as page borders, open the Design tab
Alt + G
Ribbon: Access keys
To use common formatting commands, paragraph styles, or to use the Find tool, open Home tab
Alt + H
Ribbon: Access keys
To manage Mail Merge tasks, or to work with envelopes and labels, open Mailings tab
Alt + M
Ribbon: Access keys
To insert tables, pictures and shapes, headers, or text boxes, open Insert tab
Alt + N
Ribbon: Access keys
To work with page margins, page orientation, indentation, and spacing, open Layout tab.
Alt + P
Insert or mark table of contents, footnotes and citations
Go to «Tell me what you want to do» and Smart Lookup (in Word 2016)
Alt + Q
Ribbon: Access keys
To use Spell Check, set proofing languages, or to track and review changes to your document, open the Review tab
Alt + R
Ribbon: Access keys
To add a table of contents, footnotes, or a table of citations, open the References tab
Alt + S
Ribbon: Access keys
To choose a document view or mode, such as Read Mode or Outline view, open the View tab You can also set Zoom magnification and manage multiple windows of documents
Alt + W
Insert characters by using character codes
while holding, type character code (on the numeric keypad): Insert the ANSI character for the specified ANSI (decimal) character code. For example, to insert the euro currency symbol, hold down Alt and press 0128 on the numeric keypad
Alt
Function key reference
Show KeyTips
F10
Move within a table
To the next cell in a row
⭾ Tab
Move within a table
To the previous cell in a row
↑ Shift + ⭾ Tab
Print and preview documents
Move around the preview page when zoomed in
← ↑ → ↓
Ctrl + Function keys
Expand or collapse the ribbon
Ctrl + F1
Shift + Function keys
Display a shortcut menu
↑ Shift + F10
Function key reference
Go to the next pane or frame
F6
Ribbon: Change focus by using the keyboard
Open a selected menu or gallery on the ribbon
Space
Insert special characters
(after you type the first few characters of the AutoText entry name and when the ScreenTip appears) An AutoText entry
⤶ Enter
Ribbon: Change focus by using the keyboard
Cycle through floating shapes, such as text boxes or images (press Tab repeatedly)
Ctrl + Alt + 5 then ⭾ Tab
Extending selection
Turn extend mode off.
Esc
Create and edit documents
Create a new document
Ctrl + N
Create and edit documents
Open a document
Ctrl + O
Create and edit documents
Close a document
Ctrl + W
Create and edit documents
Remove the document window split
Alt + Ctrl + S
Check spelling and review changes in a document
Close the Reviewing Pane if it is open.
Alt + ↑ Shift + C
Create and edit documents
Save a document
Ctrl + S
Work with web content
Insert a hyperlink
Ctrl + K
Work with web content
Go back one page
Alt + ←
Work with web content
Go forward one page
Alt + →
Function key reference
Update the selected fields
F9
Print and preview documents
Print a document
Ctrl + P
Print and preview documents
Switch to print preview
Alt + Ctrl + I
Move around in a document
Up one screen (scrolling)
Page Up
Move around in a document
Down one screen (scrolling)
Page Down
Move around in a document
To the beginning of a document
Ctrl + Home
Move around in a document
To the end of a document
Ctrl + End
Check spelling and review changes in a document
Insert a comment (in the Revision task pane)
Alt + R then C
Check spelling and review changes in a document
Turn change tracking on or off
Ctrl + ↑ Shift + E
Check spelling and review changes in a document
Select Review tab on ribbon
Alt + R then ↓
Check spelling and review changes in a document
Select Spelling & Grammar
Alt + R then S
Find, replace, and go to specific items
Open the search box in the Navigation task pane
Ctrl + F
Find, replace, and go to specific items
Replace text, specific formatting, and special item.
Ctrl + H
Find, replace, and go to specific items
Go to a page, bookmark, footnote, table, comment, graphic, or other location
Ctrl + G
Find, replace, and go to specific items
Switch between the last four places that you have edited
Alt + Ctrl + Z
Move around in a document
One character to the left
←
Language bar: Turn on East Asian Input Method Editors
Alt Turn Korean Input Method Editor (IME) on 101 keyboard on or off
→
Move around in a document
One word to the left
Ctrl + ←
Move around in a document
One word to the right
Ctrl + →
Move around in a document
One paragraph up
Ctrl + ↑
Move around in a document
One paragraph down
Ctrl + ↓
Move within a table
To the previous row
↑
Language bar: Set proofing language
Review list of proofing languages
↓
Move through document in Read View mode
Go to end of document.
End
Move through document in Read View mode
Go to beginning of document
Home
Move around in a document
To the top of the window
Alt + Ctrl + Page Up
Move around in a document
To the end of the window
Alt + Ctrl + Page Down
Move around in a document
To the top of the next page
Ctrl + Page Down
Move around in a document
To the top of the previous page
Ctrl + Page Up
Shift + Function keys
Move to the last change
↑ Shift + F5
Insert or mark table of contents, footnotes and citations
Mark a table of contents entry
Alt + ↑ Shift + O
Insert or mark table of contents, footnotes and citations
Mark a table of authorities entry (citation).
Alt + ↑ Shift + I
Insert or mark table of contents, footnotes and citations
Mark an index entry
Alt + ↑ Shift + X
Insert or mark table of contents, footnotes and citations
Insert a footnote
Alt + Ctrl + F
Insert or mark table of contents, footnotes and citations
Insert an endnote
Alt + Ctrl + D
Insert or mark table of contents, footnotes and citations
Go to next footnote (in Word 2016)
Alt + ↑ Shift + >
Insert or mark table of contents, footnotes and citations
Go to previous footnote (in Word 2016)
Alt + ↑ Shift + <
Switch to another view of the document
Switch to Read Mode view
Alt + W then F
Switch to another view of the document
Switch to Print Layout view
Alt + Ctrl + P
Switch to another view of the document
Switch to Outline view
Alt + Ctrl + O
Switch to another view of the document
Switch to Draft view
Alt + Ctrl + N
Working with headings in Outline view
Promote a paragraph
Alt + ↑ Shift + ←
Working with headings in Outline view
Demote a paragraph.
Alt + ↑ Shift + →
Apply styles to paragraphs
Apply the Normal style
Ctrl + ↑ Shift + N
Move within a table
Row up
Alt + ↑ Shift + ↑
Move within a table
Row down
Alt + ↑ Shift + ↓
Working with headings in Outline view
Expand text under a heading
Alt + ↑ Shift + +
Working with headings in Outline view
Collapse text under a heading
Alt + ↑ Shift + -
Working with headings in Outline view
Expand or collapse all text or headings
Alt + ↑ Shift + A
Working with headings in Outline view
Hide or display character formatting
/
Working with headings in Outline view
Show the first line of text or all text
Alt + ↑ Shift + L
Working with headings in Outline view
Show all headings with the Heading 1 style
Alt + ↑ Shift + 1
Working with headings in Outline view
Show all headings up to Heading 1-9.
Alt + ↑ Shift + Num 1 — Num 9
Insert paragraphs and tab characters in a table
Tab characters in a cell
Ctrl + ⭾ Tab
Move through document in Read View mode
Go to page 1-9
1 — 9
Function key reference
Extend a selection
F8
Extending selection
Select the nearest character
F8 then ← →
Shift + Function keys
Reduce the size of a selection
↑ Shift + F8
Extending selection
Extend a selection one character to the right
↑ Shift + →
Extending selection
Extend a selection one character to the left
↑ Shift + ←
Extending selection
Extend a selection to the end of a word
Ctrl + ↑ Shift + →
Extending selection
Extend a selection to the beginning of a word
Ctrl + ↑ Shift + ←
Extending selection
Extend a selection to the end of a line
↑ Shift + End
Extending selection
Extend a selection to the beginning of a line
↑ Shift + Home
Extending selection
Extend a selection one line down
↑ Shift + ↓
Extending selection
Extend a selection one line up
↑ Shift + ↑
Extending selection
Extend a selection to the end of a paragraph
Ctrl + ↑ Shift + ↓
Extending selection
Extend a selection to the beginning of a paragraph
Ctrl + ↑ Shift + ↑
Extending selection
Extend a selection one screen down
Shift + Page Down
Extending selection
Extend a selection one screen up
Shift + Page Up
Extending selection
Extend a selection to the beginning of a document
Ctrl + ↑ Shift + Home
Extending selection
Extend a selection to the end of a document
Ctrl + ↑ Shift + End
Extending selection
Extend a selection to the end of a window
Alt + Ctrl + Shift + Page Down
Extending selection
Extend a selection to include the entire document
Ctrl + A
Ctrl + Shift + Function keys
Extend a selection or block
Ctrl + ↑ Shift + F8 then ← ↑ → ↓
Extending selection
Extend a selection to a specific location in a document
F8 + ← ↑ → ↓
Delete text and graphics
Delete one character to the left
⬅ Backspace
Delete text and graphics
Delete one word to the left
Ctrl + ⬅ Backspace
Delete text and graphics
Delete one character to the right
Del
Delete text and graphics
Delete one word to the right
Ctrl + Del
Copy and move text and graphics
Cut selected text or graphics to the Office Clipboard.
Ctrl + X
Delete text and graphics
Undo the last action
Ctrl + Z
Ctrl + Function keys
Cut to the Spike
Ctrl + F3
Copy and move text and graphics
Open the Office Clipboard
Alt + H then F then O
Copy and move text and graphics
Copy selected text or graphics to the Office Clipboard.
Ctrl + C
Copy and move text and graphics
Paste the most recent addition or pasted item from the Office Clipboard.
Ctrl + V
Copy and move text and graphics
Move text or graphics once.
F2 then Mouse movement then ⤶ Enter
Copy and move text and graphics
Copy text or graphics once.
↑ Shift + F2 then Mouse movement then ⤶ Enter
Alt + Function keys
Create a new Building Block
Alt + F3
Ctrl + Shift + Function keys
Insert the contents of the Spike
Ctrl + ↑ Shift + F3
Copy and move text and graphics
Copy the header or footer used in the previous section of the document.
Alt + ↑ Shift + R
Select text and graphics in a table
(press arrow keys repeatedly) Extend a selection to adjacent cells
↑ Shift + ← ↑ → ↓
Select text and graphics in a table
Select the column from top to bottom
Shift + Alt + Page Down
Select text and graphics in a table
Select the column from bottom to top
Shift + Alt + Page Up
Select text and graphics in a table
(with Num Lock off) Select an entire table
Alt + Num 5
Move within a table
To the first cell in a row
Alt + Home
Move within a table
To the last cell in a row
Alt + End
Move within a table
To the first cell in a column
Alt + Page Up
Move within a table
To the last cell in a column
Alt + Page Down
Format characters
Open the Font dialog box to change the formatting of characters.
Ctrl + D
Shift + Function keys
Change the case of letters
↑ Shift + F3
Format characters
Format all letters as capitals
Ctrl + ↑ Shift + A
Format characters
Apply bold formatting
Ctrl + B
Format characters
Apply an underline
Ctrl + U
Format characters
Underline words but not spaces
Ctrl + ↑ Shift + W
Format characters
Double-underline text
Ctrl + ↑ Shift + D
Format characters
Apply hidden text formatting
Ctrl + ↑ Shift + H
Format characters
Apply italic formatting
Ctrl + I
Format characters
Format letters as small capitals
Ctrl + ↑ Shift + K
Format characters
Apply subscript formatting (automatic spacing)
Ctrl + =
Format characters
Apply superscript formatting (automatic spacing)
Ctrl + ↑ Shift + +
Language bar: Turn on East Asian Input Method Editors
Turn Chinese Input Method Editor (IME) on 101 keyboard on or off
Ctrl + Space
Format characters
Change the selection to the Symbol font
Ctrl + ↑ Shift + Q
Change or resize font
Open the Font dialog box to change the font.
Ctrl + ↑ Shift + F
Change or resize font
Increase the font size
Ctrl + ↑ Shift + >
Change or resize font
Decrease the font size
Ctrl + ↑ Shift + <
Change or resize font
Increase the font size by 1 point
Ctrl + ]
Change or resize font
Decrease the font size by 1 point
Ctrl + [
Copy and review text formats
Copy formats.
Ctrl + ↑ Shift + C
Copy and review text formats
Paste formats.
Ctrl + ↑ Shift + V
Change paragraph alignment
Switch a paragraph between centered and left-aligned.
Ctrl + E
Change paragraph alignment
Switch a paragraph between justified and left-aligned
Ctrl + J
Change paragraph alignment
Switch a paragraph between right-aligned and left-aligned
Ctrl + R
Change paragraph alignment
Left align a paragraph
Ctrl + L
Change paragraph alignment
Indent a paragraph from the left
Ctrl + M
Change paragraph alignment
Remove a paragraph indent from the left
Ctrl + ↑ Shift + M
Change paragraph alignment
Create a hanging indent
Ctrl + T
Change paragraph alignment
Reduce a hanging indent
Ctrl + ↑ Shift + T
Change paragraph alignment
Remove paragraph formatting
Ctrl + Q
Copy and review text formats
(asterisk on numeric keypad does not work) Display nonprinting characters
Ctrl + ↑ Shift + *
Shift + Function keys
Start context-sensitive Help or reveal formatting
↑ Shift + F1
Set line spacing
Single-space lines.
Ctrl + 1
Set line spacing
Double-space lines.
Ctrl + 2
Set line spacing
Set 1.5-line spacing.
Ctrl + 5
Set line spacing
Add or remove one line space preceding a paragraph
Ctrl + 0
Apply styles to paragraphs
Open Apply Styles task pane.
Ctrl + ↑ Shift + S
Apply styles to paragraphs
Open Styles task pane.
Alt + Ctrl + ↑ Shift + S
Apply styles to paragraphs
Start AutoFormat.
Alt + Ctrl + K
Apply styles to paragraphs
Apply the Heading 1 style
Alt + Ctrl + 1
Apply styles to paragraphs
Apply the Heading 2 style
Alt + Ctrl + 2
Apply styles to paragraphs
Apply the Heading 3 style
Alt + Ctrl + 3
Ctrl + Function keys
Insert an empty field
Ctrl + F9
Insert special characters
A line break
↑ Shift + ⤶ Enter
Insert special characters
A page break
Ctrl + ⤶ Enter
Insert special characters
A column break
Ctrl + ↑ Shift + ⤶ Enter
Insert special characters
An em dash
Alt + Ctrl + Num -
Insert special characters
An en dash
Ctrl + Num -
Insert special characters
An optional hyphen
Ctrl + -
Insert special characters
A nonbreaking hyphen
Ctrl + ↑ Shift + -
Insert special characters
A nonbreaking space
Ctrl + ↑ Shift + Space
Insert special characters
The copyright symbol
Alt + Ctrl + C
Insert special characters
The registered trademark symbol
Alt + Ctrl + R
Insert special characters
The trademark symbol
Alt + Ctrl + T
Insert special characters
An ellipsis
Alt + Ctrl + .
Insert special characters
A single opening quotation mark
Ctrl + ` then `
Insert special characters
A single closing quotation mark
Ctrl + ' then '
Insert special characters
Double opening quotation marks
Ctrl + ` then ↑ Shift + '
Insert special characters
Double closing quotation marks
Ctrl + ' then ↑ Shift + '
Insert characters by using character codes
Find out the Unicode character code for the selected character
Alt + X
Adding objects
Open object dialog box. Then Press down arrow to select an object type and press Enter to create an object
Alt then N then J then J
Mail merge and fields
Preview a mail merge
Alt + ↑ Shift + K
Mail merge and fields
Merge a document
Alt + ↑ Shift + N
Mail merge and fields
Print the merged document
Alt + ↑ Shift + M
Mail merge and fields
Edit a mail-merge data document
Alt + ↑ Shift + E
Mail merge and fields
Insert a merge field
Alt + ↑ Shift + F
Mail merge: Working with fields
Insert a DATE field
Alt + ↑ Shift + D
Mail merge: Working with fields
Insert a LISTNUM field
Alt + Ctrl + L
Mail merge: Working with fields
Insert a Page field
Alt + ↑ Shift + P
Mail merge: Working with fields
Insert a TIME field
Alt + ↑ Shift + T
Ctrl + Shift + Function keys
Update linked information in a Word source document
Ctrl + ↑ Shift + F7
Ctrl + Shift + Function keys
Unlink a field
Ctrl + ↑ Shift + F9
Shift + Function keys
Switch between a field code and its result
↑ Shift + F9
Alt + Function keys
Switch between all field codes and their results
Alt + F9
Alt + Shift + Function keys
Run GOTOBUTTON or MACROBUTTON from the field that displays the field results
Alt + ↑ Shift + F9
Function key reference
Go to the next field
F11
Shift + Function keys
Go to the previous field
↑ Shift + F11
Ctrl + Function keys
Lock a field
Ctrl + F11
Ctrl + Shift + Function keys
Unlock a field
Ctrl + ↑ Shift + F11
Language bar: Set proofing language
Open the Set Proofing Language dialog box
Alt + R then U then L
Language bar: Set proofing language
Set default languages
Alt + R then L
Language bar: Turn on East Asian Input Method Editors
Turn Japanese Input Method Editor (IME) on 101 keyboard on or off
Alt + ~
Function key reference
Get Help or visit Office.com.
F1
Function key reference
Move text or graphics
F2
Function key reference
Repeat the last action
F4
Function key reference
Choose the Go To command (Home tab).
F5
Function key reference
Choose the Spelling command (Review tab)
F7
Function key reference
Choose the Save As command
F12
Shift + Function keys
Copy text.
↑ Shift + F2
Shift + Function keys
Repeat a Find or Go To action
↑ Shift + F4
Shift + Function keys
Go to the previous pane or frame (after pressing F6)
↑ Shift + F6
Shift + Function keys
Choose the Thesaurus command (Review tab, Proofing group)
↑ Shift + F7
Shift + Function keys
Choose the Save command
↑ Shift + F12
Ctrl + Function keys
Choose the Print Preview command.
Ctrl + F2
Ctrl + Function keys
Close the window
Ctrl + F4
Ctrl + Function keys
Go to the next window
Ctrl + F6
Ctrl + Function keys
Maximize the document window
Ctrl + F10
Ctrl + Function keys
Choose the Open command
Ctrl + F12
Ctrl + Shift + Function keys
Edit a bookmark
Ctrl + ↑ Shift + F5
Ctrl + Shift + Function keys
Go to the previous window
Ctrl + ↑ Shift + F6
Ctrl + Shift + Function keys
Choose the Print command
Ctrl + ↑ Shift + F12
Alt + Function keys
Go to the next field
Alt + F1
Alt + Function keys
Exit Word
Alt + F4
Alt + Function keys
Restore the program window size
Alt + F5
Alt + Function keys
Move from an open dialog box back to the document, for dialog boxes that support this behavior
Alt + F6
Alt + Function keys
Find the next misspelling or grammatical error
Alt + F7
Alt + Function keys
Run a macro
Alt + F8
Alt + Function keys
Display the Selection task pane
Alt + F10
Alt + Function keys
Display Microsoft Visual Basic code
Alt + F11
Alt + Shift + Function keys
Go to the previous field
Alt + ↑ Shift + F1
Alt + Shift + Function keys
Choose the Save command
Alt + ↑ Shift + F2
Alt + Shift + Function keys
Display a menu or message for an available action
Alt + ↑ Shift + F10
Alt + Shift + Function keys
Choose Table of Contents button in the Table of Contents container when the container is active.
Alt + ↑ Shift + F12
Ctrl + Alt + Function keys
Display Microsoft System Information
Ctrl + Alt + F1
Ctrl + Alt + Function keys
Choose the Open command
Ctrl + Alt + F2
This tutorial shows how to change the proofing language for comments in Microsoft Word.
But first, why would you want to change the proofing language for comments? Because …
Comments in Word Inherit Proofing Languages
When you use Word’s Track Changes to edit someone else’s document, the comment tool automatically inherits the original author’s proofing language along with spelling and grammar-check settings. Normally this inheritance isn’t a problem. However, if the author wrote the text in another language and then translated it to English, your comments may be ignored by the spelling and grammar check (now called the Editor) until you change the comments to your desired proofing language.
This tutorial is available as a YouTube video showing all the steps in real time.
Watch more than 150 other writing-related software tutorials on my YouTube channel.
Please note that the images below are from Word for Microsoft 365. The steps also apply to Word 2021, Word 2019, Word 2016 and Word 2013; however, the interface in these older versions may look slightly different.
1. Select the Home tab in the ribbon.

2. Select the dialog box launcher in the Styles group.

3. Select the Options button in the Styles task pane.

4. Select All styles in the Select styles to show drop-down menu in the Style Pane Options dialog box.

5. Select the OK button to close the Style Pane Options dialog box.

6. Scroll to Comment Text in the Styles task pane; hold your cursor over Comment Text to reveal the options arrow.
![]()
7. Select the options arrow and then select Modify from the drop-down menu.

8. Select the Format button in the Modify Style dialog box.

9. Select Language in the drop-down menu.

10. Select English (or another preferred language) in the Mark selected text as drop-down menu in the Language dialog box.

11. Uncheck Do not check spelling or grammar to ensure that Word will include your comments in spelling and grammar checks.

12. Select the OK button to close the Language dialog box.

13. Select the OK button to close the Modify Style dialog box.

14. Save, close, and then reopen the document to activate your new comment review settings.
Recommended Reading: How to Change the Font and Font Size of Comments in Word
Updated September 17, 2022
Free MS Word Spelling & Grammar Check Tutorial – Microsoft Word 2010 – Formatting
Free Online Microsoft Word Tutorials
MS Word 2010 – Formatting
* Set Language
*
Running a Spell Check
*
Running a Grammar Check
Word can check both your spelling and grammar. Caution: You still need to proofread your document!
Test your MS Word skills with the corresponding FREE Online Multiple Choice
Spelling and Grammar Check Test
* Set Language
You are forgiven for thinking the language option in Microsoft Word only applies to people who speak more than one language and need to type in a language other than English. Within English itself there are multiple dialects and Wikipedia lists more than 45 dialects across as many countries. Each of these dialects has different spelling conventions, for example: centre (UK spelling) versus center (US spelling).
With the world truly becoming a global village increasing the likelihood of us needing to interact with people all around the world, it is important to know how to adjust the Microsoft Word language setting to accommodate different dialects of English and even other languages when needed.
To check which language a document is set to:
1. Select the whole document by pressing Ctrl+a on your keyboard.
2. On the Status bar at the bottom of your Word screen, click on the Language button (circled in yellow in the screenshot below). You will note that this document is set to English (UK).
To change the language setting of a document:
1. First select the whole document by pressing Ctrl+a on your keyboard.
2. Click on the Language button on the Status Bar (circled in yellow in the screenshot above).
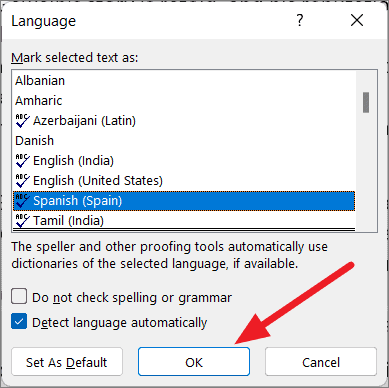
3. This will launch the Language dialogue box pictured below:
4. Scroll through the list of languages in the Language dialogue box and select the language or dialect that you require by clicking on it once in the list. Press the OK button to effect the change.
5. The languages and dialects you use most often will appear at the top of the list. The list is sorted alphabetically and you can find all dialects of English (for example) by finding English in the list of languages and then looking out for the dialect in brackets (for example US for United States English).
6. Use the ‘Set as Default’ button in the bottom left-hand corner of the dialogue box to set your selected language as the default language used in your document.
NOTE OF CAUTION: do not tick the box labelled ‘Do not check spelling or grammar’ unless you are absolutely sure you do not wish spelling and language errors to show up. The ‘Detect language automatically’ box can also result in unexpected errors in your document as Word will change the language of your document to what it ‘thinks’ the language should be. These boxes are a good starting point when your document is not checking spelling and language correctly. Select the whole document (Ctrl+a), launch the language dialogue box and ensure these boxes are not ticked.
* Running a Spellcheck
The spellcheck function may make you wonder about all the years you spent preparing for spelling bees and learning to refine your spelling abilities. You can use the spell checker in Word while typing, to correct misspelt words, or after completing a document and before proofreading it.
To check spelling while you type:
1. When you type a word and spell it incorrectly, Word will insert a wavy redline underneath the misspelt word. Examples are circled in yellow in the screenshot below:
2. Right-click on the misspelt word and review the spelling options provided by Word (circled in yellow in the screenshot below). Depending on the misspelt word, you will have different spelling suggestions offered to you:
3. Pick the correctly spelt word from the list to replace the misspelt word by clicking on the correctly spelt word in the list. The misspelt word in your document will automatically be replaced by the word you select.
If a word is spelt correctly but MS Word picks it up as a spelling error, you can tell Word to ignore it (i.e. to stop marking it as an error) or to ignore all instances of the word throughout your document. You can also add the word to your dictionary. The latter option will ensure Word picks up any misspelling on the new word when you use it in future.
To ignore a word that is picked up as a spelling error:
1. Right-click the word and select Ignore from the list.
2. The red wavy line underneath the word will disappear to indicate it is being ignored as a spelling error.
To ignore all instances of a word:
1. Right-click the word and select Ignore All from the list.
2. The red wavy line underneath the word will disappear to indicate it is being ignored as a spelling error. Future uses of the same word in the document will not be picked up as an error.
To add a word to the dictionary:
1. Right-click the word and select Add to Dictionary from the list.
2. The red wavy line underneath the word will disappear to indicate it is no longer viewed as a spelling error. When you type the word again in future it will not be picked up as a typing error and if you misspell the word, you will have the correct spelling as a correction suggestion.
To run a spellcheck on a completed document:
1. Click on the Review tab on the Ribbon (no need to select the document first).
2. Click on the Spelling & Grammar button located in the Proofing group. This will launch the Spelling & Grammar dialogue box (pictured in the screenshot below):
3. Errors will show up as red words in the Not in Dictionary box.
4. Use the Ignore Once and Ignore All buttons to skip a word which you do not wish to correct to move on to the next error.
5. Use the Add to Dictionary button to add a word to your Word dictionary to ensure it is not picked up as an error in future.
6. To correct a misspelt word, select the correctly spelt version of the word in the Suggestions box and then click on the Change button. Use the Change All button to correct the spelling of a word throughout the document.
To end a spell check, close the dialogue box by clicking the Cancel button or continue checking through the document until Word prompts you that spellcheck has completed.
Quick Tip: a shortcut for launching the Spelling (and Language) dialogue box is to press F7 on your keyboard.
* Running a Grammar Check
Grammar Check works parallel to the spell checker. Grammar errors are underlined with a green wavy line and words that are used incorrectly are underlined with a blue wavy line. You can correct grammar errors as you type or correct them after completing a document and before proofreading the document.
To correct grammar errors as you type:
1. When you make a possible grammar error, Word will insert a wavy green or blue line underneath the error. Examples are circled in yellow in the screenshot below:
2. Right-click on the word or phrase that is marked as having a grammar error and review the suggestions provided by Word (circled in yellow in the screenshot below):
3. Correct the grammar error by clicking on the correct option in the list. The word, phrase or sentence in your document will automatically be replaced with the option you select from the list.
If Word picks up a word, phrase or sentence as containing grammar errors which is not really an error, you can tell Word to ignore it (i.e. to stop marking it as an error) or to ignore a rule (to ignore similar faux grammatical errors throughout the rest of the document).
To ignore a grammatical error:
1. Right-click the word and select Ignore from the list.
2. The green or blue wavy line underneath the word, phrase or sentence will disappear to indicate it is being ignored as an error.
To get more information on a grammatical error:
1. Right click the word, phrase or sentence that is marked as a grammar error with a green or blue wavy line underneath.
2. Pick ‘About this Sentence’ from the list. This will launch a dialogue box that explains the error and provides you with examples and suggestions of how to fix your sentence:
To run a language check on a completed document:
1. Right-click on a grammar error in your document.
2. Select Grammar from the list to launch the Grammar dialogue box.
OR
1. Click on the Review tab on the Ribbon (no need to select the whole document first).
2. Click on the Spelling & Grammar button located in the Proofing group. This will launch the Spelling & Grammar dialogue box (pictured in the screenshot below). You can review the grammar error by looking in the top part of the dialogue box where the error will be in green font.
3. Use the Ignore Once and Ignore Rule buttons to skip a word, phrase or sentence which you do not wish to correct and to move on to the next error.
4. To correct a grammar error, select the correct option from the Suggestions box by clicking on it and then click on the Change button.
5. To get an explanation about the error and examples and suggestions of how to fix your sentence, click on the Explain button.
To end a grammar check, close the dialogue box by clicking the Cancel button or continue checking through the document until Word prompts you that the Spelling and Grammar check has been completed.
Remember, spelling and grammar checkers are useful tools, but do not replace proofreading a document. It is important to still review the content of your document as there are many proofing errors that Word is not equipped to pick up.
PROOFING TIP: if you want to impress readers of your document with your vocabulary or if you just simply do not wish to use the same word multiple times, use the Synonyms option to find alternatives for words. Simply right click the word you wish to find a different version for and click on Synonyms. You can then select a replacement word from the available options listed.
Test your MS Word skills with the corresponding FREE Online Multiple Choice
Spelling and Grammar Check Test
TRY THE NEXT TUTORIAL: Word Page Numbering Basics Tutorial
TRY THE NEXT TEST: Word Page Numbering Basics Test
* More from TestsTestsTests.com
Yes, obviously. Just select the text and press the language button in the status bar

If your document has been written in multiple languages then things are trickier.
- If different keyboard layouts were used for typing them, but the layout doesn’t match the language name then you may use VBA to fix that.
- If you’ve typed them with the same layout (like English and French with the French layout) then sometimes Word is able to guess the language. It does have a language detection feature as you can see in the Language dialog above, but it can only detect languages in the list you specify. Notice the part highlighted by me:
Detect language automatically
In 2010, 2013, and 2016 versions of Word and Outlook
- Open a new document or email message.
- On the Review tab, in the Language group, click Language.
- Click Set Proofing Language.
- In the Language dialog box, select the Detect language automatically check box.
- Review the languages shown above the double line in the Mark selected text as list. Office can detect only those languages listed above the double line. If the languages that you use are not shown above the double line, you must enable the editing language (turn on the language-specific options) so that Office can automatically detect them.
Turn on automatic language detection
However the «Detect language automatically» feature often fails to work when you switch language during typing, or when you paste text in another language. So unfortunately you’ll still have to use some VBA to change the language. You can call some external service or use the built-in language detection feature, but with finer tuning to make the result more desireable
See also
- Specifying a Language for Text
- Check spelling and grammar in a different language
- Change spelling check language for a Document in Microsoft Word 2010
If you’ve been working in Word for a while, you may have noticed that sometimes a document set to your language reports spelling errors that it shouldn’t (e.g. I set my documents to English (Australia), but parts of the document may be set to English (US), and so the correct Australian spelling of words like ‘organisation’ may be flagged as errors).
Or perhaps when you do a spell check, you get a message saying that areas of your document were set to not check spelling.
What’s going on here?
Well, I don’t know the definitive answer. But I can tell you that there are NUMEROUS places where you can set language settings, both in Word, in Office, and in Windows. If Word finds a conflict in these settings, it does the best it can (no, I don’t know how it makes the decision about which setting to apply).
I’ll try to list as many as I know about — hopefully, these will help you troubleshoot language conflicts or strange spell check reports. (Note: Some of this information is repeated for the various versions of Windows, Office, and Word — I suspect those using Word 2010 and later won’t look at the Word 2003 information, so that’s why I’ve repeated it.)
Windows
- Start > Control Panel > Region and Language Options: Check the settings on all tabs and under all buttons in the dialog box. Make sure the selected location and language match. NOTE: Windows 10 has separate settings for Region and Language — check both.
- Start > Control Panel > Date and Time: Set your time zone. While not directly related to language, your time zone should match your location set in the Regional and Language Options (above), unless, of course, you use this computer when traveling.
Office 2003
- See: Set the default language: https://cybertext.wordpress.com/2009/03/11/office-2003-set-the-default-language/
Office 2007
- Start > All Programs > Microsoft Office > Microsoft Office Tools > Microsoft Office 2007 Language Settings: Set the Enabled editing languages AND your Primary editing language. (This dialog box can also be accessed from within Word Options.)
Office 2010
- Start > All Programs > Microsoft Office > Microsoft Office Tools > Microsoft Office 2010 Language Preferences: Choose the editing languages, set one as the default, and tell Windows which language to use for the interface elements such as buttons, tabs, Help, and tooltip text. (This dialog box can also be accessed from within Word’s Options, and from the Review tab — see below.)
Office 2016
- Start > Office 2016 Language Preferences: Choose the editing languages, set one as the default, and tell Windows which language to use for the interface elements such as buttons, tabs, Help, and tooltip text. (This dialog box can also be accessed from within Word’s Options, and from the Review tab — see below.)
Word 2003
- Tools > Language > Set Language: This supposedly sets the language for the entire document, but it can be overridden by settings at a more granular level, such as Styles. You can set the Default language here.
- Tools > Spelling and Grammar: Set the dictionary language here. Also, click Options on this dialog box, then click Settings to see what the grammar checker will check. If you think you’ve added something to the dictionary by mistake, click Options on the Spelling and Grammar dialog box, then Custom Dictionaries, then select the Dictionary Language you’re using and click Modify to edit the words stored in your custom dictionary.
- Tools > AutoCorrect Options: While not strictly related to language, if you see weird things happening like ‘ACN’ changing to ‘can’ (when you REALLY want ‘ACN’), it’s likely that there’s an AutoCorrect set up to make that change automatically. Check the list at the bottom of the AutoCorrect tab and delete any you don’t want.
- Styles: There’s an option to set the language for EVERY style! By default, no language is set. But if you think a setting on a style may be the issue, check the style (Format > Styles and Formatting). Right-click on the style and select Modify. On the Modify Style dialog box, click Format > Language to see what language — if any — is set for that particular style. Don’t forget that some styles inherit properties from other styles, so the language may not be set on the style you’re looking at. Also, if Do not check spelling or grammar is set for a particular style, that explains why some sections of your document may be skipped when you run the spell checker.
Word 2007
- Review tab > Proofing group > Set Language: This supposedly sets the language for the entire document, but it can be overridden by settings at a more granular level, such as Styles. You can set the Default language here.
- Office button > Word Options > Popular > Language Settings: Set the Enabled editing languages AND your Primary editing language. (Same dialog box as mentioned under Office 2007 above)
- Office button > Word Options > Proofing > AutoCorrect Options: While not strictly related to language, if you see weird things happening like ‘ACN’ changing to ‘can’ (when you REALLY want ‘ACN’), it’s likely that there’s an AutoCorrect set up to make that change automatically. Check the list at the bottom of the AutoCorrect tab and delete any you don’t want.
- Office button > Word Options > Proofing > Custom Dictionaries: If you think you’ve added something to the dictionary by mistake, click this button, then select the Dictionary Language you’re using and click Edit word list to edit the words stored in your custom dictionary. You set the Dictionary Language here too.
- Styles: There’s an option to set the language for EVERY style! By default, no language is set. But if you think a setting on a style may be the issue, check the style. Display the Styles pane, right-click on the style and select Modify. On the Modify Style dialog box, click Format > Language to see what language — if any — is set for that particular style. Don’t forget that some styles inherit properties from other styles, so the language may not be set on the style you’re looking at. Also, if Do not check spelling or grammar is set for a particular style, that explains why some sections of your document may be skipped when you run the spell checker.
Word 2010, Word 2013, Word 2016
- Review tab > Language group > Language > Set Proofing Language: This supposedly sets the language for the entire document, but it can be overridden by settings at a more granular level, such as Styles. You can set the Default language here.
- File > Options > Language: (Same dialog box as mentioned under Office 2010 above; also accessible via Review tab > Language group > Language > Language Preferences. )
- File > Options > Proofing > AutoCorrect Options: While not strictly related to language, if you see weird things happening like ‘ACN’ changing to ‘can’ (when you REALLY want ‘ACN’), it’s likely that there’s an AutoCorrect set up to make that change automatically. Check the list at the bottom of the AutoCorrect tab and delete any you don’t want.
- File > Options > Proofing > Custom Dictionaries: If you think you’ve added something to the dictionary by mistake, click this button, then select the Dictionary Language you’re using and click Edit word list to edit the words stored in your custom dictionary. You set the Dictionary Language here too.
- Styles: There’s an option to set the language for EVERY style! By default, no language is set. But if you think a setting on a style may be the issue, check the style. Display the Styles pane, right-click on the style and select Modify. On the Modify Style dialog box, click Format > Language to see what language — if any — is set for that particular style. Don’t forget that some styles inherit properties from other styles, so the language may not be set on the style you’re looking at. Also, if Do not check spelling or grammar is set for a particular style, that explains why some sections of your document may be skipped when you run the spell checker. (Update September 2018: I now have a macro to set the language for ALL styles at once: https://cybertext.wordpress.com/2018/09/21/word-macro-to-set-the-language-for-all-styles/)
See also:
- PowerPoint 2007: Set the language for all text: https://cybertext.wordpress.com/2009/12/30/powerpoint-2007-set-language-for-all-text/
- http://wordribbon.tips.net/Pages/T008715_Foreign_Language_Changes_while_Typing.html
- http://wordribbon.tips.net/Pages/T005938_Specifying_a_Language_for_Text.html
- http://wordribbon.tips.net/Pages/T008135_Ensuring_that_Spell_Checking_is_Enabled_in_All_Styles.html
- http://wordribbon.tips.net/Pages/T006278_Getting_SpellCheck_to_Work.html
- http://wordribbon.tips.net/Pages/T006026_What_to_Do_if_Spell_Check_Doesnt_Catch_Misspelled_Words.html
[Links last checked October 2017; updated to include information for Word 2010-2016, Windows 7 and Windows 10 (October 2017)]
I have already published a detailed post on how to customise your comment boxes/balloons. This issue came up for me the other day, and I wanted to note down some quick instructions. Please note these instructions are for Word 2010 and upwards for Windows and may not work in other versions.
Why are my comment balloons in a different language?
In my case, I was running a final spell-check over a document when I suddenly realised that my comment balloons were in Australian English (I realised this when the spell-checker switched over to Australian English while taking exception to a word I had not, in fact, mis-typed).
Why would this be? Well, the formatting of the comment balloons comes under its own Style, separate from normal text, so at some stage this document, or the computer it came from, or the template the author was using, had come to have Australian English as the comment box language.
How did I get it back to UK English?
How do I change the comment balloon language?
Follow the normal steps for updating the comment balloon style, so get to the styles menu by
- Pressing Control + Alt + Shift + s all at the same time
- Making sure you’re in the Home tab and click on the little tiny arrow at the bottom right of the Styles menu
This gives you the Styles dialogue box.

Using either of these methods, you will bring up the Styles dialogue box.

Click on the rightmost button: Manage Styles to bring up the next box: Manage Styles. To get to Comment Balloons: click on the down arrow to change As Recommended to Alphabetical:

Once you’ve got the list into alphabetical order, find Comment text, and then click on the Modify button.

Click the Format button and choose Language …

And change the language:

And then all the OK buttons to get back.
You can also choose whether this change applies only to this document, or to all documents based on this template, and add it to your Quick Styles list if you want:

Press the OK button, and carry on pressing OK buttons until you get back to your document. Now your comment box language will be whatever you asked it to be!
Why not take a look at these related topics, which should help you further?
Customising comments balloons
What to do if your comment boxes go tiny in Word
What to do if your comment boxes start running from right to left
Customising Track Changes
This is part of my series on how to avoid time-consuming “short cuts” and use Word in the right way to maximise your time and improve the look of your documents. Find all the short cuts here …
Do let me know if this has helped you, saved your bacon, etc. – and do share with the buttons at the bottom of this article.
Microsoft Word is one of the most popular and widely used programs for documentation purposes around the world. If you hail from a non-English speaking country, then you may want to use MS Word in your own language or any other language of your choice.
Sometimes, you may want to access accent marks or include special characters from a different language in your writing – this would require you to change the MS Word language itself. Fortunately, Microsoft Word allows you to change the editing language, proofing tools, and the user interface language (display language) and set a different display language while applying another language in editing and proofing documents.
In this article, we’ll show you how to change the display language as well as the editing and proofing language in Microsoft Word. Throughout the post, we’ll be using Microsoft 365 but most of the options are similar to the offline versions (2019, 2016, 2013, or 2010) and Office 365. So irrespective of the version you’re using, this article can surely help change or switch up the language(s) on your Microsoft Word.
Changing the Display and Help Languages
When you install Microsoft Office, it usually has English as its default language or the local/regional language of the location that powered the MS Word purchase. If you want to change this language(s) to any other, you would have to manually install it/them first.
A display language is the one that’s visible on all tabs, menus, buttons, preferences, dialog boxes and other controls on your Word application. If you want to use a different language instead of the default, follow these steps:
Open Microsoft Word and click the ‘File’ tab.
In the backstage view, click ‘Options’.
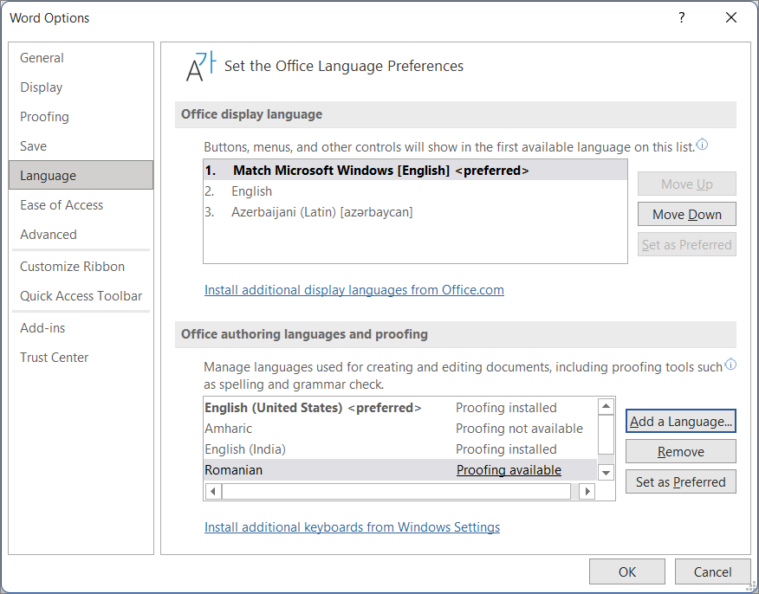
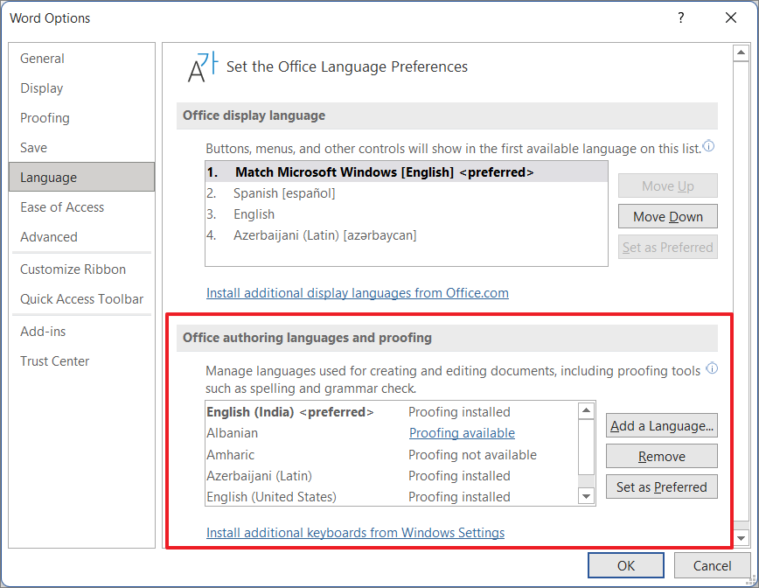
A Word Options dialog window will appear. Here, select the ‘Language’ tab. In the Language tab, you will see two sections – ‘Office display language’ and ‘Office authoring languages and proofing’.
If you are using Office 2019, 2016, 2013, or 2010, you will see ‘Choose Editing Languages’ and ‘Choose Display Languages’

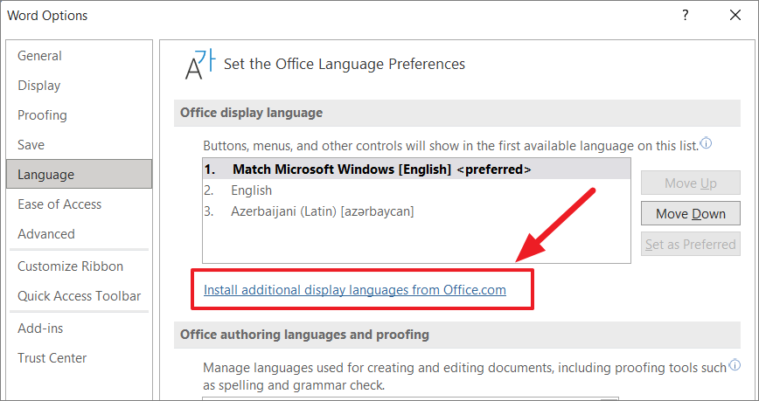
‘Office display language’ or ‘Choose Display Languages’ section is where you can set the MS Word display (UI) language. You’ll see a list of installed languages under this section. If the language you’re looking for is not in the box, you would have to manually download and install that particular language pack.
Adding Language Packs on Office
If a specific language is not listed here, click the ‘Install additional display languages from Office.com’ link below the box (as shown below).
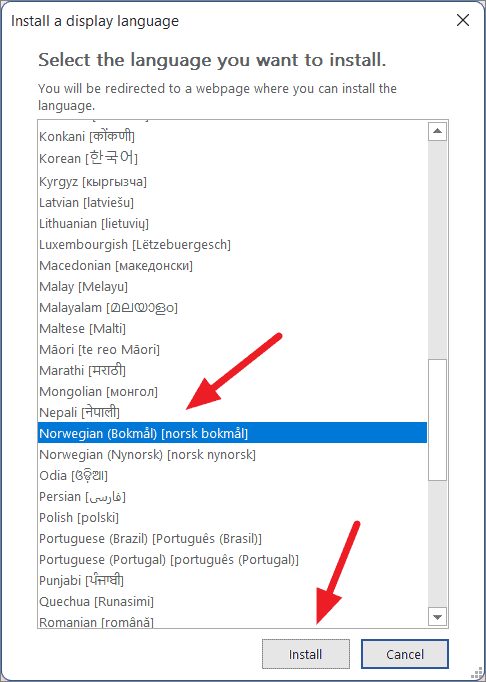
This will show you a ‘Install a display language’ dialog. Here, choose your language and click ‘Install’.
This will take you to the Microsoft website where you can download the language pack for the selected language as shown below. Here, click the ‘Download’ button.
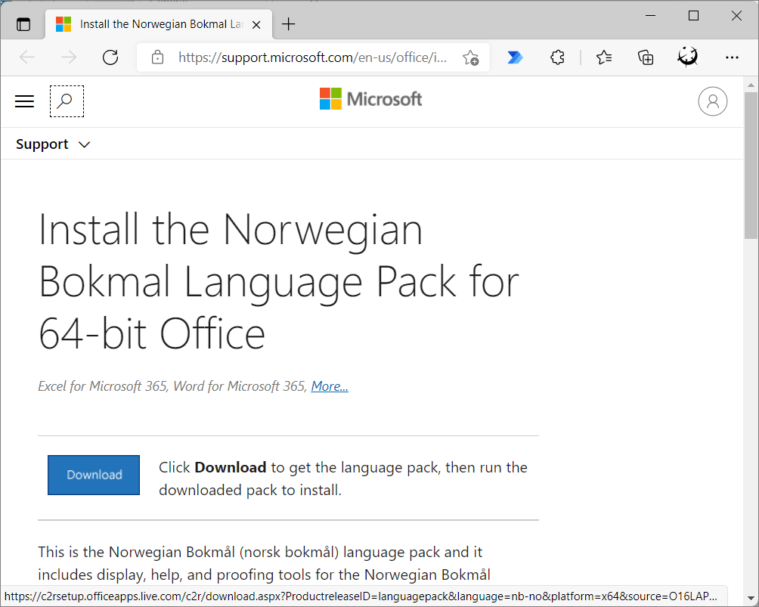
Run the downloaded setup file to install it.
Wait for the installation to complete, then close and re-launch Word. Sometimes, you may need to reboot your computer for smoother functioning.

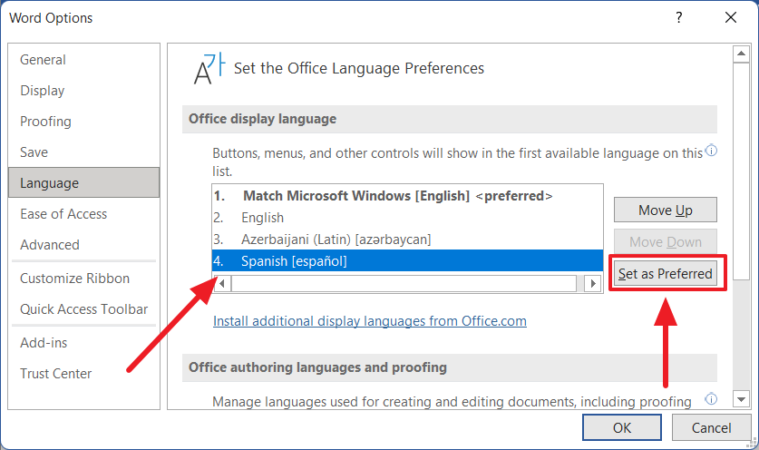
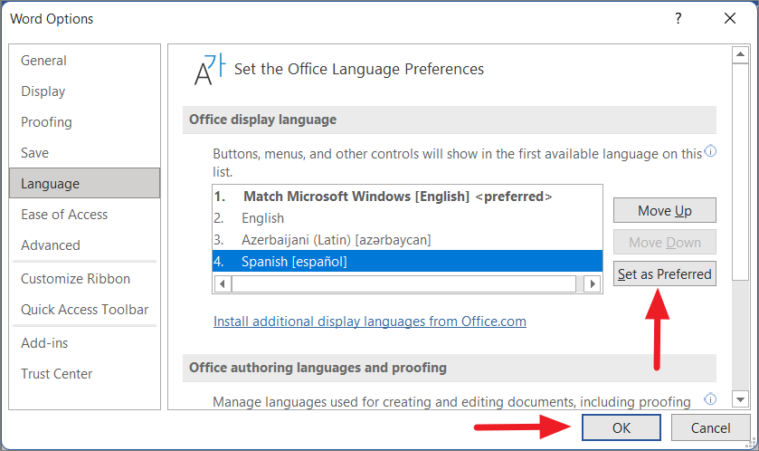
Then, open the MS Word app again and go to File > Options > Language. As you can see, the ‘Office display language’ box lists the installed language. Now, select your desired language and click the ‘Set as Preferred’ or ‘Set as Default’ option (for Office 2019 and older versions).
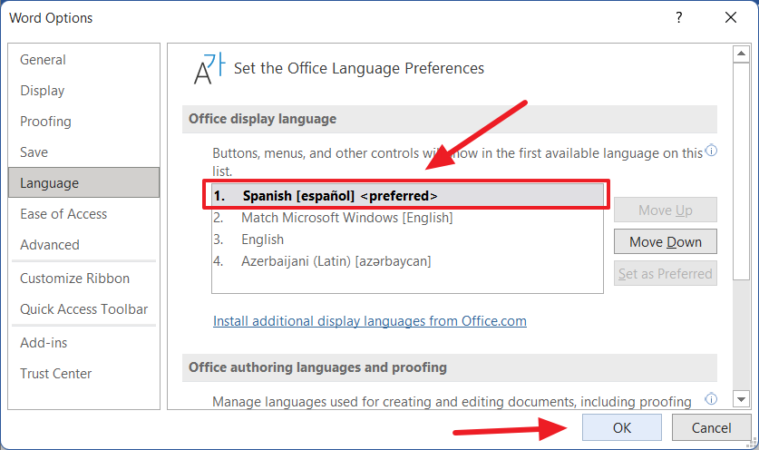
After you select the ‘Set as preferred’ or ‘Set as Default’ button, your selected language should show ‘<preferred>’ at the end as shown below. Then, click ‘OK’.
Adding Language Packs from Office Webpage
Alternatively, you can directly visit the MS Office’s Language pack for Office page, where you can download the language you wish to use. Microsoft Office offers over 100 additional language accessory packs which you can download and install for free.
Once you’re on Office’s language accessory pack webpage, scroll to see a section called ‘Step 1: Install the language accessory pack’. Under this section, select your Office version tab.
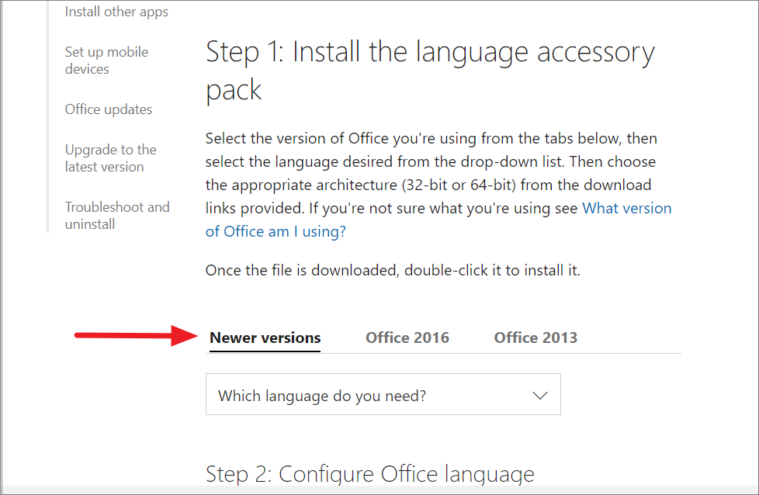
Then, choose your language from the ‘Which language do you need?’ drop-down.
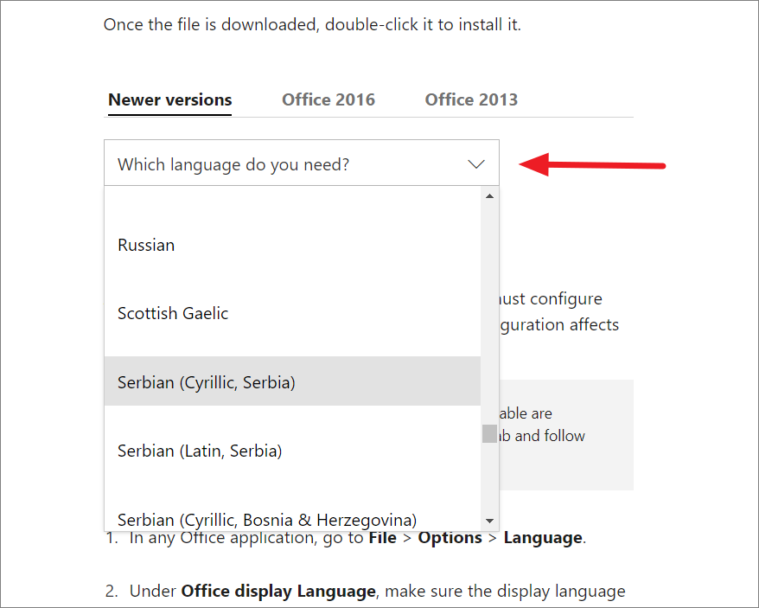
Once you select the language, you’ll notice the ’32-bit’ and ’64-bit’ download links. If your operating system is of 32-bit architecture, click ‘Download (32-bit)’. Or if your system uses 64-bit OS, then, select the ‘Download (64)’ bit.
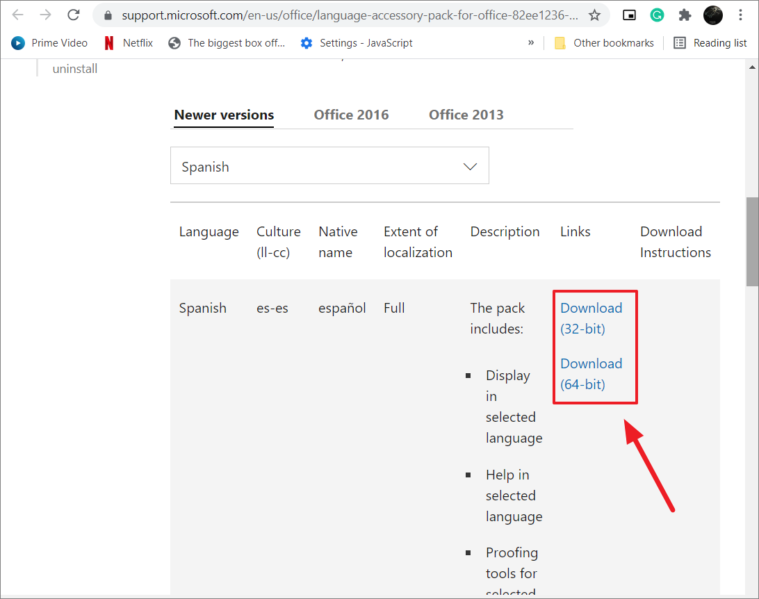
After the file is downloaded, install the setup file, close, and re-open the Word app. Then, go to the Word Options menu, choose the language pack you installed under the ‘Office display language’ box and select ‘Set as Preferred or ‘Set as default’. Then, click ‘OK’.
Restart Word and you’ll see that the UI language is changed for MS Word.
Changing the Editing and Proofing Language
The editing/authoring language is the language in which you write and edit documents. This language also controls the text direction and arrangement for vertical, right-to-left, and mixed text. The Proofing tool checks for spelling and grammatical errors. If the editing/input and proofing language is already installed on your computer, you can easily change it. If not, you need to first manually install the language and then change it.
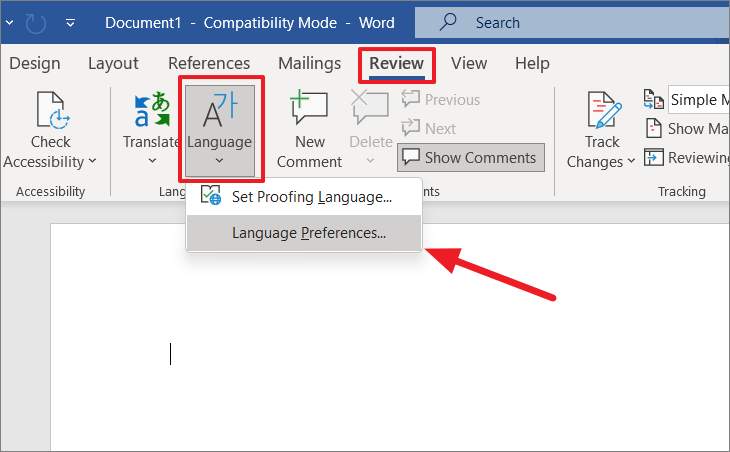
Open the Word application, click the ‘File’ tab and select ‘Options’ to open Word Options. You can also open the Word Options window by switching to the ‘Review’ tab in the Ribbon and clicking the ‘Language’ button and then selecting the ‘Language Preference’ option.
In the Word Options, select the ‘Language’ tab. You’ll see the ‘Office authoring languages and proofing’ or ‘Choose Editing language’ section where you can add and set the language for editing. When you install MS Word, the app will automatically be configured to use the default system language.
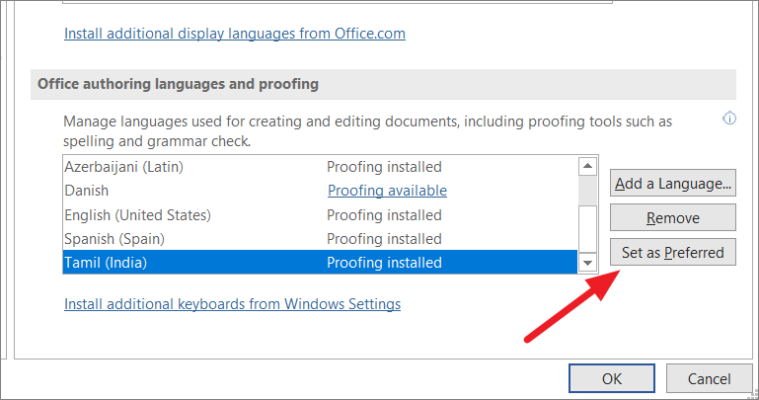
The ‘Office authoring languages and proofing’ box lists all installed system and Office languages. If the language you want to change is on the list, select the language and click ‘Set as Preferred’ or ‘Set as Default’.

Installing Additional Input Languages for Word
Follow these installation steps if a specific language is on the ‘Office authoring languages and proofing’ box.
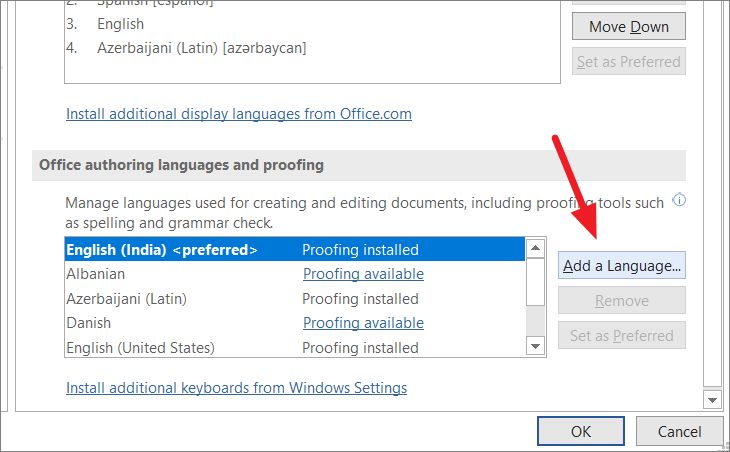
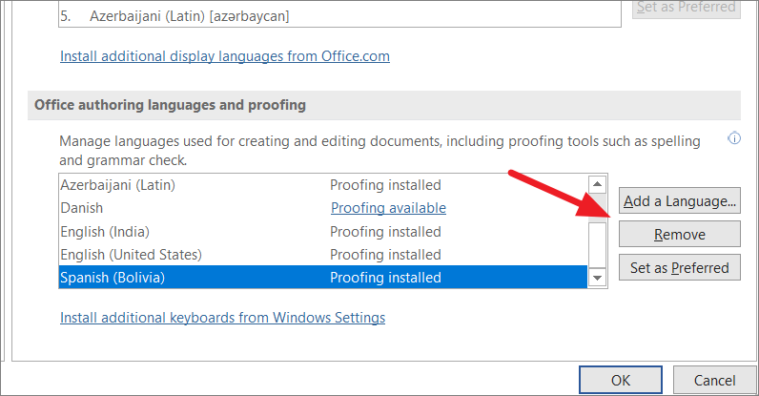
To add an authoring language, click the ‘Add a Language..’ button.
Select the language you want to add and click ‘Add’.
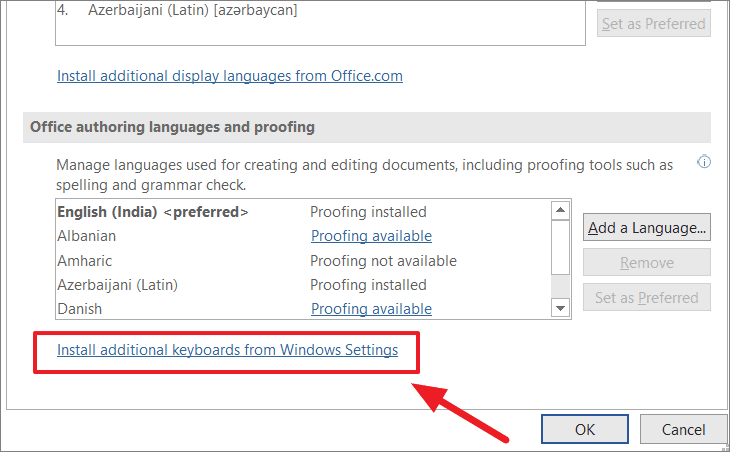
Most of the time, even if you add the language, you still have to manually install the language or additional proofing tools on your Windows OS.
To install additional input/editing language on your computer, click the ‘Install additional keyboards from Windows Settings’ link below the Office authoring languages and proofing box.
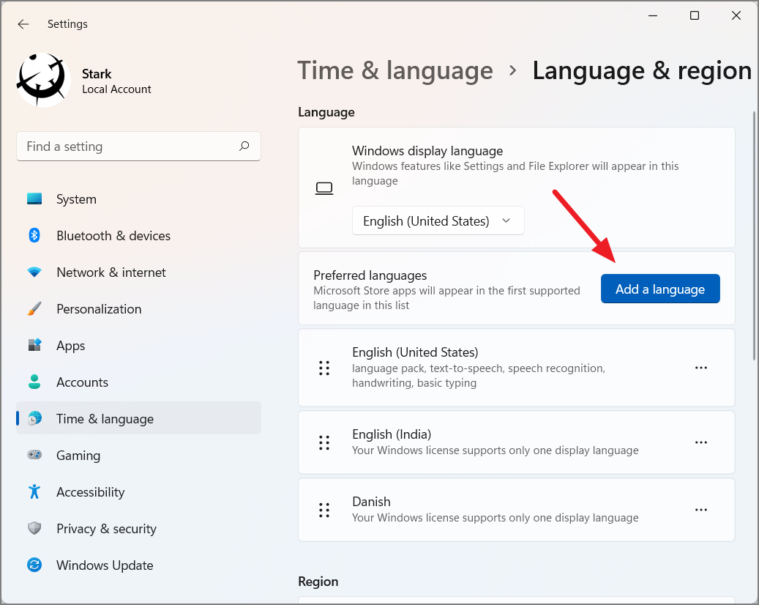
This will open the Windows Settings page where you can install languages on your system. Click the ‘Add a language’ button (if you have Windows 10 or 11).
In the ‘Choose a language to install’ dialog box, choose a language and select ‘Next’.
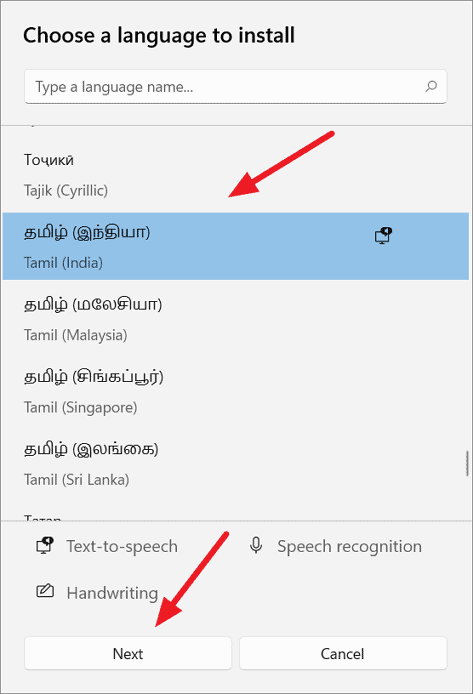
On the next page, select ‘Install’.

Once done, you’ll see the installed language in the list of languages.

Usually, when you type on your computer, the system will use the default input language (first in this list) to input characters. So, you should change the input language to the recently installed language to actively use the latter. You can do this via the settings application or from the taskbar.
Via Settings App
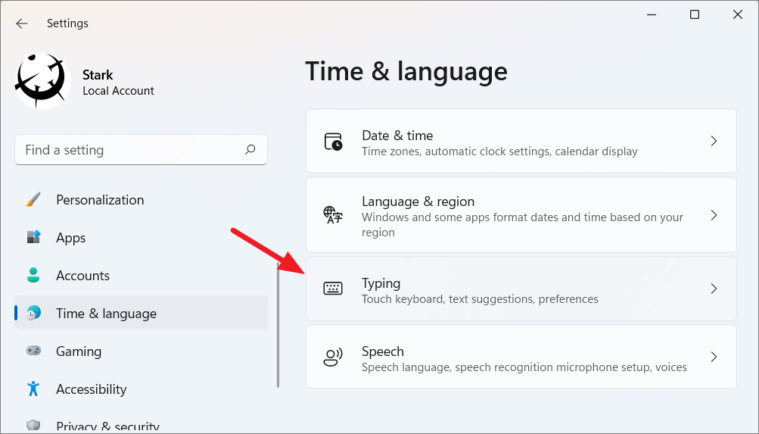
To change the input keyboard layout, select the ‘Time & language’ settings, and click the ‘Typing’ option.
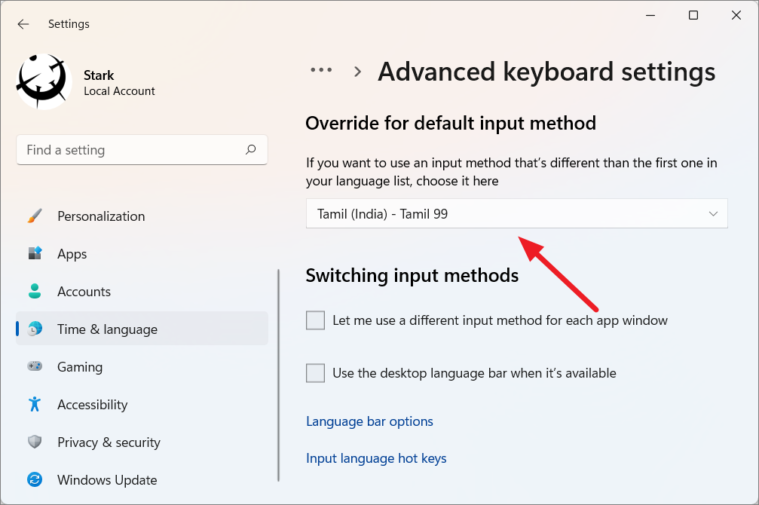
Then, select ‘Advanced keyboard settings’.

Now, choose your input method to use as a default.
Via Taskbar
OR, you can easily switch between the input method from the taskbar.
After you installed the language, go back to File > Options > Language. In the Word Options, you’ll notice the installed language in the ‘Office authoring and proofing language’ box.
To remove an editing language, first, select the language and then hit ‘Remove’.
Installing Proofing Tools
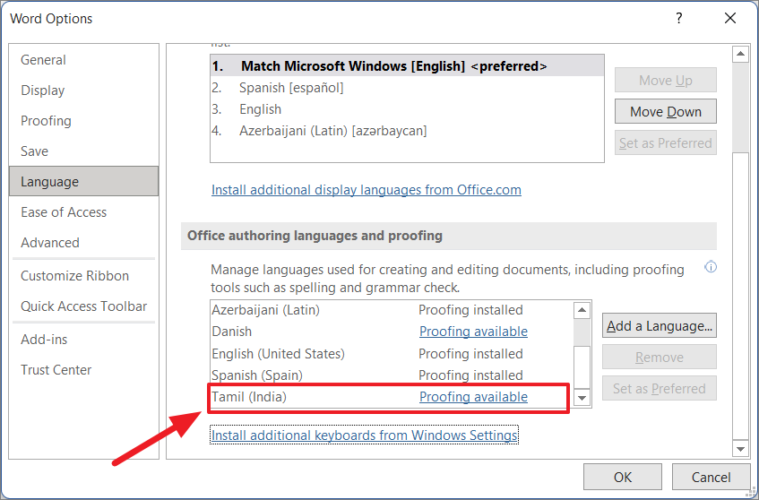
Sometimes, proofing tools may not be installed on Office even after installing the input language. If you’re using Microsoft 365, you would see three proofing tool statuses next to each language, namely – ‘Proofing available, Proofing not available, Proofing installed’. For other Office suites (like Office 2019, 2016, etc.), the status will be shown as ‘Enabled’ or ‘Not enabled’ under the Keyboard layout column.
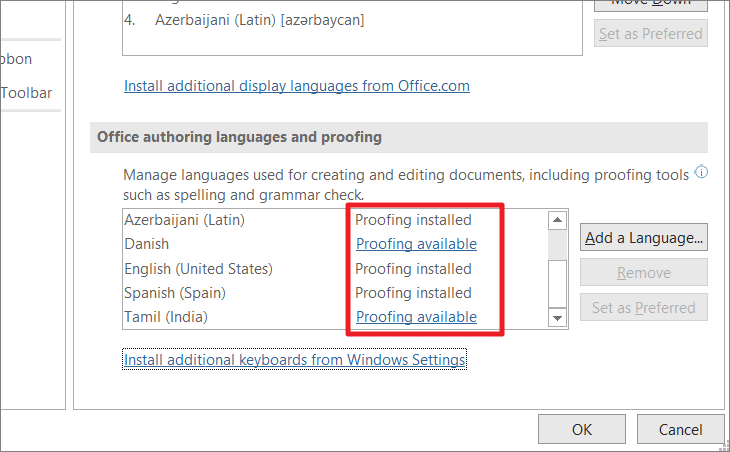
‘Proofing not available’ means the proofing tools are not available for that particular language. ‘Proofing available’ suggests you download and install the language pack with proofing tools for that language. And ‘Proofing installed’ means the proofing tools are installed for that specific language and you are free to use them.
If Proofing tools are available but not installed, click the ‘Proofing available’ link next to the language you want to use to download the language pack.
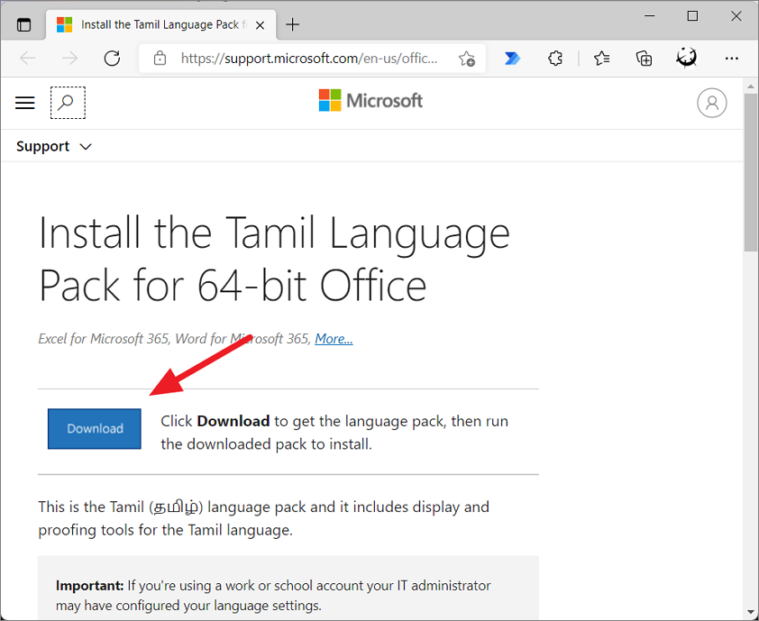
This will direct you to the Language pack download page on the Microsoft Office website. Here, click the ‘Download’ button.
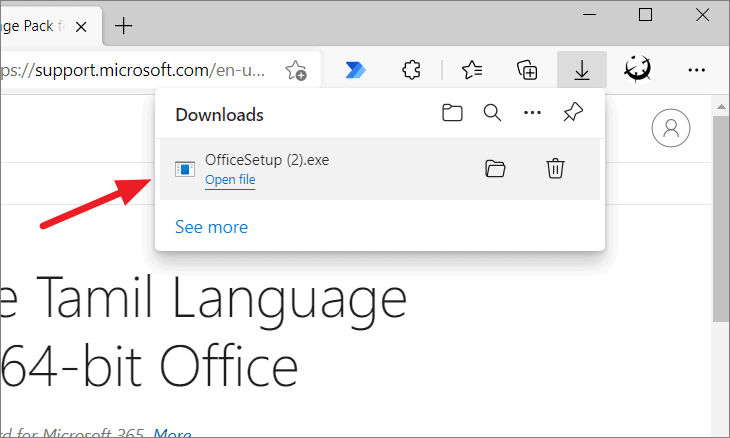
After the download is complete, install the ‘OfficeSetup.exe’ file, wait for the installation to complete, then close and re-launch the Word app.
After re-launching the app, go to Word Options. You’ll now see ‘Proofing installed’ next to the chosen language. Now, select the language and click ‘Set as Preferred’.
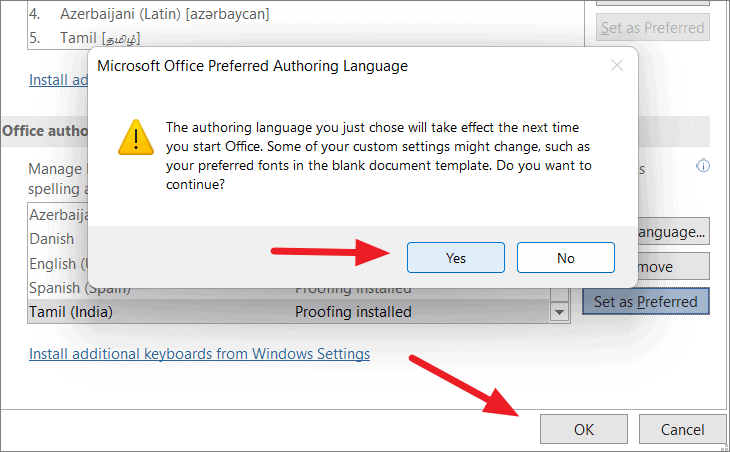
Word will show you a warning message to let you know that the authoring language you just chose will take effect the next time you launch Office. It also warns you of changes that may occur to custom settings (like your preferred default font). If you want to continue, click ‘Yes’. Then, click ‘OK’ to close the Word Options.
Now, restart your Microsoft Word, again, to change the editing and proofing language.
Once the Word editing language is changed, you would have to change your keyboard layout to type text in the changed language. Usually, the keyboard layout language matches the characters of a different language as the keys on your keyboard would automatically translate to the chosen different language on your screen. Essentially, the keyboard layout language controls and changes display characters when manually typed.
Switching Between Keyboard Layouts
When you install a new language on your OS, it comes with a keyboard for language-specific key layouts and input options. After you install more than one keyboard layout for different languages, you can easily switch between those keyboard languages using the language bar.
When you change/switch the keyboard language, the keyboard layout shifts to the keyboard for that particular language. For instance, if you are writing something in English and if you want to include content in a different language, you can quickly switch between keyboard layouts to write in different languages.
Here’s what you need to do to change the keyboard layout to a different language.
When you have more than one layout installed, the Language bar (language abbreviation) automatically appears in the ‘System Tray’ or ‘Notification Area’. To change the keyboard layout, click the language icon (ENG stands for English keyboard) and select the language you want to use from the list of available keyboards.
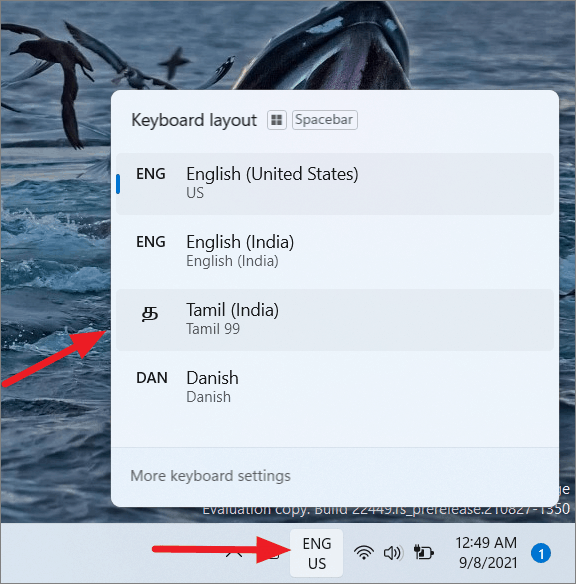
If you have Windows 10 or 11, you can press Windows+Spacebar to switch layouts. The language abbreviation represents the active keyboard layout of the system.
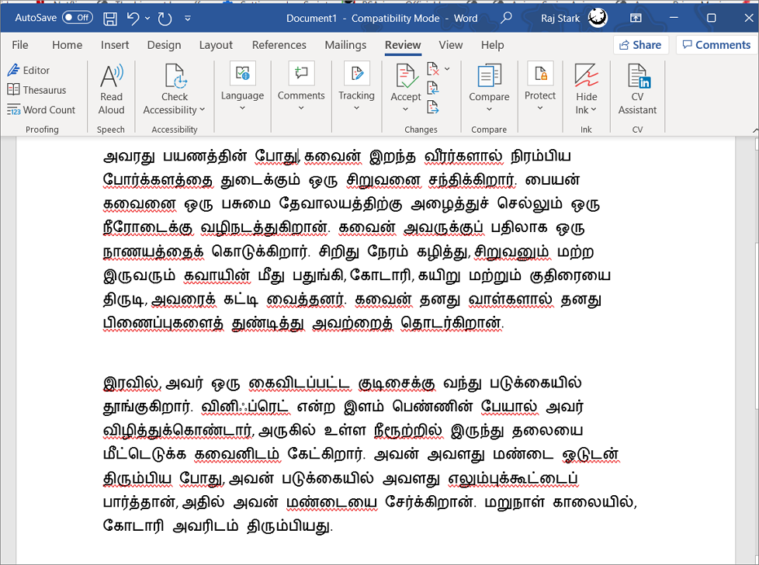
Now, you can easily write and edit Word documents using a different language.
Proofreading in Different Languages
MS Word also allows you to write or edit in one language and proofread text in another. To proofread in a different language, go to the ‘Review’ tab, select ‘Language’, and click the ‘Set Proofing Languages..’ option.
Then, select the language from the Language dialog box and click ‘OK’. Here, you also have options to ignore spelling/grammar errors, detect language automatically or set the default language.
For instance, if you want to include a word or phrase in a different language without showing grammatical errors, you should only change the proofing language for the particular word or phrase.
To do this, first, select the word or phrase, then go to the ‘Review’ tab, select ‘Language’ and click the ‘Set Proofing Languages..’ option. Then, choose a language from the list and click ‘OK’. Word will ignore spelling and grammar on the highlighted selection.
That’s it, folks! You can now easily change both the display and editing and proofreading languages on your MS Word to any language(s) of your choice.